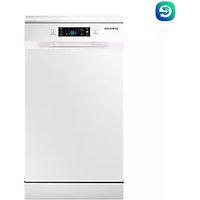
DW60M5070FS - Dishwasher SAMSUNG - Free user manual and instructions
Find the device manual for free DW60M5070FS SAMSUNG in PDF.

User questions about DW60M5070FS SAMSUNG
0 question about this device. Answer the ones you know or ask your own.
Ask a new question about this device
Download the instructions for your Dishwasher in PDF format for free! Find your manual DW60M5070FS - SAMSUNG and take your electronic device back in hand. On this page are published all the documents necessary for the use of your device. DW60M5070FS by SAMSUNG.
USER MANUAL DW60M5070FS SAMSUNG
Thank you for purchasing this Samsung product.

DD81-02615B-03
SAMSUNG
Safety instructions
Congratulations on your new Samsung dishwasher. This manual contains important information on the installation, use and care of your appliance. Please take time to read this manual to take full advantage of your dishwasher's many benefits and features.
WHAT YOU NEED TO KNOW ABOUT SAFETY INSTRUCTIONS
Please read this manual thoroughly to ensure that you know how to safely and efficiently operate the extensive features and functions of your new appliance and retain it at a safe place near the appliance for your future reference. Use this appliance only for its intended purpose as described in this user manual.
Warning and important safety instructions in this manual do not cover all possible conditions and situations that may occur. It is your responsibility to use common sense, caution, and care when installing, maintaining, and operating your dishwasher.
Because the following operating instructions cover various models, the characteristics of your dishwasher may differ slightly from those described in this manual and not all warning signs may be applicable. If you have any questions or concerns, contact your nearest service center or find help and information online at www.samsung.com.
IMPORTANT SAFETY SYMBOLS AND PRECAUTIONS
Important safety symbols
| WARNING | Hazards or unsafe practices that may result in severe personal injury and/or property damage. |
| CAUTION | Hazards or unsafe practices that may result in personal injury and/or property damage. |
| CAUTION | To reduce the risk of fire, explosion, electric shock, or personal injury when using your dishwasher, follow these basic safety precautions: |
| Do NOT attempt. | |
| Do NOT disassemble. | |
| Do NOT touch. | |
| Follow directions explicitly. | |
| Unplug the power plug from the wall socket. | |
| Make sure the appliance is grounded to prevent electric shock. | |
| Call the service centre for help. | |
| Note |
These warning symbols are here to prevent injury to you and others.
Please follow them explicitly.
Keep these instructions in a safe place and ensure that new users are familiar with the content.
Pass them on to any future owner.

To reduce the risk of fire, electric shock, or injury to persons when using your appliance, follow basic precautions, including the following:
2_Safety instructions
- This appliance is not to be used by persons (including children) with reduced physical, sensory or mental capabilities, or lack of experience and knowledge, unless they have been given supervision or instruction concerning use of the appliance by a person responsible for their safety.
- For use in Europe: This appliance can be used by children aged from 8 years and above and persons with reduced physical, sensory or mental capabilities or lack of experience and knowledge if they have been given supervision or instruction concerning use of the appliance in a safe way and understand the hazards involved. Children shall not play with the appliance. Cleaning and user maintenance shall not be made by children without supervision.
- Children should be supervised to ensure that they do not play with the appliance.
- If the supply cord is damaged, it must be replaced by the manufacturer, its service agent or similarly qualified persons in order to avoid a hazard.
- The new hose-sets supplied with the appliance are to be used and that old hose-sets should not be reused.
- For appliances with ventilation openings in the base, that a carpet must not obstruct the openings.
- For use in Europe: Children of less than 3 years should be kept away unless continuously supervised.
Safety instructions 3
Safety instructions
- CAUTION: In order to avoid a hazard due to inadvertent resetting of the thermal cut-out, this appliance must not be supplied through an external switching device, such as a timer, or connected to a circuit that is regularly switched on and off by the utility.
-
This appliance is intended to be used in household and similar applications such as:
-
staff kitchen areas in shops, offices and other working environments;
-farm houses; - by clients in hotels, motels and other residential type environments;
-
bed and breakfast type environments.
-
The door should not be left in the open position since this could present a tripping hazard.
- WARNING: Knives and other utensils with sharp points must be loaded in the basket with their points down or placed in a horizontal position.
4_Safety instructions
INSTRUCTIONS WHEN USING YOUR DISHWASHER

This dishwasher is not designed for commercial use. It is intended for use in domestic households and in similar working and residential environments such as:
Shops
- Offices and showrooms
and by residents in establishments such as:
- Hostels and guest houses.

It must only be used as a domestic appliance as specified in these user manual, for cleaning domestic crockery and cutlery.
Any other usage is not supported by the manufacturer and could be dangerous.

The manufacturer cannot be held liable for damage resulting from incorrect or improper use or operation.

Do not use solvents in the dishwasher. Danger of explosion.

Do not inhale or ingest dishwasher detergent. Dishwasher detergents contain irritant or corrosive ingredients which can cause burning in the nose, mouth and throat if swallowed, or inhibit breathing. Consult a doctor immediately if detergent has been swallowed or inhaled.

Avoid leaving the door open unnecessarily, as you could trip over it.

Do not sit or lean on the opened door. This could cause the dishwasher to tip and be damaged, and you could get injured.

Only use detergent and rinse aid formulated for domestic dishwashers. Do not use washing-up liquid.

Do not use the strong acid cleaning agent.

Do not fill the rinse aid reservoir with powder or liquid detergent. This will cause serious damage to the reservoir.

Inadvertently filling the salt reservoir with powder or liquid dishwasher detergent will damage the water softener. Make sure you have picked up the correct packet of dishwasher salt before filling the salt reservoir.

Please only use special coarse grained dishwasher salt for reactivation, as other salts may contain insoluble additives which can impair the functioning of the softener.

In an appliance with a cutlery basket (depending on model), cutlery is cleaned and dried more if placed in efficiently the basket with the handles downwards. However, to avoid the risk of injury, place knives and forks etc. with the handles upwards.

Plastic items which cannot withstand being washed in hot water, such as disposable plastic containers, or plastic cutlery and crockery should not be cleaned in the dishwasher.
The high temperatures in the dishwasher may cause them to melt or lose shape.

On models with Delay Start function, make sure that the dispenser is dry before adding detergent. Wipe dry if necessary. Detergent will clog if poured into a damp dispenser and may not be thoroughly dispersed.

Knives and other utensils with sharp points must be loaded in the basket with their points down or placed in a horizontal position.
Safety instructions
5
Safety instructions
INSTRUCTIONS FOR PROTECTING YOUR CHILDREN

WARNING
This appliance is not a toy! To avoid the risk of injury, keep children well away and do not allow them to play in or around the dishwasher or to use the controls. They will not understand the potential dangers posed by it. They should be supervised whenever you are working in the kitchen.
There is also a danger that children playing might shut themselves in the dishwasher.

This appliance can be used by children aged from 8 years and above and persons with reduced physical, sensory or mental capabilities or lack of experience and knowledge if they have been given supervision or instruction concerning use of the appliance in a safe way and understand the hazards involved. Children shall not play with the appliance.
Cleaning and user maintenance shall not be made by children without supervision.

Older children may only use the dishwasher when its operation has been clearly explained to them and they are able to use it safely, recognising the dangers of misuse.

KEEP CHILDREN AWAY FROM DETERGENTS! Dishwasher detergents contain irritant and corrosive ingredients which can cause burning in the mouth, nose and throat if swallowed, or inhibit breathing. Keep children away from the dishwasher when the door is open.
There could still be detergent residues in the cabinet.
Consult a doctor immediately if your child has swallowed or inhaled detergent.
INSTRUCTIONS FOR INSTALLING YOUR DISHWASHER

Before setting up the appliance, check it for any externally visible damage. Under no circumstances should you use a damaged appliance. A damaged appliance could be dangerous.

The dishwasher must only be plugged into the electricity supply via a suitable switched socket. The electrical socket must be easily accessible after the dishwasher is installed so that it can be disconnected from the electricity supply at any time. (Refer to the "Parts and features" section on page 10.)

There must be no electrical sockets behind the dishwasher. Danger of overheating and fire risk if the dishwasher were to be pushed up against a plug.

The dishwasher must not be installed under a hob. The high radiant temperatures which are sometimes generated by a hob could damage the dishwasher. For the same reason it should not be installed next to open fires or other appliances which give off heat, such as heaters etc.

Do not connect the dishwasher to the mains supply until it has been fully installed and any adjustment has been made to the door springs.

Before connecting the appliance, check that the connection data on the data plate (voltage and connected load) match the mains electricity supply. If in any doubt, consult a qualified electrician.

The electrical safety of this appliance can only be guaranteed when continuity is complete between it and an effective grounding system. It is most important that this basic safety requirement is present and regularly tested and where there is any doubt the electrical system in the house should be checked by a qualified electrician.
The manufacturer cannot be held liable for the consequences of an inadequate grounding system (e.g. electric shock).

Safety instructions

Do not connect the appliance to the mains electricity supply by a multi-socket unit or an extension lead. These do not guarantee the required safety of the appliance (e.g. danger of overheating).

This appliance may only be installed in mobile installations such as ships if a risk assessment of the installation has been carried out by a suitably qualified engineer.

The plastic housing of the water connection contains an electrical component. The housing must not be submerged in water.

There are electrical wires in the hose of Aqua-Stop. Never cut the water inlet hose, even if it is too long.

Installation, maintenance and repairs may only be carried out by a suitably qualified and competent person in strict accordance with current national and local safety regulations. Repairs and other work by unqualified persons can be dangerous. The manufacturer cannot be held liable for unauthorised work.

The integrated waterproof system offers protection from water damage, provided the following conditions are met:
- The dishwasher is correctly installed and plumbed in.
- The dishwasher is properly maintained and parts are replaced where it can be seen that this is necessary.
- The stopcock has been turned off when the appliance is not used for a longer period of time (e.g. during holidays).
- The waterproof system will work even if the appliance is switched off. However, the appliance must remain connected to the electricity supply.

A damaged appliance can be dangerous. If the dishwasher gets damaged, switch it off at the mains and call your dealer or the service department.

Unauthorised repairs could result in unforeseen dangers for the user, for which the manufacturer cannot accept liability. Repairs should only be undertaken by an approved service technician.

Faulty components must only be replaced by original spare parts. Only when these parts are fitted can the safety of the appliance can be guaranteed.

Always disconnect the dishwasher from the electrical supply for maintenance work (switch off at the wall socket and remove the plug).

If the connection cable is damaged it must be replaced with a special cable, available from the manufacturer. For safety reasons, this must only be fitted by the service department or an authorised service technician.

In countries where there are areas which may be subject to infestation by cockroaches or other vermin, pay particular attention to keeping the appliance and its surroundings in a clean condition at all times. Any damage which may be caused by cockroaches or other vermin will not be covered by the guarantee.

In the event of a fault or for cleaning purposes, the appliance is only completely isolated from the electricity supply when:
- it is switched off at the wall socket and the plug is withdrawn, or
- it is switched off at the mains, or
the mains fuse is disconnected, or - the screw-out fuse is removed (in countries where this is applicable).

Do not make any alterations to the appliance, unless authorised to do so by the manufacturer.
Safety instructions
7
Safety instructions

Never open the casing/housing of the appliance.
Tempering with electrical connections or components and mechanical parts is highly dangerous and can cause operational faults or electric shock.

While the appliance is under guarantee, repairs should only be undertaken by a service technician authorised by the manufacturer. Otherwise the guarantee will be invalidated.

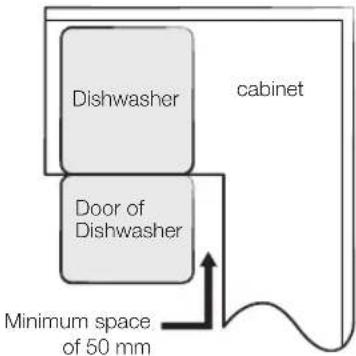
When installing the product, make sure there is space at the top, left, right and back of the product to ensure proper ventilation.
If there is insufficient space between the product and the sink, it may damage the sink or allow mold to grow.

Make sure that your dishwasher's hardness level setting is correct as your area.
(Refer to the "Water softener mode (Water hardness level setting)" section on page 14.)
8_Safety instructions
Contents
PARTS AND FEATURES
10
USING THE DETERGENT AND WATER SOFTENER
14
LOADING THE DISHWASHER RACKS
19
WASHING PROGRAMMES
25
CLEANING AND CARE
28
SETTING UP YOUR DISHWASHER
31
INSTALLING YOUR DISHWASHER
34
TROUBLESHOOTING
40
APPENDIX
43
10 Dishwasher features
12 Control panel
13 Displays
14 Water softener mode
(Water hardness level setting)
15 Loading the salt into the softener
16 Using detergent
17 Using rinse aid
17 Adjusting the amount of rinse aid
18 How to use the Multi tab option
19 Loading the upper basket
21 Loading the lower basket
21 Folding spikes of lower basket
22 Cutlery(silverware) tray
24 For washing in the dishwasher the following cutlery/dishes
25 Turning on the appliance
25 Change the programme
26 At the end of the wash cycle
27 Wash cycle table
28 Cleaning the filters
29 Cleaning the spray arms
29 Cleaning the door
29 Caring for the dishwasher
29 Protect against freezing
30 How to maintain your dishwasher
31 Water supply and drain
33 Connection of drain hoses
33 Position the appliance
33 Start of dishwasher
34 Built under, Semi built in, Fully built in Dishwasher
40 Before calling for service
42 Information codes
43 Specifications
43 Product dimension
Contents_9
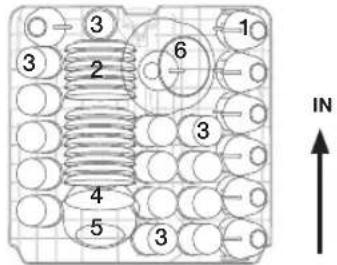
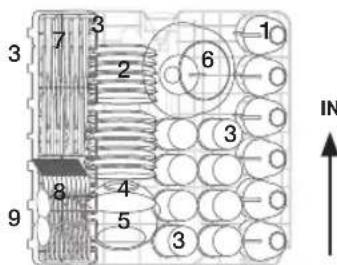
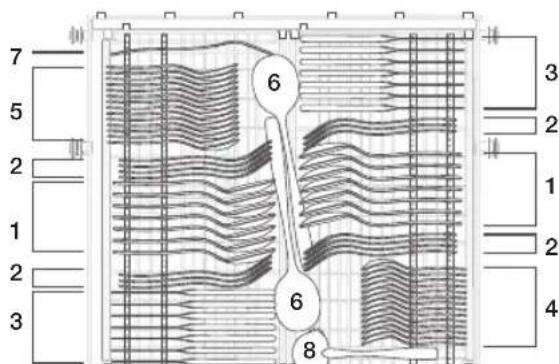
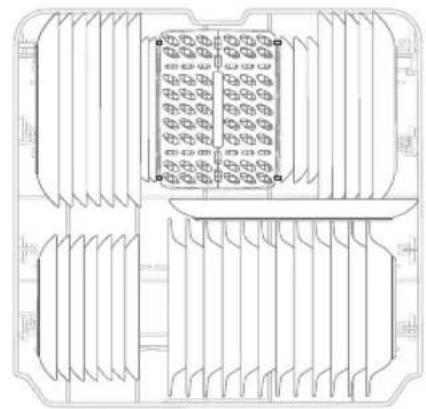
Parts and features
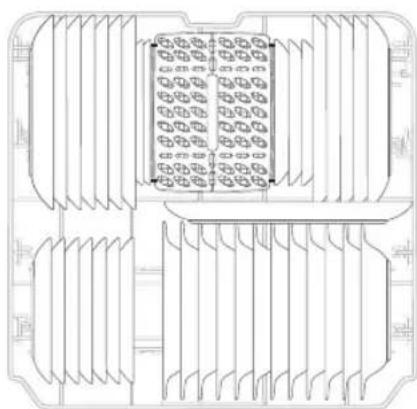
DISHWASHER FEATURES
Front & Rear view (DW60M5070)

Accessory parts - User manual, Salt funnel, cutlery basket.
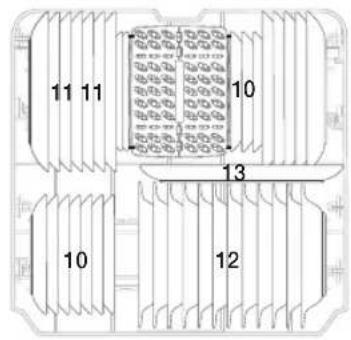
| 1 | Brd Rack |
| 2 | Upper Basket |
| 3 | Lower Basket |
| 4 | Duct Nozzle |
| 5 | Salt Container |
| 6 | Dispenser |
| 7 | Cup Shelf |
| 8 | Spray arms |
| 9 | Filter assembly |
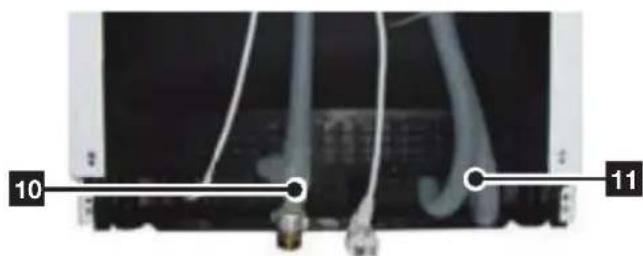
| 10 | Inlet hose |
| 11 | Drain hose |
10_Parts and features
Front & Rear view (DW60M5050)
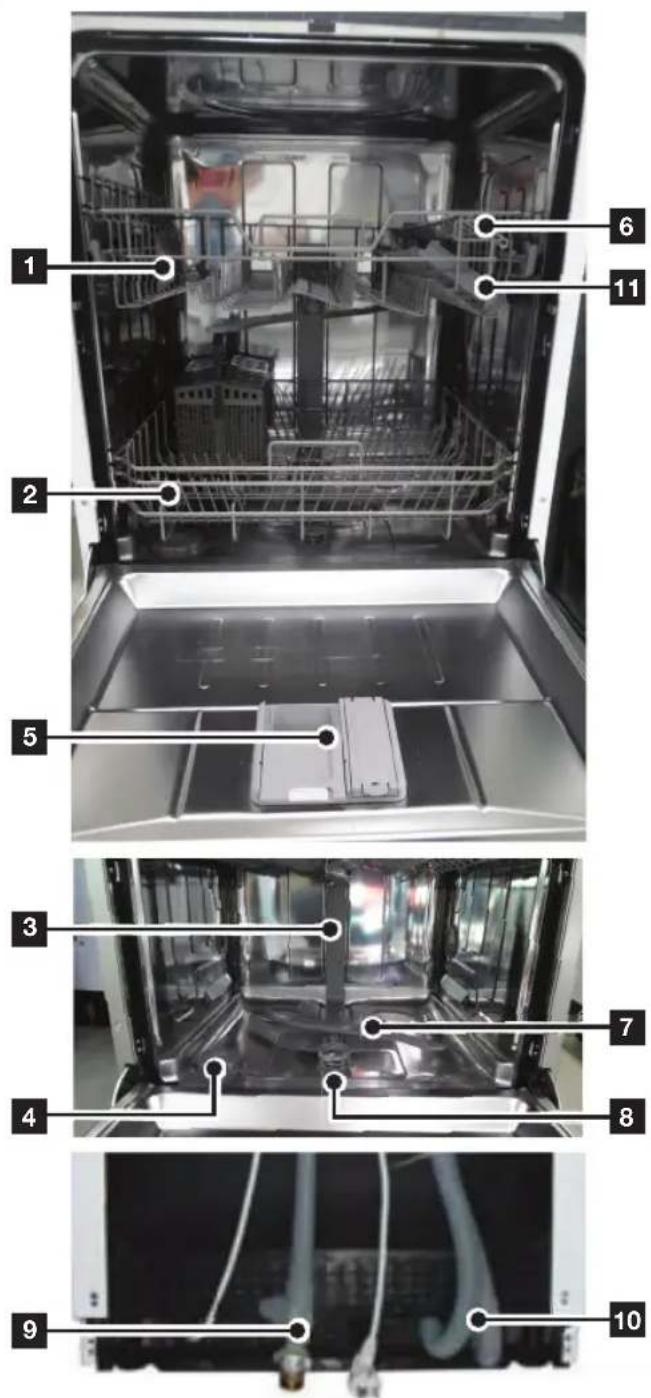

Accessory parts - User manual, Salt funnel, cutlery basket.
| 1 Upper Basket |
| 2 Lower Basket |
| 3 Duct Nozzle |
| 4 Salt Container |
| 5 Dispenser |
| 6 Cup Shelf |
| 7 Spray arms |
| 8 Filter assembly |
| 9 Inlet hose |
| 10 Drain hose |
| 11 Knife Rack |
Parts and features 11
Parts and features
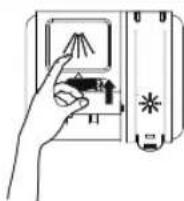
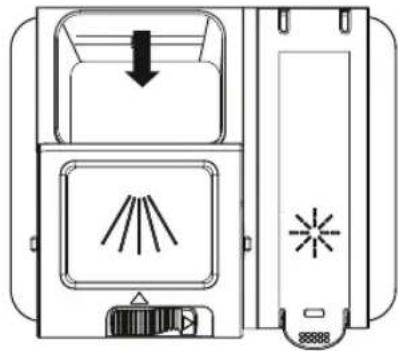
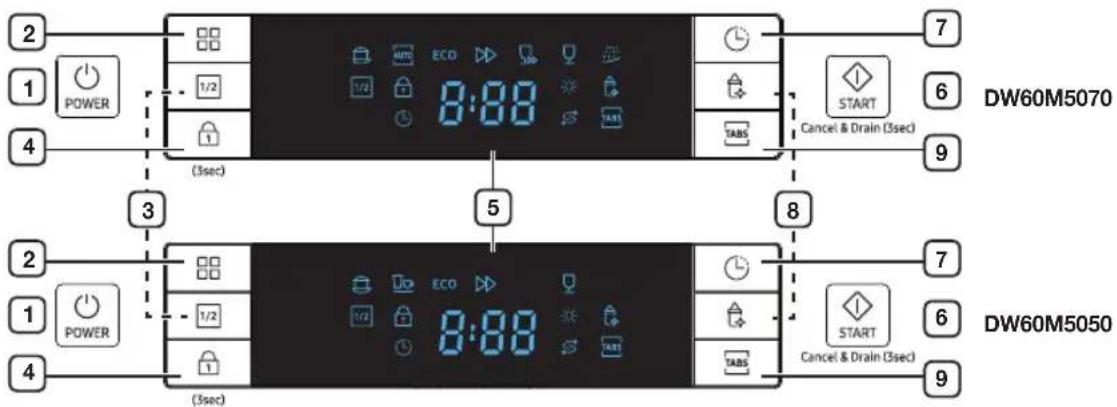
CONTROL PANEL
DW60M5070FS/DW60M5070FW/DW60M5050FS/DW60M5050FW
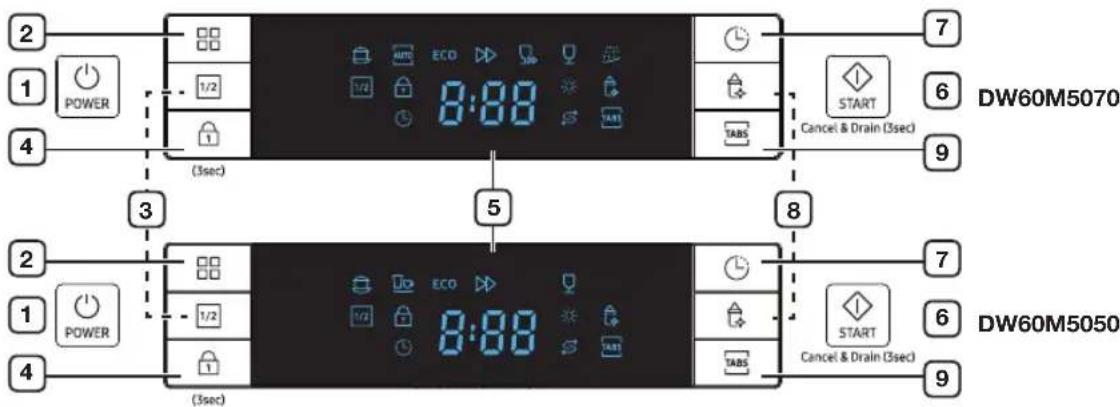
| 1 POWER Press this button to turn on your dishwasher: the screen lights up. | |
| 2 Program To select washing program press this button. | |
| 3 Half load | For small amount of loading items, press the Half load button to save energy. |
| 4 Control lock | This option allows you to lock the buttons on the control panel so children cannot accidentally start the dishwasher by pressing the buttons on the panel. To lock and unlock the buttons on the control panel, hold down the Control lock button for three (3) seconds. |
| 5 Display window Running indicator, delay time, information codes and etc. | |
| 6 START | To start a cycle, press the START button before closing the door. *Reset : To cancel a currently running cycle and drain the dishwasher, press and hold the START button for three (3) seconds. Once the dishwasher is reset, select a cycle and option, and then press START to restart the dishwasher. |
| 7 Delay start | Press this button to set the delayed hours for washing. You can delay the start of washing up to 24 hours. One press on this button delays the start of washing by one hours. |
| 8 Hygiene | Push the Hygiene button for the best possible hygiene in your dishwasher. This function is available with all program except Quick Wash and Pre Wash. |
| 9 Multi tab | To select Multi tab option which needs salt and rinse aid but a Multi tab tablet. This function is available with all program except Auto, Quick Wash and Pre Wash. |
-
When the door is open only the POWER button will operate.
-
You can select options (Multi tab, Delay start and/or Half load) before starting a cycle.

IMPORTANT: To get the best performance from your dishwasher, read all the operating instructions before using it for the first time.
12_.Parts and features
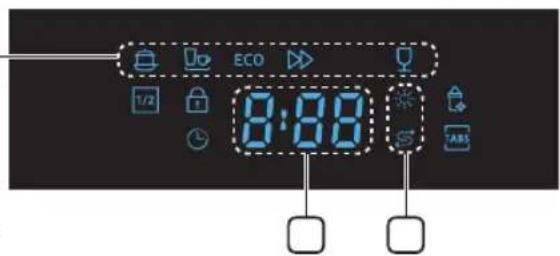
DISPLAYS
DW60M5070FS/DW60M5070FW/DW60M5050FS/DW60M5050FW

DW60M5070 DW60M5050

| 1 Program icons Press the Program button to select each program. | |
| Intensive Heavily soiled items include pots and pans | |
| Auto wash | Lightly to heavily soiled daily using items, automatic detection of the amount of soils. (DW60M5070) |
| Normal | For normally soiled loads, such as pots, plates, glasses, and lightly soiled pans. (DW60M5050) |
| ECO ECO | Normally soiled daily using items, with reduced energy and water consumptions. |
| Express Normal daily used items, with short cycle time. | |
| Quick Wash Lightly soiled with very short cycle time. (DW60M5070) | |
| Delicate Lightly soiled delicate items. | |
| Pre Wash | Cold water rinse for removing dirt before running another program. (DW60M5070) |
| Display Display the remaining time, information code, or delay time. | |
| If Rinse or Salt Refill indicator is lit, it means rinse or salt is needed to refill. | |
| If Rinse or Salt Refill indicator is lit, it means rinse or salt needs to be refilled. To refill the rinse reservoir, refer to the “Filling the rinse aid reservoir” section on page 17. | |
| If the "Salt Refill" indicator is lit, it means the dishwasher is low on dishwasher salt and needs to be refilled. To refill the salt reservoir, refer to the “Loading the salt into the softener” section on page 15. | |
Using the detergent and water softener
WATER SOFTENER MODE (WATER HARDNESS LEVEL SETTING)
The dishwasher is designed to allow for adjusting the amount of salt consumed based on the hardness of the water used. This is intended to optimise the level of salt consumption. To set the salt consumption, proceed as below:
- Switch on the appliance;
- Press the Program button for more than 5 seconds to start the water softener set model within 60 seconds after the appliance was switched on;
- Press the Program button to select the proper set according to your local environment, the sets will change in the following sequence: H1 → H2 → H3 → H4 → H5 → H6; It is recommended that adjustments should be made in accordance with the following table.
- The manufactory setting: H3 (EN 50242)
- Wait for 5 seconds to end the set up model.
| WATER HARDNESS | Selector Position | Salt consumption (gram/cycle) | |||
| °dH°fH | Clark mmol/l | ||||
| 0-5 0-9 0-6 0-0.94 H1 0 | |||||
| 6-11 10-20 7-14 1.0-2.0 | H2 9 | ||||
| 12-17 21-30 15-21 | 2.1-3.0 | H3 | 12 | ||
| 18-22 31-40 22-28 | 3.1-4.0 | H4 | 20 | ||
| 23-34 41-50 29-42 | 4.1-6.0 | H5 | 30 | ||
| 35-55 61-98 43-69 | 6.1-9.8 | H6 | 60 | ||

1 dH (German degree) = 0.178 mmol/l
1 Clark (British degree) = 0.143 mmol/l
1 fH (French degree) = 0.1 mmol/l

Contact your local water board for information on the hardness of your water supply.

WATER SOFTENER
The hardness of the water varies from place to place. If hard water is used in the dishwasher, deposits may form on dishes and utensils. The appliance is equipped with a special softener that uses a salt specifically designed to eliminate lime and minerals from the water.
[Deposits on utensils]
- Using the detergent and water softener
LOADING THE SALT INTO THE SOFTENER
Always use salt intended for use with dishwasher.
The salt container is located beneath the lower rack and should be filled as follows:

ATTENTION
- Only use salt specifically designed for use in dishwashers. All other types of salt not specifically designed for use in a dishwasher, especially table salt, will damage the water softener. In case of damages caused by the use of unsuitable salt the manufacturer does not give any warranty nor is liable for any caused damages.
-
Only fill with salt just before starting one of the complete washing programs. This will prevent any grains of salt or salty water, which may have been split, remaining of the bottom of the machine for any period of time, which may cause corrosion.
After the first wash cycle the control panel light expires. -
Remove the lower basket and then unscrew and remove the cap from the salt container.
-
If you are filling the container for the first time, fill 2/3 of its volume with water (around 1 liter).
-
Place the end of the funnel (supplied) into the hole and introduce about 1.5kg of salt. It is normal for a small amount of water to come out of the salt container.
- Carefully screw the cap back on.
- Usually, the salt warning light will be off after the salt container is filled with salt.

- The salt container must be refilled when the salt warning light on the control panel comes on. Although the salt container is filled enough, the indicator light may not switch off until the salt fully dissolves. If there is no salt warning light on the control panel, you can judge when to load the salt into the softener by the cycles that the dishwasher has run.
- If a lot of salt is spilt inside the dishwasher, run a pre wash program to reduce the spillage.
Using the detergent and water softener
USING DETERGENT
All dishwasher cycles require detergent in the detergent compartment.
Add the correct amount of detergent for the selected cycle to ensure the best performance.

CAUTION: Use dishwasher detergent only. Regular detergent produces too much foam, which may decrease the dishwasher's performance or cause it to malfunction.

WARNING: Do not swallow dishwasher detergent. Avoid breathing in the fumes. Dishwasher detergent contains irritants and caustic chemicals that can induce respiratory conditions. If you have swallowed dishwasher detergent or inhaled the fumes, seek medical attention immediately.

WARNING: Keep dishwasher detergent out of the reach of children.
Filling the detergent dispenser
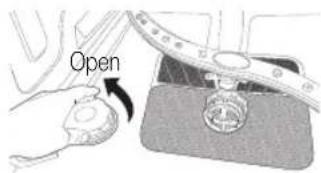
- Open the detergent dispenser flap by pushing the detergent dispenser release catch.

The flap is always open at the end of a dishwashing cycle.
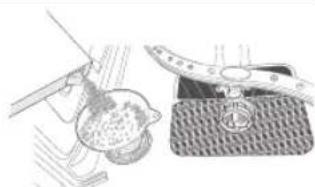
- Add the recommended amount of detergent to the main wash detergent compartment.
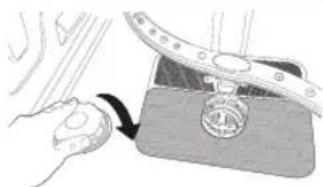
- Close the flap by sliding it to the left and then pressing it down.

There is no separate button that is specific to using tablet detergents.
- For better cleaning result, especially if you have very dirt items, add small amount (about 8 g) of detergent on the door. That will act in prewash phase.
16_.Using the detergent and water softener
USING RINSE AID
Filling the rinse aid reservoir
When the Rinse Refill indicator lights up on the control panel, refill with rinse
Your dishwasher has been designed to use liquid rinse aid only.
Using a powdered rinse aid will clog the reservoir opening and cause the dishwasher to malfunction.
Rinse aid improves the drying performance of the dishwasher.

CAUTION: Do not add regular detergent to the rinse aid reservoir.
- Remove the rinse aid reservoir cap by lifting up the handle.

Adding rinse aid to tablet detergents will improve drying performance.
- Fill the rinse aid reservoir with rinse aid.

Use the viewing port when filling the rinse aid reservoir.

CAUTION: Do not fill the reservoir above the maximum level. Excess rinse aid can overflow during the wash cycle.
- Close the cap after all.
ADJUSTING THE AMOUNT OF RINSE AID
You can adjust the amount of rinse aid by below sequence. As good drying performance as you set the higher number.
- Switch on the dishwasher.
- Press the Program button for five seconds, within 60 seconds from turning on the dishwasher.(same with Softener setting mode)
- Press the Delay start button to enter the Rinse aid setting mode.
- The LCD shows the present rinse level. (between d1~d5)
- Press the Program button to select the amount of rinse aid you want. The sets will change in the following sequence; d1 d2 d3 d4 d5 d1. (The default level is d4.)
- Select the amount of rinse aid and wait for 5 seconds to complete the setup.
Using the detergent and water softener
HOW TO USE THE MULTI TAB OPTION
Your dishwasher has a Multi tab option which does not need salt and rinse aid but a 3 In1 tablet. This option can select on Intensive, Eco program only.

The Multi tab setting is only for use with Multi tab tablets. If using Multi tab tablet without this option, the appliance will not get its best performance.
- Put the Multi tab tablet into the container then start the Multi tab option.
- Close the lid and press until it locks in place.

When using Multi tab compact combination detergents ensure that the lid can be closed correctly.

ATTENTION: Keep all detergents in a safe place out of children's reach. Always add the detergent in the dispenser just before starting the dishwasher.
18_.Using the detergent and water softener
Loading the dishwasher racks
For best performance of the dishwasher, follow these loading guidelines. Features and appearance of racks and silverware baskets may vary from your model.

Attention before or after loading the dishwasher racks
Scrape off any large amounts of leftover food. It is not necessary to rinse the dishes under running water. Place objects in the dishwasher in the following order:
- Items such as cups, glasses, pots/pans, etc. are stood upside down.
- Curved items, or those with recesses, should be at a slant so that water can run off.
- Ensure they are stacked securely and can not tip over.
- Ensure they do not prevent the spray arms from rotating while washing takes place.
Very small items should not be washed in the dishwasher as they could easily fall out of the racks.

Removing the dishes
To prevent water dripping from the upper basket into the lower basket, we recommend that you empty the lower basket first and then the upper basket.
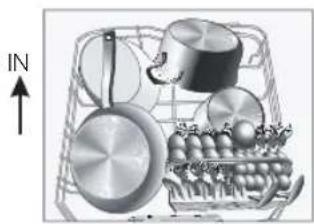
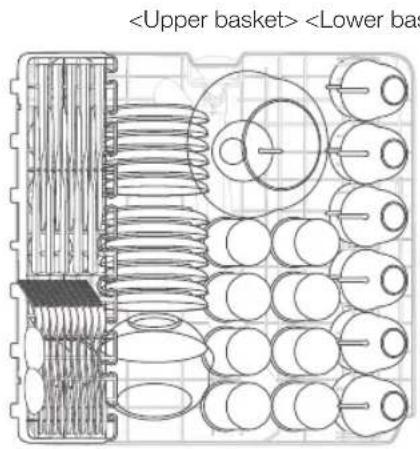
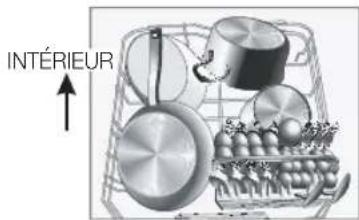
LOADING THE UPPER BASKET
The upper basket is designed to hold more delicate and lighter dishware such as glasses, coffee and tea cups and saucers, as well as plates, small bowls and shallow pans (as long as they are not too dirty). Position the dishes and cookware so that they will not get moved by the spray of water. Always place glasses, cups & bowls upside down.
DW60M5070
(14 place setting)
DW60M5050
(13 place setting)
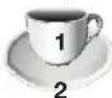
Cups
Saucers

Glasses

Small serving bowl

Medium serving bowl

Large serving bowl

Knives
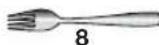
Forks
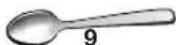
Soup spoons
Loading the dishwasher racks
Adjusting the Upper Basket
The height of the upper basket can be adjusted in order to create more space for large utensils both for the upper/lower basket.
- To lower the upper rack, press the "A" levers located at the left and right sides of the upper basket and push the upper basket downwards slightly at the same time.
- To raise the upper rack, just pull the upper basket upwards without operating any levers.
CAUTION: We recommend adjusting the height of the upper basket before loading dishes into the basket. If you adjust the the basket after loading the dishes, you may damage the dishes.
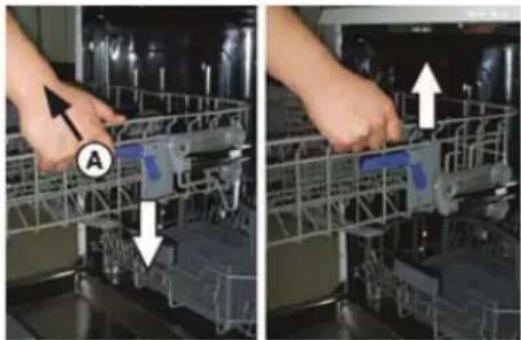
To lower position To upper position
20 Loading the dishwasher racks
LOADING THE LOWER BASKET
We recommend that you place large items which are most difficult to clean in to the lower rack: pots, pans, lids, serving dishes and bowls, as shown in the figure to the right.
It is preferable to place serving dishes and lids on the side of the racks in order to avoid blocking the rotation of the top spray arm. Pots, serving bowls, etc. must always be placed top down.
Deep pots should be slanted to allow water to flow out.
The bottom rack feature fold down tine rows so that larger or more pots and pans can be loaded.
DW60M5070
(14 place setting)
DW60M5050
(13 place setting)

Dessert dishes
Dinner plates
Soup bowls
Oval platter

Long items, serving cutlery, salad servers and big knives should be placed on the shelf so that they do not obstruct the rotation of the spray arms.
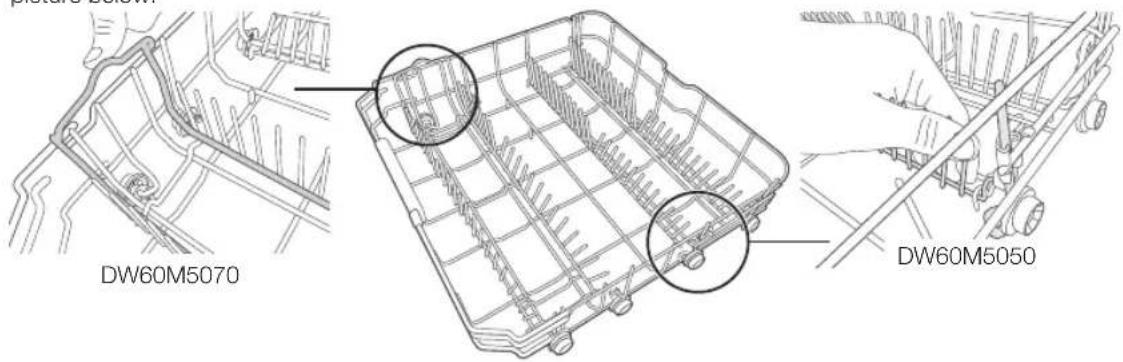
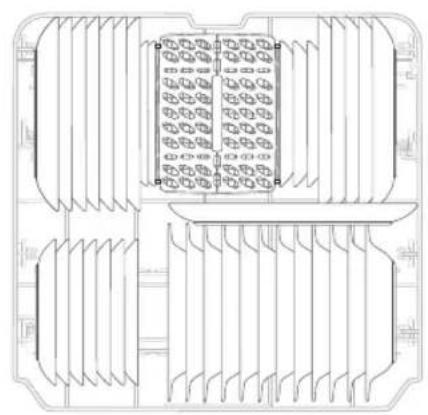
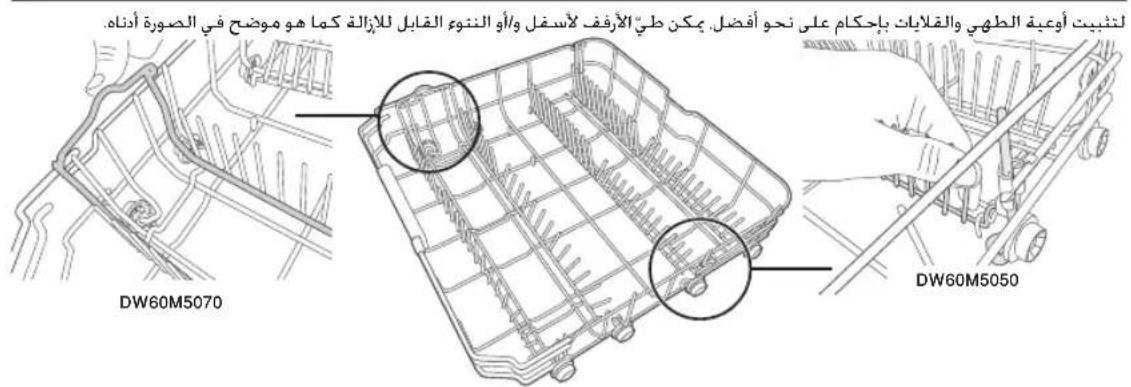
FOLDING SPIKES OF LOWER BASKET
For better stacking of pots and pans, the spikes can be folded down and/or removable tine as show in the picture below.
Loading the dishwasher racks
Loading the dishwasher racks
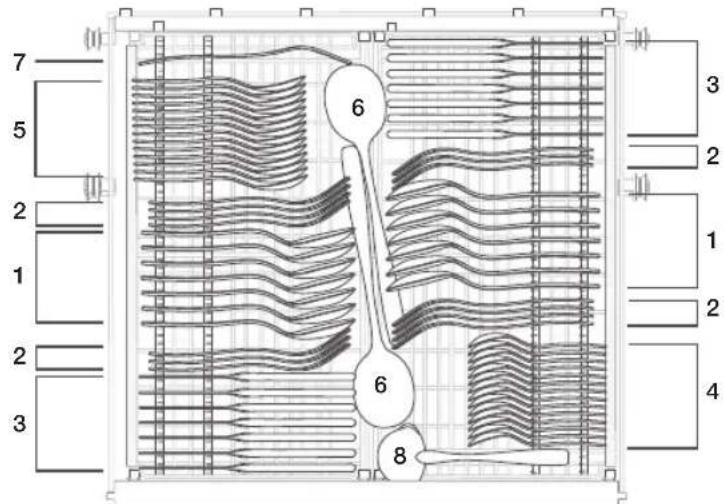
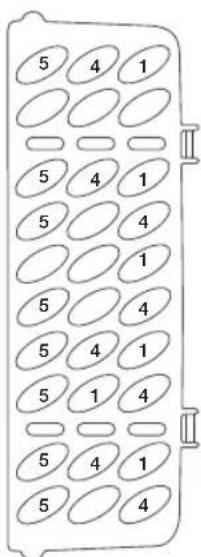
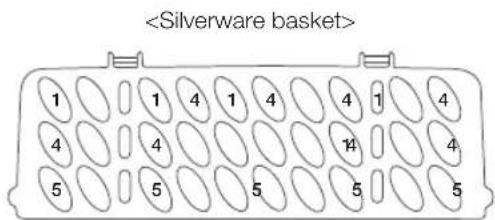
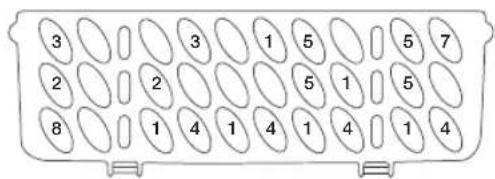
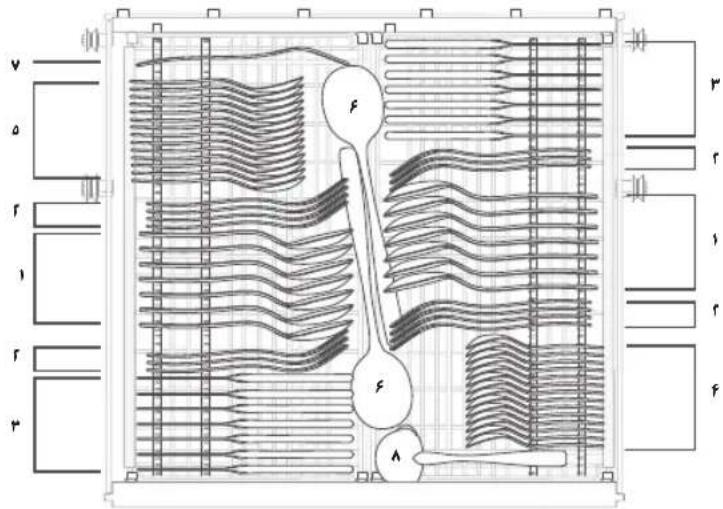
CUTLERY(SILVERWARE) TRAY
Silverware should be placed in the cutlery tray with handles at the bottom: The spoon should be loaded individually into the appropriate slots, especially long utensils should be placed in the horizontal position at the front of the upper basket.
DW60M5070
| 1 Soup spoons 5 Desser spoons |
| 2 Forks 6 Serving spoons |
| 3 Knives 7 Serving forks |
| 4 Teaspoons 8 Grave lades |

WARNING
- Do not let any item extend through the bottom.
Always load sharp utensils with the sharp point down!
22 Loading the dishwasher racks
DW60M5050

| 1 Soup spoons 5 Desser spoons |
| 2 Forks 6 Serving spoons |
| 3 Knives 7 Serving forks |
| 4 Teaspoons 8 Gravy laddes |

WARNING
- Do not let any item extend through the bottom.
Always load sharp utensils with the sharp point down!
Loading the dishwasher racks
FOR WASHING IN THE DISHWASHER THE FOLLOWING CUTLERY/ DISHES
| Not suitable Limited suitability | |
| Plastic items that are not heat resistant. | Some types of glasses can become dull after a large number of washes. |
| Older cutlery with glued parts that is not temperature resistant. | Silver and aluminium parts have a tendency to discolour during washing. |
| Bonded cutlery items or dishes. | Glazed patterns may fade if machine washed frequently. |
| Pewter or Copper items Lead crystal glass. | |
| Steel items subject to rusting. | |
| Wooden platters. | |
| Items made from synthetic fibres. |

Do not try and wash items soiled with cigarette ash, candle wax, lacquer or paint. If you buy new dishes please make sure that they are suitable for dishwashers.

Please do not overload your dishwasher. Do not use any dish that are not suitable for dishwashers. This is important for good results and for reasonable energy consumption.
When loading the dishes and cutlery
Dishes and cutlery must not impede the rotation of the spray arms.
Load hollow items such as cups, glasses, pans etc. with the opening downwards so that water cannot collect in the container or a deep base.

Dishes and items of cutlery must not lie inside one another, or cover each other
- To avoid damage to glasses, they must not touch.
- Load large items which are most difficult to clean into the lower rack.
- The upper rack is designed to hold more delicate and lighter dishware such as glasses, coffee and tea cups.

ATTENTION
Long bladed knives stored in an upright position are a potential hazard! Long and/or sharp items of cutlery such as carving knives must be positioned horizontally in the upper basket.
Damage to glassware and other dishes.
| Possible causes Suggested remedy | |
| ·Type of glass or manufacturing process. Chemical composition of detergent. ·Water temperature and duration of dishwasher programme. | ·Use glassware or porcelain dishes that have been marked dishwasher-proof by the manufacturer. ·Use a mild detergent that is described as kind of dishes If necessary, seek further information from detergent manufacturers. ·Select a programme with as low a temperature. ·To prevent damage, take glass and cutlery out of the dishwasher as soon as possible after the programme has ended. |
24 Loading the dishwasher racks
Washing programmes
TURNOING ON THE APPLIANCE
Starting a cycle wash
- Draw out the lower and upper basket, load the dishes and push them back.. It is recommended to load the lower basket first, then the upper one (see the section entitled "Loading the dishwasher racks").
- Pour in the detergent (see the section entitled "Using the detergent and water softener").
- Insert the plug into the socket. The power supply is 220 - 240V 50Hz the specification of the socket is 10 A 250 VAC. Make sure that the water supply is turned on to proper pressure.
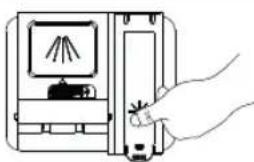
- Close the door, press the POWER button, to switch on the machine.

A click could be heard when the door is closed perfectly. When the washing is over, you can shut off the switch by pressing POWER button.
CHANGE THE PROGRAMME
Premise:
- A cycle that is underway can only be modified if it has only been running for a short time. Otherwise, the detergent may have already been released, and the appliance may have already drained the wash water. If this is the case, the detergent dispenser must be refilled (see the section entitled "Filling the detergent dispenser").
- Press POWER button or START button for 3 seconds to cancel the programme, and turn on it again, then you can change the programme to the desired cycle setting.

If you open the door during a wash cycle, the machine will pause. The program light will stop blinking and the buzzer will beep every minute unless you close the door. After you close the door, the machine will keep on working after 3 seconds automatically.
If your model has broken memory function, the machine will go on to finish the selected program after the power cut.
Adding dishes
A forgotten dish can be added at any time before the detergent dispenser opens.
- Open the door a little to stop the washing.
- After the spray arms stop working, you can open the door completely.
- Add forgotten dishes.
- Close the door, the dishwasher will work after ten seconds.

WARNING: It is dangerous to open the door when washing, because the hot water may scald you. If the door is opened while the dishwasher is running, a safety mechanism is activated and stops the cycle.
Washing programmes
AT THE END OF THE WASH CYCLE
When the working cycle has finished, the buzzer of dishwasher will beep shortly, then stop. In the digital display appears "0", only in this case the programme has ended.
- Switch off the dishwasher by pressing the POWER button.
- Turn off the water tap!
Open the door carefully. Hot steam may escape when the door is opened!
- Hot dishes are sensitive to knocks. The dishes should be allowed to cool down around 15 minutes before removing from the appliance.
- Open the dishwasher's door, leave it and wait a few minutes before removing the dishes. In this way they will be cooler and the drying will be improved.
- Unloading the dishwasher.
It is normal that the dishwasher is wet inside.
Empty the lower basket first and then the upper one. This will avoid water dripping from the upper basket onto the dishes in the lower one.
26_Washing programmes
WASH CYCLE TABLE
DW60M5070/DW60M5050
| Program Description of Cycle Running time (min) Energy (kWh) Water (€) | ||||
| Intensive | Pre Wash (50 °C) | 170 1.6 18.5 | ||
| Wash (60 °C) | ||||
| Rinse | ||||
| Rinse | ||||
| Rinse (70 °C) | ||||
| Drying | ||||
| ECO | Wash (45 °C) | 195 | 1.053 (DW60M5070)1.039 (DW60M5050) | 12 |
| Rinse | ||||
| Rinse (65 °C) | ||||
| Drying | ||||
| Delicate | Pre Wash | 130 0.95 14.5 | ||
| Wash (40 °C) | ||||
| Rinse | ||||
| Rinse (60 °C) | ||||
| Drying | ||||
| Express | Pre Wash (50 °C) | 60 0.9 10 | ||
| Wash (60 °C) | ||||
| Rinse (60 °C) | ||||
| Drying | ||||
| Quick Wash(DW60M5070) | Wash (45 °C) | 30 0.75 11 | ||
| Rinse (50 °C) | ||||
| Rinse (55 °C) | ||||
| Auto(DW60M5070) | Pre Wash (45 °C) | 150 0.9-1.3 1 | 1-15 | |
| Auto (45-55 °C) | ||||
| Rinse | ||||
| Rinse (65 °C) | ||||
| Drying | ||||
| Normal(DW60M5050) | Pre Wash (45 °C) | 180 1.35 15 | ||
| Auto (55 °C) | ||||
| Rinse | ||||
| Rinse (65 °C) | ||||
| Drying | ||||
| Pre Wash(DW60M5070) | Pre Wash 15 0.02 4 | |||

The wash time varies depending on the pressure and temperature of the supplied water.

Quick Wash: Continuous use of the Quick Wash cycle for an extended time is not recommended. This may reduce the performance of the water softener.
Cleaning and care
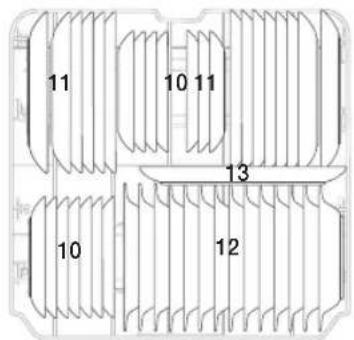
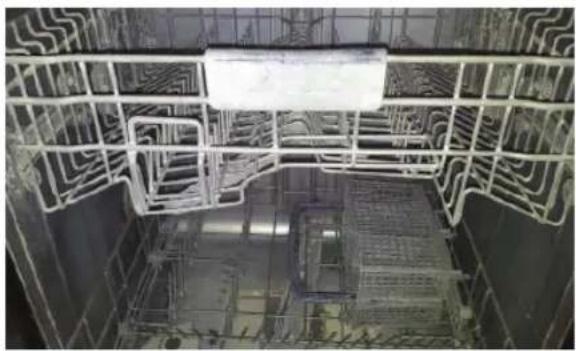
CLEANING THE FILTERS
Filtering system
For your convenience, we have placed the drain pump and filtering system within easy reach inside the tub. There are three components of the filtering system: the main filter, the coarse filter, and the fine filter.
- Main filter: Food and soil particles trapped by this filter are pulverized by a special jet on the lower spray arm and washed down the drain.
-
Coarse fi lter: Larger items, such as pieces of bone or glass, that could clog the drain are trapped in the coarse fi lter. To remove an item caught in this fi lter, gently squeeze the tabs on top of this fi lter and lift it out.
-
Fine filter: This filter holds soil and food residue in the sump area and prevents it from being redeposited on the dishes during a cycle.

ATTENTION: Do not put the fine filter upside down.
Filter assembly
For best performance and results, the filter assembly must be cleaned. The filter efficiently removes food particles from the wash water, allowing it to be recirculated during the cycle. For this reason, it is a good idea to remove the larger food particles trapped in the filter after each wash cycle by rinsing the semicircular filter and cup under running water. To remove the filter assembly, turn it in anti-clockwise direction and lift the filter assembly up. The entire filter assembly should be cleaned regularly.
To clean the coarse filter and the fine filter, use a cleaning brush. Then, reinsert the entire assembly in the dishwasher, positioning in its seat, pressing downward, turning it clockwise direction.
The dishwasher must never be used without the filters. Improper replacement of the filter may reduce the performance level of the appliance and damage dishes and utensils.

WARNING: Never run the dishwasher without the filters in place. When cleaning the filters, do not damage them. Otherwise the filters may not perform as intended and poor wash results or damage to the internal parts may be encountered.
CLEANING THE SPRAY ARMS
It is necessary to clean the spray arms regularly as hard water residue can clog the spray arm jets and bearings. To remove the middle spray arm, hold the nut, rotate the arm clockwise to remove it. To remove the lower spray arm, pull out the spray arm upward. Wash the arms in warm and soapy water and use a soft brush to clean the jets. Replace them after rinsing them thoroughly.

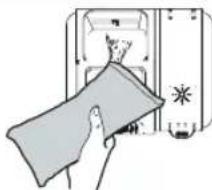
CLEANING THE DOOR
To clean the edge around the door, you should use only a soft warm, damp cloth.
Also, never use abrasive cleaners or scouring pads on the outer surfaces because they will scratch the finish. Some papers towels can also scratch or leave marks on the surface.

WARNING: Never use a spray cleaner to clean the door panel for it could damage the door lock and electrical components. It is not advised to use the abrasive agent or some paper towel because of the risk of scratching or leaving spots on the stainless steel surface.
CARING FOR THE DISHWASHER
To clean the control panel use a lightly damp cloth then dry thoroughly. To clean the exterior use a good appliance polish wax.
Never use sharp objects, scouring pads or harsh cleaners on any part of the dishwasher.
PROTECT AGAINST FREEZING
If your dishwasher is left in an unheated place during the winter:
- Cut off electrical power to the dishwasher.
- Turn off the water supply and disconnect the water inlet pipe from the water valve.
- Drain water from the inlet pipe and water valve. (Use a pan to catch the water)
- Reconnect the water inlet pipe to the water valve.
- Remove the filter in the tub the bottom and use a sponge sock up water.
Cleaning and care
HOW TO MAINTAIN YOUR DISHWASHER
After Every Wash
After every wash, turn off the water supply to the appliance and leave the door slightly ajar so that moisture and odours not trapped inside.
- Remove the Plug
Before cleaning or performing maintenance, always remove the plug from the socket.
- No Solvents or Abrasive cleaning
To clean the exterior and rubber parts of the dishwasher, do not use solvents or abrasive cleaning products. Use only a cloth and warm soapy water. To remove spots or stains from the surface of the interior, Use a cloth dampened with water and a little white vinegar, or a cleaning product made specifically for dishwashers.
- When You Go on Holiday
When you go on holiday, it is recommended that you run a wash cycle with the dishwasher empty and then remove the plug from the socket, turn off the water supply and leave the door of the appliance slightly ajar. This will help the seals last longer and prevent odours from forming within the appliance.
- Moving the Appliance
If the appliance must be moved, try to keep it in the vertical position. If absolutely necessary, it can be positioned on its back.
Seals
One of the factors that cause odours to form in the dishwasher is food that remains trapped in the seals. Periodic cleaning with a damp sponge will prevent this from occurring.
Setting up your dishwasher

WARNING : Electrical shock hazard
Disconnect electrical power before installing dishwasher.
Failure to do so could result in death or electrical shock.

ATTENTION: The installation of the pipes and electrical equipments should be done by professionals.
About electricity connecting

CAUTION, for personal safety:
DO NOT USE AN EXTENSION CORD OR AN ADAPTER PLUG WITH THIS APPLIANCE.
DO NOT, UNDER ANY CIRCUMSTANCES, CUT OR REMOVE THE THIRD GROUNDING PRONG FROM THE POWER CORD.
Electrical requirements
An 220-240 V\~, 50 Hz fuse or a circuit breaker.
- An individual branch circuit serving your dishwasher.
Grounding instructions

Insure proper ground exists before use

This appliance must be grounded. In the event of a malfunction or breakdown, grounding will reduce the risk of electric shock by providing a path of least resistance of electric current. This appliance is equipped with a cord having an equipment-grounding conductor and a grounding plug. The plug must be plugged into an appropriate outlet that is installed and grounded in accordance with all local codes and ordinances.

WARNING: Improper connection of the equipment grounding conductor can result in the risk of an electric shock. Check with a qualified electrician or service representative if you are in doubt whether the appliance is properly grounded. Do not modify the plug provided with the appliance.
WATER SUPPLY AND DRAIN
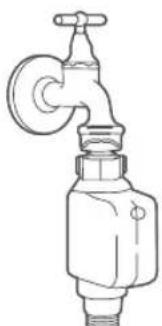
Cold water connection
Connect the cold water supply hose to a threaded 3/4 (inch) connector and make sure that it is fastened tightly in place. If the water pipes are new or have not been used for an extended period of time, let the water run to make sure that the water is clear. This precaution is needed to avoid the risk of the water inlet to be blocked and damage the appliance.

Provided water supply hose has the aqua-safe system. Ensure that water supply hose's aqua-safe pipe is connected to the faucet.
Setting up your dishwasher 31
Setting up your dishwasher
Hot water connection
The water supply to the appliance can also be connected to the house hot water line (centralized system, heating system), as long as it does not exceed a temperature of 60^ . In this case, the wash cycle time will be shortened by about 15 minutes and the wash efficiency slightly reduced. The connection must be made to the hot water line following the same procedures as those for the connection to the cold water line.

Positioning the appliance
Position the appliance in the desired location. The back should rest against the wall behind it, and the sides, along the adjacent cabinets or wall. The dishwasher is equipped with water supply and drain hoses that can be positioned to the right or the left to facilitate proper installation.
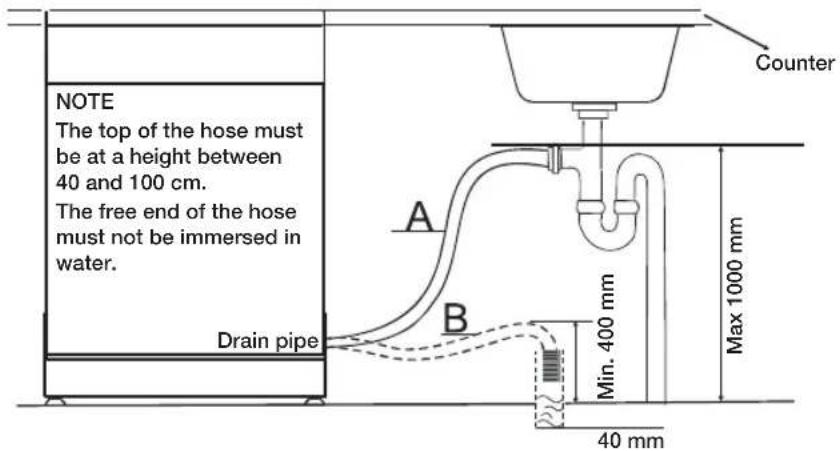
How to drain excess water from hoses
If the sink is 1000mm higher from the floor, the excess water in hoses cannot be drained directly into the sink. It will be necessary to drain excess water from hoses into a bowl or suitable container that is held outside and lower than the sink.
Water outlet
Connect the water drain hose. The drain hose must be correctly fitted to avoid water leaks.
Ensure that the water inlet hose is not kinked or squashed.
Extension hose
If you need a drain hose extension, Use a similar size and quality drain hose.
It must be no longer than 4 metres; otherwise the cleaning effect of the dishwasher could be reduced.
Syphon connection
The waste connection must be at a height of between 40~cm (minimum) and 100~cm (maximum) from the bottom of the dishwasher. The water drain hose should be fixed by a hose clip.
Aqua-safe
The Aqua-safe System is a safety valve system, preventing water leaks. If the water inlet hose starts to leak anytime, the safety valve cuts off the running water. If the water inlet hose or the safety valve is damaged, remove and replace it.
Do not enlarge or shorten the inlet hose.
32 Setting up your dishwasher
CONNECTION OF DRAIN HOSES
Insert the drain hose into a drain pipe with a minimum diameter of 4 cm, or let it run into the sink, making sure to avoid bending or crimping it. The top of the hose must be at a height between 40 and 100 cm. The free end of the hose must not be immersed in water to avoid the back flow of it.
POSITION THE APPLIANCE
Position the appliance in the desired location. The back should rest against the wall behind it, and the sides, along the adjacent cabinets or walls. The dishwasher is equipped with water supply and drain hoses that can be positioned either to the right or the left sides to facilitate proper installation.
Levelling the Appliance
Once the appliance is positioned for levelling, the height of the dishwasher may be altered via adjustment of the screwing level of the feet. In any case, the appliance should not be inclined more than 2^ .
START OF DISHWASHER
The following should be checked before starting the dishwasher.
- the dishwasher is level and fixed
- the inlet valve is opened
- There is no leakage at the connections of the conducts
- the wires are tightly connected
- the power is switched on
- the inlet and drain hoses are not knotted
- All packaging materials and printings have been taken out of the dishwasher

ATTENTION: After installation please put this manual in a safe place. The contents of this manual can be useful to users.
Setting up your dishwasher 33
Installing your dishwasher
BUILT UNDER, SEMI BUILT IN, FULLY BUILT IN DISHWASHER
Be sure that you or your installer follow these instructions closely so that your new dishwasher works properly and that you're not at risk of injury when washing dishes.

New installation
If the dishwasher is a new installation, most of the installation work must be done before the dishwasher is moved into place.

Replacement
If the dishwasher is replacing an old dishwasher, you must check the existing dishwasher connections for compatibility with the new dishwasher. Replace the existing connections as necessary.
STEP 1. SELECTING THE BEST LOCATION FOR THE DISHWASHER

The installation position of dishwasher should be near the existing inlet and drain hoses and power cord.

One side of the cabinet sink should be chosen to facilitate the connection of drain hoses of the dishwasher.
- Choose a place near the sink to facilitate the installation of inlet and drain hoses.
- Less than 5 mm between the top of dishwasher and cabinet and the outer door aligned to cabinet.
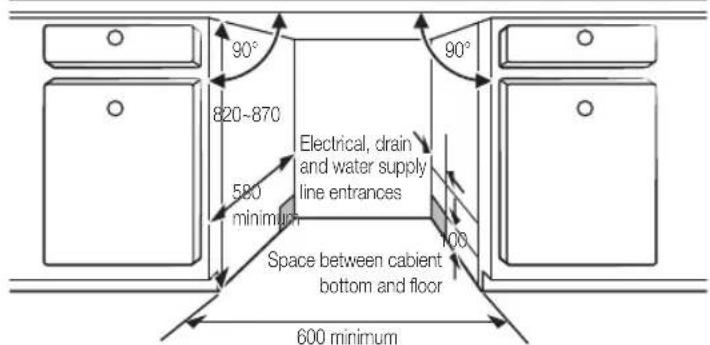
- If dishwasher is in stalled at the corner of the cabinet, there should be some space when the door is opened.

Depending on where your electrical outlet is, you may need to cut a hole in the opposite cabinet side.
34_Installing your dishwasher
STEP 2. CHECKING WATER SUPPLY AND ELECTRICAL REQUIREMENTS

- The water supply line pressure must be between 0.04-1.0 MPa.
Supply cold water only. Make sure that the water temperature does not exceed 60^ - Do not supply hot water. Otherwise, the product may malfunction.

- Use a rated power of 220-240 V~, 50 Hz.
- Install the product while the power cord is unplugged.
- Use a power outlet with a maximum allowable current of 16 A. (The maximum current for this dish washer is 11 A.)
-
When powering the dishwasher, ensure that your power supply has:
-
An 220-240 V~, 50 Hz fuse or circuit breaker.
-
An individual branch circuit serving your dishwasher.
After the installation, check if the power cord is not bent or damaged. -
Ensure that the water supply valve is turned off before connecting the water supply line to the dishwasher.
- Seal the water supply line connections using teflon tape or sealing compound to stop any water leakage.
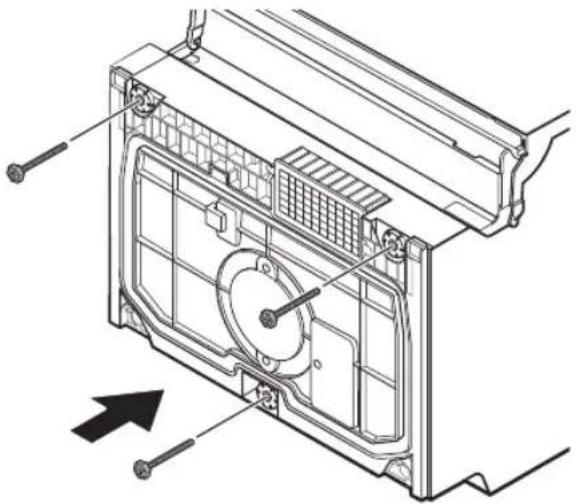
STEP 3. PREPARED THE CUSTOM PANEL (FOR FULLY BUILT IN AND SEMI BUILT IN DISHWASHER)
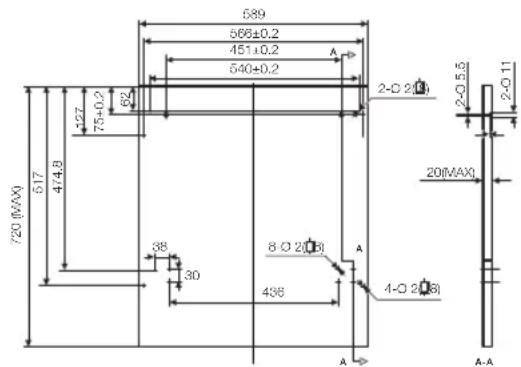
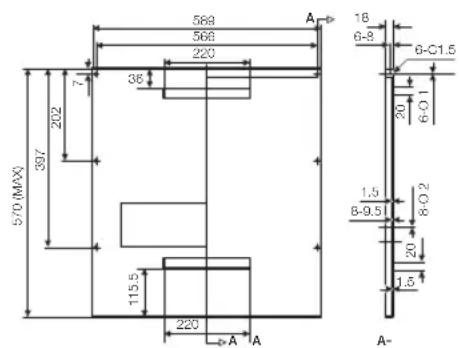
The custom panel should be processed in accordance with the illustrated dimensions.
Fully built in
Semi built in
Installing your dishwasher
Fully built in
- Install the hook on the custom wooden panel and put the hook into the slot of the outer door of dishwasher.
- After positioning of the panel, fix the panel onto the outer door by screws and bolts.

CAUTION: Use a custom panel between 3 - 7kg
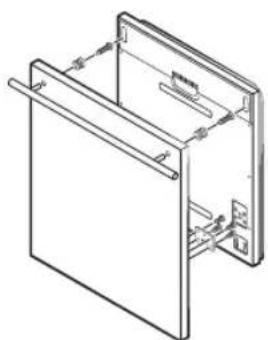
Take away the four short screws.
Semi built in
- Magical plaster A and magical plaster B be disjoined on, magical plaster A on the custom wooden panel and felted magical plaster B of the outer door of dishwasher.
- After positioning of the panel, fix the panel onto the outer door by screws and bolts.

CAUTION: Use a custom panel between 3 - 6kg
Take away the four short screws.
Pin up the four long screws.
36_Installing your dishwasher
STEP 4. TENSION ADJUSTMENT OF THE DOOR SPRING (FOR FULLY BUILT IN AND SEMI BUILT IN DISHWASHER)
- The door springs are set at the factory to the proper tension for the outer door. If custom wooden panel are installed, you will have to adjust the door spring tension. Rotate the adjusting screw to drive the adjustor to strain or relax the steel cable.
- Door spring tension is correct when the door remains horizontal in the fully opened position yet rises to a close with the slight lift of a finger.
Installing your dishwasher
STEP 5. DISHWASHER INSTALLATION

- Install the furniture door to the outer door of the dishwasher using the brackets provided. Refer to the template for positioning of the brackets. (For Fully built in and Semi built in dishwasher)
- Adjust the tension of the door springs by using an Allen key turning in a clockwise motion to tight en the left and right door springs. Failure to do this could cause damage to your dishwasher. (For Fully built in and Semi built in dishwasher)
- Connect the inlet hose to the cold water supply.
- Connect the drain hose. Refer to diagram.
- Connect the power cord.
- Affix the condensation strip under the work surface of cabinet. Please ensure the condensation strip is fl ush with edge of work surface.
- Place the dishwasher into position.
- Level the dishwasher. The rear food can be adjusted from the front of the dishwasher by turning the Allen screw in the middle of the base of dishwasher use an Allen key. To adjust the front feet, use a fl at screw driver and turn the front feet until the dishwasher is level.
- The dishwasher must be secured in place. There are two ways to do this:
A. Normal work surface : Put the installation hook into the slot of the side plane and se cure it to the work surface with the wood screws.
B. Marble or granite work top: Fix the side with Screw.
38_Installing your dishwasher
STEP 6. LEVELING THE DISHWASHER

Dishwasher must be level for proper dish rack operation and wash performance.
- Place a spirit level on door and rack track inside the tub as shown to check that the dishwasher is level.
- Level the dishwasher by adjusting the three levelling legs individually.
- When level the dishwasher, please pay attention not to let the dishwasher tip over.

If the height of the leg is not high enough, use extra feet.
Installing your dishwasher
Troubleshooting
The manufacturer, following a policy of constant development and up-dating of the product, may make modifications without giving prior notice.
BEFORE CALLING FOR SERVICE
| PROBLEM POSSIBLE CAUSE WHAT TO DO | ||
| Dishwasher doesn't run | • Fuse blown or the circuit breaker tripped. | •Replace fuse or reset circuit breaker.Remove any other appliances sharing the same circuit with the dishwasher. |
| •Power supply is not turned on. | •Make sure the dishwasher is turned on and the door is closed securely.Make sure the power cord is properly plugged into the wall socket. | |
| •Water pressure is low. •Check that the water supply is connected properly and the water is turned on. | ||
| Drain pump doesn't stop | •Overflow. •The system is designed to detect an overflow. When it does, it shuts off the circulation pump and turns on the drain pump. | |
| Noise • Some audible sounds are normal. | •Sound from soft food shredding action and detergent cup opening. | |
| •Utensils are not secure in the baskets or something small has dropped into the basket. | •To ensure everything is secured in the dishwasher. | |
| •Motor hums. •Dishwasher has not been used regularly.If you do not use it often, remember to set it to fill and pump out every week, which will help keep the seal moist. | ||
| Suds in the tub • Improper detergent. •Use only the special dishwasher detergent to avoid suds. If this occurs, open the dishwasher and let suds evaporate.Add 1 gallon of cold water to the tub.Close and latch the dishwasher, then start the "soak" wash cycle to drain out the water. Repeat if necessary. | ||
| •Spilled rinse agent. •Always wipe up rinse agent spills immediately. | ||
| Stained tub interior • Detergent with colorant was used. | •Make sure that the detergent is the one without colorant. | |
| Dishes are not dried • Rinse agent dispenser is empty. | •Make sure that the rinse agent dispense is filled. | |
| Dishes and flatware not clean | •Improper program. •Select a more intensive wash program. | |
| •Improper rack loading. | •Make sure that the action of the detergent dispenser and spray arms are not blocked by large dishware. | |
40_Troubleshooting
| PROBLEM POSSIBLE CAUSE WHAT TO DO | ||
| Spots and filming on glasses and flatware | 1. Extremely hard water. 2. Low inlet temperature. 3. Overloading the dishwasher. 4. Improper loading. 5. Old or damp powder detergent. 6. Empty rinse agent dispenser. 7. Incorrect dosage of detergent. | To remove spots from glassware: 1. Take out all metal utensils out of the dishwasher. 2. Do not add detergent. 3. Choose the longest cycle. 4. Start the dishwasher and allow it to run for about 18 to 22 minutes, then it will be in the main wash. 5. Open the door to pour 2 cups of white vinegar into the bottom of the dishwasher. 6. Close the door and let the dishwasher complete the cycle. If the vinegar does not work: Repeat as above, except use 1/4 cup (60 ml) of citric acid crystals instead of vinegar. |
| Cloudiness on glassware | Combination of soft water and too much detergent. | Use less detergent if you have soft water and select a shortest cycle to wash the glassware and to get them clean. |
| Yellow or brown film on inside surfaces | Tea or coffee stains. Using a solution of 1/2 cup of bleach and 3 cups warm water to remove the stains by hand. WARNING: Wait for 20 minutes after a cycle to allow heating elements cool down before cleaning interior; Failing to follow this instruction may result in injury. | |
| Iron deposits in water can cause an overall film. | Contact a water softener company to install specialist water filtration system on the water supply. | |
| White film on inside surface | Hard water minerals. Clean the interior, use specialist dishwasher cleaner or use a damp sponge with dishwasher detergent and wear rubber gloves. Never use any other cleaner than dishwasher detergent for the risk of foaming or suds. | |
| Detergent cup lid won't latch | Dial is not in the OFF position. | Turn the Dial to OFF position and slide the door latch to the left. |
| Detergent left in dispenser | Dishes block detergent dispenser. | Re-loading the dishes properly. |
| Steam • Normal phenomenon. There is some steam coming through the vent by the door latch during drying and water draining. | ||
| Black or gray marks on dishes | Aluminum utensils have rubbed against dishes. | Use a mild abrasive cleaner to eliminate those marks. |
| Water standing in the bottom of the tub | This is normal. A small amount of clean water around the outlet on the tub bottom keeps the water seal lubricated. | |
Troubleshooting
Troubleshooting
| PROBLEM POSSIBLE CAUSE WHAT TO DO | ||
| Dishwasher leaks • Overfill dispenser or rinse aid spills. | • Be careful not to overfill the rinse aid dispenser. Spilled rinse aid could cause overusing and lead to overflowing. Wipe away any spills with a damp cloth. | |
| • Dishwasher isn't level. • Make sure the dishwasher is level. | ||
| Buttons are not working on power on state | • Door is open. • When door is opened, buttons are not working except POWER button. Close the door and press the button. | |
| • Control lock function is selected. | • When selected Control lock function, buttons are not responded. To unlock this function, hold down the Control lock button for three (3) seconds. Also, Control lock function is released when power cord is reconnected. | |

The result of washing performance may be caused by a power supply issue. Try another program before contacting for service.
INFORMATION CODES
When a fault occurs, the appliance will display information codes to warn you.
| Codes Meanings Possible Causes | ||
| 4C Water supply check | Faucets is not opened, or water intake is restricted,or water pressure is too low | |
| LC Leakage Some element of dishwasher leaks. | ||
| HC Not reaching required temperature Malfunction of heating element | ||
| PC Divider valve failed Divider | valve failed | |
| AC | Failure of communication between main PCB with sub PCB | Open circuit or break wiring for the communication |
| bC2 | Button pressed long time | Button pressed 30 seconds |

WARNING: If overflow occurs, turn off the main water supply before calling a service. If there is water in the base pan because of an over fill or small leak, the water should be removed before restarting the dishwasher.

Troubleshooting
Appendix
SPECIFICATIONS
| Model | DW60M5070FS/DW60M5070FW DW60M5050FS/DW60M5050FW | |
| Type Free Standing | ||
| Power 220-240 V~, 50 Hz | ||
| Water pressure 0.04 - 1.0 Mpa | ||
| Rated power usage 1760-2100 W | ||
| Hot water connection Max 60 °C | ||
| Dry type Condensed dry system | ||
| Wash type Rotating nozzle spray | ||
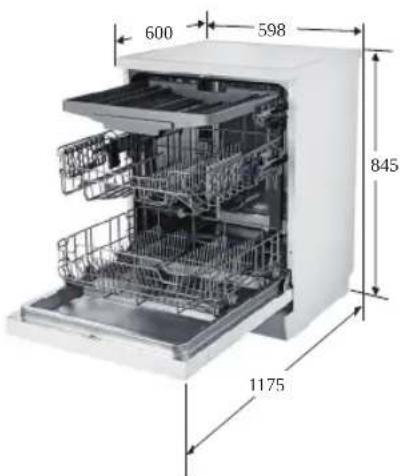
| Dimensions (Width x Depth x Height) 598 x 600 x 845 mm | ||
| Wash capacity | DW60M5070 14 place setting | |
| DW60M5050 13 place setting | ||
| Weight | DW60M5070F* Unpacked 53 kg | |
| DW60M5050F* Unpacked 49 kg | ||
PRODUCT DIMENSION
DW60M5070FS/DW60M5070FW DW60M5050FS/DW60M5050FW
Appendix_43
For standard test
DW60M5070

The information for comparability test as follows:
- Washing capacity: 14 place settings
Test standard: EN 50242, MS EN 50242/EN 60436 - Position of upper basket: to lower position
- Wash cycle: Eco
Additional options: None
Rinse aid setting: d5
Water softener setting: H3
Dosage of the standard detergent: pre/wash 5g+ main/wash 30g
For the arrangement of the items, refer below figures
| 1 Soup spoons | |
| 2 Forks | |
| 3 Knives | |
| 4 Teaspoons | |
| 5 Dessert spoons | |
| 6 Serving spoons | |
| 7 Serving forks | |
| 8 Gravy ladles |

For standard test
DW60M5050
The information for comparability test as follows:
- Washing capacity: 13 place settings
Test standard: EN 50242, MS EN 50242/EN 60436 - Position of upper basket: to lower position
- Wash cycle: Eco
Additional options: None - Rinse aid setting: d5
Water softener setting: H3
Dosage of the standard detergent: pre/wash 5g+ main/wash 27.5g
For the arrangement of the items, refer below figures
| 1 Soup spoons | |
| 2 Forks | |
| 3 Knives | |
| 4 Teaspoons | |
| 5 Dessert spoons | |
| 6 Serving spoons | |
| 7 Serving forks | |
| 8 Gravy ladles |
Product fiche
REGULATION (EU) NO 1059/2010, MS 205:2011
| Supplier | SAMSUNG | |
| Model name | DW60M5050** DW60M5070** | |
| Rated Capacity (place setting) | 13 14 | |
| Energy efficiency class | A+ | |
| Annual energy consumption, (AE c) (kWh/year) 1) | 295 299 | |
| Standard cycle energy consumption, (E t) (kWh) | 1.039 1.053 | |
| Power consumption in off mode, P o (W) | 0.45 | |
| Power consumption in left-on mode, P l (W) | 0.49 | |
| Annual water consumption, (AW c) (L/year) 2) | 3360 | |
| Drying efficiency class, A (most efficient) to G (least efficient) | A | |
| Standard programme 3) | Eco | |
| Programme time for the standard cycle, (min) | 195 | |
| Duration of the left-on mode, (T l) (min) | 30 | |
| Airborne acoustical noise emissions (dBA re 1pW) | 48 46 | |
| Model DW60M5070FS / DW60M5070FW / DW60M5050FS / DW60M5050FW | ||
| Fully built-in | ||
| Built-under Yes | ||
| Free standing Yes | ||
| Semi built in | ||

1) based on 280 standard cleaning cycles using cold water fill and the consumption of the low power modes. Actual energy consumption will depend on how the appliance is used.
2) based on 280 standard cleaning cycles. Actual water consumption will depend on how the appliance is used.
3) 'Standard programme' is the standard cleaning cycle to which the information in the label and the fi che relates, that this programme is suitable to clean normally soiled tableware, and that it is the most efficiient programme in terms of combined energy and water consumption.
4) The wash time varies depending on the pressure and temperature of the supplied water.
Terminology for dishwasher
| 1. Circulation Motor | A motor that sucks the water remaining on the floor of the dishwasher and infects water using high pressure through the internal water passages to the top Middle and lower nozzles. |
| 2. Drain Pump | The pump that drains the polluted water from the dishwasher generated while the dishwasher is running. |
| 3. Heater | The heater is located on the water passages inside the dishwasher. It heats the flowing water to increase wash efficiency. |
| 4. Flow Meter | Measure the amount of supplied water by counting the pulses of the hall IC located at the next of the inlet valve. |
| 5. Distributor | Located at the output end of the sump inside the dishwasher. It turns the flow of the water that goes to the bottom part of the dishwasher on or off. (This model does not have this part) |
| 6. Dispenser | The location where the detergent and rinse aids are stored so they can be used by the dishwasher. The dispenser automatically supplies detergent and rinse aids to the inside of the dishwasher when they are needed. |
| 7. Tub Assy | An internal case mode of stainless steel that makes up the basic framework of the dishwasher. |
| 8. Sump Assy | The place inside the dishwasher where water is collected. The injected water gathers here after circulation. The sump Assy is connected to the circulation motor and drain pump. |
| 9. Tub Front Assy | An internal case made of stainless steel that makes up internal part of the front door. |
| 10. Base Assy A plastic part that makes up the basic bottom framework. | |
| 11. Basket Assy The upper and lower racks where dishes can be loaded. | |
| 12. Middle/Lower Nozzles | Washes dishes by rotating and injecting the supplied water through the water passage at high pressure. |
| 13. Case Brake | A passage that adjusts the air pressure by connecting the pressure of the inside air which is expanded at high temperature during wash and rinse cycles and the outside air pressure. |
| 14. Door Lock Switch | Detects whether the door of the dishwasher is open or closed if the door is open while the dishwasher is running the cycle is temporary stopped. |
SAMSUNG
QUESTIONS OR COMMENTS?
| COUNTRY CALL | OR VISIT US ONLINE AT | |
| U.A.E 800-SAMSUNG (800-726 7864) | www.samsung.com/ae/support (English) www.samsung.com/ae_ar/support (Arabic) | |
| OMAN 800-SAM GS (800-72627) | ||
| KUWAIT 183-CALL | (183-2255) | |
| BAHRAIN 8000-GSAM (8000-4726) | ||
| QATAR 800-CALL | (800-2255) | |
| JORDAN | 0800-22273 06 5777444 | www.samsung.com/levant/support |
| Lebanon 1299 | ||
| Iraq 80010080 | ||
| ALGERIA 3004 | www.samsung.com/n_africa/supportTUNISIA 80 100 012 | |
| MOROCCO 080 100 | 22 55 | |
| MAURITIUS 800 5050 | www.samsung.com | /africa_en/support |
DW60M5070FS/DW60M5070FW/DW60M5050FS/DW60M5050FW
DW60M5070FS/DW60M5070FW/DW60M5050FS/DW60M5050FW

DW60M5070 DW60M5050
DW60M5070
(14 couverts)
DW60M5050
(13 couverts)

Assiettes à dessert

Assiettes-repas
Bols deSoupe

Plat oval

RACCORDEMENT DES FLEXIBLES D'EVACUATION
DW60M5070FS/DW60M5070FW
DW60M5050FS/DW60M5050FW
Annexe_43
J
J
J
J
J
J
J
J
J
J
J
J
J
J
J
J
J
J
J
J
J
J
J
J
J
J
J
J
J
J
J
J
J
J
J
J
J
J
J
J
J
J
J
J
J
J
J
J
J
J
J
J
J
J
J
J
J
J
J
J
J
J
J
J
J
J
J
J
J
J
J
J
J
J
J
J
J
J
J
J
J
J
J
J
J
J
aL
J< 1yjIgblalbcla JyjIy
g. 1.
gJ 1000000000000000000000000000000000000000000
P
J 10
1 1
-:a,jLio
s 1
1g 1
1
1
gjLgJawgaggogg
aolwJlwlj!
gIb21 AJIue pIaui Jg 1sL
gJLJI 1111111111111111111111111111111111111111111

AEL = 90^
JLLg
jaiy
a
aalgag aajlall gglalh jao paaannll Jjayagao loS jao jgs S bai jb81 allw plaswl 1

1 1

aalalalalalalalalalalalalalalalalalalal
a a a a a a a a a a a a a a a a a a a a a a a a a a a a a a a a a a a a a a a a a a a a a a a a a a a a a a aaa
A
aL
aaii i 1
aaii i 133 2c lgjg jnna aal 25,uiy lgl g paaunu jua aegio jz klaillll
aieaoosgaiabwglalal
J 1
(1)
J 1
a aai g iie aihwgl lloal jui b
g j 1000000000000000000000000000000000000000000000000
Lg 10
a281 28100 g jg jia 888888888888888888888888888
y
J 1
LgagjglJyJgJgJgJgJgJgJgJgJgJgJgJgJgJgJgJgJgJgJgJgJgJgJgJgJgJgJgJgJgJgJgJgJgJgJgJgJgJgJgJgJgJgJgJgJgJgJgJgJgJgJ
1111111111111111111111111111111
jLgJU JSLgJ1
aagaaag aagaaag Jlllglgagagagagagagagagagagagagagagagagagagagagagagagagagagagagagagagagagagagagagagagagagagagagagagagagagagagagagagagagagag
y
i 15
g 1 g 1 g 1 g 1 g 1 g 1 g 1 g 1 g 1 g 1 g 1 g 1 g 1 g 1 g 1 g 1 g 1 g 1 g 1 g 1 g 1 g 1 g 1 g
gai gai iiai 10 gaiy gai y alluie y saa aae
(1.19 a
aosu1wU A
jIb8J allJc 1
( a + b) ( a^2 - ab + b^2) = a^3 + b^3
olal jnssgimno sll) olil gao 12 oI iag aill p
10
a1 = 2,an + 1 = n1 + an
ai = 1n( ai - 1 + a_i)
a3 = 32a2,a4 = 32a3.
11
aIgJI aIwJUa3 19 Jb2aJIuuc aJ Ua3
aJawJdWJ Jg3
1
(a11g)dsuUc
jIb8JdJIuWt JzJzJIJI JIb8JUxS<JJuWt
jLJ1 J 1
0
JaaJIa,glgaii
[{\left( 2\right) }^{n} = {\left( 1\right) }^{n}\left( {1 + \left( {1 + u}\right) }\right) ]
a
将 an + 1 = 2an2a_n + 1 + 12
jIb81 aJLw, aJLcJI 19
S OBC = S AOB + S_ BOC
- aolal jIbIaI allwae Ic bIaI a5
gagag g
j431 g
1
aioo,aoo aoo Joell baw c3 a5o jIbJaiLwrc
Jol
ailll aoll Juaill Jue
LagJgaj
1
1
9. Lg.
(DW60M5070)
DW60M5070FS/DW60M5070FW/DW60M5050FS/DW60M5050FW
| DW60M5070 DW60M5050 | ||
17-0j+1g 28
#
olil jucgio 01olil gao
g 1111 1111 1111 1111 1111 1111
L L
1
1
Jusll Jusll Jusll Jusll Jusll Jusll Jusll Jusll Jusll Jusll Jusll Jusll Jusll
JgU L 10 H6H5H4H3H2H1
H3 (EN 50242) :
1
jglg jglg jglg jglg jglg jglg jglg jglg jglg jglg jglg jglg jglg jglg jglg jglg jglg jglg jglg jglg jglg jglg jglg jglg jglg jglg jglg jglg jglg jglg jglg jglg jglg jglg j
1,2,3,4,5,6,7,8
aill gaiog aiil piai 1
111 1
jIb21 allwge piaiWU jana 11 Lioi po
yLsLgai,gi gaiu

a a a a a a a a a a a a a a a a a a a a a a a a a a a a a a a a
Aaiu Aaii jaiu Jauui Juaa iiaai 45
iill 2,000 80000000000000000000000000000000000
151 Jua 1c Juaa 1 Juaa Jaa a a a a a a
g 100000000000000000000000000000000000000000000000000
1
gag aagcog cgo glabal allwic adio gss y 8yglut wglutw wglut alwoc abo
aIyI IblbI ayI yI yI yI yI yI yI yI yI yI yI yI yI yI yI yI yI yI yI yI yI yI yI yI yI yI yI yI yI yI yI yI
5g 1
JalabJglaio 1a Jglabai allwau ciaibao j


Bil
1
Jawell a, gol alil sic Igioe Iaill jy Lai

JUULI 10000000000000000000000000000

Jaaie Jaaie aae aae aae aae aae aae aae
aill jai jai wui jiaio 2

0o (LoljA gllg) afoa s oal 1uilll aolw wglg lsl aolw aaii Jaae Jaae
J 1
a11 11
abwJUcLuo jzj
Jaiil aaii jaii jaii Jaii Jaii Jaii Jaii Jaii Jaii Jaii Jaii Jaii Jaii
a1 = 23,a2 = - 43,b1 = 58,b2 = - 78
(olllgaii jaiil gao 0ailljai) jia21 allwue jiaui jaii i. jy (0) wot coai jil jil dc la
a aal sllnsslglg g jgdl ggljglge
(d1-d5 1Ld1 1sLCLD aLw
jlll jwlil biall cllac jaii aai iill clnoa 5 ayai jai jie Iiaol
(.d4gjgjgjgj1).d1←d5←d4←d3←d2←d1
1.1281 JLa5g jil (0) juaa aal yjbjg cahll sclu 405
- al11 gao 15.
#
Ligll 0eio yol j1 plaswla
10 10
lae salaei g aSo calalgul
1 1
j4+1 j0s1j Lj5jLj3
clogll 2000 yjell j11 p3 aegl jie clogll 2000 yjell g
Ailco jaiy jia Jaiy jaiy jaiy jaiy jaiy jaiy
SlligSll 10000000000000000000000000000000000000000000000000
Lsilll jiei

Lalj Jlalj Jgauo jao oLso gaii
a

A
a
JLSCgoljooalizjglb2aillwcljI JcJgssuJlllJ 03
j8 jIb no aaii aii iA iALw
glzblalllccjj jgol
Lg 128 g 128 g 128 g 128 g 128 g 128 g 128 g 128 g 128 g 128 g 128 g 128 g 128 g 128 g 128 g 128 g 128 g 128 g 128 g 128
:iJUJJUg→gUU
Lai Lai Lai Lai Lai Lai Lai Lai Lai Lai Lai Lai Lai Lai Lai Lai Lai Lai Lai Lai Lai Lai Lai Lai Lai Lai Lai Lai Lai Lai Lai Lai Lai Lai Lai Lai Lai Lai Lai Lai Lai Lai Lai Lai Lai Lai Lai Lai Lai Lai
DW60M5050
(5) = , = ,
DW60M5070
()

alwztoaiojblb
0

10 1

y

c_1 + c = 1
LS
0_2 + 5 > 0 奥米1.5 ( 1,1)
gao gao jiu jia jing jia jing jia jing jia jing jia jing jia jing jia jing jia jing jia jing jia jing jia jing jia jing jia jing jia jing jia jing jia jing jia jing jia jing jia jing jia jing jia jing jia jing jia jing
L
Lgcll jao Jil0 g a aalj 1
y 111111111111111111111111111111111
DW60M5050
(6) 13 ( a - a + w)

DW60M5070
()
gL+25b
Lwsl
ailllglb

5g1.3 34
aill lll 100 g 2 8 2 3 5 5 5 5 5 5 5 5 5 5 5 5 5 5 5 5 5 5 5 5

aLwJ aLwJ 0
11 1
#
()g)
aLg 100000000000000000000000000000000000000000000
aI aI I aI I aI I aI I aI I aI I aI I aI I aI I aI I aI I aI I aI I aI I aI I aI I aI I aI I aI I aI I aI I aI I aI I aI I aI I aI I aI I aI I aI I aI I aI I aI I aI I aI I
DW60M5070
| s#d1 #c#o | a | |
| d#d1 #c#o | f | |
| d#d1 #L# | g | |
| d#d1 #e, e0 | h |
| slusslglc30 | 1 | |
| clsgsll | 1 | |
| gsslsll | 1 | |
| glsslglc30 | 1 |
m = 311
1
31.281 aJUue 1 Jc03
DW60M5050
| s#131 #cL0 | a | |
| s#111 #cL0 | f | |
| s#111 #cL0 | v | |
| s#111 #cL0 | w |
| slw21qcclo | 1 | |
| lls | 1 | |
| cs | 1 | |
| glw | 1 |
中
Lgll 1jie jie aee 8cww 1 Lgaiy aegi gao 801 Jn
1
#
a111111111111
| الإستعمالrivيةالعربيةالعربيةالعربيةالعربيةالعربيةالعربيةالعربيةالعربيةالعربيةالعربيةالعربيةالعربيةالعربيةالعربية | |
| الإستعمالrivيةالعربيةالعربيةالعربيةالعربيةالعربيةالعربيةالعربيةالعربيةالعربيةالعربية | الإستعمالrivيةالعربيةالعربيةالعربيةالع-ieالعربيةالع-ieالع-ieالع-ieالع-ieالع-ie |
| الإستعمالrivيةالعربيةالع-ieالع-ieالع-ieالع-ieالع-ieالع-ieالع-ie | الإستعمالrivيةالع-ieالع-ieالع-ieالع-ieالع-ieالع-ie |
| الإستعمالrivيةالع-ieالع-ieالع-ieالع-ie | الإستعمالrivيةالع-ieالع-ieالع-ie |
| الإستعمالrivيةالع-ieالع-ieالع-ie | الإستعمالrivيةالع-ie |
| الإستعمالrivيةالع-ieالع-ie | الإستعمالrivيةالع-ie |
Lgio 1000

Jusuui aaii iis jie 1jLai Jg lalai aiae gai paaa 2. jilai ai Jll Jll Jll Jll Jll J

SLWJgJb81 Joo
aL 10
jL Lai jie jie jie jie jie jie jie jie jie jie jie jie jie jie jie jie jie jie jie jie jie jie jie jie jie jie jie jie jie jie jie jie jie jie jie jie jie jie jie jie jie

gai li jinl gao jlg581 aofo 8

JawwllgLgAaBaa gRgRgGgGgGgGgGgGg

gai gai jia lii gai 521 Jia aigai gai aai ai iai iai iai iai iai


15000000000000000000000000000000000000000000
aIglllalwly gai gai gai gai gai gai gai gai
5.3-21 gLbBg 6.8Li
a a a a a a a a a a a a a a a a a a a a a a a a a a a a a a a
1
ailllll llll lalollll glll jglll oaiy yolll lylall alaae aalab
g 8
aillg0g 1j
Jauuul
JolSJIy jll ci liSc JooJI y oIJI wJ, gJ i aegi
wllgblb21 a
j1j1 1 j1j01 aJluu Jauwog JJI j
slll lll 1i iis 111111111111111111111111111
Jue 8g aegg jolai jui jilal Jlalw

rJ 1
山
Juii j, g2 slguiic
golj g5 jas ailll oio gag aaiyll wll lgl 0" yhag aegn aagaaa agu glb21 allwuy
J 1
(j) POWER jIJI JIJI JIJI JIJI JIJI JIJI JIJI
1ol11y:gic
1111 1

jglg jglg jglg a 10 dal ydl glb21 d jy jdyd lcll al dwl s gsl
a aae aee aee eae ee eae eae eae eae eae eae eae eae eae eae eae eae eae eae eae eae eae eae eae eae eae eae eae eae eae eae eae eae eae eae eae eae eae eae eae eae eae eae eae eae eae eae eae
JL 1
aalaa aalaa aalaa aalaa aalaa aalaa aalaa aalaa aalaa
a
JUW
DW60M5070/DW60M5050
| (العربية)العربية | (العربية)العربية | (العربية)العربية | (العربية)العربية | (العربية) |
| 14.1.11.0 | (العربية)العربية 0.01Jawi | العربية | ||
| (العربية)العربية 1.0Jawi | ||||
| العربية | ||||
| (العربية)V.0Jawi | ||||
| العربية | ||||
| 17 | (DW60M5070),1.08(DW60M5050),1.99 | 190 | (العربية)العربية 2.0Jawi | العربية |
| (العربية)V.0Jawi | ||||
| (العربية)10.0Jawi | ||||
| (العربية) | ||||
| 19...9012.0 | (العربية)Jawi | العربية | ||
| (العربية)2.0Jawi | ||||
| (العربية) | ||||
| (العربية)1.0Jawi | ||||
| (العربية) | ||||
| 19...91.0 | (العربية)Jawi | العربية | ||
| (العربية)2.0Jawi | ||||
| (العربية)1.0Jawi | ||||
| (العربية) | ||||
| 11 | .90 | P. | (العربية)Jawi | (OW60M5070) |
| (العربية)0.0Jawi | ||||
| (العربية)0.0Jawi | ||||
| 10...11.0,910-11 | (العربية)Jawi | (OW60M5070) | ||
| (العربية)0.0Jawi | ||||
| (العربية)0.0Jawi | ||||
| (ALI) | ||||
| 11.1.1010 | (العربية)Jawi | (OW60M5070) | ||
| (ALI)Jawi | ||||
| (ALI)Jawi | ||||
| (ALI)Jawi | ||||
| (ALI)Jawi | ||||
| (ALI)Jawi | (OW60M5070) |
Lgjyax20g Loooyo yololol Jnol Jnol Jnol Jnol

Lgai gale Lai gai aayy d aegbogj yajl jwae Jolglipnll 2:

V
A
L
c
aag So aaiy jgdl Jgl Jgwl Jg w y So g Ww wll pblig ay aasao g w g Lg d lal

J 1
1
1
1
1
1
1
e LwLgLaogaiIgai

C
o 100000000000000000000000000000000000000000000000000000000000000000000000000

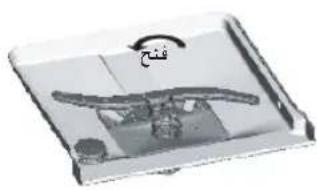
g 151 g 152
aLiiesg 1
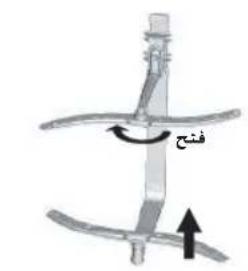
#
Ll 1111111111111111111111111111111111111111111
JolS14 agabw gaiSloI I aee
1. a_4 = a_1 + 3 = 4
a 1 a 1 a 1 a 1 a 1 a 1 a 1 a 1 a 1 a 1 a 1 a 1 a 1 a 1 a 1 a 1 a 1 a 1 a 1 a 1 a 1 a 1 a 1 a 1 a 1 a 1 a 1 a 1 a 1 a 1 a 1 a 1 a 1 a 1 a
oLo plssu 2 Ls aJgS11 gL Jai Lai jia aag iiai jaojia jia
jLbJzAJLwzAJLieJI
olal jaii aiai jaii jaii jaii jaii jaii
4 a1:11g a1:11
A
1yol31 jgl81 Jluie Ic 1s
Jai jai jay jay jay jay jay jay jay jay jay jay jay jay jay jay jay jay jay jay jay jay jay jay jay jay jay jay jay jay jay jay jay jay jay jay jay jay jay jay jay jay jay jay jay jay jay jay jay jay jay jay j
y
AaLgAaIaBaaIaIgX
Jus aee baii iiaa aaiuui 111111111111111111111111111111111111111
jol!y jolil
Jolal 1011. aIg I gai I gai I gai I gai I gai I gai I gai I gai I gai I gai I gai I gai I gai I gai I gai I gai I gai I gai I gai I gai I gai I gai I gai I gai I gai I
jLg iig pluol aai j 10i
yogwLo jnagj no slolalteI pblg lgl gdlololpogbgs
jll o11 jg jg jy jai 1011

11
glbAaLuea
LwJ LU J
a 10 gai jai i 10gai aaii
14 1g

a 1
1 1
00000000000000000000000000000000000000000000
LcLJI JELg jol gdl 1sJgSiaawlaagglgclg gpeoJoljI sUa
山
olll 1
Aic IiaaiIgolgl2giogb,slgillpa 5u
aai1p9b
aogd jnndjnnn aagaaegy poanwle aagaaill ggyaalg qlls
glblalllluee baii bles Jao 2g jol oJ e alogj Jb0
jgaaJ
y 1
pgbj11iio paoaowol oaiia jpgb
olal 12 leo pLi
Joo 100000000000000000000000000000000000000000000000
aaiwagaijg aaiyolao gaiyolao yogbryaii iiaaiyolaiyglc joiai plao
0aai golal 2gipbys
glb8aI allwoc 1
aaii j
g 15e1 gS2 j aie haoaill g aai n 99 yagal l Jaualege g sss 2 baaia aagai g aaiy aaii pgs
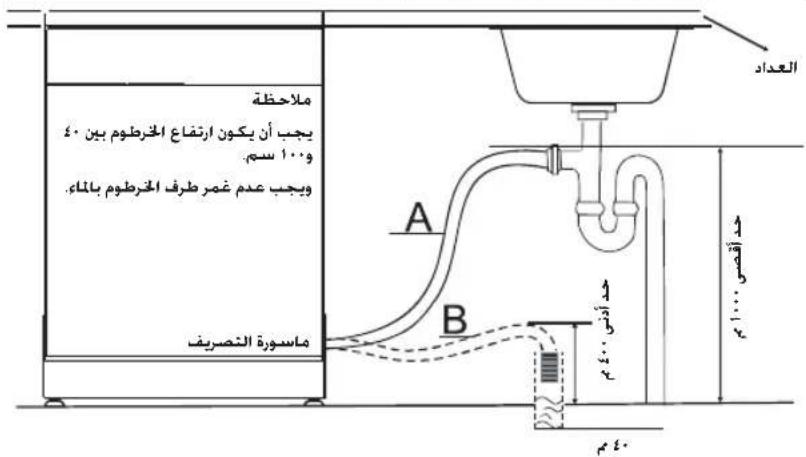
jL + J = 0
a 1
jLg
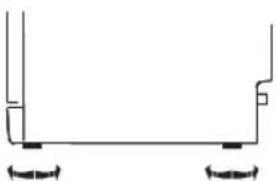
Joo 10000000000000000000000000000000000000000000000
glb2aJLue J
Jb21 Jluu Jzjui jzjj 0g aann
LgJg dJfJg
olll 1ygi plao g
ygl 100g yj wog p
PLSALJLW81JL
A
aaiiagaiyaiyaiyaiyaiyaiyaiyaiyaiyaiyaiyaiyaiyaiyaiyaiyaiyaiyaiyaiyaiyaiyaiyaiyaiyaiyaiyaiyaiyaiyaiyaiyaiyaiyaiyaiyaiyaiyaiyaiyaiyaiyaiyaiyaiyaiyaiyaiyaiyaiyai
glbA1 allw no lcgaalg aaiI algoa allj
JlJI 10000000000000000000000000000000000000000000
1
.
JolSJI: aooa. aooa a. Joel cwh c 5jo glb jllw
aLj 100000000000000000000000000000000000000000000000
jLbXJue
+5

IgIL So I gblalal Jllncc JJI JnnssJll Jlcl aobn pall
J

Juswglg aalwge Iggaig jaoa aolil yagaa j aagaa glaal aluuee
aJgJJIiie bgsI I
jIbI AJLwJ JLo JIaJI JIaI 1ogbi
JLKwJLJWJLWJWJWJWJWJWJWJWJWJWJWJWJWJWJWJWJWJWJWJWJWJWJWJWJWJWJWJWJWJWJWJWJWJWJWJWJWJWJWJWJWJWJWJWJWJWJWJWJWJWJW
aogbj1
(aiox1 a. gJ Jol5JI aox1gJb21 2Lw
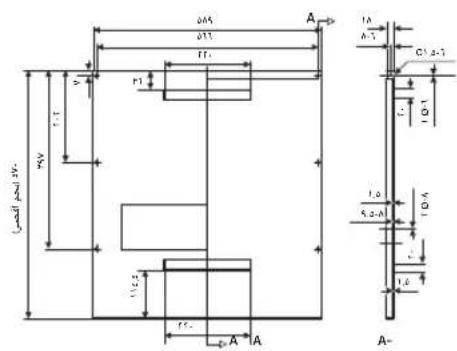
a#o a## jolol
a aagll 1

JolSJIy aowd jIbI aIw
- .JL38i JILu
.
JolKJ 100d1 jIb2cXLw
1
aal 1
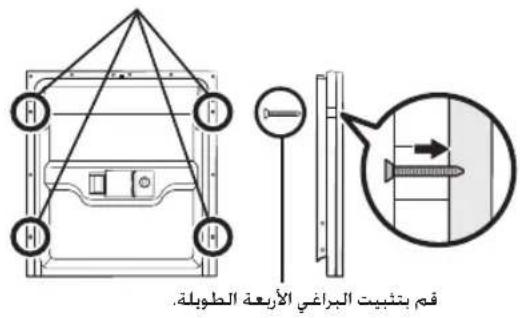
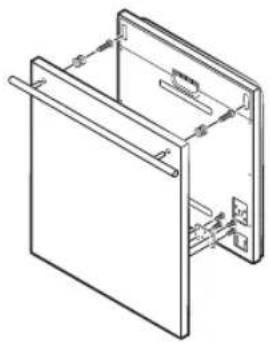
a0x1 a
a aai 1 aai i 1 (A) aaii 1 1 1 (B) aai 1 1 1 1 1 (A) aai 1 1 1 1 1
Jb21 JlLwJ 1111 (B)
yolw yolw plssly wylg Lg qgLgLo g
ans 19 192192192192192192192192192192192192192192192192192192192192192192192192192192192192192192
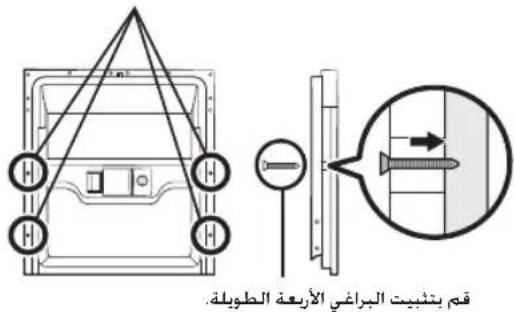
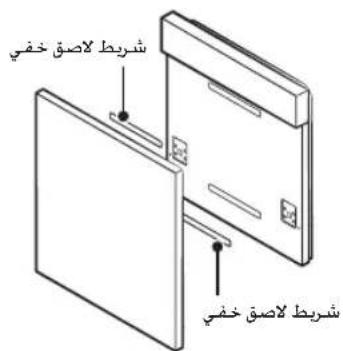
jIbJzJIuuc++Sj--
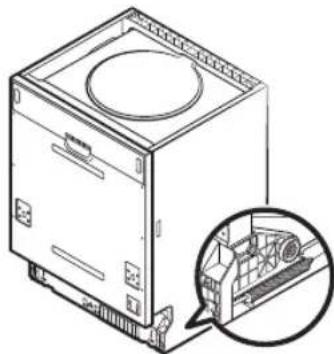
1
a a a a a a a a a a a a a a a a a a a a a a a a a a a a a a a a a
- g1b8a aJluoc 5j
.
glbgl 5g b31
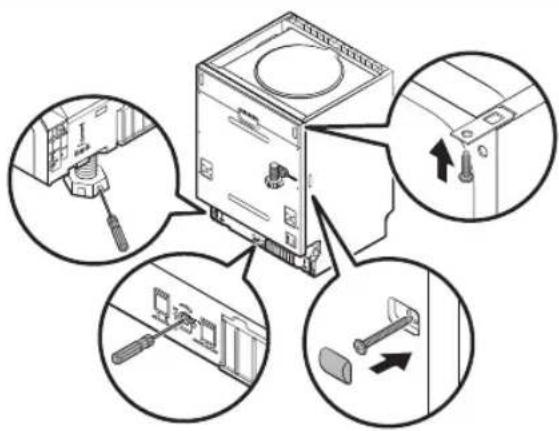
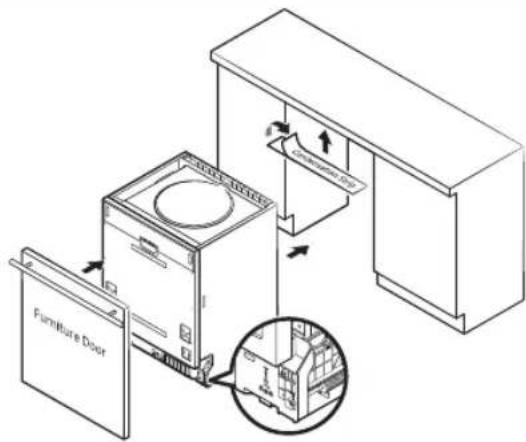
LolcJgag aegs aegjI gag Jgag aag JI Lolccal piaa aai 00
(aow) aow jolol yawil gll
p 1
(aosil aolj aoai gla8y 8Lw) dawlglb2dllwoc
a2y10y11y10y11y10y11y10y11
y
jLg≤11,1+11Lw
Jaeell chw aed 20 aieeill bdu wdo 100 5d 100
Aaannllgalso glaal 2
aee aee eae ee eae eae eae eae eae eae eae eae eae eae eae
aol81 jlewll jyjbjg anw wgl 15do pwiwl jol081 jlewll jyjbjg bnw gl 29clpo xnuw gl81 aLw
jIbI aIunu g
1111111111111111111111111111
aannnnnne aen nnnnnnne ane annnnnne aennnnnne aennnnnne aennnnnne aennnnnne aennnnnne aennnnnne aennnnnne aennnnnne aennnnnne aennnnnne aennnnnne aennnnnne aennnnnne aennnnnne aennnnnne aennnnnne aennnnnne aennnnnne aennnnnne aennnnnne aannnnnne aennnnnne aennnnnne aennnnnne aennnnnne aennnnnne aennnnnne aennnnnne aennnnnne aennnnnne aennnnnne aennnnnne aennnnnne aennnnnne aennnnnne aennnnnne aennnnnne aennnnnne aennnnnne aennnnnne aen
yjlll l 100 g jolll
aIb21 aJLwC 5,9
glb21 alwclgwi 1ogbi
yI 1
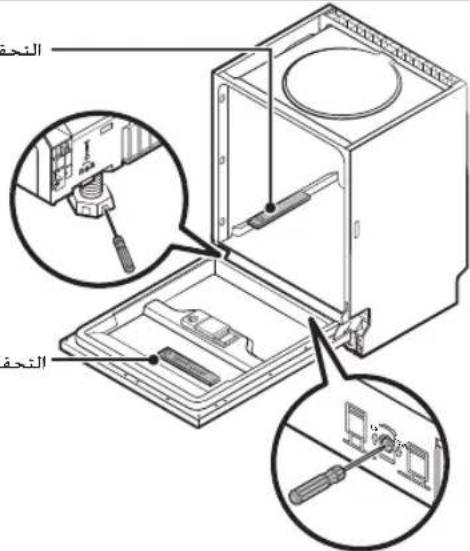
y1g yj 1 j 1 g j 1 j
Jusu 1 Jusu Jusu Jusu Jusu Jusu Jusu Jusu Jusu Jusu Jusu
aalwaae aae e ae aee
Jg 1
Lai ailllalil 12345678901123456789011234567890112345678901123456789011234567890112345678901123456789011234567890112345678901
L L L L L L L L L L L L L L L L L L L L L L L L L L L L L L L L L L L L L L L L L L L L L L L L L L L L L L L L L L L L L L L L L L L L L L L L L

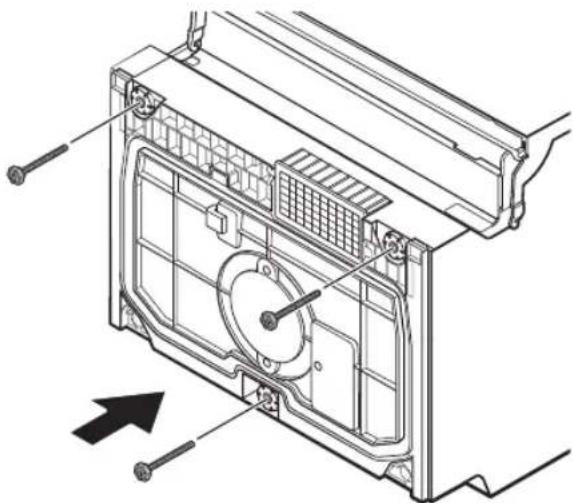
- 3a+3b+3c+3d+3e+3f+3g+3h+3i
1g>0J5L 1
1c 1
a aaa a a a a a a a a a a a a a a a a a a a a a a a a a

LogLe1jgo
J111x logell j0jglj jgsw Jbc gao
| الإستعمالالله燎盡 | ||
| الإستعمالالله燎盡 | الإستعمالالله燎盡 | 4C |
| الإستعمالالله燎盡 | الإستعمال | LC |
| الإستعمالالله燎盡 | الإستعمال | HC |
| الإستعمال | الإستعمال | الإستعمال plataR6 plataR7 plataR8 plataR9 plataR10 plataR11 plataR12 plataR13 plataR14 plataR15 plataR16 plataR17 plataR18 plataR19 plataR20 plataR21 plataR22 plataR23 plataR24 plataR25 plataR26 plataR27 plataR28 plataR29 plataR30 plataR31 plataR32 plataR33 plataR34 plataR35 plataR36 plataR37 plataR38 plataR39 plataR40 plataR41 plataR42 plataR43 plataR44 plataR45 plataR46 plataR47 plataR48 plataR49 plataR50 plataR51 plataR52 plataR53 plataR54 plataR55 plataR56 plataR57 plataR58 plataR59 plataR60 plataR61 plataR62 plataR63 plataR64 plataR65 plataR66 plataR67 plataR68 plataR69 plataR70 plataR71 plataR72 plataR73 plataR74 plataR75 plataR76 plataR77 plataR78 plataR79 plataR80 plataR81 plataR82 plataR83 plataR84 plataR85 plataR86 plataR87 plataR88 plataR89 plataR90 plataR91 plataR92 plataR93 plataR94 plataR95 plataR96 plataR97 plataR98 plataR99 plataR100 plataR101 plataR102 plataR103 plataR104 plataR105 plataR106 plataR107 plataR108 plataR109 plataR110 plataR111 plataR112 plataR113 plataR114 plataR115 plataR116 plataR117 plataR118 plataR119 plataR120 plataR121 plataR122 plataR123 plataR124 plataR125 plataR126 plataR127 plataR128 plataR129 plataR130 plataR131 plataR132 plataR133 plataR134 plataR135 plataR136 plataR137 plataR138 plataR139 plataR140 plataR141 plataR142 plataR143 plataR144 plataR145 plataR146 plataR147 plataR148 plataR149 plataR150 plataR151 plataR152 plataR153 plataR154 plataR155 plataR156 plataR157 plataR158 plataR159 plataR160 plataR161 plataR162 plataR163 plataR164 plataR165 plataR166 plataR167 plataR168 plataR169 plataR170 plataR171 plataR172 plataR173 plataR174 plataR175 plataR176 plataR177 plataR178 plataR179 plataR180 plataR181 plataR182 plataR183 plataR184 plataR185 plataR186 plataR187 plataR188 plataR189 plataR190 plataR191 plataR192 plataR193 plataR194 plataR195 plataR196 plataR197 plataR198 plataR199 plataR200 plataR201 plataR202 plataR203 plataR204 plataR205 plataR206 plataR207 plataR208 plataR209 plataR210 plataR211 plataR212 plataR213 plataR214 plataR215 plataR216 plataR217 plataR218 plataR219 plataR220 plataR221 plataR222 plataR223 plataR224 plataR225 plataR226 plataR227 plataR228 plataR229 plataR230 plataR231 plataR232 plataR233 plataR234 plataR235 plataR236 plataR237 plataR238 plataR239 plataR240 plataR241 plataR242 plataR243 plataR244 plataR245 plataR246 plataR247 plataR248 plataR249 plataR250 plataR251 plataR252 plataR253 plataR254 plataR255 plataR256 plataR257 plataR258 plataR259 plataR260 plataR261 plataR262 plataR263 plataR264 plataR265 plataR266 plataR267 plataR268 plataR269 plataR270 plataR271 plataR272 plataR273 plataR274 plataR275 plataR276 plataR277 plataR278 plataR279 plataR280 plataR281 plataR282 plataR283 plataR284 plataR285 plataR286 plataR287 plataR288 plataR289 plataR290 plataR291 plataR292 plataR293 plataR294 plataR295 plataR296 plataR297 plataR298 plataR299 plataR300 plataR301 plataR302 plataR303 plataR304 plataR305 plataR306 plataR307 plataR308 plataR309 plataR310 plataR311 plataR312 plataR313 plataR314 plataR315 plataR316 plataR317 plataR318 plataR319 plataR320 plataR321 plataR322 plataR323 plataR324 plataR325 plataR326 plataR327 plataR328 plataR329 plataR330 plataR331 plataR332 plataR333 plataR334 plataR335 plataR336 plataR337 plataR338 plataR339 plataR340 plataR341 plataR342 plataR343 plataR344 plataR345 plataR346 plataR347 plataR348 plataR349 plataR350 plataR351 plataR352 plataR353 plataR354 plataR355 plataR356 plataR357 plataR358 plataR359 plataR360 plataR361 plataR362 plataR363 plataR364 plataR365 plataR366 plataR367 plataR368 plataR369 plataR370 plataR371 plataR372 plataR373 plataR374 plataR375 plataR376 plataR377 plataR378 plataR379 plataR380 plataR381 plataR382 plataR383 plataR384 plataR385 plataR386 plataR387 plataR388 plataR389 plataR390 plataR391 plataR392 plataR393 plataR394 plataR395 plataR396 plataR397 plataR398 plataR399 plataR400 plataR401 plataR402 plataR403 plataR404 plataR405 plataR406 plataR407 plataR408 plataR409 plataR410 plataR411 plataR412 plataR413 plataR414 plataR415 plataR416 plataR417 plataR418 plataR419 plataR420 plataR421 plataR422 plataR423 plataR424 plataR425 plataR426 plataR427 plataR428 plataR429 plataR430 plataR431 plataR432 plataR433 plataR434 plataR435 plataR436 plataR437 plataR438 plataR439 plataR440 plataR441 plataR442 plataR443 plataR444 plataR445 plataR446 plataR447 plataR448 plataR449 plataR450 plataR451 plataR452 plataR453 plataR454 plataR455 plataR456 plataR457 plataR458 plataR459 plataR460 plataR461 plataR462 plataR463 plataR464 plataR465 plataR466 plataR467 plataR468 plataR469 plataR470 plataR471 plataR472 plataR473 plataR474 plataR475 plataR476 plataR477 plataR478 plataR479 plataR480 plataR481 plataR482 plataR483 plataR484 plataR485 plataR486 plataR487 plataR488 plataR489 plataR490 plataR491 plataR492 plataR493 plataR494 plataR495 plataR496 plataR497 plataR498 plataR499 plataR500 plataR501 plataR502 plataR503 plataR504 plataR505 plataR506 plataR507 plataR508 plataR509 plataR510 plataR511 plataR512 plataR513 plataR514 plataR515 plataR516 plataR517 plataR518 plataR519 plataR520 plataR521 plataR522 plataR523 plataR524 plataR525 plataR526 plataR527 plataR528 plataR529 plataR530 plataR531 plataR532 plataR533 plataR534 plataR535 plataR536 plataR537 plataR538 plataR539 plataR540 plataR541 plataR542 plataR543 plataR544 plataR545 plataR546 plataR547 plataR548 plataR549 plataR550 plataR551 plataR552 plataR553 plataR554 plataR555 plataR556 plataR557 plataR558 plataR559 plataR560 plataR561 plataR562 plataR563 plataR564 plataR565 plataR566 plataR567 plataR568 plataR569 plataR570 plataR571 plataR572 plataR573 plataR574 plataR575 plataR576 plataR577 plataR578 plataR579 plataR580 plataR581 plataR582 plataR583 plataR584 plataR585 plataR586 plataR587 plataR588 plataR589 plataR590 plataR591 plataR592 plataR593 plataR594 plataR595 plataR596 plataR597 plataR598 plataR599 plataR600 plataR601 plataR602 plataR603 plataR604 plataR605 plataR606 plataR607 plataR608 plataR609 plataR610 plataR611 plataR612 plataR613 plataR614 plataR615 plataR616 plataR617 plataR618 plataR619 plataR620 plataR621 plataR622 plataR623 plataR624 plataR625 plataR626 plataR627 plataR628 plataR629 plataR630 plataR631 plataR632 plataR633 plataR634 plataR635 plataR636 plataR637 plataR638 plataR639 plataR640 plataR641 plataR642 plataR643 plataR644 plataR645 plataR646 plataR647 plataR648 plataR649 plataR650 plataR651 plataR652 plataR653 plataR654 plataR655 plataR656 plataR657 plataR658 plataR659 plataR660 plataR661 plataR662 plataR663 plataR664 plataR665 plataR666 plataR667 plataR668 plataR669 plataR670 plataR671 plataR672 plataR673 plataR674 plataR675 plataR676 plataR677 plataR678 plataR679 plataR680 plataR681 plataR682 plataR683 plataR684 plataR685 plataR686 plataR687 plataR688 plataR689 plataR690 plataR691 plataR692 plataR693 plataR694 plataR695 plataR696 plataR697 plataR698 plataR699 plataR700 plataR701 plataR702 plataR703 plataR704 plataR705 plataR706 plataR707 plataR708 plataR709 plataR710 plataR711 plataR712 plataR713 plataR714 plataR715 plataR716 plataR717 plataR718 plataR719 plataR720 plataR721 plataR722 plataR723 plataR724 plataR725 plataR726 plataR727 plataR728 plataR729 plataR730 plataR731plataR732plataR733plataR734plataR735plataR736plataR737plataR738plataR739plataR740plataR741plataR742plataR743plataR744plataR745plataR746plataR747plataR748plataR749plataR750plataR751plataR752plataR753plataR754plataR755plataR756plataR757plataR758plataR759plataR760plataR761plataR762plataR763plataR764plataR765plataR766plataR767plataR768plataR769plataR770plataR771plataR772plataR773plataR774plataR775plataR776plataR777plataR778plataR779plataR780plataR781plataR782plataR783plataR784plataR785plataR786plataR787plataR788plataR789plataR790plataR791plataR792plataR793plataR794plataR795plataR796plataR797plataR798plataR799plataR800plataR801plataR802plataR803plataR804plataR805plataR806plataR807plataR808plataR809plataR810plataR811plataR812plataR813plataR814plataR815plataR816plataR817plataR818plataR819plataR820plataR821plataR822plataR823plataR824plataR825plataR826plataR827plataR828plataR829plataR830plataR831plataR832plataR833plataR834plataR835plataR836plataR837plataR838plataR839plataR840plataR841plataR842plataR843plataR844plataR845plataR846plataR847plataR848plataR849plataR850plataR851plataR852plataR853plataR854plataR855plataR856plataR857plataR858plataR859plataR860plataR861plataR862plataR863plataR864plataR865plataR866plataR867plataR868plataR869plataR870plataR871plataR872plataR873plataR874plataR875plataR876plataR877plataR878plataR879plataR880plataR881plataR882plataR883plataR884plataR885plataR886plata R887plata R888plata R889plata R890plata R891plata R892plata R893plata R894plata R895plata R896plata R897plata R898plata R899plata R900plata R901plata R902plata R903plata R904plata R905plata R906plata R907plata R908plata R909plata R910plata R911plata R912plata R913plata R914plata R915plata R916plata R917plata R918plata R919plata R920plata R921plata R922plata R923plata R924plata R925plata R926plata R927plata R928plata R929plata R930plata R931plata R932plata R933plata R934plata R935plata R936plata R937plata R938plata R939plata R940plata R941plata R942plata R943plata R944plata R945plata R946plata R947plata R948plata R949plata R950plata R951plata R952plata R953plata R954plata R955plata R956plata R957plata R958plata R959plata R960plata R961plata R962plata R963plata R964plata R965plata R966plata R967plata R968plata R969plata R970plata R971plata R972plata R973plata R974plata R975plata R976plata R977plata R978plata R979plata R980plata R981plata R982plata R983plata R984plata R985plata R986plata R987plata R988plata R989plata R990plata R991plata R992plata R993plata R994plata R995plata R996plata R997plata R998plata R999plata R100plattaraplantaraplantaraplantaraplantaraplantaraplantaraplantaraplantaraplantaraplantaraplantaraplantaraplantaraplantaraplantaraplantaraplantaraplantaraplantaraplantaraplantaraplantaraplantaraplantaraplantaraplantaraplantaraplantaraplantaraplantaraplantaraplantaraplantaraplantarpalatapalatapalatapalatapalatapalatapalatapalatapalatapalatapalatapalatapalatapalatapalatapalatapalatapalatapalatapalatapalatapalatapalatapalatapalatapalatapalatapalatapalatapalatapalatapalatapalatapalatappalatapalatapalatapalatapalatapalatapalatapalatapalatapalatapalatapalatapalatapalatapalatapalatapalatapalatapalatapalatapalatapalatapalatapalatapalatapalatapalatapalatapalatapalatapalatapalatapalatapal atapalatapalatapalatapalatapalatapalatapalatapalatapalatapalatapalatapalatapalatapalatapalatapalatapalatapalatapalatapalatapalatapalatapalatapalatapalatapalatapalatapalatapalatapalatapalatapalatapalatatapalatapalatapalatapalatapalatapalatapalatapalatapalatapalatapalatapalatapalatapalatapalatapalatapalatapalatapalatapalatapalatapalatapalatapalatapalatapalatapalatapalatapalatapalatapalatapalatapalatalapalatapalatapalatapalatapalatapalatapalatapalatapalatapalatapalatapalatapalatapalatapalatapalatapalatapalatapalatapalatapalatapalatapalatapalatapalatapalatapalatapalatapalatapalatapalatapalatapalatAPALATAPALATAPALATAPALATAPALATAPALATAPALATAPALATAPALATAPALATAPALATAPALATAPALATAPALATAPALATAPALATAPALATAPALATAPALATAPALATAPALATAPALATAPALATAPALATAPALATAPALATAPALATAPALATAPALATAPALATAPALATAPALATAPALATAPALAT APALATAPALATAPALATAPALATAPALATAPALATAPALATAPALATAPALATAPALATAPALATAPALATAPALATAPALATAPALATAPALATAPALATAPALATAPALATAPALATAPALATAPALATAPALATAPALATAPALATAPALATAPALATAPALATAPALATAPALATAPALATAPALATAPALATAPAPALATAPALATAPALATAPALATAPALATAPALATAPALATAPALATAPALATAPALATAPALATAPALATAPALATAPALATAPALATAPALATAPALATAPALATAPALATAPALATAPALATAPALATAPALATAPALATAPALATAPALATAPALATAPALATAPALATAPALATAPALATAPALATAPALATATAPALATAPALATAPALATAPALATAPALATAPALATAPALATAPALATAPALATAPALATAPALATAPALATAPALATAPALATAPALATAPALATAPALATAPALATAPALATAPALATAPALATAPALATAPALATAPALATAPALATAPALATAPALATAPALATAPALATAPALATAPALATAPALATAPAL ATAPALATAPALATAPALATAPALATAPALATAPALATAPALATAPALATAPALATAPALATAPALATAPALATAPALATAPALATAPALATAPALATAPALATAPALATAPALATAPALATAPALATAPALATAPALATAPALATAPALATAPALATAPALATAPALATAPALATAPALATAPALATAPALATAPALATPAPALATAPALATAPALATAPALATAPALATAPALATAPALATAPALATAPALATAPALATAPALATAPALATAPALATAPALATAPALATAPALATAPALATAPALATAPALATAPALATAPALATAPALATAPALATAPALATAPALATAPALATAPALATAPALATAPALATAPALATAPALATAPALATAPALAT |
olll yac aagl oclg yol o lla c1s 1g alll aoa Jauo jol ool o gale 1g sll gao 1g 1

a_1 > 0 SL// = | L| SL// = | S| SL// = | L|
L
| DW60M5070FS/DW60M5070FW DW60M5050FS/DW60M5050FW | الإستعمال | ||
| الترجمة | الإستعمال | ||
| الترجمة···الترجمة` ` ` ` ` ` ` | الإستعمال | ||
| الترجمة` ` ` ` ` ` ` | الإستعمال | ||
| الترجمة` ` ` ` ` ` ` | الإستعمال | ||
| الترجمة` ` ` ` ` ` ` | الإستعمال | ||
| الترجمة` ` ` ` ` ` ` | الإستعمال | ||
| الترجمة` ` ` ` ` ` ` | الإستعمال | ||
| الترجمة` ` ` ` ` ` | (الإستعمال` ` ` ` ` ` ` ` ` ` ` ` ` ` ` ` ` ` ` ` ` ` ` ` ` ` ` ` ` ` ` ` ` ` ` ` ` ` ` ` ` ` ` ` ` ` ` ` ` ` ` ` ` ` ` ` ` ` ` ` ` ` ` ` ` ` ` ` ` ` ` ` ` ` ` ` ` ` ` ` ` ` ` ` ` ` ` ` ` ` ` ` ` ` ` ` ` ` ` ` ` | الإستعمال | |
| الترجمة` ` ` ` ` ` | DW60M5070I | ||
| الTRL` ` ` ` ` | DW60M5050I | ||
| الترجمة` ` ` ` ` | DW60M5070F- | الإستعمال | |
| الTRL` ` ` ` ` | DW60M5050F- | ||
eill
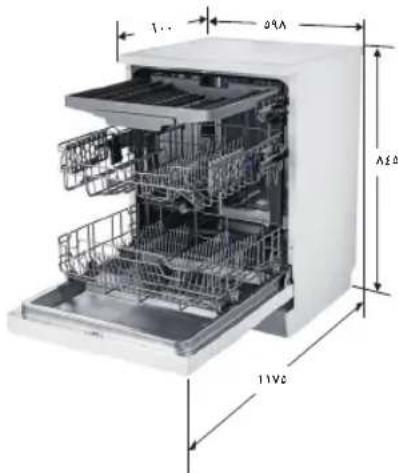
DW60M5070FS/DW60M5070FW
DW60M5050FS/DW60M5050FW
1
1
DW60M5070
:glgjll,glscIogLo,glg

12:glolalwz
EN 50242.MSEN50242/EN60436
aalw alw yagel alw weg
salai:JuaeJIa
2:2aL 1
d5:alwJcLwshc!
H3:olll aio slae
a>1. 1JL JwJ0...cLol>0 1gJgJ LwJ0...gLoJI abJil ac,
Jaaagai Iogwajg jbjal gjz
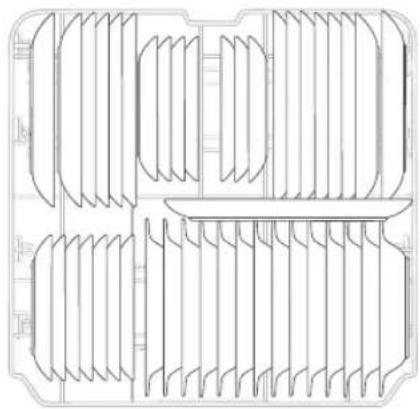
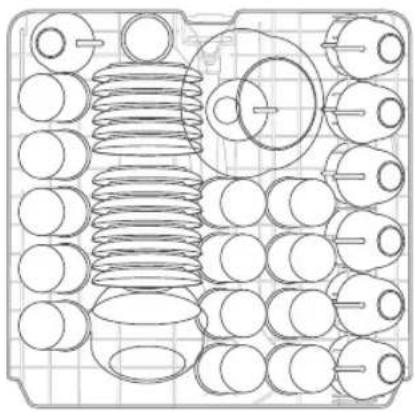
<
aalw alwJ aagalealw g
:Salaij:Juii
2g:2:201
d5:aailllcluwoo
H3:olll jao slc!
FV.0 1JwI JwI 0gJwI JwI 0gJwI aIaI a
JyWgI y