ASS18 - Saw Westfalia - Free user manual and instructions
Find the device manual for free ASS18 Westfalia in PDF.
| Product Type | Cordless Circular Saw |
| Brand | Westfalia |
| Model | ASS18 |
| Power Supply | 18V lithium-ion battery (not included) |
| Dimensions (L x W x H) | Approx. 300 x 200 x 250 mm |
| Weight | Approx. 3 kg |
| Blade Diameter | 165 mm (estimated) |
| Max Cutting Depth | Approx. 50 mm |
| No-load Speed | Approx. 4000 rpm |
| Main Functions | Precise cutting, depth adjustment, spindle lock |
| Safety | Anti-kickback protection, safety switch, blade brake |
| Maintenance & Cleaning | Clean ventilation slots regularly, check blade before use |
| Spare Parts & Repairability | Replacement blades and batteries available; repair by specialist |
| General Information | Use up to 2000 m altitude; storage temperature 20°C |
| Included Accessories | Charger, cutting guide, hex key (estimated) |
Frequently Asked Questions - ASS18 Westfalia
User questions about ASS18 Westfalia
0 question about this device. Answer the ones you know or ask your own.
Ask a new question about this device
Download the instructions for your Saw in PDF format for free! Find your manual ASS18 - Westfalia and take your electronic device back in hand. On this page are published all the documents necessary for the use of your device. ASS18 by Westfalia.
USER MANUAL ASS18 Westfalia
Original Instructions
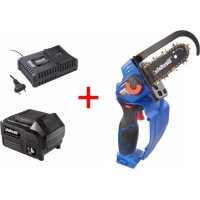
18 V Li-Ion Jig Saw ASS18
Article No. 92 35 89


Instruction manuals provide valuable hints for using your new device. They enable you to use all functions, and they help you avoid misunderstandings and prevent damage.
Please take the time to read this manual carefully and keep it for future reference.


Safety Notes.. Page 16
Before first Use. Page 20
Setting up the Battery Charger.. Page 20
Charging the Battery . 20
Battery Charge Level.. Page 21
Notes about Battery Charging . Page 21
Inserting and Removing the Battery Pack.. Page 22
Inserting the Saw Blade.. Page 22
Turning ON/OFF. Page 22
Adjusting the Pendulum Stroke Page 22
Making Bevel Cuts . Page 23
Dust Extraction.. Page 23
Dust Collection/Blowing Function Lever.. Page 24
Parallel Guide. Page 24
Battery Disposal. Page 24
Maintenance, Cleaning and Storing.. Page 24
Saw Blade Types . 26
Technical Data . Page 27

Please note the included General Safety Notes and the following safety notes to avoid malfunctions, damage or physical injury:
- Please read this manual carefully and use the unit only according to this manual.

-
Dispose of used packaging material carefully or store it out of the reach of children. There is a danger of suffocation!
-
Persons with limited physical, sensorial or mental abilities are not allowed to use the machine, unless they are supervised and briefed for their safety by a qualified person.
-
The unit is not a toy and does not belong in the hands of children. Never leave the unit unsupervised when in use. Keep it out of reach of children or persons in need of supervision. Children should be supervised to ensure that they do not play with the unit.
-
Do not cut or saw where there may be hidden electricity, gas or water utility services.
-
Only use saw blades that are suitable for this model. Do not cut with blunt, damaged or bent saw blades. Make sure the saw blade is firmly tightened before switching on the unit.
-
Do not attempt to cut workpieces so small that they cannot be securely fastened. Do not support the workpiece with your hand or your foot. There is danger of kick-back! Do not reach over the front of the unit or place either hand in the vicinity of the saw blade, e.g. to remove lose splinters, swarf/shavings or jammed workpiece fragments.
-
Always remove the battery when not in use, before maintaining or changing the saw blade.
-
For your safety, please wear safety goggles, a dust mask and ear protection.


- Make sure there are no nails, screws or similar items in the work piece.
Safety Notes
- Periodically check all nuts, bolts and other fixings and tighten where necessary.
- Should the unit become damaged do not use it any further and have it repaired by a professional or contact our customer service. Do not disassemble the unit or try repairing it yourself.
- Do not let familiarity gained from frequent use of tools allow you to become complacent and ignore tool safety principles. A careless action can cause severe injury within a fraction of a second.
- Keep handles and grasping surfaces dry, clean and free from oil and grease. Slippery handles and grasping surfaces do not allow for safe handling and control of the tool in unexpected situations.
- Hold the power tool by insulated gripping surfaces when performing an operation where the cutting tool may contact hidden wiring. Contact with a "live" wire will also make exposed metal parts of the power tool "live" and give the operator an electric shock.
- Use clamps or another practical way to secure and support the workpiece to a stable platform. Holding the work by your hand or against the body leaves it unstable and may lead to loss of control.
Additional Battery and Charger Safety Notes
WARNING: Li-lon batteries, if incorrectly used, stored or charged are a fire, burn and explosion hazard.
Use the Battery Charger correctly
- Refer to the section of this manual relating to use of the battery charger before attempting to charge the battery.
- Do not attempt to use the charger with any batteries other than those supplied.
- Keep the battery charger clean; foreign objects and dirt can cause a short circuit and block the ventilation holes. Failure to follow these instructions may result in overheating or fire.
- Allow batteries to cool for 15 minutes after charging or heavy use. Failure to follow these instructions may cause overheating or fire.
- Use only chargers recommended by the manufacturer to charge the batteries. If a charger is suitable for a certain kind of battery there is a risk of fire. Only use Li-lon batteries provided with a product or specifically designed to be compatible.
- Use power tools only with specifically designated battery packs. Use of any other battery packs may create a risk of injury and fire.
- Do not use a battery pack or tool that is damaged or modified. Damaged or modified batteries may exhibit unpredictable behaviour resulting in fire, explosion or risk of injury.
- If the charger connection cable is damaged, it must be replaced by the manufacturer, an authorised service workshop or a specialist before use.
- The unit is designed for operation in altitudes of up to 2000 m above sea level.
- Keep the battery out of reach of children.
-
When not in use batteries should be stored at room temperature (approximately 20^ C).
-
Do not open, disassemble, crush, heat above 60^ C or incinerate. Do not dispose of in fire or similar.
- When battery pack is not in use, make sure the battery pack cannot be shorted accidentally. Keep the battery clean at all times. Keep it away from other metal objects, like paper clips, coins, keys, nails, screws or other small metal objects that can make a connection from one terminal to another. Shorting the battery terminals together may cause burns or a fire.
- If used incorrectly, liquid may leak from the battery. Avoid contact with it. In case of accidental contact, rinse with water. If the liquid gets into the eyes, seek additional medical attention. Leaking battery fluid may cause skin irritation or burns.
- Do not expose a battery pack or tool to fire or excessive temperature. Exposure to fire or temperature above 130^ may cause explosion.
- Follow all charging instructions and do not charge the battery pack or tool outside the temperature range specified in the instructions. Charging improperly or at temperatures outside the specified range may damage the battery and increase the risk of fire.
- Never service damaged battery packs. Service of battery packs should only be performed by the manufacturer or authorized service providers.

Batteries do not belong in the household garbage.
For battery disposal please check with your local council.

Before first Use
Unpack the saw and check the unit for any damage in transit. Dispose of packaging materials or store it out of reach of children. Plastic bags etc. may become a deadly toy for children.
Please note that that battery and charger are not included with the tool!
Setting up the Battery Charger - (Battery and Charger not included)
- If fitted, remove the battery from the battery charger.
- Insert the battery charger mains plug into a suitable mains socket.
Note: One LED on the charger will indicate ready status. For further information please refer to the included manual of the included charger.
WARNING: Only use this charger to charge compatible batteries that are specifically designed for this tool.
WARNING: The charger is designed for indoor use only, and must not be used in damp or wet conditions.
Charging the Battery
WARNING: Failure to follow the correct procedure when charging batteries will result in permanent damage.
Note: Normal charging time is 1 hour for a recently discharged battery. However, if the battery (1) has been left in a discharged state for some time, it may take up to 1.5 hours to charge.
- Slide a fully or partially discharged battery onto the battery charger.
- Once charging commences, the red LED will illuminate.
- When the battery is fully charged, the green LED will illuminate.
If the battery is defective the red LED flashes!
Note: Make sure the battery and battery charger are lined up correctly. If the battery does not slide onto the battery charger easily, do not force it. Instead, remove the battery, check the top of battery and the battery charger slot are clean and undamaged and that the contacts are not bent.
Battery Charge Level
The battery has a built-in charge indicator. Pressing on the button to the right will indicate the charge level. The right LED indicates a high charge level and the left a low charge level that will mean the battery pack will require charging soon.
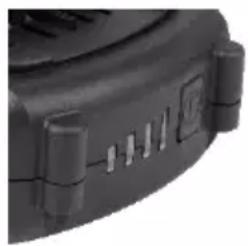
IMPORTANT: When a low charge level is indicated be aware the tool may stop operating while using the tool. In some instances this may be dangerous. It is recommended to always ensure the battery pack has a good charge level.
Notes about Battery Charging
- The battery should be charged at ambient temperatures between 10^ C and 40^ C (ideally around 20^ C).
- After charging, allow 15 minutes for the battery to cool before use.
- Ensure that the charger is disconnected from the mains supply after use, and is stored correctly.
- Do not leave batteries on charge for extended periods and never store batteries on charge.
- The battery charger monitors battery temperature and voltage while charging. Remove the battery once charging has been completed to maximise charge cycles of the battery and not waste power.
- Batteries can become faulty over time, individual cells in the battery can fail and the battery could short. The charger will not charge faulty batteries. Use another battery, if possible, to check correct functionality of the charger and purchase a replacement battery if a faulty battery is indicated.
- Do not store Lithium-lon battery packs in a discharged state long term. This can damage the Lithium-lon cells. For long-term storage, store batteries in a high charge state disconnected from the power tool.
- The capacity of batteries will reduce over time. After 100 charge cycles, the battery's operation time and the maximum torque performance of the tool will slightly reduce. This decline will continue until the battery has minimal capacity after 500 charge cycles. This is normal and not a fault with the battery pack.
Inserting and removing the Battery Pack
Warning: Before inserting or removing the battery pack, make sure the litre saw is switched off.
- Slide the battery pack into battery slot at the rear of the saw head. To insert the battery pack, align the battery pack with the battery base at the rear of the saw head and slide the battery pack into the saw so that the battery pack is locked in position.
- To remove the battery pack, press the battery's release button and pull the battery pack off at the same time.
Inserting a Saw Blade
- Before undertaking any work on the machine, disconnect it from the power mains.
- To insert the saw blade first fold the clear cap (12) up.
- Loosen the saw blade holder lock (11) by turning until the saw blade can be inserted into the holder all the way.
- Allow the saw blade lock to turn back and the saw blade is tight.
- After that fold the clear cap back down. The clear cap must always be used.
Please note: The saw blade will become very hot during cutting due to friction. Pay attention for that when removing the saw blade. Protect yourself with protective gloves if necessary.
Turning ON/OFF
- Press the ON/OFF switch (3).
The ON/OFF switch can be locked in position for continuous operation by pressing the locking button (2).
- Press ON/OFF switch (3) again to release the locking button (2). To switch off the saw, release the ON/OFF switch.
Adjusting the Pendulum Stroke
The pendulum is adjusted with the pendulum stroke adjusting lever (8). The pendulum gives the saw blade a horizontal pendulousness. At level 0 the saw blade does not execute any pendulum movement; the biggest pendulum movement is at level 3. When moving downwards, the saw blade is pushed backwards to ease the throw-off of the splints. Because
of this the cutting speed for longitudinal sections rises and less power is needed while sawing. Furthermore, the lifetime of a saw blade is increased.
For Cutting
Metal set the pendulum stroke to 0 or 1.
- Core board, plywood and plastics set the pendulum stroke to 1 or 2.
- Hard- and softwood and particle and flake boards set the pendulum stroke to 1, 2 or 3.
The harder the material to be cut is the smaller the pendulum stroke can be and the softer the material is the larger the pendulum stroke should be set.
Note: Because of the additional vertical movement, the cutting edges will be torn out more as if working without pendulum. The surface coatings of wood plate especially tend to fray because of their refractory structure when working with additional pendulum.
Making Bevel Cuts
You can make bevel cuts to 45^ with this saw if you angle the base plate.
- First, loosen the two internal hex screws (14) which can be seen in the central opening of the base plate by using the included hex key ((6).
- After loosening, push the base plate slightly back until the metal teeth in the housing disengages from the base plate.
- Now you can adjust the base plate to the angle desired.
- Fix it in that position by pushing forward and tightening the internal hex head screws.
Dust Extraction
Make sure the lever (4) for dust collection resp. dust blowing function in in the position for dust collection.
Dust collection
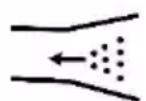
Dust blowing Function

The jig saw can be connected with a dust extractor or a vacuum cleaner via the included adaptor pipe. Insert the adapter into the saw.
Always use a dust removal, if possible, or at least a dust mask for your own safety.

Dust Collection/Blowing Function Lever
To keep the cutting line clear of chips, place the suction/blowing function lever (4) in the direction of "blowing". The airflow keeps the cutting line clean.
Parallel Guide
Use the parallel guide (15) delivered for a cutting guide parallel to a wood edge.
- To install the parallel bar, slide it through the mounting latches (10) in the base plate. With the centimetre scale on the guide bar you can precisely set the distance between the edge and the saw blade.
- With the screws in the base plate the guide bar can now be secured.
Battery Disposal
- Run motor until the battery is completely discharged.
- Remove the battery from the tool.
- Wrap heavy insulating tape around the battery terminals or enclose in a sealable plastic bag to prevent possible shorting.
- Dispose of the battery through your local waste removal authority. Physically damaged batteries may not be shipped.
Maintenance, Cleaning and Storing
- Remove the battery before undertaking any cleaning or maintenance work.
- Do not use aggressive chemicals which may dissolve plastic parts, or abrasives.
- The battery can be recharged up to 500 times if treated carefully. However, over time the battery's performance can deteriorate. If necessary you can purchase a 4.0 Ah replacement battery under the
Operation
article number 87 84 75 from Westfalia.
- After every use clean the unit of wood dusts with a hand brush or a cloth. You must particularly clean regularly the air exhaust of the engine. The engine can overheat if the exhausts are closed.
- Maintenance and repair work can only be done by a qualified technician. You can also contact the Westfalia Service.
- Always store the unit in a dry place that is protected from dust and dirt.
Operation
Saw Blade Types
Use for rough and fast cuts in wood, chipboard etc., PVC
Use for rough and intermediate speed cuts in wood, chipboard etc., PVC, glass fiber, non-ferrous sheet-metals, aluminium
Use for clean and even cuts in wood, chipboard etc., PVC, glass-fibre, nonferrous metals, sheet-metal, aluminium
Use for cuts in Non-ferrous metals, steel, sheet-steel, aluminium
Use for clean curved cuts in wood, chipboard etc.


Pendulum Stroke Jig Saw
Stroke Rate
0-3000 min-1
Cutting Rate
Wood
80 mm
Steel
6 mm
In Plastics
12 mm
Weight
1620 g
A-Weighted Noise Levels
Sound Pressure Level L_pA^*
85.9 dB(A) K = 5 dB(A)
- The declared vibration total value and the declared noise emission values have been measured in accordance with a standard test method and may be used for comparing one tool with another. The declared vibration total value may also be used in a preliminary assessment of exposure.
The vibration emission and noise emission during actual use of the power tool can differ from the declared total value depending on the ways in which the tool is used. and, the need to identify safety measures to protect the operator that
Technical Data
are based on an estimation of exposure in the actual conditions of use (taking account of all parts of the operating cycle such as the times when the tool is switched off and when it is running idle in addition to the trigger time).
Try to minimize the impact of vibration and noise. Exemplary measures to reduce vibration exposure include wearing gloves while using the tool, limiting working time, and using accessories in good condition.

declare by our own responsibility that the product
18 V Li-Ion Stichsäge ASS18
18 V Li-Ion Jig Saw ASS18
Article1 923589
Article No. 92 35 89
is according to the basic requirements, which are defined in the European Directives and their amendments.
2011/65/EU Restriction of the Use of certain hazardous Substances in electrical and electronic Equipment (RoHS)
2006/42/EC Machinery
EN 62841-1:2015+AC, EN 62841-2-11:2016
The technical documentations are on file at the QA department of the Westfalia Werkzeug-company.
Hagen, 20^th of August, 2019
Shamun J.clingbeil
Please help avoid waste materials.
If you at some point intend to dispose of this article, then please keep in mind that many of its components consist of valuable materials, which can be recycled.
Please do not discharge it in the rubbish bin, but check with your local council for recycling facilities in your area.