
Maple iSize - Car seat Babyblume - Free user manual and instructions
Find the device manual for free Maple iSize Babyblume in PDF.

| Brand | Babyblume |
| Model | Maple iSize |
| Category | i-Size car seat (40 to 80 cm) |
| Approval | Regulation No. 129 (i-Size) |
| Carrycot standard | EN12790:2009 |
| Use | Rear-facing on i-Size compatible seats (not on seat with airbag) |
| Installation | With or without Isofix base (base optional) |
| Handle position | 3 positions: transport/carry, carrycot, rest/installation |
| Number of headrest positions | Height adjustable (number not specified) |
| Height of shoulder straps | Adjustable (at least 2 positions) |
| Buckle | 2-hook buckle, with red release button |
| Canopy | Removable with lock |
| Stroller adapter | Required (not included) |
| Cover cleaning | Hand wash at 30°C max, no bleach, dry clean (except trichloroethylene), no tumble dry, no ironing |
| Frame cleaning | No detergent, chemicals or lubricants |
| Spare parts | Replacement cover recommended by manufacturer |
| Repairability | Do not modify the seat; after an accident, do not reuse |
| Included accessories | Shell, handle, canopy, headrest, padding, shoulder strap covers |
| Warranty / Customer service | Contact the manufacturer or retailer for assistance |
Frequently Asked Questions - Maple iSize Babyblume
User questions about Maple iSize Babyblume
0 question about this device. Answer the ones you know or ask your own.
Ask a new question about this device
Download the instructions for your Car seat in PDF format for free! Find your manual Maple iSize - Babyblume and take your electronic device back in hand. On this page are published all the documents necessary for the use of your device. Maple iSize by Babyblume.
USER MANUAL Maple iSize Babyblume
natural_image
Interior view of a baby car seat with gray upholstery and black straps (no visible text or symbols)i-Size
40-80 cm
Verstellknopf
natural_image
Line drawing of a vehicle's top view showing the roof and side panel (no text or symbols)natural_image
Hand holding a small object with a red curved line, possibly part of a technical diagram or schematic (no readable text or symbols)natural_image
Top-down line drawing of a car seat with seats and overhead equipment (no text or symbols)natural_image
Illustration of a baby in a baby seat inside a medical or rehabilitation vehicle frame, with no visible text or symbols.
natural_image
Diagram showing three stages of a medical procedure with red circular markers, no text or symbols presentThank you for purchasing our 40-80 cm i-Size infant carrier. If you have any questions referring to the product or need any help, please contact our customer service.
1. Safety instructions
- This is an „i-size“ child restraint system. It is approved in accordance with Regulation No. 129 for use in „i-size compatible“ vehicle seating positions as specified by the vehicle manufacturers in the vehicle owner's manual.
- If in doubt, contact the manufacturer or retailer.
- The baby carrier complies with EN12790: 2009.
- Always make sure all straps that secure the seat are tight. Likewise, all straps must be adapted to the child's body. Make sure that no strap is twisted.
- Never leave your child unattended.
- Do not use the seat against the direction of travel on the front passenger seat if it is equipped with an airbag.
• After a collision or an accident, the child seat must not be used again. - When not using the child seat, it is recommended that it is strapped into the vehicle to prevent injury in the event of an accident.
- Make sure all straps are tight and not loose.
- Attach the safety belt according to the markings on the seat and the operating instructions.
- Make sure that items of baggage or other objects that could cause injury in the event of a collision are properly secured.
- Note that no parts of the child seat are loose and lie around, so that these parts can not be pinched.
- In order to avoid a fall, your child should always be strapped.
- It is dangerous to modify the child seat in any way without having received instructions from the manufacturer.
- Failure to follow these instructions will endanger your child's safety.
- The child seat may not be used without cover.
- The cover should not be replaced unless the cover is recommended by the manufacturer. Any change can affect the function of the child seat.
- Please use a different restraint system as soon as your child is able to sit independently.
- Before you make any changes to your car, take your child out of the baby carrier.
- Protect the seat from direct sunlight to prevent your child from getting burned.
• We advise against second-hand products because of their unknown prehistory.
2. Component Parts
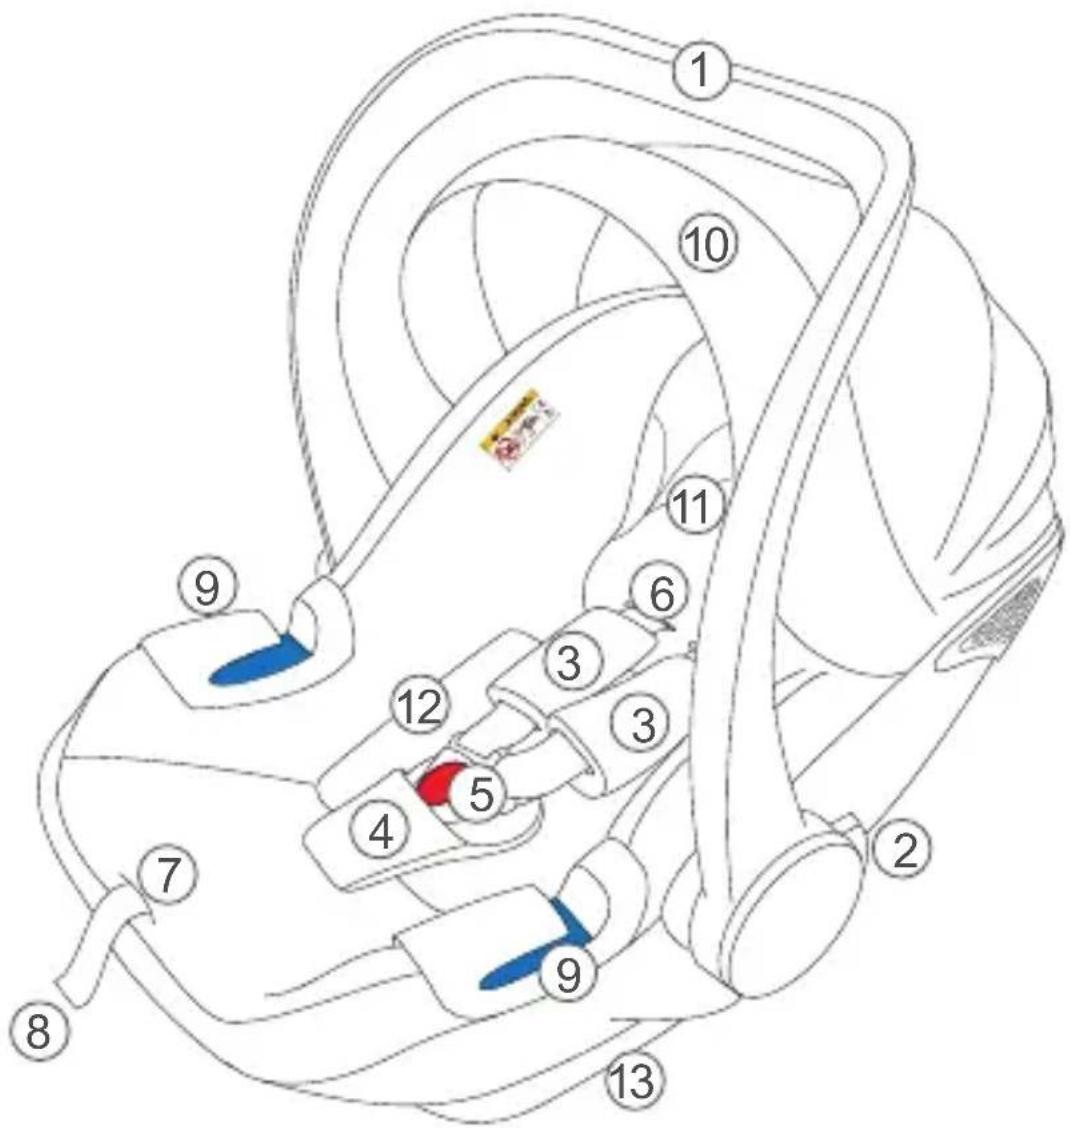
1 Handle
2 Handle Button
3 Shoulder Pad
4 Crotch Pad
5 Buckle
6 Webbing
7 Center function adjustment
8 Adjustment webbing
9 Side webbing guide
10 Canopy
11 Headrest
12 Inner Pad
13 Carrier shell
3. Adjustment of the handle

Handle button
To set the carrying handle, simultaneously press handle button on the left and right of the carrying handle. There is the possibility of 3 settings.
Please make sure that the handle is locked.
A: Vehicle position in the car or carrying position outside the vehicle.
B: Cradle position
C: Rest position or the position to put the baby in the shell.
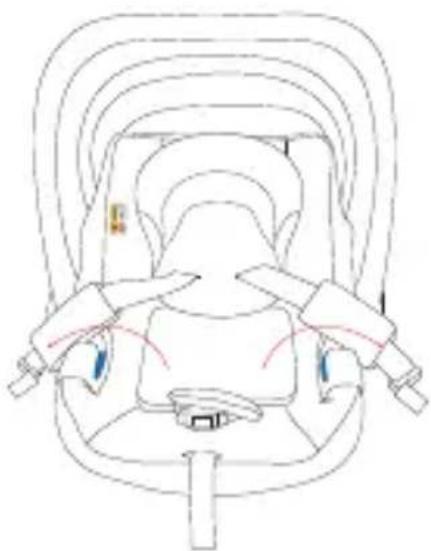
4. Adjusting the straps
4.1 Adjusting the strap length
- Loosen the shoulder straps by pressing on the central belt adjuster (1).
- While holding down the central belt adjustment, pull the shoulder straps (2) forwards at the same time.
4.2 Adjusting the belt height

natural_image
Line drawing of a mechanical component with a blue handle and top view (no text or symbols)- Release the lock on the flap by pressing the tab downwards.

natural_image
Line drawing of a hand holding a mug over a control panel (no text or symbols)- Pull the silver lock towards you and move it up or down to bring the straps to the desired height.
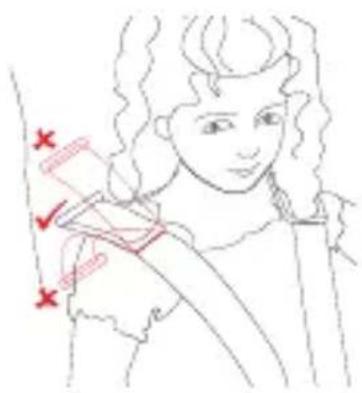
- Check the positioning of the shoulder straps at regular intervals - your child will grow!
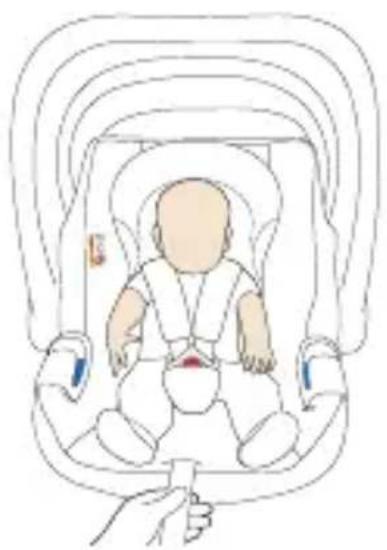
5. Installation in the vehicle
natural_image
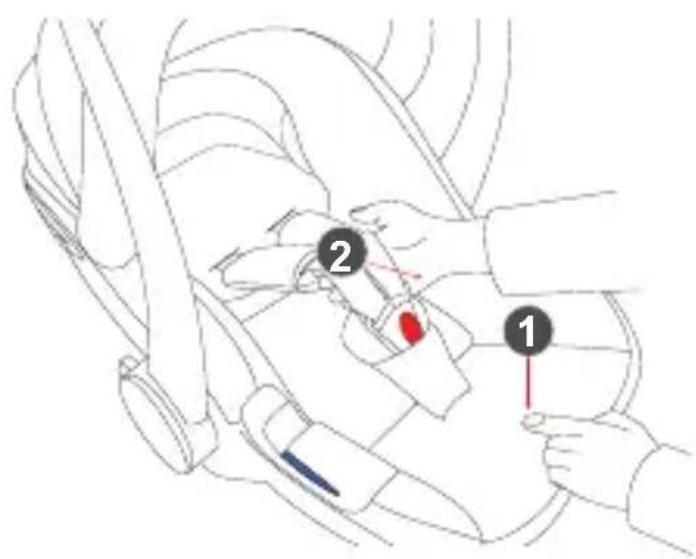
Top-down line drawing of a car seat with seats and rearview brackets (no text or symbols)- First, open the buckle by pressing the red button on the lock.
- Put the straps on the side of the baby carrier and place your child in the carrier.
natural_image
Illustration of a baby in a baby seat inside a medical or rehabilitation vehicle frame, with no visible text or symbols.
natural_image
Diagram showing three stages of a medical procedure with red circular markers on white background (no text or symbols)- Close the buckle by inserting both locking hooks into the buckle and closing it with an audible „click“
- Gently pull on the central belt adjustment strap to tighten the shoulder straps.
Please note that these are adapted to the body of your child.
5.1 Installation without Isofix base
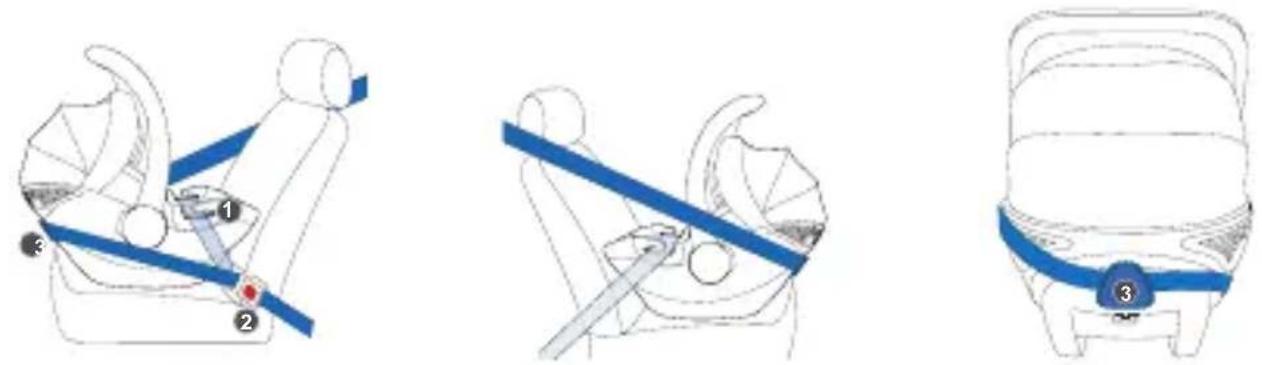
- Pull the safety belt of the vehicle and carry out the lap belt under the side guide (1) right and left.
- Pull the shoulder strap along the back of the infant carrier through the guide (3).
- Close the seat belt of the vehicle and make sure that it is tightened.
5.2 Installation with Isofix base (optional)
Adjustment knob of the stand

- Pull up on the stand adjustment lever and at the same time press the adjustment on the stand itself to bring it to the last position.
- Gently push the base into the Isofix anchorage of your car to connect the base to the car.
- Check if the Isofix anchorage is correctly installed. The color must change from orange to green.
- Push the base back toward the back of the car so that the baby carrier is as close as possible to it.

- Press the button on the base of the station (1) and move the stand down so that it touches the floor of the car and the color indicator changes from orange to green.
- Place the baby carrier on the base and place it so that it clicks into place. When the color indicator turns green, the baby carrier is placed correctly.
6. Removal of the baby seat
6.1 Removal without Isofix base
- Release the strap from the seat belt of your vehicle.
- Pass the shoulder strap along the back of the infant carrier and release it from the guide.
- Release the lap belt from the guides on the right and left as well.
6.2 Removal with Isofix base (optional)
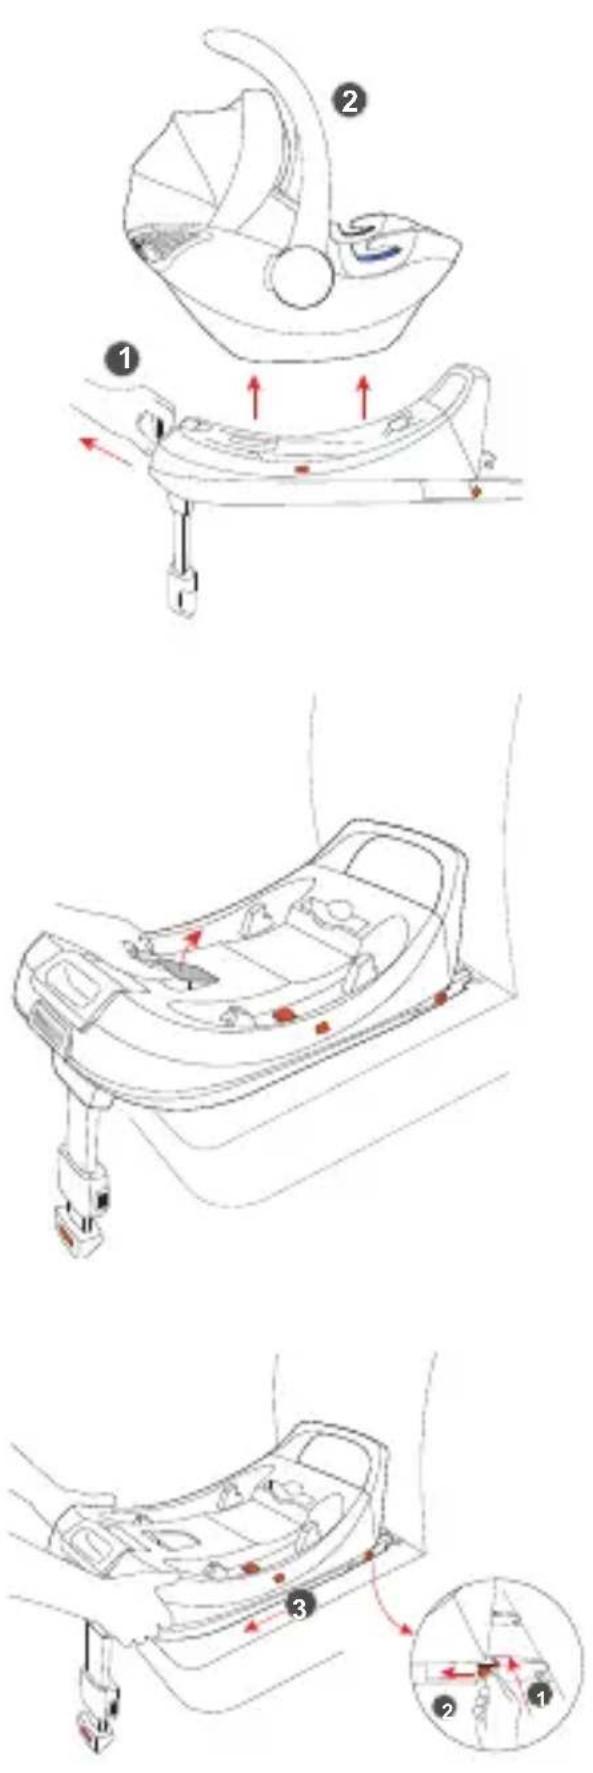
- Pull the adjustment lever on the base above the pedestal (1) to release the infant carrier.
Pull the carrycot straight up (2) so that it comes loose from the base.
-
Pull the lever up in the front half of the base.
-
Press the orange button on the Isofix anchorage inward on both sides (1), at the same time pull the orange button on the anchorage on both sides (2).
- Now loosen the Isofix base by pulling it towards you. (3)
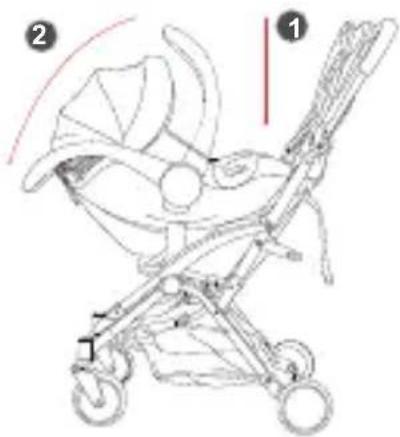
7. Infant carrier on stroller (opti onal)
7.1 Att aching to the stroller
Please note that att achment to the stroller requires an additional adapter, which is not included.
-
To attach the infant carrier, place the baby carrier on the adapters so they fit right and left into the bezel. The carrying handle must be in the foremost position (1). Press the baby seat down slightly so that the baby seat sits properly on the adapters.
-
Now place the carrying handle in the rearmost positi on (2), this locks the infant carrier in and the hold is granted.
Please note that the carrycot only holds while the carrying handle is in the rearmost positi on (2).
7.2. Removing from the stroller

-
To release the baby carrier, move the carrying handle to the frontmost position (1). By adjusting the carrying handle, the baby carrier is loose.
-
You can now take the carrycot by the carry handle and pull straight up (2). Now the baby carrier can be solved easily.
6. Washing instructions
Never use a solvent, chemical cleaning agent or lubricant to clean the child seat.

Hand wash, water temperature below 30 °C
Do not bleach

dry cleaning, all solvents except trichlo- rethylene

Not suitable for dryer

Do not iron
Bouton de réglage
natural_image
Line drawing of a vehicle's top view showing the roof and side panel (no text or symbols)natural_image
Hand holding a small object with a red curved line, possibly part of a technical diagram or schematic (no readable text or symbols)natural_image
Top-down line drawing of a car seat with seats and overhead equipment (no text or symbols)natural_image
Illustration of a baby in a baby seat inside a medical or rehabilitation device, with no visible text or symbols.
natural_image
Diagram showing three stages of a medical procedure with red circular markers on white background, no text or symbols presentnatural_image
Line drawing of a vehicle's top view showing the roof and side panel (no text or symbols)natural_image
Hand holding a small object with a red curved line, possibly part of a technical diagram or schematic (no readable text or symbols)natural_image
Top-down line drawing of a car seat with seats and overhead equipment (no text or symbols)natural_image
Illustration of a baby in a baby seat inside a medical or rehabilitation vehicle frame, with no visible text or symbols.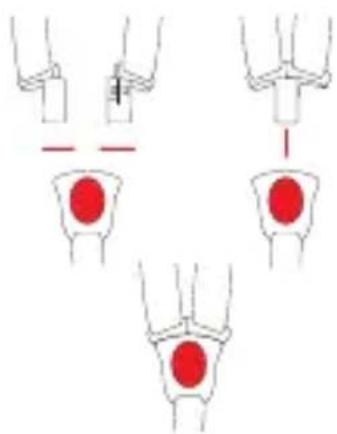
natural_image
Diagram showing three stages of a medical procedure with red circular markers, no text or symbols presentnatural_image
Line drawing of a baby stroller with labeled parts (no text or symbols present)natural_image
Facebook logo icon (no text or symbols present)
Find us on Facebook!
www.facebook.com/babyblume.de
- Safety instructions
- Component Parts
- Adjustment of the handle
- Adjusting the straps
- Adjusting the strap length
- Adjusting the belt height
- Installation in the vehicle
- Installation without Isofix base
- Installation with Isofix base (optional)
- Removal of the baby seat
- Removal without Isofix base
- Removal with Isofix base (optional)
- Infant carrier on stroller (opti onal)
- Att aching to the stroller
- Removing from the stroller
- Washing instructions
Brand : Babyblume
Model : Maple iSize
Category : Car seat