
1530623 - Motion detector Renkforce - Free user manual and instructions
Find the device manual for free 1530623 Renkforce in PDF.
| Product type | HF motion detector for flush mounting (ceiling/wall) |
| Dimensions (L x H x D) | 61.5 x 37 x 25 mm |
| Weight | Approx. 50 g |
| Operating frequency | 5.8 GHz (CW radar, ISM band) |
| Transmit power | < 0.2 mW |
| Power consumption | Approx. 0.9 W |
| Max. switching power | 500 W (resistive load) |
| Contact type | Single-pole relay |
| Detection angle | Horizontal 360°, vertical 180° |
| Adjustable range | Approx. 1 to 15 m |
| Recommended mounting height | Ceiling: 2–6 m; Wall: 1.5–3.5 m |
| Motion detection speed | 0.6 to 1.5 m/s |
| Adjustable operating time | 10 s (±3 s) to 12 min (±1 min) |
| Adjustable brightness threshold | 3 to 2000 lux |
| Operating temperature | -20 °C to +40 °C |
| Permissible relative humidity | 0 % to 93 % (non-condensing) |
| Permissible cable cross-section | 0.75 – 1.5 mm² |
| Installation location | Dry indoor only |
| Protection rating | IP20 (for indoor use) |
| Operating display | Flashing green LED |
| Settings | 3 dial controls: TIME, SENS, LUX |
| Maintenance and cleaning | Disconnect before cleaning; dry, lint-free cloth; no harsh chemicals |
| Safety | Installation by a qualified electrician; observe the 5 safety rules |
| Spare parts / Repairability | No internal parts requiring maintenance; repair by qualified technician only |
| General information | Compliant with Directive 2014/53/EU; declaration of conformity available online |
Frequently Asked Questions - 1530623 Renkforce
User questions about 1530623 Renkforce
0 question about this device. Answer the ones you know or ask your own.
Ask a new question about this device
Download the instructions for your Motion detector in PDF format for free! Find your manual 1530623 - Renkforce and take your electronic device back in hand. On this page are published all the documents necessary for the use of your device. 1530623 by Renkforce.
USER MANUAL 1530623 Renkforce
L = Phase, braunes Kabel
www.conrad.com/downloads
Built-in HF motion detector
Item no. 1530623
Intended use
The motion detector's integrated HF sensor responds to motions within the detection range, e.g., when a person enters the detection range. Thus, the motion detector can be used for monitoring entrances or staircases.
The motion detector's output can be used, for example, for controlling a light or other power consuming device. Observe the maximum connected load in the chapter "Technical data".
The motion detector is only intended for use in dry, closed interiors, it must not get damp or wet. For safety and approval reasons, you may not convert and/or alter the product. If you use the product for other purposes than those described above, the product may be damaged. Furthermore, an improper use involves risks such as short-circuits, fire, electric shocks, etc. Please read the operating instructions carefully and do not discard them. If you pass the product on to a third party, please hand over these operating instructions as well.
This product complies with the applicable national and European Regulations. All names of companies and products are the trademarks of the respective owners. All rights reserved.
Package contents
Motion detector
- Operating Instructions

Up-to-date operating instructions
Download the latest operating instructions via the link www.conrad.com/downloads or scan the QR code. Follow the instructions on the website..
Explanation of symbols

The lightning symbol inside a triangle is used when there is a potential risk of personal injury, such as electric shock.

An exclamation mark in a triangle indicates important instructions in these operating instructions which absolutely have to be observed.

The arrow symbol is used when specific tips and information on the operation are provided.

The product is only intended to be installed and used in dry indoor spaces; it must not get damp or wet.

Observe the operating instructions!
Safety instructions
Please read the operating instructions carefully and pay particular attention to the safety instructions. We do not assume liability for any injuries/material damages resulting from failure to observe the safety instructions and the information in these operating instructions regarding the proper use of the product. Furthermore, in such cases, the warranty/guarantee will be null and void.
Attention, important note!
Only persons with relevant electro-technical knowledge and experience should carry out the installation!*)
If it is not installed properly, you risk:
-
your own life
-
the life of the person using the electrical system.
If it is not installed properly, you risk severe damage to property, e.g., by fire.
You face the risk of being held liable for personal injury and material damage. Contact an Electrician!
*) Specialist knowledge required for the installation:
In particular, the following expertise is required in regards to the installation:
- the applicable "5 safety rules": Switch off power; secure against switching back on; determine voltage-free status; earthing and short-circuiting; cover or fence off nearby live parts
- Choose appropriate tools, meters and, if necessary, personal protective equipment
Evaluation of the measurement results - Selection of the electrical installation material to ensure the shutdown conditions
IP protection types - Installation of the electrical installation material
- Type of mains supply network (TN system, IT system, TT system) and the connection conditions that follow from them (classical earthing, protective earthing, required additional measures, etc.)
If you do not have the expertise required for the installation, do not connect and install it yourself, but ask a qualified technician.
- Unauthorised conversion and/or modification of the product is not allowed for safety and approval reasons. Do not open/disassemble. It does not contain any internal parts that need to be adjusted or maintained by you.
- Maintenance, adjustment or repair work may only be carried out by an expert/ authorised service centre familiar with the hazards involved and the relevant regulations.
- The motion detector is not a toy and should be kept out of the reach of children! There is a risk of fatal electric shock! Install the motion detector out of the reach of children.
- The product may only run on mains voltage (see section „Technical data"). Never try to operate the product at another voltage, as this will ruin the product.
- During installation, all poles must be disconnected from the mains voltage, e.g., via RCD. There must be an appropriately dimensioned fuse or circuit breaker between the RCD and the product.
- The product may be installed and used only in dry indoor spaces; it must not get damp or wet. There is a risk of fatal electric shock!
- Only use the product when it is firmly mounted/steady. Never install and/or operate it in vehicles.
- Do not use the product in rooms with adverse environmental conditions, where combustible gases, vapours or dust are or may be present! There is a danger of explosion!
- Do not expose the product to extreme temperatures, strong vibrations or strong mechanical stress.
- Do not connect the product to the power supply immediately after it has been transferred from a cold room into a warm one (e.g., during transport). The condensation that forms might destroy the device. Moreover, there is danger of electric shock!
Allow the product to reach room temperature. Wait until the condensation has evaporated. This might take several hours. Only after this, should it be installed, connected to the mains supply and put into use.
- If it can be assumed that safe operation is no longer possible, the product must be turned off and precautions are to be taken to ensure that it is not used unintentionally. Do not touch the product.
First switch off the mains voltage to all poles (switch off the connected circuit breaker or remove the fuse and then switch off the connected RCD).
After this, arrange for a skilled electrician to check the product.
-
Safe operation can no longer be assumed if:
-
the product shows visible signs of damage
- the product does not work at all or well (flickering light, leaking smoke or a smell of burning, the light flickers, audible cracking noises, discolouration to the product or the adjacent surfaces.)
- the device was stored for a longer period of time in unfavourable conditions
-
it was exposed to heavy loads during transport
-
Do not leave the packaging material carelessly lying around, since it could become a dangerous plaything for children.
- On industrial sites, the accident prevention regulations of the association of the industrial workers' society for electrical equipment and utilities must be followed!
- If you have any questions that are not answered in this manual, please contact our technical service or another specialist.
Functional description
The motion detector sends out signals in the 5.8 GHz range (much like a radar). These signals are reflected back from surfaces located within the detection range.
The integrated electronic system evaluates the received signals. If there is a motion within the detection range (no matter whether this is a human, animal or object), the signals received will change and the switching output of the motion detector is activated.
The range of detecting motion is determined by several factors:
The movement sensor's mounting height
The size of the object
- Settings of the control dial "SENS" (sensitivity) on the motion detector
- Distance from the object to the motion detector
- Speed of movement
Metal objects near the motion detector
The entire area surrounding the motion detector is captured due to the 360^ radial angle of detection and a 180^ opening angle. The range is up to 15m depending on the site of installation.
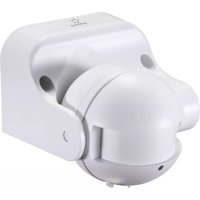
Connections and control elements
1 LED for function display
2 Brightness sensor
3 Dial "LUX" (brightness setting)
4 Dial.SENSs (sensitivity)
5 Mounting hole (one each on left and right on the motion detector)
6 Dial "TIME" (power-up time)
7 Opening for connection cable
L = phase
N = Neutral wire
L^ = Switched phase, to the power consuming device
8 Unlock button for connection terminals
9 Integrated antenna (this side must face the direction of the detection range)
Preparations for installation
- Only install the motion detector on a stable surface. Only use the motion detector when it is securely mounted.

Important!
are metal objects behind/under the mounting location (e.g., steel beams, plates or similar), the motion detector will not function properly
In addition, the flow of water or sewage pipes may trigger a switching process.
If you plan to mount several motion detectors, they must have a minimum distance of 2m to each other.
- Walls, furniture or the like will not inhibit the motion detection due to the high frequency technology used. Depending on the material thickness and humidity level, the degree of permeation can vary or the high frequency signal may be attenuated.
| Material Permeation | Attenuation | |
| Synthetic/plastics yes 5 | - 10% | |
| Wood yes 10 - 20% | ||
| Glass yes 15 - 30% | ||
| Brickwork | yes, with wall thickness of < 30 cm 60 - 70% | |
| no, with wall thickness of > 30 cm 100% | ||
| Reinforced concrete no | 100% | |
| Metal | no 100% | |
These values should only be seen as guideline values. There may be large variations depending on the materials and the environmental conditions.
- Ideally, the motion detector should be mounted on a ceiling. Depending on the room type and the desired function, it is also possible to mount it on a wall.

Make sure in any case that the product is mounted out of the reach of children. Children might otherwise open the motion detector, which could cause a fatal electric shock!
- Keep a distance of at least 1 m to the walls when mounting the motion detector on a ceiling. A larger distance is recommended for thin walls; otherwise, persons on the other side of the wall may also trigger a switching process.
Sensitivity and thus range can be reduced with the knob "SENS", if there are false activations.
Installation and connection

Please refer to the "Safety instructions" and "Preparations for installation" chapters!

The motion detector must be installed only when it is voltage-free. It is not sufficient to just turn off the light switch!
First switch off all poles of the mains supply by removing the fuse or switching off at the circuit breaker and then also switch off the associated residual current circuit breaker. Secure it against unauthorised reconnection, e.g., with a danger sign.
Check that the mains connection is free of current, i.e. with an appropriate tester.
- Make sure you fix the motion detector to a solid base, e.g., masonry. Use screws and, if necessary, screw anchors that are suitable for the surface.
- Fasten the motion detector with two screws and plugs to the room ceiling.

Pay attention when drilling and tightening the screws that no cables or pipes are damaged!
Depending on the mounting location, Ensure that contact protection is appropriate and, if necessary, connection cables or cable strain relief are properly fixed in place.

When selecting the mounting location, make sure that the brightness sensor is able to detect ambient brightness. Otherwise, the brightness control will not work via the "LUX" dial, and the motion detector switches the connected device (for example, a lamp) also during the day.
- Remove the insulation on the mains cable and the connection cable connected to the device. The individual wires of the lines must be stripped over a length of approx. 8 mm.
- Connect the individual wires of the mains cable and of the cable connected to the device with the terminal attachments in the motion detector.
To do this, insert the stripped cable into the corresponding terminal (cable cross section 0.75
- 1.5mm^2 ). Only one cable must be inserted into each terminal!
L = Phase, brown cable
N = Neutral wire, blue cable
L' = Switched phase, to the power consuming device
Pay attention to the figure below the terminals.
- To remove a cable from the terminal, press the corresponding unlock button using a suitable screwdriver. Afterwards, the cable can be pulled out again.
- The protective earth wire (PE, yellow-green cable) must be connected to a different place (e.g., to an external terminal box) since there is no corresponding attachment in the motion detector.
- Switch on the power.
Adjusting the motion detector
The motion detector has three control dials, which can be used to change the power-up time (rTIME^a) , the sensitivity (rSENS^a) and the switch-on threshold at a certain ambient brightness (_rLUX^a) .
a) Dial "TIME" (power-up time)
Using this control dial, you can set the power-up time for the output L' to the device. Turning it to the left will reduce the power-up time of the connected device, while turning to the right will extend the time.
A setting of 10 second (tolerance ± 3 seconds) up to 12 minutes (tolerance ± 1 minute) is possible.
If new motion is detected during the on-time, the duty cycle starts once again; the device stays switched on.
b) Dial „SENS“ (sensitivity)
With this control dial it is possible to configure how strong a motion must be in order to trigger a switching process.
Turning to the left, anticlockwise (towards - ) reduces the sensitivity, while turning to the right, clockwise (towards +^ ) increases it.
By adjusting the sensitivity, you can also control the range of the sensor (e.g., a person who walks through the monitoring area is recognised only at a closer proximity to the sensor, if sensitivity is reduced).
Should false activations occur often, reduce the sensitivity (by turning the dial a little to the left towards ^
c) Dial "LUX" (brightness setting)
The switching threshold is set by means of this dial and controls the ambient brightness at which the motion detector is activated (and then activates the connected consumer, if a movement in the detection range is detected).
Turning the dial anticlockwise to the left means the motion detector will activate when it is darker; turning it to the right, in the direction of the sun symbol, activates the motion detector in brighter conditions.
Functional test
To perform a function test, it is necessary to set a short switch-on time (turning the dial "TIME" to the setting "10S"). In addition, the dial for brightness ("LUX") must be turned completely to the right (in the direction of the sun symbol).
The desired sensitivity is to be set with the knob "SENS". For the first test, set the knob in the middle position.
Now cross the detection range. The motion detector activates the connected device when it detects motion within the detection range. In addition, a green LED lights up on the motion detector.
Set the dial accordingly after performing the function test. Then check whether the motion sensor responds the way you want under real-life conditions and adjust the setting of the dial step-by-step.
Troubleshooting
The connected device is not switched on
- Check the settings for the dial "LUX" used for the brightness control. Turning it too far to the left (anticlockwise) will cause the motion detector to activate only when it is dark.
- Check whether it is powered, and whether the device, (for example a lamp, a bulb) functioning.
- Increase the sensitivity (turning the dial ^n SENS ^n towards _n^n + 1 ).
- Rapid movements within the monitoring area are filtered out by the electronic system in order to prevent switching errors.
The connected device is switched on permanently
- There are constant movements within the monitoring area; this can also be a motion in an adjoining room detected by the high frequency technology used. Reduce the sensitivity (turning the dial, SENS towards).
Please note: If the motion detector is activated by a movement and a new movement is detected during the on-time, the duty cycle starts again! - Set a very short switch-on time for testing, in order to narrow down the causes.
The setting of the dial control "LUX" is not working properly
Always make sure that the brightness sensor is not covered.
- Ambient light prevents functioning at night. Turn the dial a bit more towards the sun symbol (thus the motion detector will already work in brighter surroundings).
Care and cleaning
- Disconnect the product from the mains supply before each cleaning procedure.
- Never use abrasive cleaning agents, rubbing alcohol or other chemical solutions, since these could damage the casing or even impair operation.
- Use a dry, lint-free cloth to clean the product.
Disposal

Electronic devices are recyclable material and do not belong in the household waste. Dispos of an unserviceable product in accordance with the relevant statutory regulations.
Declaration of conformity (DOC)
We, Conrad Electronic SE, Klaus-Conrad-Straße 1, D-92240 Hirschau, hereby declare that this product conforms to the 2014/53/EU directive.

The full text of the EU conformity declaration is available via the following Internet address:
www.conrad.com/downloads
Select language by clicking a flag symbol and enter the order number of the product in the search field; then you will be able to download the EU declaration of conformity in PDF format.
Technical data
Operating voltage 220 - 240 V/AC, 50/60 Hz
Internal power consumption.. approx. 0.9 W
HF system. 5.8 GHz, CW radar, ISM band
Transmitting power. < 0.2mW
Switching power max. 500 W (resistive load)
max. 150 W (inductive load)
Devices with mainly resistive load are, e.g., light bulbs, heaters, etc.
Devices with inductive load are, for example, engines, control gears (e.g., for LEDs), conventional transformers, energy saving bulbs, etc.
Switch type relay, single-pole
Permissible line cross section
for connection terminals .0.75 - 1.5 mm2
Detection angle. 360^ horizontal, 180^ vertical
Range. adjustable, approx. 1 - 15 m
Recommended mounting height wall mount: 2 - 6 m
wall mounting: 1.5 - 3.5 m
Speed for motion detection. 0.6 - 1.5 m/s
Duty cycle. adjustable 10 s (±3 s) to 12 min (±1 min)
Ambient brightness....adjustable, 3 to 2000 lux
Installation site............only in dry enclosed rooms
Ambient conditions temperature -20^ to +40^ , air humidity 0% to 93% relative, non-condensing
Dimensions. 61.5 x 37 x 25 mm (L x W x H)
Weight .approx.50g
Mode d'emploi
L = Phase, cable marron
www.conrad.com/downloads
Tension de service. 220 - 240 V/CA, 50/60 Hz
max. 150 W (charge inductive)

www.conrad.com/downloads


- Built-in HF motion detector
- Intended use
- Package contents
- Up-to-date operating instructions
- Explanation of symbols
- Safety instructions
- If you do not have the expertise required for the installation, do not connect and install it yourself, but ask a qualified technician.
- Functional description
- Connections and control elements
- Preparations for installation
- Important!
- Installation and connection
- Adjusting the motion detector
- a) Dial "TIME" (power-up time)
- b) Dial „SENS“ (sensitivity)
- c) Dial "LUX" (brightness setting)
- Functional test
- Troubleshooting
- The connected device is not switched on
- The connected device is switched on permanently
- The setting of the dial control "LUX" is not working properly
- Care and cleaning
- Disposal
- Declaration of conformity (DOC)
- Technical data
- Mode d'emploi
Brand : Renkforce
Model : 1530623
Category : Motion detector