
WDT40Q3SIS - Water dispenser Avanti - Free user manual and instructions
Find the device manual for free WDT40Q3SIS Avanti in PDF.

| Product Type | High-end water dispenser |
| Brand | Avanti |
| Model | WDT40Q3SIS |
| Power Supply | 115 V ~ 60 Hz, 15 A, 3-prong grounded plug |
| Bottle Capacity | 2, 3 or 5 gallons (standard bottle) |
| Hot Water Temperature | 185 °F – 203 °F (85 °C – 95 °C) |
| Cold Water Temperature | 41 °F – 50 °F (5 °C – 10 °C) |
| Child Safety | Hot water faucet with sliding safety button |
| Indicator Lights | Red (hot) and blue (cold) indicators with auto shut-off |
| Automatic Safety Shut-off | Yes, in case of reservoir overheating |
| Ventilation | 5 inches (12.7 cm) gap between unit and wall |
| Cleaning | Reservoir: hot water and baking soda; drip tray and faucets: mild detergent; condenser: vacuum or brush monthly |
| Long-Term Non-Use Maintenance | Unplug, drain water from faucets and rear drain plug |
| Weight (approx) | 11 kg (25 lb) |
| Dimensions (H x W x D, approx) | 101 x 30 x 30 cm (40 x 12 x 12 inches) |
| Parts and Labor Warranty | 1 year (12 months) from date of purchase by first owner |
| Customer Service | 800-220-5570 (USA) |
Frequently Asked Questions - WDT40Q3SIS Avanti
User questions about WDT40Q3SIS Avanti
0 question about this device. Answer the ones you know or ask your own.
Ask a new question about this device
Download the instructions for your Water dispenser in PDF format for free! Find your manual WDT40Q3SIS - Avanti and take your electronic device back in hand. On this page are published all the documents necessary for the use of your device. WDT40Q3SIS by Avanti.
USER MANUAL WDT40Q3SIS Avanti
natural_image
Line drawing of a modern water dispenser with lid and front panel (no text or symbols)BEFORE USE, PLEASE READ AND FOLLOW ALL SAFETY RULES AND OPERATING INSTRUCTIONS.
Avanti has a policy of continuous improvement on its products and reserves the right to change materials and specifications without notice.
Avanti Products LLC
P.O. Box 520604
Miami, FL 33152
www.avantiproducts.com
TABLE OF CONTENTS
| Help Us Help you | 3 |
| Important Safety Instructions | 4 – 5 |
| Parts and Features | 6 |
| Electrical Connection | 7 |
| Installation Guidelines | 8 |
| Operation Instructions | 9 |
| Before Using Your Water Dispenser | 9 |
| Operating Your Water Dispenser | 10 |
| Replacing the Water Bottle | 10 |
| Indicator Lights | 10 |
| Care and Maintenance | 10 |
| Taking the dispenser out of service | 10 |
| Problems with Your Water Dispenser | 11 |
| Troubleshooting Guide | 11 |
| Service for Your Water Dispenser | 11 |
| Your Avanti Products Warranty | 12 |
| Instrucciones en Español | 13 – 22 |
| Instruction en Français | 23 – 32 |
| Registration Information and Registration Card | Last Page |
HELP US HELP YOU...
Read this guide carefully.
It is intended to help you operate and maintain your new appliance properly.
Keep it handy to answer your questions. If you don't understand something or you need more help, please call:
Avanti Customer Service 800-220-5570
Keep proof of original purchase date (such as your sales slip) with this guide to establish the warranty period.
CAUTION:
THIS APPLIANCE IS NOT DESIGNED FOR THE STORAGE OF MEDICINE OR OTHER MEDICAL PRODUCTS.
Write down the model and serial numbers.
You'll find them on a plate located on the rear outside wall of the appliance.
Please write these numbers here:
Date of Purchase
Model Number
Serial Number
Use these numbers in any correspondence or service calls concerning your appliance.
If you received a damaged appliance, immediately contact the dealer (or builder) that sold you the appliance.
Save time and money. Before you call for service, check the Troubleshooting Guide. It lists causes of minor operating problems that you can correct yourself.
IF YOU NEED SERVICE
We're proud of our service and want you to be pleased. If for some reason you are not happy with the service you receive, here are some steps to follow for further assistance. FIRST, contact the people who serviced your appliance. Explain why you are not pleased. In most cases, this will solve the problem.
NEXT, if you are still not pleased, write all the details, including your telephone number, and send it to:
Customer Service
Avanti Products
10880 NW 30 Street
Miami, FL 33172 USA
APPLIANCE SAFETY
Your safety and the safety of others are very important.
We have provided many important safety messages in this manual and on your appliance. Always read and obey all safety messages.
This is the Safety Alert Symbol. This symbol alerts you to potential hazards that can kill or injure you and others.
All safety messages will follow the Safety Alert Symbol and either the wards" DANGER", "WARNING" or "CAUTION".
Danger means that failure to heed this safety statement may result in severe personal injury or death.
Warning means that failure to heed this safety statement may result in extensive product damage, serious personal injury, or death.
Caution means that failure to heed this safety statement may result in minor or moderate personal injury, or property or equipment damage.
All safety messages will alert you to what the potential hazard is, tell you how to reduce the chance of injury, and let you know what can happen if the instructions are not followed.
PROP. 65 WARNING FOR CALIFORNIA RESIDENTS
WARNING:
Cancer And Reproductive Harm
www.p65warnings.ca.gov
IMPORTANT SAFEGUARDS

Before the appliance is used, it must be properly positioned and installed as described in this manual, so read the manual carefully. To reduce the risk of fire, electrical shock or injury when using the appliance, follow basic precautions, including the following:

DANGER

- Plug into a grounded 3-prong outlet, do not remove grounding prong, do not use an adapter, and do not use an extension cord
- Replace all panels before operating
- It is recommended that a separate circuit, serving only your beverage cooler, be provided. Use receptacles that cannot be turned off by a switch or pull chain
- Never clean appliance parts with flammable fluids. These fumes can create a fire hazard or explosion. And do not store or use gasoline or other flammable vapors and liquids in the vicinity of this or any other appliance. The fumes can create a fire hazard or explosion.
- Before proceeding with cleaning and maintenance operations, make sure the power line of the unit is disconnected.
- Do not connect or disconnect the electric plug when your hands are wet
- Unplug the appliance or disconnect the power before cleaning or servicing. Failure to do so can result in electrical shock or death.
- Do not attempt to repair or replace any part of your appliance unless it is specifically recommended in this material. All other servicing should be referred to a qualified technician.

WARNING

- Use two or more people to move and install the appliance. Failure to do so can result in back or other injury.
- To ensure proper ventilation for your appliance, the unit must be completely unobstructed. Choose a well-ventilated area with temperatures above 55^ (13°C) and below 90^ (32°C). This unit must be installed in an area protected from the elements, such as wind, rain, water spray or sunlight.
- The appliance should not be located next to ovens, grills or other sources of high heat.
- The appliance must be installed with all electrical, water and drain connections in accordance with state and local codes. A standard electrical supply (115 V AC only, 60 Hz), properly grounded in accordance with the National Electrical Code and local codes and ordinances is required.
- Do not kink or pinch the power supply cord of the appliance.
- The fuse (or circuit breaker) size should be 15 amperes.
- It is important for the appliance to be leveled in order to work properly. You may need to make several adjustments to level it.
- All installation must be in accordance with local plumbing code requirements.
- Make certain that the pipes are not pinched or kinked or damaged during installation.
- Check for leaks after connection.
- Never allow children to operate, play with or crawl inside the appliance
- Do not use solvent-based cleaning agents or abrasives on the interior. These cleaners may damage or discolor the interior.
- Do not use this apparatus for other than its intended purpose.
PARTS AND FEATURES
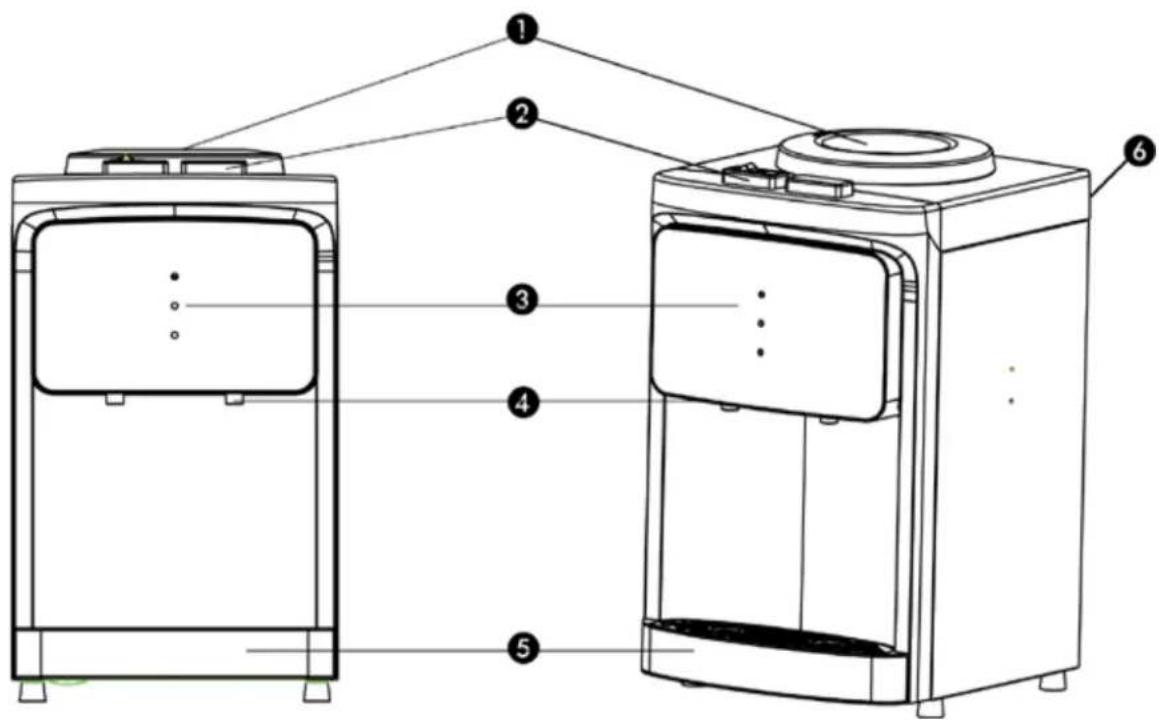
- WATER INTAKE
- HOT / COLD WATER DISPENSER BUTTONS
- INDICATOR LIGHTS
- HOT / COLD WATER FAUCETS
- REMOVABLE DRIP TRAY
- POWER SWITCHES
RED: HOT WATER
GREEN: COLD WATER
ATTENTION / WARNING
DO NOT TURN ON THE HOT WATER POWER SWITCH BEFORE FILLING THE HOT WATER TANK WITH WATER. THIS WILL CAUSE THE UNIT TO OVERHEAT AND SHUTDOWN.
Install the water bottle and allow the tanks to fill with water for approximately 10 – 15 minutes. Before turning on the HOT water power switch.
Your unit is equipped with an AUTOMATIC SAFETY SHUTOFF SWITCH which will turn the unit off until the hot water tank cools to a safe temperature.
Usual time to reset is approximately 30 – 45 minutes, once the temperature reaches a safe level, the unit will reset and begin to operate normally.
If the unit has gone into RESET MODE, turn off the hot water power switch ensure there is water in the tanks and allow the unit to cool down.
Electrical Connection
\~ Warning\~
Improper use of the grounded plug can result in the risk of electrical shock. If the power cord is damaged, have it replaced by an authorized Avanti Products service center.
This appliance should be properly grounded for your safety. The power cord of this appliance is equipped with a three-prong plug which mates with standard three prong wall outlets to minimize the possibility of electrical shock.
Do not under any circumstances cut or remove the third ground prong from the power cord supplied.
This appliance requires a standard 115Volts\~/60Hz electrical outlet with three-prong ground.
The cord should be secured behind the appliance and not left exposed or dangling to prevent accidental injury.
Never unplug the appliance by pulling the power cord. Always grip the plug firmly and pull straight out from the receptacle.
Do not use an extension cord with this appliance. If the power cord is too short, have a qualified electrician or service technician install an outlet near the appliance.
ÿ EXTENSION CORD
Because of potential safety hazards under certain conditions, it is strongly recommended that you do not use an extension cord with this unit. However, if you must use an extension cord it is absolutely necessary that it be a UL/CUL-Listed, 3-wire grounding type appliance extension cord having a grounding type plug and outlet and that the electrical rating of the cord be 115 volts and at least 10 amperes.
ÿ SURGE PROTECTOR
Most electrical appliances use a series of electric control boards to operate. These boards are very susceptible to power surges and could be damaged or destroyed.
If the appliance is going to be used in an area or if your city / country is prone to power surges / outages; it is suggested that you use a power surge protector for all electrical devices / appliances you use. The surge protector that you select must have a surge block high enough to protect the appliance it is connected to. If you have any questions regarding the type and size of surge protector needed contact a licensed electrician in your area.
Damages due to power surges are not considered a manufacturer covered defect and will void your product warranty.
Important Safety Instructions
| ~ WARNING~ | To reduce the risk of burns, fire, electrical shock, or injury when using your appliance, follow these basic precautions: |
| Read all instructions before using the water dispenser.Never clean parts with flammable fluids. The fumes can create a fire hazard or explosion.Do not store or use gasoline or any other flammable vapors and liquids in the vicinity of this or any other water dispenser. The fumes can create a fire hazard or explosionDo not plug unit into receptacle until you ensure the water tank switches are off.-Save these instructions- | |
INSTALLATION GUIDELINES:
- Remove the exterior and interior packing.
- Place your appliance on a surface that is strong enough to support the dispenser when it is fully loaded.
- Locate the appliance away from direct sunlight and sources of heat (stove, heater, radiator, etc.). Direct sunlight may affect the acrylic coating and heat sources may increase electrical consumption. Extreme cold ambient temperatures may also cause the appliance not to perform properly.
- Allow 5 inches of space between the water dispenser and the wall, which allows for proper air circulation.
- Plug the appliance into an exclusive properly installed-grounded wall outlet. Do not cut or remove the third (ground) prong from the power cord under any circumstances. Any questions concerning power and/or grounding should be directed toward a certified electrician or an authorized Avanti Products service center.
• This water dispenser is not recommended for outdoor use. - Do not locate the dispenser in area where the temperature may fall below freezing (32° F).
- Keep area around dispenser free of dust and dirt.
- Keep the reserve supply of water bottles away from excessive heat and light.
• Never unplug the water cooler, except for maintenance or transport.
OPERATION INSTRUCTIONS
Before Using Your Water Dispenser
- Check to be sure the following parts are included:
β Instruction manual
- Before connecting the appliance to the power source, let it stand upright for approximately 2 hours. This will reduce the possibility of a malfunction in the cooling system from handling during transportation.
- The water dispenser is pre-cleaned at the factory, but the reservoir and water lines must be flushed with fresh water before use as follows:
- Keep the unit unplugged.
- Fill water tank with tap water full to capacity (more than 3/4 of a gallon). Wait for 5 minutes until water settles.
- Plug the dispenser into the electrical outlet Power light will illuminate. Turn on the HOT and COLD power switches at the rear of the unit, the HOT and COLD indicator lights will illuminate and now we are ready to complete the first cycle. In order to do that, wait for the cold water indicator light to go off (another 40 minutes, approximately).
- Unplug the dispenser from the electrical outlet. Proceed to drain the water from the faucets one at a time until no more water remains.
(Note: To facilitate this operation, use a large container). - Then, drain any water left in the tanks by opening the drain plug located on the back, until it drains completely.
• Proceed to close the drain cap. - Place the standard 2, 3 or 5-gallon bottle of water on the water inlet, allow water to stand for approximately one minute.
- Open water faucets to insure water flows from both faucets.
• Plug dispenser into the electrical outlet.
• Now you are ready to use your water dispenser.
NOTE: Your water dispenser has been cleaned and sanitized before leaving the factory, but in case a taste problem develops, place two tablespoons of baking soda and add tap water. Fill water tank again and repeat basic operations previously outlined.
\~ WARNING\~
IMPROPER USE OF THE GROUNDED PLUG CAN RESULT IN THE RISK OF ELECTRICAL SHOCK. IF THE POWER CORD IS DAMAGED, HAVE IT REPLACED BY AN AUTHORIZED AVANTI PRODUCTS SERVICE CENTER.
OPERATING YOUR WATER DISPENSER
ÿ Steps to replace water bottles
• Use a clean cloth to wipe off neck of bottle.
- Remove cap.
- Carefully lift bottle (approx. 40 lbs.) using your legs and not your back. Do not place hands on opening of bottle while placing in reservoir.
- Insert the water bottle on the water intake over reservoir opening so it settles properly on it.
- Wipe off any water which may have splashed on dispenser top.
ÿ Indicator Lights:
Turn the cooling switch on.
There are 3 indicator lights on the front of the unit. POWER, HOT and COLD
The POWER indicator light will glow indicating the unit is plugged in and the power switch is in the ON position.
The HOT indicator light will glow after the Power Switch turned on, and the heating process will begin. When the water reaches the appropriate temperature the HOT indicator light will turn off and the heating cycle will stop, when the temperature of the water in the reservoir falls below the appropriate temperature the HOT light will glow indicating the heating system as begun again.
The COLD indicator light will glow after the Power Switch turned on, and the cooling process will begin. When the water reaches the appropriate temperature the COLD indicator light will turn off and the cooling cycle will stop, when the temperature of the water in the reservoir rises above the appropriate temperature the COLD light will glow indicating the cooling system as begun again.
DISPENSING WATER
To dispense hot water:
♦ Slide red safety button to the right and hold while pressing downward on hot water faucet to dispense hot water.
◆ Safety button will return to its original position when faucet is released.
◆ Ensure all water has dispensed prior to removing glass from the dispensing area.
To dispense cold water:
◆ Press and hold downward on the cold water faucet to dispense cold water.
- When you have dispensed the desired amount of water, simply release the cold water faucet.
◆ Ensure all water has dispensed prior to removing glass from the dispensing area.
CARE AND MAINTENANCE
- Wash the inside of the reservoir with a warm water and baking soda solution. The solution should be about 2 tablespoons of baking soda to a quart of water.
• The drip tray and water faucets should be cleaned with mild detergent and warm water. - At regular intervals or once a month inspect the coils located across the back of the dispenser. Vacuum accumulation of dust or clean it with a soft bristled brush.
TAKING DISPENSER OUT OF SERVICE
- If the water dispenser will not be used for a long period of time, unplug the power cord from the wall outlet.
- Drain the water through the faucets.
- Turn the POWER switch to the "OFF" position.
- Drain the water from the tank by removing the plug from the back of the dispenser.
Unit should not be transported on the sides. Place it upright if possible and cover it with a blanket.
PROBLEMS WITH YOUR WATER DISPENSER
You can solve many common water dispenser problems easily, saving you the cost of a possible service call. Try the suggestions outlined below to see if you can solve the problem before calling the service.
TROUBLESHOOTING GUIDE
| PROBLEM | POSSIBLE CAUSE |
| Water dispenser does not operate. | Not plugged in.The circuit breaker tripped or a blown fuse. |
| Water cooler is not cold enough. | Check to be sure the POWER switch on the back is ON.The water dispenser does not have the correct clearances. |
SERVICE FOR YOUR WATER DISPENSER
We are proud of our customer service organization and the network of professional service technicians that provide service on your Avanti appliances. With the purchase of your Avanti appliance, you can have the confidence that if you ever need additional information or assistance, the Avanti Products Customer Service team will be here for you. Just call us toll-free.
AVANTI PRODUCTS CUSTOMER SERVICES
| Product Information800-323-5029 | Whatever your questions are about our products, help is available. |
| Part Orders800-220-5570 | You may order parts and accessories that will be delivered directly to your home.You may order these items by personal check, money order, Master Card, or Visa. |
| In-Home Repair Service800-220-5570 | An Avanti Products authorized service center will provide expert repair service, scheduled at a time that is convenient for you. Our trained servicers know your appliance inside and out. |
| YOUR AVANTI PRODUCTSWARRANTY | Staple your sales receipt here. Proof of original purchase date is needed to obtain service under warranty. |
| WHAT IS COVERED – LIMITED ONE-YEAR WARRANTYAvanti Products warrants that the product is free from defects in materials and/or workmanship for a period of twelve (12) months from the date of purchase by the original owner. The foregoing timeline begins to run upon the date of purchase, and shall not be stalled, tolled, extended, or suspended for any reason whatsoever unless described in detail in the warranty document. For one year from the date of purchase by the original owner, Avanti products will, at its option, repair or replace any part of the product which proves to be defective in material or workmanship under normal use. Avanti Products will provide you with a reasonably similar product that is either new or factory refurbished. During this period Avanti Products will provide all parts and labor necessary to correct such defects free of charge, so long as the product has been installed and operated in accordance with the written instructions in this manual. In rental or commercial use, the warranty period is 90 days. All Avanti appliances of 4.2 cubic feet capacity or less must be brought/sent to the appliance service center for repair. | |
| WARRANTY EXCLUSIONS / WHAT IS NOT COVERED:The warranty coverage described herein excludes all defects or damage that are not the direct fault of Avanti Products, including without limitation, one or more of the following: | |
| A failure to comply with any applicable state, local, city, or county electrical, plumbing and/or building codes, regulations, or laws, including failure to install the product in strict conformity with local fire and building codes and regulations.Any external, elemental and/or environmental forces and factors, including without limitation, rain, wind, sand, floods, fires, mud slides, freezing temperatures, excessive moisture or extended exposure to humidity, lightning, power surges, structural failures surrounding the appliance, and acts of God. | |
| Content losses of food or other content due to spoilage.Incidental or consequential damagesParts and labor costs for the following will not be considered as warranty:Light bulbs and/or plastic housing.Shipping and handling costs associated with the replacement of the unit.Repairs performed by unauthorized servicers. Service calls that are related to external problems, such as abuse, misuse, inadequate electrical power, accidents, fire, floods, or any other acts of God. | Failure of the product if it is used for other than it intended purpose.The warranty does not apply outside the Continental USA.Surcharges including but not limited to, any after hour, weekend, or holiday service calls, tolls, ferry trip charges, or mileage expense for service calls to remote areas. |
| In no event shall Avanti Products have any liability or responsibility whatsoever for damage to surrounding property, including cabinetry, floors, ceilings, and other structures and/or objects around the product. Also excluded from this warranty are scratches, nicks, minor dents, and other cosmetic damages on external surfaces and exposed parts; Products on which the serial numbers have been altered, defaced or removed; service visits for customer education, or visits where there is nothing wrong with the product; correction of installation problems (you are solely responsible for any structure and setting for the product, including all electrical, plumbing and/or other connecting facilities, for proper foundation/flooring, and for any alterations including without limitation cabinetry, walls, floors, shelving etc., as well as the resetting of breakers or fuses. | |
| OUT OF WARRANTY PRODUCTAvanti Products is under no obligation, at law or otherwise, to provide you with any concessions, including repairs, pro-rates, or product replacement, once this warranty has expired. | |
Ayúdenos a ...
natural_image
Warning symbol: black triangle with exclamation mark (no text or numbers)SOUTENIR. 65 MISE EN GARDE POUR LES RÉSIDENTS DE CALIFORNIE
ATTENTION:
- ARRIVÉE D'EAU
- Eau chaude / froide BOUTONS DE DISTRIBUTEURS
- SIGNAUX LUMINEUX
- ROBINETS eau chaude / froide
- AMOVIBLE LE BAC
- BOUTONS DE PUISSANCE
ROUGE: EAU CHAUDE
VERT: EAU FROIDE
ATTENTION / AVERTISSEMENT
NE METTEZ PAS l'interrupteur CHAUD D'ALIMENTATION EN EAU AVANT DÉPÔT DE LA CHAUFFE EAU AVEC DE L'EAU. CECI AFFECTER LA SURCHAUFFE ET SHUTDOWN.
Thank you for purchasing this fine Avanti product. Please fill out this form and return it to the following address within 100 days from the date of purchase and receive these important benefits:
AVANTI PRODUCTS LLC P.O.Box 520604 – Miami, Florida 33152
ÿ Protect your product:
We will keep the model number and date of purchase of your new Avanti product on file to help you refer to this information in the event of an insurance claim such as fire or theft.
ÿ Promote better products:
We value your input. Your responses will help us develop products designed to best meet your future needs.
-(detach here)
Avanti Registration Card
| Name | Model # Serial # |
| Address | Date Purchased Store / Dealer Name |
| City State Zip | E-mail Address |
| Area Code Phone Number | Occupation |
| Did You Purchase An Additional Warranty | As your Primary Residence, Do You: |
| £ Extended£ None | £ Own £ Rent |
| Your Age: | |
| Reason for Choosing This Avanti Product:Please indicate the most important factorsThat influenced your decision to purchase this product: | £ under 18 £ 18-25 £ 26-30£ 31-35 £ 36-50 £ over 50Marital Status:£ Married £ Single |
| £ Price£ Product Features£ Avanti Reputation£ Product Quality£ Salesperson Recommendation£ Other:____£ Friend / Relative Recommendation£ Warranty£ Other:____ | Is This Product Used In The:£ Home £ BusinessHow Did You Learn About This Product:£ Advertising£ In-Store Demo£ Personal Demo |
Comments:
WDT40Q3S-IS - VER 1.0 - 06252019
PRINTED IN CHINA


- HELP US HELP YOU...
- Read this guide carefully.
- Avanti Customer Service 800-220-5570
- CAUTION:
- Write down the model and serial numbers.
- IF YOU NEED SERVICE
- APPLIANCE SAFETY
- Your safety and the safety of others are very important.
- IMPORTANT SAFEGUARDS
- DANGER
- WARNING
- PARTS AND FEATURES
- ATTENTION / WARNING
- DO NOT TURN ON THE HOT WATER POWER SWITCH BEFORE FILLING THE HOT WATER TANK WITH WATER. THIS WILL CAUSE THE UNIT TO OVERHEAT AND SHUTDOWN.
- Electrical Connection
- \~ Warning\~
- ÿ EXTENSION CORD
- ÿ SURGE PROTECTOR
- INSTALLATION GUIDELINES:
- OPERATION INSTRUCTIONS
- Before Using Your Water Dispenser
- OPERATING YOUR WATER DISPENSER
- ÿ Steps to replace water bottles
- ÿ Indicator Lights:
- DISPENSING WATER
- CARE AND MAINTENANCE
- TAKING DISPENSER OUT OF SERVICE
- PROBLEMS WITH YOUR WATER DISPENSER
- SERVICE FOR YOUR WATER DISPENSER
- ATTENTION / AVERTISSEMENT
- NE METTEZ PAS l'interrupteur CHAUD D'ALIMENTATION EN EAU AVANT DÉPÔT DE LA CHAUFFE EAU AVEC DE L'EAU. CECI AFFECTER LA SURCHAUFFE ET SHUTDOWN.
- AVANTI PRODUCTS LLC P.O.Box 520604 – Miami, Florida 33152
- ÿ Protect your product:
- ÿ Promote better products:
Brand : Avanti
Model : WDT40Q3SIS
Category : Water dispenser