
WD29EC - Water dispenser Avanti - Free user manual and instructions
Find the device manual for free WD29EC Avanti in PDF.


| Product Type | Water Dispenser |
| Brand | Avanti |
| Model | WD29EC |
| Tank Capacity | 3 gallons (11.4 L) |
| Available Temperatures | Hot water (90°C), cold water (10°C), room temperature water |
| Power Supply | 115 V, 60 Hz |
| Total Power | 650 W (heating 500 W, cooling 150 W) |
| Dimensions (L x D x H) | 30 x 30 x 45 cm |
| Weight | 15 kg |
| Tank Material | Stainless Steel |
| Refrigerant | R134a |
| Anti-drip System | Yes |
| Water Level Indicator | Yes |
| Maintenance and Cleaning | Clean the tank every 3 months with a vinegar/water mixture (1:1) |
| Safety | Child lock for hot water |
| Spare Parts | Available on Avanti website |
| Repairability | Repairability index: 7.5/10 (estimate) |
Frequently Asked Questions - WD29EC Avanti
User questions about WD29EC Avanti
0 question about this device. Answer the ones you know or ask your own.
Ask a new question about this device
Download the instructions for your Water dispenser in PDF format for free! Find your manual WD29EC - Avanti and take your electronic device back in hand. On this page are published all the documents necessary for the use of your device. WD29EC by Avanti.
USER MANUAL WD29EC Avanti
Before operating this unit, please read these instructions completely and save them for future use.
Operating Instructions
(Household) Heated Eyelash Curler


Thank you for choosing a Panasonic Heated Eyelash curler. Please read all instructions before use.
Safety Precautions
Warning
- Keep the appliance dry.

The symbol on the left means "Do not wash the product with water".
- Terminate the usage when there is abnormality or failure.
- Continued use of the eyelash curler may cause fire, electric shock or other injuries.
- Keep out of the reach of toddlers and infants.
- Failure to do so may result in burns or accidental ingestion of the accessories or removable small parts.
Caution
- Do not push the rotating comb against the eyelids.
- Do not use the appliance without the rotating comb.
- Do not use the appliance without the heater cover.
- Doing so may result in damage your eyes, burns or other injuries.
- If you have conjunctivitis or any other eye disease, consult a medical professional before use.
- Failure to do so may damage your eyes.
- Stop using the appliance if your eyes feel uncomfortable.
- If the heater touches your skin and feels hot, cool the affected area with water.
- If you feel any abnormality in your eye or eyelid during or after use, consult a medical professional.
- Failure to do so may damage your eyes.
- Do not use the appliance for any purpose other than curling eyelashes.
- Be careful when using the appliance around other people as they may unintentionally bump into you.
- Failure to do so may result in burns or injury.
- Never alter the appliance. Also, do not disassemble or repair it.
- Doing so may cause unexpected accidents or trouble. Contact the store where you purchased the appliance or authorized service center for repair.
• Always follow the cautions printed on the battery.
- Check the polarity of the battery (+ and -) and install it correctly.
- Remove the battery immediately when it is discharged.
- Remove the battery when not using the appliance for an extended period of time.
- Use the battery by the recommended use-by date.
- Failure to do so may cause overheating or explosion of the battery, injury or contamination of surroundings due to leakage.
- Do not drop the eyelash curler, or subject it to impact.
- Doing so could result in injury or malfunction.
- Do not disassemble the battery or throw it into a fire. Do not short-circuit the battery.
- Doing so may result in burns or injury.
-
Do not immerse the eyelash curler in water or get it wet.
-
Doing so may result in malfunction.
- Never use thinners, benzine, or alcohol to clean the eyelash curler since it may cause malfunction or cracking/discoloration of the parts. Clean using a mild detergent.
- This appliance is not intended for use by persons (including children) with reduced physical, sensory or mental capabilities, or lack of experience and knowledge, unless they have been given supervision or instruction concerning use of the appliance by a person responsible for their safety. Children should be supervised to ensure that they do not play with the appliance.
Parts identification (Fig. 1)
A Main body
① Heater cover
② Rotating comb
③ Power switch [0/1]/Rotation switch [↑]
④ Battery cover
⑤ Ready mark
B Protective cap
© Cleaning brush
Installing or replacing the battery
- Make sure the power switch is in the "0" position.
- Rotate the battery cover in the direction of the arrow, and align the marks. (Fig. 2)
- Remove the battery cover. (Fig. 3)
- Insert the battery. (Fig. 4)
- Be careful to insert the battery with + and - correctly oriented.
- Rotate the battery cover in the direction of the arrow, and align the marks. (Fig. 5)
Notes
- You can use the appliance for approximately 3 weeks with the Panasonic AA (LR6) alkaline battery. (When used once a day, 2 minutes at a time, at a room temperature of 25^ ( 77^ )) (The power and number of possible uses will vary according to the batteries.)
- Use only AA (LR6) alkaline battery.
- Please dispose of used battery appropriately.
Use
Using the eyelash curler
- Remove the protective cap.
- Slide the power switch to the "1" position to turn the appliance on.
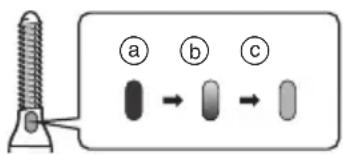
• The heater will turn ON. - Check that the ready mark has changed from purple to pink.
- It will take 1 or 2 minutes for it to reach optimal temperature when the room temperature is 25^ (77 °F).

a Purple
(b) Starts to change the color. (The appliance can be used.)
© Pink
- Depending on battery usage conditions, it may take some time for the ready mark to completely change color.
- The ready mark may not change color if the room temperature is too low. However, if the rotating comb is warmed up for 2 minutes or longer, it can be used.
Use this appliance in a temperature of 15 °C (59 °F) to 35 °C (95 °F). The following may occur when used under 15 °C (59 °F):
- It may not curl as much.
- Battery life becomes shorter.
-
It will take longer for the ready mark to turn its color.
-
Apply commercially available mascara.
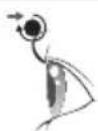
- Touch the rotating comb against your eyelashes and press the rotation switch to curl.
| Rotation switch | Left hand Right hand Direction | ||
 |  |  |  |
 |  |  |  |
- The rotating comb rotates in the “▲or”▼ direction.
-
The finished curl differs depending on the direction of rotation. (See page 11.)
-
If you move the rotating comb slowly, it will be easier to create the curl and fewer touches will be needed. (Repeated touching may cause the mascara to come off.)
- Slide the power switch to the "0" position to turn the appliance off.
• The heater will turn OFF. - Attach the protective cap.
- Apply mascara to finish.


Certain types of false eyelashes and eyelash glue are weakened by heat and may change color or deteriorate.
Forming curls
Until you get used to it, practice the movement several times.
▶ Natural curl
1 Make the lashes stand up at their base.
- Do not press the rotation switch.

Keep the comb on the base of the lashes for about 3 seconds
2 Create the shape.
Press up ( ) on the rotation switch.

Move the comb slowly towards the tips
4 Repeat Steps 1 to 3 several times.

Finished lashes
3 Curl the tips.
Press up ( ) on the rotation switch.

Keep the comb on the tips for about 3 seconds
▶ Strong curl
1 Make the lashes stand up at their base.
- Do not press the rotation switch.

Keep the comb on the base of the lashes for about 3 seconds
2 Create the shape.
Press down ( ) on the rotation switch.

Move the comb slowly towards the tips
3 Curl the tips.
Press down ( ) on the rotation switch.
Keep the comb on the tips for about 3 seconds

Repeat Steps 1 to 3 several times.

Finished lashes

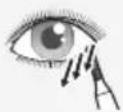
Lower eyelashes

Push the eyelashes lightly to create a curl.
Press down ( ) on the rotation switch.

Keep the comb in position with the rotation on for about 3 seconds
Tips
Lift the eyelashes at the outer corners of the eyes
To emphasize the width of your eyes, angle the rotating comb and touch the eyelashes at the outer corner of the eye, moving the comb towards the outer end of the eyebrow to curl.

Tips
Making the inner corner of the eyes look wider
To strongly emphasize the eyelashes at the inner corners of the eye, angle the rotating comb and move it towards the inner end of the eyebrow.

Move the rotating comb with a zig-zag motion to catch the bases of the eyelashes
Use this technique when you wish to catch the lashes to facilitate curling.

Tips
Making the lower lashes at the outer corner of the eye look fuller
Hold the rotating comb vertically and move it towards the center of the eye. Move the appliance without using rotation.
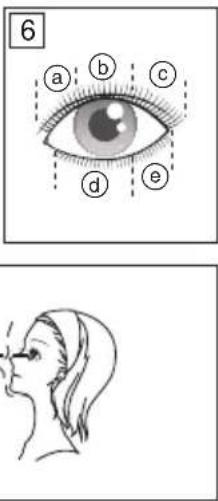
▶ Blocking (Fig. 6)
If you separate the portions to be curled into sections, it is easier to finish the curling.
- Divide upper eyelashes into 3 sections based on imaginary lines extending from the left and right edges of the iris.
(a) Inner corner of eye to inner edge of iris
⑥ Inner edge of iris to outer edge of iris
© Outer edge of iris to outer corner of eye
- Divide the lower eyelashes into 2 sections
(d) Inner corner of eye to outer edge of iris
(e) Outer edge of iris to outer corner of eye
▶ Angle of face (Fig. 7)
Use while looking slightly downward.
- Place a mirror directly in front of you and raise your chin.
Mascara appropriate as a base
- Waterproof type (including long, volume, and curl)
- Long type
- Curl type
Mascara appropriate for finishing touch
• Volume type
Clean
- Make sure the power switch is in the "0" position.
- Cleaning will be more difficult if the mascara dries and becomes too hard. There is also a risk that the rotating comb will not rotate. We therefore recommend that you clean after every use.
Main body
Immerse a cloth in water with a little hard soap dissolved in it, squeeze out the cloth, and wipe clean.
Rotating comb
After every use, clean with the supplied cleaning brush.
• After the mascara has dried, move the cleaning brushes along the grooves of the comb, focusing on the gaps in the comb.
• Take care not to press too hard.

Attaching the rotating comb
Align the heater cover grooves (a) with the mark on the rotating comb, and fully insert the main body into the rotating comb.
• If the heater cover comes off, refit it securely.

natural_image
Diagram showing a screw and its tip with an arrow indicating direction (no text or symbols)Specifications
| Model No. EH-SE60 | |
| Power source | AA (LR6) alkaline battery x 1(sold separately) |
This product is intended for household use only.
FOR YOUR CONVENIENCE, WE HAVE ESTABLISHED A TOLL-FREE (IN USA ONLY) NATIONAL ACCESSORY PURCHASE HOT LINE AT 1-800-332-5368. IN CANADA, CONTACT PANASONIC CANADA INC. AT THE ADDRESS OR TELEPHONE NUMBER ON THE BACK PAGE.
natural_image
Diagram showing a screw and its pin (no text or symbols present)Spécifications
natural_image
Diagram showing a screw and its tip with an arrow indicating direction (no text or symbols)Especificaciones
natural_image
Diagram showing a tool and a screw with an arrow indicating direction (no text or symbols)Especificações
Panasonic Corporation of North America
One Panasonic Way, Secaucus, NJ 07094
IN CANADA CONTACT:
AU CANADA, COMMUNIQUEZ AVEC:
Panasonic Canada Inc.
5770 Ambler Drive, Mississauga, Ontario L4W 2T3
(905) 624-5010
EN MEXICO CONTACTE CON:
Panama, Republic of Panama
(507) 229-2955
NO BRASIL ENTRE CONTATO COM:
Panasonic do Brasil Limitada.
Service • Assistance • Accessories


- Safety Precautions
- Warning
- Caution
- Parts identification (Fig. 1)
- Installing or replacing the battery
- Notes
- Use
- Using the eyelash curler
- Forming curls
- Make the lashes stand up at their base.
- Create the shape.
- Repeat Steps 1 to 3 several times.
- Curl the tips.
- ▶ Strong curl
- Tips
- Lift the eyelashes at the outer corners of the eyes
- Making the inner corner of the eyes look wider
- Move the rotating comb with a zig-zag motion to catch the bases of the eyelashes
- Making the lower lashes at the outer corner of the eye look fuller
- ▶ Blocking (Fig. 6)
- ▶ Angle of face (Fig. 7)
- Clean
- Main body
- Rotating comb
- Attaching the rotating comb
Brand : Avanti
Model : WD29EC
Category : Water dispenser