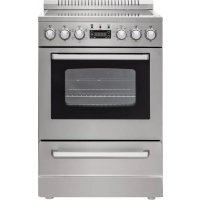
DER24P3S - Cooker Avanti - Free user manual and instructions
Find the device manual for free DER24P3S Avanti in PDF.


| Product Type | Electric Range |
| Brand | Avanti |
| Model | DER24P3S |
| Width | 24 inches (approx. 61 cm) |
| Height | 36 inches (approx. 91 cm) |
| Depth | 25 inches (approx. 63.5 cm) |
| Weight | Approx. 45 kg |
| Power Supply | 240 V ~ 60 Hz, 40 A |
| Number of Burners | 4 electric burners (3x 1200 W, 1x 1800 W) |
| Maximum Oven Temperature | 550 °F (288 °C) |
| Oven Bake Element | 2100 W (lower) |
| Broil Element | 2000 W (upper) |
| Timer | Digital, adjustable from 1 to 99 minutes |
| Oven Light | 15 W bulb, type E14, 300 °C |
| Oven Racks | 2 removable racks |
| Storage Drawer | Removable under oven |
| Anti-Tip Device | Anti-tip bracket included to be installed on floor |
| Cleaning | Enameled surfaces, mild detergent and warm water |
| Warranty | 1 year parts and labor |
| Spare Parts Available | Bulbs, heating elements, knobs, racks, drawer |
Frequently Asked Questions - DER24P3S Avanti
User questions about DER24P3S Avanti
0 question about this device. Answer the ones you know or ask your own.
Ask a new question about this device
Download the instructions for your Cooker in PDF format for free! Find your manual DER24P3S - Avanti and take your electronic device back in hand. On this page are published all the documents necessary for the use of your device. DER24P3S by Avanti.
USER MANUAL DER24P3S Avanti
Avanti has a policy of continuous improvement on its products and reserves the right to change materials and specifications without notice.
Avanti Products LLC
P.O. Box 520604
Miami, FL 33152
www.avantiproducts.com
TABLE OF CONTENTS
| Help Us Help You ... | 3 |
| Range Safety | 4 |
| Important Safeguides | 5 |
| The Anti-tip Bracket | 6 |
| Parts and Features | 7 |
| Important Safety Instructions | 8 – 9 |
| Installation Instructions | 10 |
| Before Using Your Electric Range | 10 |
| Important Precautions and Recommendations | 11 |
| Installation of Your Electric Range | 12 – 13 |
| Electrical Connection | 14 |
| Leveling the Range | 15 |
| Anti-tip Bracket Installation | 15 |
| Operating Your Electric Range | 16 |
| Control Panel | 16 – 17 |
| Using the Oven | 18 – 19 |
| Using the Surface Unit | 20 |
| Cookware Tips | 20 |
| Care and Maintenance | 21 |
| General Information | 21 |
| Cleaning Your Range | 21 |
| Removable Storage Drawer | 21 |
| Troubleshooting Guide | 22 |
| Service for Your Appliance | 23 |
| Wiring Diagram | 23 |
| Your Avanti Products Warranty | 24 |
| Instrucciones en Español | 25 – 36 |
| Instructions en Français | 37 - 58 |
| Registration Information and Registration Card | Last Page |
HELP US HELP YOU...
| Read this guide carefully. | Write down the model and serial numbers. |
| It is intended to help you operate and maintain your new appliance properly. | You'll find them on a plate located on the rear outside wall of the appliance. |
| Keep it handy to answer your questions. If you don't understand something or you need more help, please call: | Please write these numbers here: |
| Avanti Customer Service 800-220-5570 | Date of Purchase |
| Keep proof of original purchase date (such as your sales slip) with this guide to establish the warranty period. | Model Number |
| Serial Number | |
| CAUTION: THIS APPLIANCE IS NOT DESIGNED FOR THE STORAGE OF MEDICINE OR OTHER MEDICAL PRODUCTS. | Use these numbers in any correspondence or service calls concerning your appliance. If you received a damaged appliance, immediately contact the dealer (or builder) that sold you the appliance. Save time and money. Before you call for service, check the Troubleshooting Guide. It lists causes of minor operating problems that you can correct yourself. |
IF YOU NEED SERVICE
| We're proud of our service and want you to be pleased. If for some reason you are not happy with the service you receive, here are some steps to follow for further assistance.FIRST, contact the people who serviced your appliance. Explain why you are not pleased.In most cases, this will solve the problem. | NEXT, if you are still not pleased, write all the details, including your telephone number, and send it to:Customer ServiceAvanti Products10880 NW 30 StreetMiami, FL 33172 USA |
RANGE SAFETY
Your safety and the safety of others are very important.
We have provided many important safety messages in this manual and on your appliance. Always read and obey all safety messages.

This is the Safety Alert Symbol.
This symbol alerts you to potential hazards that can kill or injure you and others.
All safety messages will follow the Safety Alert Symbol and either the words
"DANGER", "WARNING" or "CAUTION". These words mean:

DANGER

Danger means that failure to heed this safety statement may result in severe personal injury or death.

WARNING

Warning means that failure to heed this safety statement may result in extensive product damage, serious personal injury, or death.
CAUTION
Caution means that failure to heed this safety statement may result in minor or moderate personal injury, or property or equipment damage.
All safety messages will alert you to what the potential hazard is, tell you how to reduce the chance of injury, and let you know what can happen if the instructions are not followed.

PROP. 65 WARNING FOR CALIFORNIA RESIDENTS
WARNING:
Cancer And Reproductive Harm
www.p65warnings.ca.gov
IMPORTANT SAFEGUIDES

Before the appliance is used, it must be properly positioned and installed as described in this manual, so read the manual carefully. To reduce the risk of fire, electrical shock or injury when using the appliance, follow basic precaution, including the following:

DANGER

- It is recommended that a separate circuit, serving only your appliance be provided. Use receptacles that cannot be turned off by a switch or pull chain.
- Never clean appliance parts with flammable fluids. These fumes can create a fire hazard or explosion. And do not store or use gasoline or other flammable vapors and liquids in the vicinity of this or any other appliance. The fumes can create a fire hazard or explosion.
- Before proceeding with cleaning and maintenance operations, make sure the power line of the unit is disconnected.
- Unplug the appliance or disconnect power before cleaning or servicing. Failure to do so can result in electrical shock or death.
- Do not attempt to repair or replace any part of your appliance unless it is specifically recommended in this manual. All other servicing should be referred to a qualified technician.

WARNING

- This appliance shall not be used for space heating. The surface unit should not be operated without cookware. This information is based on safety considerations.
• All openings in the wall behind the appliance and in the floor under the appliance shall be sealed. - Keep appliance area clear and free from combustible materials, gasoline, and other flammable vapors.
• Do not obstruct the flow of ventilation air. - Disconnect the electrical supply to the appliance before servicing.
- When removing appliance for cleaning and/or service:
• Disconnect AC power supply.
• Carefully remove the range by pulling outward.
CAUTION: Range is heavy. Use care in handling.
- The misuse of oven door (e.g. stepping, sitting, or leaning on them) can result in potential hazards and /or injuries.
- When installing or removing the range for service, a rolling life jack should be used. Do not push against any of the edges of the range in an attempt to slide it into or out of the installation. Pushing or pulling a range (rather than using a lift jack) also increases the possibility of bending the leg spindles or the internal coupling connectors.
- It is important for the appliance to be leveled in order to work properly. You may need to make several adjustments to level it.
• Never allow children to operate, play with or crawl inside the appliance. - Electrical Grounding Instructions - The appliance must be installed and grounded by a qualified technician in accordance with the National Electrical Code ANSI/NFPA No. 70 (Latest Edition) and local electrical code requirements.
- Replacement Parts – Only authorized replacement parts may be used in performing service on the range. Replacement parts are available from factory authorized parts distributors. Contact the nearest Avanti service center in your area.
• Take care to prevent aluminum foil and meat probes from contacting the heating elements.
THE ANTI-TIP BRACKET
The range will not tip during normal use. However, the range can tip if you apply too much force or weight to the open door without the anti-tip bracket fastened down properly.
To reduce the risk of tipping the appliance, the appliance must be secured by properly installed anti-tip device packed with the appliance.
PARTS & FEATURES
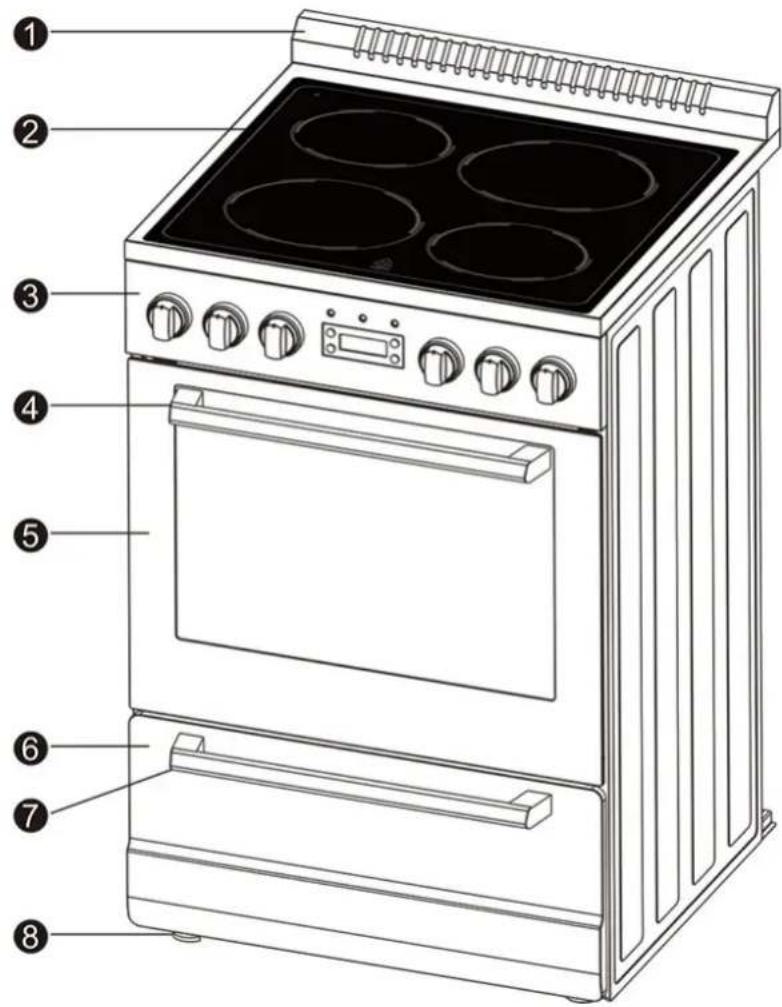
- Backsplash with integrated oven vents
- Cooktop
- Control panel
- Oven Handle
- Oven Door
- Storage Drawer
- Storage Drawer Handle
- Leveling Legs (4)
IMPORTANT SAFETY INSTRUCTIONS
 WARNING WARNING | To reduce the risk of fire, electrical shock, or injury when using the range, follow these basic precautions: |
| Read all instructions before using the range.WARNING:TO REDUCE THE RISK OF TIPPING OF THE RANGE, THE RANGE MUST BE SECURED BY PROPERLY INSTALLED ANTI-TIP DEVICE. TO CHECK IF THE DEVICE IS INSTALLED PROPERLY, SILDE RANGE FORWARD, LOOK FOR ANTI-TIP BRACKET SECURELY ATTACHED TO FLOOR, AND SLIDE RANGE BACK SO REAR RANGE FOOT IS UNDER ANTI-TIP BRACKET.CAUTION:Do not store items of interest to children in cabinets above a range or on the backsplash of a range – children climbing on the range to reach items could be seriously injured.Proper Installation - Be sure the range is properly installed and grounded by a qualified technician.Never use your appliance for warming or heating the room.Do Not Leave Children Alone - Children should not be left alone or unattended in area where the appliance is in use. They should never be allowed to sit or stand on any part of the appliance.Wear Proper Apparel - Loose fitting or hanging garments should never be wornwhile using the appliance.User Servicing - Do not repair or replace any part of the appliance unless specifically recommended in the manual. All other servicing should be referred to a qualified technician.Storage in or on Appliance - Flammable materials should not be stored in an oven or near the surface units.Do Not Use Water on Grease Fires - Smother fire or flame or use dry chemical orfoam-type extinguisher.Use Only Dry Potholders - Moist of damp potholders on hot surfaces may result in burns from steam. Do not let potholder touch hot heating elements. Do not use a towel or other bulky cloth.Use Proper Pan Size - This appliance is equipped with one or more surface units of different size. Select utensils having flat bottoms large enough to cover the surface unit heating element. The use of undersized utensils will expose a portion of the heating element to direct contact and may result in ignition of clothing. Proper relationship of utensil to burner will also improve efficiency.Never Leave Surface Units Unattended at High Heat Settings – Boil overcauses smoking and greasy spillovers that may ignite.Make Sure Reflector Pans or Drip Bowls Are in Place - Absence of these pans or bowls during cooking may subject wiring or components underneath to damage.Protective Liners - Do not use aluminum foil to line surface unit drip bowls or oven bottoms, except as suggested in the manual. Improper installation of these liners may result in a risk of electric shock, or fire.Glazed Cooking Utensils - Only certain types of glass, glass/ceramic, ceramic, earthenware, or other glazed utensils are suitable for range top service without breaking due to sudden change in temperatureUtensil Handles Should Be turned Inward and Not Extend Over Adjacent Surface Units – To minimize burns, ignition of flammable materials, and spillage due to unintentional contact with the utensil, the handle of a utensil should be positioned so that it is turned inward and does not extend over adjacent surface units. | |
- Do Not Soak Removable Heating Elements – Heating elements should never be immersed in water.
- Do Not Cook on Broken Cook-top – If cook-top should break, cleaning solutions and spillovers may penetrate the broken cook-top and create a risk of electric shock. Contact a qualified technician immediately.
- Clean Cook-top With Caution – If a wet sponge or cloth is used to wipe spills on a hot cooking area, be careful to avoid steam burn. Some cleaners can produce noxious fumes if applied to a hot surface.
- Use Care When Opening Door – Let hot air or steam escape before removing or replacing food.
- Do Not Heat Unopened Food Containers – Build-up of pressure may cause container to burst and result in injury.
- Keep Oven Vent Ducts Unobstructed.
- Placement of Oven Racks – Always place oven racks in desired location while oven is cool. If rack must be moved while oven is hot, do not let potholder contact hot heating element in oven.
- Do Not Touch Surface Units, Heating Elements, Interior Surfaces of Oven or Areas Near Units - Surface units and heating elements may be hot even though they are dark in color. Area near surface and interior surfaces of an oven become hot enough to cause burns. During and after use, do not touch, or let clothing or other flammable materials contact surface units, areas near units or interior surfaces of oven until they have had sufficient time to cool. Other surfaces of the appliance may become hot enough to cause burns – among these surfaces are oven vent openings and surfaces near these openings, oven doors, and window of oven doors.
This Unit Is For Indoor Use Only -SAVE THESE INSTRUCTIONS-
INSTALLATION INSTRUCTIONS

WARNING
HAVE THIS RANGE INSTALLED BY A QUALIFIED INSTALLER.
Improper installation, adjustment, alteration or maintenance can cause injury or property damage. Consult a qualified installer or service agency.
IMPORTANT – SAVE FOR THE LOCAL ELECTRICAL INSPECTOR'S USE.
ÿ BEFORE USING YOUR ELECTRIC RANGE
- Remove the exterior and interior packing. - Check to be sure you have all of the following parts:
• 2 Oven Racks
• 1 Broiler Tray and Grid
• 1 Rotisserie Rod with Forks (Model DER24P3S ONLY)
• 1 Anti-tip Bracket
(Packed in the Styrofoam packing above the range – DO NOT DISCARD)
• 1 Instruction Manual
• 1 Backsplash Assembly (Backsplash and (5) five screws)
(Packed in the Styrofoam packing above the range - DO NOT DISCARD)
• Clean the interior surface with lukewarm water using a softcloth.
- Have your range installed and properly grounded by a qualified installer in accordance with the installation instructions.
- Do not attempt to repair or replace any part of your range unless it is specifically recommended in this manual.
- Do not remove permanently affixed labels, warnings, or plates from the product. This may void the warranty.
- The installer should leave these instructions with the consumer who should retain for local inspector's use and for future reference.
- Please observe all local and national codes and ordinances.
NOTICE
Before you use this range for the first time: The heating elements have a protective coating, which must be burned off before use. To do this, open the oven door and set the temperature control knob to 550°F. Turn the function selector to the Bake element and the Broil element separately to approximately 15 minutes. It is important to ensure adequate ventilation during this period.
IMPORTANT:
This range is designed and manufactured solely for the cooking of domestic (household) food and is not suitable for any non-domestic application and therefore should not be used in a commercial environment.
The range warranty will be void if the range is used within a non-domestic environment i.e. a semi commercial, commercial or communal environment.
ÿ IMPORTANT PRECAUTIONS AND RECOMMENDATIONS
After having unpacked the range, check to ensure that it is not damaged, and the oven door closes correctly. In case of doubt, do not use it and consult your supplier or a professionally qualified technician.
Packing elements (i.e. plastic bags, polystyrene foam, packing straps, etc.) should not be left around within easy reach of children, as these may cause serious injuries.
The range has been thoroughly tested for safe and efficient operation. However, as with any appliance, there are specific installation and safety precautions that must be followed to ensure safe and satisfactory operation.
- Do not attempt to modify the technical characteristics of the appliance as this may become dangerous to use.
- Do not carry out cleaning or maintenance operations on the appliance without having previously disconnected it from the electric power supply.
• After use, ensure that the knobs are in OFF position or the ○ “standby” position.
• Never touch the appliance with wet hands or feet.
• Do not operate the appliance barefooted.
- Do not allow children or other incapable people to use the appliance without supervision.
• During and after use of the range, certain parts will become very hot. Do not touch cooktop.
- Keep children away from the range when it is in use.
• Fire Risk! Do not store flammable materials in the oven or in the bottom drawer.
- Fire Risk! Do not attempt to dry clothing or any other type of textile in the oven or in the bottom drawer.
• Make sure that electrical cables connecting other appliances in the proximity of the range cannot come into contact with the hob or become entrapped in the oven door.
- Do not line the oven walls with aluminum foil. Do not place shelves, pans, backing trays, broil tray or other cooking utensils on the base of the oven chamber.
- The manufacturer declines all liability for injury to persons or damage to property caused by incorrect or improper use of the range.
- To avoid any possible hazard, the appliance must be installed by qualified personnel only. Any repairs by unqualified persons may result in electric shock or short circuit. In order to avoid possible injuries to your body or to the range, do not attempt ant repairs by yourself. Such work should be carried out by qualified service personnel only.
- Burn Hazard! The oven and cooking accessories may become very hot during operation. Make sure children are kept out of reach and warn them accordingly. To avoid burns use clothes and gloves when handling hot parts or utensils.
- Stand away from the range when operating oven door. Hot air or steam which escapes can cause burns to hands, face, and/or eyes.
- Never clean the oven with any high-pressure steam cleaning devices, as it may provoke a short circuit.
- Do not leave anything on the top of oven vent. Never cover the oven vent opening with aluminum foil or any other material.
• This range is intended for household use. Never use the appliance for any other purpose.
- If you should decide not to use the range any longer (or decide to substitute an older model), before disposing of it, it is recommended that it be made inoperative in an appropriate manner in accordance to health and environmental protection regulations, ensuring in particular that all potentially hazardous parts be made harmless, especially in relation to children who could play with old appliances. Remove the door before disposal to prevent entrapment.
ÿ INSTALLATION OF ELECTRIC RANGE
- The electric range must be installed by a qualified technician. Make sure you have everything necessary for correct installation. It is the installer's responsibility to comply with installation clearances specified in the manual.
- Cabinet opening dimensions that are shown above must be used. Given dimensions are minimum clearances. The minimum spacings must be maintained between the appliance cooking surface and the horizontal surface above the cooking top.
- 30 inches is the minimum clearance between the top of the cooking surface and the bottom of an unprotected wood or metal cabinet
- To eliminate the risk of burns or fire by reaching over heated surface units, cabinet storage space located above the surface units should be avoided. If cabinet storage is to be provided, the risk can be reduced by installing a range hood that projects horizontally a minimum of 5 inches beyond the bottom of the cabinets.
- Place your electric range on a floor that is strong enough to support it when it is fully assembled as above picture. To level your electric range, adjust the leveling legs at the bottom of the unit.
- Avoid locating the unit in moist areas. As this may result in the risk of electricalshock.
ÿ ELECTRICAL CONNECTION

WARNING
Improper grounding can result in the risk of electrical shock. If the power cord is damaged, have it replaced by an authorized Avanti Products service center.
- The appliance must be properly installed and grounded by a qualified technician in accordance with the National Electrical Code ANSI/NFPA No. 70 (Latest Edition) and local electrical code requirements. Installation should be made by a licensed electrician.
- The range may be connected by means of permanent "Hard Wiring" or "Power Supply Cord Kit". Power supply cord is not supplied but is available through your local electric supply house.
- Use only 3-conductor or 4-conductor UL listed range cord rated at 40 amps with 125/250V minimum voltage range. These cords may be provided with strain relief or conduit connector.
- The range must be connected to the proper electrical voltage and frequency as specified on the rating label.
- The range can be connected directly to the fused disconnect (or circuit breaker box) through flexible, armored or non-metallic sheathed, copper cable (with grounding wire). Allow two to three feet of slack in the line so that it can be moved if servicing is ever necessary.
• For personal safety, the range must be properly grounded. - Remove house fuse or open circuit breaker before beginning installation.
- Do not attempt to repair or replace any part of the appliance unless it is specifically recommended in this manual. All other servicing should be referred to a qualified technician.
- To minimize the possibility of electric shock, disconnect this appliance from the A/C power supply before attempting any maintenance.
NOTE: Turning the appliance off does not disconnect the appliance from the power supply. We recommend having a qualified technician service your appliance.
Installation of the Backsplash
natural_image
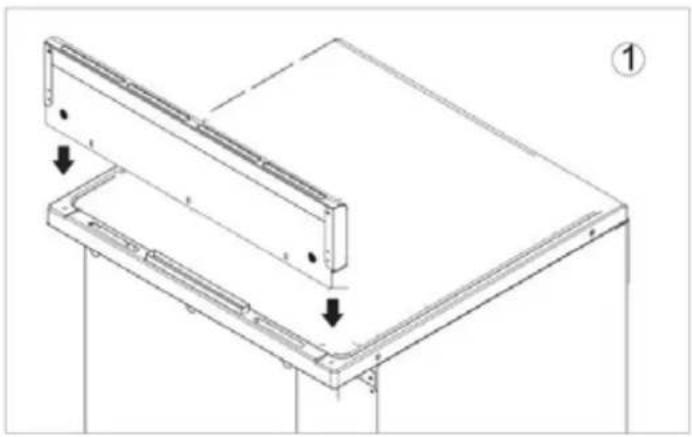
Technical diagram of a mechanical assembly with two components and directional arrows indicating movement (no text or symbols)Step 1.: Sit the backsplash on the rear part of the range.(see diagram above)
natural_image
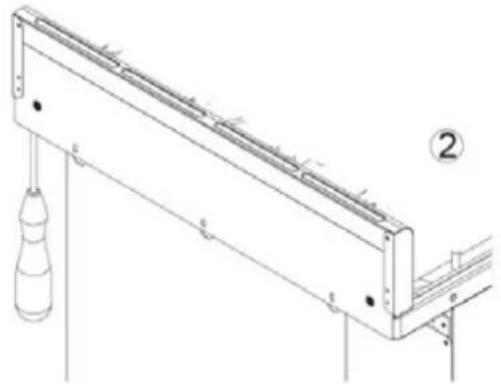
Technical line drawing of a mechanical assembly with a hanging cylindrical component and labeled part (2), no text or symbols present.Step 2.: Secure the backsplash to the range from the bottom with the (2) two screws included.
natural_image
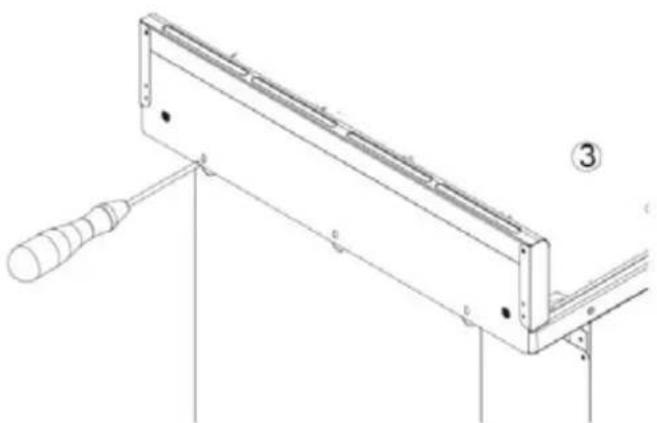
Technical line drawing of a mechanical assembly with a tool and base, no visible text or symbolsStep 3.: Secure the backsplash to the range from the back using the (3) three screws included. (See diagram above)
3-Wire Power Cord Installation
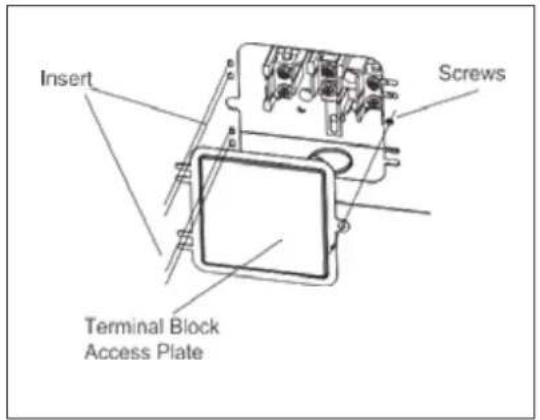
- Remove the Terminal Block Access Plate on the back of range by removing the 1 fixing screws.
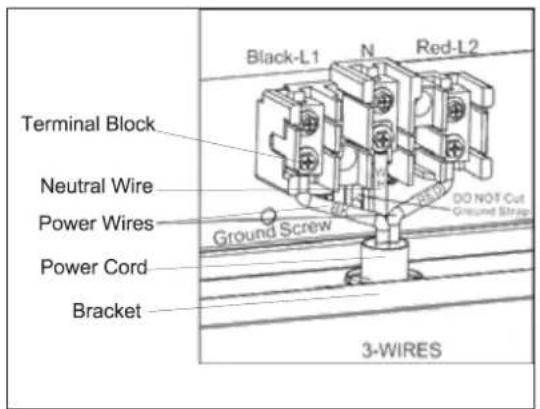
- Assemble the strain relief in the hole on bracket.
- Insert the power cord through the strain relief and tighten.
- Allow enough slack to easily attach the cord terminals to the terminal block.
- Remove the 3 wire terminal nuts and washers from the terminal block.
- Plug the terminal holes of power cord. The neutral or ground wire of the power cord must be connected to the neutral terminal located in the center of terminal block. The power leads must be connected to L1 and L2.
• Plug washers and tighten nuts securely.
• Assemble the Terminal Block Access Plate.
4-Wire Power Cord Installation
- Remove the Terminal Block Access Plate on the back of range by removing the 1 fixing screws.
• Assemble the strain relief in the hole on bracket. - Insert the power cord through the strain relief and tighten.
- Allow enough slack to easily attach the cord terminals to the terminal block.
- Remove the 3 wire terminal nuts and washers from the terminal block.
- Remove the ground strap from the frame of range and terminal by removing its screw and cutting is as shown.
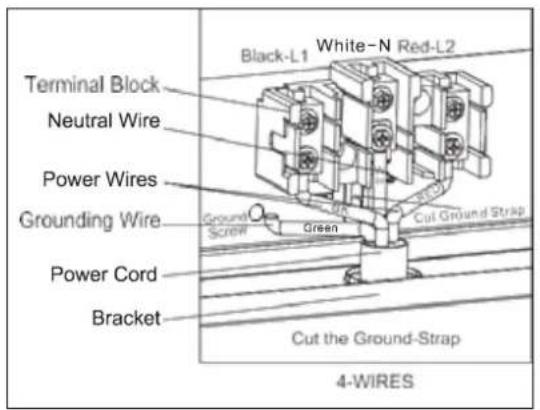
- Plug the terminal holes of power cord. The neutral wire of the power cord must be connected to the neutral terminal located in the center of terminal block. The ground wire of the power supply cord must be attached to the frame of range by using the green colored grounding screw. The power leads must be connected to L1 and L2.
• Plug washers and tighten nuts securely.
- Assemble the Terminal Block Access Plate.
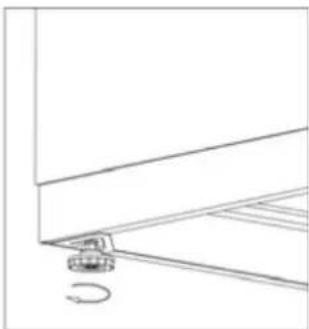
The range must be level to obtain proper operating. The four screws type leveling legs located on the corners at the bottom of range should be adjusted by turning them clockwise to make the range higher or counter-clockwise to lower the range until the range is level. Use a level on surface units to check the leveling of the range.
natural_image
Simple line drawing of a corner structure with a small car and curved arrow (no text or symbols)ÿ ANTI-TIP BRACKET INSTALLATION
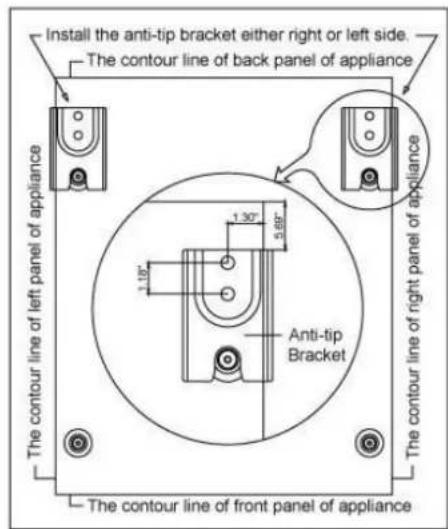
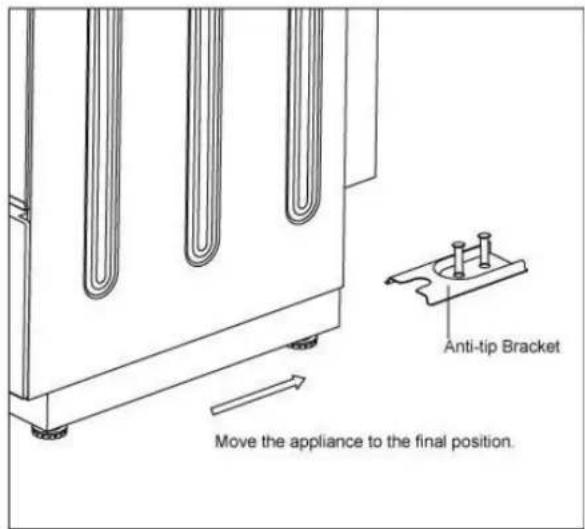
To reduce the risk of tipping the range by abnormal usage or improper door loading, the range must be secured by properly installing the anti-tip device packed with the appliance.
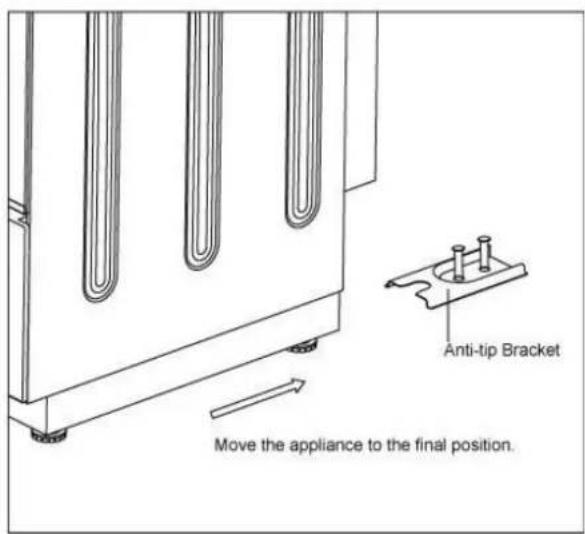
- Place the anti-tip bracket on the floor as shown figure. Anti-tip bracket can be installed one either right or left side.
• Make the locations of 2 holes of ant-tip bracket on the floor. - Use a 5/16" masonry drill bit and insert plastic anchor.
- Secure bracket to floor using screws supplied.
• Slide appliance into position.
NOTE: If range is relocated, the bracket must be removed and installed in new location.
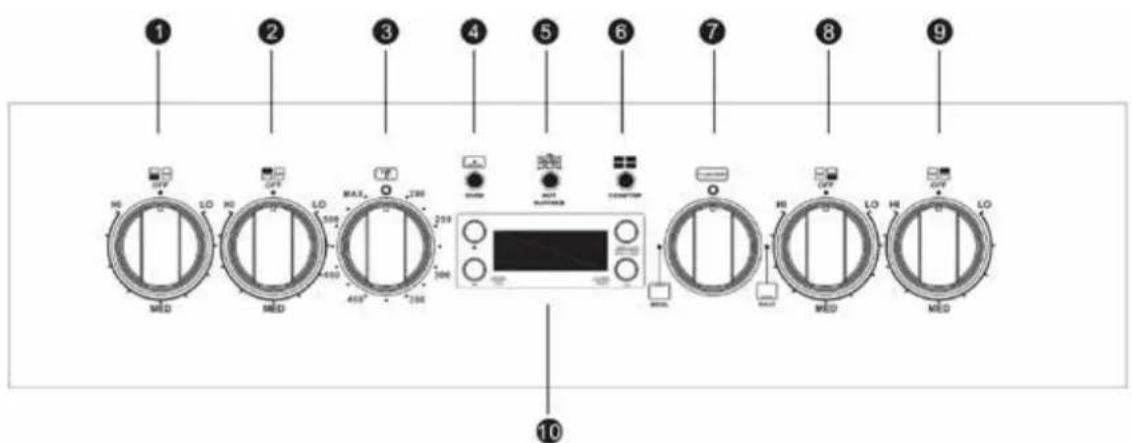
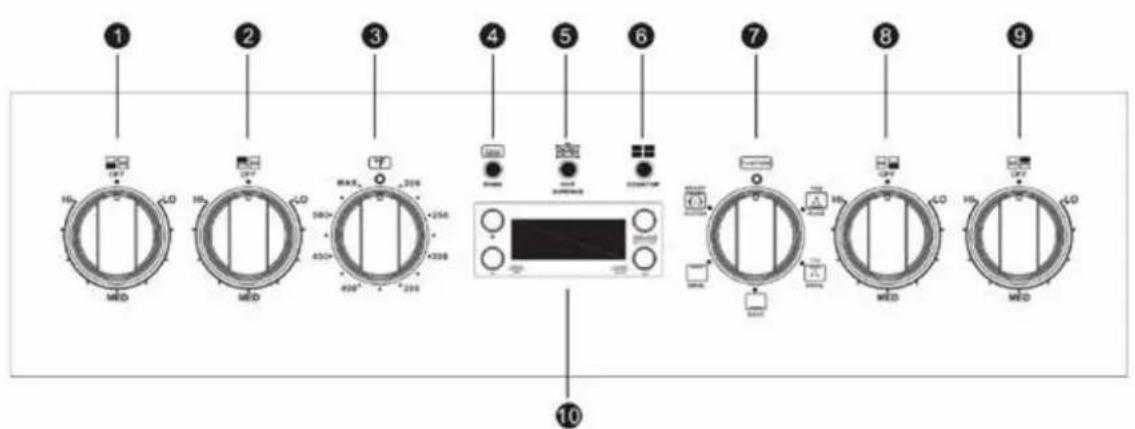
- Front Left Burner Knob
- Rear Left Burner Knob
- Oven Temperature Selector Knob
- Oven Indicator Light (Green)
- Hot Surface Indicator Light (Red)
- Cooktop Indicator Light (Green)
- Oven Function Selector Knob
- Front Right Burner Knob
- Rear Right Burner Knob
- Digital Timer / Controller
** Hot Surface Indicator Light will turn on when the cooktop is being used and will remain lit until the surface temperature of the glass cooktop returns to a safe temperature.
DIGITAL KITCHEN TIMER
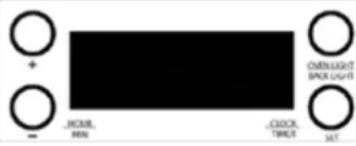
Digital Display
Up (+) Button
Down (-) Button
Set Button
Oven Light/Back Light
ON/OFF Button
When you first plug in the range or power has returned after 10 hours you will see 12:00 in the display and hear an alarm tone.
CLOCK:
To set the clock, press the SET button once, the hour will flash. Adjust the hour by pressing the UP or DOWN buttons, when done, press the SET button and repeat the steps for the minutes.
To confirm the setting simply wait approximately 5 seconds and the set time will show in the LED display.
COOK TIMER:
Press and hold the SET button for approximately 3 seconds. The display will show 00:00. Press the UP or DOWN buttons to choose the desired cook time (1 – 99 minutes, default is 00 minutes). After 5 seconds, the setting will be confirmed, and the countdown will begin. The display will return to the CLOCK display mode, to see the countdown press the SET button 3 times.
Once the selected time has elapsed, the alarm will sound 15 times or until a button is pressed.
OVEN LIGHT:
To turn the oven light ON or OFF simply press the OVEN LIGHT /
BACKLIGHT BUTTON.
BACKLIGHT:
To turn the indicator lights behind the control panel knobs ON or OFF press and hold the OVEN LIGHT / BACK LIGHT button for approximately 3 seconds
OPERATING INDICATOR LIGHTS
The OVEN and BURNERS indicating lights will come ON separately when oven and top burners are in use.
Hot Surface Indicator Light will turn on when the cooktop is being used and will remain lit until the surface temperature of the glass cooktop returns to a safe temperature.
OVEN RACK
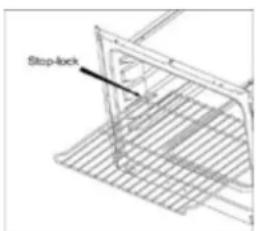
The rack is designed with stop-locks so that when placed correctly on the rack supporters, they will stop before coming completely out from the oven and will not tilt when removing food from or placing food on them.
When placing cookware on the rack, pull the rack out to the bump on the rack support. Place the cookware on the rack, then slide the rack back into the oven.
To remove the rack from the oven, pull it towards you, tilt the front end upward and pull it out.
ÿ HOW TO USE THE OVEN
The oven is controlled by two separate knobs, the Broil / Oven Control Knob is used to select the mode of operation used for cooking and the Oven Temperature Knob which is used to set the desired cooking temperature.
When the Broil / Oven Control knob is in the ☐ or "standby" position, the heating elements will not operate.
You must first select the appropriate cooking mode (Broil or Oven/Bake) and then select the desired temperature as described in the instructions below.
| Model(s): | Function Mode | Function / Mode Description | |
| DER20P3S DER24P3S |  | Standard Conventional Baking (Lower element will cycle on and off to maintain the selected temperature). | |
| DER20P3S DER24P3S | Standard Conventional Broiling (Upper element will cycle on and off to maintain the selected temperature). | ||
| DER24P3S ONLY |  | Convection Fan Baking (Lower element will cycle on and off with the convection fan to circulate the air in the oven maintain the selected temperature). | |
| DER24P3S ONLY |  | Convection Fan Broiling (Upper element will cycle on and off with the convection fan to circulate the air in the oven maintain the selected temperature). | |
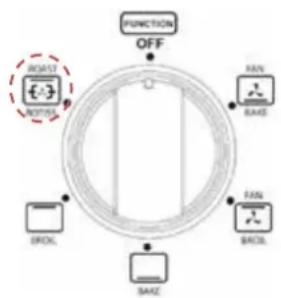
| DER24P3S ONLY | [5X4W] | Rotisserie (Upper element and convection fan will cycle on and off to maintain the selected temperature while the meat is rotated by the rotisserie motor to roast the meat). | |
USING THE OVEN
Turn the Broil/Oven Control knob to select the desired function / mode as described above.
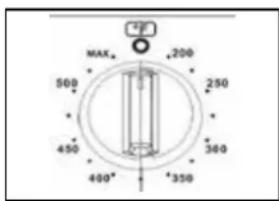
Turn the Oven Temperature Knob clockwise to select the desired temperature up to 500°F.
To switch off the oven turn the thermostat control to the “standby” position.
You can use your range for Bake and Broil. For that reason, the oven has two different heating elements which are:
- Bake element 2100W (Lower heating element)
- Broil element 2000W (Upper heating element)
CAUTION: The oven door becomes very hot during operation. Keep children well out of reach.
WARNING: The door is hot, use the handle
WARNING: After use, turn the Oven Function Control and Oven Temperature
Control knobs to the • STANDBY position to turn the oven off.
OVEN THERMOSTAT
Rotate clockwise until the required temperature is reached
[From ○ (Standby) to MAX (550°F)].
USING THE BROILER
In this setting only the upper element is switched ON heat is distributed by radiation.
In order to broil, use the following steps:
- Place the meat on the broil grid in broiler pan.
Always use the grid so that the fat drips into the broiler pan, otherwise the juices may catch on fire. Do not broil without using the broiler pan.
- Position the broiler pan on the second level from the top.
- Turn the knob OvenBroil/Oven Control Knob to
- Turn the knob Oven Temperature Knob clockwise to select the desired temperature up to 550^ F.
- To switch off the oven turn the thermostat control and function control knobs to the “standby” position.
Always remember that when the oven is hot, outside surfaces of the range get hot.
IMPORTANT:
Always use suitable protective gloves when inserting/removing the broiler pan, shelves, pans and other cooking utensils from the oven.
OVEN RACK
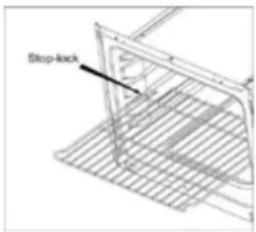
The rack is designed with stop-locks so that when placed correctly on the rack supporters, they will stop before coming completely out from the oven and will not tilt when removing food from or placing food on them.
When placing cookware on the rack, pull the rack out to the bump on the rack support. Place the cookware on the rack, then slide the rack back into the oven.
To remove the rack from the oven, pull it towards you, tilt the front end upward and pull it out.
ROTISSERIE (MODEL DER24P3S - ONLY)
This range is equipped with an automatic rotisserie for roasting.
The rotisserie feature allows for an even cooking and all-over browning of the meat while preventing the meat from cooking in its rendered grease. The rotisserie will turn the meat allowing it to baste itself while roasting.
Be sure that you have received the rotisserie accessories included with your unit.
flowchart
graph TD
    A["FAST"] --> B["ON/OFF"]
    C["FAN"] --> D["BAS"]
    E["FAN"] --> F["BAD"]
    G["ROOL"] --> H["SAKE"]
    I["SOYA"] --> J["SOYA"]
    K["FUNCTION"] --> L["OFF"]
(1) Rotisserie Spit – Rod
(2) Rotisserie Forks
Always use the included broiling pan when using the rotisserie to catch the rendered grease and allow for easy access to the meat when putting in and removing the rotisserie spit – rod.
To use the rotisserie, preheat the oven to the desired temperature.
Secure the meat to be cooked onto spit-rod using the rotisserie forks.
Insert the rotisserie spit-rod into the rotating assembly and select the rotisserie function.
Be sure the baking / broiling tray is below the meat being cooked to avoid spills and to prevent possible flare-up of the oven flame.
ALWAYS TURN THE ROTISSERIE FUNCTION TO OFF BEFORE REMOVING THE ITEMS FROM THE OVEN.
CAUTION - USE HEAT RESISTANT GLOVES WHEN REMOVING THE ITEMS FROM THE OVEN.
∅ USING THE SURFACE UNITS
- Use care when touching the cooktop. The glass surface of the cooktop will retain heat after the controls have been turned off.
- Do not use the cooktop if broken. If the glass should break, cleaners and or spills may penetrate the broken cooktop and present a risk of electric shock. Contact a qualified technician immediately.
- Avoid scratching the glass. The cooktop can be easily scratched by using items similar to knives, sharp object, rings, jewelry.
- Avoid storing items that can melt or possibly catch fire on the glass cooktop, even if not in use. In the even the cooktop is accidentally turned on and or heat from the oven vent may cause items to melt or ignite.
• NEVER COOK DIRECTLY ON THE GLASS, ALWAYS USE APPROPRIATE COOKWARE.
BURNER CONTROL KNOB
The range comes with four burners. To operate the burners simply push in and turn the knob to the desired position. These controls go from low to high power output, having a number of positions
To switch off the Burner, turn the burner control knob to the setting position.
Your range is equipped with four surface units with two different sizes. Two of them are 6" and two of them are 8" in size. The surface controls are easily operated. Simply push in and turn the knob to the desired position.
- 8" Large burners: 1800 Watts
- 6" Small burners: 1200 Watts
When the element is energized, the indicator light will be lit regardless of the setting when one or more of the elements are turned on. The control has a variable of power output from LO to HI with a number of positions. The range of heat is increased by turning the knob to HI, decreased by turning the knob to LO.
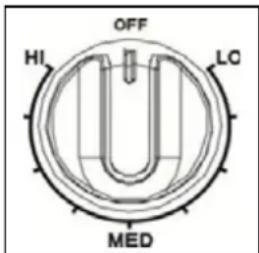
IMPORTANT: To switch on, always lightly press the control knob inwards then turn.
TO AVOID OVERCOOKING, REMOVE POTS / PANS FROM THE COOKTOP WHEN THE FOOD IS COOKED. AVOID PLACING ANY OBJECTS ON THE COOKTOP UNTIL IT HAS COOLED DOWN COMPLETELY.

WARNING
Make sure that the handles of cookware do not stick out over the edge of the range, to avoid them being knocked over by accident. This also makes it more difficult for children to reach the cooking pots/pans.
COOKWARE TIPS
The physical characteristics of pots and pans influence the performance of any cooking systems.
Therefore, emphasis must be placed on the importance of using proper cookware.
- Use cooking vessels with flat bottoms and tight-fitting lids to conserve energy and shorten cooking times.
- Only certain types of glass, glass/ceramic, ceramic, earthenware or other glazed cookware are suitable for use on glass cooktops. Manufacturers suggest using low to medium heat selections when using glass cookware.
- Pan size should match the element size. A slightly larger pan covers the entire element and prevents spillovers from contacting the heat surface and burning in. Using a smaller pan than the element is a waste of energy.
- To avoid spattering and to maximize efficiency, pan bottoms should be clean and dry before coming in contact with the cooktop.
CARE AND MAINTENANCE
ÿ GENERAL INFORMATION
- CAUTION: Before any operation of cleaning and maintenance disconnect the appliance from the electrical supply.
• It is advisable to clean when the appliance is cold and especially for cleaning the enameled parts. - Avoid leaving alkaline or acidic substances (lemon juice, vinegar, etc.) on the surfaces.
- Avoid using cleaning products with a chlorine or acidic base.
- The oven must always be cleaned after every use, using suitable products and keeping in mind that its operation for 30 minutes on the highest temperature eliminates most grime reducing it to ashes.
√ CLEANING YOUR RANGE
- Disconnect the A/C from the main power box or designated circuit breaker, turn off the range, make sure all surface units are off and cool before removing anything, then remove all items including shelves and rack.
- Wash the inside surfaces with a warm water and baking soda solution. The solution should be about 2 tablespoons of baking soda to a quart of water.
• Wash the shelves and rack with a mild detergent solution.
• The outside of the range should be cleaned with mild detergent and warm water. - Wring excess water out of the sponge or cloth when cleaning area of the controls, or any electrical parts.
- Wash the outside cabinet with warm water and mild liquid detergent. Rinse well and wipe dry with a clean soft cloth.
• Do not use steel wool or steel brush on the cook top.
ÿ REMOVABLE STORAGE DRAWER
natural_image
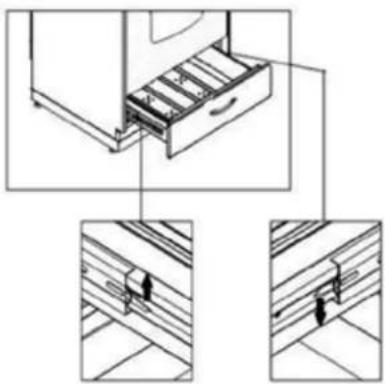
Technical line drawing of a cabinet drawer with two inset views showing internal components (no text or symbols)① Lift the left small hook upward, at the same time, push the right small hook downward. (See the picture)
Do not store flammable material in the oven or in the bottom drawer.
ÿ REPLACING THE OVEN LIGHT
Before any maintenance is started involving electrical parts of the appliance, it must be disconnected from the power supply.
• Let the oven cavity and broil burner cool down.
- Switch off the electric supply.
- Remove the protective cover.
- Unscrew and replace the bulb with a new one suitable for high temperature (300°C \~ 570°C) having the same specifications: 240V 60Hz, 15W, E14.
- Replace the protective cover.
NOTE: Oven bulb replacement is not covered by your guarantee.
PROBLEMS WITH YOUR ELECTRIC RANGE?
You can solve many common appliance problems easily, saving you the cost of a possible service call. Try the suggestions below to see if you can solve the problem before calling the servicer.
TROUBLESHOOTING GUIDE
| PROBLEM | POSSIBLE CAUSE |
| Surface units will not maintain a rolling boil or frying rate is not fast enough | You must use pans that are absolutely flat.Pan bottoms should closely match the diameter of the surface unit selected. |
| Foods cook slowly | Improper cookware being used. |
| Surface units do not operate | You have blown a household fuse or tripped a circuit breaker.The surface units are not plugged in all the way.You have not set the control knobs correctly. |
| Control knobs will not turn | If it is a surface unit control knob, you are not pushing in before turning.If it is oven control knob, you are trying to turn the knob to wrong direction. |
| Oven light does not work | Light bulb is loose or defective.Switch operating oven light is broken. |
| Oven does not work | You have blown a household fuse or tripped a circuit breaker.You have not set the control knobs correctly. |
| Food does not broil properly | The oven control knob is not set at Broil.Improper rack position being used.Cookware is not suited for broiling.Oven thermostat is defective. |
| Food does not bake properly | The oven control knob is not set properly.Rack position is incorrect.Incorrect cookware or cookware of improper size is being used.Oven thermostat is defective. |
SERVICE FOR YOUR APPLIANCE
We are proud of our customer service organization and the network of professional service technicians that provide service on your Avanti appliances. With the purchase of your Avanti appliance, you can have the confidence that if you ever need additional information or assistance, the Avanti Products Customer Service team will be here for you. Just call us toll-free.
AVANTI PRODUCTS CUSTOMER SERVICES
| Product Information800-323-5029 | Whatever your questions are about our products, help is available. |
| Part Orders800-220- 5570 | You may order parts and accessories that will be delivered directly to your home by personal check, money order, Master Card, or Visa. |
| In-Home Repair Service800-220-5570 | An Avanti Products authorized service center will provide expert repair service, scheduled at a time that is convenient for you. Our trained servicers know your appliance inside and out. |
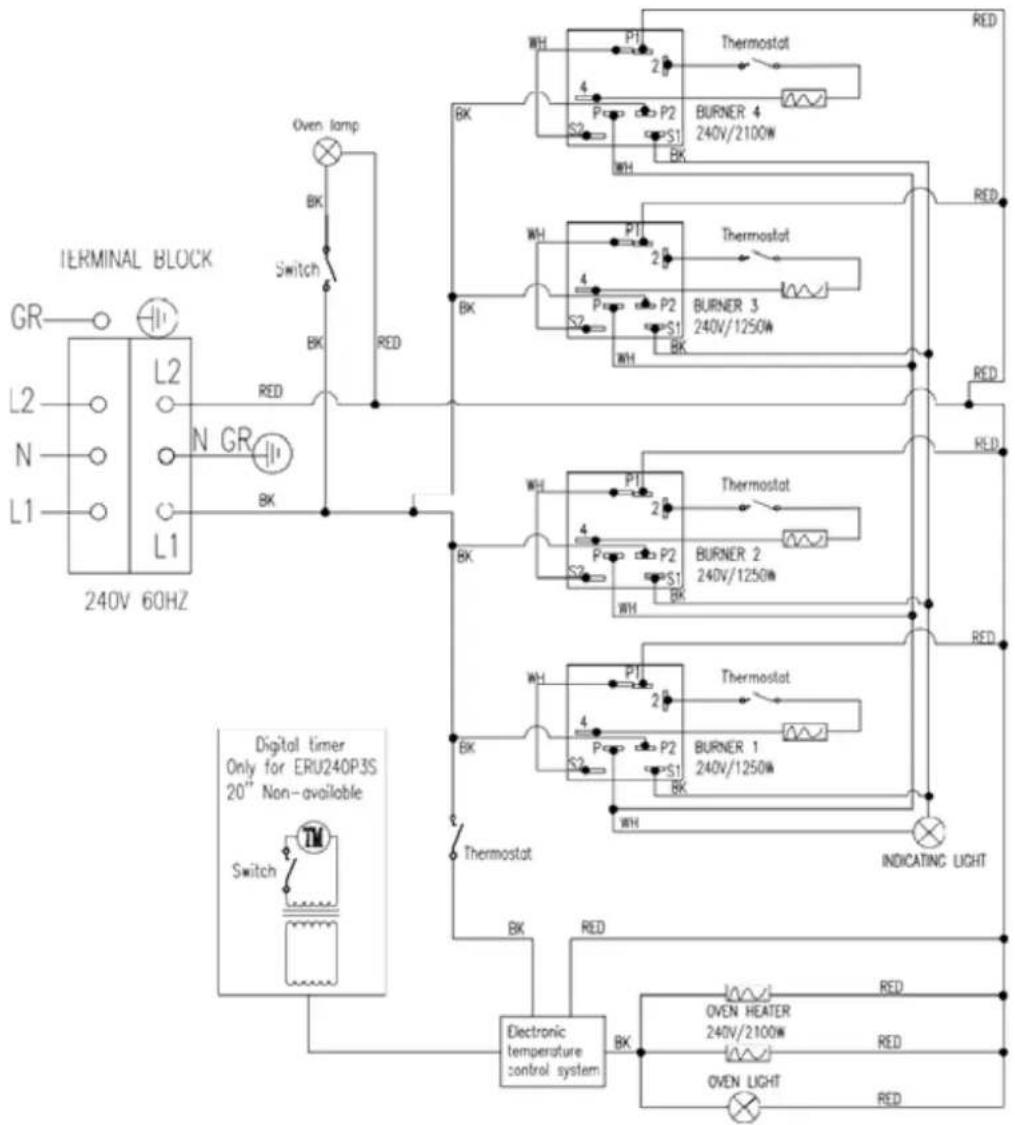
WIRING DIAGRAM
| YOUR AVANTI PRODUCTSWARRANTY | Staple your sales receipt here. Proof of original purchase date is needed to obtain service under warranty. |
| WHAT IS COVERED - LIMITED ONE-YEAR WARRANTYAvanti Products warrants that the product is free from defects in materials and/or workmanship for a period of twelve (12) months from the date of purchase by the original owner. The foregoing timeline begins to run upon the date of purchase, and shall not be stalled, tolled, extended, or suspended for any reason whatsoever unless described in detail in the warranty document. For one year from the date of purchase by the original owner, Avanti products will, at its option, repair or replace any part of the product which proves to be defective in material or workmanship under normal use. Avanti Products will provide you with a reasonably similar product that is either new or factory refurbished. During this period Avanti Products will provide all parts and labor necessary to correct such defects free of charge, so long as the product has been installed and operated in accordance with the written instructions in this manual. In rental or commercial use, the warranty period is 90 days. All Avanti appliances of 3.5 cubic feet capacity or less must be brought/sent to the appliance service center for repair. | |
| FULL 30 - DAY WARRANTYFrom the date of purchase on glass parts and finish of porcelain enamel, painted, or bright metal finished parts. | |
| WARRANTY EXCLUSIONS / WHAT IS NOT COVERED:The warranty coverage described herein excludes all defects or damage that are not the direct fault of Avanti Products, including without limitation, one or more of the following: | |
| ·A failure to comply with any applicable state, local, city, or county electrical, plumbing and/or building codes, regulations, or laws, including failure to install the product in strict conformity with local fire and building codes and regulations.·Any external, elemental and/or environmental forces and factors, including without limitation, rain, wind, sand, floods, fires, mud slides, freezing temperatures, excessive moisture or extended exposure to humidity, lightning, power surges, structural failures surrounding the appliance, and acts of God. | |
| ·Content losses of food or other content due to spoilage.·Incidental or consequential damages·Parts and labor costs for the following will not be considered as warranty:·Door springs, and/or frames.·Inner door panels, door shelves, doorrails, and/or door supports.·Light bulbs and/or plastic housing. | ·Shipping and handling costs associated with the replacement of the unit.·Repairs performed by unauthorized servicers.·Service calls that are related to external problems, such as abuse, misuse, inadequate electrical power, accidents, fire, floods, or any other acts of God.·Failure of the product if it is used for other than it intended purpose.·The warranty does not apply outside the Continental USA.·Surcharges including but not limited to, any after hour, weekend, or holiday service calls, tolls, ferry trip charges, or mileage expense for service callsto remote areas. |
| In no event shall Avanti Products have any liability or responsibility whatsoever for damage to surrounding property, including cabinetry, floors, ceilings, and other structures and/or objects around the product. Also excluded from this warranty are scratches, nicks, minor dents, and other cosmetic damages on external surfaces and exposed parts; Products on which the serial numbers have been altered, defaced or removed; service visits for customer education, or visits where there is nothing wrong with the product; correction of installation problems (you are solely responsible for any structure and setting for the product, including all electrical, plumbing and/or other connecting facilities, for proper foundation/flooring, and for any alterations including without limitation cabinetry, walls, floors, shelving etc., as well as the resetting of breakers or fuses. | |
| OUT OF WARRANTY PRODUCTAvanti Products is under no obligation, at law or otherwise, to provide you with any concessions, including repairs, pro-rates, or product replacement, once this warranty has expired. | |
| WARRANTY - RANGES / TOASTER OVEN | |
natural_image
Technical line drawing of a mechanical assembly with two downward arrows indicating components (no text or symbols present)natural_image
Technical line drawing of a mechanical assembly with a hanging cylindrical component and a numbered label (2), no readable text or symbols present.natural_image
Technical line drawing of a mechanical assembly with a tool and bracket (no text or symbols)GAVETA DE ALMACENAJE REMOVIBLE
natural_image
Technical diagram of a mechanical assembly with two components and directional arrows indicating movement (no text or symbols present)natural_image
Technical line drawing of a mechanical assembly with hanging weights and a labeled component (no text or symbols present)natural_image
Technical line drawing of a mechanical clamp or bracket assembly with a handle and base (no text or symbols)natural_image
Simple line drawing of a corner structure with a small car and curved arrow (no text or symbols)ÿ BRIDE ANTIBASCULEMENT INSTALLATION
UTILISATION DE VOTRE APPAREIL
ÿ PANNEAU DE CONTRÔLE
CONTROL PANEL
MODELE: DER20P3S
MODELE: DER24P3S
ÿ UTILISATION DU FOUR
REMARQUE:
CHACUNE DES BOBINES DE SURFACE SONT ÉQUIPÉES D'UN «DISPOSITIF DE SÉCURITÉ DE LA TEMPÉRATURE» QUI MESURERA LA TEMPÉRATURE DE LA BOBINE ET LE POT / LA POT UTILISÉS.
SI, À TOUT MOMENT, LE CAPTEUR MESURE UNE TEMPÉRATURE SUPÉRIEURE AU MAXIMUM INDIQUÉ PAR LES NORMES DE SÉCURITÉ, LE DISPOSITIF COUPE AUTOMATIQUEMENT L'ALIMENTATION DU BRÛLEUR. UNE FOIS QUE LE TEMPERTUARE A ATTEINT LA TEMPÉRATURE DE SÉCURITÉ STANDARD, LE DISPOSITIF SERA RÉINITIALISÉ AUTOMATIQUEMENT.
POUR ÉVITER LA CUISSON EN CUISSON, ENLEVEZ LES POTS / Casseroles DE LA TABLE DE CUISSON LORSQUE LES ALIMENTS SONT CUIITS. ÉVITEZ DE PLACER TOUT OBJET SUR LA PLAQUE DE CUISSON JUSQU'À CE QU'IL SOIT REFROIDISSÉ COMPLÈTEMENT.
Thank you for purchasing this fine Avanti product. Please fill out this form and return it to the following address within 100 days from the date of purchase and receive these important benefits:
Avanti Products LLC P.O.Box 520604 – Miami, Florida 33152
ÿ Protect your product:
We will keep the model number and date of purchase of your new Avanti product on file to help you refer to this information in the event of an insurance claim such as fire or theft.
ÿ Promote better products:
We value your input. Your responses will help us develop products designed to best meet your future needs.
(detach here)-
Avanti Registration Card
Name
Address
City State Zip
Area Code
Phone Number
Did You Purchase An Additional Warranty
□ Extended
□ None
Reason for Choosing This Avanti Product: Please indicate the most important factors That influenced your decision to purchase this product:
□ Price
□ Product Features
□ Avanti Reputation
□ Product Quality
□ Salesperson Recommendation
□ Other:
□ Friend / Relative Recommendation
□ Warranty
□ Other: ____
Comments:
Model # Serial #
Date Purchased
Store / Dealer Name
E-mail Address
Occupation
As your Primary Residence, Do You:
□ Own
□ Rent
Your Age:
□ under 18 □ 18-25 □ 26-30
□ 31-35 □ 36-50 □ over 50
Marital Status:
□ Married □ Single
Is This Product Used In The:
□ Home □ Business
How Did You Learn About This Product:
□ Advertising
□ In-Store Demo
□ Personal Demo
CERAMIC ranges - VER. 12242019
PRINTED IN CHINA

- RANGE SAFETY
- DANGER
- WARNING
- CAUTION
- WARNING:
- IMPORTANT SAFEGUIDES
- THE ANTI-TIP BRACKET
- PARTS & FEATURES
- This Unit Is For Indoor Use Only -SAVE THESE INSTRUCTIONS-
- INSTALLATION INSTRUCTIONS
- HAVE THIS RANGE INSTALLED BY A QUALIFIED INSTALLER.
- IMPORTANT – SAVE FOR THE LOCAL ELECTRICAL INSPECTOR'S USE.
- ÿ BEFORE USING YOUR ELECTRIC RANGE
- NOTICE
- IMPORTANT:
- ÿ IMPORTANT PRECAUTIONS AND RECOMMENDATIONS
- ÿ INSTALLATION OF ELECTRIC RANGE
- ÿ ELECTRICAL CONNECTION
- Installation of the Backsplash
- 3-Wire Power Cord Installation
- 4-Wire Power Cord Installation
- ÿ ANTI-TIP BRACKET INSTALLATION
- DIGITAL KITCHEN TIMER
- When you first plug in the range or power has returned after 10 hours you will see 12:00 in the display and hear an alarm tone.
- CLOCK:
- COOK TIMER:
- OVEN LIGHT:
- BACKLIGHT:
- OPERATING INDICATOR LIGHTS
- OVEN RACK
- ÿ HOW TO USE THE OVEN
- USING THE OVEN
- OVEN THERMOSTAT
- ROTISSERIE (MODEL DER24P3S - ONLY)
- ∅ USING THE SURFACE UNITS
- BURNER CONTROL KNOB
- COOKWARE TIPS
- CARE AND MAINTENANCE
- ÿ GENERAL INFORMATION
- √ CLEANING YOUR RANGE
- ÿ REMOVABLE STORAGE DRAWER
- Do not store flammable material in the oven or in the bottom drawer.
- ÿ REPLACING THE OVEN LIGHT
- PROBLEMS WITH YOUR ELECTRIC RANGE?
- SERVICE FOR YOUR APPLIANCE
- GAVETA DE ALMACENAJE REMOVIBLE
- ÿ BRIDE ANTIBASCULEMENT INSTALLATION
- UTILISATION DE VOTRE APPAREIL
- ÿ UTILISATION DU FOUR
- REMARQUE:
- Avanti Products LLC P.O.Box 520604 – Miami, Florida 33152
- ÿ Protect your product:
- ÿ Promote better products:
- Avanti Registration Card
Brand : Avanti
Model : DER24P3S
Category : Cooker