99382 - Fan TREBS - Free user manual and instructions
Find the device manual for free 99382 TREBS in PDF.
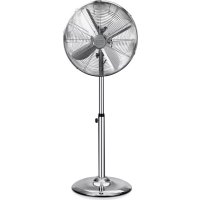
| Product type | Pedestal fan |
| Brand | Trebs |
| Model | 99382 |
| Dimensions | 120 x 60 x 60 cm |
| Weight | 3.6 kg |
| Power supply | 220-240 V ~ 50 Hz |
| Power consumption | 50 W |
| Number of speeds | 3 (1: low, 2: medium, 3: high) |
| Oscillation angle | 85° |
| Tilt angle | 5° up, 20° down |
| Noise level | 53.5 dB(A) |
| Main functions | 3 speeds, automatic oscillation, manual tilt |
| Maintenance and cleaning | Soft, dry or slightly damp cloth; do not use chemicals; no lubrication required (sealed bearings) |
| Safety | Use on a flat surface, indoors only; do not use in wet or flammable environments; unplug before cleaning; do not insert objects; not suitable for children under 8 years without supervision |
| Spare parts and repairability | No user-replaceable parts; damaged cable must be replaced by a professional; do not open the fan |
| Warranty | 24 months, manufacturing defects, domestic use |
Frequently Asked Questions - 99382 TREBS
User questions about 99382 TREBS
0 question about this device. Answer the ones you know or ask your own.
Ask a new question about this device
Download the instructions for your Fan in PDF format for free! Find your manual 99382 - TREBS and take your electronic device back in hand. On this page are published all the documents necessary for the use of your device. 99382 by TREBS.
USER MANUAL 99382 TREBS
natural_image
White desktop fan with four blades and a stand, no visible text or symbolsHandleiding Staande ventilator
Manual Standing fan
text_image
Technical diagram of a wind turbine with numbered parts for identification and assembly reference.IMPORTANT SAFETY REGULATIONS
Please read all safety regulations carefully before using the product.
- Only use the fan in the manner described in this manual.
- Always place the fan on a flat surface.
- This fan may not be used without a pedestal or lying on its side.
- Don't use this fan outdoors.
- Don't use this fan in spaces with a high humidity, such as bathrooms.
- Don't use the fan in an environment where gasoline, paint or similar flammable liquids are used or stored.
- Before use, check the rated voltage indicated on the label on the product. This fan is designed for an electric power supply of 220-240V\~50Hz.
- This fan must not be earthed!
- Don't use any electrical extension cord for this fan.
- This fan is not suitable for dimmers.
- Don't arrange the cable underneath a covering object. Arrange the cable in such a way that nobody can trip over it.
- Regularly check the cable for any damage. If the cable is damaged, it must be replaced by the manufacturer or supplier. The cable may also be repaired by a qualified person to prevent dangerous situations.
- The user may not open the fan.
- No parts of this fan may be replaced by the user.
- This product is not suitable for children younger than 8 years old.
- This product is not intended for use by persons (including children) with reduced physical, sensory or mental abilities, or with a lack of knowledge and experience, unless they're under the supervision of or have received instructions regarding the device from a person responsible for their safety.
- Never insert your finger through the mesh of the fan.
18 Don't allow children to insert objects through the mesh. - Don't use the fan near a window.
20 Never let hair, curtains, table cloths or clothing get near the fan. - Make sure that the fan does not touch any objects during oscillation.
- The fan must always be disconnected from the wall outlet when not in use. Make sure the fan is fully switched off before removing the plug from the wall outlet.
- Switch off the fan and remove the plug from the wall outlet before cleaning the fan.
- You may use a soft and dry cloth to remove dust from the fan. If the fan is very dirty, you may use a slightly moist cloth to clean the fan. Never use any cleaning agents, sprays or other chemical liquids, as they will damage the fan.
- The motor bearings are permanently sealed and don't require additional lubrication.
- Never let water get into or onto the fan housing.
- Store the fan in its original packaging in a dry ventilating room.
FAN STRUCTURE

text_image
Technical diagram of a wind turbine with numbered parts for identification and assembly reference.| 1. Fixing screw for the fan covers |
| 2. Protective front cover |
| 3. Locknut |
| 4. Fan blades |
| 5. Mounting nut |
| 6. Protective rear cover |
| 7. Motor shaft |
| 8. Motor housing |
| 9. Oscillation button |
| 10. Speed switches |
| 11. Housing of the switches |
| 12. Fixing screw |
| 13. Upper tube |
| 14. Connection between the tubes |
| 15. Lower tube |
| 16. Crossed pedestal |
| 17. Cover |
INSTALLATION
-
Slide the two bars into each other, creating the crossed pedestal (16).
-
Use the 4 screws to fix the lower tube (15) onto the crossed pedestal (16).
-
Loosen the connector between the tubes (14) from the lower tube.
-
Place the cover (17) over the lower tube (15) and let it fall over the crossed pedestal (16).
-
Place the connector between the tubes (14) back onto the lower tube (15), but don't tighten the connector yet.
-
Slide the upper tube (13) out of the lower tube (15) to extend it.
-
Re-tighten the connector between the tubes (14) on the lower tube.
-
Place the housing of the motor (8) and switches (11) onto the upper tube and tighten it to the upper tube (13) using the fixing screw (12).
-
Loosen the locknut (3) and mounting nut (5) of the motor shaft (7).
-
Slide the protective rear cover (6) with the handle upwards over the motor shaft (7).
-
Tighten Mounting nut (5) anti-clockwise against the fan blades (6).
-
Schuif de ventilatorbladen (4) over de motoras (7).
-
Tighten the locknut (3) anti-clockwise against the fan blades (4).
-
Turn the clips of the protective front cover (2) outwards and hang the protective cover over the edge of the protective rear cover. Make sure that the opening at the bottom of the protective front cover is aligned with the opening at the bottom of the protective rear cover.
-
Insert the screw (1) through both openings at the bottom of the protective covers and fix the covers together using the nut.
-
Finally, close the clips around both protective covers.
OPERATION INSTRUCTIONS
- Place the fan on a flat surface.
- Check whether the voltage corresponds to what is indicated on the product label.
- Insert the plug into a wall outlet.
-
Press the 1, 2 or 3 button to activate the fan.
-
Position 1 provides the lowest airflow.
- Position 2 provides an average airflow.
-
Position 3 provides a high airflow.
-
Press the '0' button to switch off the fan.
-
The fan oscillates automatically from left to right. If you'd like to fix its position, depress the oscillation button (9) at the rear of the fan. The fan will then remain in that position. Pull the button (9) back up to make the fan oscillate automatically again.
- You may tilt the fan by carefully moving the motor housing (7) up or down.
- Remove the plug from the wall outlet when not using the fan. Make sure that the fan is fully switched off before doing so.
DISCARDING OLD EQUIPMENT
Old electric and electronic devices often contain valuable materials. However, they also contain harmful substances that were necessary for their functionality and safety. If these are placed with the non-recyclable waste or disposed of incorrectly, they can be harmful to human health and the environment. Never place your device with the non-recyclable waste.
REMARK
- Use the collection points available in your community and recycle old electric and electronic devices. Contact your town hall, the local waste disposal company or your dealer for more information.
• Make sure that your old device, until it's picked up, is safely stored out of reach of children.
WARRANTY
• We provide a warranty of 24 months for this product. The warranty starts on the date of purchase and is intended for faults due to production or the used materials.
- Your statutory warranty rights in accordance with § 439 ff. BGB-E will remain unaffected by this.
- The warranty does not apply to damages as a result of improper handling or use, nor to malfunctions that only have a minor effect on the functionality or value of the product. Normal wear and tear, transport damage, to the extent that we are not responsible for this, as well as damages caused by repairs not performed by us, are also excluded from the warranty rights.
- This device is designed for household use and has the right performance levels.
- Any use in commercial situations is only covered by the warranty if the device is not put under a heavier strain that in a household situation. The device is not intended for additional commercial use.
- In the case of well-founded complaints, we will repair the defective device at our discretion or replace it with a device that shows no problems.
All possible manufacturing faults must be reported within 14 days of delivery. All further claims are excluded. When invoking the warranty, please contact us first before sending us the product (you must always provide us with proof of purchase).
TECHNICAL DETAILS
- Model: 99382 - Standing fan
- Voltage: 220V-240V; 50Hz
- Power consumption: 50 W
- Oscillation angle: 85 degrees
- Tilt angle: 5 degrees upwards, 20 degrees downwards
- Noise level: 53.5 dB(A)
- Product dimensions: 120x60x60 cm
- Weight: 3.6 kg
SERVICE
If you have any further questions regarding the product after having read the user's manual, please contact the Trebs customer service:
CE Regulations
Hereby, Trebs B.V., Thermiekstraat 1a, 6361 HB Nuth, The Netherlands, declares that this product is in compliance with the essential EU directive requirements.
The declaration of conformity may be consulted via techdoc@commaxxgroup.com
CE