
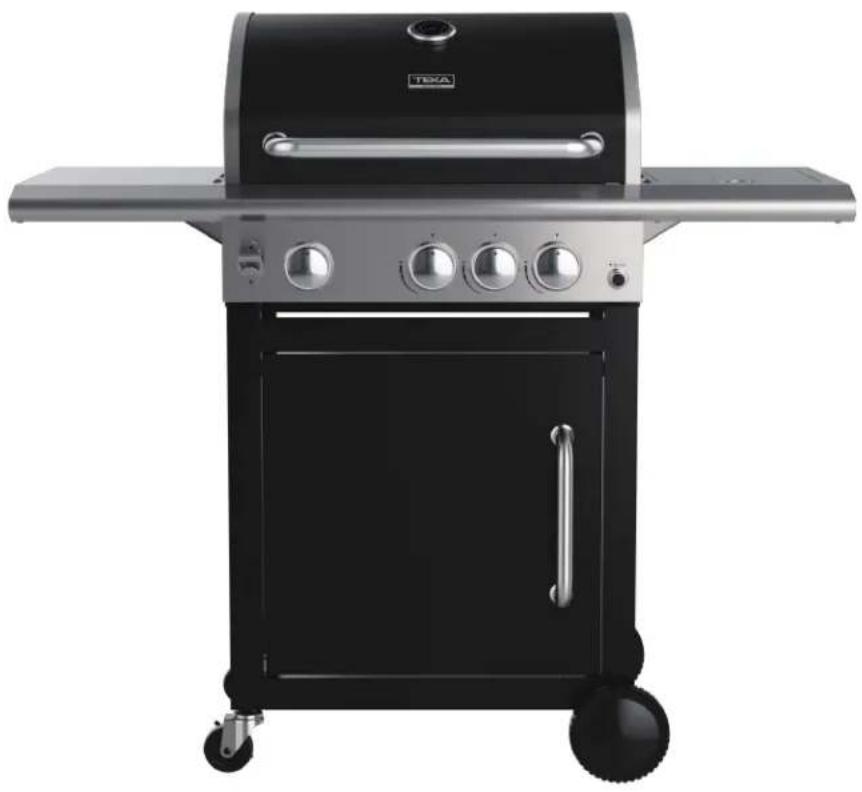
BBQ 3100 G - Barbecue TEKA - Free user manual and instructions
Find the device manual for free BBQ 3100 G TEKA in PDF.
| Product type | Gas barbecue |
| Brand | Teka |
| Model | BBQ 3100 G |
| Dimensions (W x D x H) | 121.8 x 57.5 x 116.5 cm |
| Weight | Approximately 33.2 kg |
| Cooking surface | 58.3 x 40.8 cm |
| Total power | 13.17 kW |
| Main burners | 3 x 3.22 kW |
| Side burner | 1 x 3.51 kW |
| Gas supply | Butane (28-30 mbar) / Propane (37 mbar) |
| Nominal calorific power | 1,056 g/h |
| Ignition | Piezo electric (AA 1.5 V battery not included) |
| Main material | Brushed stainless steel |
| Wheels | 2 wheels (one with brake) + 2 casters |
| Storage door | Yes, with handle |
| Thermometer | Built into the lid |
| Grates | Warming rack + 2 cooking grates |
| Grease tray | Yes, removable |
| Usage | Outdoor use only |
| Number of pages of manual | 82 pages |
| Country of compliance | European Union (CE marking) |
Frequently Asked Questions - BBQ 3100 G TEKA
User questions about BBQ 3100 G TEKA
0 question about this device. Answer the ones you know or ask your own.
Ask a new question about this device
Download the instructions for your Barbecue in PDF format for free! Find your manual BBQ 3100 G - TEKA and take your electronic device back in hand. On this page are published all the documents necessary for the use of your device. BBQ 3100 G by TEKA.
USER MANUAL BBQ 3100 G TEKA
natural_image
Modern kitchen interior with glossy black cabinets and ovens, featuring a 'TEKA' logo in the top-right corner (no other text or symbols visible)User Manual
T-BBQ 3100 G BK-SS
EN ESPTFR
GAS BARBECUE
natural_image
Exterior view of a black and silver TEKA electric grill (no signage or text visible)Should you have any questions, please contact us. Contact information can be found on our website teka.com.
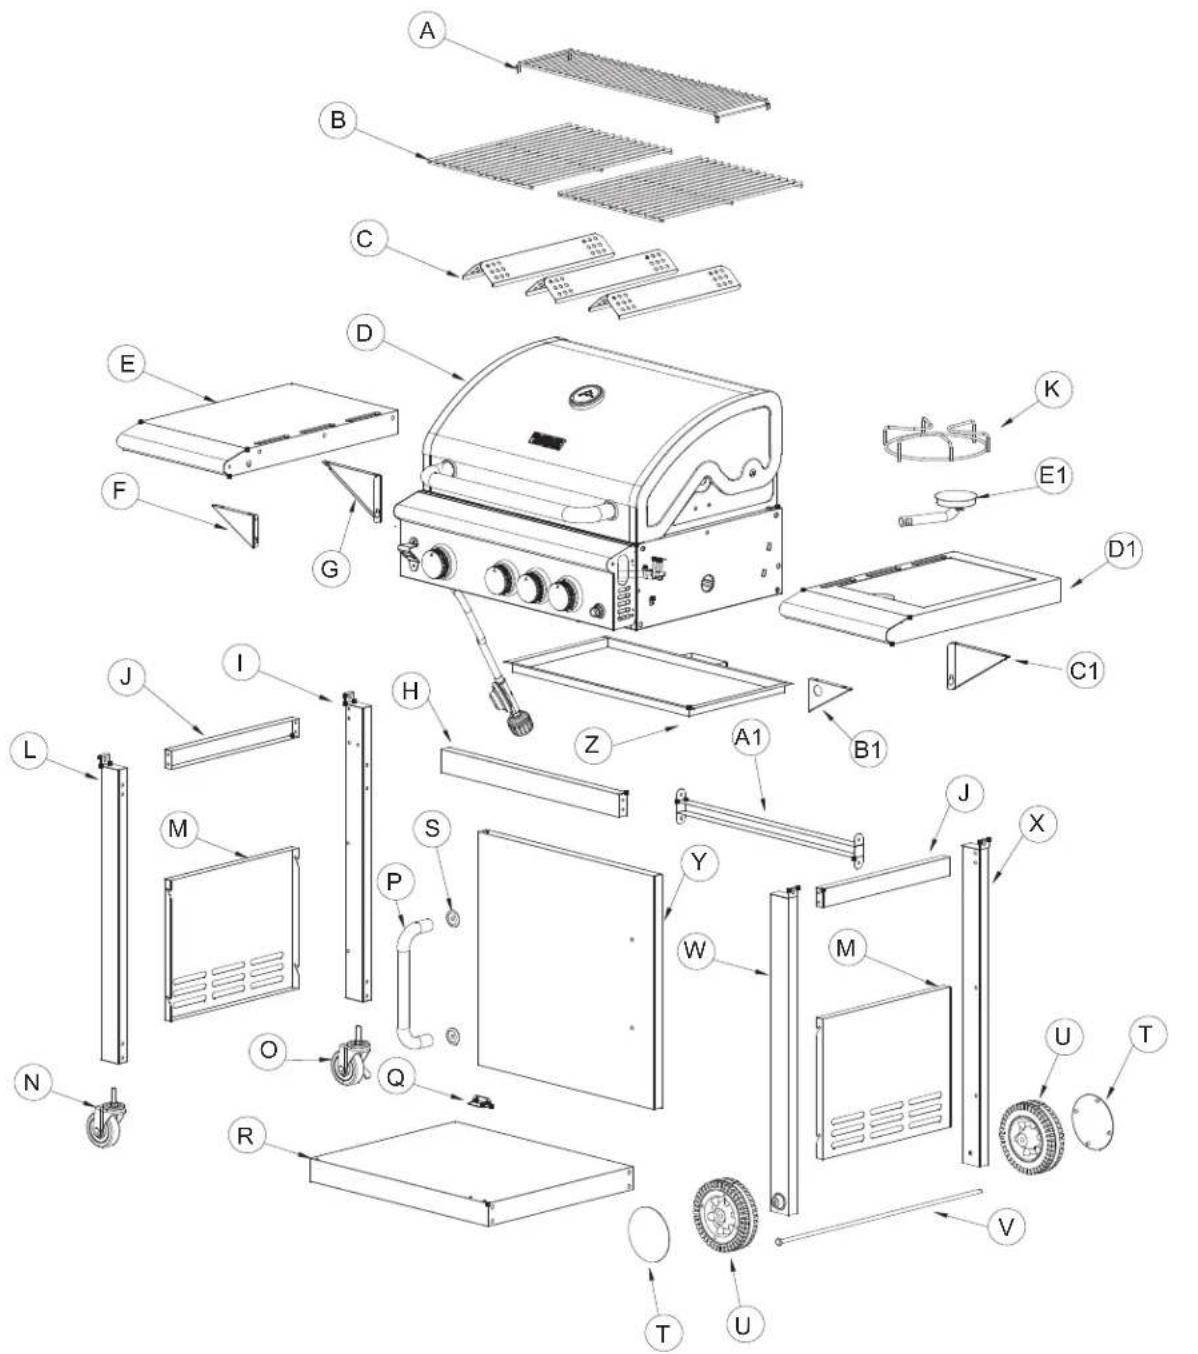

Table of contents
Before you start using the appliance ....EN-5
Intended use ...... EN-5
Safety precautions ...... EN-5
Safety symbols....EN-5
Safety Instructions ...... EN-6
Battery Safety Information EN-7
Scope of supply......EN-8
Assembly......EN-8
Preparation EN-8
Required tools....EN-8
Assembling the barbecue....EN-8
Inserting the battery......EN-15
Connecting the gas cylinder EN-15
Regulator and hose....EN-15
Appliance storage EN-15
Gas cylinder....EN-15
Connecting to the appliance ...... EN-15
Checking for gas leaks....EN-15
Setting up the barbecue....EN-16
Before grilling EN-16
Operation......EN-16
Maintenance and cleaning......EN-17
Troubleshooting EN-19
Waste disposal ...... EN-19
Declaration of conformity....EN-19
Specifications EN-19
Gas Tank......EN-19
Replacement parts ...... EN-20
Before you start using the appliance
After unpacking the appliance and before each use, check it for any damage.
Do not use the appliance if it has any visible damage and immediately inform your dealer.
The user manual is based on the standards and regulations applicable in the European Union. Always observe the relevant national laws and regulations of the country of use! TEKA will not be liable for any damage caused by the alteration or modification of the product or its components during the installation. The installer will be liable for any damages or faults occurred for the incorrect assembly or installation. For any damages resulting from the installation of the product, please contact the authorized installer.

Before using the appliance, carefully read the safety information and operating instructions. You will then know how to use all functions safely and reliably.
Keep the user manual in a safe place and hand it over to any subsequent user of your appliance.

Before using your appliance for the first time, please carefully read the installation and maintenance instructions included.
Depending on the model, the accessories and features included in your appliance may vary from those shown in the pictures.
Intended use
This barbecue is intended for heating up, cooking and grilling different kinds of foodstuff in well-ventilated outdoor areas.
The appliance must be operated with low pressure propane or butane liquefied petroleum gas (LPG). It may not be supplied with natural gas.
This product is intended for private use only and may not be used for any commercial or industrial purposes.
This appliance must only be used as described in this user manual. Any other use will be considered improper and may cause property damage and personal injury.
The manufacturer is not liable for any damage resulting from improper use.
Safety precautions
Safety symbols
Danger! (High risk)

Failure to observe this precaution can result in fatal injuries.
Warning! (Medium risk)

Failure to observe this precaution can result in property damage.
Caution! (Low risk)

Precaution that should be taken into account when handling the appliance.
GENERAL SAFETY INSTRUCTIONS
These safety instructions must be observed during every use.
- Use outdoors only!
- Read the instructions before using the appliance.
- WARNING! Accessible parts may be very hot. Keep young children away.
- This appliance must be kept away from flammable materials during use.
- Do not move the appliance during use!
– Turn off the gas supply at the gas cylinder after use.
– Any modification of the appliance may be dangerous.
- The necessity of not obstructing the ventilation openings of the container compartment.
– Dimensions of pot or pan to use on the side burner: 203.2 mm - 254 mm.
GENERAL BARBECUE WARNINGS
- WARNING! Danger of carbon monoxide poisoning! Never operate the appliance in enclosed areas such as garages or sheds, as this leads to a carbon monoxide build-up resulting in personal injury or death.
- WARNING! Danger of explosion! Never operate the appliance in enclosed areas such as garages or sheds, as this leads to gas accumulation in case of a leakage which may result in an explosion.
- Always lock the wheels with their brakes (if available) prior to use.
- Do not attempt to move the appliance while it is in use.
- Do not attempt to modify the appliance in any way. Only use attachments and accessories recommended by the manufacturer. Any alterations made to the appliance, improper use, or non-compliance with the instructions lead to danger.
- Do not use the appliance in the immediate presence of aerosol cans, flammable liquids, volatile gases, or other flammable substances. Keep open flames such as candles or torches away from the appliance.
- Do not store any flammable liquids or volatile gases near the appliance.
- Do not leave the appliance unattended during use.
- Do not use liquid fuels with this appliance.
- Never lean over the cooking surface while igniting the appliance or during cooking.
- This appliance is configured to work with low-pressure propane & butane liquefied petroleum gas (LPG). Do not use natural gas supply.
- Open the cover before igniting the appliance.
- Use caution when opening the cover when the appliance is being used. Hot steam could collect inside the cover and may be ejected quickly when opened. Do not open the cover too quickly.
- Do not touch hot surfaces. Use the handle only for lifting the cover.
- Cover the appliance only when it has completely cooled down completely.
- Never obstruct the ventilation openings of the cylinder compartment.
-
Never use charcoal or other solid fuels in this appliance.
-
It is recommended a minimum distance of the appliance to any combustible materials must be 1 m.
- Do not place anything on the top for the cover while the appliance is in use!
GAS CONNECTIONS / GAS CYLINDER / PRESSURE REGULATOR WARNINGS
- Check the appliance and all connections regularly and each time the gas cylinder is replaced for possible gas leaks.
- Never check for gas leaks using a match or any other open flame.
- Never alter or modify the pressure regulator or gas supply assembly.
- Always turn the gas supply off on the gas cylinder or the pressure regulator and disconnect the gas hose after use.
- Never store gas cylinders indoors or close to heat sources.
- Always store gas cylinders in the upright position, never in a horizontal position which could cause the gas cylinder to leak or the gas to leak into the gas hose.
- Never use the appliance without the pressure regulator.
- Only use pressure regulators approved for liquid petroleum gas (LPG) and complying with national regulations.
GAS HOSE WARNINGS
- Inspect the gas hose(s) prior to and after each use: look for any cuts, cracks, excessive wear, or other damage. The gas hose(s) shall be replaced every one to two years by a qualified technician or the retailer only. Replace brittle gas hoses and their connections. If in doubt, ask a local specialist.
- Protect the gas hose(s) against damages. Do not let it/ them hang over sharp edges. Do not twist, squeeze or bend it / them. Keep the gas hose(s) away from hot surfaces and ensure that nobody can trip over it / them.
- Only use gas hoses approved for liquid petroleum gas (LPG) and complying with national regulations.
- Every kind of work or replacement of the hoses is to be conducted according to the manufacturer's instructions by qualified personnel or specialists.
- The maximum length of the hose shall not exceed 1.5m.
IF YOU SMELL GAS
- Never light the appliance if you smell gas.
- Immediately turn the gas supply off on the appliance as well as on the gas cylinder and / or the pressure regulator.
- Extinguish all open flames near the appliance such as candles and torches. Switch off all electrical appliances in the surroundings.
- Make sure the area is well ventilated with fresh air.
- Open the cover of the appliance in order to let the gas escape. Should you still smell gas, do not use the appliance any longer and have it repaired by an authorized professional only.
Safety Instructions
Danger! Risk of fire!

The barbecue parts become very hot during use and can cause fire.
- Always have a ready-to-use fire extinguisher and a first aid kit at hand in the event of an accident or fire.
- Place the barbecue on a secure, non-flammable, flat, level, stable, heat-resistant and clean surface away from any heat source prior to use.
- Ensure that the barbecue is set up at least 1 m away from highly combustible materials such as awnings or wooden furniture.
- Do not move the barbecue during use.
- Some foods produce flammable fats and juices. Clean the barbecue on a regular basis, preferably after each use.
- Do not leave the operating barbecue unattended.
Danger! Risk of fire!

Never attempt to switch on/light the barbecue with the lid closed.
- Only operate the gas barbecue with the lid closed at a low flame.
Danger! Risk of burns and accidents!

This appliance is not intended for use by persons (including children) with reduced physical, sensory or mental capabilities, or lack of experience and/or knowledge.
- This group of people must be informed about the dangers associated with the use of the appliance and must be supervised by a person responsible for their safety.
- Supervise children at all times to ensure that they do not play with the appliance.
- Any modifications to the product may be extremely hazardous and are therefore prohibited. Do not attempt to make unauthorized modifications to the appliance. In the event of damage, repairs or other problems with the barbecue, please contact our service center or a local dealer.
- Keep the appliance away from children and pets.
Do not touch the barbecue, flame burner and food being grilled during use as they become extremely hot and can cause severe burns. - Keep sufficient distance from hot parts since any contact can cause severe burns.
- Always wear barbecue or oven gloves (e.g. Category II heat-resistant gloves rated according to DIN-EN 407) when grilling.
- Use only long-handled barbecue utensils with heat-resistant grips.
- Do not wear clothing with wide sleeves.
- Allow the barbecue to cool down completely before cleaning it or stowing it away.
Danger! Risk of deflagration!

When poured into the flames, flammable liquids create flashes or deflagrations.
- Never use flammable fluids such as gasoline or spirit
Danger! Risk of poisoning!

Gas is odorless and can be deadly in enclosed spaces!
- The barbecue is intended for outdoor use only.
Danger! Health risk!

Do not use paint solvents or thinners to remove stains. These substances are hazardous to health and must not come into contact with food.
Danger! Risks to children!

Children playing with the packaging film can get caught in it, which can result in suffocation.
- Do not let children play with the packaging film.
- Do not let children put small assembly parts into their mouths as these present a choking hazard. The parts can cause choking if swallowed.
Danger! Risk of injury!

Both the barbecue and individual parts have some sharp edges.
- Individual parts of the barbecue must be handled with care to prevent accidents or injuries during assembly and use. Wear safety gloves where necessary.
- Do not set up the barbecue near entryways or high-traffic zones.
- Utmost care must be exercised when grilling. You may lose control of the appliance if distracted.
- Always be attentive to and aware of what you are doing. Do not use this product if you are unfocused or tired, or if you are under the influence of drugs, alcohol, or medicines. Just one moment of carelessness during use of the product can cause serious injuries.
Warning! Risk of damage!

During use, the screws can loosen slowly and impair the barbecue's stability.
- Check the tightness of screws before each use. If necessary, re-tighten all screws to ensure the barbecue stands always stable.
Warning! Risk of damage!

Do not use any strong or abrasive solvents or scouring pads as these can damage the surfaces and leave scuff marks.
Danger! Risk of burns and accidents!

Caution! If you smell gas:
- Immediately shut off gas to the appliance.
- Extinguish any open flame.
- Open the lid.
- If odour continues, keep away from the appliance and immediately call your gas supplier or fire department.
Danger! Risk of burns and accidents!

The barbecue must be stored away from fuels (e.g. gasoline) or other flammable liquids or gases.
- Gas cylinders must be stored separately from the gas barbecue.
- Gas cylinders must be stored away from the gas barbecue.
- Do not place gas cylinders which are not in use directly under the gas barbecue while heating.
Danger! Risk of fire!

This appliance must be kept away from flammable materials during use.
- Do not obstruct the ventilation openings of the cylinder compartment.
- Changing the gas cylinder must be carried out away from any source of ignition.
- Gas cylinders must never be stored at temperatures exceeding 50 °C. On extremely hot days, efforts should be made to keep the cylinders in the shade.
Battery Safety Information
- WARNING: KEEP BATTERY OUT OF REACH OF
CHILDREN. Swallowing can lead to chemical burns, perforation of soft tissue, and death. Severe burns can occur within two hours of ingestion. Seek medical attention immediately.
-
If you think the battery might have been swallowed or placed inside any part of the body, seek immediate medical attention.
-
Do not allow children to replace the battery without adult supervision.
-
Exhausted batteries should be immediately removed from the equipment and properly disposed of.
-
Do not dispose of the batteries in fire. Do not expose batteries to heat or fire. Avoid storage in direct sunlight.
-
If the battery should leak, remove it with a cloth from the battery compartment. Dispose of battery according to regulations. If battery acid has leaked, avoid contact to skin, eyes, and mucous membranes. Rinse affected areas immediately after contact with the acid and wash with plenty of clean water. Visit a physician.
-
Do not encapsulate and/or modify batteries.
-
Before you discard the appliance, dispose of batteries in an environmentally safe manner.
-
Always insert batteries correctly with regard to polarity (+ and -) marked on the battery and in the battery compartment. When batteries are inserted in reverse they might be short-circuited or charged. This can cause overheating, leakage, venting, rupture, explosion, fire, and personal injury.
-
Only use the battery type indicated in this manual.
-
Do not short-circuit batteries. When the positive (+) and negative (−) terminals of a battery are in electrical contact with each other, the battery becomes short-circuited. For example, loose batteries in a pocket with keys or coins can be short-circuited. This can result in venting, leakage, explosion, fire, and personal injury.
-
Do not charge alkaline batteries. Attempting to charge a non-rechargeable (primary) battery can cause internal gas and/or heat generation resulting in leakage, venting, explosion, fire, and personal injury.
13.Do not subject batteries to mechanical shock.
-
Do not dismantle, open or shred batteries.
-
WARNING: Used batteries must not be disposed of in the household rubbish. Take them to a designated disposal/collection site.
Scope of supply
| Part No. | Part Description Q'ty | |
| A Warming | Rack 1 | |
| B Cooking | grid 2 | |
| C Flame | Tamer 3 | |
| D Firebox | Assembly 1 | |
| E Left Side | Shelf 1 | |
| F Bracket | F 1 | |
| G Bracket | G 1 | |
| H Cart | Front Brace 1 | |
| I Cart Leg | Rear Left 1 | |
| J | Cart Side Brace | 2 |
| K Side | Burner Grid 1 | |
| L | Cart Leg, Front Left | 1 |
| M | Cart Side Panel | 2 |
| N Caster | 1 | |
| O Locking | Caster 1 | |
| P Door | Handle 1 | |
| Q Door | Stopper 1 | |
| R Cart | Bottom Panel 1 | |
| S Door | Handle Bezel 2 | |
| T Wheel | Cap 2 | |
| U Wheel | 2 | |
| V Axle | 1 | |
| W | Cart Leg, Front Right | 1 |
| X Cart Leg | Rear Right 1 | |
| Y Door | 1 | |
| Z Grease | Tray 1 | |
| A1 | Cart Rear Brace | 1 |
| B1 | Bracket B1 | 1 |
| C1 | Bracket C1 | 1 |
| D1 | Side Burner Shelf | 1 |
| E1 | Side Burner | 1 |
| AA | 1/4"x12mm Screw | 20 |
| BB | 5/32"x10mm Screw | 30 |
| CC | 1/4" Spring Washer | 8 |
| DD | 1/4" Flat Washer 6 | |
| EE | Cotter Pin 1 |
Please check the delivery for completeness and transport damage. If any part is missing or defective, please contact your dealer.
Complaints regarding damage or missing parts lodged upon commencement or completion of installation will not be recognized.
Assembly
Preparation
Before beginning assembly of product, make sure all parts are present. Compare parts with package contents list and hardware contents list. If any part is missing or damaged, do not attempt to assemble the product.
Contact the dealer from whom you purchased the appliance if you find that parts are missing or show damage.
Do not use the appliance unless missing parts have been delivered in addition or defective parts have been replaced. Using an incomplete or damaged appliance leads to personal injury and property damage.
Remove and safely discard any packaging material or promotional labels attached to the set.
- Assemble the appliance completely and make all required adjustments prior to operation.
- Follow the assembly and operation instructions closely. Use the figures as a visual guide.
- Pay attention to small parts such as screws and nuts that are loosened or removed for assembly or during adjustments. Keep them safe in order to avoid losing them.
- The appliance is large. It is recommended to assemble by two people.
Danger! Risk of injury!

Failure to follow these instructions can lead to problems and risks while using the barbecue.
- Follow all assembly instructions listed here.
WARNING!
Use the appliance only after it has been completely assembled and adjusted!
IMPORTANT: Parts sealed by the manufacturer or the manufacturer's agent shall not be manipulated by the user.
Required tools
1x cross-head screwdriver
1x adjustable open-end wrench
Assembling the barbecue
- First read through the assembly instructions completely.
- Two people are required for assembly.
- Take your time to assemble the barbecue on a level surface of three to four square meters.
- Make sure the required tools are within easy reach. Small parts such as handles may already be pre-assembled.
Step 1
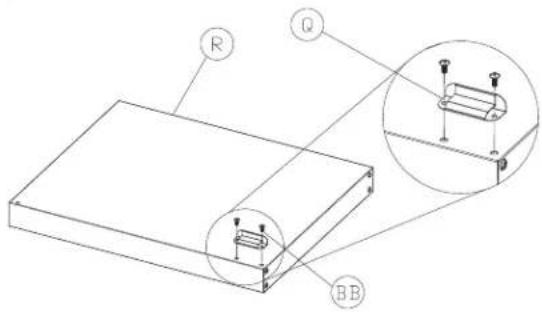
Use 2pcs of screw BB to install the door stopper Q onto the bottom panel R.
Step 2

Use 8pcs of screw AA and 8pcs of spring washer CC, to install the cart legs I/L/X/W as shown above.
Step 3

Use 4pcs of screw BB to install the rear brace (A1) onto the rear cart legs (2pcs).
Step 4
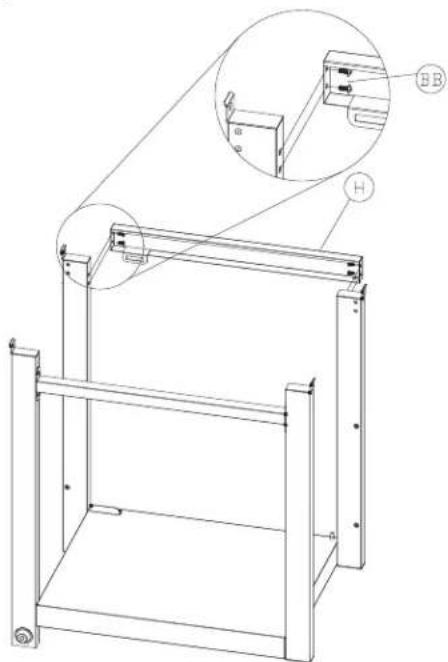
natural_image
Technical line drawing of a mechanical frame assembly with an inset showing a close-up view of a bracket (no text or symbols present)Use 4pcs of screw BB to install the front brace (H) onto the front cart legs (2pcs).
Step 5
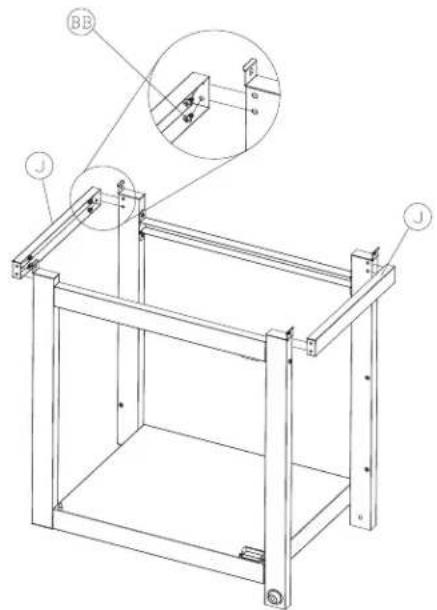
Use 8pcs of screw BB to install the side brace J (2pcs) onto the cart legs as shown above.
Step 6
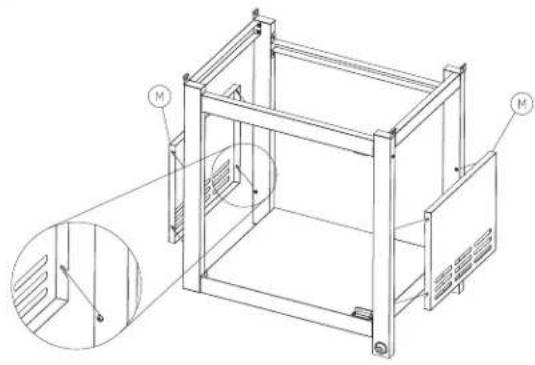
natural_image
Technical line drawing of a mechanical enclosure or frame structure with mounting holes and internal compartments, shown with an inset magnified view (no text or symbols)Loosen the pre-assembled screws on cart legs, then attach the 2pcs of side panel M onto the cart legs. Tighten the screws.
Step 7

Install casters N&O onto the left side cart legs. Then use the axle V to install the wheels U onto the right side cart legs.
Step 8

Use a wrench to tighten the 2pcs casters. Insert the cotter pin EE into the end of the axle, then install the wheel caps T.
Step 9

Use 2pcs of screw AA to install the door handle P and bezels S as shown above.
Step 10
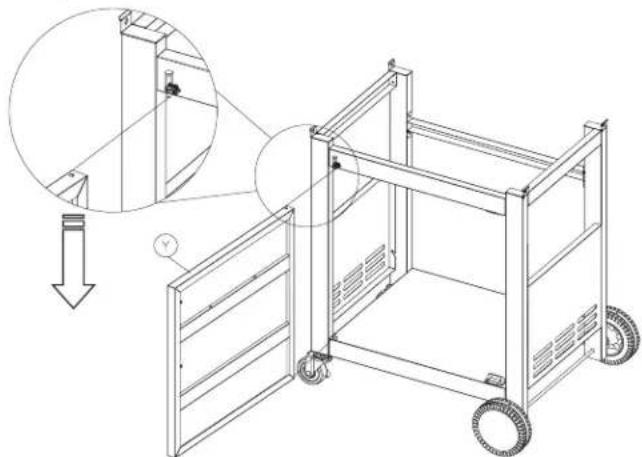
natural_image
Technical line drawing of a mechanical cart with wheels and a side view showing a close-up detail (no text or symbols)Install the door Y onto the cart.
Step 11

Place the firebox assembly D onto the cart.
Step 12

Use 4cps of screw AA to secure the firebox assembly.
Step 13
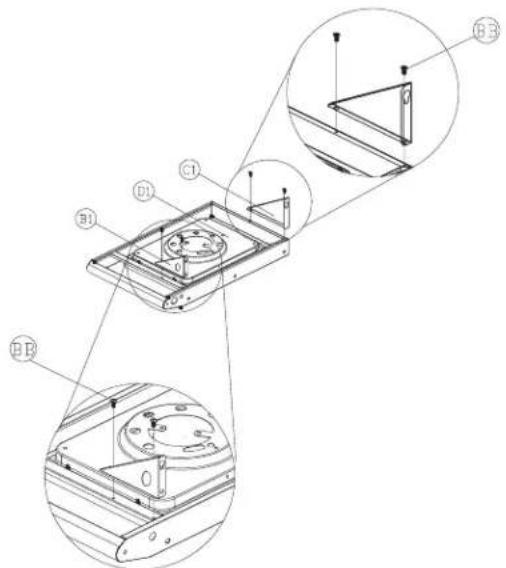
Use 4pcs of screw BB to install the brackets B1 and C1 on side burner shelf D1.
Step 14

Use 4pcs of screws BB to install the brackets F and G on the left side shelf E.
Step 15
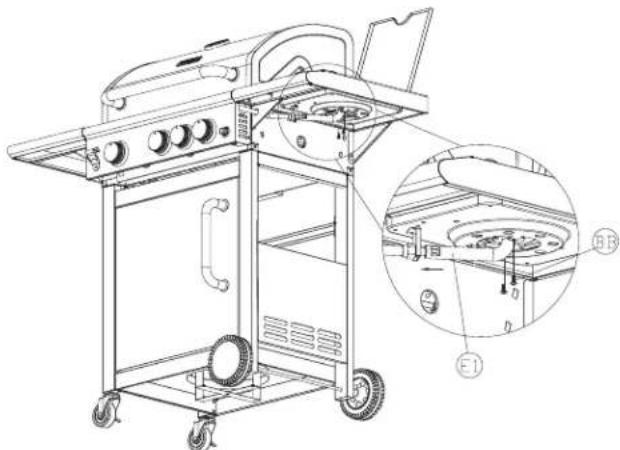
natural_image
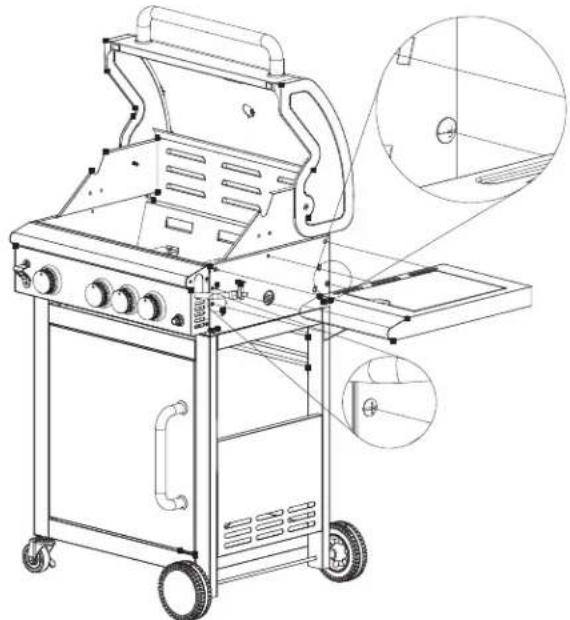
Technical line drawing of a grill with labeled components and an inset view showing internal structure (no text or symbols present)Loosen the pre-assembled screws on the firebox, then attach the side burner shelf onto the firebox. Tighten the screws.
natural_image
Technical line drawing of a mechanical device with labeled components (no text or symbols beyond labels)Use 3pcs of screw AA and 3pcs of flat washer DD to install the side burner shelf as shown above.
Step 16
natural_image
Technical line drawing of a gas stove with wheels and internal components (no text or symbols)Loosen the pre-assembled screws on the firebox, then attach the left shelf onto the firebox. Tighten the screws.

Use 3pcs of screw AA and 3pcs of flat washer DD to install the left shelf as shown above.
Step 17
natural_image
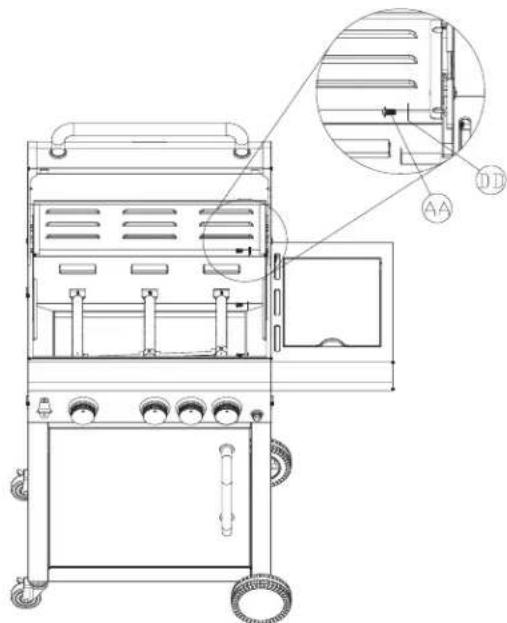
Technical line drawing of a mechanical device with wheels and internal components (no text or symbols)Use 2pcs of screw BB to tighten the side burner shelf and left shelf from outside of the firebox.

natural_image
Technical line drawing of a mechanical cart with wheels and a close-up inset showing internal components (no text or symbols)Step 18
natural_image
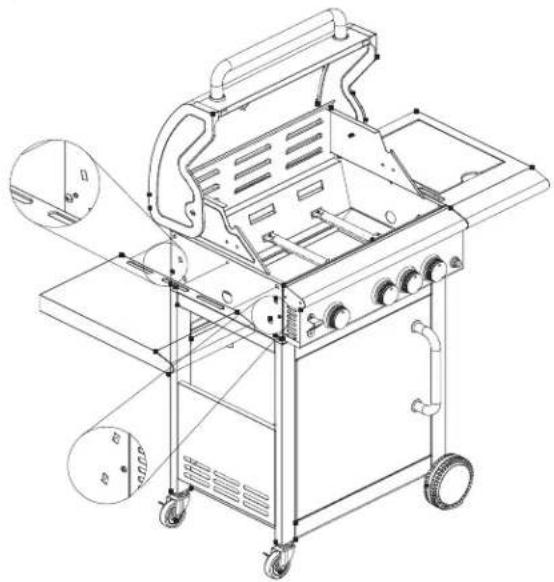
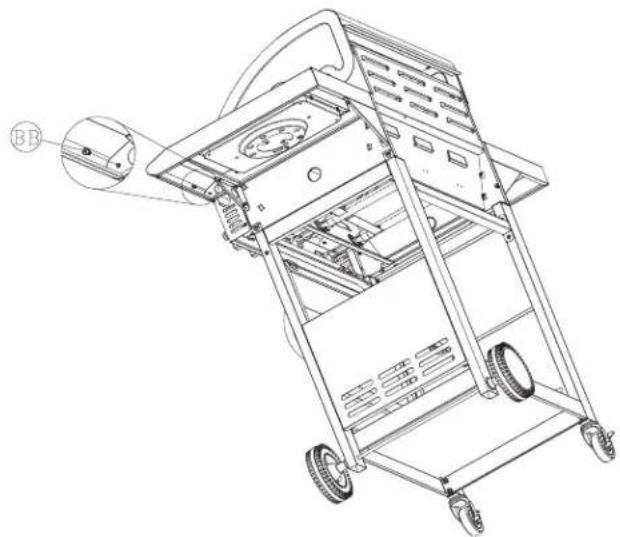
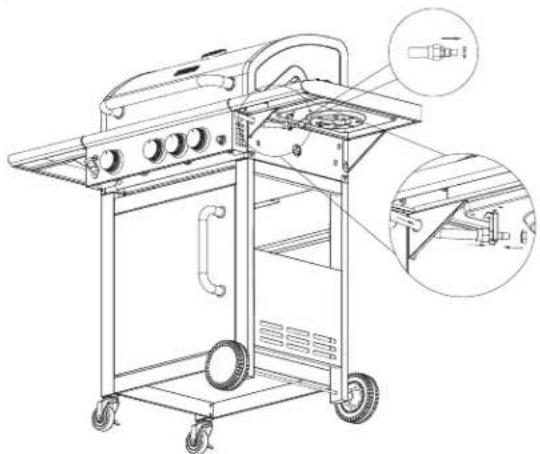
Technical line drawing of a portable electric grill with wheels and internal compartments (no text or symbols)Have the side burner nozzle passing through the bracket B1, then fix the nozzle on the nozzle bracket.
natural_image
Technical line drawing of a portable electric guitar chassis with wheels and internal components (no text or symbols)Use 2pcs of screws BB to fix side burner E1 onto the bottom panel of the shelf.
natural_image
Line drawing of a standard 3D grill with open lid and wheels, no text or symbols presentConnect the side burner electrode wire.
Step 19

natural_image
Technical line drawing of a portable grill with wheels and control panel (no text or symbols)

natural_image
Technical line drawing of a portable electric stove with wheels and a handle (no text or symbols)Place the flame tamer C, warming rack A, cooking grid B and grease tray Z into the grill as shown above.
Inserting the battery
Make sure to insert a battery into the appliance for automatic burner activation. You need only one 1.5 V AA battery (not included). Remove the battery compartment cover located between the temperature controllers and insert a 1.5 V AA battery into the battery compartment. Pay attention to the correct polarity (+/-). The plus of the battery must point outwards. Replace the battery compartment cover.
Connecting the gas cylinder
WARNING! Be aware of flashbacks!
Make sure there is no debris, spiders, small insects, or webs inside the head of the gas cylinder, pressure regulator, burner(s), burner tube(s), or hose before any connection is made. They can obstruct the gas flow, which could result in a fire in and around the burner tube. This kind of fire is known as “flashback” and can cause serious damages. Check and clean (refer to “Maintenance and cleaning” on page EN-17.) all the parts of the appliance before assembling it, to reduce the chance of its occurrence.
Regulator and hose
These accessories come complete with the gas barbecue. Replacement parts can be purchased from your appliance dealer or an authorized LPG dealer. Use only regulators and hoses approved for LPG with the above pressures. The estimated service life of the regulator is 2 years. It is recommended to change it every 2 years.
NEVER use an unregulated gas supply.
The use of an inappropriate or defective regulator or gas hose is dangerous. Always check that you have the appropriate parts before using the barbecue.
The gas hose used must comply with relevant standards and regulations of the country in which the appliance is used. The length of the gas hose must not exceed 1.5 meters.
The gas hose must be replaced if damaged and when national conditions require it. Contact your dealer for replacement.
The hose must not be twisted or kinked. Make sure that the gas hose is not obstructed, kinked, or in contact with any parts of the gas barbecue other than its connection.
Appliance storage
Storage of an appliance indoors is only allowed without the gas cylinder. When the barbecue is not to be used for an extended period of time, it should be stored with a protective cover in a dry and dust-free environment.
Gas cylinder
The appliance is supplied without a gas cylinder. The user should order a gas cylinder separately. The gas cylinder must not be dropped or handled roughly or improperly!
The gas cylinder must be removed from the barbecue when it is not in use. Make sure to put the protective cap on the gas cylinder after it has been removed from the appliance. Gas cylinders must be stored separately from the appliance.
Gas cylinders must not be stored in premises below ground level, in stairwells, passageways and carriageways of
buildings, as well as in their immediate vicinity. The valves must be provided with protective caps and locking nuts. Gas cylinders (including empty ones) must be stored in an upright position.
Gas cylinders must be stored outdoors in an upright position and out of the reach of children. Gas cylinders must never be stored at temperatures exceeding 50 °C. Gas cylinders must not be stored near open flames or other ignition sources.
Smoking in the vicinity of gas cylinders is strictly prohibited!
Connecting to the appliance
Put the gas cylinder on the base plate.
Warning!
The gas cylinder must be put on the base plate. Do not keep another gas cylinder in the cabinet. Before you start using the gas barbecue, make sure the gas cylinder is in the gas cylinder holder on the base plate in the cabinet.
Ensure that the heads of the gas cylinder, regulator or burner are free from dirt prior to connecting the gas cylinder to the appliance. There could be spiders and insects in there blocking the openings of the burner or venturi. A blocked burner can cause a fire underneath the barbecue. Clean blocked burner openings with a sturdy pipe cleaner.
Warning! Hand-tighten one side of the gas hose onto the pressure regulator thread and then tighten it firmly with a 17 size open-end wrench.
Warning, left-hand thread! Do not use an additional seal! Hand-tighten the other side of the gas hose onto the valve connection thread on the appliance. Then tighten it firmly with a 17 size open-end wrench.
Warning, left-hand thread! Do not use an additional seal! Attach the pressure regulator to the gas cylinder valve and tighten by hand.
Follow the instructions supplied with the regulator.
Warning!
Check all connections for gas leaks before every use!
Always check for leaks using soapy water. Never use an open flame to detect leaks.
Checking for gas leaks
- Extinguish any open flame or cigarettes in the area.
- Make sure the cylinder valve and the barbecue are "OFF."
- Mix 1 part dishwashing detergent with 3 parts water. Leak test requires approx. 50 ml of soapy water.
- Ensure that all temperature controllers are set to 80 (off).
- Attach the regulator to the gas cylinder and turn on the burner using the left temperature controller. Ensure that the connections are secure.
- Open the gas valve.
- Apply the soapy water on the hose and all connections. Bubbles indicate that there is a leak.
- If a leak is detected, close the gas cylinder valve, tighten the connection and retest.
- If the leak persists, contact your barbecue dealer for assistance. Do not attempt to operate the appliance if a leak is present.
Setting up the barbecue
Warning! Risk of damage!

During use, the screws can loosen slowly and impair the barbecue's stability.
- Check the tightness of screws before each use. If necessary, retighten all screws to ensure the barbecue stands always stable.
- Before use, place the barbecue on a level, solid surface outdoors.
Before grilling
Wash off possible rough production residues using warm water; in doing so, avoid using cleaning agents or dishwashing detergents.
Rub both grill grates with a soft cloth wetted with cooking or frying oil.
Pre-firing the barbecue
Before using the barbecue for the first time, heat it up for at least 10 to 20 minutes to burn away production residues. In the process, intense odor may develop, which is harmless and only lasts for a short time. Do not touch hot surfaces during preheating to avoid damaging them. Close the lids for a few minutes during pre-firing. Always set the gas barbecue to a small or medium flame when the lid is closed. Remove the lids for the rest of the pre-firing process.
Operation
Danger! Risk of explosion!

Read through the following instructions for turning on/firing up the barbecue and all warnings and safety instructions before actually firing up the barbecue.
- Check the barbecue for cracks, cuts or other damage before using it.
- Stop using the barbecue if the gas hose is damaged or broken.
- Open the barbecue lid before igniting the burner. An explosive flash may otherwise result, which can cause severe physical injuries and even death.
Danger! Risk of burns!

Do not touch the barbecue and food being grilled during use as they become extremely hot and can cause severe burns.
- Before barbecuing for the first time, heat up the barbecue for at least 15 minutes with a lid closed and on a high flame without grillables. The heat cleans the internal parts and burns away the production residues of colored barbecue parts. In the process, odors and some smoke may develop. However, they are harmless and only last for a short time. Ensure sufficient ventilation.
- Keep sufficient distance from hot parts since any contact can cause severe burns.
- Always wear barbecue or oven gloves (e.g. Category II heat-resistant gloves rated according to DIN-EN 407) when grilling.
- Use only long-handled barbecue utensils with heat-resistant grips.
- Do not wear clothing with wide sleeves.
- When using the barbecue, the floor and surrounding walls can be soiled, e.g. through fat splashes. Ensure that they are adequately protected against such soiling.
Danger! Risk of burns and accidents!

If the burner fails to ignite, turn the temperature controller clockwise to (off) and then turn the regulator on the gas cylinder clockwise to Off.
Ignition system - ignition with piezo-igniter
- Open the barbecue lid before turning on the burner.
- Set all temperature controllers to (off).
- Attach the regulator to the gas cylinder. Set the gas valve on the regulator to On. Do not bend over the barbecue.
- First push in the left knob and turn it to the left _Max (high flame), while simultaneously pressing the piezo-igniter to ignite the burner. Release the piezo-igniter when the burner is ignited.
- If the burner fails to ignite within 5 seconds, turn the knob to "OFF" and wait 5 minutes for the gas to escape and then repeat the whole procedure described above. If the burner still does not ignite, ignite it manually as described below in section Conventional ignition with matches of the user manual.
-
The flame temperature can be adjusted with the temperature controller in the range between _Max (high flame) and (low flame).
-
The side burner is turned on and operated in the same way as the main burner.
- To switch off the barbecue, set the regulator on the gas cylinder to Off. Then turn the temperature controller on the barbecue to (off).
Conventional ignition with matches
Danger! Risk of burns!

When lighting the barbecue, always hold a match underneath the barbecue, not above it.
- Open the barbecue lid before turning on the burner.
- Set all temperature controllers to 80 (off).
- Attach the regulator to the gas cylinder. Set the gas valve on the regulator to On. Do not bend over the barbecue. Use soapy water to check if leaks are present between the gas cylinder and the regulator.
- Push in the left temperature controller and turn it counterclockwise to the Max position.
- Bring a burning commercially available (extra-long) fireplace match from underneath through the large hole in the base of the burner housing near the burner.
- Repeat the same procedure for the second burner.
- If the side burner does not catch fire, set the temperature controller to (off). Push in the side burner temperature controller and turn it counter-clockwise to the Max position. Using a fireplace match, build up fire from underneath near the gap between the ignition head and the burner.
- If you have any problems with lighting up your barbecue, consult the dealer.
Cooking with the lid closed
Gas barbecues with lids allow gentle cooking of larger pieces of meat and whole poultry, similar to an oven.
With the lid closed, only flame is required. Set the temperature to a low or medium flame and close the lid. AVOID
EXCESSIVE HEATING OF THE BARBECUE. Opening the lid for no reason each time causes heat to escape and thus extends the cooking time. You should therefore avoid opening the lid unnecessarily.
Finishing barbecuing
As soon as the food has been cooked, the barbecue should be allowed to burn for 5 more minutes on a high flame. This enables to burn away residues on the burner and make cleaning easier. Make sure that the lid is removed during this process.
Turning off the barbecue
To switch off the barbecue, set the regulator on the gas cylinder to Off. Then turn the temperature controller on the barbecue to (off). Wait until the barbecue has cooled down sufficiently before closing the lid.
Cooking tips
- Brush the grill grates with cooking or vegetable oil prior to using the appliance.
- Use a brush with a long handle. Juices from the food drip onto the heater during cooking and vaporize. The steam arising from this process contributes to the taste of the food.
- Adjust the temperature controller between Max (high flame) and (low flame) in order to achieve your desired cooking results.
- Keep the lid closed at a low flame in order to achieve a more consistent result and to cook larger pieces of meat or whole chickens.
- Avoid opening the lid too often as accumulated heat escapes each time, increasing the grilling duration as a result.
Maintenance and cleaning
Your barbecue is made of high-quality materials.
Clean the barbecue after each use. To clean and maintain the surfaces, please observe the following instructions:
Danger! Risk of burns!

Allow the barbecue to cool down completely before cleaning.
Danger! Health risk!

Do not use paint solvents or thinners to remove stains. These substances are hazardous to health and must not come into contact with food.
Warning! Risk of damage!

Do not use any strong or abrasive solvents or scouring pads as these can damage the surfaces and leave scuff marks.
- After each use, allow the barbecue to burn for approx. 5 more minutes without any grillables. This minimizes the food residues.
- Set the regulator on the gas hose to Off before cleaning the barbecue.
- Remove the grill grate (B2) and clean it thoroughly with soapy water. Rinse it with clean water and then dry it off thoroughly.
- Use a wet sponge to remove loose residues from the barbecue.
- Any grease layer that may have built up on the internal surface of the lid can be cleaned off using a hot strong soapy solution. Then rinse with clean water and dry completely before using the barbecue again.
- Food residues on the barbecue base can be removed with a brush, spatula or cleaning sponge. Then wash again with soapy water. Rinse with clean water and dry.
- Clean the inner and outer surfaces with warm soapy water as a general practice.
- Clean wooden surfaces with a soft cloth and hot soapy water. Then rinse with clean water. Never clean wooden surfaces with barbecue cleaner concentrates.
- Use a soft, clean cloth for drying. Do not scratch the surfaces when wiping them dry.
Warning! Never use commercially available oven cleaners!
- Tighten all screws before every use to ensure that the barbecue stands stable at all times.
- When the gas barbecue is not in use, it should be covered with a protective cover.
Cleaning the burners
- Set the regulator on the gas cylinder to Off. Then set the temperature controller on the barbecue to ∞ (off) and disconnect the gas hose from the gas cylinder.
- Remove the grill grates.
- Clean the burners with a soft brush or with compressed air. Then wipe them dry with a cloth.
- Clean blocked openings with a sturdy pipe cleaner, a wire or with the opened end of a paper clip.
Cleaning the ignition head
- Soiling of the ignition head tip may make it difficult to build up fire. In this case, it must be cleaned. The ignition head tip is located next to the burner opening.
- To ensure perfect functioning, food residues between the ignition head tip and the burner must be removed. Use fine sandpaper/emery paper to clean the ignition head tip and the burner edge.
- The ignition head tip should be approx. 4 - 6 mm away from the burner edge. This is the optimal distance for reliable ignition.
Maintaining barbecue surfaces and lids
IMPORTANT INFORMATION
Maintaining and protecting stainless steel surfaces
Your barbecue was manufactured with stainless steel components. All stainless steel parts require a certain protection and care effort in order to keep their original appearance. Contrary to general perception, stainless steel is not hundred percent resistant to flash rust and corrosion; therefore, it does require certain maintenance. Even the highest-quality stainless steel parts need to be cleaned on a regular basis with fresh water so that oxidation and corrosion are prevented.
Modern aesthetics requires that your barbecue be equipped with stainless steel components and a brushed finish. This brushed finish is achieved by running stainless steel sheets through a process in which the mirror finish of the steel is removed and thus the sheets leave the processing plant in a brushed condition.
Brushed stainless steel requires regular cleaning and maintenance in order to preserve its appearance. Without proper care, signs of rust or corrosion are sure to appear on the steel surface over time.
Stainless steel does require maintenance. Cleanliness and stainless steel are closely interrelated.
Once you have assembled the barbecue, it is recommended that you use a clean cloth to apply a thin film of olive oil on all accessible stainless steel surfaces.

natural_image
Hand cleaning a large metallic surface with a cloth (no text or symbols visible)Then rub in the olive oil and subsequently wipe the surface with a clean cloth so that the finish is not oily. This way you will ensure that the material is protected from dirt and other aggressive harmful substances because the surface will be covered with a temporary food-safe protective layer.
The olive oil film also makes subsequent polishing and removal of fingerprints and the like much easier. Repeat this procedure from time to time when you clean your barbecue.
IMPORTANT INFORMATION
You may have purchased a protective cover for your barbecue. To protect your investment, we recommend that you cover the barbecue with the protective cover whenever it is not in use. However, make sure to put on the protective cover only when your barbecue has cooled down and is clean and dry. It may be necessary to use a protective cover. Caution! Putting a protective cover on your barbecue while it is warm, wet or dirty may lead to heavy rusting.
For this reason, your barbecue must always be cool, clean and thoroughly dried before you put on the protective cover. This is especially important before long periods of disuse, e.g. during winter storage.
Follow these maintenance and care tips thoroughly in order to preserve the quality of your barbecue for a long time.
Take good care of your investment and it will serve you well for years to come.
Troubleshooting
| Problem Probable cause Remedy | ||
| Burner will not ignite. | - LPG cylinder is empty- Defective regulator- Blocked burner- Blocked gas nozzles or gas hose- Electrode cable is loose or disconnected from electrode or igniter- Defective electrode or cable- Defective ignition switch | - Replace with full LPG cylinder- Have the regulator checked or replaced- Cleaning the burners- Clean the gas nozzles and gas hose- Reconnect the cable- Replace the electrode or cable- Replace the ignition switch |
| Burner will not catch fire when using a match | - LPG cylinder is empty- Defective regulator- Blocked burner- Blocked gas nozzles or gas hose | - Replace with full LPG cylinder- Have the regulator checked or replaced- Cleaning the burners- Clean the gas nozzles and gas hose |
| Low flame or flashback (fire in the burner pipe or roaring noise) | - LPG cylinder is too small- Blocked burner- Blocked gas nozzles or gas hose- Very strong wind in the area of the gas barbecue | - Use a larger gas cylinder- Cleaning the burners- Clean the gas nozzles and gas hose- Set up the gas barbecue in an area sheltered from the wind |
| Temperature controller is hard to turn | - Blocked gas valve - Replace the gas valve | |
Waste disposal

The packaging is made from environmentally friendly materials, which you can dispose of at your local recycling points.

Do not under any circumstances dispose of the barbecue in normal household waste! Either bring to an approved waste management firm or dispose o fit at your municipal waste disposal facility. Observe the current regulations in force. If in doubt, get in touch with your disposal facility.
Batteries and rechargeable batteries

Batteries must not be disposed of with normal household waste. Recycle them at the collection points provided for this purpose. Contact the local authorities or your dealer for recycling advice. Correct disposal of old batteries helps protect the environment and human health.
Declaration of conformity
This product complies with the applicable European and national directives. This is confirmed by the CE marking (respective declarations can be requested from the manufacturer).
Specifications
Product: Item no. T-BBQ 3100 G BK-SS gas barbecue
Weight: approx. 33.2 kg
Overall dimensions: approx. 121.8 x 57.5 x 116.5 cm (W x D x H)
Grill surface: approx. 58.3 x 40.8 cm
Main burner: 3 items, each 3.22 kW
Side burner: 1 item, 3.51 kW
Power: 13.17 kW
Nominal heat load, max.: max. 1056 g/h
Appliance category: I 3+(28-30/37)
Gas type/gas pressure: Butane at 28-30 mbar and propane at 37 mbar
Main burner nozzle: 0.86 mm
Side burner nozzle: 0.89 mm
Battery 1x 1.5 V AA (not included)
Gas Tank

Key parameters
- Maximum diameter: 35.3 cm
- Maximum height: 45.72 cm
- Use only 20 lb (9.07 kg) gas tank.
Our address:
TEKA Industrial S.A.
C/Cajo 17, 39011 Santander

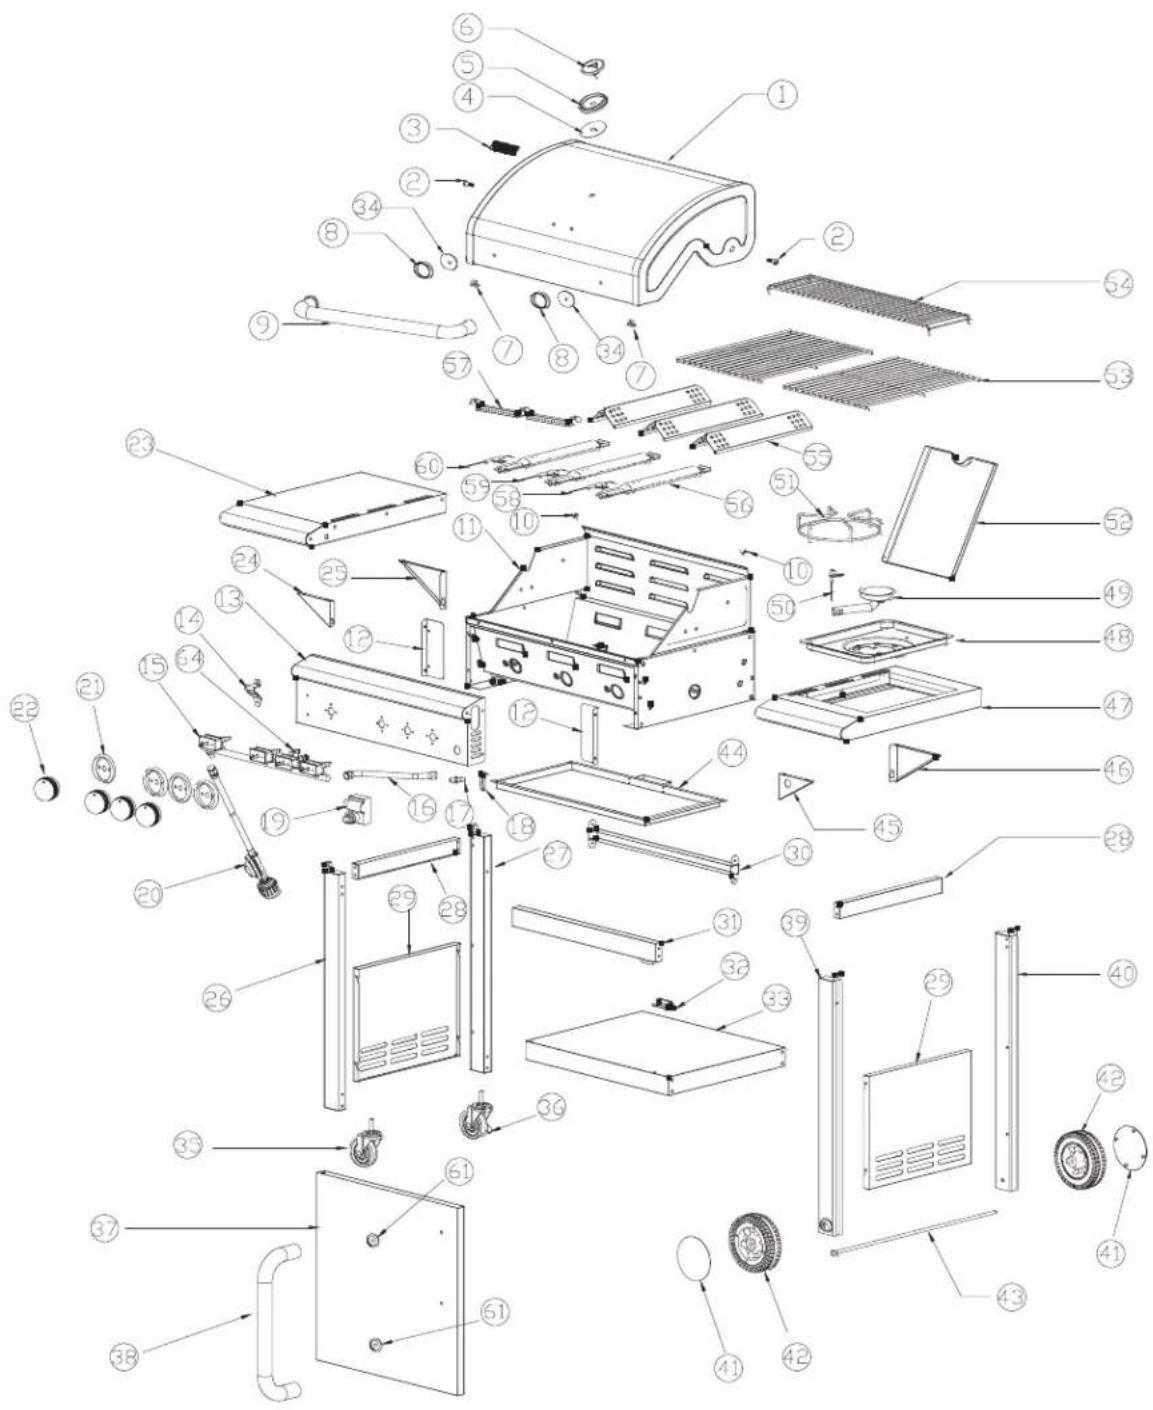
| No. Part Description | |
| 1 Main | Lid |
| 2 Hing | Screw |
| 3 Name | Plate |
| 4 Heat | Insulating Spacer, for Thermometer |
| 5 Thermometer | Bezel |
| 6 Thermometer | |
| 7 Lid | Bumper |
| 8 Lid | Handle Bezel |
| 9 Lid | Handle |
| 10 Fixbox | Bumper |
| 11 Firebox | Assembly |
| 12 Control Panel Bracket | |
| 13 Control Panel | |
| 14 Bottle | Opener |
| 15 Gas | Manifold, for Main Burner |
| 16 Gas | Hose |
| 17 Side | Burner Nozzle Connector |
| 18 Side | Burner Nozzle Bracket |
| 19 Ignitor | |
| 20 Regulator | |
| 21 Knob | Bezel |
| 22 Knob | |
| 23 Left | Side Shelf |
| 24 Bracket | F |
| 25 Bracket | G |
| 26 Cart | Leg, Front Left |
| 27 Cart | Leg, Rear Left |
| 28 Cart | Side Brace |
| 29 Cart | Side Panel |
| 30 Cart | Rear Brace |
| 31 Cart | Front Brace |
| No. Part Description | |
| 32 Door Stopper | |
| 33 Cart Bottom Panel | |
| 34 Heat Insulating Spacer, for Lid Handle | |
| 35 Caster | |
| 36 Locking Caster | |
| 37 Door | |
| 38 Door Handle | |
| 39 Cart Leg, Front Right | |
| 40 Cart Leg, Rear Right | |
| 41 Wheel Cap | |
| 42 Wheel | |
| 43 Axle | |
| 44 Grease Bucket | |
| 45 Bracket B1 | |
| 46 Bracket C1 | |
| 47 Side Burner Shelf | |
| 48 Bottom Panel, for Side burner Shelf | |
| 49 Side Burner | |
| 50 Side Burner Electrode & Wire | |
| 51 Side Burner Grid | |
| 52 Side Burner Shelf Lid | |
| 53 Cooking Grid | |
| 54 Warming Rack | |
| 55 Flame Tamer | |
| 56 Main Burner | |
| 57 Igniting Tube | |
| 58 Main Burner Electrode & Wire A | |
| 59 Main Burner Electrode & Wire B | |
| 60 Main Burner Electrode & Wire C | |
| 61 Door Handle Bezel |
BARBACOA DE GAS

natural_image
Exterior view of a black TEKA gas stove with open doors and wheels (no visible text or symbols)
AA

BB

CC

DD

EE
Índice
natural_image
Technical line drawing of a mechanical frame assembly with an inset showing a close-up view of a bracket (no text or symbols present)natural_image
Technical line drawing of a metal frame structure with mounting brackets and a magnified inset showing detail (no text or symbols)natural_image
Technical line drawing of a mechanical enclosure or frame structure with mounting holes and internal compartments, shown with an inset magnified view (no text or symbols)natural_image
Technical line drawing of a mechanical cart with wheels and a magnified inset showing a detail (no text or symbols)natural_image
Technical line drawing of a grill with labeled components and an inset view showing internal structure (no text or symbols present)natural_image
Technical line drawing of a gas stove with wheels and internal components (no text or symbols)natural_image
Technical line drawing of a mechanical device with wheels and a labeled component (no text or symbols present)natural_image
Technical line drawing of a mechanical cart with wheels and a close-up inset showing internal components (no text or symbols)Paso 18

natural_image
Technical line drawing of a portable electric grill with wheels and internal compartments (no text or symbols)natural_image
Technical line drawing of a portable electric grill with wheels and internal components (no text or symbols)natural_image
Line drawing of a standard 3D grill with open lid and wheels, no text or symbols presentnatural_image
Line drawing of a portable electric grill with open doors and wheels (no text or symbols)

natural_image
Technical line drawing of a portable electric stove with wheels and a handle (no text or symbols)natural_image
Hand cleaning a large stainless steel container with a cloth (no text or symbols visible)TEKA Industrial S.A.
C/Cajo 17, 39011 Santander
natural_image
Exterior view of a black TEKA gas stove with open doors and wheels (no visible text or symbols)
AA

BB

CC

DD

EE
Índice
natural_image
Technical line drawing of a mechanical frame assembly with an inset showing a close-up view of a bracket (no text or symbols present)natural_image
Technical line drawing of a metal frame structure with mounting brackets and a magnified inset showing detail (no text or symbols)natural_image
Technical line drawing of a mechanical enclosure or frame structure with mounting holes and internal compartments, shown with an inset magnified view (no text or symbols)natural_image
Technical line drawing of a mechanical cart with wheels and a magnified inset showing a detail (no text or symbols)Utilize 4 parafusos AA para fixar o conjunto de fornalha.
Passo 13

natural_image
Technical line drawing of a grill with labeled components and an inset view showing internal structure (no text or symbols present)natural_image
Technical line drawing of a portable air conditioner unit with labeled components (no text or symbols beyond labels)natural_image
Technical line drawing of a gas stove with wheels and internal components (no text or symbols)natural_image
Technical line drawing of a multi-tiered industrial machine with wheels and control panel (no text or symbols)natural_image
Technical line drawing of a mechanical cart with wheels and a side view showing internal components (no text or symbols)Passo 18

natural_image
Technical line drawing of a portable electric grill with wheels and internal compartments (no text or symbols)natural_image
Technical line drawing of a portable electric Range hood with wheels and internal components (no text or symbols)natural_image
Line drawing of a standard 3D grill with open lid and wheels, no text or symbols presentnatural_image
Line drawing of a portable electric grill with open doors and wheels (no text or symbols)

natural_image
Technical line drawing of a portable electric stove with wheels and a handle (no text or symbols)natural_image
Hand cleaning a large stainless steel container with a cloth (no text or symbols visible)natural_image
Technical line drawing of a cylindrical tank with side supports and a top-mounted valve (no text or symbols)TEKA Industrial S.A.
C/Cajo 17, 39011 Santander

natural_image
Exterior view of a black and silver TEKA electric grill (no signage or text visible)
AA

BB

CC

DD

EE
Table des matières
natural_image
Technical line drawing of a mechanical frame assembly with an inset showing a close-up view of a bracket (no text or symbols present)natural_image
Technical line drawing of a metal frame structure with mounting brackets and a magnified inset showing detail (no text or symbols)natural_image
Technical line drawing of a mechanical enclosure or frame structure with mounting holes and internal compartments, shown with an inset magnified view (no text or symbols)natural_image
Technical line drawing of a mechanical cart with wheels and a magnified inset showing a detail (no text or symbols)natural_image
Technical line drawing of a grill with labeled components and an inset view showing internal structure (no text or symbols present)natural_image
Technical line drawing of a gas stove with wheels and internal components (no text or symbols)natural_image
Technical line drawing of a portable air conditioner unit with wheels and a labeled component (no text or symbols present)natural_image
Technical line drawing of a mechanical cart with wheels and a close-up inset showing internal components (no text or symbols)Étape 18

natural_image
Technical line drawing of a portable electric grill with wheels and internal compartments (no text or symbols)natural_image
Technical line drawing of a portable electric grill with wheels and internal components (no text or symbols)natural_image
Line drawing of a standard 3D grill with open lid and wheels, no text or symbols presentnatural_image
Line drawing of a portable electric grill with open doors and wheels (no text or symbols)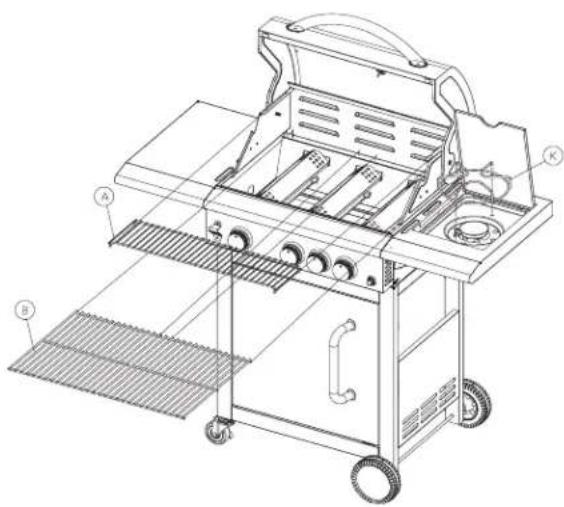

natural_image
Technical line drawing of a portable electric stove with wheels and a handle (no text or symbols)natural_image
Hand cleaning a large metallic surface with a cloth (no text or symbols visible)Piles et batteries rechargeables

natural_image
Technical line drawing of a cylindrical tank with side supports and a top-mounted valve (no text or symbols)Caractéristiques
TEKA Industrial S.A.
C/Cajo 17, 39011 Santander

natural_image
World map silhouette showing continents and countries with no text or labels- GAS BARBECUE
- Table of contents
- Before you start using the appliance
- Intended use
- Safety precautions
- Safety symbols
- GENERAL SAFETY INSTRUCTIONS
- GENERAL BARBECUE WARNINGS
- GAS CONNECTIONS / GAS CYLINDER / PRESSURE REGULATOR WARNINGS
- GAS HOSE WARNINGS
- IF YOU SMELL GAS
- Safety Instructions
- Danger! Health risk!
- Danger! Risks to children!
- Danger! Risk of injury!
- Warning! Risk of damage!
- Danger! Risk of burns and accidents!
- Danger! Risk of fire!
- Battery Safety Information
- Scope of supply
- Assembly
- Preparation
- WARNING!
- Required tools
- Assembling the barbecue
- Inserting the battery
- Connecting the gas cylinder
- WARNING! Be aware of flashbacks!
- Regulator and hose
- NEVER use an unregulated gas supply.
- The gas hose must be replaced if damaged and when national conditions require it. Contact your dealer for replacement.
- Appliance storage
- Gas cylinder
- Connecting to the appliance
- Checking for gas leaks
- Setting up the barbecue
- Before grilling
- Pre-firing the barbecue
- Operation
- Ignition system - ignition with piezo-igniter
- Conventional ignition with matches
- Cooking with the lid closed
- Finishing barbecuing
- Turning off the barbecue
- Cooking tips
- Maintenance and cleaning
- Warning! Never use commercially available oven cleaners!
- Cleaning the burners
- Cleaning the ignition head
- Maintaining barbecue surfaces and lids
- IMPORTANT INFORMATION
- Maintaining and protecting stainless steel surfaces
- Troubleshooting
- Waste disposal
- Batteries and rechargeable batteries
- Declaration of conformity
- Specifications
- Key parameters
- Our address:
- BARBACOA DE GAS
- Índice
- Table des matières
- Piles et batteries rechargeables
- Caractéristiques
Brand : TEKA
Model : BBQ 3100 G
Category : Barbecue