
M925DAB - Audio System KENWOOD - Free user manual and instructions
Find the device manual for free M925DAB KENWOOD in PDF.
Pick your language and provide your email: we'll send you a specifically translated version.
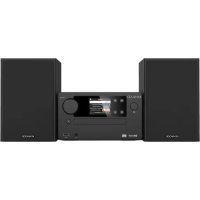
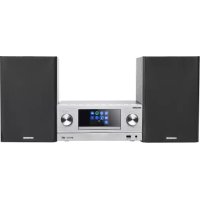
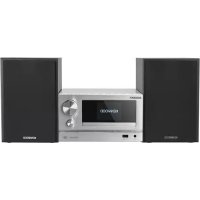
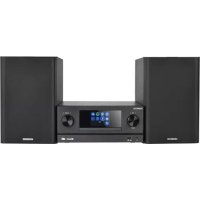
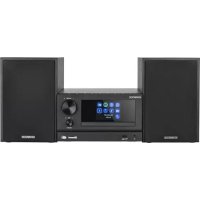
| Product type | Compact audio system with CD player, DAB+/FM radio, Bluetooth, USB and line input |
| Brand | Kenwood |
| Model | M-925DAB |
| Main unit dimensions (W x H x D) | 260 x 116 x 242 mm |
| Main unit weight | 2.0 kg |
| Speaker dimensions (W x H x D) | 172 x 263 x 242 mm (each) |
| Speaker weight | 2.4 kg (each) |
| Power supply | 100-240 V~, 50/60 Hz |
| Power consumption | 40 W operation, less than 1 W standby |
| Amplifier output power | 2 x 50 W into 6 ohms |
| Frequency range | 20 Hz - 20 kHz (± 3 dB) |
| Radio tuner | DAB+ (Band III: 174.928-239.200 MHz) and FM (87.5-108 MHz) |
| CD functions | CD audio and MP3 CD playback, repeat and random play |
| USB functions | MP3 file playback (FAT16/32, up to 500 mA, bitrate 32-320 kbps) |
| Bluetooth | Version 5.0, class 2, range approx. 10 m, profiles A2DP and AVRCP |
| Auxiliary input | 3.5 mm jack socket (Line-In) |
| Headphone output | 3.5 mm jack socket |
| Equalizer | 5 presets (Flat, Classic, Pop, Jazz, Rock) + Bass/Treble adjustments |
| Clock and alarm functions | 2 independent alarms, sleep timer (15-90 min), automatic update via DAB/FM |
| Display | TFT screen with brightness adjustment (3 levels) |
| Safety | Class 1 laser product, automatic shutdown after 15 minutes of silence |
| Maintenance and cleaning | Clean with a dry or slightly damp cloth (no solvents) |
| Spare parts and repairability | Repair by authorized service only; use of original parts recommended |
| General information | 2-year warranty; operating temperature 0°C to +40°C; WEEE to be recycled |
Frequently Asked Questions - M925DAB KENWOOD
How to set the alarm on the Kenwood M-925DAB?
Press the MENU button on the remote, select System then Alarm. Choose Alarm 1 or Alarm 2, set the time, duration (15 to 90 min), source (DAB, FM, CD, USB or Tone), frequency (Every day, Once, Weekend, Weekdays) and volume. Confirm to activate.
How to connect a smartphone via Bluetooth?
Set the device to BT mode (MODE button). Turn on Bluetooth on your smartphone and search for devices. Select M-925DAB. If a PIN code is requested, enter 0000. The screen shows Connected when the connection is successful.
What to do if there is no sound?
Check that the device is on and the correct source is selected (DAB, FM, CD, USB, BT, Line-In). Increase the volume. Make sure the speakers are properly connected (black cable to black terminal, red to red). If the problem persists, unplug and plug back the power.
How to set the clock manually?
Go to MENU > System > Time > Set time/date. Set hours, minutes, day, month and year with navigation keys and confirm. You can also disable automatic update in Auto Update if necessary.
How to save a radio station as favorite?
Select the desired station. Hold down the PROG button until Save prog. appears. Choose a location (1 to 30) with navigation keys and confirm with OK. The message Program XX saved confirms the saving.
How to use the sleep timer?
Press MENU > System > Sleep. Select the desired duration (15, 30, 45, 60 or 90 minutes) or Off to disable. The remaining time is displayed at the bottom of the screen. You can also access it directly via the SLEEP button on the remote.
How to adjust the sound (bass/treble)?
Use the BASS and TREBLE knobs on the front panel to adjust the level from -6 to +6. You can also select one of the 5 equalization presets with the EQ button on the remote: Flat, Classic, Pop, Jazz or Rock.
How to reset the device to factory settings?
Go to MENU > System > Factory reset. Select YES and confirm. Note: all personal data (presets, settings) will be erased.
What types of USB files are compatible?
The device reads MP3 files (bitrate 32-320 kbps) on USB drives formatted in FAT16 or FAT32, with a maximum current of 500 mA. Devices must be USB Mass Storage class. Folders are navigable with the ALBUM- and ALBUM+ buttons.
What to do if the remote control stops working?
Replace the batteries (2 x AAA/R03) respecting polarity. Make sure there is no obstacle between the remote and the sensor. Avoid direct sunlight or fluorescent light. If the problem persists, reset the device by unplugging and plugging back the power.
User questions about M925DAB KENWOOD
0 question about this device. Answer the ones you know or ask your own.
Ask a new question about this device
No questions yet. Be the first to ask one.
Download the instructions for your Audio System in PDF format for free! Find your manual M925DAB - KENWOOD and take your electronic device back in hand. On this page are published all the documents necessary for the use of your device. M925DAB by KENWOOD.
USER MANUAL M925DAB KENWOOD
Manual assistant
Powered by Anthropic
Waiting for your message
Product information
Brand : KENWOOD
Model : M925DAB
Category : Audio System