per confermare. Sono a disposizione ie seguenti profili:
Potente / Chiaro / Luminoso / Caldo / Bilanziato
16.2 Impostazioni Internet
16.2.1 Assistente di rete
L'assistente di rete vi aiuta a collegare la vostra radio a Internet. Per richiamarlo, si prega di procedere come segue:
Selezionare nel menu "Config. di sistema le "Rete" e confermare in seguito "Assistenterete". La radio avvia ora una ricerca delle connessioni WLAN disponibili e le elenca nella lista delle connessioni. Con i tasti < SU> oppure < GIU> e col regolatore < TUNE> è possibile selezionare le diverse reti. Alla fine della lista selezionare l'opzione "[Cercare alla]" oppure "[Config. manuale)".
16.2.2 Connessione di rete ricerca fili (WLAN)
A seconda della rete, avete diverse opzioni tra cui scegliere per la connessione alla rete. Le reti che supportano una connessione Wi-Fi Protected Setup (WPS) sono identificare nell'elenco con il preferso ["WPS..."]. Altre connessioni sono reti aperte o connessioni che sono protette alla procedura PSK = Pre-Shared Key (chiave pre-condivisa).
Avvertenza: Una connessione di rete attiva è indicata da un significato bianco nell'angolo in basso a destra del display. Se non è attivo nessun collegamento, quello significato è barrato in rosso.
16.2.3 WPS- / PSK- / Connessione aperta
Una connessione WPS consente di collegare la radio alla rete in modo semplice ma sicuro. Sono disponibili due opzioni. Impostazione del collegamento attraverso PBC = Push-Button- Configura-zione (configurazione premendo un pulsante) o con la procedura PIN, in cui l'interfaccia web del,vostro router vi chiede di insertire una sequenza di numero generata in modo casuale.
16.2.4 Impostazione tramite PBC
Selezionare la rete desiderata ["WPS..."]. In seguito col "Menu WPS selezionare l'opzione "Premere il tasting" e confermare. Ora premete il tasting WPS sul vostro router o punto di accesso (AP). Per la procedura esatta, consultare il manuale d'uso del router o dell'AP. In alternatively, il processo cui èssere avviato sono nel menu "Impostazioni Internet all'indirizzo "Impostazione PBC Wlan".Seguire le istruzioni sul display.
16.2.5 Impostazione tramite PIN
Selezionare la rete desiderata ["WPS..."]. In seguito col "Menu WPS selezionare l'opzione "PIN" e confirmare. La radio genererà ora un codice a 8 cifre, che dovrete insertire premendo il tasto <OK> e poi insertire il numerotramite il router o l'interfaccia utente AP. Per ulteriori informazioni, consultare il manuale del Router o dell'AP.
16.2.6 Salta WPS / Impostazione tramite PSK (tasto di pre-condivizione)
Selezionare "Salta WPS" per stabilire la connessione utilizzando i codici di rete. Per le reti sulla supporto WPS, si può andare direttamente alla maschera di immissione. Ora inserte il codice e confermate con il tasto Pulsante "OK. Se la voce è corretta, la radio si collega alla vostra rete e stabilisce una connessione a Internet.
16.2.7 Connessione aperta
Si consiglia di non collegarsi ad una rete aperta. Se la rete selezionata non è criptata, potete confirmararlo col tasting < 0K> . Successivement viene stabilita la connessione a Internet.
16.2.8 Impostazione manuale della connessione di rete
Con DHCP attivo, si prega di procedere come segue:
Si prega di selezionare i menu "Impostazioni di rete" -> "Impostazioni manuale" -> "Wireless" -> "DHCP attivo". Quindi insertire l'SSID completo (nome della rete) e confermarlo sul modulo "OK". Ora selezionare il metod di crittografia appropriato.
Questo si trovava nella configurazione del router o dell'AP. A seconda del modo selezionato, il codice di rete viene ora immessa e visualizzata sul display e confermata con "OK".
16.2.9 Con DHCP inattivo, si prega di procedere come segue:
Selectionare i menu "Impostazioni Internet" -> "Impostaz. manuale" -> "Senza cavo" -> "DHCP inattivo". Ora insere le informazioni su "Indirizzo IP", "Subnet Mask", "Ind. Gateway", "DNS primario e "DNA secondario". Con i tasti oppure sul telecomando e col regolatore è possibile visualizzare i valori. Con i tasti , oppure è possibile selezionale i singoli blocchi di numeroi da impostare. Procedere quando come descritto al punto "DHCP attivo".
16.3 Visualizzare le impostazioni di rete
In questo menu si trovano tutte le impostazioni del profilo di rete attualmente utilizzato. Per fare quello, selezionare nel menu "Impostazioni di rete" il menu "Vedere impostaz." Con i tasti oppure sul telecomando e col regolatore è possibile visualizzare i valori.
16.4 Impostazione del PIN NetRemote
In questo menu è possibile impostare un PIN di 4 cifre che viene richiesto la prima volta che viene impostata l'app UNDOK (vedi capitolo 24). L'impostazione predefinita è "1234". Il PIN dovrebbe essereambiato immediatamente.
16.5 Profilo di rete
Qui potete videere l'elenco dei profili di rete memorizzati nella radio. Se avete creato più profili, selezionate quello con la distance più breve dal router o dall'AP corrispondente.
É possibile cancellare i profili di rete che non sono più necessari premendo il tasto oppure sul telecomando, o il regolatore per selezionare il profilo da cancellare e confermare con . Il profilo di rete attivo è contrassegnato con "*.
Avverenza: Non è possibile cancellare il profilo di rete.
16.6 Cancellare le impostazioni di rete
In questo menu è possibile cancellare le impostazioni di rete del profilo corrente. Per fare quello, selezionare il tasting "Sì" e confirmare l'iscrizione con . Selezionando il pulsante "NO" il processo viene interrotto.
16.7 Tenere rete connessa
Questo menu serve a stabilire se la connessione WLAN alla rete debba essere mantenuta in standby. In quello modo è possibile accendere la radio con l'applicazione UNDOK (vedi paglia 27). Il consumo di energia in modalità standby è leggermente superiore nella modalità in rete. Selezionare per l'impostazione il pulsante "SI" o "NO" e confermare l'immissione. con il tasting < OK>
17. Impostazioni ora
Nel menu "Ora/Data" è possibile effettuare le impostazioni per l'ora e la data. Sono a disponizione i seguenti profili:
Qui è possibile impostare manually l'ora e la data. Con i tasti oppure sul telemando e col regolatore è possibile cancellare i valori. Con i tasti oppure vengono selezionati i singoli blocchi di numero i vengono salvati anni i valori.
Qui è possibile specificare da quale fonte l'ora e la data devono essere aggiornate. Si possono scegliere i seguenti moduli:
Aggiorn. da DAB: Ora e data sono aggiornate tramite DAB.
Aggiorn. da FM: Ora e data sono aggiornate tramite UKW.
Aggiorn. da Rete: Ora e data sono aggiornate alla rete.
Nessun aggiorn.: Ora e la data devono essere impostate manually.
L'opzione attualmente selezionata è contrassegnata con "**" marcato.
In quello menu è possibile determinare se l'orologio viene visualizzato in fornato 12 o 24 ore.
Selectionare con i tasti < SINISTRA> oppure < DESTRA>; la conferma viene fatta col tasto < OK>.
L'opzione attualmente selezionata è contrassegnata con "**" marcato.
18. Lingua
Nel menu "Lingua" è possibile impostare la lingua del menu della radio. Se si imposta il dispositivo con il Procedura guidata di configurazione la lingua del dispositivo è giornata impostata li. Per selezionare una lingua utilizzare i tasti oppure e confermare premendo il tasto . In alternatively,但这a selezione possono essere eseguitaanche con il regolatore .
Si possono scegliere le seguenti lingue:
danese, finlandese, francese, inglese, italiano, norvegese, olandese, polacco, portoghese, spagnolo, svedese, turco, tedesco
19. Impostazioni di fabbrica
Per resettare la radio alle impostazioni di fabbrica, selezionare "Sl" sul menu "Ripristino valori di default". Attenzione: Tutte le impostazioni effettuate in precedenza vengono cancellate.
Selezionando "NO" il processo viene interrotto.
Avvertenza: In agli caso, resettate la radio alle impostazioni di fabbrica prima di consegnarla (ad esempio, venderla o regalarla).
20. Aggiornamento software
In questo menu è possible verificare se è disponibile un aggiornamento software per la radio.
Se si selezione "Aggiorn. autom." la radio controllerà automaticamente e regolarmente la presenza di nuovi aggiornamenti software.
Selezionare la voce di menu "Verifica ora" per cercare una nuova versione. Se si trovau un software più recente, selezionare "Sì" per installerli, oppure "NO" per annullare l'aggiornamento. Con "Sì" riavvia la radio per eseguire l'operazione.
Poi il softwareiene scaricato e vi verrà richiesto di "Procedere", ossia se l'aggiornamento deve essere effettuato. Si prega di selezionare "Sì" per condere oppure "NO" per annullare l'aggiornamento.
Lampeggiante alternatively "Attenzione: non rimuovere l'alimentazione" e la versione del software da installare. Quando il processo è complete apparirà "Aggiornamento completato nel display e si può confirmare il processo premendo .
Il numero di versione del software installato si trovava nella cartella "Config. di sistema" quello il punto "Informazioni".
Attenzione!
Assicurarsi che sia disponibile un'alimentazione stabile prima di avviare un aggiornamento del software. Un'interruzione durante un aggiornamento può causare danni irreparabili alla radio!
21. Installazione guidata
Nel menu "Installaz. guidata" è possibile avviare nuovamente l'assistente di configurazione. Procedere come descritto al punto "3.8 Avvio della procedura guidata di configurazione".
In questo menu troverete tra l'altro il numero di versione del firmware attuale. Tenerlo pronto nel caso in cui sia necessario contattare il servizio clienti.
Si prega di leggere l'informativa sulla privacy qui elencata o di visitare quello site web: www.frontiersmart.com/privacy
24. Illuminazione
L'illuminazione del display può essere programmata in 3 livelli di luminosità. Nel menu è possibile effettuire le seguenti impostazioni di "Controluce":
"Timeout": Tempo fino a quando il display è impostato sul livello di illuminazione nella schermata "Livello di Dim" è regolamenti.
Possibilità di scelta: "On / 10 / 20 / 30 / 45 / 60 / 90 / 120 / 180 secondi"
"On" significa che la radio è sempre nel livello di luminosità del parametro "A livello".
"A livello": Luminosità del display quando la radio è accesa.
Possibilità di scelta: "Alto" / "Medio" / "Basso"
"Livello di Dim": Impostazione della luminosità per il funzionamento e stand-by.
Possibilità di scelta: "Medio" / "Basso" / "Notte" / "Off"
25. UNDOK - Controllo della radiotramite app
L'application UNDOK (app) sviluppata da Frontier Silicon porta il piano controllo di radio e altoparlanti sul vostro smartphone.
Non importa se state configurando il dispositivo per la prima volta, configurando gli equalizzatori o gestendo i vostri canali preferiti - UNDOK vi offre tutte le funzionalità del vosto smartphone o tablete vi offre quando èsuccia più comfort. Scarica l'applicazione UNDOK dal Google Play Store o dall'Apple App Store
Configurazione iniziale dell'apparecchio con UNDOK
Quando la radio viene accesa per la prima volta, o dopo che la radio è stata impostata sulle impostazioni di fabbrica, la radio è in modalità SETUP e viene创建工作 un cosiddetto micro access point (rete WLAN propria). Questo permette al vostro smartphone o tablet di connettersi alla radio.
Impostazione con Android
Assicurarsi che la radio sia in modalità SETUP. Apire l'applicazione UNDOK sul vostro smartphone o tablet e selezionare la voce di menu "Impostare ilsystema audio".
Premere "AVANTI" e selezionare la voce di menu "SELECTIONARE PUNTO DI ACCESSO".
Si après il menu WLAN dell'apparecchio terminale, selezionare la rete "M-7000S". Dopo il collegamento, il display在哪 "Collegato a M-7000S" nell'app.Seguire le istruzioni dell'applicazione per completare la configurazione della radio. Infine, la radio si collega alla rete e si può iniziare l'ascolto premendo "Usa il mio systema audio" ora azionare I'apparecchio con I'UNDOK-APP.
Impostazione con iOS
Assicurarsi che la radio sia in modalità SETUP. Apire l'applicazione UNDOK sul,vostro iPhone o iPad e selezionare la voce di menu "Impostare ilsystema audio".
Premere "AVANTI" e selezionare la voce di menu "SELECTIONARE PUNTO DI ACCESSO".
Si après il menu WLAN dell'apparecchio terminale, selezionare la rete "M-7000S". Dopo il collegamento, il display在哪 "Collegato a M-7000S" nell'app.Seguire le istruzioni dell'applicazione per completare la configurazione della radio. Infine, la radio si collega alla rete e si cui iniziare l'ascolto premendo "Usa il miosystema audio" ora azionare I'apparecchio con I'UNDOK-APP.
26. Risoluzione dei problemi
In caso di malfunzionamenti, verificare i seguenti punti:
Nessun suono
Inserire correttamente l'alimentatore di rete.
Ilsystemanonrispondealla pressione diun taste
→ Scollegare e ricollegare l'alimentatore di rete.
Problemi di ricezione radio
Riorientare l'antenna.
Non è possibile stabilire una connessione di rete
Controllare la funzione WLAN, assicurarsi che la password sia corretta.
27. Cura e manutenzione
Pulizia dell'alloggiamento:
Utilizzare un panno leggermente inumidito con un detergente delicato. Non utilizzato detergenti contenenti alcool, ammoniaica o abrasivi.
La condensa (rugiada) può formarsi all'interno dell'apparecchiatura se vi è una differenza significativa tra la temperatura dell'apparecchiatura e la temperatura ambiente. Se all'interno dell'unità si forma della condensa, non è possibile garantire il corretto funzionamento. In questo caso, l'unità deve essere sottoposta a manutenzione per alcune ore; dopo che l'umidità si via asciugata, l'unità può essere riutilizzata.
Particolare attenzione deve essere prestata nelle seguenti circostanze
Se l'apparecchiatura viene spostata da un luogo ad un altro dove la temperatura è significativamente più alta o più bassa, o se l'umidità nel luogo in cui l'apparecchiatura è installata aumenta, ecc.
Come maneggiare i CD
Tenere il CD in modo da non toccare la superficiedel segnale. (Il dato non stampato è il dato di riproduzione.)
Utilizzato esclusivamente CD con la marcatura. Un CD privo di esta marcatura potrebbe fra l'alto non essere riprodotto correttamente.
Indicazioni per l'utilizzo di un disposativo USB
Questo appearecchio è in grado di riproduire file audio salvati su una memoria flash o su un audio player digitale, se questi dispositivi dispongono di una porta USB (Nel presente documento quei appearecchi vengono definite dispositivi USB).
Per quanto concerne i dispositivi USB utilizzabili valgono le seguenti limitazioni:
Dispositivi USButilizzabili
Dispositivi USB apparatusi alla classe dei dispositivi di memoria di massa USB.
Anche quando si utilizes un dispositivo USB conforme alle specifiche summenzionate, è possibile che i file audio, in base al tipo o allo stato del dispositivo USB, non vengano riprodotti correttamente.
28. Smaltimento
Smaltimento delle apparecchiature elettriche ed elettroniche e delle batterie usate.
Il symbolo (cestino barrato) sul prodotto o sulla sua confezione indica che questo prodotto non deve essere trattato come un normale rifiuto domestico, ma deve essere riconsegnato ad un punto di raccolta per il riciiclaggio di apparecchiature elettriche, elettroniche e batterie. Contribuendo al corretto smaltimento di quello prodotto, si protegge l'ambiente e la salute degli altri esseri umani. Uno smaltimento improprio o non corretto mette in pericolo l'ambiente e la salute. Per ulteriori informazioni sul riciiclaggio di quello prodotto, contattare l'autorità locale o l'azienda comunale di gestione dei rifiuti. Attenzione: Il segno "Pb" sotto il symbolo della batteria indica che但这a batteria contiene piombo.
L'utente finale stesso è responsablee della cancellazione dei dati sul vecchio apparecchiotramite la voce di menu "Impostazione di fabbrica" prima dello smaltimento (vedi capitolo 18).
Il marchio denominativo e i loghi Bluetooth® sono marchi registrati di Bluetooth SIG Inc. e qualsiasi uso di questi marchi da parte di JVCKENWOOD Corporation è concesso in licenza. Gli altri marchi e nomi commerciali sono quelli dei rispetti proprietari.
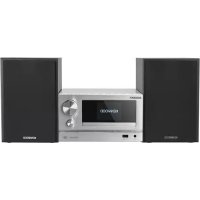
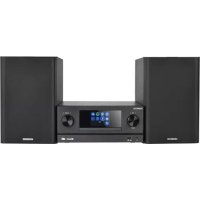
Dati tecnici M-7000S
Alimentazione della tensione Tensione alternata 100 - 240 V Frequenza di ingresso CA 50/60 Hz Potenza assorbita 25 Watt Consumo di energia in modalità standby 0,8 Watt Consumo energetico in modalità standby in rete 0,8 Watt Antenna UKW/DAB+ Intervallo di sintonizzazione DAB BAND III 174,928 MHz - 239,200 MHz Gamma di sintonia UKW 87,50 MHz - 108,00 MHz Funzionamento con CD Distanza segnale/rumore (filtro A) ≥ 65 dB Intervallo dinamico ≥ 60 dB Connessione di rete (WLAN) Reti supportate WIFI IEEE 802.11a/b/g/n Gammadi frequence supportate WiFi : 2.412 - 2.472 GHz 5.18 - 5.32 GHz, 5.50 - 5.70GHz, 5.745 - 5.825GHz Massima potenza di trasmissione WIFI 2.4 G: 13,7 dBm / WIFI 5G: 13,7 dBm WIFI 5.8G: 13,7 dBm Crittografia supportata WEP, WPA, WPA2 (PSK), WPS Formati di streaming supportati MP3, AAC/AAC+ (fino a 48 kHz, 16 bit) Dispositivi USB File riproducibili: MP3 BLUETOOTH Versione BLUETOOTH V4.2 Classe di prestazione Classe 1 Massima potenza di trasmissione 4,3 dBm Autonomia Circa 10 metri (può variare a seconda dell'ambiente) Intervallo di frequence 2,402 GHz - 2,480 GHz Profili BLUETOOTH A2DP (Profilodi distribuzione audio avanzata, AVRCP (Profilotelecomando audio/video)) Line-In Presa jack da 3,5 mm Amplificatore Potenza in uscita 2 x 30 Watt / 6 Ohm Intervallo di frequence 60 Hz - 20 kHz Pesi e misure Unità principale (L x A x P) 200 x 120 x 250 mm / 1,6 kg Altoparlante (L x A x P) 135 x 200 x 220 mm / 1,6 kg per pezzo Intervallo di temperatura 0°C / 35°C
30. Garanzia
All'utilizzatore di prodotti Kenwood:
La ringraziamo di aver scelto quello prodotto Kenwood (il "Produotto"). Se, in normali condizioni di funzionamento,esso risultasse difettoso, verrà riparato o sostuito Gratisamente, secondo i termini della presente Cartolina di Garanzia.
La preghiamo di conservare questa Cartolina di Garanzia, dato che le verrà richiesta in caso di reclamo.
Il Prodotto è garantito per due anni alla data di acquisito presso qualiasi venditore CEE di prodotti Kenwood. La garanzia copre via i materiali che la mano d'opera e la reparazione verrà eseguita miglioramente. Kenwood si riserva il diritto di sostituire il Prodotto
con un identico o, nell'ipotesi quello non fosse più prodotto, con uno di identiche caratteristiche qualora, a suo insindacabile giudizio, il costo della riparazione fosse molto elevato. Kenwood null'alto garantisce, in particolare non sono inclusi nella garanzia iosti relativi all'imballo ed alla disinstallazione/installazione del prodotto. Iosti di trasporto saranno a carico del cliente.
Condizioni
A. Durante il periodo della garanzia qualsiasi reclamo delve essere accompagnato alla Cartolina di Garanzia ed inolte da:
(a) Il suo nome, cognome ed indirizzo.
Qualora non sua possibile fornire queste informazioni, o se il Prodotto è stato modificato o alterato in qualsiasi modo dopo l'acquisto, Kenwood Corporation si riserva il diritto di rifiutare la riparazione del Prodotto secondo i termini di esta Garanzia.
B. Il Prodotto è stato realizzato in modo da dossistare tutti gli standard nazionali o locali ed i requisiti di sicurezza vigenti nella nazione dove è venduto. Eventuali modifiche necessarie per l'utilizzo in altri paesi non sono coperte da但这a Garanzia.
Se il Prodotto, venduto in Italia, viene utilizzato in una nazione europea, doveesso è soggetti a standard e requisiti diversi da quelli ivi vigenti, qualsiasi servizio reso in garanzia, potra avvenire a condizione che l'utilizzatore si accolli il costo di adattare il prodottoagli standard ed ai requisisti vigenti. Ugualmente per prodotti acquistati in altri paesi CEE ove vigono standard e requisiti diversi da quelli italiani, il servizio di garanzia sare reso in Italia a condizione che l'utilizzatore si accolli il costo di adattare il prodottoagli standard ed ai requisiti ivi vigenti. Inoltre, qualora il Prodotto sa di tipo diverso da quali commercializzati dall'importatore officiale della nazione dove viene portato per la riparazione in garanzia, ed in quale nazione non siano disponibili i pezzi di
ricambio appropriati o non possano essere resi, per altri valido motivo, servizi in garanzia, alla il costo relativo alle spedizione del Prodotto da riparare alla nazione dove è stato acquistato, e ritorno, verrà sostentuto dall'utilizzatore.
C. Questa Garanzia non copre:
(a) alterazioni del Prodotto e le normali operazioni di manutenzione e taratura, compresi i controlli periodici menzionati nel Manuale fornito con il Prodotto;
Questa Garanzia è a disposizione di chiunque sua entrato legalmente in possesso del Prodotto.
Fatto salvo quanto citato al punto (C), il Prodotto verrà riparato o sostituito Gratisamente; quando sopra non interferisce e non influisce in alcun modo sui diritti dell'utilizzatore del Prodotto a norma delle vigenti disposizioni di legge.
Indirizzo:
JVCKENWOOD ITALIA S.p.A.
Via G. Sirtori 7/9, 20129 Milano
Tel. +39(02)204821
www.kenwood.it info@it.jvckenwood.com
KENWOOD
KENWOOD
Smart Micro HiFi Systeem
M-7000S
GEBRUIKSAANWIJZING
JVCKENWOOD Corporation
Inhoudsopgave
Inhoud
Pagina
Vór het inschakelen van de spanningsvoorziening 3
Componenten en functies 7
Spotify 14
CD-speler 15
USB-speler 16
Digitale radio DAB+ 16
Bluetooth audio 19
Alarm 20
Systeeminstallingen 21
Tijdsinstellingen 24
Taal 25
Software-update 25
Privacybeleid 26
Achtergrondverlichting 26
UNDOK-app 27
Onderhoud en zorg 28
Technische gegevens 30
Omwille van het 5 GHz-frequentiebereik van de ingebouwde WLAN-module is het gebruik in volgende landen alleen binnen gebouwen toelaatbaar.
AT BE BG CZ DK EE FR DE IS IE IT EL ES CY LVL LT LU H U MT NL NO PL PT RO SL SK TR FI SE CH UK HR
AT=Oostenrijk, BE=Belgié, BG=Bulgarije, CZ=Tsjechie, DK=Denemarken, EE=Estland, FR=Frankrijk, DE=Duitsland, IS=Jlsland, IE=Ierland, IT=Italië, EL=Griekenland, ES=Spanje, CY=Cyprus, LV=Letland, LT=Litouwen, LU=Luxemburg, HU=Hongarije, MT=Malta, NL=Nederland, NO=Noorwegen, PL=Polen, PT=Portugal, RO=Roemenie, SL=Slovenië, SK=Slovakije, TR=Turkije, FI=Finland, SE=Zweden, CH=Zwitserland, UK=Verenigd Koninkrijk, HR=Kroatië
1. Vóor het inschakelen van de spanningsvoorziening
BELANGRIJKE VEILIGHEIDSINSTRUCTIES
Let op: Lees dezeagna aandachtig door om de veilige werking van het apparaat te garanderen.
Opmerkingen aandachtig lezen!
Geef gevolg aan alle veiligheids- en bedieningsinstrumenties wanner u dit product in gebruik neemt.
Instructies zorgvuldig bewaren!
U dient de veiligheids- en bedieningsinstructies te bewaren om ze later te konnen raadplegen.
Alle waarschuwingsinstructies in acht nemen!
U dient aan alle aan het product aangegeven en in de gebruiksaanwijzing vermelde waarschuwingen strikt gevolg te gehen.
1.1 Alleen met een droge doek reinigen!
Trek de netstekker van dit apparaat uit de wandcontactdoos voordat u dit product reinigt.
Gebruik nooit vloeibare reinigingsmiddelen of reinigingssprays. Gebruik voor de reiniging alleen een een bevochtigde doek.
1.2 Accessoires
Gebruik alleen de door de fabrikant aangegeven accessoires.
1.3 Gebruik dit apparaat Niet in de nabijheid van water
Het apparaat mag nooit aan waterdruppels of - spatten blootgesteld worden - zoals bijvoorbeeld in de nabijheid van een badkuip, een wastafel, een aanrecht in de keuken, een wasmachine, in een vochtige kelderruimte of in de nabijheid van een zwembad, enz. Zet nooit met vloeistoffen bevulde houders, zoals bv. bloemenvazen, op het apparaat.
1.4 Ventilatie
Sleuven en openings in de behuizing dienen voor de verluchting van het apparaat, om de betrouwbare werkung van het apparaat veilig te stellen en om het apparaat gegen oververhitting en een möglichke zelfontbranding te beschermen. Blokkeer de ventilatieopeningen Niet. Installeer het apparaat in overeenstemming met de door de fabrikant verstekte gegevens. Blokkeer nooit de ventilatieopeningen doordat u het apparaat op een bed, bank, tapijt of een al even zachte onderlaagzet. Dit apparaat mag Niet in een boekenrek of inbouwkast ingebouwd worden wanner er nicht voor voldoende ventilatie gezorgd is.
1.5 Spanningsvoorziening
Apparaat mag alleen aangesloten worden op de netspanning die aan het apparaat aangegeven is. Als u Niet zeker bent van het type van de spanningsvoorziening in uw woning, richt u zich tot uw dealer of tot het lokale energiebedrijf.
1.6 Netsnoer
Zorg ervoor dat men Niet over het netsnoer kan struikelen en dat het netsnoer in de onmiddelijk nabijheid van een contactdoos, waaronder ook bijkomende contactdozen, Niet afgekneld worden. Ook aan de uitlaat van het apparatusaat mag het netsnoer in geen geval geplet worden. Omdat de netstekker worden gebruikt om de stekker volledig van het net los te koppelen, moet deze aan het netsnoer blijven zitten en te allen tjnde bereikbaar blijven.
1.7 Onweer
Het apparaat van het stroomnet verbeken bij onweer en wanner het langere tijd Niet gebruikt worden.
1.8 Overbelasting
Overbelast nooit wandcontactdozen, verlengsnoeren of meervoudige contactdozen, odomat anders het gevaar voor brand of elektrische schokken bestaat.
1.9 Binnendringen van vreemd materiaal en vloeistof
Let erop dat er nooit vreemd materiaal of vloeistof door ventilatieopeningen dit apparaat binnendringt, sondern het anders tot contact met onder hoe spanning staande componenten dan wel tot een kortsluiting met de waaruit voortvloeieende brand of elektrische schok kan komen. Mors nooit vloeistoffen van eender welke aard op dit apparaat.
1.10 Onderhoud
Tracht nooit zich, het onderhoud van dit apparaat uit te voeren,,ondat door de openingsen of door het verwijderen van afdekkingen onder spanning staande onderdelen vrij gelegd+kennen worden. De aanraking van deze onderdelen kan immers bevaren met zich meebrengen. Laat alle onderhoudswerkzaamheden over aan gekwalificeerd klantenservicepersoneel.
1.11 Beschadigungen die een reparatie vereisen
Onderhouds- en reparatiewerkzaamheden alleen door een gekwalificierde klantenservice latentuitvoeren.
Een onderhoudsbeurt/reparatie isoodzakelijk als het apparaat (bv. netsnoer of de stekker) beschadigd ward, als er vloeistof in het apparaat gelopen is, wanner er voorwerpen het apparaat binnengedrongen zich, als het apparaat aan regen of vochtigheid blootgesteld was, als het Niet meer perfect functioneert of neergevallen is.
1.12 Wisselstukken
Wanner er wieselstukken benodigd worden, overtuigt u er zich van dat de klantenservicetechnicus wieselstukken gebruikt die door de fabrikant voorgeschreiben zijn of diedezelfde eigenschappen als de originele onderdelen hebben. Niet-toelaatbare wieselstukken konnen tot brand, elektrische schokken of andere ongevallen leiden.
1.13 Veiligheidscontrole
Verzoek de klantenservicetechnicus na de beeinging van onderhouds- of reparatiewerkzaamheden aan dit apparaat om de uitvoering van een veiligheidscontrole om vast te stellen, of het apparaat zich in een perfecte operationele toestand bevindt.
1.14 Warmte
Installeeer het apparaat Niet in de nabijheid van hare oppervlakken zoals bv. radiatoren, straalkachels, ovens of andere apparaten (versterkers inbegrepen) die heet hunnen worden. Stel nooit objcten met open vlammen, zoals kaarsen of lantaarns, op of in de buurt van het apparaat op. De gedinstalleerde batterijen mogen Niet aan felle hitte, zoals direct zonlicht, vuur of dergelijkke, blootgesteld worden.
1.15 Batterijen
Als u de radio eén maand of langer Niet gebruikt, verwijdert u de batterijen uit het batterijvak van de afstandsbediening om te verhinderen dat de batterijen uitlopen. Voer uitlopende batterijen onmiddelijk vakkundig en met inachtneming van alle relevante wettelijke voerschriften af. Uitlopende batterijen konnen letselsverozaken en het apparaat beschadigen. Combineer nooit batterijen van een verschillend type of oude met neue batterijen.
Om het risico op een elektrische schok, brand etc. tot een minimum te herleiden
Verwijdt u geen schroeven, afdekkingen of onderdelen van de behuizing.
De inschakelknop verwreekt de stroomtoevoer in geen enkele stand volkommen.
Gelieve de netstekker uit de wandcontactdoos te trekken om het apparaat compleet van de stroom te verbreken.
1.16 Risico's in combinatie met hoge volumes
Om möglichke gehoorschade te voorkomen, luistert u Niet gedurende langere perioden met een hoog volume.
1.17 Netwerkverbinding
Gelieve u er zich van te vergewissen dat bij uw netwerktoegangspunt (router) de Firewall-functionie geactiveerd is. Raadpleeg in dit verbande gebruiksaanwijzing van uw router.
-G elieve, indien u geen netwerkverbinding tot stand wenst te brengen, de instellingsassistent (zie 3.8) Niet uit te voeren.
1.18 Afstandsbediening
Als u de afstandsbedieningssensor aan direct zonlicht of aan het Licht van fluorescentielampen bloatstelt, kan het tot functiestoringen komen. In dergelijkke gezallen dient u het system op een andereplaatste installeren om dergelijkke functiestoringen te vermijden.
De bijgeleverde batterij is berekend op een functionele controle en kan een beperkte levensduur hebben. Als het bereik van de afstandsbediening afneemt, verrangt u de oude batterijen door neue.
Opgepast!
Explosiegevaar als de batterij door een verkeerd type verrangen worden;
Hoge of lage extreme temperatures, Waaraan een batterijijdens het gebruik, de opslag of het transport blootgesteld kan zich;
Lage luchtdruk op große hoogte;
De verwanging van een batterij door een verkeerd type dat een beveiliging kan omzeilen (bv. bij een,aantal lithiumbatterijtypes);
Het weglooien van een batterij in vuur of in een hete oven of het mechanisch kneuzen of snijden van een batterij;
Het hinterlaten van een batterij in een omgeving met extreem hoge temperaturen die tot een explosie of tot het vrijkomen van brandbare vloeistoffen of gassen kan leiden;
Een batterij die blootgesteld is aan een extreem luchtdruk die tot een explosie of tot het vrijkommen van brandbare vloeistoffen kan leiden.
1.19 Automatische energiebesparingsfunctie
Het model is met een automatische energiesbesparingsfunctie uitergerust. Deze schakelt het apparaat binnen 15 minutes in de modus "Stand-by" wanner de weergave met een zeer gering volume plaatsvindt resp. wanner de radio stil afgestemd is. Deze instelling kan nicht gewijzigd worden.
BELANGRIJK VOOR LASERPRODUCTEN
LASERPRODUCT VAN DE KLASSE 1
OPGEPAST: De behuizing Niet openen. Het apparaat bevat geen onderdelen die door de gebruiker onderhonden konnen worden; onderhoudsbeurten alleen door gekwalificeerd vakpersoneel lately uitvoeren.
Hiermee verklaart de JVCKENWOOD Corporation dat de radio-installatie van het type M-7000S aan de richtlijn 2014/53/EU voldoet. De volledige tekst van de EU-conformiteitsverklaring is op volgende website beschikbaar: http://www.kenwood.com/cs/eudoc/
Fabrikant:
JVCKENWOOD Corporation
3-12. Moriyacho, Kanagawa-ku, Yokohama-shi, Kanagawa 221-0022, JAPAN
Gemachtigde (EU): JVCKENWOOD EUROPE B.V.
Amsterdamseweg 37, 1422 AC UITHOORN, THE NETHERLANDS0
2. Ingebruikname
2.1 Uitpakken
Pak het apparaat voorzichtiguit en let erop dat alle accessoires aanwezig zijn:
Infrarood-afstandsbediening
2 x batterij AAA/R03
Gebruiksaanwijzing
2 x luidspreker
2.2 Aansluten
Open het batterijvak van de afstandsbediening en breng de batterijen met de juiste polariteit aan. De vooropgestelde polariteit (+/-) is in het batterijvak aangegeven.
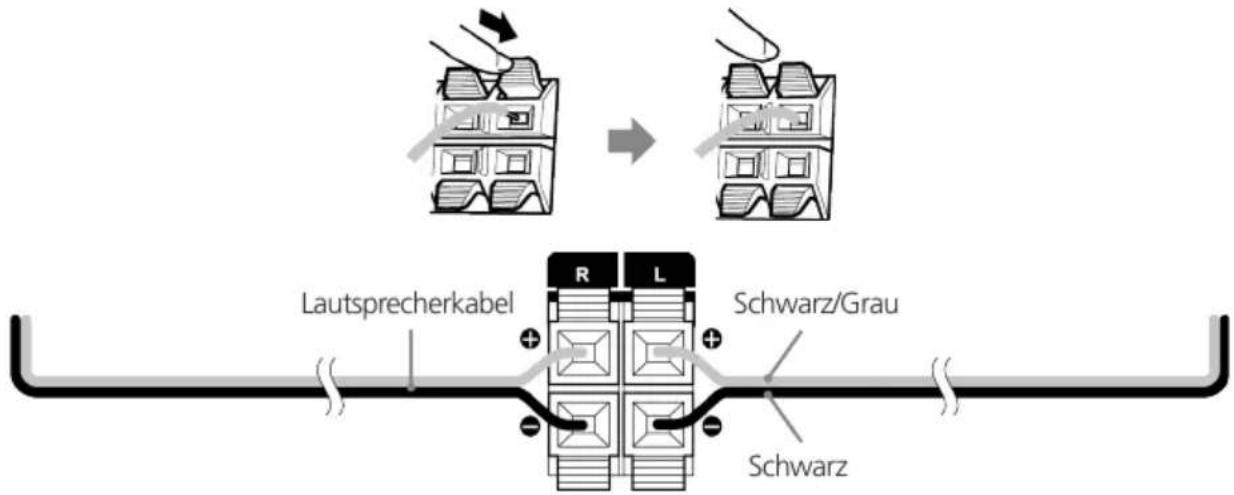
Verbind de linke en rechtse luidspreker met de aansluiting (Speaker Out) aan dechterzijde van het apparaat. Druk waaroor op de veerbeugels en steek de losse uiteinden van het snoer in de waaroor bestemde openingsen. Daarbij de zwarte leidingdraden met de zwarte veerklem verbinden. De andere leidingdraad worden analogoog daarmee met de rode klem.
Sluit de netstekker vast aan op een wisselstroomcontactdoos. Omdat de netstekker voor het compleet verbeken van het stroomnet gezruikt worden,要去 de contactdoos voortdurend toegankelijk blijven.
2.3 DAB+ / FM antennaeansluiting
Sluit de werpantenne op het contactvoetie [FM ANTENNA 75Ω] aan
Zoek deplaats, waar de Beste ontvangst bereikt worden.
Zet de antennae vast.
Bij de met het systeme geleverde antennae gaat het om een gewone werpantenne. Voor een stabiele signaalontvangst worden het gebruik van een (in de handel verkrijgbare) buitenantenne aanbevolen.
Trek voor de aansluiting van een buitenantenne in eerste instantie de kamerantenne af.
De ontvangst van radiozenders uit het kabelnetwork ka Niet gegarandeerd worden.
2.4 Netwerkverbinding
Om Internetradio te konnen ontvangen,要去 de radio in een netwerk gedentegreerd worden. De router要去 waaroor ingeschakeld zich en er要去 een internetverbinding bestaan. Vergewis u waar bij van dat de WLAN-verbinding van de router geactiveerd is. Raadpleeg in dit verband ook de bebruiksaanwijzing van de router.
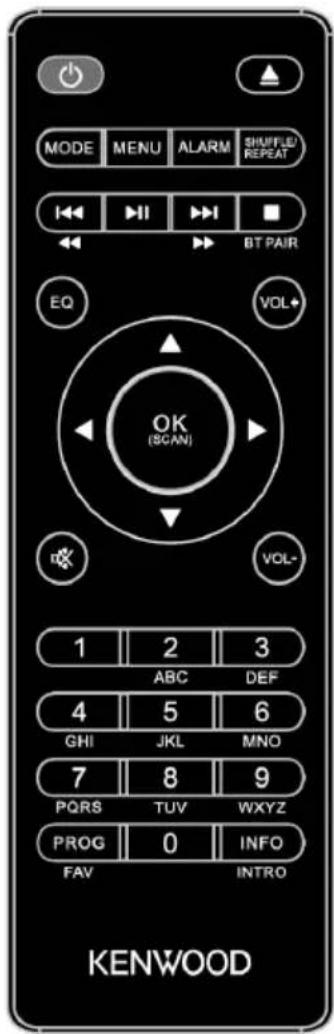
3. Componenten en functies
Stand-by Aan/Jit, wekker uit
CD-lade openen/sluiten (Eject)
MODE Modusselectie openen/Sluiten
MENU Menuopen/Sluiten
ALARM Wekker instellen
SHUFFLE/ Muziek: Willekeurige -Herhalingsselectie REPEAT
Weergave starten, pauzeren
Title: prong/titel-z./zender-zoekfunctie FM voorwaarts
Tilspong/titel-z./zender-zoekfunctie FM achterwaarts
Bluetooth koppeling, weergave stoppen
Amhoog; FM: Frequentie instellen
Omlaag; FM: Frequentie instellen
一 Links; stap achteruit, Voorinstelgeheugen achechteruit
Rechts; volgende stap, voorinstelgeheugen vooruit
OK
EQ Equalizer-voorinstelling kiezen
Stille afstemming, stille afstemming teniet doen
Vostiller / Luider
(oo)irinvoer Voorinstelgeheugen, invoer titelnummer
Prlprogrammering, Voorinstelgeugen bezeten
Nefschakeling beeldscherminformatie; bij weergave
10 seconden intro per track
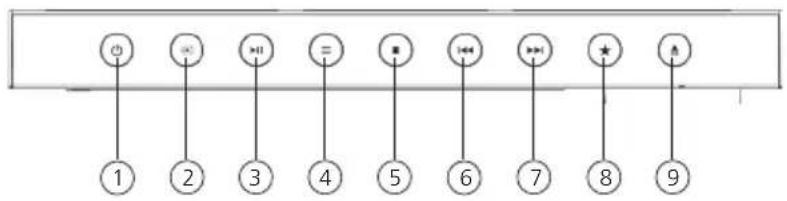
3. Componenten en functieservo1g 3. Componenten en fu
1 - Volume
1 - Stand-by
1-Luidsprekeraansluiting
3.1 In-/ Uitschakelen (stand-by)
Drukop de toets op de afstandsbediening of aan het apparaat om de radio in te schakelen. Druk opnieuw op de toets om het apparaat in de stand-by modus te zetten. Om het apparaat vollediguit te schakelen, verbreekt u het van de stroomvoorziening.
Door het indrukken van de toetsen op de afstandsbediening(Intu in de menu's navigeren. Door het indrukken van de toets bevestigd de selectie. Deze bedieningsstappen hunnen ook aan het apparaat, met de regelaar ,uitgevoerd worden. Door de regelaar te draaien, navigeert u door de menu's, de bevestiging van een menupunt volgt door te drukken op de regelaar.
3.3 Invoer van wachtwoorden, zoekteksten etc.
Selecteer met de betreffende cijfers en/of letters individuel en bevestig de gegeven selectie door het indrukken van . Gelieve, om een foutieve invoor te corrigeren, maar het veld te gaan en met toets op de afstandsbediening te bevestigen. Daardoor wordt de LASTe invoor gewist. Gebruik het veld "ANNULE" om de invoor compleet voortijdig tebeeindigen. Is uw selectie volledig, gelieve dan te navigerenaar het veld "OK" en de selectie te bevestigen door het indrukken van de toets .
3.4 Volume aanpassen en „Mute"
Doodr het indrukken van de toetsen en op de afstandsbediening of door het draaien van de regelaar aan het apparaat kut u het volume aanpassen. Door het indrukken van de toets worden de radio stil afgestemd. Door nogmaals de toets in te drukken, worden het oorspronkelijke volume hersteld.
Door het herhaaldelijk indrukken van de toets kan er, afhankelijk van bron en zender, bijkomende informatie weergegeven worden:
Beschrijving
Naam van de zender, van het actuele programme, inhoud, thema's etc..
De programmastijl (genre) van de zender worden aangegeven.
Signaïniveau en signaïlfout
Kanaalinformatie
In de modi „FM-radio" en „Digitale radio DAB+“ staat er aan de rechtse displayrand onderaan informatatie over ontvangststerkte, stereomodus, RDS-signal (alleen FM) en voorinstelgeugenplaats ter beschikking. Ontbreekt de betreffende individatie, dan staat de informatatie Niet ter beschikking.
3.6 Instellingsassistant
Bij de eerste start worden automatisch de instellingsassistent (set-up wizard) gestart.
De instellingsassistent wordt in het Egels uitgevoerd.
U kurz de assistent overslaan en later in het Duits opnieuw oproepen.
Bij de eerste ingebruikname worden alle beschikbare menutalen opgesomd. Met de toetsen de gewenste taal selecteren en met bevestigen.
3.8 Start van de instellingsassistant
Voor een eenvoudige en snelle eerste ingebruikname (instelling vanijd en datum, instelling van de internetverbinding etc.) adviseren wij u de uitvoering van de instellingsassistent. Gelieve waarvoor "JA" te selecteren. Wenst u de instellingsassistent over te slaan, dan kiest u "NEE".
Alle instellingen die met behulp van de instellingsassistent plaatsvinden, können later ook individuel via de systeeminstelleningen doorgevoerd worden. Alternatief kan de instellingsassistent te allen tjnde opnieuw uitgevoerd worden. Kies verwolgens „JA" of „NEE" om de instellingsassistent automatisch bij de volgende start van de radio al dan Niet uit te voeren. Daarna bevindt u zich in het hoofdmenu.
- Datum/Tijd
12/24- uur formaat
- Automatische update (tijd & datum)
Update van DAB of FM (aanbevolen)
Bij de automatische update via het radionetwork FM/DAB/DAB+ wordenijdstip en datum door de omroepen beschikbaar gesteld. Bij een afstelling via deze brunnen worden zichs na een stroomstoring hetijdstip correct ingesteld. Zodoende konnen ook ingestelde wektijden aangehonden worden.
- Update van Netwerk
Bij selectie van deze optie worden tijdstip en datum automatisch via de internetverbinding ingesteld. Aanvullend konnen de tijdzone en zomer-/wintertijd aangepast worden.
- Geen update
Tijdstip en datum moeten handmatig ingesteld worden.
- Verbonden blijven met netwerk
In het hoofddstuk „Systeeminstellungen" worden er gedetailleerder op de netwerkconfiguration ingegaan.
Het hoofdmenu omvat de verschillende audiobonnen en instelmogelijkheden:
Internetradio
Spotify
Bluetooth
Extra Ingang (Line-In)
Sluimertijd
Alarmer
Systeeminstallingen
Druk bij geselecteerde audiobron op de toets MENU> op de afstandsbediening of aan het apparaat en selecteer "Hoofdmenu".
5. Internetradio
De internetradio bildet een zeer ruime waaier aan de meest uiteenlopende aanbiedingen in de hele wereld. Daar bij kunt u de stations op veelvuldige wijze selecteren. Gelieve waarvoor in het hoofdmenu de bron "Internetradio" te selecteren.
5.1 Zoeken van zenders
De radio bildet verschillende möglichkheden om maar gewenste zenders te zoeken.
Navigeer binnen de menupunten en opties. Hebt u de gewenste zender gezonden, dan bevestigt u de selectie met de toets OK>. De weergave van internetradio kan door het indrukken van de toets op de afstandsbediening gestopt worden. Door de toets nogmaals in te drukken, worden de zender opnieuw geladen.
5.1.1 Zoekenaar landen en regio's
Om zenders uit bepaalde continenten, landen en regio's te zoeken, drukt u op de toets
om de „Zenderlijst" op te roepen. Bevestig de selectie.
Kies het menu „Locatie" om een land of een regio te selecteren.
5.1.2 Zoekenaar genres
Om zenders met bepaalde muziekstromingen of thema's te zoeken, gaat u als volgt te werk: Druk op de toets
, om de „Zenderlijst" op te roepen. Na bevestiging van de selectie navigeert u maar het menu „Ontdekken". Na de bevestiging kunt u een bijkomende beperking volgens oorsprong of taal van de zenders doorvoeren.
5.1.3 Zoeken maar nameen
Als u de naam van de gewenste zender kent, kurz u doelgerichtaar deze zender zoeken:
Druk op de toets
, om de „Zenderlijst" op te roepen. Na bevestiging van de selectie navigeert u waar het menu „Zoeken". Voer in het invoermasker de volledige zendernaam of een gedeelte van de zendernaam in en kies het veld „OK" om het zoeken te starten. U krijgt een opsomming van alle zenders, wier names de gezochte tekst omvatten.
5.1.4 Populaire zenders
Een greep uit de populairste zenders krijgt u als volgt:
Druk op de toets
, om de „Zenderlijst" op te roepen. Na bevestiging van de selectie navigeert u maar het menu „Populair" en kiest u de gewenste zender.
5.1.5 Lokale zenders
Gelieve, om doelgerichtaar zenders uit het land van de actuele locatie van de radio te zoeken, als volgt te werk:
Druk op de toets
, om de „Zenderlijst" op te roepen. Na bevestiging van de selectie navigeert u maar het menu met de landnaam van de actuèle locatie (bv. „Nederland").
Binnen deze lokale beperking kut u aanvullendaar genres,lokale of populaire zenders zoeken.
5.2 Favorieten (geheugenplaatsen)
Om uwfavorite zenders op te slaan, staan er 40 geheugenplaatsen (favorieten) ter beschikking.
Deze kurz u willekeurig met zenders uit de bronnen „Internetradio" en „Podcasts" bezetten.
Gelieve, om opgeslagen zenders aan het hoofdapparaat op te roepen, de toets ^* in te drukken en de gewenste geheugenplaats te selecteren door te draaien aan de regelaar . Om de zender te laden, drukt u op .
5.2.1 Opslaan van zenders met de afstandsbediening:
De geheugenplaatsen 1-10+kunnen door middel van de cijfertoetsen op de afstandsbediening bezet worden. Selecteer waarvoordewgenste zender en druk op een cijfertoets op de afstandsbediening totdat „Voorkeuze opgeslagen" op het display verschijnt. De geheugenplaatsen hunnen nu opgeroepen worden door via de afstandsbediening even op de toets te drukken.
5.2.2 Opslaan van zenders op de geheugenplaatsen 11 - 40:
Selecteer het gewenste station en houd de knop op de afstandsbediening ingedrukt. Kies nu een geheugenlocatie uit de lijst met zendergeheugens en bevestig uw keuze met de -knop op de radio. Op het display verschijnt „Voorkeuze opgeslagen". De zenderlijst kut u comfortabel oproepen door de toets <^*> op de radio of op de afstandsbediening te drukken (PROG knop). Gebruik de toetsen of de -knop om een station te selecteren en druk op om te bevestigen.
Opmerking: De geheugenplaatsen können nicht gewist worden, er kan alleen met andere zenders over geschreveven worden.
6. Podcasts
Podcasts waar oproepbare inzendingen over verschillende onderwerpen, bv. informatieve uitzendingen, nuews en veel meer. Net als bij internetradio is er de mogelijkheid om podcasts te filteren of in de hele databank waar een podcast te zoeken. Gelingve in het hoofdmenu de bron „Podcasts" te selecteren.
6.1 Zoeken van podcasts
De radio bildet verschillende möglichkheden om maar podcasts te zoeken. Navigeer binnen de menupunten en opties. Hebt u de gewenste podcast gezonden, dan bevestigt u de selectie met de toets OK>. De weergave van podcasts kan door het indrukken van de toets PLAY/PAUSE> op de afstandsbediening gesauzeerd en wee gestart worden. Door het permanent indrukken van de toetsen kan er binnen de podcast met toenemende snugelid (max. een 32-voud) vooruit en中断uiit gespoeld worden. Door even te drukken op de toets
wordt er maar het begin van de podcast gesprongen.
6.1.1 Zoekenaar landen en regio's
Om podcasts uit bepaalde continenten, landen en regio's te zoeken, drukt u op de toets
om de „Podcast-lijst" op te roepen. Bevestig de selectie.
Kies het menu „Locatie" om een land of een regio te selecteren.
6.1.2 Zoekenaar genres
Om podcasts met een bepaalde inhoud of met bepaalde onderwerpen te zoeken,.gaat u als volgt te werk:
Druk op de toets
om de „Podcast-lijst" op te roepen. Na bevestiging van de selectie navigeert u maar het menu „Ontdekken". Na de bevestiging kunt u een bijkomende beperking volgens oorsprong of taal van de podcast doorvoeren.
6.1.3 Zoeken maar nameen
Als u de naam van de gewenste podcast kent, kurz u doelgerichtaar deze podcast zoeken:
Druk op de toets
om de „Podcast-lijst" op te roepen. Na bevestiging van de selectie navigeert u waar het menu „Zoeken". Voer in het invoermasker de volledige naam van de podcast of een gedeelte van de naam van de podcast in en kies het veld „OK" om het zoeken te starten. U krijgt een opsomming van alle podcasts of episode, wier names de gezochtete tekst omvatten.
6.1.4 Populaire podcasts
Gelieve, om doelgerichtaar populaire podcasts uit het land van de actuèle locatie van de radio te zoeken,als volgt te werk:
Druk op de toets
om de „Podcast-lijst" op te roepen. Na bevestiging van de selectie navigeert u maar het menu met de landnaam van de actuèle locatie (bv. „Nederland"). Binnen.Deze lokale beperking kunt u aanvullend waar genres, lokale of populaire podcasts Zoeken.
6.2 Favorieten (geheugenplaatsen)
Om podcasts op te slaan, staan er 40 geheugenplaatsen (favorieten) ter beschikking. Deze favorieten kurz u willekeurig met zenders uit de bronnen „Internetradio" en „Podcasts" bezeten. Gelinge, om Voorkeuze opgeslagen podcasts aan het hoofdapparaat op te roepen, de toets ^* in te drukken en de gewenste geheugenplaats te selecteren door te draaien aan de regelaar . Om de podcast te laden, drukt u op .
6.2.1 Opslaan van podcasts met de afstandsbediening:
De geheugenplaatsen 1-10 kuren door middel van de cijfertoetsen op de afstandsbediening bezet worden. Selecteer waarvoordewenste podcast en druk op een cijfertoets op de afstandsbediening totdat „Voorkeuze opgeslagen" op het display verschijnt. De geheugenplaatsen+knen nu opgeroepen worden door via de afstandsbediening even op de toets te drukken.
6.2.2 Opslaan van podcasts op de geheugenplaatsen 11 - 40:
Selecteer de gewenste podcast en houd de toets op de afstandsbediening ingedrukt. Selecteer nu uit de lijst met de zendergeheugens een geheugenplaats en bevestig de selectie met de toets
aan de radio. Op het display verschijnt „Voorkeuze opgeslagen". De geheugenplaatsen Aunt u comfortabel oproepen door de toets <水> aan de radio of op de afstandsbediening even in te drukken. Gebruik de toetsen of de regelaar om een podcast te selecteren en druk op om te bevestigen.
Opmerking: De geheugenplaatsen können nicht gewist, maar alleen met andere podcasts overschreiben worden.
7. Spotify
Gebruik je telefoon, tablet of computer als een afstandsbediening voor Spotify. Ga waar Spotify.com/ connect om te leren hoe je dat doet. De Spotify-software is onderworpen aan voor derden geldende licenties die op het volgende adres opgeroepen+kennen worden:
www.spotify.com/connect/third-party-licenses
Installer de Spotify-app op uw Android-/iOS-apparaat. Deze=kunt u in de Play Store of UIT de Apple App Store downloads. Na de installmentie start u de app en logt u met uw toegangsgegevens aan resp. registreert u zich. De radio en het Android-/ iOS-apparaat met de Spotify-app要去en zich in hetzelfde network bevinden.
7.1 Gebruik
Gelieve in het hoofdmenu de bron „Spotify" te selecteren en zoals gewoonlijk de weergave van Spotify op uw smartphone te starten. Aan de onderste rand van het beeldscherm van de telefoon worden het Spotfiy Connect-logo en „Beschikbare apparaten" aangegeven. Druk op „Beschikbare apparaten" om een lijst met de in het netwerk beschikbare apparaten waar te gehen. Selecteer nu „M-7000S" en de weergave vindtplaats via de radio. Een succesvolle verbinding worden door groene letters aangegeven. Na een succesvolle eerste verbinding kunt u de smartphone ook als volgt met de radio verbinden: Kies in het hoofdmenu de bron „Spotify" en druk op . Op het display verschijnt nu „Press Play ...". Door het indrukken van de toets op de afstandsbediening worden de verbinding tot stand gebracht en de weergave van de actuèle playlist gestart. Via de afstandsbediening kan er ook:tussen de titels van de actuèle lijst gesprongen worden.
7.2 Favorieten (geheugenplaatsen)
Om playlists op te slaan, staan er 10 geheugenplaatsen (favorieten) ter beschikking.
7.2.1 Opslaan van playlists met de afstandsbediening:
De geheugenplaatsen 1-10{kunnen door middel van de cijfertoetsen op de afstandsbediening bezet worden. Selecteer waar voor de gewenste playlist en druk op een cijfertoets op de afstandsbediening totdat "Voorkeuze opgeslagen" op het display verschijnt. De geheugenplaatsen{kunnen nu opgeroepen worden door via de afstandsbediening even op de toets te drukken. Er{kunnen ook individuele titels die Niet in playlists beschikbaar zich, opgeslagen worden.
Opmerking: De geheugenplaatsen können nicht gewist, maar er kan alleen met andere playlists/titels over geschreveven worden.
8. CD-speler
Via deze bron kurz u audio-CD's en MP3-CD's afspelen. Gelieve waaroor in het hoofdmenu de bron „CD" te selecteren. Open het CD-vak door de toets aan het hoofdapparaat of op de afstandsbediening in te drukken. Leg de CD in en sluit het vak door te drukken op . De weergave begint automatisch met de eerste titel van de CD. Door de toets op de afstandsbediening in te drukken, kurz u de titels van de CD even lately afspelen. Door nog een andere toets in te drukken, wordenthese functie beeindigd.
Bij audio-CD's wordt de informatie over het aantal titels en totale speelduur als volgt aangegeven:
TXX XX:XX
Daar bij staat het eerste cijferblok voor het,aantal titels en het tweeede voor de totale spelelduur van de CD.
8.1 Afspelen van MP3-bestanden
Selecteer de gewenste map of titel UIT het menu, de muziekweergave worden met de toets OK> gestart. Via de toetsen kut u in de mapstructuren navigeren. Met de toets worden de weergave gesauzeerd en voortgezet. Door het permanent indrukken van de toetsen kan er binnen de titel met toenemende snugheid (max. een 32-voud) vooruit en achteruit gespoeld worden. Door even te drukken op geraakt men tot het begin van de titel of tot de vorige titel.
Bij CD's die MP3-bestanden bevatten, worden het aantal beschikbare mappings en bestanden als volgt aangegeven:
FXX TXXX
Daar bij staat het cijfer anschter „F" voor het aantal mappings en het tweede cijferblok voor het totaalaantal „T" bestanden.
8.2 Willekeurige weergave en herhaling
Gelieve, om titels van een CD of MP3-bestanden in een map in toevallige volgorden waar te geben of om de weergave van de bestanden te herhalen, als volgt te werk te gaan:
Druk op de toets
en selecteer „Herhalen" en/of „Shuffle". Met de toets worden de functies telkens in- of uitgeschakeld. Alternatief kunt u ook de toets op de afstandsbediening�oor gebruiken.
Door het herhaaldelijk indrukken, worden de functies als volgt geactiveerd:
1 x indrukken: Herhaling titel / 2 x indrukken: Herhaling map (alleen MP3)
3 x indrukken: Herhaling Alles / 4 x indrukken: Shuffle / 5 x indrukken: Uit
9. USB-speler
Via deze bron=kunt u MP3-bestanden (16Bit/48kHz) van een USB-stick afspelen. Selecteer waarvoor in het hoofdmenu de bron "USB".
9.1 Afspelen van MP3-bestanden
Selecteer de gewenste map of titel uit het menu, de muziekweergave worden met de toets OK> gestart. Via de toetsen kut u in de mapstructuren navigeren. Met de toets worden de weergave gesauzeerd en voortgezet. Door het permanent indrukken van de toetsen kan er binnen de titel met toenemende snugheid (max. een 32-voud) vooruit en achteruit gespoeld worden. Door even te drukken op geraakt men tot het begin van de titel of tot de vorige titel.
9.2 Willekeurige weergave en herhaling
Gelieve, om MP3-bestanden in een map in willekeurige reeksen wee ter goven of om de weergave van de bestanden te herhalen, als volgt te werk te gaan:
Druk op de toets
en selecteer „Herhalen" en/of „Shuffle". Met de toets worden de functies telkens in- of uitgeschakeld. Alternatief(Intukt u ook de toets op de afstandsbediening waar voor gebruiken. Door het herhaaldelijk indrukken, worden de functies als volgt geactiveerd:
1 x indrukken: Herhaling titel / 2 x indrukken: Herhaling map
3 x indrukken: Herhaling Alles / 4 x indrukken: Shuffle / 5 x indrukken: Uit
10. Digitale radio DAB+
Gelieve, om de digitale radio DAB+ te ontvangen, in het hoofdmenu over te schakelen waar de bron „DAB radio". Bij de eerste omschakeling worden er een automatische afstemming van de zenders gestart. Op het display verschijnt „Volledige scan“, het,aantal tot nu toe gezonden zenders en een overeenkomstige voortgangsbalk. Een aantal zenders biedt bijkomende informatie als zogenaamde Slideshow aan.
Om dit in groot formaat op het radiodisplay waar te gehen, drukt u op de op de afstandsbediening of aan de radio. Door de toets opnieuw in te drukken, schakelt het display waar terug.
10.1 Afstemming van de zenders
Om waar ontvangbare zenders te zoeken,(Intucht u een automatische afstemming van de zenders starten. Roep waar voor met de toets
het menu op en kies „Volledige scan".Op het display verschijnt „Volledige scan", het aantal tot nu toe gezonden zenders en een overeenkomstige voortgangsbalk. Daarna+zijn de zenders in alfabetische volgorde opgeslagen.
Zenders die bij een vorige afstemming van de zenders gezonden worden, maar op het gegeven mo
ment Niet te ontvangen zich, worden in de zenderlijst met een "?" voör de zendernaam aangegeven.
10.2 Handmatig instellen
U=kunt ensembles ook handmatig instellen. Roep waarvoort met de toets
het menu op en selecteer „Handmatig afstemmen". Daarna het gewenste kanaal selecteren en met bevestigen. Nu wordt er informatatie over het ensemble en wordt de signalsterkte aangegeven. Door nogmaals te drukken op de toets worden de betreffende zenders in de lijst opgeslagen.
10.3 Zenderlijst
Druk op de toets
en bevestig „Zenderlijst" met . Gebruik de toetsen of de < TUNE> regelaar voor de selectie van een zender en druk op om te bevestigen. Het apparaat begint automatisch met de weergave.
Opmerking: De ontvangstkwaliteit van een zender is afhankelijk van factoren zoals waar, opstellingsplaats en antennie-orientering. Indien een zender uit de zenderlijst Niet ontvangbaar is, wijzigt u de orientatie van de antennie of deplaats van opstelling van de radio. Niet meer ontvangbare zenders konnen uit de zenderlijst verwijderd worden.
10.4 Niet (meer) ontvangbare zenders wissen
Zenders die nicht meer ontvangen kuren worden, kuren uit de lijst gewist worden. Druk waarvoor op de toets MENU> en selecteer „Verwijderen nicht möglich". Selecteer bij „U verwijdert alle ongeldige zenders, doorgaan?“ „JA“ en deze zenders worden gewist. Door het selecteren van „NEE“ worden u wee hier het menu geleid, zonder de zenders te wissen.
10.5 Favorieten (geheugenplaatsen)
Om DAB+ zenders op te slaan, staan er 20 geheugenplaatsen (favorieten) ter beschikking. Gelieve, om opgeslagen zenders aan het hoofdapparaat op te roepen, de toets ^* in te drukken en de gewenste geheugenplaats te selecteren door in te drukken.
10.5.1 Opslaan van DAB+ zenders met de afstandsbediening:
De geheugenplaatsen 1-10{kunnen door middel van de cijfertoetsen op de afstandsbediening bezet worden. Selecteer waarvoor de gewenste zender en druk op een cijfertoets op de afstandsbediening totdat "Voorkeuze opgeslagen" op het display verschijnt. De geheugenplaatsen+kennen nu opgeroepen worden door via de afstandsbediening even op de toets te drukken.
10.5.2 Opslaan van DAB+ zenders op de geheugenplaatsen 11 - 20:
Selecteer e gewenste zender en houd de toets <FAV> op de afstandsbediening ingedrukt. Selecteer nu uit de lijst met de zendergeugens een geheugenplaats en bevestig de selectie met de toets <TUNE> aan de radio. Op het display verschijnt „Voorkeuze opgeslagen". De geheugenplaatsenkest u comfortabel oproepen door de toets <FAV> op de afstandsbediening even in te drukken. Gebruik de toetsen <OMHOOG/OMLAAG> of de <TUNE> regelaar voor de selectie van een zender en druk op <OK> om te bevestigen.
over geschreveen worden.
10.6 DRC (Dynamic Range Control)
Sommige DAB+ zenders ondersteunen DRC dat het verschil tussen luide en stille kranken vermindert.
Volgende instellingen zijn möglichk:
DRC hoog:
Sterke compressie van de verschillende volumes. De dynamiek worden in ruime mate verminderd.
DRC laag:
Lage compressie, zonder aanzienlijke vermindering van de dynamiek.
DRC uit:
Er volgt geen compressie.
Om de instellingen door te voeren, gaat u als volgt te werk:
Druk op de toets
en selecteer „DRC". In het volgende menu konnen de instellenen voor
DRC gewijzigd worden. De actuèle instelling wordt door 串 ^ 串 aangegeven.
10.7 Zendervolgorde
Standaard sorteert de radio de zenders in alfabetische volgorde. De zenders können darüber op ensembles gesorteerd worden.
Om de instellingen door te voeren, gaat u als volgt te werk:
Druk op de toets
en selecteer „Zendervolgorde". In het volgende menu können de instellen gen gewijzigd worden. De actuele instelling wordt door 串 ^ 串 aangegeven. De actuele instelling wordt door **aangegeven.
11. FM-radio
Selecteer in het hoofdmenu "FM RADIO" om waar FM-ontvangst om te schakelen.
11.1 Afstemming van de zenders
U kunt automatisch waar FM-zenders latent zoeken. Gelieve, om de automatische afstemming van zenders te starten, de toets <OK> op de afstandsbediening of aan de radio n te drukken. De Zoekfunctie stopt bij de volgende gezonden zender en de radio begint met het afspelen.
11.2 Installingen automatische afstemming
Met deze functie kurz u vastleggen, of er alleen zenders met een sterk ontvangssignaal in aanmerking genomen worden. Druk waaroor op de toets
en selecteer „Scaninstelling". In het hiernavolgende menu „Scan FM-stations" kurz u nu de vraag „Alleen sterke zenders?" met „JA" of „NEE" beantwoorden. De actuele instelling worden door ^ aangegeven.
11.3 Audio-installingen
Bij zenders met zwakke ontvangst kan door omschakeling maar mono-ontvangst een lichte kwaliteitsverbetering gerealiseerd worden. Druk waaroor op de toets
en selecteer „Audioinstelling". In het hiernavolgende menu „FM-ontvangst zwak"kest u nu de vraag „Mono
luisteren?" met „JA" of „NEE" beantwoorden. De actuele instelling wordt door ** aangegeven. 11.4 Favorieten (geheugenplaatsen)
Om FM-zenders op te slaan, staan er 20 geheugenplaatsen (favorieten) ter beschikking. Gelieve, om opgeslagen zenders aan het hoofdapparaat op te roepen, de toets ^* in te drukken en de gewenste geheugenplaats te selecteren door in te drukken.
11.4.1 Opslaan van FM-zenders met de afstandsbediening:
De geheugenplaatsen 1-10 kuren door middel van de cijfertoetsen op de afstandsbediening bezet worden. Selecteer waarvoordewenste zender en druk op een cijfertoets op de afstandsbediening totdat „Voorkeuze opgeslagen" op het display verschijnt. De geheugenplaatsen+kennen nu opgeroepen worden door via de afstandsbediening even op de toets te drukken.
11.4.2 Opslaan van FM-zenders op de geheugenplaatsen 11 - 20:
Selecteer e gewenste zender en houd de toets <FAV> op de afstandsbediening ingedrukt. Selecteer nu uit de lijst met de zendergeheugens een geheugenplaats en bevestig de selectie met de toets <TUNE> aan de radio. Op het display verschijnt „Voorkeuze opgeslagen". De geheugenplaatsen kurz u comfortabel oproepen door de toets <FAV> op de afstandsbediening even in te drukken. Gebruik de toetsen <OMHOOG/OMLAAG> of de <TUNE> regelaar voor de selectie van een zender, en druk op <OK> om te bevestigen.
Opmerking: De geheugenplaatsen können nicht gewist worden, er kan alleen met andere zenders over geschreveven worden.
12. Bluetooth audio
De BLUETOOTH-functie LAST de draadloze overdracht van muziekbestanden (Audio Streaming) aan de radio toe. Er kuren smartphones, tablets of gelijkaardige apparaten gekoppeld worden. Selecteer waarvoor in het hoofdmenu de bron „Bluetooth".
12.1 Eerste koppeling van Bluetooth-apparaten (Pairing)
Vergewis u ervan dat het te koppelen eindapparaat ingeschakeld en Bluetooth geactiveerd is. Selecteer in het hoofdmenu de bron „Bluetooth". Op het display verschijnt „Bluetooth vindbaar". Open nu de Bluetooth-installingen op het te koppelen eindapparaat en startaar het zoeken maar beschikbare Bluetooth-apparaten. Selecteer „M-7000S" en start het koppelingsproces. Nadat het Pairing voltooid werk, verschijnt op het display „Verbonden". Nu kan de muziekweergave via het eindapparaat gestuurd worden. Gebruik waarvoor een muziek-appaar nad keuze.
De basisbediening van weergave/pauze en titelsprong is via de betreffende toetsen op de afstandsbediening möglichk.
Opmerking: Sommige eindapparaten vereisen bij de koppeling een PIN-code, voer dan „0000" in.
12.2 Automatische verbinding na reeds plaatsgebonden koppeling
Als van de bron „Bluetooth" omgeschakeld of de radio uitgeschakeld wordt, wordt de Bluetooth-verbinding verbroken. Wordt de radio wee ingeschakeld of wordt er terug maar de bron „Bluetooth" omgeschakeld, dan wordt er een automatische verbinding tot stand gebracht.
Opmerking: Gleeve, indien een automatische verbinding nicht möglich is, als volgt te werk te gaan: Druk op de toets
en selecteer „Bekijk Details". Vervolgens opent de „Gekoppelde Apparatenlijst" om het gewenste apparaat te selecteren en te koppelen. Door het indrukken van de toets te drukken en „Verbonden" verschijnt kort in het display.
12.3 Nog een ander eindapparaat koppelen
Gelieve, om nog een ander eindapparaat met de radio te koppelen, te drukken op de toets
en „Bluetooth instellen" te selecteren. Daardoor wordt de actuèle verbinding verbroken.
Ga nu zoals bij de eerste koppeling van een eindapparaat te werk. Daarna is ook dit eindapparaat in de lijst met de gekoppelde apparaten opgeslagen en kan het via het betreffende menu (zie hierboven) geselecteerd worden. Er konnen maximaal 8 apparaten opgeslagen worden.
12.4 Onderbreken van de Bluetooth-verbinding
Wenst u de verbinding met een gekoppeld apparaat te onderbreken, gelieve dan 2 seconden lang te drukken op de toets op de afstandsbediening. De radio schakelt dan weeer om maar de koppelingsmodus.
13. Analoge aansluitingen
13.1 Line-In
Voor de weergave van muziek konnen er op de Line-In aansluiting externe apparaten, zoals bv. MP3-Player, DVD-Player of spelconsoles aangesloten worden. Gelieve waarvoor in het hoofdmenu de bron „Line-IN" te selecteren.
14. Sluimertijd
Met deze functie kurz u de radio na een bepaalde tijd automatisch in de stand-bymodus schakelen. U kurz waar bijCUS 15,30,45 of 60 minuten kiezen, "Sluimeruit" wist de vooraf ingestelde tijds.Druk waaroor bij een gekozen audiobron op de toets MENU> en kies Hoofdmenu". Vervolgens met de toets of of \ in het menu "Sluimertijd instellen" de gewenste tijdspanne selectoreren en met de toets OK> bevestigen.Met de toets de menu's wee verlaten. De overblIJvende resterende tijd wordt op het display links onderaan, met achefterwaarts lopende minutes,aangegeven.
15. Alarmer
Deze radio beschikt over 2 individuel instelbare wektijden. Druk op de toets op de afstandsbediening en kies „Alarm 1" of „Alarm 2" om de instelleningen door te voeren.
Alternatifiek Aunt u de wekker ook via het hoofdmenu oproepen. Aanvullend is een instelling aan de radio met de toets en de regelaar < TUNE> möglichk. In de stand-by modus+kennen de opgeslagen wekkers van de toets geactiveerd en gedexeerd worden. Voor de programmering van de wekker staan volgende opties ter beschikking:
15.1 Geactiveerd:
Selecteer hier, op welke dagen de wekker geactiveerd dient te worden. Ter beschikking staat volgende keuze: Uit / Dagelijks / Een keer / Weekends / Doordeweekseragen Kies „Uit" om een geactiveerde wekker te deactiveren.
15.2 Tijd:
Stel met de toets of eerst de uren en na het indrukken van de toets dan de minutes van de wektijd in.
15.3 Modus:
Hier stelt u de audiobron in, waarmee er gewekt dient te worden. Ter beschikking staat volgende keuze: Zoemer / Internetradio / DAB / FM /CD / USB
15.4 Programma:
Hier worden de zender vastgelegd, waarmeer er gewekt dient te worden. Ter beschikking staan hier de voor het LAST beluisterde zender of de in de favorieten opgeslagen stations. Geldt Niet voor de modus Zoemer, CD en USB .
15.5 Volume:
Stel hier het gewenste werkvolume in.
15.6 Opslaan:
Hebt u alle instellingen doorgevoerd, gelieve dan de toets in te drukken om de instellenen op te slaan.
Een geactiveerde wekker worden met een wekkersymbol en met het nummer van de actieve wekker links onderaan op het display weergegeven. In de standby-modus kut u ook de ingestelde wektijd zich.
15.7 Uitschakelen van de wekker na het wekker
Gelieve, om de wekker tot de volgende wekcylus uit te schakelen, de toets aan het apparat of op de afstandsbediening in te drukken, op het display verschijnt even „Alarm uit". Wenst u de wekfunctie slechts enkele minuten lang te onderbreken (Snoopze), dan kut u elke andere toets gebruiken. De wekvertraging worden door het indrukken van de toets in de stappen 5, 10, 15 en 30 minutes ingesteld en kan ook.altijd waar verlangd worden. De radio schakelt na korteijd automatisch weeer om maar „Stand-by" en de resterendeijd, totdat er opnieuw gewekt worden, worden naast het knipperende wekkersymbol aangegeven.
Opmerking: Bij een stroomstoring blijven de opgeslagen wektijden behouden.
16. Systeeminstallingen
In de systeeminstellungen kunt u deinstallen van de radio wijzigen en belangrijke informatatie over de radio oproepen.
16.1 Equalizer
Met de equalizer kut u de klank van de radio waar wens aan. U kut kiezen uit voorgeconfigureerde instellenen of u kut uw eigien profiel aanmaken. Geltveaarvoor als volgt te werk te gaan:
Druk op de toets
, en selecteer eerst „Systeeminstelingen" en daarna „Equalizer". Met de toets of kont u een klankprofiel selecteren en daarna met bevestigen. Volgende profielen staan ter beschikking:
Krachtig / Duidelijk / Helder / Warm / Balanced
16.2 Internetinstallingen
16.2.1 Netwerkassistent
De netwerkassistent helpt bij de verbinding van de radio met het internet. Gelieve, om deze op te roepen, als volgt te werk te gaan:
Selecteer in het menu „Systeeminstellingen" de „Netwerk" en bevestig daarna
"Netwerkwizard". De radio gaat nu van start met een afstemming van de zenders volgens beschikbare WLAN-verbindingen en somt dezeervolgens op. Met de toets of en met de < TUNE> regelaar+kunnen de verschillende netwerken geselecteerd worden. Op het einde van de lijst bestaat de möglichkheid om "[Opnieuw scannen]" of "[Handmatige configuratie.]" te selecteren.
16.2.2 Draadloze networkverbinding (WLAN)
Afhankelijk van het netwerk staan er verschillende opties ter beschikking om de verbinding met het netwerk tot stand te brengen. Netwerken die een WPS-verbinding (Wi-Fi Protected Setup) ondersteunen, worden in de lijst door de voorop gestelde benaming „[WPS...]" aangegeven. Bij andere verbindingen gaat het om open netwerken of om verbindingen die door het PSK-proces = Pre-Shared-Key (vooraf overeengekomen sleutel) beschermd+zijn.
Opmerking: Een actieve netwerkverbinding worden door een wit symbol onderaan rechts op het display aangegeven. Is er geen verbinding actief, dan is dit symbool rood doorgestreept.
16.2.3 WPS- / PSK- / Open verbinding
Een WPS-verbinding maakt een eenvoudige en toch beschemde verbinding van de radio met uw neetwerk möglich. Daar bij staan er twee möglichkheden ter beschikking. De totstandkoming van de verbinding door PBC = Push-Button-Configuration (configuratie door het indrukken van een knop) of door het PIN-proces, waar bij u door het webinterface van uw router verzocht worden, een toevalig gegenererde cijferreeks in te voeren.
16.2.4 Totstandkoming door middel van PBC
Selecteer het gewenste netwerk „[WPS...]". Vervolgens met „WPS-menu" de optie „Druk op de knop" selecteren en bevestigen. Druk nu op de WPS-toets aan uw router of Access-Point (AP). Voor de precieze werkwijze verwijzen wij maar de gebruiksaanwijzing van uw router of AP. Alternatief kan het proces ook in het menu „Internetinstallingen" onder „PBC WLAN opbouw" gestart worden. Volg waar bij de aanwijzingen op het display.
16.2.5 Totstandkoming door PIN
Selecteer het gewenste netwerk „[WPS...]" Vervolgens met „WPS-menu" de optie „PIN" selecteren en bevestigen. De radio genereert nu een uit 8 cijfers bestaande code die u met de toets OK> dient te bevestigen; bovendien moet u het cijfer verrolgens via de gebruikersinterface van de router of van het AP invoeren. Voor bijkomende informatie waarover verwijzen wij hier het handboek van router of AP.
16.2.6 WPS overslaan / totstandkoming door middel van PSK (Pre-Shared-Key)
Kies „WPS overslaan" om de verbinding door een netwerksleutel tot stand te brengen. Bij netwerken+zonder WPS-ondersteuning geraakt u direct in het invoermasker. Voer nu de sleutel in en bevestig.Deze met de knop "OK". Is de invoer correct, dan worden de radio met uw netwerk verbonden en wordt er een internetverbinding tot stand gebracht.
16.2.7 Open verbinding
Wij adviseren u, geen verbinding met een openetwork tot stand te brengen. Indien het door u gekozenetwork Niet versleuteld is,(Intu dit met de toets < OK> bevestigen.Daarna wordt de internetverbinding tot stand gebracht.
16.2.8 Handmatige totstandkoming van de netwerkverbinding
Gelieve bij een actief DHCP als volgt te werk te gaan:
Gelieve de menu's „Internetinstallingen“ -> „Handmatige installingen“ -> „Draadloos“ -> „DHCP inschakelen" te selecteren. Voerervoigens de volledige SSID (netwerknaam) in en bevestig deze op de knop „OK". Kies nu de passende versleutelingsmethode.
Gelieve deze uit de configuratie van de router of van het AP af te leiden. Afhankelijk van de gekozen methode worden nu de netwerksleutel ingevoerd en op de knop „OK“ bevestigd.
16.2.9 Gelieve bij een inactief DHCP als volgt te werk te gaan:
Gelieve de menu's „Internetinstallingen“ -> „Handmatige installingen“ -> „Draadloos“ -> „DHCP uitschakelen" te selecteren. Voer nu de informatatie over „IP-adres“, „Subnetmasker“, „Gateway-adres“, „Primaire DNS" en „Secundaire DNS" in. Met de toets of op de afstandsbediening of aan de < TUNE> regelaar+kunnen de waarden ingesteld worden. Met de toets , of kunt u de individuèle cijferblokken voor de instelling selecteren. Vervolgens gaat u verder te werk zoals onder „DHCP actief" beschreiben.
16.3 Netwerkinstallingen weergeven
In dit menu vindt u alle instellingen van het op het geveven moment gebruikte netwerkprofiel. Selecteer waarvoor in het menu „Netwerk" het menu „Bekijk Instellingen". Met de toets of op de afstandsbediening of met de < TUNE> regelaar+kunnen de waarden aangegeven worden.
16.4 NetRemote PIN-set-up
In dit menu=kunt u een UIT 4 cijfers bestaande PIN instellen die bij de eerste instelling van de UNDOK-app (zie hoofdstuk 24) opgevraagd worden. Vooraf ingesteld is hier „1234". De PIN dient onmiddelijk gewijzigd te worden..
16.5 Networkprofiel
Hier ziet u de lijst met de in de radio opgeslagen netwerkprofielen. Indien u meerere profielen aangemaaakt hebt, kiest u het profiel met de kortste afstand tot de/het betreffende router of AP. U kurz nicht更是 benodigde netwerkprofielen wissen doordat u met de toets of op de afstandsbediening of met de < TUNE> regelaar het te wissen profiel selecteert en met de toets bevestigt. Het actieve netwerkprofiel worden met _^* aangegeven.
Opmerking: Het actieve netwerkprofil kan nicht gewist worden.
16.6 Wis netwerkinstellungen
In dit menu=kunt u de netwerkinstelingen van het actuele profiel wissen. Selecteer waarvoor de knop „JA" en bevestig de invoer met de toets OK>. Door het kiezen van de knop „NEE" worden het proces voortijdig beeindigd.
16.7 Handhaven networkverbinding
In dit menu worden ingesteld, of de WLAN-verbinding met het netwerk in de stand-by modus gehandhaafd dient te worden. Daardoor kunt u de radio via de UNDOK-app (zie paginga 27) inschakelen. Het stroomverbruik in de stand-by modus is in de gekoppelde modus Lichtjes hoger. Selecteer voor de instelling van de knop "JA" of "NEE" en bevestig de invoer met de toets .
17. Tijdsinstallingen
In het menu „Tijd / Datum" können er instellenen voorijd en datum doorgevoerd worden. Daar bij staan volgende opties ter beschikking:
Hier können=tijd en datum handmatig ingesteld worden. Met de toets of op de afstandsbediening of de < TUNE> -controller. Met de toets , of worden de individuele cijferblokken geselecteerd en de waarden ook opgeslagen.
Hier kurz u vastleggen, uit welke bron tijdstep en datum een update dienen te ondergaan. Volgende opties staan ter beschikking:
Update van DAB: Tijd en datum worden via DAB geupdated.
Update van FM: Tijd en datum worden via FM geupdated.
Update van Netwerk: Tijd en datum worden door het netwerk geüpdate.
Geen update: Tijd en datum moeten handmatig ingesteld worden.
De op het geveven moment geselecteerde optie is met _n^* aangegeven.
In dit menu=kunt u vastleggen, of de weergave van de klok in het 12- of 24-uur formaat dient te gebeuren. Selecteren met de toets of , de bevestiging vindt plaats met de toets . De op het geveven moment geselecteerde optie is met _n^*^ aangegeven.
18. Taal
In het menu „Taal"(Int) kunt u de menutaal van de radio vastleggen. Indien u het apparaat met de Instellingsassistent in gebruik genomen hebt, werk waar reeds de taal van het apparaat ingesteld. Gelieve, om een taal te selecteren, de toets of te selecteren en deze te bevestigen door het indrukken van de toets . Alternatief kan de selectie ook met de < TUNE> regelaar uitgevoerd worden.
Volgende talen staan ter beschikking:
Deens, Duits, Engels, Fins, Frans, Italiaans, Netherlands, Noors, Pools, Portugees, Zweeds, Spaans, Turks
19. Fabrieksinstalling
Gelieve, om de radio terug in de toestand bij levering te brengen, "JA" in het menu „Fabrieksinstellung" te kiezen. Let op: Alle voordien doorgevoerde instellingen worden gewist.
Bij de selectie van „NEE" worden het proces voortijdig beeindigd.
Opmerking: Breng de radio in ieder geval terug in de toestand bij levering, voordat u hem doorgeeft (bv. als u hem verkoopt,cadeau doet of weggooit).
20. Software-update
In dit menu=kunt u nakijken, of er voor de radio een software-update ter beschikking staat. Wanner u „Auto Update" selecteert, contrôleert de radio automatisch regelmatig de beschikbaarheid van weitere software-updates.
Kies het menupunt „Nu controlleren" om maar een neue versie te zoeken. Wordt er een/Newwere software gezonden, gelieve dan „JA" te selecteren om deze te installereren of „NEE" om de update voortijdig tebeeindigen. Bij „JA" start de radio opnieuw om het proces uit te voeren.
Daarna worden de software gedownload en u wordt dan met „Proceed“ bevraagd, of de update uitgevoerd dient te worden. Gieve „YES“ bij toestemming of „NO“ te kiezen om de update voortijdig tebeeindigen. Beurtelings knippert „Waarschuwing: do not remove power" en de te installeren softwareversie. Is het proces voltooid, dan staat „Update completed" op het display en kunt u het proces met de toets <OK> bevestigen.
Het versienummer van de gedinstalleerde software(Int)kunt u in het menu „Systeeminstellingen" onder het punt „Info" opvragen.
Let op!
Let erop dat er een stabiele stroomvoorziening is voordat u een software-update start.
Een onderbreking tijdens een update kan onherstelbare schade aan de radio veroorzaken!
21. Installatiewizard
In het menu „Installatiewizard"kest u de instellingsassistent opnieuw starten. Ga waarvoortewerk zoals onder het punt ^3.8 Start van de instellingsassistent beschreiben.
In dit menu vindt u onder andere het versienummer van de actuèle firmware. Houd deze ter beschikking indien u met de klantenservice contact wenst op te nemen.
23. Privacybeleid
Gelieve de waar vermelde gegevensbeschemingsbepalingen te lezen of deze website op te roepen: www.frontiersmart.com/privacy
24. Achtergrundverlichting
De displayverlichting kan in 3 holderheidstrappen geprogrammeerd worden. Volgende instellenen können in het menu „Achtergrondverlichting" doorgevoerd worden:
"Time-Out": Tijd, tot wonneer het display tot op de verlichting strap in de „Dim-instelling“ geregeld worden.
Keuzemogelikheden: „Aan / 10 / 20 / 30 / 45 / 60 / 90 / 120 / 180 seconden"
"Aan" betekent dat de radio alsijd in de helderheidstrand van de „Opiveau" blijft.
"Op niveau": Helderheid van het display wanner de radio ingeschakeld worden.
Keuzemogelijkheden: "Hoog" / "Medium" / "Laag"
"Dim Niveau": Helderheidsinstalling voor werkung en stand-by.
Keuzemogelijkheden: "Medium" / "Laag" / "Nacht" / "Uit"
25. UNDOK - besturing van de radio via app
De door Frontier Silicon ontwikkelde UNDOK-application (app) zorgt ervoor dat de volledige controle van radio's en luidsprekers op uw smartphone krijgt.
Bij de eerste instelling van het apparaat, bij de configuraties van Equalizer of bij het beheer van uw要做好e zenders - het maakt Niet uit: UNDOK biedt u alle features op de smartphone of het tablet en biedt u daardoor nog meer comfort. Download de UNDOK-app in de Google Play Store of in de Apple App Store.
Eerste instelling van het apparatusat met UNDOK
Wanner er voor het eerst ingeschakeld wordt of nadat de radio op fabrieksinstelleningen gezet werk, staat de radio in de SETUP-modus en worden er een zogenaamd Micro-Access-Point (van een eigen WLAN-net) geproduced. Daardoor kan uw smartphone of tablet met de radio verbonden worden.
Instellen met Android
Vergewis u ervan dat de radio zich in de SETUP-modus bevindt. Open de UNDOK-APP op uw smartphone of tablet en kies waar het menupunt „Audiosystem instellen".
Druk op „VERDER" en selecteer het menupunt „KIES HET TOEGANGSPUNT".
Het WLAN-menu van het eindapparaat gaat open, selecteer waar het netwerk „M-7000S". Na de ver-binding staat „Verbonden met M-7000S" in de app. Volg de verdere aanwijzingen van de app voor een complete instelling van de radio. Tot slot worden de radio met het netwerk verbonden en kunt u door het indrukken van „Mijn audiosystemeem gebruiken" het apparatus nu met de UNDOK-APP bedieren.
Instellen met iOS
Vergewis u ervan dat de radio zich in de SETUP-modus bevindt. Open de UNDOK-APP op uw iPhone of iPad en kies waar het menupunt „Audiosystem instellen".
Druk op „VERDER" en selecteer het menupunt „KIES HET TOEGANGSPUNT".
Het WLAN-menu van het eindapparaat gaat open, selecteer waar het netwerk „M-7000S". Na de ver-binding staat „Verbonden met M-7000S" in de app. Volg de verdere aanwijzingen van de app voor een complete instelling van de radio. Tot slot worden de radio met het netwerk verbonden en kunt u door het indrukken van „Mijn audiosystemeigbruiken" het apparatus nu met de UNDOK-APP bedieren.
26. Oplossing van storingen
Gelieve bij functiestoringen de volgende punten te controleren:
Geen klank
Steek de stekkernetvoeding maar behoren in.
Het systemd reageert nicht op het indrukken van een toets
Trek de stekkernetvoeding af en sluit deze waar aan.
Problemen bij de radio-ontvangst
Positioneer de antennpeopnieuw.
Er kan geen netwerkverbinding tot stand gebracht worden
Controller de WLAN-functie, vergewis u ervan dat het wachtwoord correct is.
27. Onderhoud en zorg
Reinigen van de behuizing
Gebruik een met een mild reinigingsmiddel Lichtjes bevochtigde doek. Gebruik geen reinigingsmiddelen die alcohol, ammoniak of schuurmiddel bevatten.
Waarschuwingsinstrumenties betreffende de vorming van condensatie
Condensatie (dauw) kan binnenin het apparaat tot ontwikkeling komen als er:tussen de temperatuur van het apparaat en de omgevingstemperatuur een wezenlijk verschil bestaat. Indien er zich binnenin het apparat consensatie Voordoet, is een perfecte werkung Nieteergerandeerd. In dit geval moet er enkele uren lang gewacht worden; nadat de vochtigheid gedroogd is, kan het apparaat wee gebruikt worden
In volgende omstandigheden moet men uiterst voorzichtig te werk gaan
Wanner het apparaat verplaatst worden van de ene maar de andereplaats, waar er een beduidend hogere of lagere temperatuur heerst, of wanner de luchtvochtigheid op deplaats van opstelling van het apparaat toeneemt, enz.
Hantering van CD's
Houd de CD zodenig vast, dat u het signaaloppervlak Niet aanraakt. (De onbedrukte zichde is de afspeelzijde.)
Gebruik uitsluitend CD's met de ONG marking. Een CD zonder deze marketing kan soms Niet maar behoren weergegeven worden.
Wetenswaardigheden over USB-apparaten
Aanwijzingen voor het gebruik van een USB-apparaat
Dit apparaat is in staat om op een flashgeheugen of op een digitale Audio-Player opgeslagen audiobestanden waar te geben als deze apparaten over een USB-poort beschikken (in dit document worden deze apparaten als USB-apparaten bestempeld).
Met betrekking tot de bruikbare USB-apparaten gelden volgende beperkingen:
Bruikbare USB-apparaten
USB-apparaten die tot de USB-massageheugenklasse behoren.
USB-apparaten, wier maximale stroomopname hoogstens 500mA bedraagt.
USB-massageheugenklasse: USB-apparaten die de PC als extern geheugen detecteert zonder dat er speciale driver of zonder dat er speciale toepassingssoftwareoodzakelijk zou zich.
Gelieve uw dealer te raadplegen als u er nicht zeker van bent, of uw USB-apparaat met de specificaties voor de USB-massageheugenklasse overeenstemt.
Het gebruik van een USB-apparaat dat Niet ondersteund worden, kan tot een verkeerde weergave of individatie van het audio-bestand leiden.
Zelfs als u een USB-apparaat gebruikt dat aan de hoger vermelde specificaties voldoet, können audiobestanden, afhankelijk van type of toestand van het USB-apparaat soms nicht perfect weergegeven worden.
28. Afvalverwerwijdering
Afvoer van gebruikte elektrische en elektronische apparaten en batterijen.
Het symbool (doorgestreepte vuilnisbak) op het product of op de verpakking waarvan wijst erop dat dit product Niet als normal huishoudelijk afval behandeld mag worden, maar op een recyclingspunt voor de recycling van elektrische en elektronische apparaten en batterijen afgegeven要去 worden Door uw bijdrage aan een correcte afvoer van dit product beschermt u het milieu en de gezondheid van uw medemens. Een onvakkundige of verkeerde afvoer brengt milieu en gezondheid in gevaar. Bijkomende informatie over de recycling van dit product krijgt u van uw gemeente of van de gemeentelijk afvalverwerkende bedrijven. Let op: Het teken „Pb“ onder het symbool voor batterijen geeft aan dat deze batterij lood bevat.
De eindgeberiker is er zich verantwoordelijk voor, gegevens op het oude apparaat via het menupunt „Fabrieksinstelling" te wissen voordat het wegegooid worden (zie hoofdstuk 18).
Het Bluetooth® woordmerk en logo's zijn geregisteerde merken van Bluetooth SIG Inc. en elk gebruik van deze merken door deirma JVCKENWOOD Corporation Vindtplaats onder licentie. Andere merken en handelsnamen zijn die van hun betreffende holders.
Technische gegevens M-7000S
Spanningsvoorziening Wisselspanning 100 – 240 V Ingangswisselstroomfrequentie 50/60 Hz Elektriceteitsverbruik 25 Watt Elektriceteitsverbruik in stand-by 0,8 Watt Elektriceteitsverbruik in netwerkgebonden stand-by 0,8 Watt Tuner UKW/DAB+ DAB-afstembereik BAND III 174,928 MHz – 239,200 MHz FM-afstembereik 87,50 MHz – 108,00 MHz CD-modus Signaal-ruisverhouding (A-filter) ≥ 65 dB Dynamiekomvang ≥ 60 dB Netwerkverbinding (WLAN) Ondersteunde netwerken WIFI IEEE 802.11a/b/g/n Ondersteunde freiagentiegebieten WiFi : 2.412 - 2.472 GHz, 5.18 - 5.32 GHz, 5.50 - 5.70GHz, 5.745 - 5.825GHz Maximaal zendvermögen WIFI 2.4 G: 13,7 dBm / WIFI 5G: 13,7 dBm WIFI 5.8G: 13,7 dBm Ondersteunde versleutelingen WEP, WPA, WPA2 (PSK), WPS Ondersteunde streamingformaten MP3, AAC/AAC+ (maximaal 48 kHz, 16 bit) USB-apparaten Afspeelbare bestanden: MP3Compatible met USB1.1 Full-Speed, FAT16, FAT32 Max. 500 mA, Bitsnelheden: 32 kBt/s tot 320 kBt/s BLUETOOTH BLUETOOTH versie V4.2 Vermogensklasse Klasse 1 Maximaal zendvermögen 4,3 dBm Reikwijdte ca. 10 meter (kan afhankelijk van omgeving afwijken) Frequentiegebied 2,402 GHz – 2,480 GHz BLUETOOTH profiel A2DP (Advanced Audio Distribution Profile, AVRCP (Audio/Video Remote Control Profile) Line-In 3,5 mm stekkerbus Versterkergedeelte Uitgangsvermögen 2 x 30 Watt / 6 Ohm Frequentiegebied 60 Hz - 20 kHz Afmetingen en gewichten Hoofdeenheid (B x H x D) 200 x 120 x 250 mm / 1,6 kg Luidsprekers (B x H x D) 135 x 200 x 220 mm / 1,6 kg per st.. Temperatuurbereik 0°C tot 35°C
30. Garantie
Beste klant,
Wij wilnen u danken voor de aanschaft van dit KENWOOD-product. Als dit product defecten vertoont in materiaal of vakmanschap onder normale omstandigheden, zullen wij in overeenstemming met de bepalingen van de volgende garantie, deze defecten gratis herstellen of het apparaat verrangen.
Bewaar deze garantiekaart op een veilige plaats.
Kenwood geeft een garantie van tweeJAr op dit apparaat vanaf de datum van aankoop volgens de factuur of aankoopbon van de Kenwood-dealer.
Deze garantie dekt gebreken in materiaal of vakmanschap. Wij behouden ons hetrecht voor het product te verrangen als economisch herstel Niet langer maybeik is. Kosten voor verpakking en installmentie en risico's verbonden aan de feitelijke reparatie zichniet inbegrepen in de garantiebepalingen en zullen worden gefactureerd.
Voorwaarden
A. Naast de overhandiging van deze garantiekaart zijn de volgende gegevens noodzakelijk om een claim in te dieren:
(a) Uw naam met volledig adres
Kenwood behoudt zich hetrecht voor de garantiedekking te weigeren als de bovengenoemde informatie ontbreekt of als er wijzigingen+zijn aangebracht aan het product na de oorspronkelijke aankoop.
B. Op het moment van levering van dit product aan de winkel voldeed dit product aan alle normen en veiligheidsvoorschriften die van toepassing zijn in het land van bestemming. Aanpassingen vereist voor bediening van dit apparaat in landen buien het land van bestemming vallen Niet onder de bovengenoemde garantiebepalingen. Bovendien accepteren wij geen aanspraelijkheid voor werkzaamheden met of voor schade aan het product die ontstaat als gezolg van dergelijke werkzaamheden.
Als het product worden gebruikt in een land waarvoort het Niet is ontworpen en geproduederd, dan worden garantiewerkzaamheden alleen uitgevoerd als de kosten voor het omzetten van het apparaat aan de nationaal geldende normen en veiligheidsvoorschriften door de gebruiker worden gedragen.
Bovendien als het product van verschlert van de producten die worden geleverd door de officièle importeur en als er geen verrangende onderdelen beschikbaar zijn voor het repareren van dit apparaat, moet de gebruiker de kosten voor het transport van het apparaat aan en van het land van aankoop dragen.
Hetzelfde geldt als er geen garantiedekking kan worden aangeboden in het land in kwestie als gevolg van andere, gerechtvaardigde redenen.
C. Uitzonderingen op garantiedekking:
(a) Wijzigingen in het product, alsmede de normale onderhouds- en aanpassingswerkzaamheden, met inbegrip van de regelmatige controles vermeld in de gebruiksaanwijzing.
Deze garantie kan worden aangeroepen door iedereen die het product legal haeft gekocht.
Overeenkomstig de bovengenoemde garantiebepalingen za het product worden gerepareerd of kosteloos verrangen. Ditrecht beperkt geenszins de andere rechten die de gebruiker heegt in het kader van de toepasselijkke wettelijkke bepalingen.
Reparatie of verranging heeft geen invloed op eventuele verlenging van de garantieperiode.
Verdere vorderingen worden uitgesloten, met name vorderingen voor orderannulering, prijsvermindering of voor vergoedig van schade.
Contactadres:
JVCKENWOOD Europe B.V.
Amsterdamseweg 37,1422AC-Uithoorn
Tel. 0297-519 900, www.kenwood.nl
KENWOOD