MC24AHV - Air-conditioner LG - Free user manual and instructions
Find the device manual for free MC24AHV LG in PDF.

User questions about MC24AHV LG
0 question about this device. Answer the ones you know or ask your own.
Ask a new question about this device
Download the instructions for your Air-conditioner in PDF format for free! Find your manual MC24AHV - LG and take your electronic device back in hand. On this page are published all the documents necessary for the use of your device. MC24AHV by LG.
USER MANUAL MC24AHV LG
Please read this manual carefully before operating your set and retain it for future reference.
TYPE : Multi
The equipment complies with requirements of the Technical Regulation, in terms of restrictions for the use of certain dangerous substances in electrical and electronic equipment.
TABLE OF CONTENTS
Safety Precautions......3
Prior to Operation ......6
Operating Instructions......7
Remote Controller ....7
Remote Control Operation....10
Additional features.....18
Maintenance and Service ....22
Operation Tips ......27
Troubleshooting .....28
FOR YOUR RECORDS
Write the model and serial numbers here:
Model #
Serial #
You can find them on a label on the side of each unit.
Dealer's Name
Date Purchased
■ Staple your receipt to this page in the event you need it to prove date of purchase or for warranty issues.

READ THIS MANUAL
Inside you will find many helpful hints on how to use and maintain your air conditioner properly. Just a little preventive care on your part can save you a great deal of time and money over the life of your air conditioner.
You'll find many answers to common problems in the chart of troubleshooting tips. If you review our chart of
Troubleshooting Tips first, you may not need to call for service at all.

PRECAUTION
- Contact the authorized service technician for repair or maintenance of this unit.
- Contact the installer for installation of this unit.
- The air conditioner is not intended for use by young children or invalids without supervision.
- Young children should be supervised to ensure that they do not play with the air conditioner.
- When the power cord is to be replaced, replacement work shall be performed by authorized personnel only using only genuine replacement parts.
- Installation work must be performed in accordance with the National Electric Code by qualified and authorized personnel only.
natural_image
Illustration of people enjoying a picnic with a table, sun, palm tree, and patterned background (no text or symbols)Safety Precautions
To prevent injury to the user or other people and property damage, the following instructions must be followed.
■ Incorrect operation due to ignoring instruction will cause harm or damage. The seriousness is classified by the following indications.

WARNING
This symbol indicates the possibility of death or serious injury.

CAUTION
This symbol indicates the possibility of injury or damage.
■ Meanings of symbols used in this manual are as shown below.
 | Be sure not to do. |
 | Be sure to follow the instruction. |

WARNING
■ Installation
Do not disassemble or repair the product. Always earth the product.
- Contact your dealer and service center. • It will cause fire or electric shock.
Do not handle the flammable gas or explosive materials near the product.
Do not install where flammable gas could leak.
- Otherwise, it may cause fire or failure of product. • Otherwise, it may cause explosion or fire.
Do not install the product on an defected installation stand.
Be cautious when unpack and install the product.
- Otherwise, It may cause injury or accident. • Sharp edges could cause injury.
For installation, always contact the dealer or service center.
Do not install the product on an defected installation stand.
- Otherwise, it may cause fire, electric shock, explosion or injury.
- Otherwise, It may cause injury or accident.
For electric work, contact the dealer or service center.
Do not use damaged power cable.
- It will cause fire or electric shock. • It will cause fire or electric shock.
Always install an circuit breaker and main breaker.
- No installation may cause fire and electric shock.
Operation
Do not touch(operate) product with wet hands.
- Otherwise, it may cause fire or electric shock.
Do not put the heater, etc. near the power cable.
- Otherwise, it may cause fire and electric shock.
Ventilate well in using with a stove, etc.
- Otherwise, an oxygen shortage may occur.
Do not place heavy object on the power cable.
- Otherwise, it may cause fire or electric shock.
Cover the electric part.
- Otherwise, it may cause fire or electric shock.
Do not open the suction inlet of the product during operation.
- Otherwise, it may cause electric shock or failure.
Be cautious that children could not step on the product.
- Otherwise, children may be seriously injured.
Take care to ensure that water could not enter into the product.
- Otherwise, it may cause fire or electric shock.
If strange sounds, or small or smoke comes from product. Turn the breaker off or disconnect the power supply cable.
- Otherwise, it may cause electric shock or fire.
Do not put water into electric part.
- Otherwise, it may cause fire or failure of product, and electric shock.
When the product is not going to be used for a long time, disconnect the power supply plug or turn off the breaker.
- Otherwise, it may cause failure of product or fire.
When the product is flooded, contact the service center.
- Otherwise, it may cause fire or eletric shock.
Do not turn the breaker on/off or connect/disconnect the power supply plug during operation.
- Otherwise, it may cause fire or electric shock.
Do not touch the metal parts of the product when removing the air filter.
- Otherwise, it may cause personal injury.
Do not step or put anything on the product.
- Otherwise, it may cause personal injury and failure of product.

CAUTION
Installation
Always inspect gas leakage after installation and repair of product.
- Otherwise, it may cause failure of product.
Do not carry the product by oneself.
- Otherwise it may harm to your health.
Install the drain hose to ensure that drain can be securely done.
- Otherwise, it may cause water leakage.
Keep the level even in installing the product.
- Otherwise, it may cause vibration or water leakage.
Install the product so that noise or hot wind from the outdoor unit. May not give any damage to the neighborhoods.
- Otherwise, it may cause dispute with the neighborhoods.
Operation
Do not expose your skin directly to cool air for a long time.
When flammable gas leakages from the product, open the window for ventilation.
- Otherwise, it may harm to your health. • Otherwise, it may cause explosion or fire.
Turn the main power off when cleaning the product.
Do not put a pet or houseplant where it will be exposed to direct air flow.
- Otherwise, it may cause fire and electric shock. • This could injure the pet or plant.
Do not use the product for special purpose to preserve animals, vegetables, precision device, or art objects, etc.
Stop operation and close the window in strom or hurricane.
- Otherwise, it may cause loss of property. • Otherwise, it may cause failure of product or electric shock.
Do not place obstacles around the flow inlet or outlet.
Always insert the filter securely. Clean it once every two weeks.
- Otherwise, it may cause failure of product. • Otherwise, it may cause failure of the product.
Use a soft cloth to clean, Do not use wax, tinner or a strong detergent, etc.
Do not drink water drained from the product.
- Otherwise, it may change the appearance of the product.
- Otherwise, it may harm to your health.
Do not insert your hand or bars, etc. into the air inlet/outlet.
Do not use the product at the closed space for a long time.
- Otherwise, it may cause personal injury. • Otherwise, it may cause suffocation due to poor oxygen.
Do not operate the product for a long time in high humidity, and leave a door or window open.
Do not step onto an unstable bench when maintaining the product, etc.
- Otherwise, water may drop and wet or damage furniture, etc.
- Otherwise, it may cause personal injury.
Replace the 2 batteries with new ones of same type.
Do not charge or disassemble the batteries and do not throw them into a fire.
- Otherwise, it may cause fire or an explosion.
If liquid from the batteries gets onto your skin or clothes, wash it well with clean water.
Use a rated fuse.
- Otherwise it may harm to your health. • Otherwise, It will cause fire or electric shock.
Prior to operation
Preparing for operation
- Contact an installation specialist for installation.
- Connect the power cable between indoor unit and outdoor unit properly.
- Use a dedicated circuit.
- If the cord/plug is damaged, replace it with only an authorized replacement part.
Usage
- Being exposed to direct airflow for an extended period of time could be hazardous to your health. Do not expose occupants, pets, or plants to direct airflow for extended periods of time.
- Due to the possibility of oxygen deficiency, ventilate the room when used together with stoves or other heating devices.
- Do not use this air conditioner for non-specified special purposes (e.g. preserving precision devices, food, pets, plants, and art objects). Such usage could damage the items.
Cleaning and maintenance
- Do not touch the metal parts of the unit when removing the filter. Injuries can occur when handling sharp metal edges.
- Do not use water to clean inside the air conditioner. Exposure to water can destroy the insulation, leading to possible electric shock.
- When cleaning the unit, first make sure that the power and breaker are turned off. There is a possibility of injury if the unit's power is accidentally triggered on while cleaning inner parts of the unit.
Service
For repair and maintenance, contact your authorized service dealer.
Symbols Used in this Manual


NOTICE
This symbol alerts you to the risk of electric shock.
This symbol alerts you to hazards that could cause harm to the air conditioner.
This symbol indicates special notes.
Operating Instructions
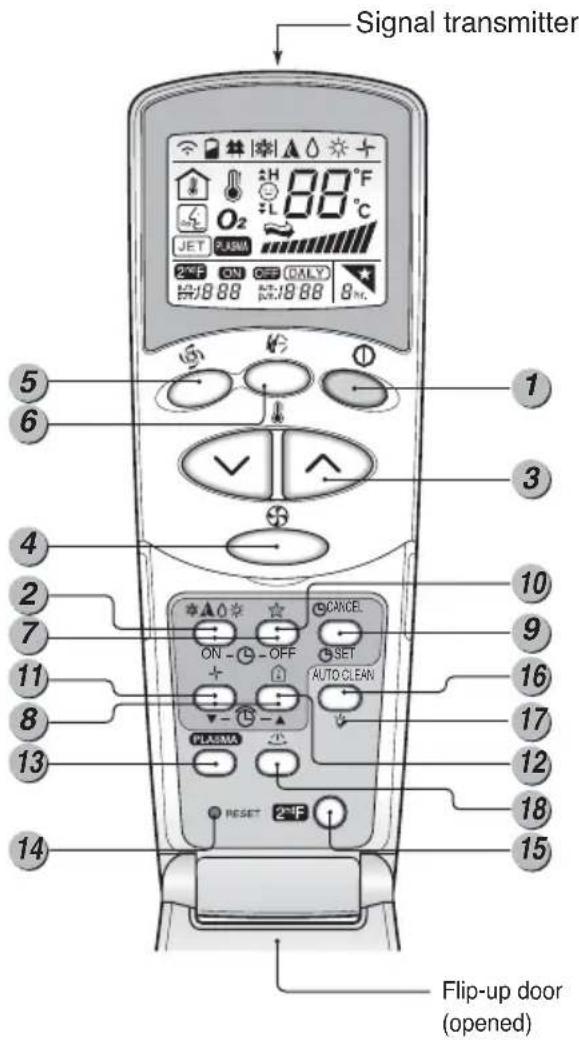
Remote Controller
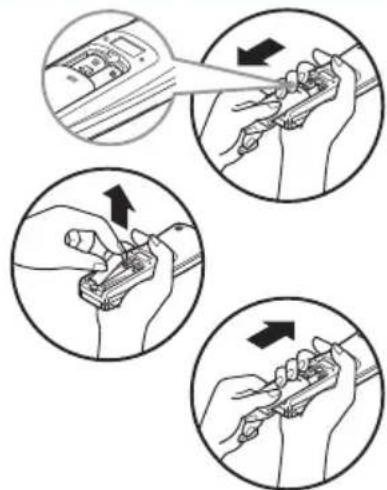
1 Remove the battery cover by pulling it according to the arrow direction.
2 Insert new batteries making sure that the (+) and (-) of battery are installed correctly.
3 Reattach the cover by sliding it back into position.
NOTICE
- Use 2 AAA(1.5volt) batteries. Do not use rechargeable batteries.
Storage and Tips For Using the Remote Controller
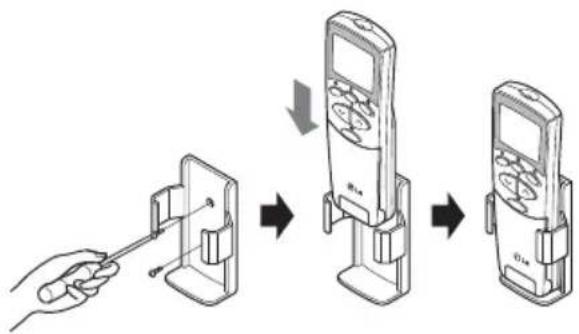
- The referring to the following picture, fix the remote controller holder onto the wall using screws.
flowchart
graph TD
    A["Input: Device with cable"] --> B["Insert: Device with cable"]
    B --> C["Add: Device with screen"]
    C --> D["Remove: Device with screen"]
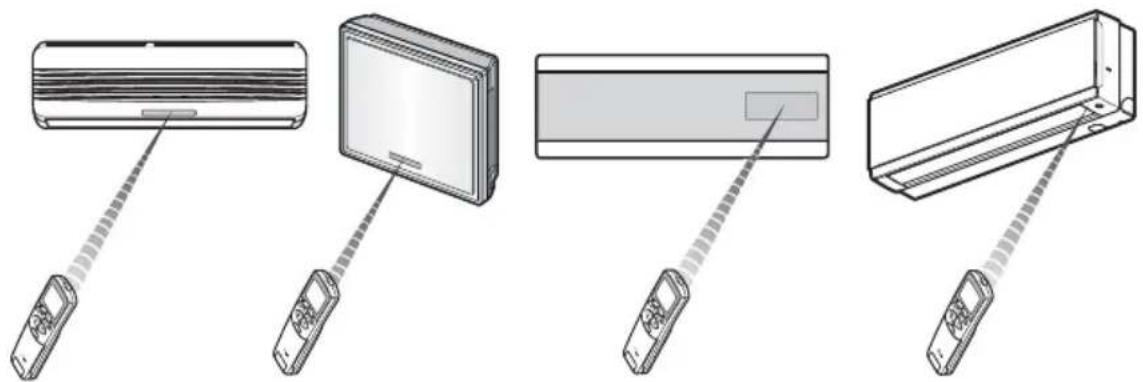
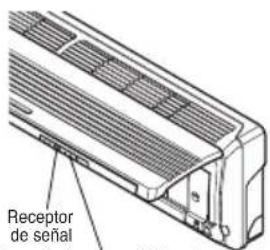
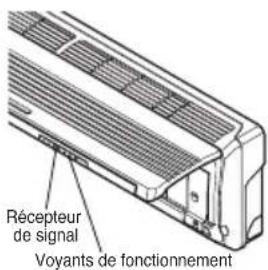
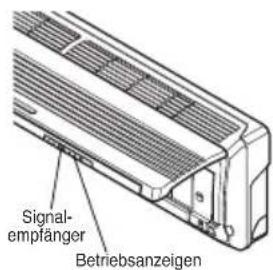
• To operate the room air conditioner, aim the Remote Controller to the signal receptor.
Standard Type Artcool Type Artcool Deluxe Type Artcool Mirror Type
Signal Receptor
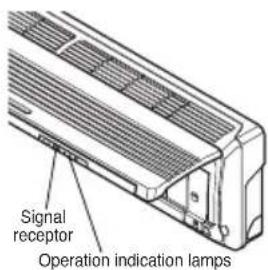
Receives the signals from the remote controller.(Signal receiving sound: two short beeps or one long beep.) Operation Indication Lamps

On/Off : Lights up during the system operation.

Sleep Mode : Lights up during Sleep Mode Auto operation.

Timer : Lights up during Timer operation.

Defrost Mode : Lights up during Defrost Mode or Hot Start operation (Heat pump model only)

OUTDOOR UNIT : Lights up during outdoor unit operation. (Cooling model only) OPERATION

Receives the signals from the remote controller.(Signal receiving sound: two short beeps or one long beep.) Operation Indication Lamps

On/Off : Lights up during the system operation.

Sleep Mode : Lights up during Sleep Mode Auto operation.

Timer : Lights up during Timer operation.

Defrost Mode : Lights up during Defrost Mode or Hot Start operation.(Heat pump model only)

Outdoor unit operation : Lights up during outdoor unit operation. (Cooling model only)

PLASMA : Indicate PLASMA purifier operation.
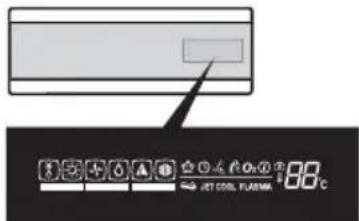
Each icon shows its own function mode.

Cooling Mode Lights up during Cooling operation. (Outline)

Auto Operation Mode Lights up during Auto operation. (Outline)

Healthy Dehumidification Mode Lights up during Healthy Dehumidification operation. (Outline)

Heating Mode Lights up during Heating operation. (Heat Pump model only) (Outline)

Defrost Mode Lights up during Defrost controller or Hot Start in Heating operation. (Outline)

Air circulation Mode Lights up during Air Circulation operation. (Outline)

Sleep Mode Lights up during Sleep Mode operation.

Timer Lights up during Timer operation.

Auto Cleaning Mode Lights up during Auto Cleaning reservation.
JET COOL
Jet Cool Mode Lights up during Jet Cool Operation.
PLASMA
Plasma Lights up during Plasma operation.
[Barcode]
Fan Speed (Low) Lights up when Fan speed is low.
[Non-Text]
Speed (Medium) Lights up when Fan speed is Medium.
[Barcode]
Fan Speed (High) Lights up when Fan speed is High.
[Non-Text]
Fan Speed (Chaos) Lights up when Fan speed is Chaos.

Desire temperature For cooling, dehumidification, heating modes it display Destired temperature
indicator
- Cooling : 18\~30C • Al : Auto Operation - Dehumidification : 18\~30C • Po : Jet Cool - Heating : 16\~30C • Lo : Test Mode

Desire temperature Icon

Indoor temperature Icon
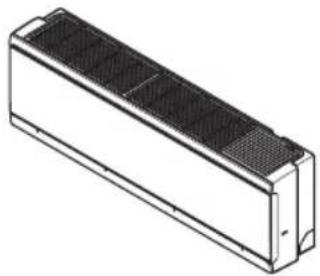
natural_image
Isometric line drawing of a rectangular electronic component with a mesh top (no text or symbols)
On/Off : Lights up during the system operation.

Sleep Mode : Lights up during Sleep Mode Auto operation.

Timer : Lights up during Timer operation.

Defrost Mode : Lights up during Defrost Mode or Hot Start operation.(Heat pump model only) Plasma : Lights up during Plasma operation.

Plasma

Desire temperature : For cooling, dehumidification, heating modes it display Destired temperature indicator • Cooling : 18\~30C • AI : Auto Operation • Dehumidification : 18\~30C • Po : Jet Cool • Heating : 16\~30C • Lo : Test Mode
Remote Control Operation
The Remote Controller transmits the signals to the system.
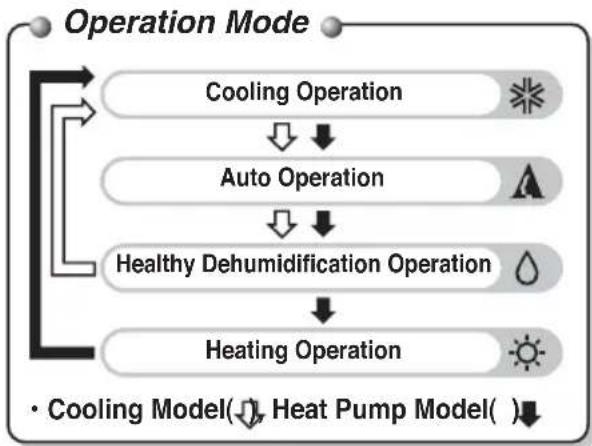
flowchart
graph TD
    A["Operation Mode"] --> B["Cooling Operation"]
    B --> C["Auto Operation"]
    C --> D["Healthy Dehumidification Operation"]
    D --> E["Heating Operation"]
    style A fill:#f9f,stroke:#333
    style B fill:#ccf,stroke:#333
    style C fill:#cfc,stroke:#333
    style D fill:#fcc,stroke:#333
    style E fill:#cff,stroke:#333
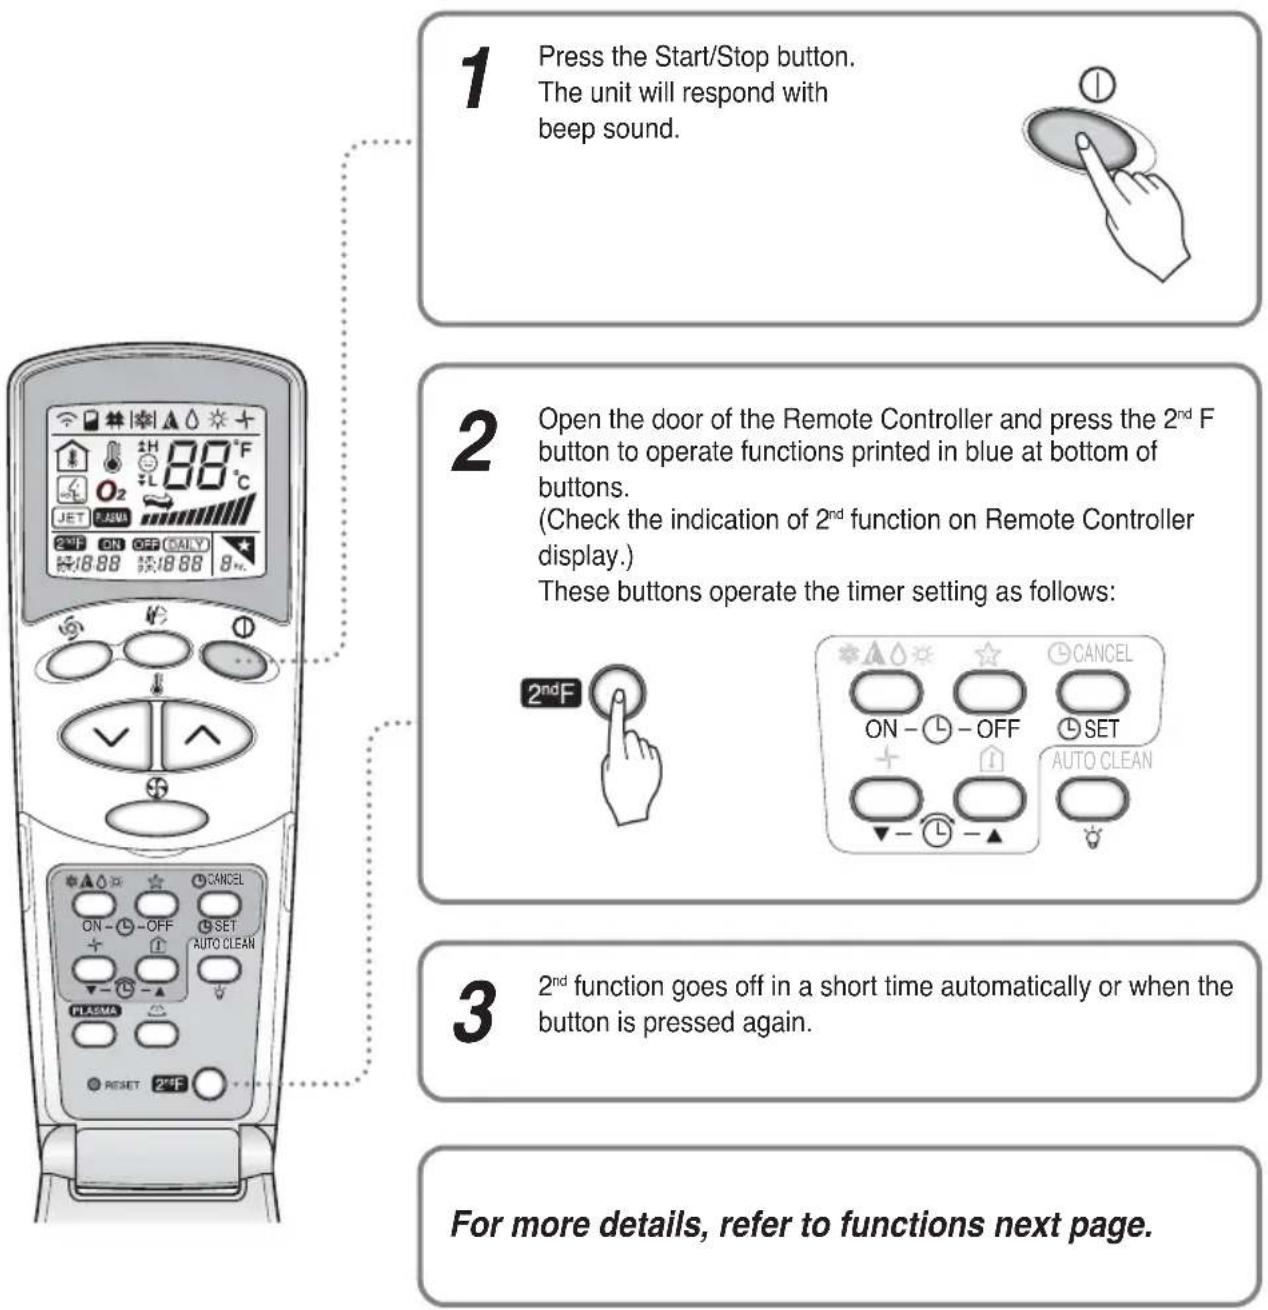
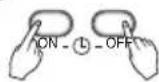
1 START/STOP BUTTON
Operation starts when this button is pressed and stops when the button is pressed again.
2 OPERATION MODE SELECTION BUTTON
Used to select the operation mode.
3 ROOM TEMPERATURE SETTING BUTTONS
Used to select the room temperature.
INDOOR FAN SPEED SELECTOR
Used to select fan speed in four steps low, medium, high and CHAOS.
5 JET COOL
Used to start or stop the speed cooling/heating. (Speed cooling/heating operates super high fan speed.)
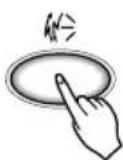
CHAOS SWING BUTTON
Used to stop or start louver movement and set the desired up/down airflow direction.
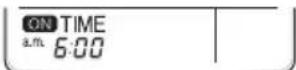
7 ON/OFF TIMER BUTTONS
Used to set the time of starting and stopping operation.
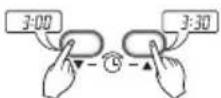
TIME SETTING BUTTONS
Used to adjust the time.
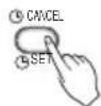
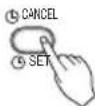
TIMER SET/CANCEL BUTTON
Used to set the timer when the desired time is obtained and to cancel the Timer operation.
10 SLEEP MODE AUTO BUTTON
Used to set Sleep Mode Auto operation.
11 AIR CIRCULATION BUTTON
Used to circulate the room air without cooling or heating.
10 ROOM TEMPERATURE CHECKING BUTTON
Used to check the room temperature.
13 PLASMA(OPTIONAL)
Used to start or stop the plasma-purification function.
14 RESET BUTTON
Initialize remote controller.
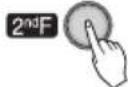
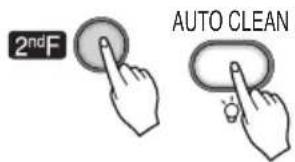
15 2nd F Button
Used prior to using modes printed in blue at the bottom of buttons.
16 AUTO CLEAN
Used to set Auto Clean mode.
17 LED LUMINOSITY(OPTIONAL)
Used to control the luminosity of the display on unit
18 HORIZONTAL AIRFLOW DIRECTION CONTROL BUTTON (NOT ON ALL MODELS)
Used to set the desired horizontal airflow direction.


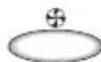


Cooling Operation
flowchart
graph TD
    A["1 Press the Start/Stop button.<br>The unit will respond with beep sound."] --> B["2 Open the door on the Remote Controller. To select Cooling Operation, press the Operation Mode Selection button.<br>Each time the button is pressed, the operation mode is shifted in the direction of the arrow."]
    B --> C["3 Set the temperature lower than the room temperature.<br>The temperature can be set within a range of 18°C~30°C in 1°C."]
    C --> D["4 You can select the fan speed in four steps-low, medium, high, or CHAOS. Each time the button is pressed, the fan speed mode is shifted."]
Natural wind by the CHAOS logic
☐ For more fresh feeling, press the Indoor Fan Speed Selector and set CHAOS mode. In this mode, the wind blows like natural breeze by automatically changing fan speed according to the CHAOS logic.

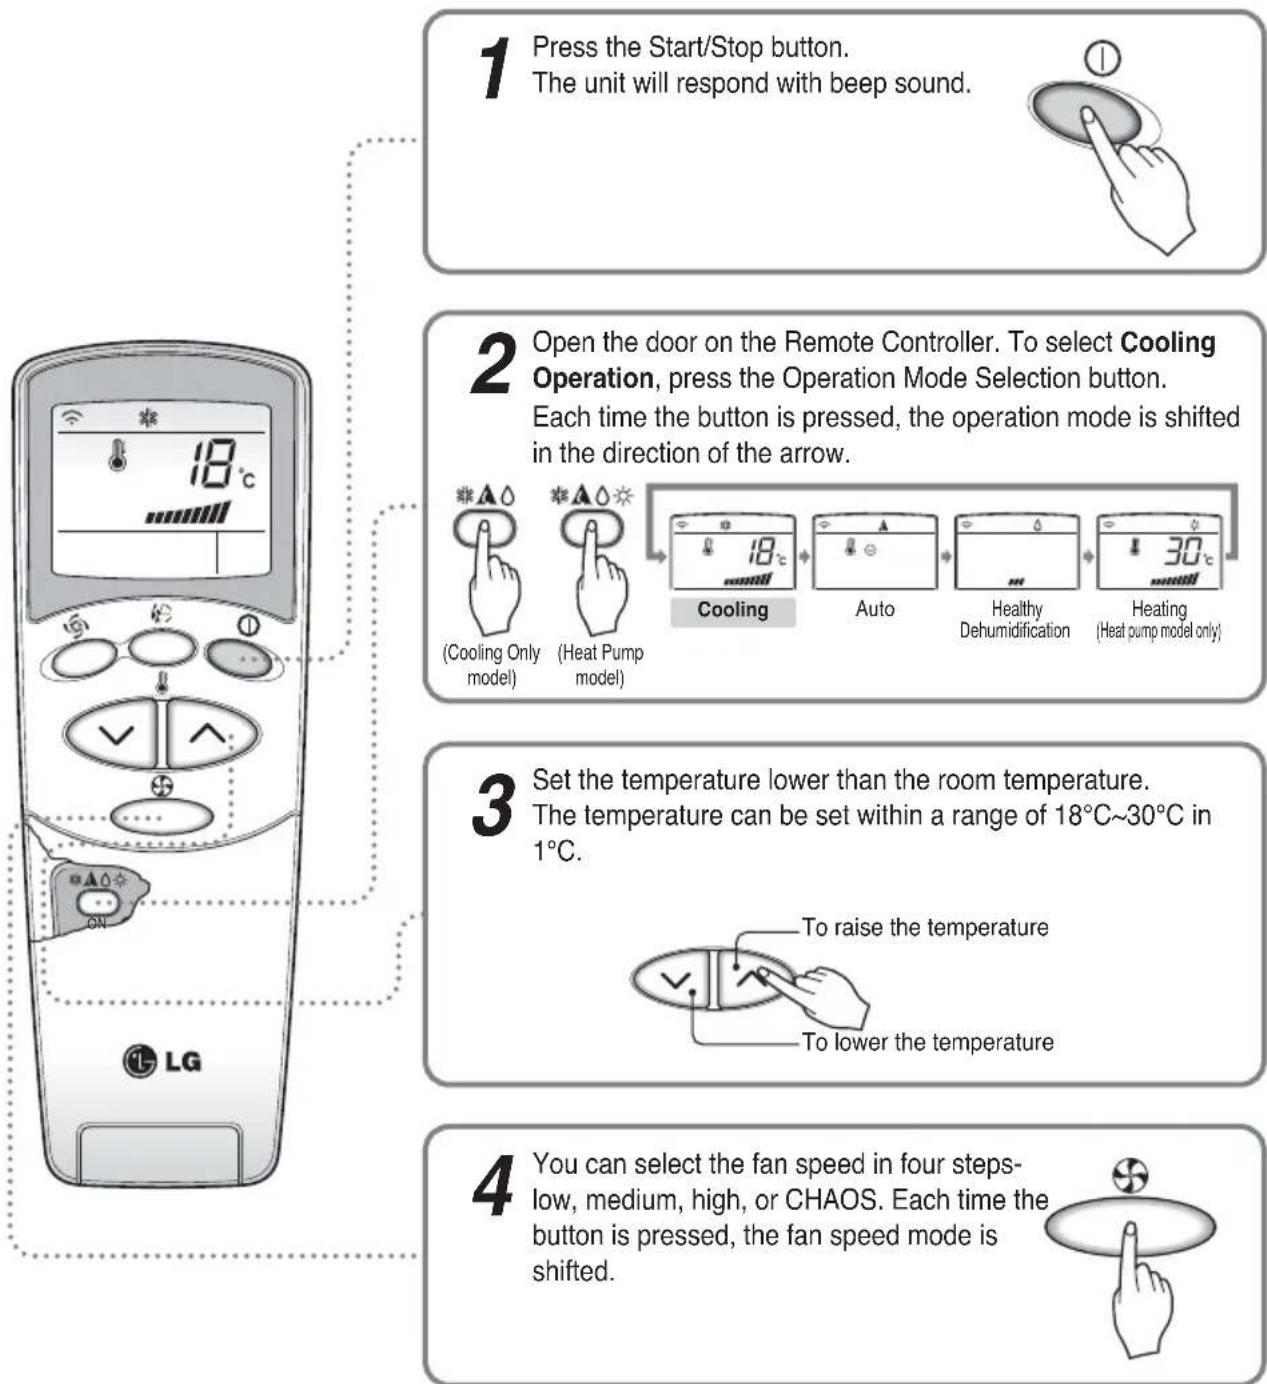
Auto Operation
DURING AUTO OPERATION:
☐ You cannot switch the indoor fan speed. It has already been set by the Fuzzy rule.
☐ If the system is not operating as desired, manually switch to another mode. The system will not automatically switch from the cooling mode to the heating mode, or from heating to cooling, then you must set the mode and the desired temperature again.
☐ During Auto Operation, pressing the chaos swing button makes the horizontal louvers swing up and down automatically. If you want to stop auto-swing, press the chaos swing button again.

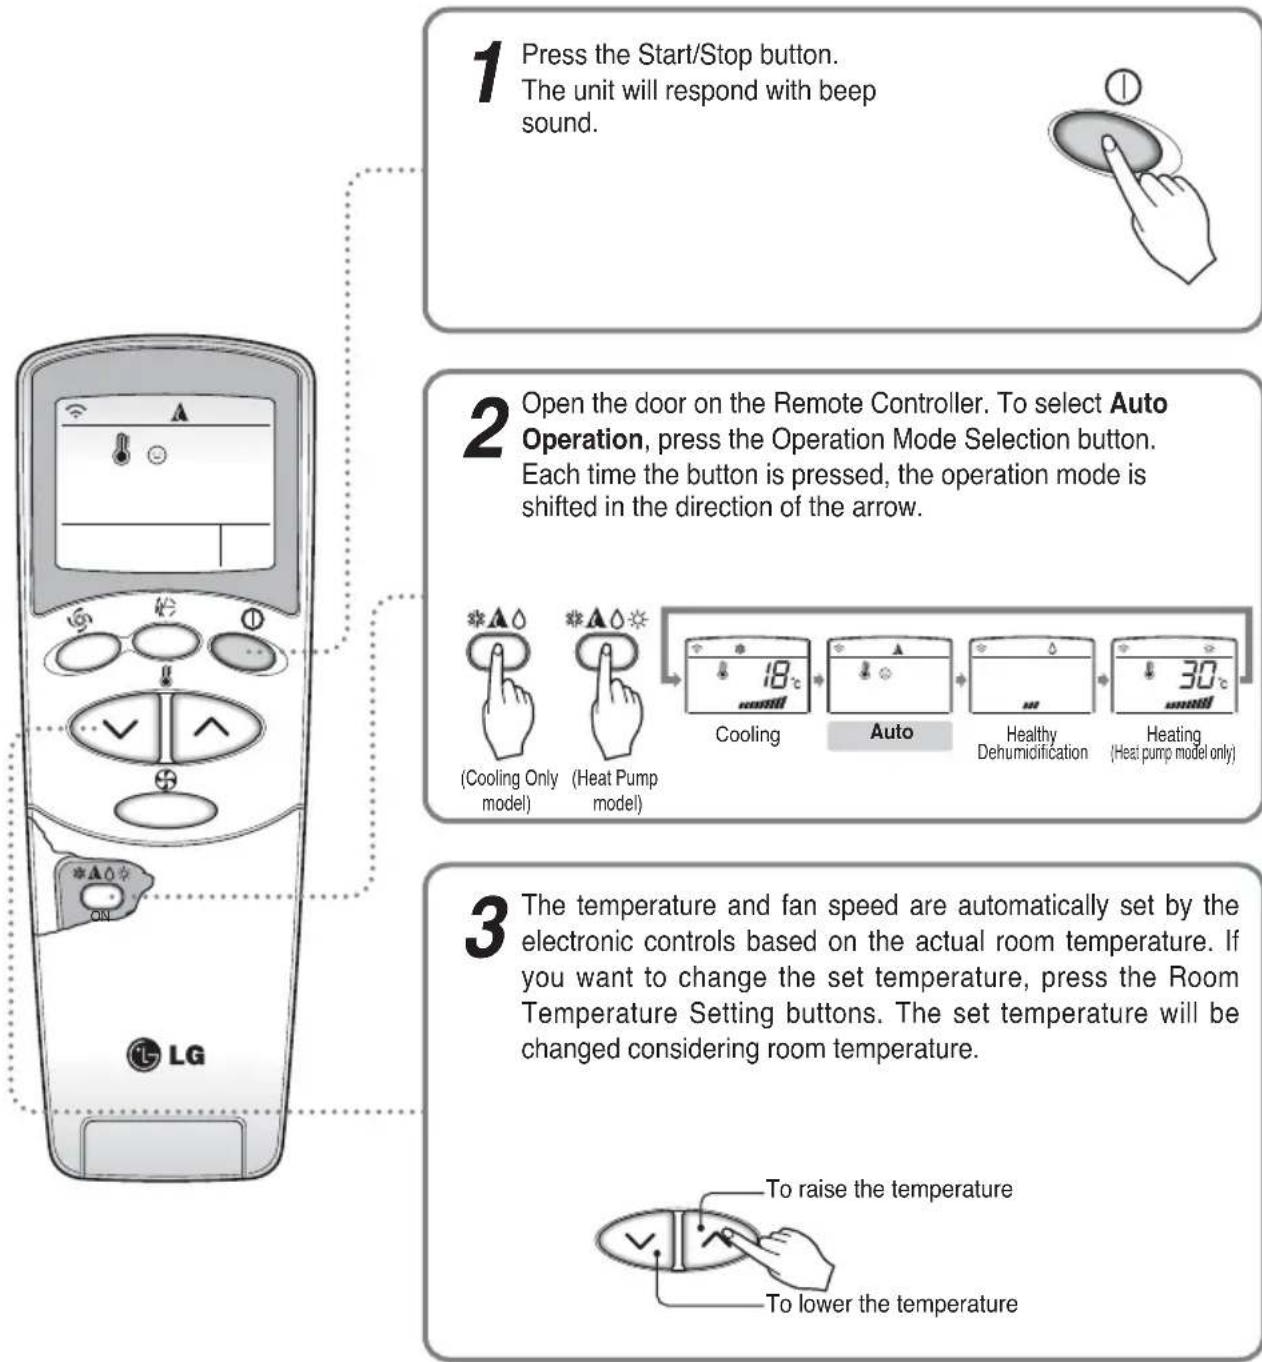
Healthy Dehumidification Operation
DURING HEALTHY DEHUMIDIFICATION OPERATION:
☐ If you select the dehumidification mode on the operation selection button, the A/C starts to run the dehumidification function, automatically setting the room temp. and air volume to the best condition for dehumidification based on the sensed room temp.
In this case, the setting temp. is not displayed in the Remote Controller and you are not able to control the room temp. either.
During the healthy dehumidification function, the air volume is automatically set according to the algorithm responding to the current room temp. and makes the room condition healthy and comfortable even in the high humidity season.

Heating Operation(Heat pump model only)
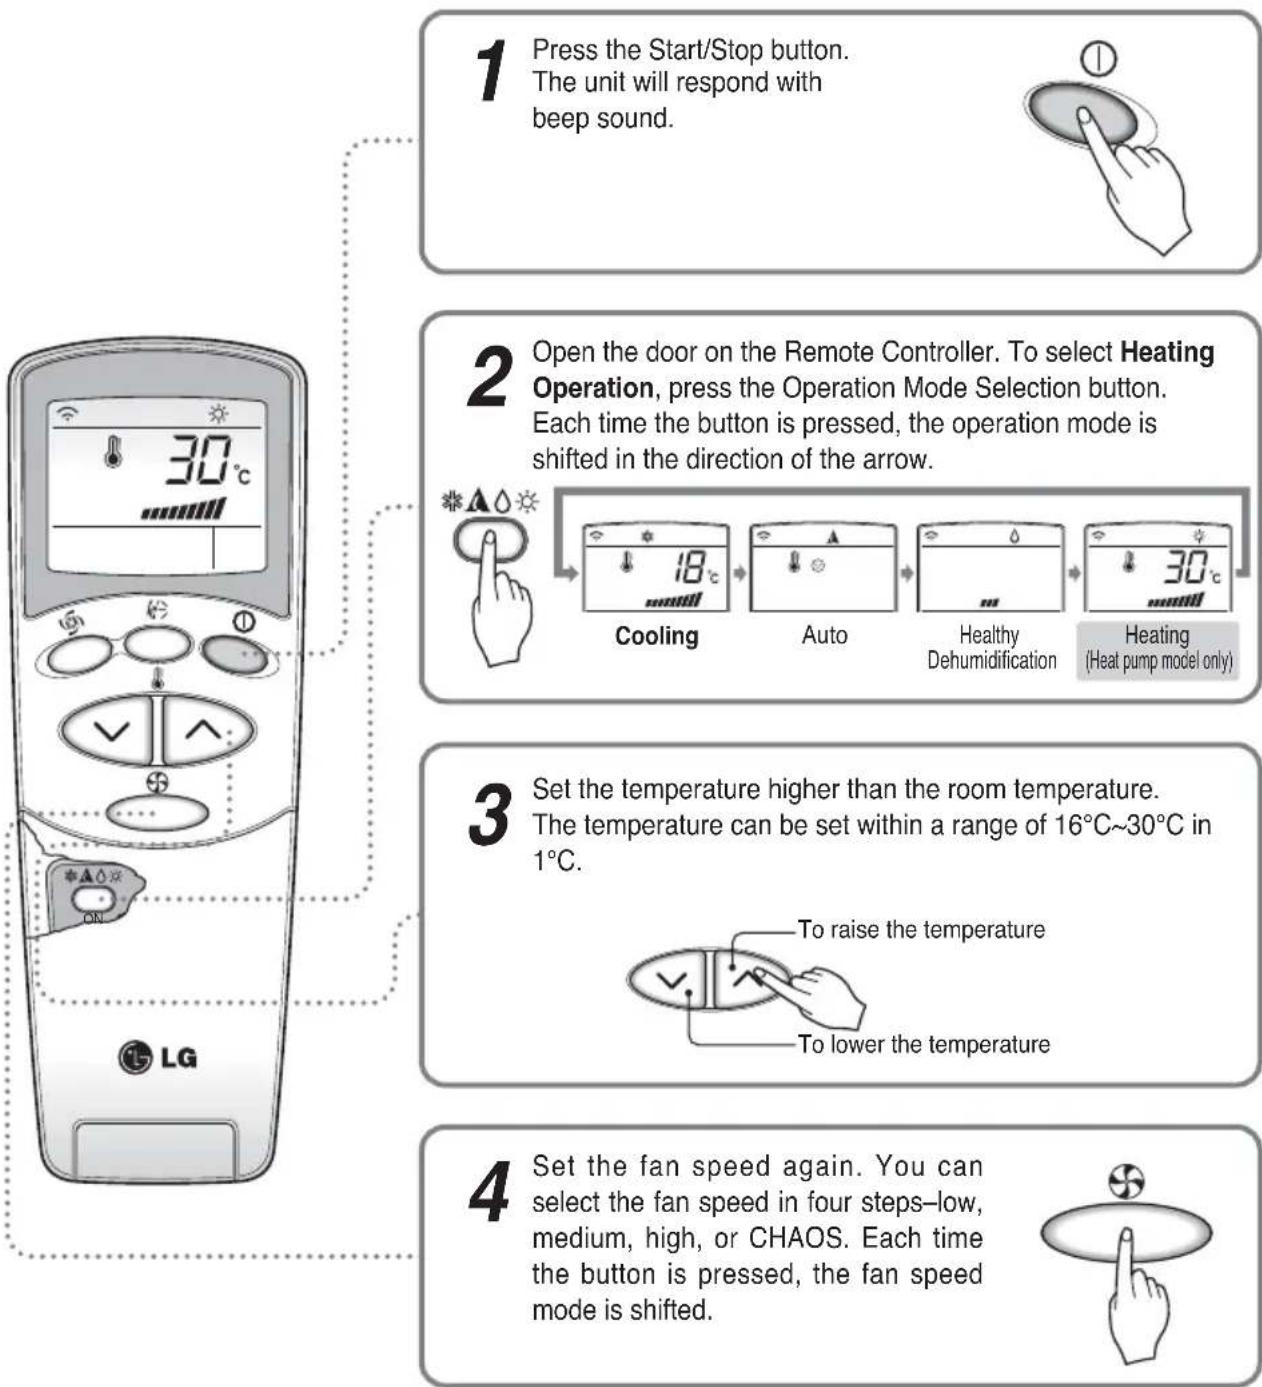
flowchart
graph TD
    A["1 Press the Start/Stop button.<br>The unit will respond with beep sound."] --> B["2 Open the door on the Remote Controller. To select Heating Operation, press the Operation Mode Selection button.<br>Each time the button is pressed, the operation mode is shifted in the direction of the arrow."]
    B --> C["3 Set the temperature higher than the room temperature.<br>The temperature can be set within a range of 16°C~30°C in 1°C."]
    C --> D["4 Set the fan speed again. You can select the fan speed in four steps-low, medium, high, or CHAOS. Each time the button is pressed, the fan speed mode is shifted."]
NATURAL WIND BY THE CHAOS LOGIC
☐ For more fresh feeling than other fan speed, press the Indoor Fan Speed Selector and set to CHAOS mode. In this mode, the wind blows like natural breeze by automatically changing fan speed according to the CHAOS logic.

Jet Cool
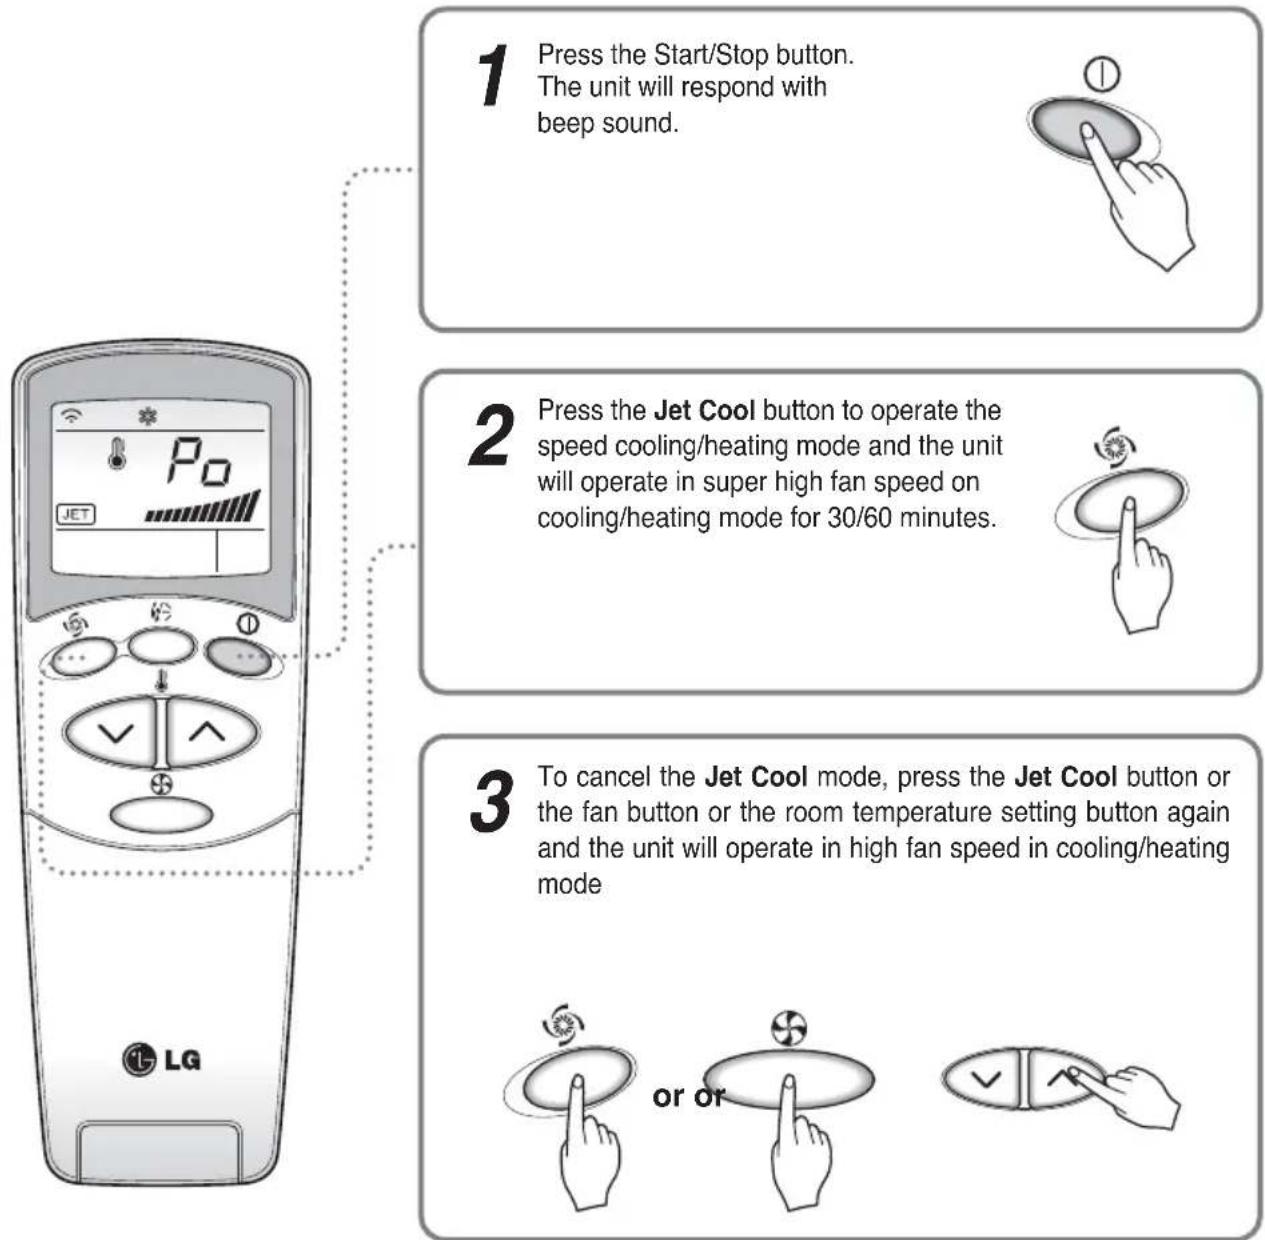
flowchart
graph TD
    A["1 Press the Start/Stop button. The unit will respond with beep sound."] --> B["2 Press the Jet Cool button to operate the speed cooling/heating mode and the unit will operate in super high fan speed on cooling/heating mode for 30/60 minutes."]
    B --> C["3 To cancel the Jet Cool mode, press the Jet Cool button or the fan button or the room temperature setting button again and the unit will operate in high fan speed in cooling/heating mode."]
NOTICE
☐ Jet Cool function in heating mode is available on Artcool type only.
During the JET COOL function at any moment, the A/C starts to blow the cool/heat air at extremely high speed for 30/60 minutes setting the room temp. automatically to 18^ / 30^ . It is especially used to cool/heat the room temperature in the shortest time.
☐ In order to return to the normal cooling/heating mode from the Jet Cool mode, you just press either the operation mode selection button, air volume selection or temp. setting button or the JET COOL button again.

PLASMA Purification Operation(Optional)
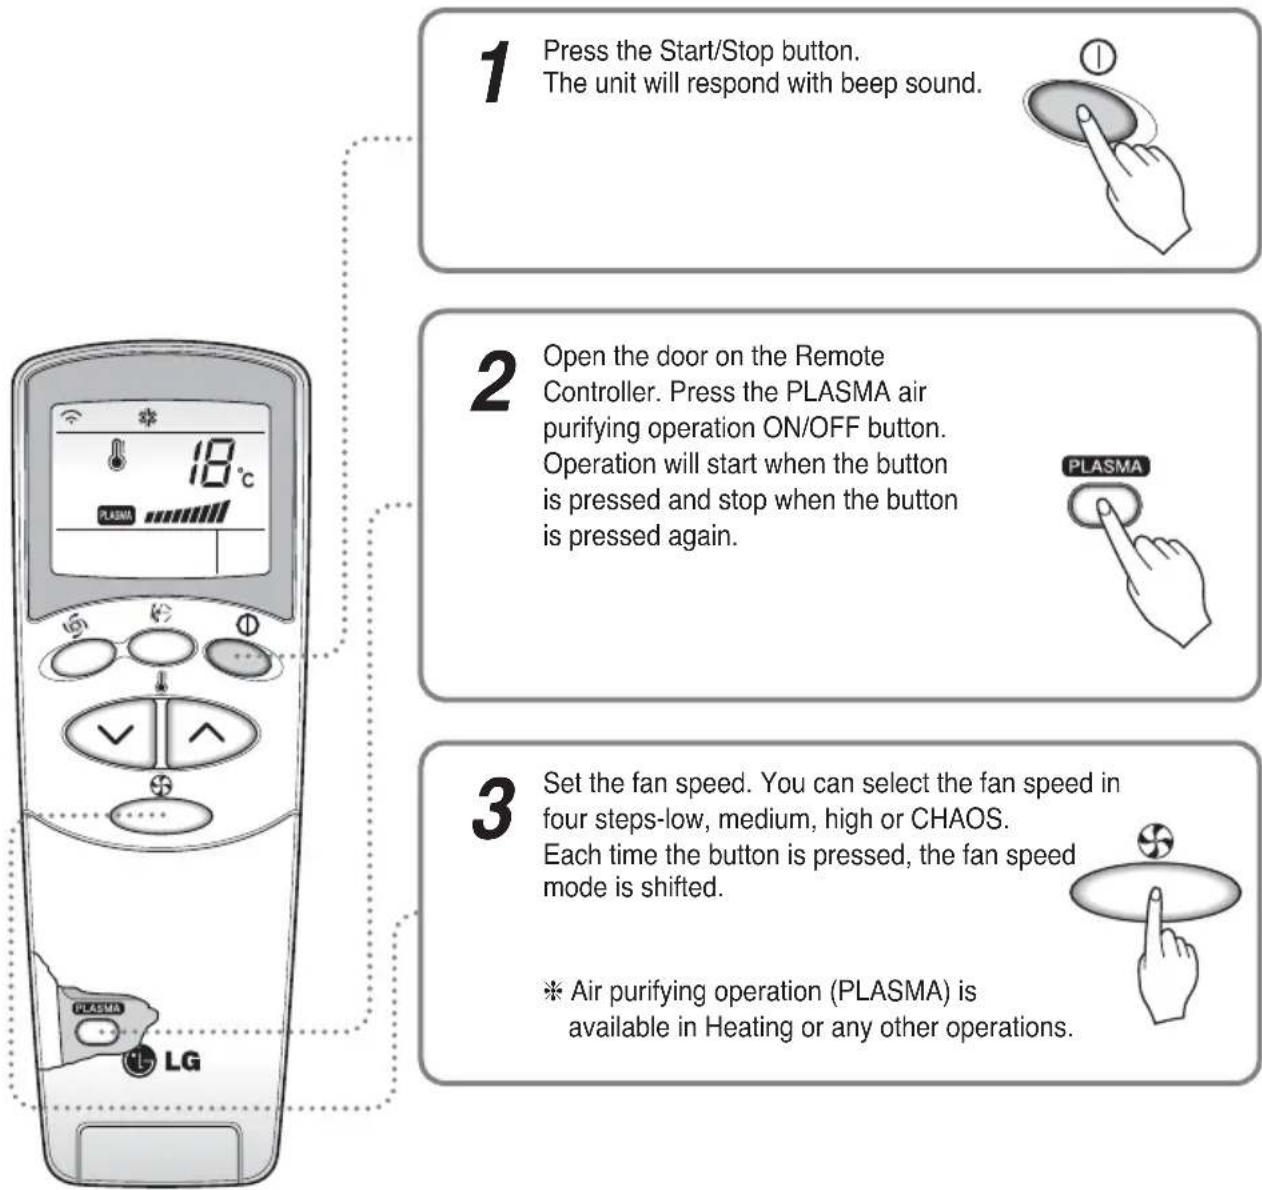
flowchart
graph TD
    A["1 Press the Start/Stop button.<br>The unit will respond with beep sound."] --> B["2 Open the door on the Remote Controller.<br>Press the PLASMA air purifying operation ON/OFF button.<br>Operation will start when the button is pressed and stop when the button is pressed again."]
    B --> C["3 Set the fan speed. You can select the fan speed in four steps-low, medium, high or CHAOS.<br>Each time the button is pressed, the fan speed mode is shifted.<br>※ Air purifying operation (PLASMA) is available in Heating or any other operations."]
PLASMA Air Purifying Operation only
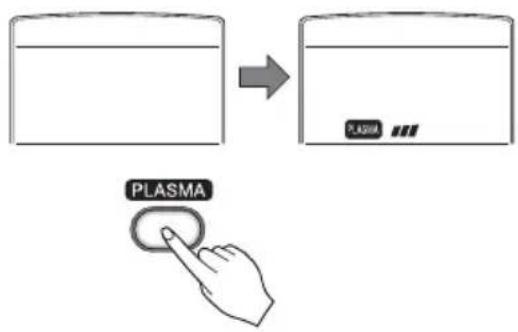
If you press the PLASMA button, PLASMA air purifying operates.
Each time the button ( ⊕ ) is pressed, the fan speed mode is shifted.

2nd F Operation
Additional features

Sleep Mode
-
Press the Sleep Mode Auto button to set the time you want the unit to turn off automatically.
-
The Timer is programmed in one-hour increments by pressing the Sleep Mode Auto button 1 to 7 times.
The sleep mode is available for 1 to 7 times. To alter the time period in steps of 1 hour, press the Sleep Mode Button while aiming at air conditioner.
- Make sure the Sleep Mode Auto LED lights up.

To cancel the Sleep Mode, press the sleep Mode Auto button several times until the star (☆) disappears from the operation display.
NOTICE The Sleep Mode will be operated at low fan speed (cooling) or medium fan speed (heat pump only) for quiet sleeping.
IN COOLING MODE: The temperature will automatically rise by 1°C over the next 30 minutes and by 2°C in 1 hour for comfortable sleeping.

Setting the Time
- Time can be set only when you have pressed the Reset button. If you have just replaced the batteries, the Reset button should be pressed to
reset the time. Press the Start/Stop button.
- Press 2^nd F button and check if 2^nd F icon is on.
- Press the Time Setting buttons until the desired time is set.
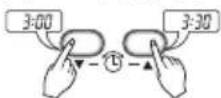
- Press the Timer SET button.
NOTICE Check the indicator for A.M. and P.M.

Delay Start/Pre-Set Stop
-
Make sure the time is set correctly on the Remote Controller display.
-
Press 2^nd F button.
- Press the ON/OFF Timer buttons to turn Timer on or off.
- Press the Time Setting buttons until the desired time is set.
- Press the selected on/off setting by pressing the Timer SET button while aiming the Remote Controller at the signal receptor.
To cancel the setting the timer.
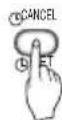
Press the Timer Cancel button while aiming Remote Controller at the signal receptor. (The timer lamp on the air conditioner and the display will go out.)
NOTICE
Select one of the following four types of operation.
with the unit running

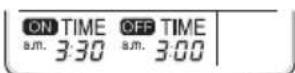
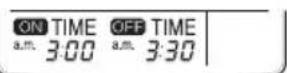
Delay OFF Timer Delay ON Timer Delay OFF and ON Timer Delay ON and OFF Timer

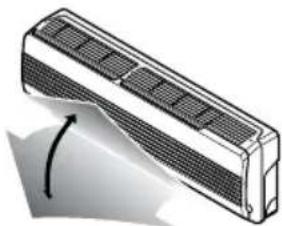
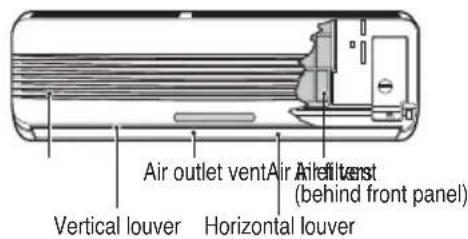
Vertical Airflow Direction Control
Standard, Artcool Deluxe Type
The up/down airflow (Vertical Airflow) can be adjusted by using the Remote Controller.
Press the Start/Stop button to start the unit.
Open the door on the
Remote Controller.
Press Chaos Swing button and the louvers will swing up and down.
Press the Chaos Swing button again to set the vertical louver at the desired airflow direction.
natural_image
Illustration of a rectangular air conditioner unit with ventilation grilles and airflow direction indicated by an arrow (no text or symbols)
Artcool Type
The up/down and right/left airflow can be adjusted by using the Remote Controller.
natural_image
Illustration of a computer monitor with curved arrows indicating data flow or download (no text or symbols)Press the Start/Stop button to start the unit.

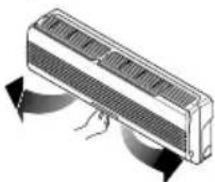
Horizontal Airflow Direction Control (Optional)
The left/right(Horizontal Airflow) can be adjusted by using the remote control.
- Press the Start/Stop button to start the unit.
- Open the door on the remote control. Press the Airflow Direction Start/Stop button and the louvers will swing left and right. Press the Horizontal Airflow Direction Control Button again to set the horizontal louver at the desired airflow direction.
NOTICE
☐ If you press the CHAOS swing button, the horizontal airflow direction is changed automatically based on the CHAOS algorithm to distribute the air in the room evenly and at the same time to make the human body feel most comfortable, as if enjoying a natural breeze.
□ Always use the Remote Controller to adjust the up/down airflow direction. Manually moving the vertical airflow direction louver by hand could damage the air conditioner.
☐ When the unit is shut off, the up/down airflow direction louver will close the air outlet vent of the system.
To adjust left/right(Horizontal Airflow) direction
Caution : Ensure that the unit is turned off before adjusting the horizontal airflow direction control.
Carefully open vertical louver to allow access to the horizontal airflow direction.
Adjust the left/right airflow direction by hand.
natural_image
Illustration of a refrigerated air conditioner with airflow arrows indicating cooling or heat transfer (no text or symbols)Press Chaos Swing button and the louvers will swing.
Press the button again and the louvers will stop. After 30 minutes, the louvers return to the maximum airflow position automatically.

Air Circulation Mode
Circulates the room air without cooling or heating.
- Press the Start/Stop button. The unit will respond with beep sound.
- Open the door on the Remote Controller. Press the Air Circulation button. Now each time that you press the Indoor Fan Speed Selector, the fan speed is shifted from low to CHAOS and back to low again.

flowchart
graph LR
    A["Hand with +"] --> B["Hand with +"]
    B --> C["→"]
    C --> D["→"]
    D --> E["→"]
    E --> F["→"]
Fan speed is on low. Fan speed is on medium. Fan speed is on high. CHAOS Air
NOTICE
☐ CHAOS Air economizes power consumption and prevents overcooling. The fan speed is automatically changed from high to low or vice versa, depending on the ambient temperature.

Auto Clean (Artcool, Artcool Deluxe, Artcool Mirror Type Only)
AUTO CLEAN

- Press the Start/Stop button to Start the unit.
- Open the door on the Remote Controller Select Cooling Operation or Healthy Dehumidification Operation.
- Press the Auto clean button.
- Although the Start/Stop button is pressed, unit operates in Auto clean Mode for 15 minutes - operates in heating operation Mode for 1 minute and circulates the room air without cooling and heating for 14 minutes. And then unit stops operating.
NOTE:
☐ During Auto Clean function, moistures left in indoor units after Cooling Operation or Healthy Dehumidification Operation can be removed.
☐ During Auto Clean function, only Start/Stop button, Plasma button and Auto Clean button are available.

Display Luminosity (AMNH076DZ\*0[MC07AH\*NZ0], AMNH096DU\*0[MC09AH\*NU0])
- The Display Luminosity of the unit can be adjusted by using the Remote Controller. Press the start/stop button to start the unit. Open the door on the Remote Controller, press the 2^nd F button and, press display luminosity button. Display will be dark. Press the button again to set bright display.
![LG MC24AHV - Display Luminosity (AMNH076DZ\*0[MC07AH\*NZ0], AMNH096DU\*0[MC09AH\*NU0]) - 2](/content/2026/04/595510/images/81c00e9bd5d56787c05993b6643ed24ebb4202da04abae6f1b1bfca48641e2cc.jpg)
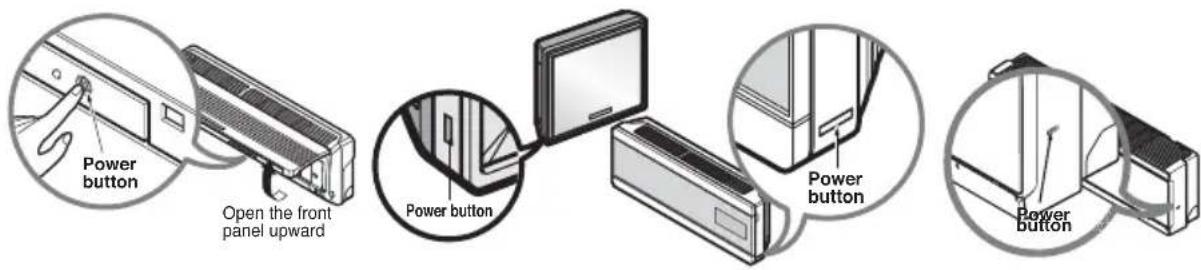
Forced Operation
The operation will be started operation if the power button is pressed without remote controller. If you want to stop operation, re-press the button.
| Cooling Model | Heat pump Model | |||
| Room Temp. ≥ 24°C 21°C | C ≤ Room Temp. < 24°C | Room Temp. < 21°C | ||
| Operating mode | Cooling Cooling | Healthy Dehumidification | Heating | |
| Indoor FAN Speed | High High | High High | ||
| Setting Temperature | 22°C 22°C | 23°C 24°C | ||

Auto restart
In case the power comes on again after a power failure, the unit operates automatically to the previous operating conditions.
So there is no need of activating this function by pressing any key or button.
In the initial mode, the fan operates at a low speed and the compressor starts about 3 minutes later.
As the compressor starts, the fan speed also resumes its previous setting mode.

In case of absence for a long time while power failure, turn off main power to avoid undersired Auto restart.
Helpful information
Fan speed and cooling capacity.
The cooling/heating capacity indicated in the specification is the value when the fan speed is set to high, and the capacity will be lower at low or medium fan speed.
High fan speed is recommended when you wish to cool/heat the room quickly.

Maintenance and Service
CAUTION: Before performing any maintenance, turn off the main power to the system.
Standard Type Indoor Unit
Grille, Case, and Remote Control
☐ Turn the system off before cleaning.
To clean, wipe with a soft, dry cloth. Do not use bleach or abrasives.
NOTICE Supply power must be disconnected before cleaning the indoor unit.
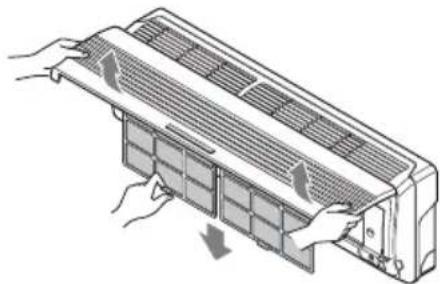
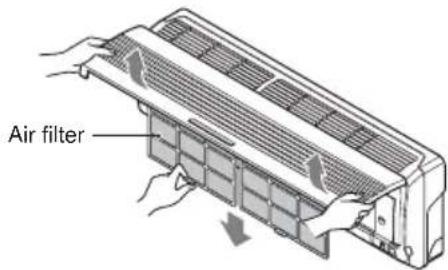
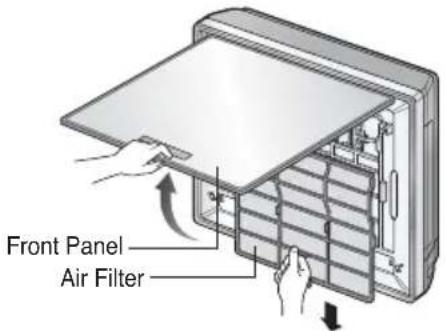
AIR FILTERS
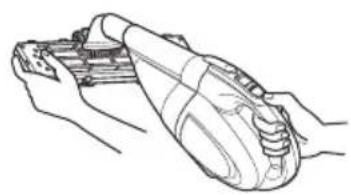
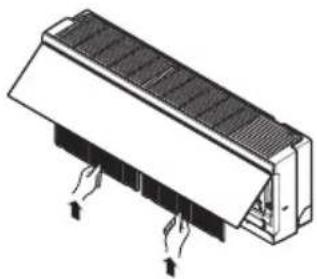
The air filters behind the front grille should be checked and cleaned once in every 2 weeks or more often if necessary.
natural_image
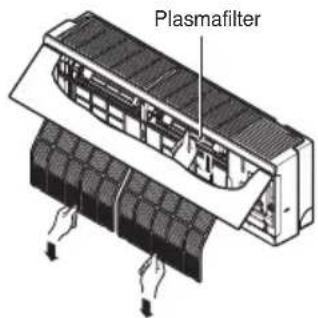
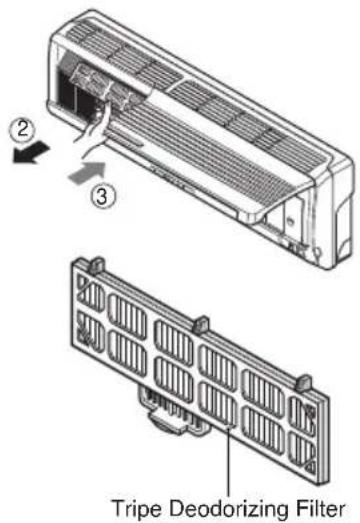
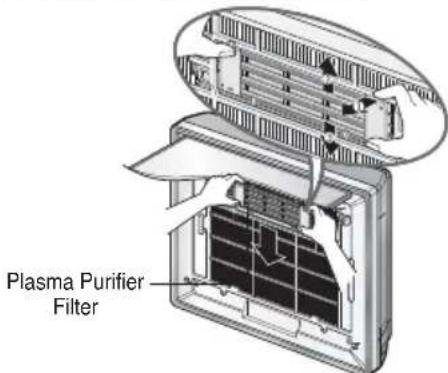
Illustration of hands installing or adjusting a wall-mounted air conditioner unit (no text or symbols visible)PLASMA FILTER, TRIPLE DEODORIZING FILTER(OPTIONAL)
The PLASMA filter behind the air filters should be checked and cleaned once in every 3 months or more often if necessary.


Don't touch this PLASMA Filter within 10 seconds after opening the inlet grille, it may cause an electric shock.
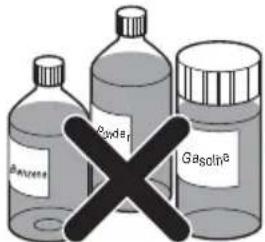
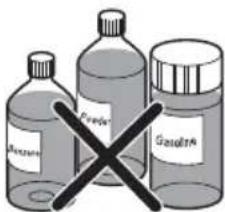
□ Never use any of the followings:
• Water hotter than 40^ C Could cause deformation and/or discoloration.
- Volatile substances Could damage the surfaces of the air conditioner.
-
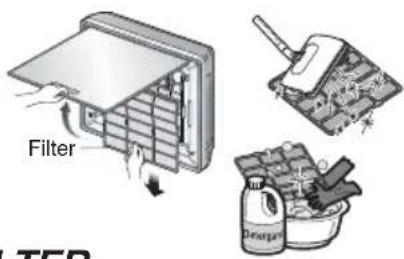
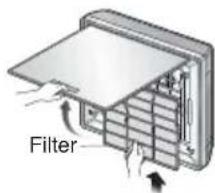
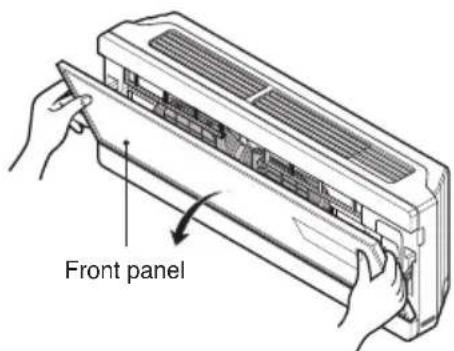
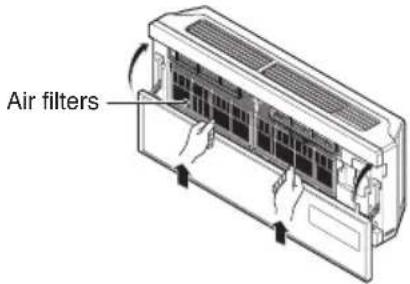
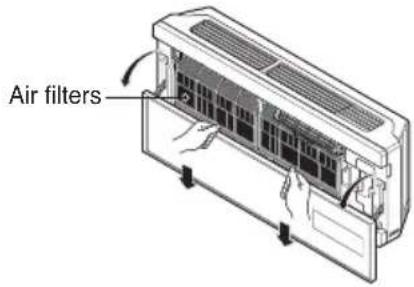
Lift the front access panel and pull the filter tab slightly forward to remove the filter.
-
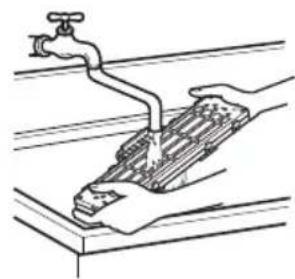
Clean the filter with a vacuum cleaner or warm, soapy water.
- If dirt is conspicuous, wash with a solution of detergent in lukewarm water. - If hot water (40°C or more) is used, it may be deformed.
-
After washing with water, dry well in the shade.
-
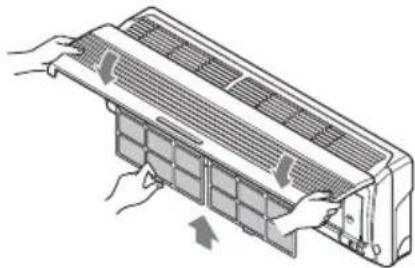
Re-install the air filter.
-
After removing the air filters, pull slightly forward to remove the PLASMA filter.
-
Remove dust with vacuum cleaner or air. (You should not try to wash with water).
-
Note the cuts of electric discharge lines.
-
Re-install the PLASMA filter to the original position.
-
After removing the air filters, pull slightly forward to remove the TRIPLE DEODORIZING filter.
-
Dry in the sunlight for two hours.
-
Re-install the TRIPLE DEODORIZING filter to the original position.
Replacement of Purifying Filter(Optional)
- Recommended use period: About 2 years
- Open front panel and remove air filters.
- Reinsert air filter and close front panel.
natural_image
Illustration of hands installing or adjusting a wall-mounted air conditioner panel (no text or symbols visible)-
Remove Triple deodorizing Filter.
-
Insert new Triple deodorizing Filter.
Artcool Type Indoor Unit
Grille, Case, and Remote Control
☐ Turn the system off before cleaning. To clean, wipe with a soft, dry cloth. Do not use bleach or abrasives.
NOTICE
Supply power must be disconnected before cleaning the indoor unit.
AIR FILTER
The air filters behind the front grill should be checked and cleaned once every 2 weeks or more often if necessary.
□ Never use any of the followings:
- Water hotter than 40°C. Could cause deformation and/or discoloration.
- Volatile substances Could damage the surfaces of the air conditioner.
-
Pull down the grille bottom, After lifting up the filter tab a bit and take the filter out slowly (Notice : Clean the filter after being stopped the product)
-
Clean the filter with a vacuum or warm, soapy water.
- If dirt is conspicuous, wash with a solution of detergent in lukewarm water.
- If hot water (40°C or more) is used, it may be deformed.
-
After washing with water, dry well in the shade.
-
Re-install the air filter.
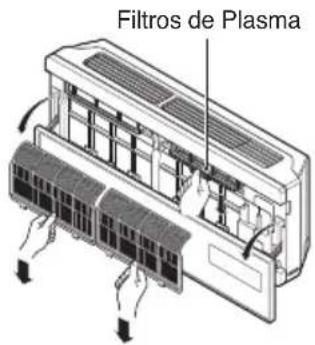
Cleaning of Purifying Filter
• Recommended use period : About 3 months
- Lift the front panel, hold it up and pull the Air filter.
-
Put in Plasma Filters in the neutral detergent for 1\~2 hours and then raise them.
-
Remove the Plasma Filter.
- Insert the Plasma Filter after perfectly drying in shade.
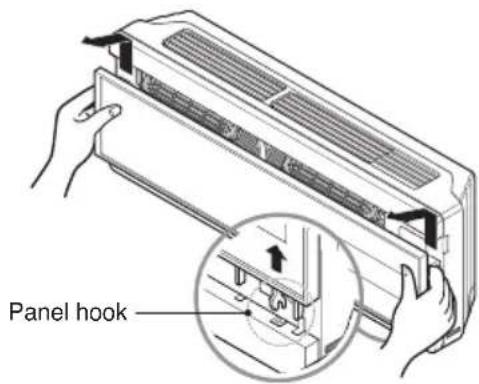
Now insert Air Filter and close the Front panel Completely by matching the hook.
natural_image
Line drawing of a hand using a tool to clean or repair a mechanical component (no text or symbols present)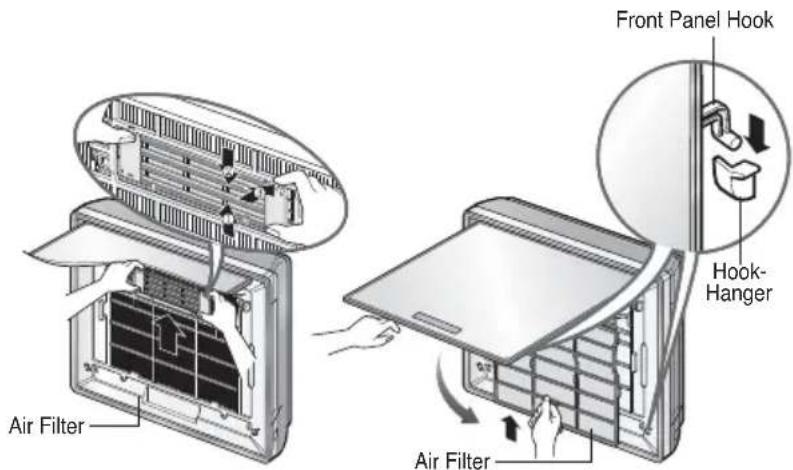
Artcool Deluxe Type Indoor Unit
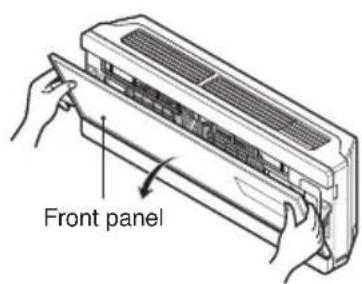
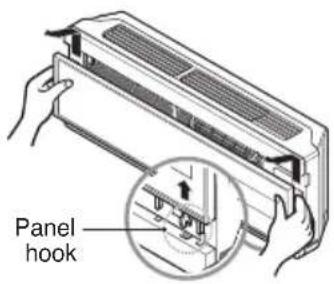
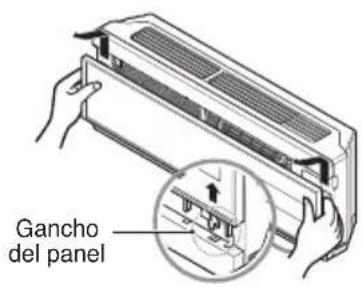
- Open the upside of Front Panel
- Lift up the Front panel. The hook of panel comes off.
- Come down the panel and then remove air filters.
- Relocate dried air filters at the shade and then close the panel.
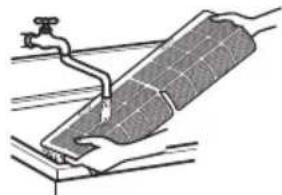
- Do cleaning by soft brush and a vacuum cleaner. If it has hard pollution, wash by water.
natural_image
Diagram of a solar panel installation with a water tap and pipe (no text or symbols)
Don't touch this PLASMA Filter within 10 seconds after opening the inlet grille, it may cause an electric shock.
□ Never use any of the followings:
• Water hotter than 40^ C
Could cause deformation and/or discoloration.
• Volatile substances Could damage the surfaces of the air conditioner.
Cleaning of Purifying Filter
• Recommended use period : About 3 months
- Open the upside of Front panel. 2. Put up the front panel.
The hook of panel comes off.
- Remove air filter and then pull out plasma filter.

- Clean plasma filter with the vacuum cleaner. 5. Insert the plasma filters at the shade and then put in air filter.
natural_image
Line drawing of a hand holding a handheld device (no text or symbols)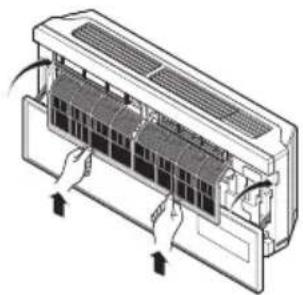
natural_image
Diagram of a car air conditioner unit with cooling fans and airflow arrows (no text or labels)Artcool Mirror Type
Grille, Case, and Remote Control
☐ Turn the system off before cleaning.
To clean, wipe with a soft, dry cloth. Do not use bleach or abrasives.
NOTICE
Supply power must be disconnected before cleaning the indoor unit.
AIR FILTERS
The air filters behind the front grille should be checked and cleaned once in every 2 weeks or more often if necessary.
- Open the front panel as shown.
- Then pull the filter tab slightly forward to remove the air filter.
- Clean the filter with a vacuum cleaner or warm, soapy water.
- If dirt is conspicuous, wash with a solution of detergent in lukewarm water.
-
If hot water (40°C or more) is used, it may be deformed.
-
After washing with water, dry well in the shade.
-
Re-install the air filter.
PLASMA FILTER
The PLASMA filter behind the air filters should be checked and cleaned once in every 3 months or more often if necessary.
- After removing the air filters, pull slightly forward to remove the PLASMA filter.
- Remove dust with vacuum cleaner or air. (You should not try to wash with water).
- Note the cuts of electric discharge lines.
- Re-install the PLASMA filter to the original position.
□ Never use any of the followings:
• Water hotter than 40^ C
Could cause deformation and/or discoloration.
- Volatile substances
Could damage the surfaces of the air conditioner.


Don't touch this PLASMA Filter within 10 seconds after opening the inlet grille, it may cause an electric shock.

When the air conditioner is not going to be used for a long time.
When air conditioner is not going to be used for a long time.
1 Operate the air conditioner on Air circulation mode (Refer to page 21) for 2 to 3 hours.
• This will dry out the internal mechanisms.
2 Turn off the circuit breaker, and disconnect the power cable.

CAUTION: Turn off the circuit breaker when the air conditioner is not going to be used for a long time.
Dirt may collect and may cause a fire.
3 Remove the batteries from the Remote Controller.
When the air conditioner is to be used again.
1 Clean the air filter and install it in the indoor unit. (Refer to page 23\~27 for cleaning filters.)
2 Check that the air inlet and outlet of the indoor/outdoor unit are not blocked.
Operation Tips
Do not overcool the room.
This is not good for the health and wastes electricity.
Make sure that the doors and windows are shut tight.
Avoid opening doors and windows if possible to keep the cool air in the room.
Keep blinds or curtains closed.
Do not let direct sunshine enter the room when the air conditioner is in operation.
Clean the air filter regularly.
Blockages in the air filter reduce the airflow and lower cooling and dehumidifying effects. Clean at least once every two weeks.
Keep the room temperature uniform.
Adjust the vertical and horizontal airflow direction to ensure a uniform temperature in the room.
Ventilate the room occasionally.
Since windows are kept closed, it is a good idea to open them and ventilate the room now and then.
Troubleshooting
Check the following points before requesting repairs or service.... If the fault persists, please contact your dealer or service center.
| Case Explanation See page | ||
| The air conditioner does not operate. | ·Check room temperature setting? | 11,14 |
| ·Check if circuit breaker is on? | - | |
| The room has a peculiar odor. | ·Check that this is not a damp smell exuded by the walls, carpet, furniture, or cloth items in the room. | - |
| It seems that condensation is leaking from the air conditioner. | ·Check the drain hose is connected tight or if indoor unit is installed even. | - |
| Air conditioner does not operate for about 3 minutes after turning on. | ·This is the protector of the mechanism.·Wait about 3 minutes and operation will begin.·About 3 minutes delay is applied to protect compressor from frequently on/off. | - |
| Does not cool or heat effectively. | ·Is the air filter dirty? See air filter cleaning instructions. | 22~26 |
| ·Has the temperature been set correctly? | 11,14 | |
| ·Are the indoor unit's air inlet or outlet vents obstructed? | - | |
| The air conditioner operation is noisy. | ·For a noise that sounds like water flowing.-This is the sound of refrigerant flowing inside the air conditioner unit.·For a noise that sounds like the compressed air releasing into atmosphere.-This is the sound of the dehumidifying water being processed inside the air conditioning unit. | - |
| Remote Controller display is faint, or no display at all. | ·Are the batteries depleted?·Are the batteries inserted in the opposite (+) and (-) directions? | 7 |
| Crack sound is heard. | ·This sound is generated by the expansion/constriction of the front panel, etc. due to changes of temperature. | - |
flowchart
graph TD
    A["Handheld device"] --> B["Inserted device"]
    B --> C["Mobile phone with screen and keypad"]
    C --> D["Add device"]
    D --> E["Mobile phone with display and keypad"]
natural_image
Diagram showing four different types of air conditioner devices with connected cables, no text or symbols present.natural_image
Illustration of a rectangular electronic device with a label pointing to its side panel (no text or symbols present)natural_image
Isometric line drawing of a rectangular electronic component with a grid-like top surface (no text or symbols)
natural_image
Illustration of a rectangular air conditioner unit with ventilation grilles and a curved arrow indicating rotation (no text or symbols)natural_image
Illustration of a computer monitor with arrows indicating data flow (no text or symbols)AVVISO
natural_image
Illustration of a refrigerated air conditioner with airflow arrows indicating cooling or ventilation (no text or symbols)natural_image
Illustration of hands installing or adjusting a wall-mounted air conditioner panel (no text or symbols visible)FILTRO PLASMA, TRIPLO FILTRO DEODORANTE (OPZIONALE)
natural_image
Illustration of a car air conditioner unit with hands installing or adjusting the panel (no text or symbols visible)natural_image
Diagram of a hand holding a flexible solar panel with a water tap, no text or symbols present
natural_image
Line drawing of a hand holding a mechanical device (no text or symbols)
natural_image
Diagram of a car air conditioner unit with hands installing or adjusting the panel (no text or labels visible)Tipo Art Cool Mirror
natural_image
Isometric illustration of a wall-mounted air conditioner unit with cooling fins and heat sinks (no text or symbols)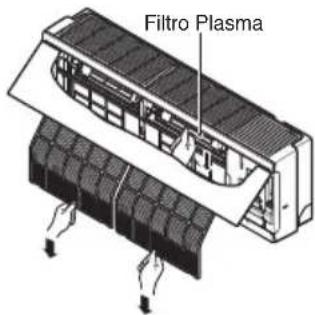

flowchart
graph TD
    A["Hand holding device"] --> B["Step 1: Display screen"]
    B --> C["Step 2: Display screen with keypad"]
    C --> D["Step 3: Display screen with keypad and display screen"]
natural_image
Illustration of four different types of air conditioner units with connected devices, showing front, back, side, and rear views (no text or symbols present)Receptor de señal
natural_image
Illustration of a rectangular electronic device with a label pointing to its side panel (no text or symbols present)natural_image
Isometric line drawing of a rectangular electronic component with a textured top surface and mounting holes (no text or symbols)
natural_image
Hand pressing a button on an oval button with a small circle above (no text or symbols)AVISO
natural_image
Hand pressing a button on an oval object with a circular icon above (no text or symbols)natural_image
Hand pressing a button on an oval object with a small circle above (no text or symbols)natural_image
Illustration of a rectangular air conditioner unit with ventilation grilles and a curved arrow indicating rotation (no text or symbols)natural_image
Illustration of a refrigerated air conditioner with airflow arrows indicating direction (no text or symbols)natural_image
Illustration of a computer monitor with curved arrows indicating data flow or sync (no text or symbols)natural_image
Illustration of hands installing or adjusting a wall-mounted air conditioner unit (no text or symbols visible)natural_image
Illustration of a hand installing or adjusting a wall-mounted air conditioner unit (no text or symbols visible)natural_image
Illustration of a hand using a tool to clean or wash a surface, with a faucet and water pipe visible (no text or symbols)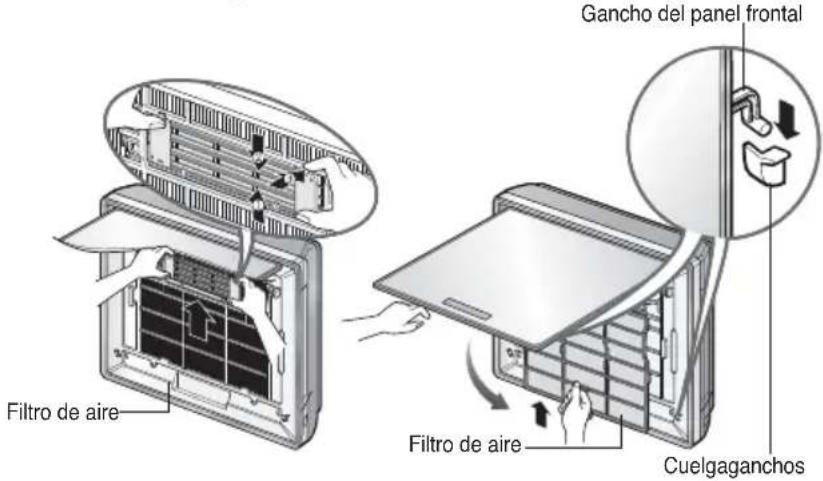
natural_image
Diagram of a solar panel installation with a water tap and pipe (no text or labels)
natural_image
Line drawing of hands holding a mechanical device (no text or symbols)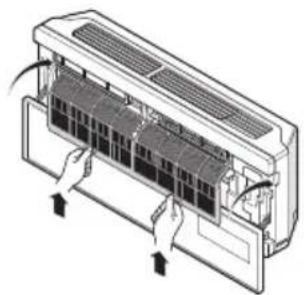
natural_image
Diagram of an air conditioner unit with cooling fins and ventilation slots (no text or labels)Tipo Artcool Mirror
natural_image
Isometric line drawing of a solar panel installation with cooling fins and mounting base (no text or symbols)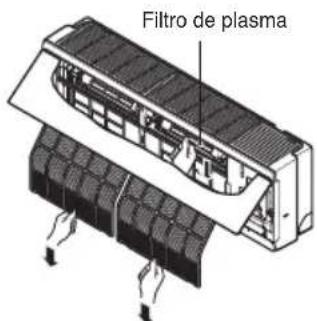

JUAN MANUEL LLORCA SOLIS
C/. VILLA MARIA, 119 04008 CRUZ DE CARAVACA ALMERIA TEL. 950 27 39 57
Tel.071/221732 Fax.071/221732
Tel.072/328449 Fax.072/328449
- CODELPOR,S A
Estrada Nacional,118 - Km 38
Zona Industrial de Vale Tripeiro,Lote 5
2130 Benavente
Tel.063/519120 Fax.063/519125
- J.B.Frio,Lda.
natural_image
Simple line drawing of people enjoying a meal at a table with sun and palm trees in the background (no text or symbols)Mesures de sécurité
REMARQUE
Récepteur de signal
natural_image
Isometric line drawing of a rectangular electronic component with a mesh top (no text or symbols)
natural_image
Hand pressing a button on an oval object with a numbered circle above (no text or symbols)natural_image
Illustration of a rectangular air conditioner unit with ventilation grilles and a curved arrow indicating rotation (no text or symbols)natural_image
Illustration of a computer monitor with curved arrows indicating data flow or rotation (no text or symbols)natural_image
Illustration of hands installing or adjusting a wall-mounted air conditioner panel (no text or symbols visible)FILTRE PLASMA, FILTRE DÉODORANT TRIPLE (OPTIONNEL)
natural_image
Illustration of a car air conditioner unit being adjusted for airflow (no text or symbols)natural_image
Illustration of a hand using a tool to clean or install a battery on a surface (no text or symbols)
natural_image
Illustration of a hand using a tool to clean or repair a solar panel on a surface (no text or symbols)natural_image
Line drawing of a hand holding a mechanical component (no text or symbols)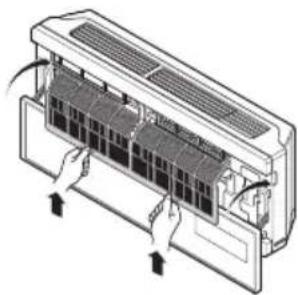
natural_image
Diagram of an air conditioner unit with cooling fins and heat exchangers (no text or labels)Type Artcool Mirror
natural_image
Technical illustration of a wall-mounted air conditioner unit with cooling fins and heat sinks (no text or symbols)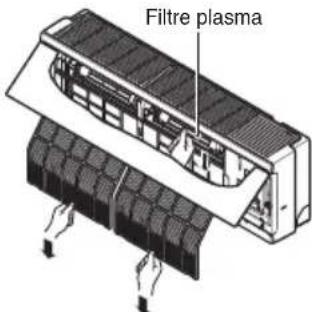

LESEN SIE DIESES HANDBUCH
natural_image
Simple line drawing of people enjoying a meal at a table with drinks and snacks (no text or symbols)Sicherheitshinweise
flowchart
graph TD
    A["Hand holding cable"] --> B["Device with cable"]
    B --> C["Device with battery"]
    C --> D["Device with display unit"]
Signalempfänger
natural_image
Isometric line drawing of a rectangular electronic component with a grid-like top and side slots (no text or symbols)
natural_image
Hand pressing a button on an oval button with a small circle above (no text or symbols)natural_image
Hand pressing a button on an oval object with a numbered circle above (no text or symbols)natural_image
Hand pressing a button on an oval object with a circular icon above (no text or symbols)natural_image
Illustration of a rectangular air conditioner unit with ventilation grilles and a curved arrow indicating rotation (no text or symbols)natural_image
Illustration of a computer monitor with curved arrows indicating data flow or rotation (no text or symbols)natural_image
Diagram of a refrigerated air conditioner with airflow arrows indicating direction (no text or symbols)natural_image
Illustration of hands installing or adjusting a wall-mounted air conditioner unit (no text or symbols visible)PLASMA-FILTER, DREIFACH-DESODORIERENDER FILTER (OPTIONAL
natural_image
Illustration of hands installing or adjusting a panel on an air conditioner cover (no text or symbols visible)LUFTFILTER
natural_image
Line drawing of a hand using a tool to lift a component on a surface (no text or symbols)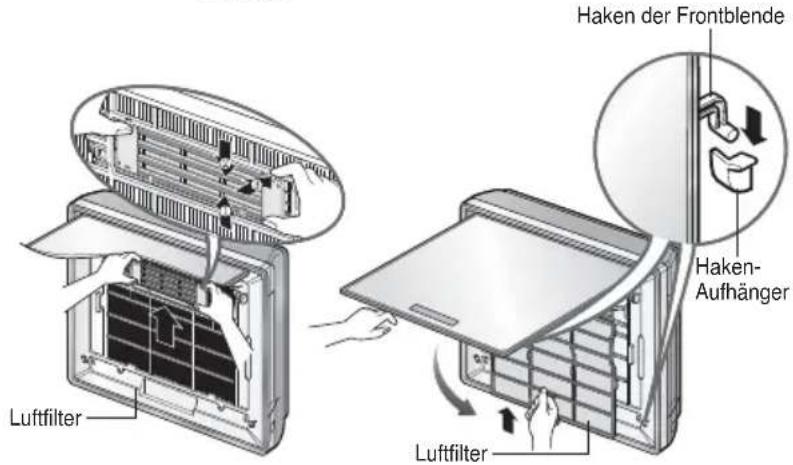
natural_image
Illustration of a hand using a tool to interact with a solar panel on a surface (no text or symbols)
natural_image
Line drawing of a hand holding a small object, possibly a tool or device, with no visible text or symbols.
natural_image
Diagram of an air conditioner unit with cooling fins and heat exchangers (no text or labels)natural_image
Technical line drawing of a wall-mounted air conditioner unit with cooling fins and ventilation slots (no text or symbols)