KM0240FHDS5 - TV Krüger&Matz - Free user manual and instructions
Find the device manual for free KM0240FHDS5 Krüger&Matz in PDF.
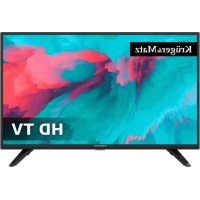
| Product type | LED TV |
| Brand | Krüger&Matz |
| Model | KM0240FHDS5 |
| Screen size | 24 inches (60 cm) |
| Screen resolution | 1366 x 768 pixels (HD Ready) |
| Digital tuner | DVB-T/T2/C, DVB-S/S2 |
| Input connectors | 1 x HDMI, 1 x USB, 1 x CI+, 1 x RJ-45, 1 x Composite AV, 1 x RF antenna, 1 x Satellite |
| Output connectors | 1 x Optical SPDIF, 1 x LINE OUT (audio) |
| Network connectivity | Built-in Wi-Fi (2.4 GHz), Ethernet RJ-45 |
| Power supply | 220-240 V ~ 50/60 Hz |
| Functions | Teletext, EPG, PVR (USB recording), Sleep timer, Child lock |
| Default lock code | 1234 (reset: 0423) |
| Remote control | With color buttons, dedicated Netflix, YouTube keys |
| Wall mount | VESA compatible (size not specified) |
| Maintenance | Use a soft, damp cloth |
| Safety | Do not expose to moisture, do not block ventilation |
| Manufacturer | Lechpol Electronics Sp. z o.o., made in China |
Frequently Asked Questions - KM0240FHDS5 Krüger&Matz
User questions about KM0240FHDS5 Krüger&Matz
0 question about this device. Answer the ones you know or ask your own.
Ask a new question about this device
Download the instructions for your TV in PDF format for free! Find your manual KM0240FHDS5 - Krüger&Matz and take your electronic device back in hand. On this page are published all the documents necessary for the use of your device. KM0240FHDS5 by Krüger&Matz.
USER MANUAL KM0240FHDS5 Krüger&Matz
natural_image
Illustration of a computer monitor with lightning bolts and a hand holding a device, no text or symbols present.Warnung

natural_image
Simple line drawing of a computer monitor with a fan-shaped frame and smoke rising (no text or symbols)Achtung

natural_image
Simple line drawing of a monitor with a cross symbol crossed out, next to a hanging curtain (no text or symbols)Warnung

natural_image
Simple line drawing of a flat-screen monitor with a black X mark on the stand (no text or symbols)Achtung

natural_image
Simple line drawing of a monitor with a crossed X symbol and a flower above it, no text or symbols present.Warnung

natural_image
Cartoon illustration of a person on a computer screen with a crossed-out X symbol (no text or symbols present)Achtung

natural_image
Simple line drawing of a geometric shape with intersecting lines and a rectangular frame (no text or symbols)Achtung

natural_image
Illustration of a person reacting to a computer screen with a magnifying glass, no text or symbols presentAchtung

natural_image
Technical line drawing of a flat-panel electronic device with mounting brackets and a central component (no text or symbols)
Schritt 1
natural_image
Technical line drawing of a flat-screen monitor or display unit with mounting brackets and connectors (no text or symbols)
Schritt 2
natural_image
Simple line drawing of a toggle switch with power button (no text or symbols)DE
The symbol indicates that dangerous voltages constituting a risk of electric shock are present within this unit.

The symbol indicates that there are important operating and maintenance instructions in the literaturaccompanying this unit.
IMPORTANT SAFETY INSTRUCTION
1) Read these instructions.
2) Keep these instructions.
3) Heed all warnings.
4) Follow all instructions.
5) Do not use this apparatus near water.
6) Clean only with dry cloth.
7) Do not block any ventilation openings, install in accordance with the instructions.
8) Do not install near any heat sources such as radiations, heat registers, stoves, or other apparatus (including amplifiers) that produce heat.
9) Do not defeat the safety purpose of the polarized plug. If the provided plug does not fit into your outlet, consult an electrician for replacement of the obsolete outlet.
10) Protected the power cord from being walked on or pinched particularly at plugs, convenience receptacles, and the point where they exit from the apparatus.
11) Only use attachments/accessories specified by the manufacturer. 12) Unplug this apparatus during lighting storms or when unused for long periods of time.
13) Refer all servicing to qualified service personnel. Servicing is required when the apparatus has been damaged in anyway, such as power-supply cord or plug is damaged, liquid has been spilled or objects have fallen into the apparatus, the apparatus has been exposed to rain or moisture, does not operate normally, or has been dropped.
14) Mains plug is used as the disconnect device, the disconnect device shall remain readily operable.
15) The ventilation should not be impeded by covering the ventilation openings with items, such as newspapers, table-cloth, curtains, etc.
16) No naked flame sources, such as lighted candles, should be placed on the apparatus.
17) Attention should be drawn to the environmental aspects of battery disposal.
18) The use of apparatus in moderate climate.
19) The apparatus shall not be exposed to dripping or splashing and that no objects filled with liquids, such as vases, shall be placed on the apparatus.
natural_image
Illustration of a computer monitor with lightning bolts and a hand holding a device, no text or symbols present.Warning

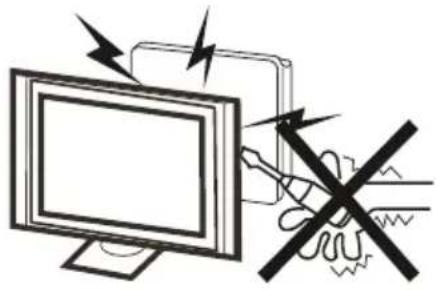
High voltages are used in the operation of this television receiver. Do not remove the cabinet back from your set. Refer servicing to qualified service personnel.

natural_image
Simple line drawing of a computer monitor with a stand and curved frame (no text or symbols)Caution

Do not block the ventilation holes in the back cover. Adequate ventilation is essential to prevent failure of electrical components.
natural_image
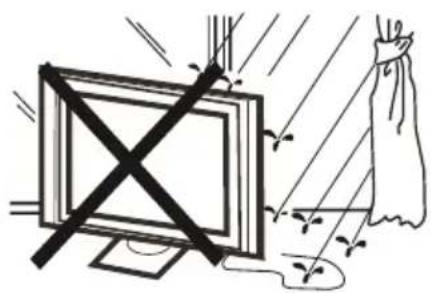
Illustration of a TV with a black X symbol crossed out, next to a rope tied to a cloth (no text or symbols present)Warning

To prevent fire or electrical shock hazard, do not expose the television receiver to rain or moisture.

natural_image
Simple line drawing of a flat-screen monitor with a black X mark on top (no text or symbols)Caution

Do not trap the power supply cord under the television receiver.
Z
natural_image
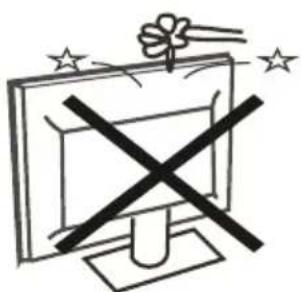
Simple line drawing of a computer monitor with a crossed X symbol and a flower on top (no text or symbols)Warning

Do not drop or push objects into the television cabinet slots or openings. Never spill any kind of liquid on the television receiver.
natural_image
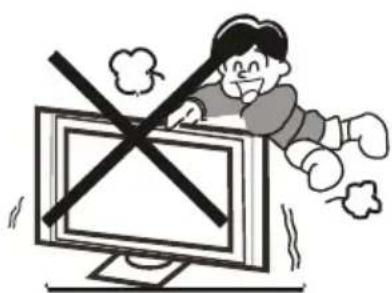
Cartoon illustration of a person running away from a computer screen with a crossed-out X symbol (no text or symbols present)Caution

Never stand on, lean on, or suddenly push the television or its stand. You should pay special attention to children. Serious injury may result if it should fall.
natural_image
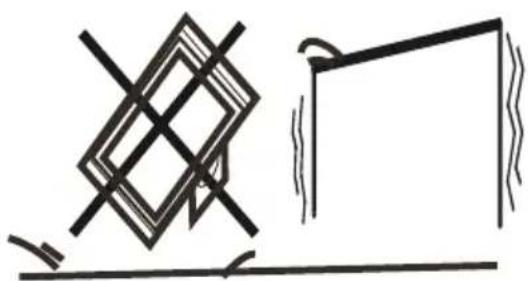
Simple line drawing of a geometric shape with intersecting lines and a partial rectangle, no text or symbols present.Caution

Do not place your television on an unstable cart, stand, shelf or table. Serious injury to an individual, and damage to the television, may result if it should fall.
natural_image
Illustration of a person reacting to a computer screen with a magnifying glass (no text or symbols present)Caution

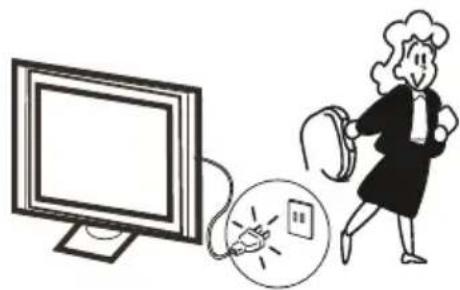
When the television receiver is not used for an extended period of time, it is advisable to disconnect the AC power cord from the AC outlet.
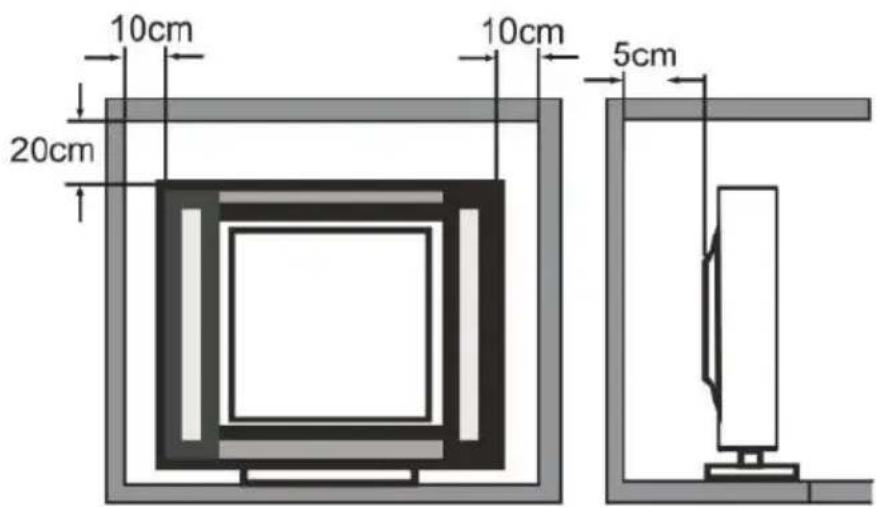
INSTALLATION
- Locate the TV in the room where light does not strike the screen directly.
- Total darkness or a reflection on the picture screen can cause eyestrain. Soft and indirect lighting is recommended for comfortable viewing.
- Allow enough space between the TV and the wall to permit ventilation.
- Avoid excessively warm locations to prevent possible damage to the cabinet or premature component failure.
- Do not cover the ventilation openings when using the TV.
Minimum distances
text_image
10cm 20cm 10cm 5cmBase stand assembly instruction
When you install the base, the need to face down flat on the TV platform. Before installing (or removing) the stand, unplug the AC power cord from the AC outlet before performing the operation, laying cushion in place the TV will be placed to prevent damage to the TV.
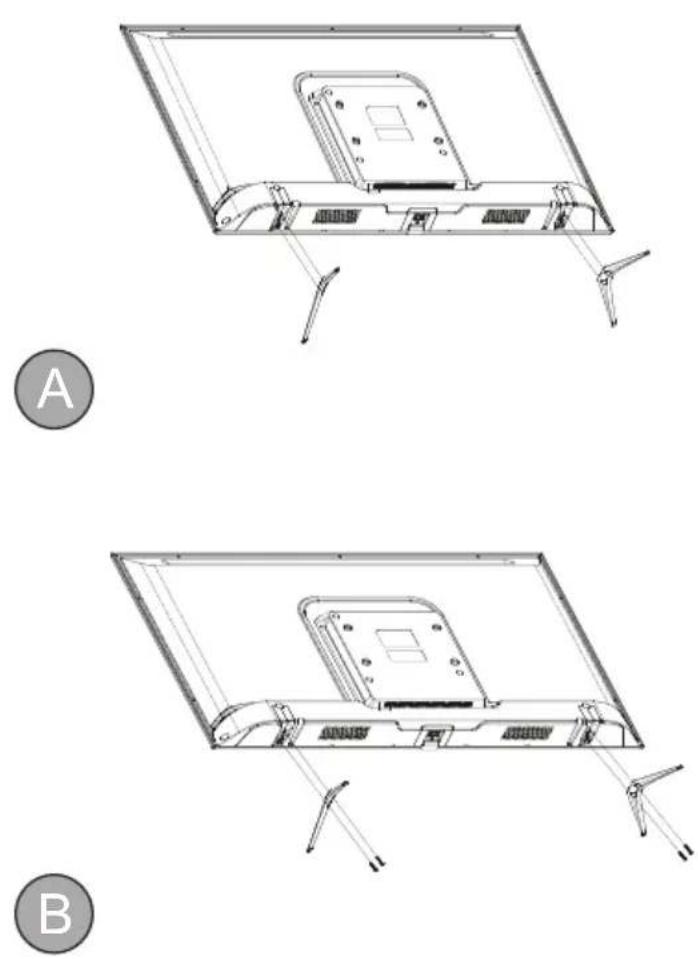
Step 1
Locate the 2 of bottom bracket into the gap in the bottom of the TV, and check that it is securely held in place as in illustration A) below.
Step 2
Lock the 2 screws in the designated location as in illustration B) below. Check each screw is firmly tightened.
Warning:
Be sure to follow the instructions for installation, if the base is not installed correctly, it may result in the TV falling over. To remove the stand, perform the steps in reverse order, the base can not adjust the angle. During the installation process, be careful to avoid damage to the TV and your hand caught and ground to the bottom of the TV.
Mounting on a wall
IMPORTANT This operation requires two people!
To ensure a safe installation, comply with the following safety instructions:
- Disconnect from power supply before mounting.
- Check that the wall can support the weight of the TV set and wall mount assembly.
- Follow the mounting instructions provided with the wall mount.
- The TV set must be installed on a vertical wall.
- Make sure to use only screws suitable for the material of the wall.
- Make sure that the TV set cables are placed in such a way that there is no danger of tripping over them.
- Mounting the TV set on the wall should be performed only by professionals.
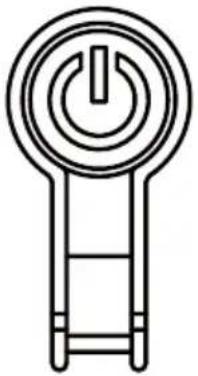
BUTTON ON THE TV SET
Note: The location, names and availability of the buttons may vary according to the TV model. Please refer to the actual product.
natural_image
Simple line drawing of a toggle switch with a power button (no text or symbols)- Press the button to turn on the TV.
- When the TV is on, press it to bring up the Menu.
- While in the Menu, press the button to select the option. Press and hold the button to confirm the option.
SOCKETS
Note: The location, names and availability of the sockets may vary according to the TV model.
| Socket Function | |
| RF input:1x analogue DVB-T/T2/C1x DVB-S/S2 | Connect with ground-based or satellite television with an antenna cable. Connect plug of an antenna cable to the ANTENNA INPUT. Connect the plug of a satellite antenna cable to the SATELLITE input. |
| LINE OUT output Connect compatible audio receiver to the TV set. | |
| CI+ slot Technology that allows you to insert a CI module that allows your TV set to receive scrambled TV channels. | |
| HDMI input Transmits video and audio data from external device such as DVD or Blu-Ray player, video game console or PC (with compatible video card) to your TV set with a HDMI cable. | |
| USB input | Connect USB storage device. |
| AV composite input Designed to | transmit video and audio data from external devices such as PVR, camera, DVD player, video game console to the TV set with RCA cable. |
| SPDIF (Optical) output Transmits | audio data from the TV set to external devices such as amplifier or speaker set with optical cable. |
| RJ-45 | Connect the TV set to the Internet with LAN cable. |
CONNECTING TO THE INTERNET
The TV set can be connected to the network in two ways:
• Wired, using the RJ-45 port.
- Wireless, using Wi-Fi network.
Connecting to a wired network
- Ensure you have:
• LAN cable long enough to reach your TV set.
- Router or modem with available RJ-45 port;
• High-speed internet connection.
- Connect LAN cable to the router and to the RJ-45 port.
- Enter Network Settings to configure the Internet connection.
- The TV set should have connected to the selected wired network.
Connecting to a wireless network
Z
- Ensure you have:
• High-speed internet connection. - Enter Network settings to configure the Internet connection.
- The TV set should have connected to the selected wireless network.
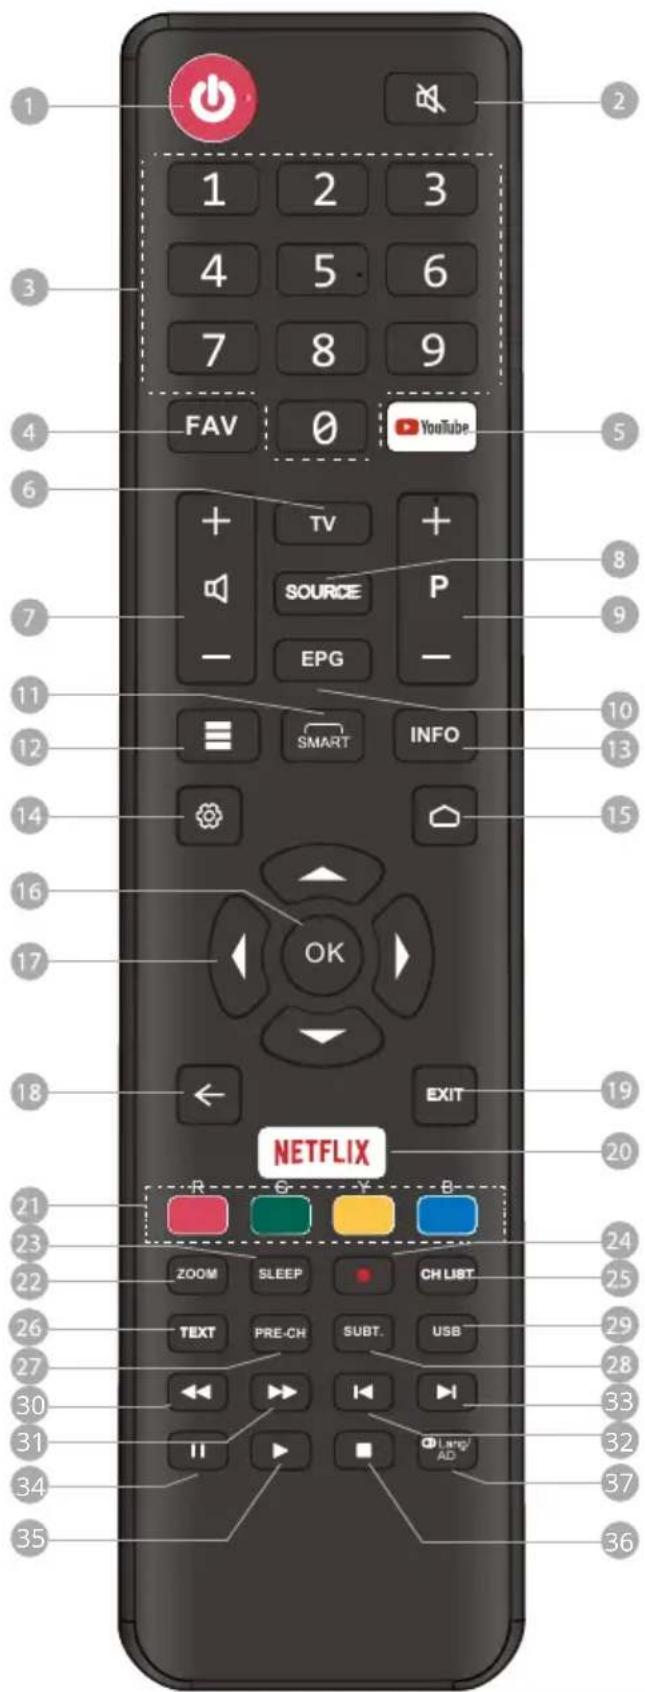
REMOTE CONTROL
Most of your television's functions are available via the menus that appear on the screen. The remote control supplied with your set can be used to navigate through the menus and to configure all the general settings.
Note! The location, names and availability of the buttons on the remote control may v according to the TV model. Some buttons may not be available on your remote contro
text_image
1 2 3 4 5 6 7 8 9 FAV 0 YouTube. + TV + SOURCE P - EPG - 11 SMART INFO 12 13 14 15 16 OK 17 EXIT 18 NETFLIX 20 21 R G Y B- 23 ZOOM SLEEP CH LIST 22 TEXT PRE-CH SUBT. USB 26 27 30 31 32 34 35 36-
Switch the TV between on and standby mode
-
:*Switch the sound off/on
-
Number key
-
FAV: Display favorite channel list
-
YouTube: Enter YouTube main page
-
TV: Enter TV mode
-
VOL +/- : Increase/decrease volume
-
SOURCE: Display and select input source
-
CH +/- : Next/previous channel
-
EPG: Enter Electronic Program Guide in TV mode
-
SMART functions
-
≡ Display Option menu
-
Display program information (if available)
-
Enter main menu
-
Open homepage of Smart TV portal
-
OK: Confirm an entry or selection
-
Use to navigate the menu and adjust options
-
➤Return to the previous menu
-
EXIT: Exit the menu
-
NETFLIX: Enter Netflix main page
-
Color buttons: Additional function
-
ZOOM: Select screen mode
-
SLEEP: Select sleep timer options
-
● : PVR function
-
CH LIST : Display channel list
-
TEXT: Display Teletext
-
PRE-CH : Return to the previous channel
-
SUBTITLE: Display subtitle menu
-
USB: Enter Multimedia menu
-
←: Search backward
-
▶: Search forward
-
Previous
-
▶Next
-
Pause
-
▶ : Play
36.: Stop
- ☉ Lang: Select audio language

BASIC OPERATION
- Connect the device to power supply socket.
- Connect the antenna cable into the appropriate RF input.
Switch the TV on and off
- When the TV is connected to power supply, it will be turned on directly or be in standby mode (red LED is on). If the TV is in standby mode, press the Power button to turn it on.
- To put the TV set into standby mode, press the Power button on the TV set or remote control. The TV set remains on, but with low energy consumption. To switch off the TV set, unplug it from power supply.
Note: For some models, press Power button to switch off the TV set.
INITIAL SETUP
The first time you switch the TV set on, the Welcome screen appears, which guides you through the initial setup process. Follow the on-screen instructions to finish the initial setup process such as selecting the language, connecting to the network, scanning channels and more. During each step, either make a choice or skip the step. If you skip a step, you can perform the setup later from the settings menu.
LOCK CODE
To enable lock function, input default code 1234. Default code should be changed in the lock menu. If you forget existing code, input code 0423 to access the lock menu.
LEARN MORE
For more information on this device visit: www.krugermatz.com.
Visit www.krugermatz.com website for more products and accessories.
In case of any doubts or questions reach out to our Frequently Asked Questions section.
Dear Customer,
Hereby, Lechpol Electronics Sp. z o.o. Sp.k. declares that this device is in compliance with Directive 2014/53/EU. The full text of the EU declaration of conformity is available at the following internet address: www.lechpol.eu.
Radio Information
• 2.4G Wi-Fi transmitter frequency range: 2412 - 2472MHz
• 2.4G Wi-Fi transmitter power: 16dBm (+/- 4dB)
• DVB-T/T2/C tuner frequency range: 45 - 858MHz
• DVB-S/S2 tuner frequency range: 950 - 2150MHz

Do not touch or be close to the ANT IN, SATELLITE IN, LAN port, AV IN, AV OUT, HDMI input, USB 2.0 port and prevent electrostatic discharge to disturb these terminals when in USB and LAN mode; otherwise it will cause the TV to stop working or abnormal status.
English
Correct Disposal of This Product (Waste Electrical & Electronic Equipment)


(Applicable in the European Union and other European countries with separate collection systems) This marking shown on the product or its literature, indicates that It should not be disposed with other household wastes at the end of its working life. To prevent possible harm to the environment or human health from uncontrolled waste disposal, please separate this from other types of wastes and recycle it responsibly to promote the sustainable reuse of material resources. Household users should contact either the retailer where they purchased this product, or their local government office, for details of where and how they can take this item for environmentally safe recycling. Business users should contact their supplier and check the terms and conditions of the purchase contract This product should not be mixed with other commercial wastes for disposal.
Made in China for LECHPOL ELECTRONICS Sp. z o.o. Sp.k., ul. Garwolińska 1, 08-400 Miętne.

text_image
CAUTION RISK OF ELECTRIC SHOCK DO NOT OPEN
ATENCIÓN
PARA EVITAR EL RIESGO DE SUFRIR UNA DESCARGA ELÉCTRICA, NO DEBE RETIRARSE LA CARCASA DEL TELEVISOR. LOS TRABAJOS DE SERVICIO TÉCNICO DEBERÁN SER REALIZADOS EXCLUSIVAMENTE POR PERSONAL CUALIFICADO.

natural_image
Illustration of a computer monitor with lightning bolts and a hand holding a device, no text or symbols presentAtención

natural_image
Simple line drawing of a computer monitor with steam rising from its side (no text or symbols)Atención

natural_image
Illustration of a TV with a cross symbol crossed out, next to a cloth hanging from a rope (no text or symbols)Atención

natural_image
Simple line drawing of a flat-screen monitor with a black X mark on top (no text or symbols)Atención

natural_image
Simple line drawing of a computer monitor with a black X symbol and a flower on top (no text or symbols)Atención

natural_image
Cartoon illustration of a person lying on a computer monitor with a crossed-out X symbol (no text or symbols present)Atención

natural_image
Simple line drawing of a geometric shape with intersecting lines and a partial rectangle, no text or symbols present.Atención

natural_image
Illustration of a person reacting to a computer screen with a magnifying glass (no text or symbols present)Atención

natural_image
Simple line drawing of a ladder with a power button symbol on top (no text or labels)S
natural_image
Illustration of a computer monitor with lightning bolts and a crossed-out hand symbol (no text or labels)Attention

natural_image
Simple line drawing of a computer monitor with a stand and smokestack (no text or symbols)Attention

natural_image
Illustration of a TV with a 'X' symbol crossed out by a rope, next to a cloth hanging from a rope (no text or symbols)Attention

natural_image
Simple line drawing of a flat-screen monitor with a black X mark on the stand (no text or symbols)Attention

natural_image
Simple line drawing of a monitor with a crossed X symbol and a flower on top, surrounded by stars (no text or symbols)Attention

natural_image
Cartoon illustration of a person lying on a computer monitor with a crossed-out black X symbol (no text or symbols present)Attention

natural_image
Simple line drawing of a geometric shape with intersecting lines and a partial rectangle, no text or symbols present.Attention

natural_image
Illustration of a person running away from a computer screen connected to a cable with a fuse, next to a small electrical socket (no text or symbols present)Attention

natural_image
Technical line drawing of a laptop chassis with front panel and side connectors (no text or symbols)Etape 1
natural_image
Technical line drawing of a flat-screen monitor with internal components and mounting brackets (no text or symbols)Etape 2
natural_image
Simple line drawing of a ladder with a power button symbol on top (no text or labels)FR
natural_image
Simple line drawing of a geometric shape with intersecting lines and a partial rectangle, no text or symbols present.Let op
natural_image
Illustration of a person running away from a computer screen connected to a cable with a plug, next to a small electronic device (no text or symbols present)Let op
natural_image
Technical line drawing of a flat-screen computer monitor with visible internal components and mounting brackets (no text or symbols)Stap 1
natural_image
Technical line drawing of a flat-screen monitor with internal components and mounting brackets (no text or symbols)Stap 2
natural_image
Simple line drawing of a ladder with a power button symbol on top (no text or labels)Z
natural_image
Technical line drawing of a laptop chassis with front panel and side connectors (no text or symbols)Krok 1
natural_image
Technical line drawing of a flat-screen monitor with internal components and mounting brackets (no text or symbols)Krok 2
natural_image
Simple line drawing of a toggle switch with power button (no text or symbols)natural_image
Illustration of a computer monitor with lightning bolts and a hand holding a device, no text or symbols presentAvertisement

natural_image
Simple line drawing of a computer monitor with a base and top, emitting steam (no text or symbols)Atentie

natural_image
Illustration of a TV screen with a 'X' symbol crossed out, next to a cloth hanging from its side (no text or symbols present)Avertisement

natural_image
Simple line drawing of a flat-screen monitor with a black X mark on the stand (no text or symbols)Atentie

natural_image
Simple line drawing of a monitor with a crossed X symbol and a flower on top, surrounded by stars (no text or symbols)Avertisement

natural_image
Cartoon illustration of a person lying on a computer monitor with a crossed-out black X symbol (no text or symbols present)Atentie

natural_image
Technical line drawing of a flat-screen monitor or display unit with internal components and mounting brackets (no text or symbols)Etapa 1
natural_image
Technical line drawing of a flat-screen monitor or display unit with mounting brackets and connectors (no text or symbols)Etapa 2
natural_image
Simple line drawing of a ladder with a power button symbol on top (no text or labels)natural_image
Completely dark image with no visible content, text, or symbols.
text_image
QR code image containing encoded data, no visible human-readable textwww.krugermatz.com
Krüger&Matz is a registered trademark