
KM0196 - Television Krüger&Matz - Free user manual and instructions
Find the device manual for free KM0196 Krüger&Matz in PDF.


| Product Type | Portable DVB-T TV |
| Brand | Krüger&Matz |
| Model | KM0196 |
| Dimensions (W x H x D) | 255 x 165 x 27 mm |
| Weight | 0.65 kg |
| Power Supply | 9 V DC, 1.5 A |
| Display Resolution Support | 576P, 720P, 1080i |
| Tuner Frequency Range | 170-230 MHz (VHF), 470-866 MHz (UHF) |
| Video Decoding | MPEG-4 AVC/H.264, MPEG-2 |
| Audio Decoding | MPEG-1 Layer 1/2/3, AC3 |
| USB Port | USB 2.0, supports up to 500 GB |
| Supported USB File Systems | FAT32, NTFS |
| Supported Multimedia Formats | MP3, JPEG, BMP, AVI |
| Recording Features | Instant recording, scheduled recording, timeshift |
| EPG (Electronic Programme Guide) | 7-day listing, schedule recording/viewing |
| Parental Control | Channel lock with password (default 000000) |
| Audio/Video Output | CVBS, AV out (analogue) |
| Cleaning Instructions | Clean only with dry cloth |
| Safety Precautions | Do not expose to rain or moisture, unplug during storms |
| Environmental Disposal | Separate collection for recycling at end-of-life |
Frequently Asked Questions - KM0196 Krüger&Matz
User questions about KM0196 Krüger&Matz
0 question about this device. Answer the ones you know or ask your own.
Ask a new question about this device
Download the instructions for your Television in PDF format for free! Find your manual KM0196 - Krüger&Matz and take your electronic device back in hand. On this page are published all the documents necessary for the use of your device. KM0196 by Krüger&Matz.
USER MANUAL KM0196 Krüger&Matz
Important Safety Instructions....1
Operation interface....3
First Time Installation.... 5
Troubleshooting....14
Technical Specifications....16
Important Safety Instructions
1) Read these instructions.
2) Keep these instructions.
3) Heed all warnings.
4) Follow all instructions.
5) Do not use this apparatus near water.
6) Clean only with dry cloth.
7) Do not install near any heat sources such as radiators, heat registers, stoves, or other apparatus (including amplifiers) that produce heat.
8) Operate this product only from the type of power source indicated on the label. If you are not sure of the type of power connected to your home, consult your bcal power company. Disconnect the unit from the mains before any maintenance or installation procedure.
9) Protect the mains cord from damage and stress.
10) Only use attachments/accessories specified by the manufacturer.
11) Unplug this apparatus during lightning storms or when unused for long periods of time.
12) Refer all servicing to qualified service personnel. Servicing is required when the apparatus has been damaged in any way, including damage to the mains cord or plug, if the unit has been exposed to liquid or moisture, has been dropped or is not operating correctly.
13) Do not impede the air flow into the unit by blocking the ventilation slots.
14) Attention should be drawn to the environmental aspects of battery disposal.
15) Use the apparatus in moderate climate.
WARNING: To reduce the risk of fire or electric shock, do not expose this apparatus to rain or moisture.
WARNING: The batteries shall not be exposed to excessive heat such as direct sun light, fire, etc.
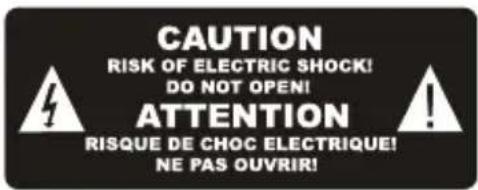

This symbol indicates that dangerous voltages constituting a risk of electric shock are present within this unit.

This symbol indicates that there are important operating and maintenance instructions in the literature accompanying this unit.

This symbol indicates that this product incorporates double insulation between hazardous mains voltage and user accessible parts. When servicing use only identical replacement parts.

This symbol on the product or in the instructions means that your electrical and electronic equipment should be disposed at the end of life separately from your household waste. There are separate collection systems for recycling. For more information, please contact the local authority or your retailer where you purchased the product.
Operation interface
Mainbody operation interface

Connection interface

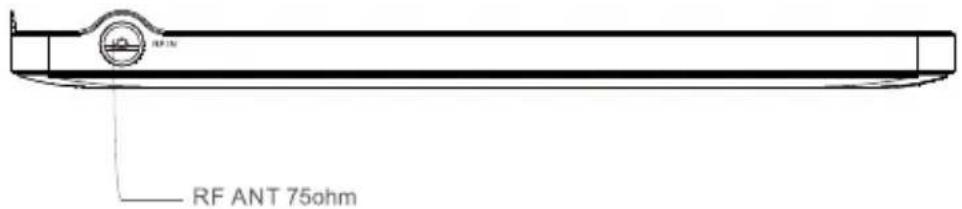
Operation interface
Remote interface

- Mode 15. REC/Zoom/Red
- Number keys 16. Green/Repeat/Timeshift
- Setup 17. Mute
- Channel up 18. Recall/Back
- Volume DOWN 19. Exit
- OK 20. Volume UP
- Page UP (DVB-T mode) 21. Page DOWN (DVB-T mode)
- Channel down 22. FAV
- TV/RATIO 23. EPG
- Info 24. TTX
- AUDIO 25. Fast backward/ Fast forward
- Subtitle 26. Timer/Blue
- LCD Setup / Play/ Pause 27. Goto/Yellow
- Stop
AV input/output and earphone connection
VCD, DVD play/VCR

As per the picture, use the A/V cable to connect the portable TV player to a TV or other devices.
Turn on the portable TV player and the other unit to which connection has been made. Press the mode button on the portable TV player or on the remote control to enter in A/V mode.
Note: The audio output only supports Analogue output. Use the AV cable in the accessory bag, connect the audio/video output on this unit to the corresponding Input on TV or stereo amplifier
First Time Installation
After all connections have been made properly, switch on TV and make sure the unit is connected to the Main Power. Press Power button to switch the unit on.
If you are using the unit for the first time or have restored the unit to factory default, the installation guide menu will appear on your TV screen.

((1) [OSD Language] press RIGHT/LEFT key to select a language.
(2) [Country] press RIGHT/LEFT key to select your country of residence.
(3) [Channel Search] press RIGHT or OK key to begin Automatic channel search.
(4) Once channel tuning is complete, you can start watching TV programs.
Basic Operation
(1). Program Manage Settings
To access the Menu, press the MENU button and select [Program]. using the RIGHT/LEFT keys to navigate through the menu.
The Menu provides options to adjust the Program Manage Settings. Select an option and press OK or RIGHT to adjust that setting. Press the EXIT button to exit the Menu.

(a) Program Edit
To edit your program preferences (lock, skip, favourite, move or delete), you will need to enter the Program Edit Menu. This Menu requires a password to access. Enter the default password '000000'. The master unlock password is '888888'.
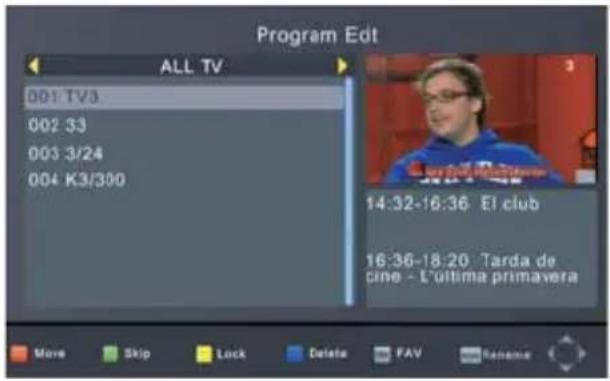
Set Favourite Channels
You can create a short list of favourite programs that you can easily access.
Set Favourite TV or Radio program:
- Select your desired channel then press the FAVOURITE button.
Aheart-shaped symbol will appear and the channel is marked as a favourite.
-
Repeat the previous step to select more Favourite channels.
-
To confirm and exit the Menu, press the EXIT key.
Disable Favourite TV or Radio channel :
Select the Favorite channel and press Favorite button on the remote control to cancel.
View Favourite Channel:
-
While in normal viewing mode, press favourite button and the favourite menu will appear.
-
Press UP/DOWN to browse through your favourite channels.
-
Press OK to select your favourite channel.
Delete a TV or radio program
-
Select the program and then press the BULE button. a warning message will appear, press OK to delete the channel.
-
Repeat the previous step to select more channels to delete.
Skip TV or radio channel
-
Select the channel you would like to skip and press the green button. a skip symbol is displayed the channel is marked as s skip.
-
Repeat the previous step to skip more channels.
-
To save your settings and exie the menu, press exit key.
Disable the skip channel function:
Select the skip channel and press the green button on the remote control to cancel.
Move a TV or Radio Program
-
Select the preferred channel then press the RED button. A move symbol will appear.
-
Press UP/DOWN to move the channel.
-
Press OK to confirm.
-
Repeat the above steps to move more channels.
Lock Program
You can lock selected programs for restricted viewing .
Lock a TV or Radio channel :
- Select the preferred channel then press the YELLOW button. A lock-shaped symbol is displayed. The channel is now marked as locked.
- Repeat the previous step to select more channels.
- To confirm your settings and exit the menu, press the EXIT button.
- Press the YELLOW button to disable the locked channels function.
- To view the locked channels, you will be required to enter either the default password '000000' or your last set password. The master unlock password is '888888'.
b) EPG (Electronic Programming Guide)
This feature shows the TV program listings for each channel for the following 7 days. By default, when the EPG is opened, the current channel's listings are shown. To view listings for other channels, press the LEFT and RIGHT arrow keys. The display shows the buttons to press to go forward or backward in the programs listing.

Note: Please see section (d) "Scheduling" to learn how to schedule program recordings and channel preview.
Preview Channel:
To set the receiver to change to a channel at a specific time (e.g. at the start of your favourite program) while you are watching another channel, please follow these steps:
- Press EPG to open the full listings.
- Select the TV channel using the LEFT / RIGHT arrow keys.
- Select the TV program you want to watch later.
- Press OK. On the window that pops up, you are able to modify the channel, date and time, as well as optionally selecting to repeat this action on a regular basis.
- Select "View" "Record" in the "Mode" option.
-Press EXIT
A few seconds before changing channels, a warning message with a count-down is displayed on screen, which will change to the programmed channel when the count-down ends.
(c) Sort
Sort your channels from the following options:
[By LCN] - Sort the channels in ascending order.
[By Service Name] - Sort the channels in alphabetical order.
[By Service ID] - Sort the channels according to the station.
[By ONID] - Sort the channels according to ONID.
To access the Menu, press MENU then select [Picture] using the RIGHT/LEFT key. The Menu provides options to adjust the video settings. Press UP/DOWN to select an option and press RIGHT/LEFT to adjust that setting. Press EXIT to exit the menu.
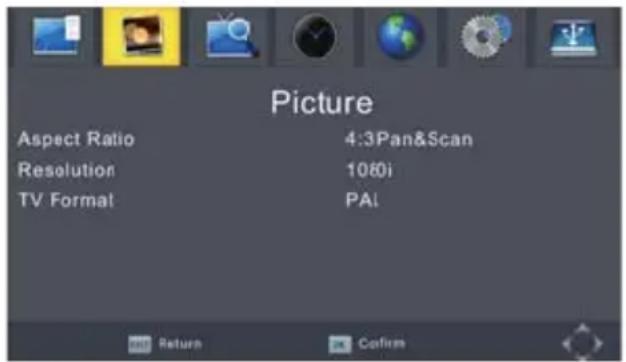
(a) Resolution
You can change this setting if the picture resolution does not appear to be correct. This setting is to match the most common setting for HDMI.
[480P]: for NTSC TV system.
[576P]: for PAL TV system.
[720P]: for NTSC or PAL TV system.
[1080l]: for NTSC or PAL TV system.
(b) TV Format
If the picture does not appear to be correct you can change this setting.
This should match the most common setting for TVs in your country.
[NTSC]: for NTSC system TV.
[PAL]: for PAL system TV.
(3). Channel Search
To access the menu, press MENU and select [Search Channel] using the RIGHT/LEFT keys.
This menu provides options to adjust the search channel settings.
Press UP/DOWN to select an option and press RIGHT/LEFT to adjust the setting.
Press EXIT to exit the menu.

(a) Auto Search
This option will automatically search for channels and save them once the scanning is complete.
All previously saved channels and settings will be deleted.
- Select [Auto Search] and press OK or RIGHT to start channel search.
- To cancel channel search, press EXIT. Any channels that have been found will be saved.
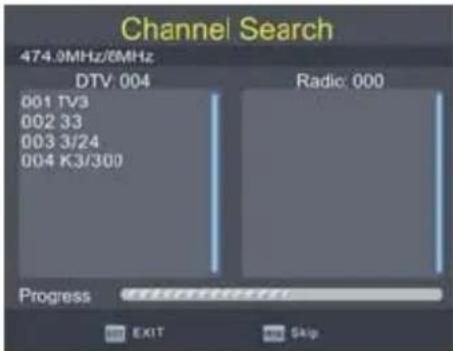
(b) Manual Search
This option allows you to scan for new channels without deleting previously saved channels and settings.
- Select [Manual Search] then press OK or RIGHT. The channel search screen will appear.

- Press the RIGHT/LEFT key to select the channel frequency.
- Press OK to start searching channels.
If a channel is found, it is saved and added to the channels list. If channels can not be found during searching, the unit will exit automatically.
(c) Country
Select your country of residence.
(d) Antenna Power
Enable Antenna Power if an external active antenna is connected.
(4). Time Setting
To access the menu, press MENU then select [Time] using the RIGHT/LEFT keys. The menu provides options to adjust the time settings.
Press UP/DOWN to select an option and press RIGHT/LEFT to adjust the settings. press exit to exit the menu.

(a) Time offset
Select auto or manual for GMT offset adjustments.
(b) Country Region
Select the Country Region when [Time Offset] is set to Auto.
(c) Time Zone
Select the Time Zone Offset when [Time Offset] is set to Manual.
(5). Option
To access the menu, press MENU select [Option] using the RIGHT/LEFT keys. The menu provides options to adjust the OSD Language, Subtitle Language and Audio Language.
Select an option and press RIGHT/LEFT to adjust the setting.
Press EXIT to exit the menu.

(a) OSD (On Screen Display) Language
Select an OSD language.
(b) Subtitle Language
Select the preferred subtitle language.
(c) Audio Language
Select the preferred audio language for watching TV channels. If the language is not available, the default program language will be used.
(6). System Setting
To access the menu, press MENU and select [System] using the RIGHT/LEFT keys. The menu provides options to adjust the system settings.
Press the UP/DOWN key to select an option and press RIGHT/LEFT to adjust the setting. Press EXIT to exit the menu.

(a) Set Password
Set or change the password for locked programs. Enter your old password or the default password '000000'. You will then be asked to enter your new password. Press OK button to confirm your new password.
Once it is confirmed, press EXIT to exit the Menu. The master unlock password is '888888'.
(b) Restore Factory Default
Reset your Set Top Box to the Default Factory Settings.
In Main Menu select [Restore Factory Default] using the RIGHT/LEFT keys and press OK or RIGHT to select. Enter your password or the default password '000000' and press OK to confirm. This option will delete all preset channels and settings. The master unlock password is '888888'.
(c) Software Update
To update the software through the USB.
(7). USB
To access the Menu, press the MENU button and select [USB] using the RIGHT/LEFT keys. The menu provides options to playback Music, Photo and Multimedia files. It can support AVI, MP3, JPEG and BMP formats.
The unit will only support USB device with FAT32 / NTFS file system.
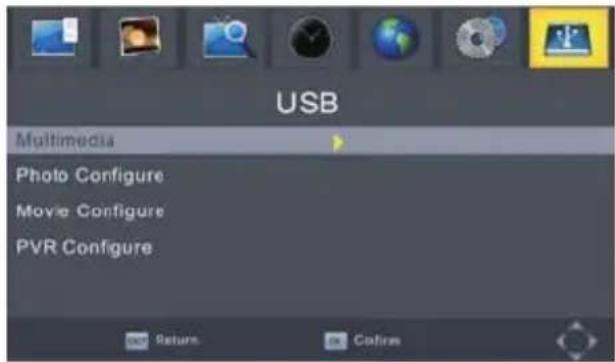
(a) Multimedia:
When a USB device is attached you can select from the Music, Photo or Movie options in this menu using the RIGHT/LEFT keys and OK to select. If a USB device is not connected, the warning message "No USB device is Found" will appear.


(b) Photo configure:
-Slide Time: adjust slide show interval to 1\~8 seconds.
-Slide Mode: adjust slide show effect as mode 0\~59 or random.
-Aspect Ratio:
[Keep]: Play picture in its original aspect.
[Discard]: Play picture in full screen mode.
(c) Movie Configure:
- Aspect Ratio:
[Keep]: Play movie in its original aspect.
[Discard]: Play movie in full screen mode.
- Subtitle Specific:
[Small]: Displays the subtitle as small mode.
[Normal]: Displays the subtitle as normal mode.
[Big]: Displays the subtitle as big mode.
- Subtitle BG:
[White]: Displays the subtitle in white background.
[Transparent]: Displays the subtitle in transparent background.
[Grey]: Displays the subtitle in grey background.
[Yellow green]: Displays the subtitle in yellowgreen background.
- Subtitle Font Color:
[Red]: Displays Subtitle in red font.
[Blue]: Displays Subtitle in blue font.
[Green]: Displays Subtitle in green font.
d) USB RECORDING.
This function is available only when a USB storage device is connected to the receiver.
Instant recording:
If you want to start recording a live show, which is currently being broadcast, go to the desired channel and press the REC button. Press again to stop recording.
Schedule a Recording:
To schedule a recording before broadcast (e.g. record your favourite show while you're out), follow these steps:
- Press EPG to open the full listings.
- Select the TV channel using the LEFT / RIGHT arrow keys.
- Select the TV show you want to record.
- Press OK. On the window that pops up, you are able to modify the channel, date, recording start -time and recording end-time, as well as optionally selecting to repeat this action on a regular basis.

- Select "OTHER RECORDING" in the "Mode" option.
- Press EXIT.
A few seconds before starting to record, a warning message with a count-down is displayed on screen, which will change to the programmed channel when the count-down ends. Once the recording has finished, a confirmation message appears on screen.
To view the scheduled events, press the blue button.
To delete a scheduled event, select the event and press the blue button.
The recording files can be deleted on this unit, you can go to the PVR, and press yellow botton to delete it. the TV program is recorded to file at PVR format, which can be playde back on this unit and PC using a suitable player ,but can not be played back on DVD or PDVD.
For recording the high definition TV programs, the version of usb device should be 2.0 or above, otherwise the unit may can not record the hd programs correctly.
When recording to usb stick or external hard disc on this model, you have to wait a few seconds before pushing rec. after inserting the media. Otherwise the unit can freeze in the signal. If that happens, then please take off power and connect again to fix this.
Note:
Scheduled recording only works when the unit power is on, it can not work when the unit is standby.
Note:
- We cannot guarantee compatibility (operation and/or bus power) with all USB mass storage devices and assume no responsibility for any loss of data that may occur when connected to this unit.
- With large amounts of data, it may take longer for the system to read the contents of a USB device.
- Some USB devices may not be properly recognised.
- Even when they are in a supported format, some files may not play or display depending on the content.
(e) Timeshift

When you are playing the program, you can insert the USB, and at any time you can press the [Time shift] button, the frame will be paused, and you may press the [PLAY] button after a second, it will start to timeshift now. You may press the PLAY button to return the normal program playing, and the timeshift is continuing, you may see from the below picture's bottom which is showing the time shift status. In this case, you may make the unit to play the recorded program from the start.
Press [Info] key to see time shift information as below:
| INFO | |
| PVR Mode | RECORD |
| Disk Total Space | 3.60 GB |
| Disk Free Space | 610.96 MB |
| File System | FAT32 |
| Cluster Size | 4 KB |
| File Name | TV3-10062008-1732.mt |
| Max Record Size | 627.32 MB |
| Max Record Time | 00:18:22 |
| Record Bitrate | 588 KB/S |
| Cur Play Size | 0 KB |
| Cur Record Size | 6.89 MB |
You can press [fast forward]/[fast back] to move the slide to left or right of the current recording.
Note: Time Shifting will only be available when USB HDD is connected to the system and read/write speed is high enough to do that.
Press [Stop] button to end the timeshift, and it will back to the normal playing of the program.
Troubleshooting
| Problem Potential Reasons What to do | ||
| No picture | Power isn't connected | Connect the power |
| The power switch is not on | Switch on the power | |
| Screen shows “No Signal” | DVB-T cable not connected | Plug in the DVB-T cable |
| Aerial cable is faulty | Check aerial cable and connections | |
| No sound from speaker | No or incorrect connection with audio cable | Connect the audio cable correctly |
| Sound on mute | Turn off mute function | |
| Only sound, no image on the screen | No or incorrect connection with AV cable | Make sure cables are connected correctly |
| The program is a radio program | Presskey to shift into TV mode | |
| Remote Control is not responding | The battery is exhausted | Change battery |
| Remote Control is not facing or close enough to the Set Top Box | Adjust the position of the Remote Control and move closer to the unit | |
| Picture is breaking up | The signal is too weak | Check aerial cable and connections |
TechnicalSpecifications
| Item | Sub Item | Parameter |
| Tuner | Input Frequency | 170~230MHz470~866MHz |
| RF Input level | 7 0 mBd28 - ~- | |
| IF Bandwidth | 7MHz/8MHz | |
| Modulation | QPSK,16QAM,64QAM,256QAM | |
| Video | Decoder Format | MPEG4 AVC/H.264 HP@L4MPEG2 MP@ML.HL |
| Output Format | 576P , 720P, 1080i, 4:3 and 16:9 | |
| Output Port | CVBS | |
| Audio | Decoder Format | MPEG-1 (layer1&2&3 ), AC3 |
| Audio output | AV out | |
| USB 2.0 | Supported Capacity | 500GB |
| Supported Media MP | 3, JPEG, BMP, AVI | |
| AC/DC adaptor | Power Supply | 9VDC == 1.5 A |
| Weight | 0.65 kgs | |
| Size | 255x165x27mm |
Notice about recycling

Your product is designed and manufactured with high quality materials and components which can be recycled and reused.
This symbol means that electrical and electronic equipment, at their end-of-life, should be disposed of separately from your household waste.
Please dispose of this equipment at your local community waste collection/recycling centre. In the European Union there are separate collection systems for used electrical and electronic products.
Please help us to conserve the environment we live in!


- Important Safety Instructions
- Operation interface
- First Time Installation
- Basic Operation
- (1). Program Manage Settings
- Program Edit
- Set Favourite Channels
- Disable Favourite TV or Radio channel :
- View Favourite Channel:
- Delete a TV or radio program
- Skip TV or radio channel
- Disable the skip channel function:
- Move a TV or Radio Program
- Lock Program
- Lock a TV or Radio channel :
- b) EPG (Electronic Programming Guide)
- Preview Channel:
- Sort
- Auto Search
- Manual Search
- Country
- Antenna Power
- (4). Time Setting
- Time offset
- Country Region
- Time Zone
- (5). Option
- Multimedia:
- Photo configure:
- -Aspect Ratio:
- Movie Configure:
- - Aspect Ratio:
- - Subtitle Specific:
- - Subtitle BG:
- - Subtitle Font Color:
- d) USB RECORDING.
- Instant recording:
- Schedule a Recording:
- Note:
- Timeshift
- Notice about recycling
Brand : Krüger&Matz
Model : KM0196
Category : Television