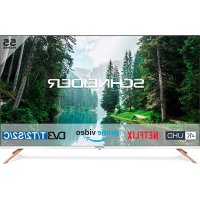
SC55S1FJORD - TV SCHNEIDER - Free user manual and instructions
Find the device manual for free SC55S1FJORD SCHNEIDER in PDF.


| Product type | 4K UHD LED TV |
| Brand | Schneider |
| Model | SC55S1FJORD |
| Screen size (diagonal) | 139.7 cm (55 inches) |
| Resolution | 3840 x 2160 pixels (4K) |
| Image format | 16:9 |
| Net weight | 11.8 kg |
| Dimensions with stand (L x W x H) | 1226 x 254 x 773 mm |
| Power supply | AC 100-240 V ~ 50/60 Hz |
| Maximum power consumption | 120 W |
| Standby power consumption | ≤ 0.5 W |
| Energy efficiency class (SDR) | G |
| TV reception | DVB-T/T2 (digital terrestrial) |
| Operating system | Smart TV (VIDAA) |
| Connectivity | Built-in Wi-Fi, LAN Ethernet, Bluetooth |
| Inputs | 3x HDMI (including 1 ARC), 2x USB, RF, CVBS + Audio L/R, CI |
| Outputs | Optical, headphone jack |
| Speakers | 2 x 8 W |
| USB playback formats | Video: MP4, MOV, MPG; Audio: MP3, AAC, WAV; Image: JPG, BMP, PNG |
| Operating temperature | 0 °C to 35 °C |
| Remote control batteries | 2 AAA batteries not included |
| Maintenance and cleaning | Soft, dry cloth; do not use chemicals |
| Safety | Wall mount recommended; do not expose to water or heat |
| Included accessories | Remote control, user guide, stand base |
Frequently Asked Questions - SC55S1FJORD SCHNEIDER
User questions about SC55S1FJORD SCHNEIDER
0 question about this device. Answer the ones you know or ask your own.
Ask a new question about this device
Download the instructions for your TV in PDF format for free! Find your manual SC55S1FJORD - SCHNEIDER and take your electronic device back in hand. On this page are published all the documents necessary for the use of your device. SC55S1FJORD by SCHNEIDER.
USER MANUAL SC55S1FJORD SCHNEIDER
natural_image
Warning symbol of a lightning bolt inside a triangle (no text or numbers)natural_image
Diagram of a cable being inserted into an open TV case, showing wiring and component layout (no text or symbols)natural_image
Black remote control with a pointer and angle markings (no text or symbols on the device itself)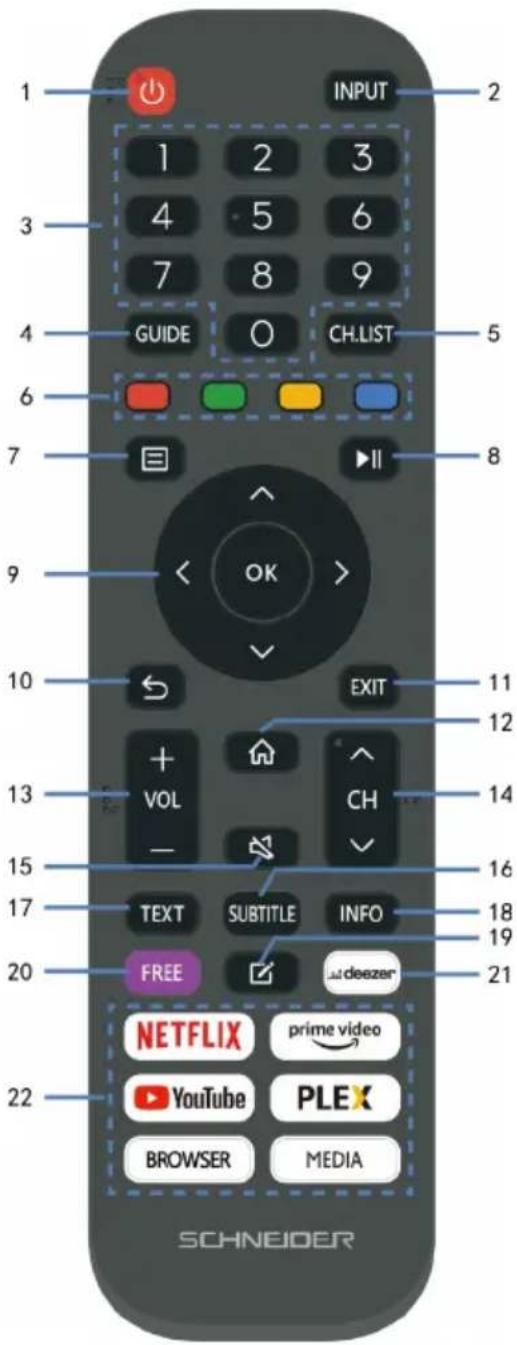
Remarques:
natural_image
Architectural floor plan showing room layout and structural elements (no text or labels)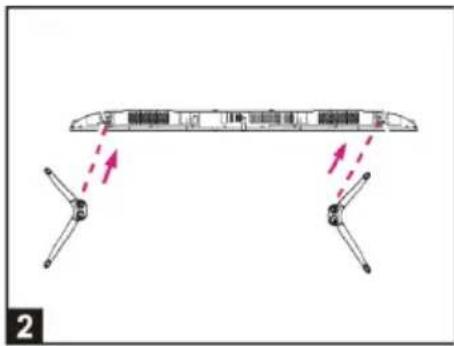
natural_image
Diagram of a long bridge structure with support towers and support pillars (no text or labels)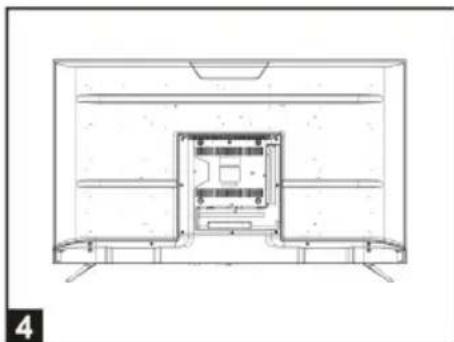
natural_image
Architectural cross-section diagram of a room with internal structural layout (no text or labels)natural_image
Technical line drawing of a structural beam with supports and load indicators (no text or symbols)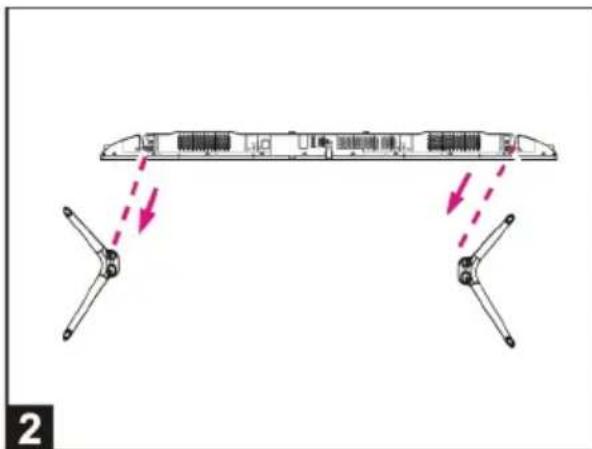
natural_image
Diagram of a multi-layered aircraft fuselage with directional arrows indicating movement or force (no text or symbols)Liste des chaînes
Remarque :
natural_image
Plain gray rectangular panel with no visible text, symbols, or markings
natural_image
Blank gray rectangle with black border (no text or symbols)
Cause possible :
natural_image
Simple line drawing of a stylized face with expressive eyes and a frowning mouth (no text or symbols)
Cause possible :
natural_image
Abstract line drawing of two stylized eyes with expressive gestures, set against a striped background (no text or symbols)
Cause possible :
natural_image
Simple line drawing of three geometric shapes: cube, cone, and sphere (no text or symbols)
Cause possible :
natural_image
Black remote control with X mark symbol (no text or labels)Cause possible :
2019/2013
Informations techniques
Important Safety Instructions....2
Control Panel....10
Connecting Cables....11
Remote Control....13
Base Installation....15
Wall Mounting Instructions....16
Operations
Basic Operation....17
Live TV....18
Connection....21
Multi-screen....24
Scart Functions....26
Picture and Sound....29
Accessibility....33
System and Support ....34
For Reference
Troubleshooting.... 36
Cleaning instruction.... 38
Technical data....39
Important safety instructions – please read carefully and keep for future reference
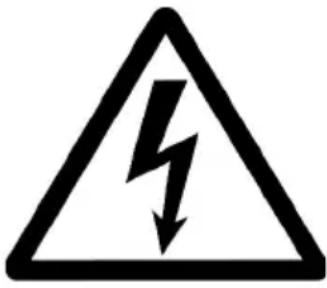 | To reduce the risk of fire or electric shock, do not expose this product to water, rain or moisture. To prevent the risk of electric shock, do not remove the cover or back of this product. In case of product failure, only qualified personnel can repair. There are no user-serviceable parts inside. |
CAUTION !
Dangerous tension inside the product! Do not open. Risk of electric shock! No parts can be repaired by the end-user. Only qualified personnel can repair and maintain this product.
If the electric cord is damaged, it must be replaced by the manufacturer or qualified after-sales personnel in order to avoid any danger.
The product must be installed in accordance with local laws.
Damaged batteries must be properly disposed. In order to protect the environment, please dispose the batteries properly, in accordance with local laws (information is available at your reseller).
Remote control batteries (not included)
shall not be exposed to excessive heat (e.g. from sun or fire).
Where to install the product
-Place the product on a straight, rigid and stable place. Do not place the product on a carpet.
-Do not place the product on top of another that may cause overheating (for example, a receiver or amplifier).
-Do not place anything underneath the product (for example, CDs or magazines).
Proper ventilation
-Place the product in a sufficiently-aerated place to avoid overheating. Allow at least 10cm spacing at the back and top of the product, and 5cm spacing on both sides to prevent overheating.
-Do not place items such as newspapers, tablecloth, curtains, in front of the ventilating openings.
Do not expose the product to high temperatures, moisture, water and dust.
-The apparatus shall not be exposed to dripping or splashing. No object filled with liquids, such as vases, shall be placed on the apparatus.
- Do not place other items close to this product that may damage it (for example, objects containing water or lightened candles).
-No naked flame sources, such as lighted candles, should be placed on the apparatus.
Electric supply
-Please unplug the product in case of prolonged non-use.
-If the supply cable is damaged, it must be replaced by the manufacturer or qualified after-sales personnel to avoid any danger.
-This product must be connected to an electrical supply 100-240V \~ 50/60Hz.
-The mains plug is used as the disconnect device, so the disconnect device shall remain readily operable
-The use of apparatus in moderate climates.
-The appliance must be connected to a power socket with ground connection.
WARNING
Never place a television set in an unstable location. A television set may fall, causing serious personal injury or death. Many injuries, particularly to children, can be avoided by taking simple precautions such as:
- Using cabinets or stands recommended by the manufacturer of the television set.
- Only using furniture that can safely support the television set.
- Ensuring the television set is not overhanging the edge of the supporting furniture.
-
Not placing the television set on tall furniture (for example, cupboards or bookcases) without anchoring both the furniture and the television set to a suitable support.
-
Not placing the television set on cloth or other materials that may be located between the television set and supporting furniture.
- Educating children about the dangers of climbing on furniture to reach the television set or its controls.
- In case this television set is to be relocated to a different location, please keep in mind and apply the above safety instructions.
Technical Specification:
Name: Television Product
Net Weight: 11.8 Kg
Operation Temperature: 0°C\~35 ℃
TV Reception System: DVB-T/T2
EU Declaration of conformity
This appliance is Television complies with the essential requirements and other provisions of Directive 2014/35/EU & 2014/30EU and the Radio Equipment Directive (RED) 2014/53/EU that goes into effect on 12 June 2016. The declaration of conformity is available on website:
http://www.schneiderconsumer.com
CE
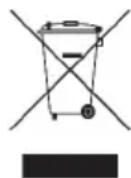
- This logo set on the product means that the recycling of this apparatus comes within the framework of the directive 2012/19/EU of July 4, 2012 concerning the waste on electrical and electronic equipment (WEEE).
- The presence of dangerous substances in the electrical and electronic equipments can have potential consequences on the environment and human health in the cycle of reprocessing this product. - Therefore, at the end of its lifetime, this product shall not be disposed with other non-recycled waste. - As the end user, your role is of prime importance in the cycles of re-using, recycling, and other forms of valorization of this electrical and electronic equipment. Local authorities and resellers have set special procedures for the purpose of collecting and recycling this product. - You have the obligation to use the selective waste collection systems put in place by your local authorities.
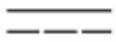 | This symbol indicates DC Voltage (for USB only). |
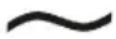 | This symbol indicates AC Voltage. |
 | This symbol indicates “Indoor use only”. |
Auto Standby
In order to save energy, the electricity consumption of this product has been reduced in both operation mode and standby mode. Furthermore, if no operation is carried out for four consecutive hours, the unit will automatically enter standby mode. Simply press the Standby button on the remote control to switch the unit back to operation mode.
Product Introduction
Congratulations! You have chosen the latest generation high definition television. Endowed with high display quality and light weight, it is power-saving and radiationless with high sensitivity television reception. The new generation television will bring you safe & comfortable brand new visual experience. Thank you for purchasing and using our products!
Accessories
User manual x1
Remote control x1
Terms and options may change depending on the models.
Control Panel
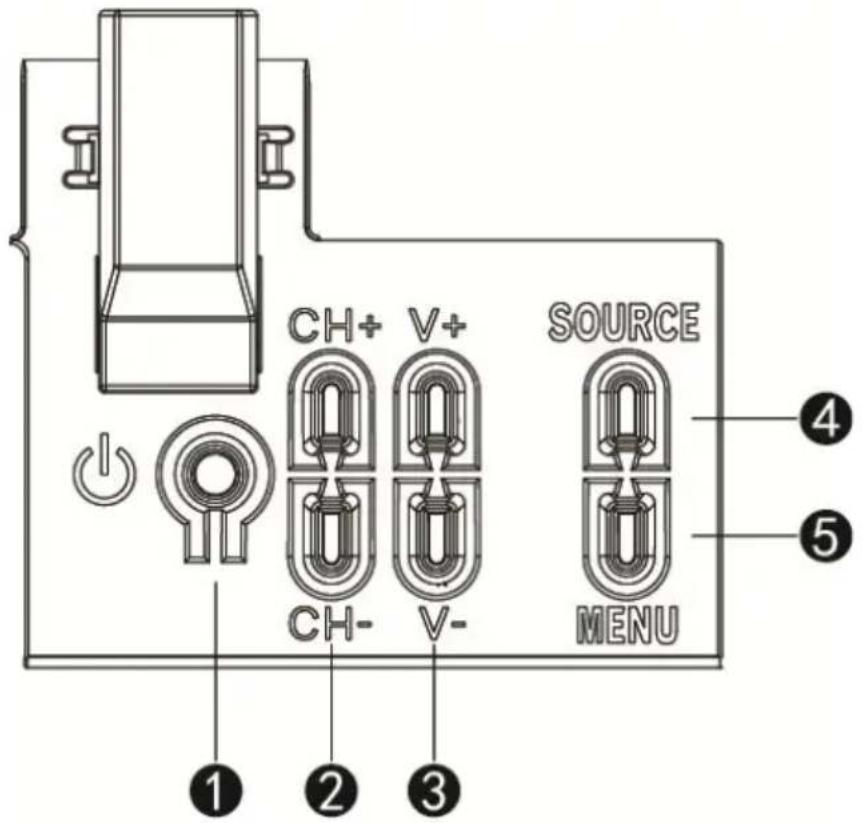
- Standby : To turn ON/OFF the TV.
- CH+/-: To select next/previous channel or move up/down.
- VOL +/- : To increase/decrease the volume level or move left/right.
- Source : To select the input source.
- Menu : To enter menu setting page.
Connecting Cables
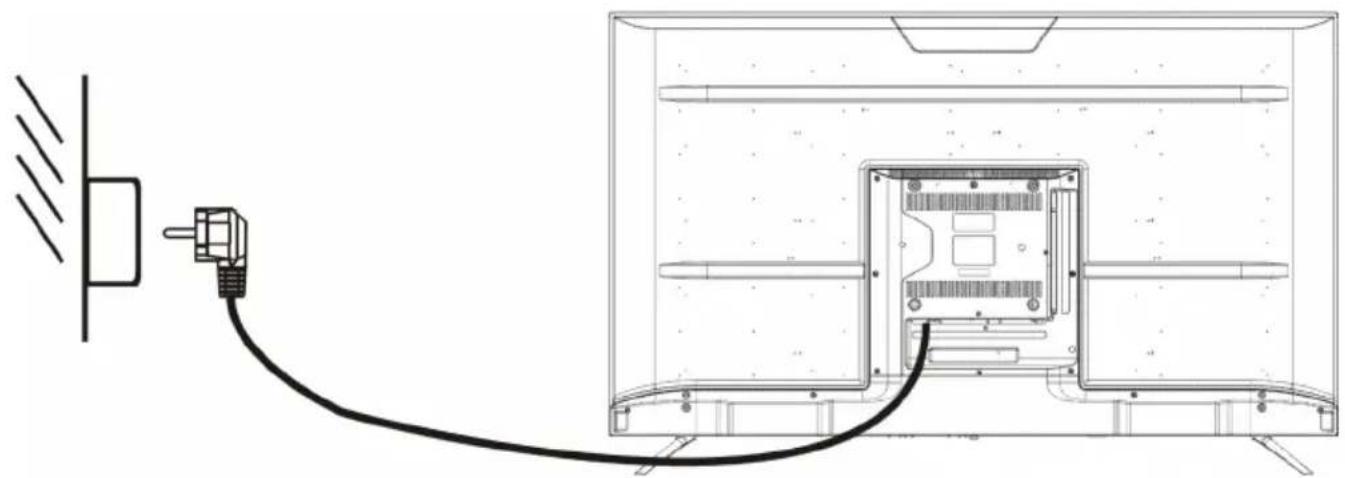
Connecting to power source
natural_image
Diagram of a cable being inserted into an open TV case, showing wiring and component layout (no text or symbols)- The television is in standby state when no images arise and the red indicating lamp shines.
- Press the standby button again on the remote control for the television the indicating lamp becomes blue.
Connecting external antenna to the unit
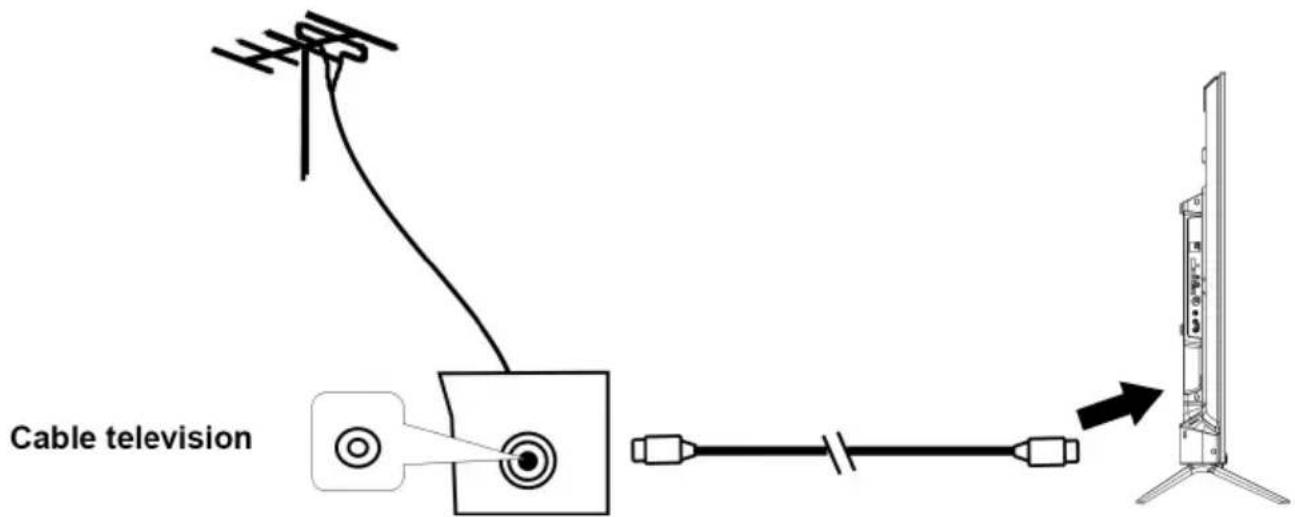
We recommend you use a 75Ω antenna cable so as to eliminate the disturbance caused by impedance mismatching. The antenna cable shall not be bundled together with the power cord.
Directly insert the 75Ω antenna cable plug into the antenna socket when applying cable television.
Note: The antenna should be checked periodically. If clear image is not available, shut down the power and then carefully check the antenna.
Connecting Cables
This TV has digital multimedia performance and can be connected to multiple external devices. The following diagram presents the connections.
![AC 100-240 - 50-60Hz LAN OPTICAL OUT CVBS L R RF(32) [10V 80mA] RT HDMI 3 HDMI 2 HDMI 1 [ABC] USB 2 [UV 80mA] USB 1 [UV 80mA] CI Ω ① ② ③ ④ ④ ⑤ ⑥ ⑦ ⑦ ⑧ ⑨ ⑩ TV](/content/2026/04/593671/images/fbc6ec6d85bd7b8988a4ef19816be86fbdb0fcf4bb91c33da11e17f4709cf3b6.jpg)
- AC IN
- LAN input terminal
- OPTICAL output terminal
- CVBS and Audio L/R input terminal
- FR IN : Connect to the external Satellite TV Antenna(DVB-S2).
- RF IN : Connect to the external TV antenna.
- HDMI1/2/3 IN : High-definition multimedia interface. ARC is in HDMI 1 only..
- USB IN
Access multi-media files stored in the USB device. - CI SLOT : Insert a CI (common interface) card.
- EARPHONE OUTPUT.
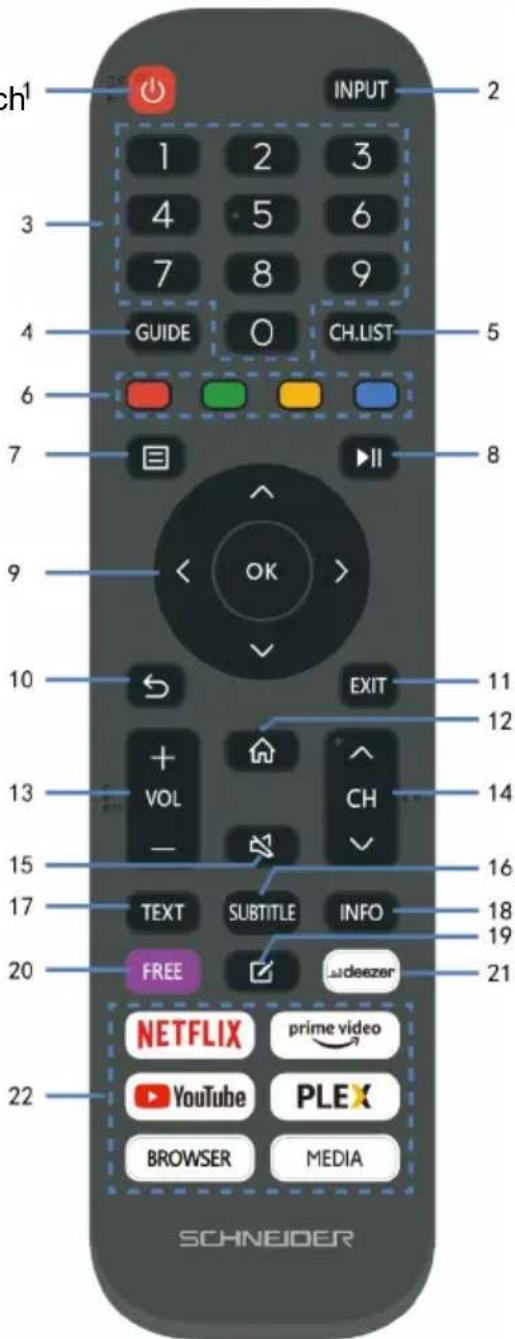
Remote Control
1 STANDBY(POWER)
Set the unit in standby mode; press it again to switch ^1
2 INPUT
Select desired input source.
3 Number buttons (0-9)
Input the number information, such as channel number and so on.
4 GUIDE
Launch the Program Guide.
5 CH.LIST
Press to show channel list.
6 4 Color
Customized in different page.
7 (MENU)
Call out the main menu or return to previous menu.
8
Press to operate start/pause playing; Move fast forward; Move fast backward.
9 DIRECTION/OK
Move up, down, left, right/Confirm.
10
Return to the previous interface or menu.
11 EXIT
Exit the current interface or menu.
12 (HOME)
Press to enter home page.
natural_image
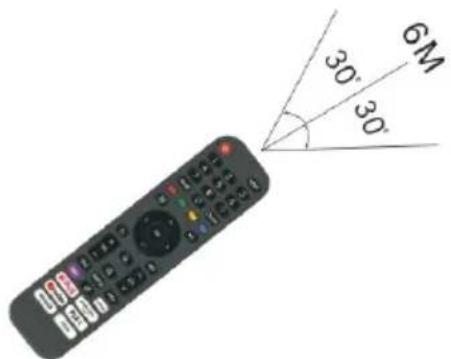
Black remote control with a 30-degree angle indicator and 6M mark (no text or symbols on the device itself)Notes:
The remote control shall be applied in effective reception scope of the television. Make the remote control point towards the infrared receiver of the television and ensure that there are no obstacles. Its normal operation distance will be shortened in direct sunlight or lamplight.
Be careful to use the remote control. avoid falling off or being trampled or splashed with liquids.
Remote Control
13 VOL +/-
Increase/decrease the volume level.
14 CH +/-
Play the next/previous program.
15 (MUTE)
Mute the sound.
16 SUBTITLE
Select available subtitles.
17 TEXT
Turn on/off the Teletext.
18 INFO
Display the available program information.
19
Set up APP shortcut key.
20 Free
Enter to the free video.
21 DEEZER
Enter to the deezer directly.
22 Content area
Six buttons for CSP Apps.
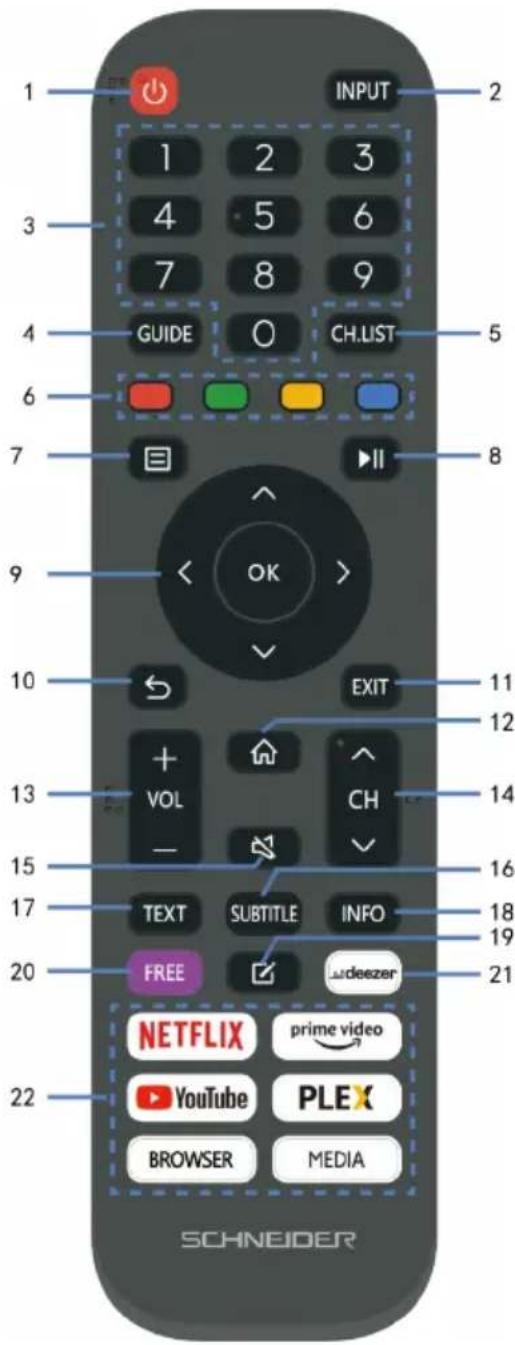
Note: The marks and positions of remote control may vary depending on the model.
Prepare the remote control
Insert 2 AAA batteries in the remote control following the polarities signs (+/-) as indicated. (Batteries are not provided)
Base Installation
- Mounting of the stand
natural_image
Architectural cross-section diagram of a room with internal furniture layout (no text or labels)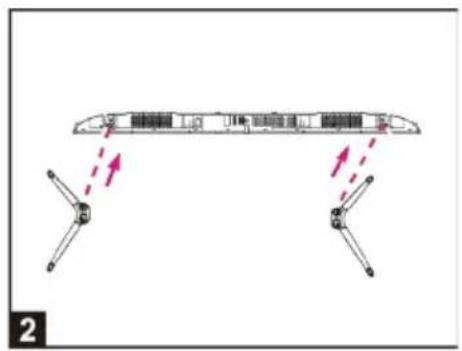
natural_image
Diagram of a long bridge with support towers and ground anchors, no text or symbols present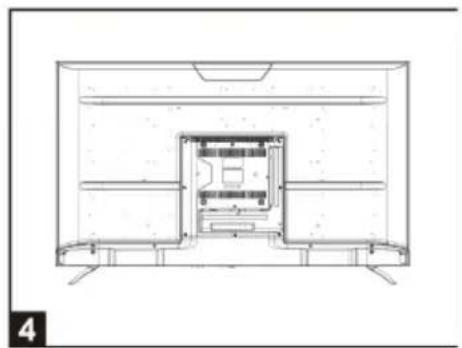
natural_image
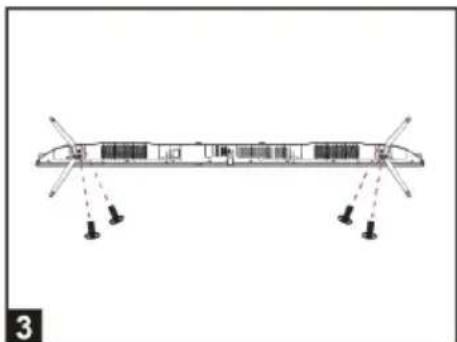
Architectural cross-section diagram of a room with internal structural elements (no text or labels)- Place the machine flat on a desktop (Caution: put a foam cushion under the machine to avoid it from scratching.)
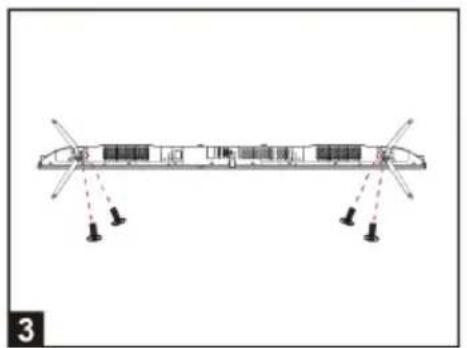
- Align the screw holes on stand and TV bottom (Figure 2)
- Fix the stand and the screen with 4pcs provided screws. (Figure 3)
- The rendering after installed. (Figure 4)
• Disassembly of the stand
natural_image
Technical line drawing of a multi-level structure with support pillars and structural elements (no text or symbols)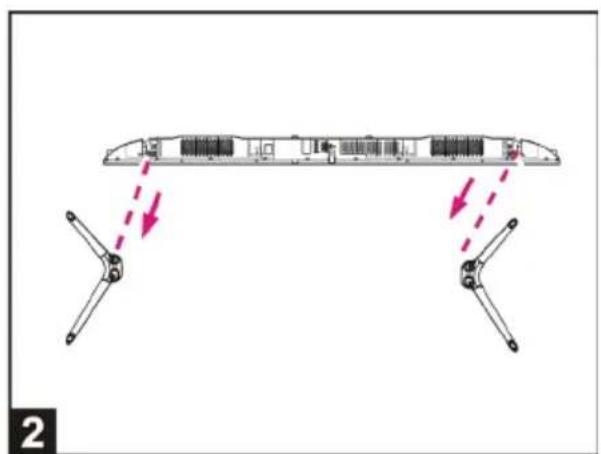
natural_image
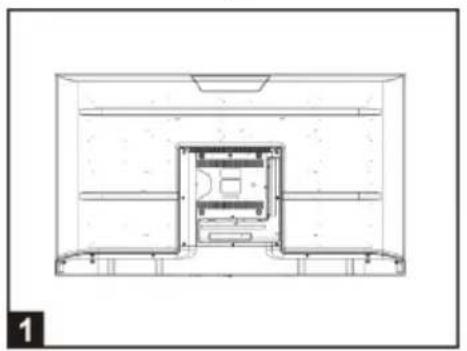
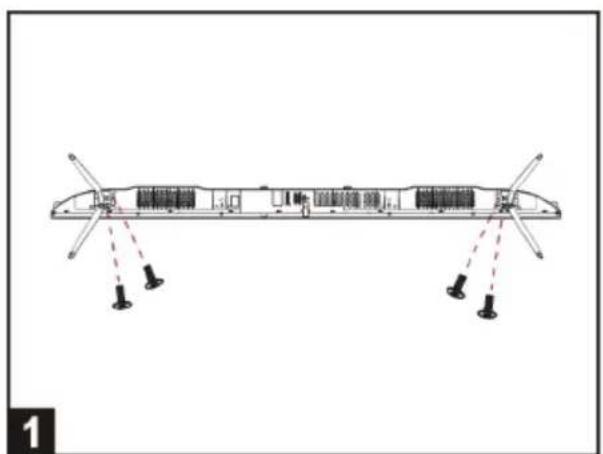
Diagram of a ship's deck structure with two articulated arms and directional arrows indicating movement (no text or symbols)- Loose the screws between the machine and stand (Figure 1).
- Remove the 2 stands from the machine (Figure 2).
Wall Mounting Instructions
- Use standard M6*12mm screws (4 pieces, not included) to mount this TV. Using different screws as specified will damage the wall mounting support and will be outside the scope of product guarantee.
- Contact a professional technician for assistance when wall mounting your TV.
- Do not wall mount the TV while TV is turned on.
• Refer to the instruction of your wall mounting bracket.
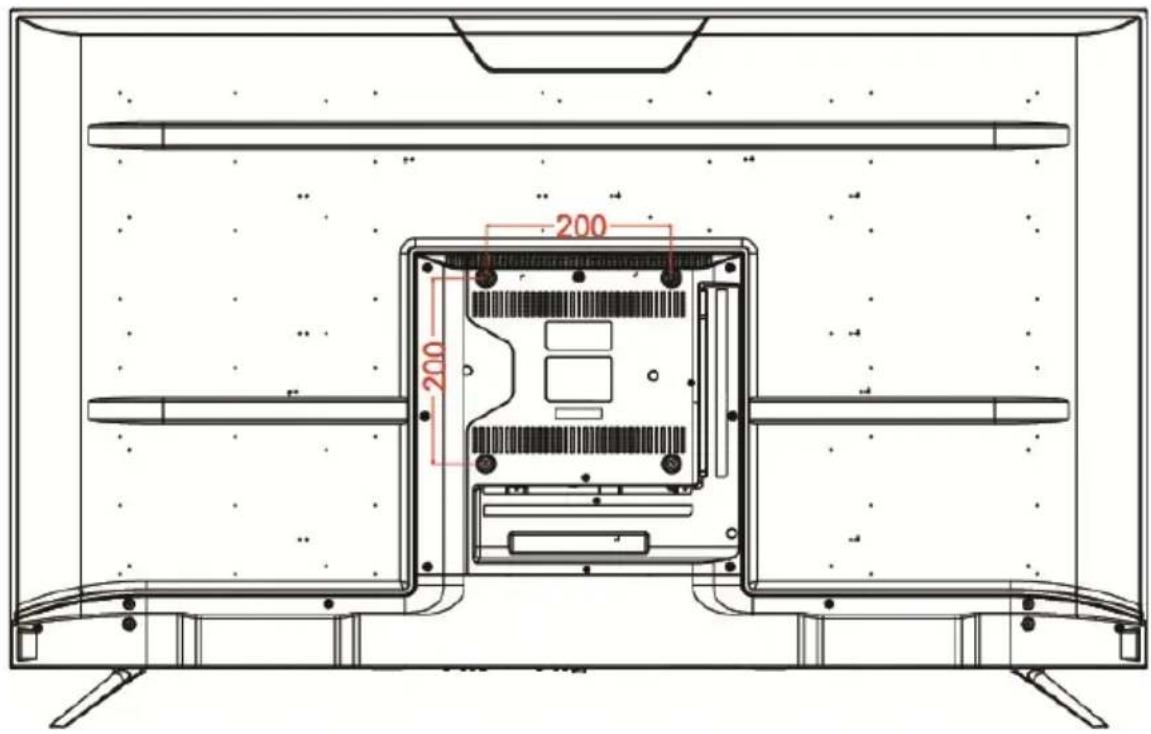
MAKE SURE ALL THE EQUIPMENTS AND POWER CORD ARE CONNECTED PROPERLY AND THE UNIT IS SET IN CORRECT MODE BEFORE KINDS OF OPERATIONS.
BASIC OPERATION
- Press STANDBY button on the unit or remote control to power ON the unit (indicator will glow blue); press it again to power OFF (standby mode) the unit (indicator will glow red).
SELECT DESIRED PROGRAM
- Press CH+ button to play next channel.
- Press CH- button to play previous channel.
- Press number buttons on remote control directly to select desired program.
VOLUME CONTROL
- Press VOL+ or VOL- to adjust the level of current volume. Available range: 0-100.
MUTE CONTROL
- Press MUTE button to mute the sound, press it again to turn on the sound.
INPUT SETTING
- Press INPUT button on the remote control to display the sources list.
- Press UP or DOWN navigation button to select desired input source, and then press OK button to confirm selection.
MULTIAUDIO SETTING
- Press MENU button on remote control and use navigation buttons to select Audio Language, choose the desired audio language.
NOTE: To enable this function, make sure that the channel you are viewing supports multi-audio languages.
INFORMATION DISPLAY
- Press INFO button on remote control to display information of current program.
MEDIA PLAYBACK
- Press INPUT button on remote control to switch the unit to USB mode.
- Insert a USB memory device into USB slot before following operations.
- Press UP/DOWN/LEFT/RIGHT navigation button to move the cursor.
- Press BACK button to return to previous menu page.
LIVE TV
Channel Scan
Auto Channel Scan

Settings > Channel > Auto Scan
Note:
- Before you select Auto Channel Scan, you can press 📄 > Settings > Channel > Auto Scan, press OK button into the submenu, select Change Setup and press OK button to select Satellite, Antenna or Cable.

Channel List
• Display the channel list
• In Live TV, press button on the
remote control to display the channel list menu.
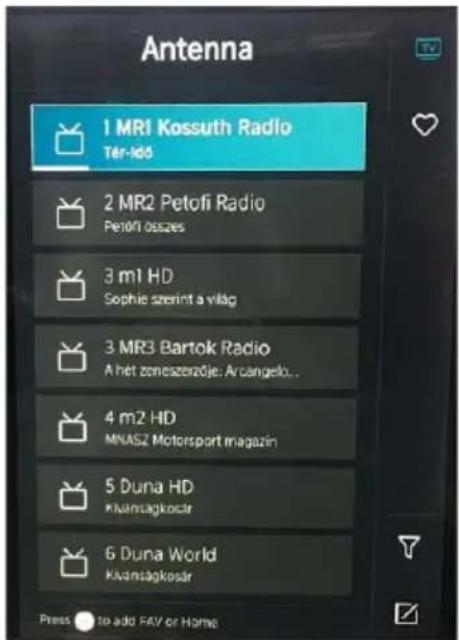
- Adding channels to your 'Favorites' list
- Press button to call out the channel list, the channel list appears on the right side of the screen.
- Press to select your favorite channel.
- Press and Choose Add to Favorite, a heart-shaped icon will appear next to your favorite channel.
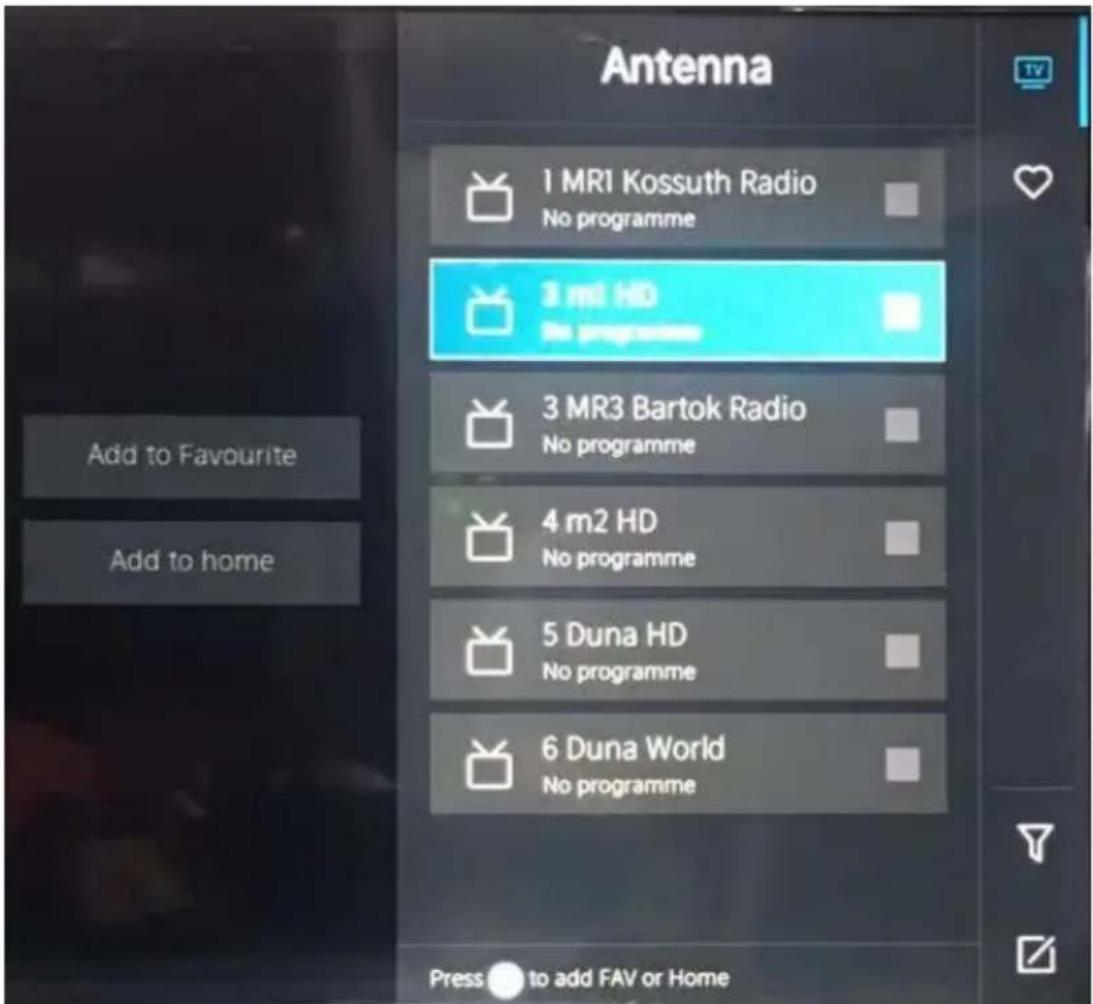
Viewing your 'Favorites' list
Press to call out the channel list, the channel list appears on the right side of the screen.
Press >favorite>, press the Navigation button select FAV1, FAV2, FAV3 or FAV4 press ok and your favorite channel with a heart-shaped icon will appear on the favorite list.
Deleting channels from your 'Favorite' list
Press to call out the channel list, the channel list appears on the right side of the screen.
Press ➤ > Favorite, using the Navigation button to select ☑ (Edit) into the submenu, select the FAV channel that you want to delete.
Press to delete.
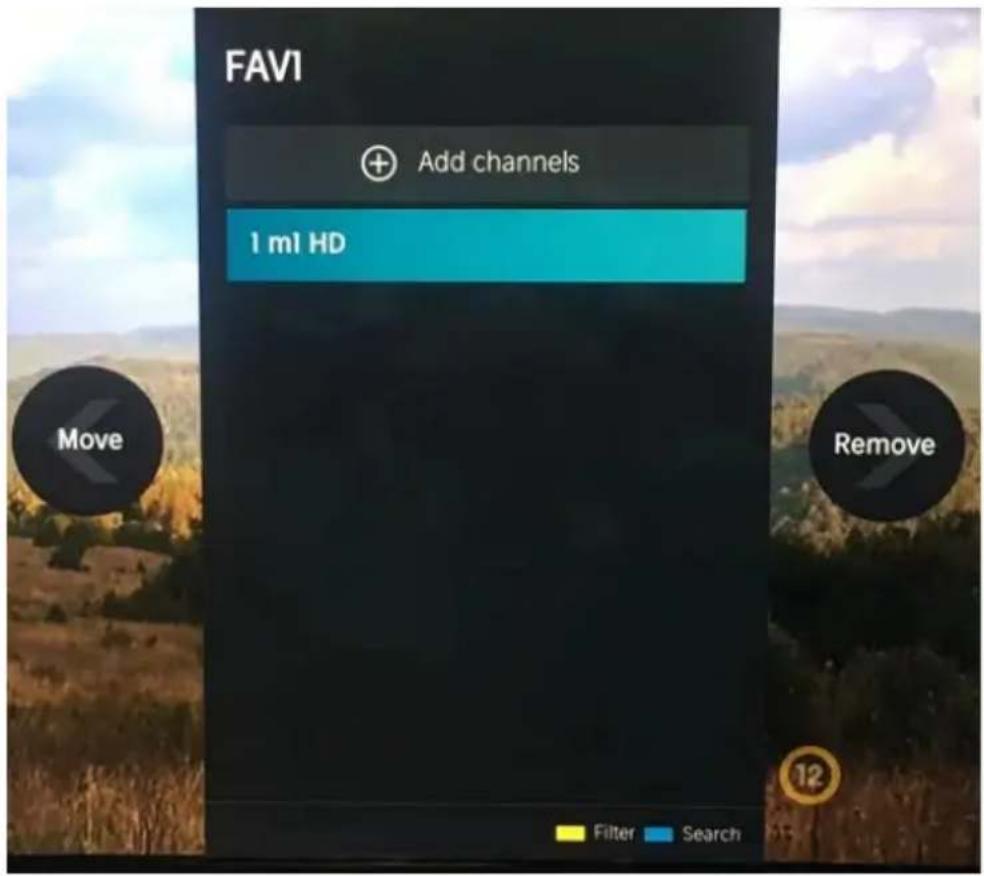
Note:
• These steps should be operated under TV inputs.
- Before you edit the fav lists, complete channel scan first.
CONNECTION
Wired LAN
Connecting to the Internet

Settings > Network > Network Configuration
You set the TV network by selecting Configuration and press the button to enter the submenu.
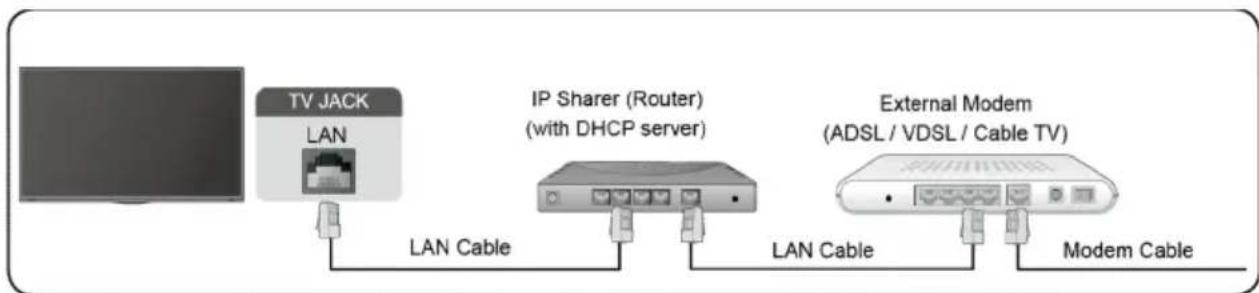
Automatically obtain an IP address
- If you connect to the wired network, the TV will automatically obtain an IP address and connect to the network.
- If the connection fails, disconnected message will display for the Ethernet status. Retry or enter the IP settings, and select Manual to input the information again.
Manually enter the IP address
- Enter the IP settings to select Manual.
- Enter the IP Address, Netmask, Gateway, DNS Server 1 and DNS Server 2 in the menu.
Note:
• This section is only for 4K models.
- You get access to the Internet through your TV.
- The default option of IP Settings Mode is DHCP.
Wireless
Connecting to the Internet
natural_image
Plain gray rectangular panel with no visible text, symbols, or markingsWireless Adapter built-in the TV set
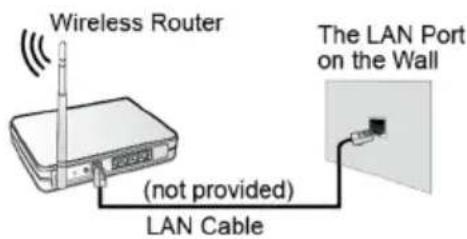
Note:
- You get access to the Internet through your TV.
- Connect to an available wireless network.
- Make sure that you have the wireless router's SSID and password before attempting to connect.
Connecting to a Wireless Network

> Settings > Network > Network Configuration
You set the TV network by selecting Configuration and press the OK button to enter the submenu.
- Connection Type
Choose a wireless network connection to access the Internet. - Refresh
Refresh wireless network.
- Advanced Settings
Configure the advanced wireless network settings for the TV.
- Add
You can add wireless network.
Note:
- If no wireless router is found, select Add and enter the network name in the SSID.
- If no wireless router is found, select Refresh.
HDMI-CEC
You can use your TV remote to control the external devices that are connected to the TV by HDMI cable. The external devices need to support HDMI & CEC Function (HDMI-CEC).
Connecting an external device through HDMI-CEC Function >

Settings > System > HDMI-CEC
- Set HDMI-CEC to On.
- Connect an HDMI-CEC-compliant device to the TV.
- Turn on the connected external device. The device is automatically connected to the TV. After connection is finished, you can access the menu of the connected device on your TV screen using your TV remote and control the device.
Note:
- HDMI cables must be used to connect HDMI CEC-compatible devices to your TV.
-
The HDMI CEC feature of the connected device must be turned on.
-
If you connect an HDMI device that is not HDMI CEC-compatible, all the HDMI-CEC control features do not work.
- Depending on the connected HDMI device, the HDMI-CEC Control feature may not work.
- The HDMI CEC feature are supported One Touch Play, Routing Control, System Standby, Device OSD Name Transfer, Remote Control Pass Through, Give Device Power Status, System Audio Control.
HDMI Device
Connect an HDMI cable from an external A/V equipment.
Some devices such as DVD player require HDMI signal to be set to output in the device's settings. Please consult your device user manual for instructions.
Please note that the HDMI connector provides both video and audio signals, it's not necessary to connect an audio cable.
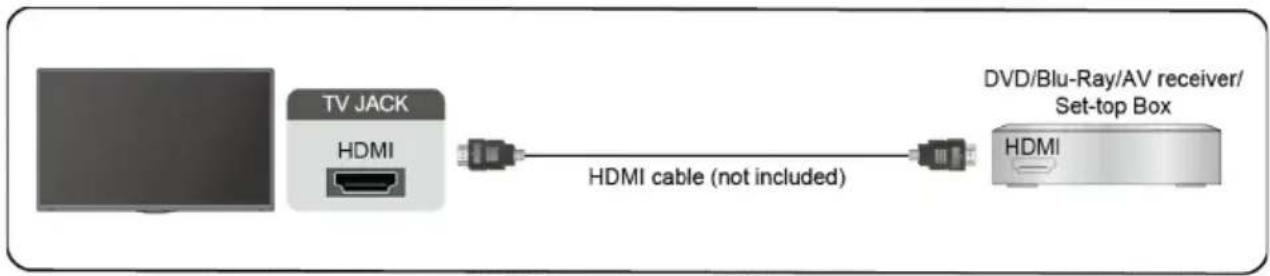
flowchart
graph LR
    A["TV JACK"] -->|HDMI cable (not included)| B["DVD/Blu-Ray/AV receiver/Set-top Box"]
USB Device
Connect the USB devices such as hard drives, USB sticks and digital cameras for browsing photos, listening to music.
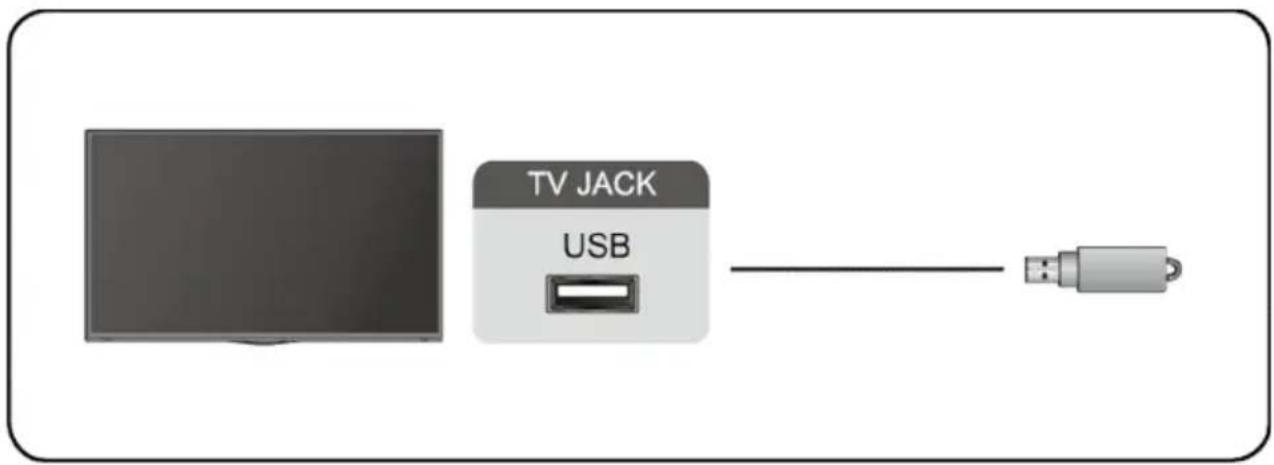
Support format: FAT32.
Multi-screen
Screen Sharing
Mirror content from your device to the TV.
INPUT > Screen Sharing
- Turn on the casting function of your Android/Windows10 device.
- Find the TV name in the searching list of your device and select it. Wait for the connection progress to complete and the content on your device will be displayed on the TV.
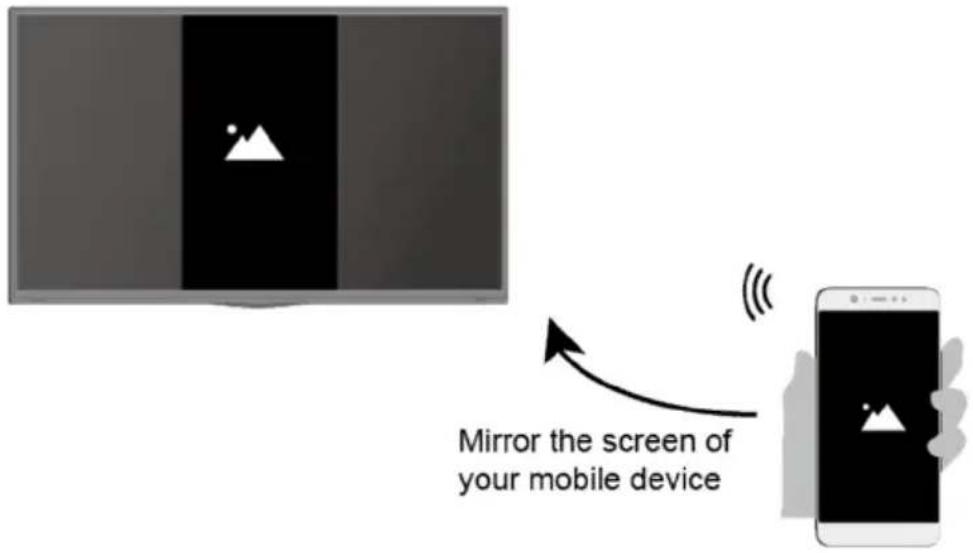
Note:
- Some Android devices may not support casting.
Content Sharing
Share media content, like videos, music or photos, from your device to the TV screen.
Before you use this function, turn on Content Sharing at ⓗ > Settings >
System > Application Settings > Content Sharing.
- Establishing Content Sharing connection between the TV and your device
- Turn on the content sharing function of your device.
-
Find the TV name in the searching list of your device and select it.
-
Wait for the connection progress to complete, and select the content you want to share
• Viewing media content of your device
Press INPUT button on your remote, and select a media content on the screen.
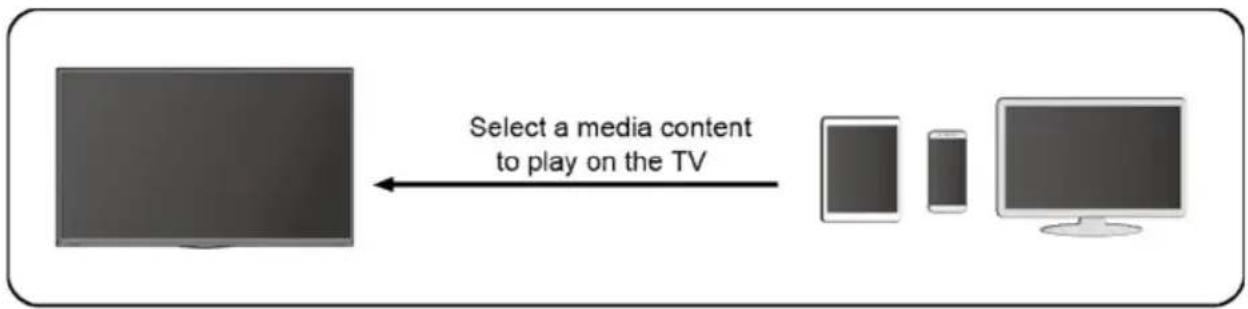
flowchart
graph LR
    A["TV"] -->|Select a media content to play on the TV| B["TV"]
    B --> C["TV"]
    C --> D["TV"]
Note:
- Make sure your device and the TV are connected to the same network.
- Some devices may not support content sharing. If your device doesn't support content sharing, you can download an app that supports the function.
- If you want to mirror content from your device, go to INPUT > Screen Sharing.
Smart Functions
Media
Playing Media contents

My Apps > Media
By default, there are Content Sharing displayed on the Media screen. If your mobile device is connected to the TV, its name also appears on the Media screen.
Note:
- For more information about Content Sharing, refer to its detailed introduction.

My Apps > Media > connected device
Select the content you want to play on the screen, like pictures, videos and music.
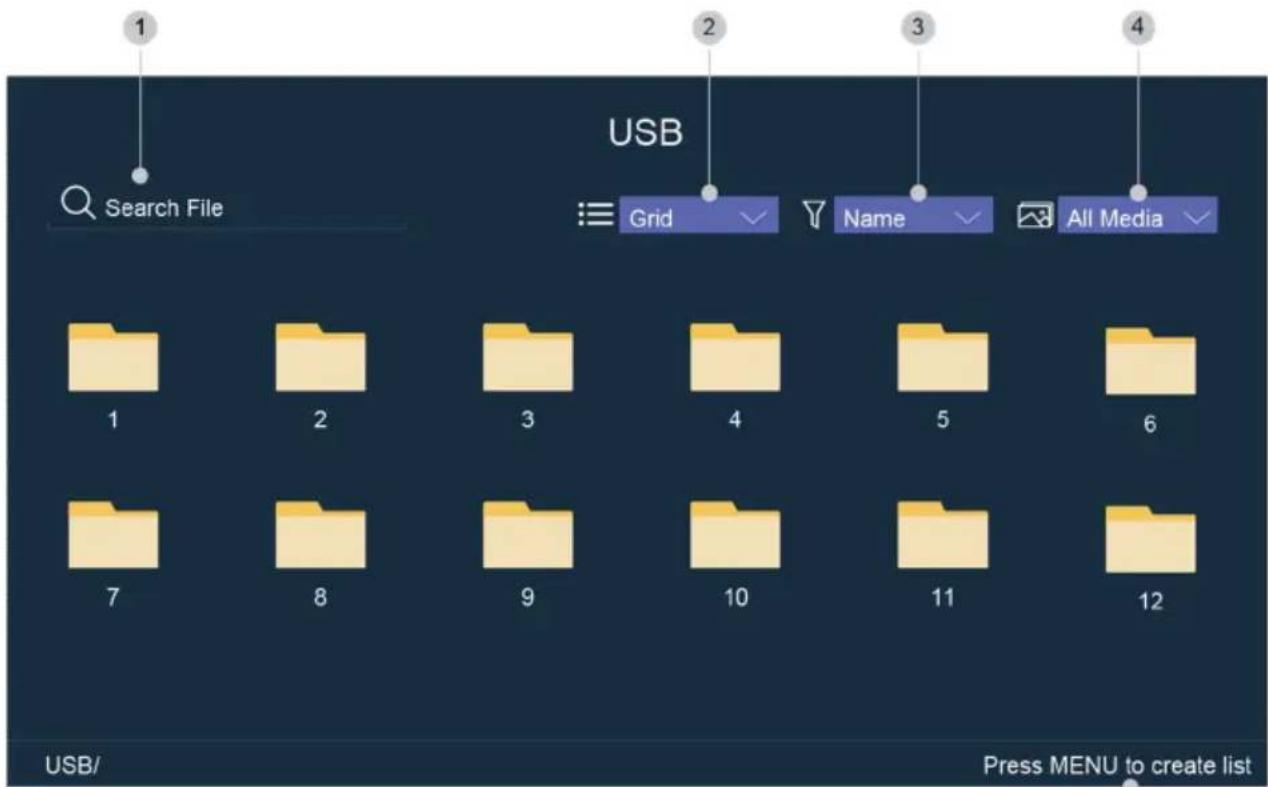
1 Input the content name you want to play.
2 Arrange the content list by Grid, List.
3 Arrange the content list by Name, Date Modified, Size.
4 Filter the content list by All Media, Photo, Video, Music.
5 Create a photo, music, or video playlist.
Playing background music during viewing pictures
You need to:
- Choose a picture to playback.
- Press button to call out playbar.
- Select Background Music and choose your music to create a Music Playlist.
- Play the background music during viewing pictures.
Note:
- The TV may be support the following file formats:
| Medium | File Format |
| Video | .MP4, .MOV, .MPG, .MPEG, .FLV |
| Picture | .jpg, .BMP, .PNG, .GIF |
| Music | .MP3, .AAC, .wav |
- For more information about connection to other device, refer to the detailed introduction of each part.
Home
Getting familiar with the Home screen
Run the TV more conveniently by selecting the corresponding sections. Press 📋 button.
- You can always view the current time at the top of the Home screen.
- If your TV is connected to the Internet through a wireless connection, then the icon will be at the top right corner of the screen.
- Manage apps
Select the item you want to move, press 📄 button to manage.
Search
Search the app you want.
Inputs
Select the input you want.
Settings
Display the Settings menu.
Notifications
Allow pop-up notifications to appear for useful information and events that occur with your TV.
- Select Notifications on the Home screen, and select Settings then display Advertising, New Arrivals, Warnings And Legal Statements, System Message, from which you can choose the types of notifications you would like to receive.
•
VIDAA Account
Sign in your VIDAA account.
A VIDAA account gives you all the best feature of your smart TV and always keeps it up to date.
Bluetooth
TV Bluetooth Speaker
You can go to > Settings > Network > Bluetooth > TV Bluetooth Speaker
TV Output: Mobile device are connected to TV with Bluetooth. Sound outputs via TV speaker.
- Go to your mobile Settings and open the Bluetooth.
- Choose VIDDA TV to connect.
Equipment Management
Manage Bluetooth device
Before you select equipment management, you can press 📄 > Sound > Speakers >
Audio Output > BT Sound Bar
Then you can go to > Settings > Network > Bluetooth > Equipment Management
- Turn on the output speaker.
- The TV will be connect to the output speaker.
Picture and Sound
Adjusting the Picture Quality
Adjust current picture mode to apply to all sources or just current source.
The menu is only for reference. The following modes may differ from the actual product.

Choosing a picture mode

Settings > Picture > Picture Mode
You can select the Picture Mode that provides the best viewing experience.
- Standard: The default mode, to make users experience high-quality images under normal light.
- Cinema Day: Enhance the contrast, color and clarity of the screen to make the color more vivid.
- Cinema Night: Reduce the screen contrast, color and clarity to make the screen looks soft.
- Dynamic: Enhance the contrast, color and clarity of the screen, so that the picture in the dynamic will balance the color.
- Sports: This mode is more suitable for watching sport video.
Choosing a Aspect Ratio

Settings > Picture > Aspect Ratio
You can adjust the Aspect Ratio to stretch or zoom the picture.
- Automatic
• 16:9
4:3 - Panoramic
- Movie Zoom
- Direct
Choosing the Game Mode under ON/OFF

Settings > Picture > Game Mode
Optimised for PC or Games consoles. Reduces Input Lag and improves responsiveness.
Configuring advanced picture settings

Settings > Picture > Picture Mode Settings

Adjust display setting for each Picture Mode.
- Apply Picture Settings: Adjust current picture mode to apply to all sources or just current source.
- Backlight: Adjust image backlight. (Optional: Off/Low/High)
• Brightness: Adjust image brightness.
- Contrast: Adjust image contrast.
• Color Saturation: Adjust image color density.
- Sharpness: Adjust the image edge sharpness.
- Adaptive Contrast: Automatically adjust dark areas and light areas of the image to see more details. Press navigation button to select Off/Low/Medium/high.
- Noise Reduction: Improve the picture quality by reducing noise. (Optional: Off/Low/Medium/High)
- MPEG Noise Reduction: Reduces MPEG block noise to provide clearer edge transitions. (Optional: Off/Low/Medium/High)
- Colour Temperature: Adjust the overall color of the image. (Optional: Warm1/Warm2/Standard/Cool)
- Expert Settings: Adjust the colour space and Gamma to best suit the content you're viewing.
- Overscan: Change the video size setting to crop the edges of the displayed image.
- Reset Current Mode: Restore all the picture settings in the current picture mode to the factory default values.
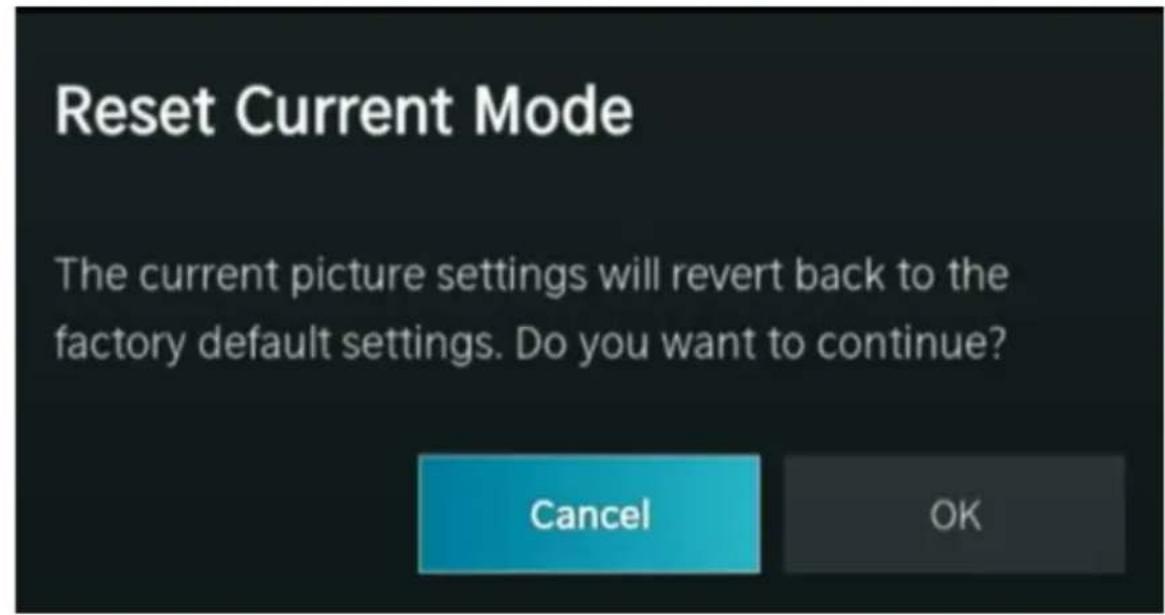
Adjusting the Sound Quality
Adjust current sound mode to apply to all sources or just current source.
The menu is only for reference. The following modes may differ from the actual product.
Choosing a sound mode

Settings > Sound > Sound Mode
You can select a favourite sound mode suitable for the content type or the listening environment.
- Standard: Produced a balanced sound in all environment.
- Theater: Increased the surround sound effect and provides a more prominent bass response.
- Music: Preserves the original sound. Good for musical programs.
- Speech: Low and high frequencies are attenuated to improve the reproduction and clarity of the human voice.
- Late Night: Improve the reproduction and clarity of the human voice with a low volume level.
- Sport: Optimised sound for watching Sports events.

Settings > Sound > Headphone
Set the sound out mode for headphones.

Settings > Sound > Sound Mode Settings
Adjust the audio settings of the TV: Apply Audio Settings/Equalizer/Wall Mount Setup/Auto Volume Control/Reset Current Mode.

Settings > Sound > Speakers
Select the speakers which you want to use.
Accessibility
Press Navigation button to select Accessibility

Settings > Accessibility
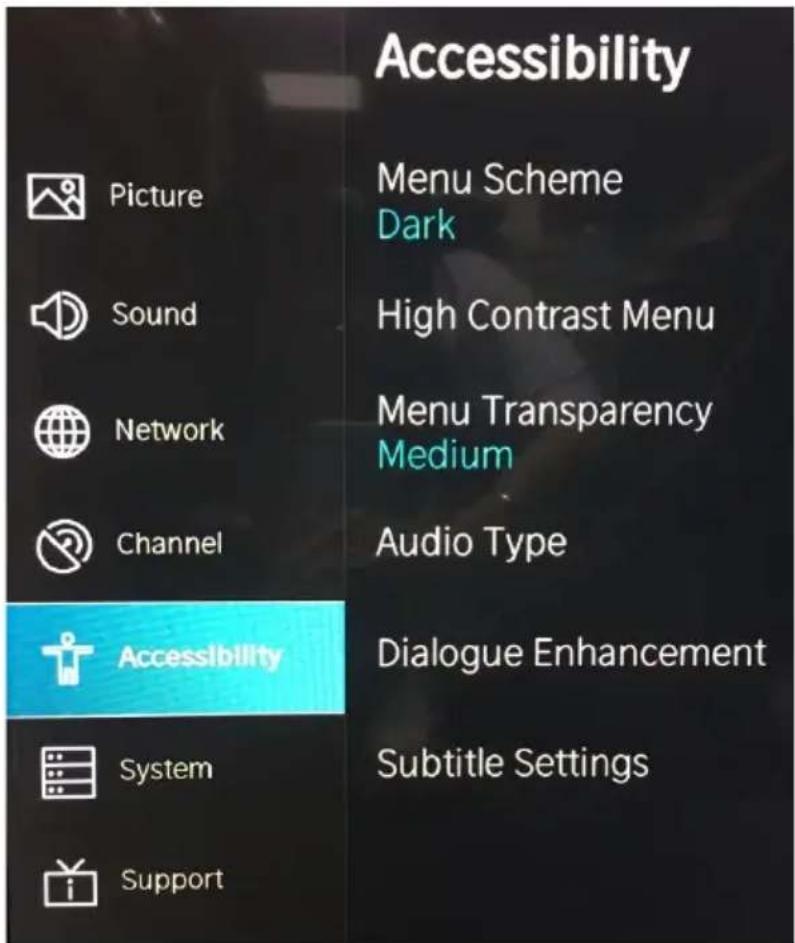
- Menu Scheme: Set the scheme of menu. (Optional: Dark/Light)
• High Contrast Menu: Turn High Contrast Menu On or Off. - Menu Transparency: Set the transparency of menu. (Optional: Off/Medium/High)
• Audio Type: Accessibility audio settings. - Dialogue Enhancement: Enable or disable dialogue enhancement.
- Subtitle Settings: Adjust Subtitle Settings for digital broadcast content.
System and Support
Setting Time

Settings > System > Time
Set the current time based on your location.
- Time Format
Set the time to display in a 12 or 24-hour format.
- Date/Time
Set the date and time.
- Time Zone
Set the time zone.
- Daylight Savings
Select whether to apply Daylight Savings Time to the TV.
Using the timer

Settings > System > Timer Settings
Adjust the timer settings to suit your preference.
- Sleep Timer
Set the sleep timer to automatically turn the TV Off within a specified time: Off, 15 Minutes, 30 Minutes, 60 Minutes, 90 Minutes, 120 Minutes, User Defined.
• Power On Timer
Set the clock for the time you want the TV to turn on automatically. You can set the time only once or set the time in specified date weekly.
• Power Off Timer
Set the clock for the time you want the TV to turn off automatically. You can set the time only once or set the time in specified date weekly.
- Menu Timeout
Set the amount of time that you would like for the menu to display: Off, 10s, 20s, 30s, 60s, 5min.
- Auto Sleep
Set the amount of time that you would like the TV to auto power off after a period of no activity : Off,3H, 4H.
• Auto Standby with No Signal
TV will go to standby if there is no signal after the set time: Off, 15min.
Upgrade

> Settings > Support > System Update
Set your TV to receive the latest firmware.
• Auto Firmware Upgrade
Set your TV to automatically receive the latest firmware.
- Check Firmware Upgrade
Check to ensure that your TV has received the latest firmware.
Note: Please ensure your TV is connected to the Internet.
• System App Auto Upgrade
App auto upgrade will be done in the background. May need your confirmation on new Privacy Notices to complete upgrade in the progress.
- Upgrade From USB
Upgrade TV software from USB device.
Note:
- Please ensure the USB flash drive insert to USB2.0 port of the TV.
- The updating files must be available in root directory.
- The format of the USB must be FAT32 and the partition table type must be MBR.
E-Manual

> Settings > Support > E-Manual
Launch the E-Manual and get to know more about your TV: First-Time Use, Enjoy Live TV, Benefits of Smart TV, Connecting to External Devices, Settings Overview, Entertainment, Accessibility Features, Troubleshooting.
Troubleshooting
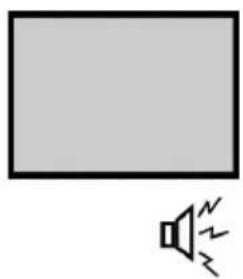
No image and voice
natural_image
Simple line drawing of a blank rectangular area with a speaker icon emitting sound waves (no text or symbols)Possible causes:
- Power cord, antenna or input devices are not connected;
• The TV set is not powered on.
Solutions:
- Check Power cord, antenna and input devices;
- Press Power key on the remote control;
- Press Power key on the set to power it off for 5 seconds and then re-power it on.
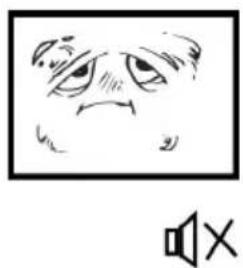
No voice
natural_image
Simple line drawing of a sad face with a speaker icon below (no text or symbols)Possible causes:
- The volume is too low; Muted or cancelled;
- Incorrect sound system.
Solutions:
- Press Volume key to turn up the volume;
- Press Mute key to cancel Mute mode.
- Well connect connection to the background sound;
- Change the sound system in the menu.
Snows and noises
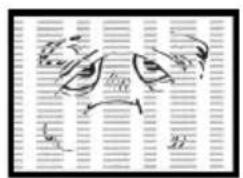
Possible causes:
- The cable is damaged or gets loose;
- Incorrect channel preset;
- Improper antenna positioning.
Solutions:
- Check whether the connection of the antenna cable, DVD and the cables is correct;
- Reset channels or fine tune the channel;
- Adjust the direction of the antenna.
Achromatic colour
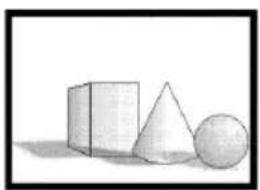
natural_image
Simple line drawing of three geometric shapes: cube, cone, and sphere (no text or symbols)
Possible causes:
- Incorrect Colour system settings; Low chroma level setting;
- Improper antenna positioning.
Solutions:
- Change the colour system into the local system in the menu;
- Increase chroma level;
- Adjust the direction of the antenna.
Remote control has no response
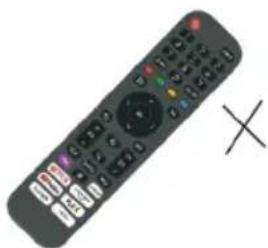
natural_image
Black remote control with black buttons and a white X symbol (no text or labels)Possible causes:
- Battery runs up;
- Incorrect battery loading;
Solutions:
- Check the battery electricity or replace the battery;
- Check if the poles of the battery are correct.
Note: To properly watch CANAL+ using this product, carry out DVB-T channel search when CANAL+ is unscrambled, from 12:30 p.m. to 1:30 p.m. and from 7:00 p.m. to 8:30 p.m.
Important Notice
The display of this television is made up of a large number of colour. Although it has at least 99.999% of effective pixels, some black dots or bright spots (red, green or blue) may appear constantly on the screen. This is a characteristic of the screen (according to industrial standards), and is not a defect. Sometimes, the screen may include an unlit pixel, which will be seen as a blue, red, green or black dot. This does not affect the functioning of the product and should be considered normal.
Cleaning Instruction
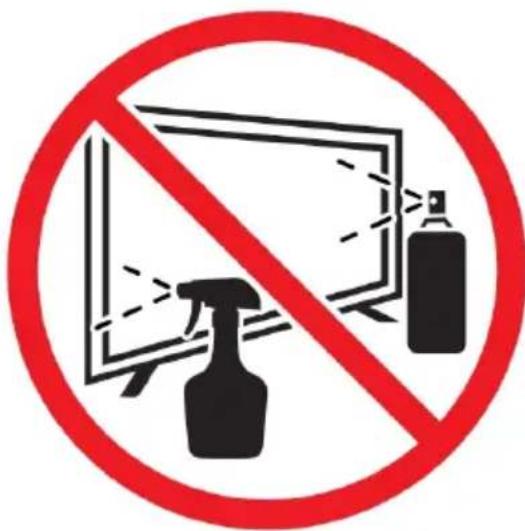
- Before cleaning this product, press STANDBY button to turn it to the standby mode and wait for a few minutes to disconnect the power plug.
- Wipe this product with a dry, soft cloth. Do not spray water directly onto the TV, but apply a small amount of water on the corner of the cloth and wipe as gently as possible. Never use cleaning fluids, wax, or chemicals.
- Never use alcohol, benzene, thinner, cleaning fluid or other chemicals. And do not use compressed air to remove dust.
- If the surface is extremely dirty, wipe it with a cloth which has been dipped in a weak soap-water solution and wrung out thoroughly, and then wipe again with a dry cloth.
●Before you plug in the TV back, let the screen dry completely.
Technical data sheet
Information for Electronic Displays for Commission Regulation
2019/2013/EU
| Value | Unit | |
| Model identification | SC-55S1FJORD | |
| Manufacturer's name or trade mark | SCHNEIDER | |
| Energy efficiency class for standard Dynamic Range (SDR) | G | A-G |
| On mode power demand for Standard Dynamic Range (SDR) | 100kWh/1000h | W |
| Energy efficiency class (HDR) | N/A | A-G |
| On mode power demand in High Dynamic Range (HDR) mode | N/A | W |
| Off mode, power demand | 0W | W |
| Standby mode power demand | Max. 0.5W | W |
| Networked standby mode power demand | 0.39 | W |
| Electronic display category | television | television/monitor/signage/other |
| Size ratio | 16:9 | Integer |
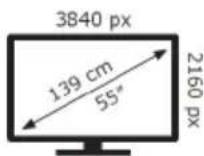
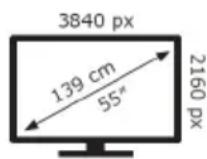
| Screen resolution (pixels) | 3840x2160 | Pixels |
| Screen diagonal | 139 cm | cm |
| Screen diagonal | 55” | Inches |
| Visible screen area | 8230.1cm2 | cm2 |
| Panel technology used | LED | E.g. LCD/LEDLCD/QLEDLCD/OLED/MicroLED/QDLED/SED/FED/EPD,etc. |
| Automatic BrightnessControl (ABC) available | No | Yes/No |
| Voice recognition sensor available | No | Yes/No |
| Room presence sensor available | No | Yes/No |
| Image refresh frequency rate | 60Hz | Hz |
| Power supply type: | Internal | Internal/External/Standar dised external |
| WiFi (Wireless) Frequency | 2400 - 2483.5 MHz5150 - 5350 MHz5470 - 5825 MHz | |
| Maximun transmittedWi-Fi power | 19dBm | |
Note:
- Energy efficiency class: A (most efficient) to G (lease efficient)
- Annual energy consumption in kWh per 1000 hr, based on the power consumption of the television operating 1000 hours. The actual energy consumption will depend on how the television is used.
The above value has been measured in accordance with standards under specified operating conditions. Result may vary according to operation time, contrast, brightness, operating mode....etc.
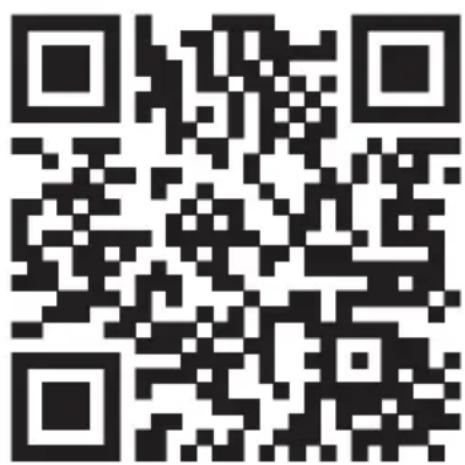
Product Information sheet according to EU Regulation No. 2019/2013 Energy labelling for Electronic Display & Television can be found below URL or QR code indicated on Energy label URL:
https://eprel.ec.europa.eu/qr/1037655
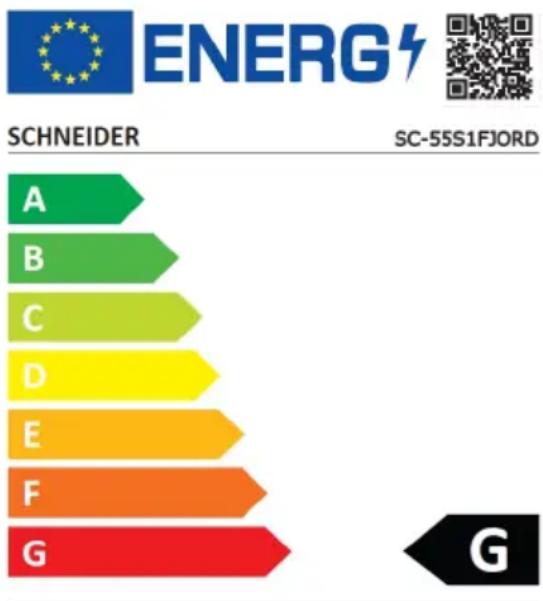
bar
| Rating | Color | | :--- | :--- | | A | Green | | B | Light Green | | C | Yellow-Green | | D | Yellow | | E | Orange | | F | Orange | | G | Red |100 kWh/1000h
2019/2013
Technical data sheet
| Trade Mark | SCHNEIDER |
| Reference | SC-55S1FJORD |
| Model | DVB-PM1550302HCATSBI |
| Viewing angle | Typical: 178(H) \ 178(V) |
| Resolution | 3840*2160 |
| Display Colour | 1.07G |
| Contrast | 5000 :1 (typical) |
| Ratio | 16:9 |
| Life time | 30,000 hours |
| Tuner | DVB-T |
| TV power supply | AC 100-240V, 50/60Hz |
| Consumption | Max.120W |
| Dimensions | 1226(W)×254(D)×773(H) |
| Weight | 11.8 kg |
| Socle | 2pcs, removable |
| Operating temperature | 0°C et 35°C |
| Remote control power supply | AAA*2pcs (not included) |
| USB port power supply | 5V,500mA |
| Hotel mode | NO |
| Loud speaker | 2*8W |
| Input | RF,HDMI*3,CVBS&L/R,LAN,CI, USB*2 |
| Output | Earphone out, Optical out |
| Reading formats | Vidéo : . mp4 |
| Musique : .mp3 | |
| Multimedia via USB | Photos : .jpg |
| Texte : .txt |

HIGH-DEFINITION MULTIMEDIA INTERFACE
The terms HDMI, HDMI High-Definition Multimedia Interface, and the HDMI Logo are trademarks or registered trademarks of HDMI Licensing Administrator, Inc.
Position: Quality Assurance Engineer
Signature:
Date: 30 Nov 2021
SCHNEIDER


(1)
FR - Manuel d'utilisation / Veuillez lire attentivement ce manuel avant de l'utiliser et conservez-le pour toute référence ultérieure.
IT - Manuale d'uso / Si prega di leggere attentamente questo manuale prima dell'uso e di conservarlo per riferimento futuro.
ES - Manual del usuario / Por favor, les este manual cuidadosamente antes de usuario y guárdelo para futuras referencias.
PT - Manual do usuário / Por favor, leis este manual cuidadosamente antes de usar, e guarde-o para referência futura.
AL - Benutzerhandbuch / Bitte lesen Sie dieses Handbuch vor dem Gebrauch sorgfaltig durch und bewahren Sie es zum späteren Nachschlagen auf
NL - Gebruiksaanwijzing / Lees deze handleiding zorgvuldig door voordat u hem gebruikt en bewaar hem voor toekomstig gebruik.
GR - Εγχειρίδιο χρήσης / Διαβάστε προσεκτικά το παρόν εγχειρίδιο πριν από τη χρήση και φυλάξτε το για μελλοντική αναφορά.
RO - Cititi cu atentie manualul de utilizare si pastrati-l pentru consultari ulterioare

- Remarques:
- Liste des chaînes
- Remarque :
- Operations
- For Reference
- Important safety instructions – please read carefully and keep for future reference
- CAUTION !
- Where to install the product
- Proper ventilation
- Do not expose the product to high temperatures, moisture, water and dust.
- Electric supply
- WARNING
- EU Declaration of conformity
- CE
- Auto Standby
- Product Introduction
- Accessories
- Connecting Cables
- Connecting to power source
- Connecting external antenna to the unit
- Remote Control
- STANDBY(POWER)
- INPUT
- Number buttons (0-9)
- GUIDE
- CH.LIST
- 4 Color
- (MENU)
- 8
- DIRECTION/OK
- 10
- EXIT
- (HOME)
- Notes:
- Prepare the remote control
- Base Installation
- - Mounting of the stand
- • Disassembly of the stand
- Wall Mounting Instructions
- MAKE SURE ALL THE EQUIPMENTS AND POWER CORD ARE CONNECTED PROPERLY AND THE UNIT IS SET IN CORRECT MODE BEFORE KINDS OF OPERATIONS.
- BASIC OPERATION
- SELECT DESIRED PROGRAM
- VOLUME CONTROL
- MUTE CONTROL
- INPUT SETTING
- MULTIAUDIO SETTING
- INFORMATION DISPLAY
- MEDIA PLAYBACK
- LIVE TV
- Channel Scan
- Channel List
- Note:
- CONNECTION
- Wired LAN
- Automatically obtain an IP address
- Manually enter the IP address
- Wireless
- > Settings > Network > Network Configuration
- HDMI-CEC
- Settings > System > HDMI-CEC
- HDMI Device
- USB Device
- Multi-screen
- Screen Sharing
- INPUT > Screen Sharing
- Content Sharing
- System > Application Settings > Content Sharing.
- Smart Functions
- Media
- You need to:
- Home
- Search
- Inputs
- Settings
- Notifications
- VIDAA Account
- Bluetooth
- TV Bluetooth Speaker
- Equipment Management
- Picture and Sound
- Adjusting the Picture Quality
- Adjusting the Sound Quality
- Accessibility
- System and Support
- Setting Time
- Using the timer
- - Auto Sleep
- • Auto Standby with No Signal
- Upgrade
- > Settings > Support > System Update
- • Auto Firmware Upgrade
- - Check Firmware Upgrade
- • System App Auto Upgrade
- - Upgrade From USB
- E-Manual
- > Settings > Support > E-Manual
- Troubleshooting
- No image and voice
- No voice
- Snows and noises
- Achromatic colour
- Remote control has no response
- Important Notice
- Cleaning Instruction
- Technical data sheet
- SCHNEIDER
Brand : SCHNEIDER
Model : SC55S1FJORD
Category : TV