SCEO23AB - Electric oven SCHNEIDER - Free user manual and instructions
Find the device manual for free SCEO23AB SCHNEIDER in PDF.

| Product type | Electric fan oven |
| Brand | Schneider |
| Model | SCEO23AB |
| Capacity | 23 liters |
| Power supply voltage | 220-240 V ~ 50/60 Hz |
| Power | 1500 W |
| Cooking modes | Off, Gratinate, Bake (convection), Roast (with rotisserie), Grill |
| Temperature range | From 100°C to 230°C (estimated from manual) |
| Timer | Yes, with end-of-cooking alarm |
| Interior light | Yes, turns on when powered |
| Door | Safety tempered glass |
| Included accessories | Drip tray, crumb tray, cooking grid, drip tray handle, rotisserie with fork |
| Maintenance and cleaning | Continuous cleaning coating; dishwasher-safe accessories |
| Safety | Manual stop by timer button; tempered glass door; hot surfaces indicated |
| Repairability | Power cord replaceable only by a qualified professional |
| Usage | Domestic use only |
Frequently Asked Questions - SCEO23AB SCHNEIDER
User questions about SCEO23AB SCHNEIDER
0 question about this device. Answer the ones you know or ask your own.
Ask a new question about this device
Download the instructions for your Electric oven in PDF format for free! Find your manual SCEO23AB - SCHNEIDER and take your electronic device back in hand. On this page are published all the documents necessary for the use of your device. SCEO23AB by SCHNEIDER.
USER MANUAL SCEO23AB SCHNEIDER
INSTRUCTION MANUAL·MANUEL D'INSTRUCTIONS
IMPORTANT SAFETY INSTRUCTIONS
When using an electric (convection) oven, always follow a number of basic safety precautions, including:
- This device can be used by children over 8 years of age and by persons whose physical, sensory or mental abilities are reduced, or persons without experience or knowledge, if they have benefited, by the intermediary of a person responsible for their safety, surveillance or prior instructions concerning the use of the device. Never let a child play with the device. Cleaning and maintenance operations should not be performed by children unless they are older than 8 years of age and remain under supervision.
- Keep the appliance and cord away from children under 8 years of age.
- If the power cable is damaged, it must
be replaced by the manufacturer, its after-sales service or similarly qualified persons in order to avoid any danger.
- The devices are not intended to be operated by means of an external timer or by a separate remote-control system
- Do not touch hot surfaces. Always use the handles or knobs.
- Close supervision is necessary when the appliance is used by or near children.
- To protect against electric shock, do not immerse cord, plug, or any part of the oven in water or other liquids.
- Do not leave the power cord near the edge of a table or countertop or touch hot surfaces.
- Do not use the appliance if it has a damaged cord or plug, if the appliance has malfunctioned, or if it has been damaged in any manner.
Return the unit to the nearest authorized service centre for inspection, repair or adjustment.
- The use of attachments not recommended by the appliance manufacturer may cause hazards and injuries.
- Do not place the appliance on or near an electric cooktop or operating gas cooktop.
- To ensure proper air circulation, make sure there is at least a 10 ~cm gap around the oven during use.
- Unplug from outlet when not in use and before cleaning. Allow the unit to cool before putting on or taking off parts and before cleaning.
- To turn the power off, turn the time switch to "OFF" and unplug the power plug. Always grasp the plug to unplug it, never pull the power cord.
- Be extremely careful when moving the broiler pan containing hot oil or
other hot liquid.
- Do not cover any part of the oven with aluminium foil. This can cause the device to overheat.
- Use extreme caution when removing the broiler pan or grates, and when disposing of hot grease or other hot liquids.
- Do not clean the inside of the oven with metal scouring pads as they may come loose, touch electrical parts, and create a risk of electric shock.
- Do not put metal or oversized food in an electric oven, as this may result in a fire and risk of electric shock.
- A fire may occur if the oven is covered or if it is in contact with a flammable material when it is in use (for example: curtains, draperies, walls or anything similar). Do not place any object on the top of the device while it is in operation.
- Use extreme caution when using
cookware made of materials other than metal or heat-resistant glass.
- Make sure nothing is touching the upper and lower heating elements of the oven.
- Do not place any of the following materials in the oven: cardboard, plastic, paper, or any similar material.
- Do not store anything other than the accessories recommended by the manufacturer in this oven when you are not using it.
- Always wear insulating and protective inserts when inserting or removing food / utensils from the hot oven.
- This appliance is equipped with a tempered safety glass door. This type of glass is stronger and breaks more easily than ordinary glass.
Nevertheless, tempered glass can break near its edges. Be careful not to scratch the surface of the door and not chip the edges.
- This unit is OFF when the time button is in the "OFF" position.
- Do not use the appliance outdoors.
- Do not use the appliance for other than intended use.
- Surfaces can become very hot during use.
- The door and outer surfaces can become very hot while the unit is in operation.
- This device is intended for use in domestic applications only.
- This device must not be powered by an external power on / off device, such as a timer.
- The back side should be close to the wall.
- For cleaning and maintenance instructions, refer to cleaning and care section on page 13.

Suitable for food
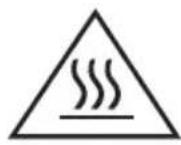
CAUTION: very hot surface
OPERATING INSTRUCTIONS
Domestic use only
Description of your rotating heat oven
MAIN COMPONENTS:
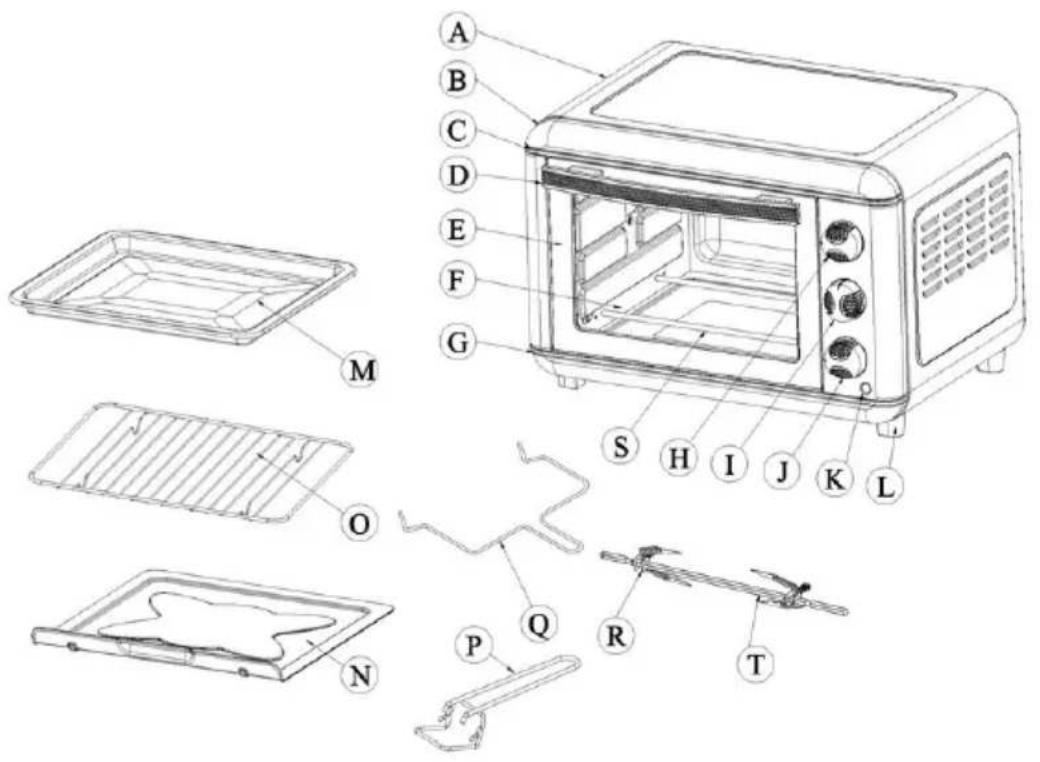
A. Housing
B. Front plate
C. Upper decorative strip
D. Door handle
E. Door frame
F. Glass door
G. Lower decorative strip
H. Temperature knob
I. Mode knob
J. Time knob
K. Indicator light
L. Foot
M. Drip pan
N. Crumb Tray
O. Cooking grid
P. Drip pan handle
Q. Rotisserie handle
R. Roasting fork
S. Heating element
T. Ax of the rotisseries
Read all the chapters of this manual and follow all instructions carefully.
Before using your convection oven
Before using your electric convection oven for the first time, be sure to:
- Read all the instructions contained in this manual.
- Check that the oven is disconnected from the electrical outlet and that its time knob is in the "OFF" position.
- Wash all accessories in hot soapy water or in a dishwasher.
- Dry all the accessories thoroughly and reassemble them in the oven, plug the oven into an electrical outlet. Your new electric oven is now ready for use.
- After reassembling your oven, we recommend that you operate it at the highest temperature
setting (230^) using the Grill mode for about 15 minutes to remove any packaging residues that may remain after shipping. This also eliminates all traces of odour that were originally present.
Note: When first used, the appliance may emit some smoke and a slight odour (for about 15 minutes). This is normal and harmless. This is due to the combustion of the protective substance applied to the heating elements in the factory.
Using your convection oven & rotisserie oven
About rotating heat cooking
Rotating heat cooking combines hot air movements generated by a fan with conventional functions (grill , brown , cook * ). Rotating heat usually allows faster cooking than conventional electric radiant heat ovens. The fan gently propels air into the food areas, allowing them to be cooked and browned quickly, preserving their moisture and flavour. The air movements make the temperature around the food uniform, making cooking more homogeneous compared to conventional ovens where some areas are warmer and others colder. The rotating heat allows you to cook at lower temperatures, saving energy and helping to keep the kitchen cooler. With rotating heat, very hot air circulates around the food, which significantly speeds up their cooking compared to conventional ovens.
Please familiarize yourself with the following oven functions and accessories prior to first use:
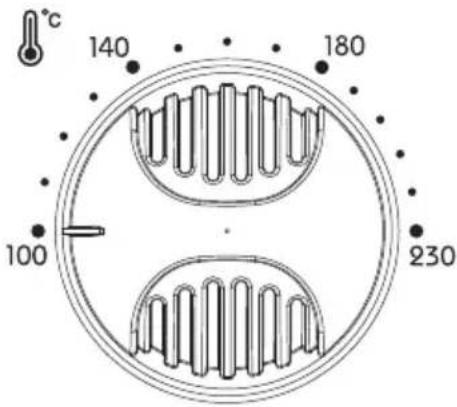
- Temperature Control(H): The temperature adjustment range is from 100^ to 230^ C. Set the desired temperature according to the selected cooking program.
- Function Control(I): This oven is equipped with five modes allowing different types of cooking
Six stages switch heating selector: Off/ upper & lower + C/upper + C /upper & lower/upper + R/ upper & lower + R+C
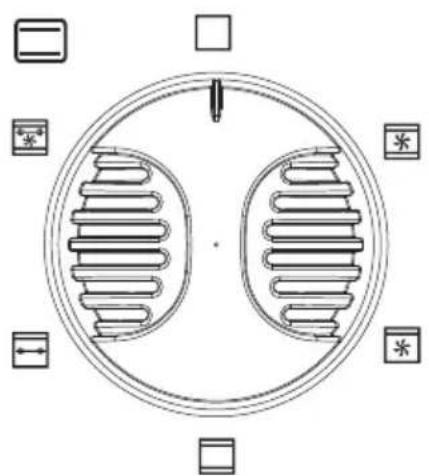

1.Off.

2.For broiling fish,steak,poultry,pork chops,etc.
(upper & lower + convection)

3.For cakes, pies, cookies, poultry, beef, pork, etc.
(upper + convection)

4.For bread, muffins, frozen waffles, pizza ,etc.
(upper & lower heating)

5.For roast or chicken, etc.
(upper heating + Rotisserie)

6.For roast or chicken, etc.
(upper & lower heating+convection)
Rotisserie+Convection
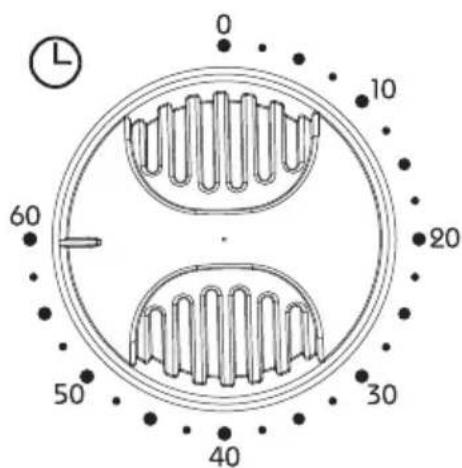
- Time Control (J): when you turn activate the timer segment of the control, turn to the right (clockwise) to toast or use as a timer. This function also has a bell rings at the end of the programmed time.
- Convection fan: The convection fan works automatically with function switch. When the desired temperature and Function is chosen, set the timer at the desired position. The convection fan will start operating.
Power "ON" neon light: It's illuminated whenever the oven is turned on. - Bake Tray (M): For use in broiling and roasting meat, poultry, fish and various other foods. Also to be used when using the rotisserie handle to catch the drippings.
- Wire Rack(O): For toasting, baking, and general cooking in casserole dishes and standard pans.
WARNING: To avoid the risk of injury or burns, do not touch the hot surfaces while using the oven. Always use pot holders.

CAUTION: Take extreme care when removing the drip pan, grill, and any hot containers from a hot oven. Always use the drip pan handle or pot holders to remove hot items from the oven.
Rotisserie Cooking
We recommend that you do not cook a roast larger than 2.5kg on the rotisserie skewer. Chicken should be bound in a string to prevent the chicken legs or wings from unraveling during roasting and so that rotisserie assemble will rotate smoothly. For best results we recommend that you preheat the oven for 15 minutes on 230^ .
Operation
- Set the temperature control to 230^ .
- Insert the meat or poultry that you are going to cook onto the rotisserie skewer making sure that the meat or poultry is secured tightly onto the skewer with the skewer clamps and thumbscrews. Make sure that the meat or poultry is centered onto the skewer.
- Insert the pointed end of the rotisserie skewer into the drive socket located
on the right hand side of the oven wall. Make sure that the square end of the rotisserie skewer rests on the rotisserie skewer support located on the left hand side of the oven wall.
- Slide the bake tray onto the lowest position to catch the food drippings.
- Turn function control to rotisserie.
- Turn the time control to the "ON" position.
- When the cooking is completed, turn the time control knob to the "OFF" position.
- Remove the rotisserie skewer from the oven by placing the hooks of the rotisserie handle under the grooves on either side of the rotisserie skewer, lift the left side of the rotisserie skewer first by lifting it up and out. Then pull the rotisserie skewer out of the drive socket and carefully remove the roast from the oven.
- Take the meat or poultry off the rotisserie skewer and place on a cutting board or platter.
Rotisserie Guide
Cooking results may vary. Adjust these times to your individual requirements
| MEAT | OVEN TEMPERATURE | TIME PER LB. |
| BEEF ROAST | 200°C | 30-35min |
| PORK ROAST | 200°C | 45-50min |
| HAM | 200°C | 45-50min |
| CHICKEN | 230°C | 30-40min |
| TURKEY | 230°C | 30-40min |
Note: All roasting times are based on meats at refrigerator temperature. Frozen meats may take considerably longer. Therefore, use of a meat thermometer is highly recommended.
Roasting in your oven
Roast your favourite piece of meat to perfection. You can cook chickens and turkeys of about 4kg and roasts of about 3kg with this oven. A guide is provided to help you determine the cooking times. However, we suggest that you regularly check the progress of cooking with a meat thermometer. For best results, we recommend preheating the oven for 15 minutes at 230^ . We do not recommend the use of oven roasting bags or glass containers in the oven. Never use cardboard, plastic, paper, or any similar material in the oven.
Usage
- Place the grill in the lowest position in the oven.
- Place the food to be cooked in a roasting pan. If you want to use the drip pan (juice/cooking plate), you do not need to insert the grill, as the drip pan supports itself on the side brackets of the oven.
- Set the temperature knob to the desired temperature.
- Turn the time knob to the ON position.
- To control or stop cooking, use the supplied drip pan handle to slide food more easily into and out of the oven.
- When cooking is completed, turn the time knob to the OFF position.
Roasting guide
Cooking results may vary. Set the time according to your personal preferences.
| MEAT | OVEN TEMPERATURE | COOKING TIME |
| ROAST BEEF | 230°C | 30-35 minutes |
| ROAST PORK | 230°C | 40-45 minutes |
| HAM | 230°C | 35-40 minutes |
| CHICKEN | 230°C | 25-35 minutes |
| TURKEY | 230°C | 25-30 minutes |
WARNING: To avoid the risk of injury or burns, do not touch the hot surfaces while using the oven. Always use pot holders.

CAUTION: Take extreme care when removing the drip pan, grill, and any hot containers from a hot oven. Always use the drip pan handle or pot holders to remove hot items from the oven.
BROWNING
For best results, it is recommended to preheat the grill oven for 15 minutes at 230^ .
Use
Preheating
- Set the thermostat knob to 230^
- Turn the mode knob to "Browning" and preheat the oven.
- Place the grill on the drip pan.
Cooking
- Set the temperature knob to the desired temperature.
- Place the food on the grill and insert them into the upper side brackets.
- The food should be placed as close as possible to the upper heating elements without touching them.
- Apply sauces and oils on the food with a brush according to your preferences.
- Turn the time knob to the on position.
It is advisable to leave the door slightly ajar. - Turn the food when half the prescribed cooking time has elapsed.
- When cooking is completed, turn the time knob to OFF.
Browning guide
Cooking results may vary. Set the time according to your personal preferences. Also check the cooking at regular intervals to avoid overcooking the food.
| MEAT | OVEN TEMPERATURE | COOKING TIME |
| RIB STEAK | 230°C | 25-30 minutes |
| SIRLOIN | 230°C | 25-30 minutes |
| HAMBURGER | 230°C | 25-28 minutes |
| LAMB CHOPS | 230°C | 30-40 minutes |
| CHICKEN DRUMSTICKS | 230°C | 30-35 minutes |
| FISH FILLETS | 200°C | 20-25 minutes |
| SALMON FILLETS | 200°C | 20-25 minutes |
| PORK CHOPS | 230°C | 40-45 minutes |
Note: All cooking times shown correspond to pieces of meat at the temperatureof a refrigerator. Frozen meats may require much longer periods of time. This is why it is highly recommended to use a meat thermometer.
Grilling
The GRILL mode uses all heating elements. This appliance allows allow you to toast 4 to 6 slices of bread, 6 muffins, waffles or frozen pancakes. When grilling only 1 or 2 items, placethem on the drip pan in the centre of the oven.
Use
Preheating
- Set the temperature knob to 230^ .
- Turn the time knob to the on position.
- Set the mode knob to "Grill".
Cooking
- Set the temperature knob to the desired temperature.
- Place the food to be grilled on the cooking grill.
- Set the temperature knob to the appropriate temperature.
The bell goes off to indicate the end of the cooking time.
Note: The grill should be positioned in the middle of the oven with the recesses pointing downwards.
Cooking
The COOK mode uses only the lower heating elements. For best results, it is recommended to preheat the oven for 15 minutes at 230^ .
Use
Preheating
- Set the temperature knob to 230^ .
- Turn the mode knob to "Cook *".
- Place the cooking grill on the middle or lower side brackets.
Cooking
- Set the temperature knob to the desired temperature.
- Place the food on the grill and insert them into the side brackets.
- The food should be placed as close as possible to the lower heating elements without touching them.
- Apply sauces and oils on the food with a brush according to your preferences.
- Turn the time knob to the ON position.
It is advisable to leave the door slightly ajar. - Turn the food when half the prescribed cooking time has elapsed.
- When cooking is completed, turn the time knob to OFF.
Positioning the cooking grills
Cookies - Use the lower and middle side brackets.
Layer cakes - Use only the lower side brackets (bake the layers one after the other). Pies - Use the lower and middle side brackets.

CAUTION: Take extreme care when removing
drip pan, grill, and any hot containers from the oven.
Always use the drip pan handle or pot holders to remove hot items from the oven.
the
Maintenance and cleaning
WARNING: Always unplug the oven and let it cool down before cleaning.
Your oven is equipped with a continuous cleaning coating that automatically cleans itself during normal use. Any spraying that occurs while cooking and comes into contact with this coating is oxidised during operation of the oven. If necessary, wipe the sides of the oven with a nylon scouring pad, a damp cloth or sponge and a mild detergent. Do not use steel wool scouring pads or abrasive cleaners and do not scrape the sides of the oven with metal utensils, as all of these methods may damage the continuous cleaning coating. All accessories must be washed in hot soapy water and can be cleaned in a dishwasher. Wipe the glass door with a damp sponge and dry it with paper towels or a rag. Clean the outside of the oven with a damp sponge. Do not use abrasive cleaners, as these may damage the external finish coating.
Do not use abrasive cleaners or steel wool scouring pads to clean the drip pan, as this may damage the enamel.
Allow all parts and surfaces to dry completely before plugging in and using the oven.
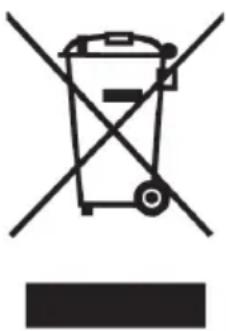
This logo affixed to the product means that it is an appliance whose processing as waste falls within the scope of the 2012/19/EU Directive on Waste Electrical and Electronic Equipment (WEEE). The presence of hazardous substances in electrical and electronic equipment may have potential effects on the environment and human health in the reprocessing cycle of this product.
Thus, at the end of the service life of this appliance, it must not be disposed of with unsorted municipal waste.
As a final consumer, your role is paramount in the cycle of reuse,
recycling and other forms of upgrading of this electrical and electronic equipment. Recovery and collection systems are made available to you by local authorities (waste disposal centres) and distributors.
You have the obligation to use the selective collection systems available to you.
The warranty does not cover the wear parts of the product or any problemsof damage resulting from:
(1) superficial deterioration due to normal wear and tear of the product;
(2) defects or deterioration due to contact of the product with liquids and due to corrosion caused by rust;
(3) any incident, abuse, misuse, or unauthorized modification, disassembly or repair:
(4) any improper maintenance operation, use of the product that is not in accordance with the instructions, or connection to an incorrect voltage;
(5) any use of accessories not supplied or not approved by the manufacturer.
The warranty will be void if the nameplate and/or serial number of the product are removed.
Technical characteristics
Capacity: 23L
Voltage: 220-240V~50/60 Hz
Power: 1500 W
CONSIGNES DE SECURITÉ IMPORTANTES
Customer Service Hotline
Service E-mail 電郵地址:8210service@gilman-group.com
Please register now at 請即上網登記:wwwToolBar.hk
Website 網址:www.gilman-group.com

Gilman
since 1841

a Gilman Group Company