USER MANUAL X20 Faema
natural_image
Line drawing of a modern coffee machine with control panel and side-mounted stand (no text or symbols)

FAEMA
faema.com
QUICK START GUIDE
USA
981-139-000 (1842) QUICK

This manual is a QUICK START GUIDE which contains the main instructions for using the machine.
The complete version of the Usage and Installation Manual is available on the machine, under the DOCUMENTATION section of CUSTOMER PROGRAMMING (1), or on the website indicated at the bottom of the page (2), using the login details given below, where you can consult and download the required file.
CUSTOMER PROGRAMMING
PROGRAMMATION DU CLIENT
(2) https://order.gruppocimbali.com/explorer/spareparts/page/login
User ID: guest
PW: Entr@nc3

GRUPPO CIMBALI
Please sign in
guest
......
Sign in

FAEMA
English
Translation of the original instructions
Français
1 Dispensing nozzle coffee/cappuccino/solubles
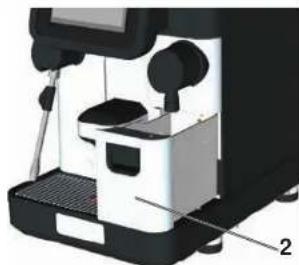
2 Grounds drawer
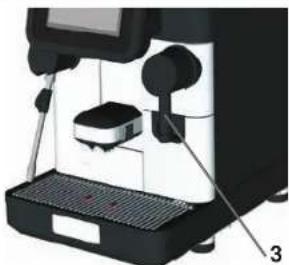
3 Hot water outlet
4 Touch screen
5 Decaffeinated coffee panel
6 Soluble hopper
6a Coffee hopper 2
6b Coffee hopper 1
7 "Sleep mode" led
8 "Sleep mode" button
9 Main switch
10 Steam pipe/Autosteam pipe *
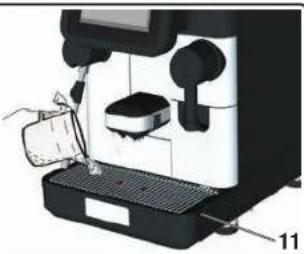
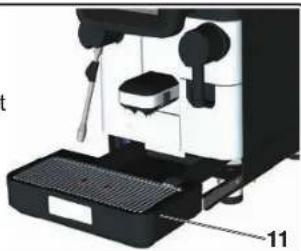
11 Tray
12 Control panel button/lock
RGB Machine lighting
USB USB Port
The components (*) are applied only in some produit configurations
FR
LEGENDE
1 Bec débit café/cappuccino/soluble
2 Tiroir à marcs
WARNING: Hot surface - ATTENTION: Surface chaude

This page is intentionally left blank.
2.1 Transport and handling 3
2.2 Installation Rules 4
3. Electrical Installation Rules 5
4. Water Installation Rules 6
5. Installation Check-up 7
6. Operator instructions 8
7. Warnings 10
8. Maintenance and repair 11
9. Dismantling the machine 12
USE
- Daily operation 13
- Description of display symbols 15
- Beverage dispensing - Coffee - Cappuccino / milk - Chocolate/solubles 16
- Beverage dispensing - Coffee / Cappuccino with powdered coffee 18
- Beverage dispensing - Hot water 19
- Beverage dispensing - Steam 20
- Cleaning and maintenance 21
Complete wash 22
Milk wash 23
Solubles wash 27
Touch screen 28
Grounds drawer 28
Cup tray 29
Decaffeinated door 29
Bodywork 29
Cleaning the coffee hopper 30
- Diagnostics messages 31
- Defects - Malfunctions 33
CUSTOMER PROGRAMMING
Date and time 34
Language 34
ILLUSTRATIONS VII
Service Line VIII
1. General Rules

Please read the warnings and rules in this User's Manual carefully before using or handling the machine in any way because they provide important information regarding safety and hygiene when operating the machine.
Keep this booklet handy for easy reference.
- The machine was designed solely for preparing espresso coffee and hot beverages using hot water or steam. Any other use is considered irregular.
- The machine must be installed in a place where it is only used by carefully trained staff that knows the risks tied to using the machine.
• The machine is for professional use only.
- This appliance can be used by children aged from 8 years and above and persons with reduced physical, sensory or mental capabilities or lack of experience and knowledge if they have been given supervision or instruction concerning use of the appliance in a safe way and understand the hazards involved.
Children shall not play with the appliance.
Cleaning and user maintenance shall not be made by children without supervision.
Use by minors, with or without adult supervision, must not contravene local employment laws.
- Never leave the machine unattended while it is in use.
• The machine must not be used outdoors.
- If the machine is stored in rooms where the temperature can drop below freezing point, empty the boiler and water circuit tubes.
- Do not expose the machine to atmospheric agents (rain, sun, and cold).
- Do not clean the machine with jets of water.
- Noise: assessed acoustic pressure level 75 dB(A) (+/- 2.5dB).
• If the power-supply cord is damaged, it can only be replaced by qualified and authorized technicians.
- If the machine is used improperly or for purposes other than those described above, it can be a source of danger. The manufacturer will not be held responsible for damages caused by improper use of the machine.


WARNING
Installation, dismantling, and adjustments must only be performed by qualified and authorized technicians.
Carefully read the warnings and rules in this manual because they provide important information regarding safe installation, use and maintenance of the machine.
Keep this booklet handy for easy reference.
2.1 Transport and handling
Packaging
- The machine is delivered in a robust cardboard package, with appropriate internal protection. The package features the standard symbols indicating rules to be followed when handling and storing the machine.
- Transport must be carried out according to the instructions on the package, handling with appropriate caution and avoiding impact of any type.
- Do not expose the machine to atmospheric agents (rain, sun, and cold).
Checks on receipt
- On receipt of the machine, carefully check all transport documentation is correct (against label on package).
- Check that the original packaging is not damaged.
• After removing the machine from its packing materials, make sure that the machine and any safety devices are intact.
- Packing materials (plastic bags, polystyrene foam, staples, etc.) must be kept out of the reach of children because they are potentially hazardous.
Advice for disposal of packaging

The packaging materials are eco-compatible and recyclable. For the protection of the environment they must not be dumped, but taken to a waste-disposal/recovery centre, according to local regulations.

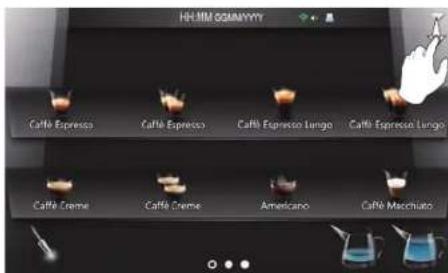
Handling


FAEMA
Staff responsible for moving the machine must be aware of the risks in moving heavy loads.
Move the machine carefully, using, when possible, the correct lifting equipment (fork lift, for example).
If moving the machine by hand, make sure:
- enough people are available for the task, depending on the machine weight and how difficult it is to handle;
- to always use the necessary safety gear (shoes/gloves).

natural_image
Line drawing of a person's hands operating a vehicle chassis with sensors and control panel (no text or symbols)
2.2 Installation Rules
- Before plugging in the machine, make sure that the information on the nameplate matches that of the electrical and water systems.
- Check that the power-supply cord is intact. Replace if damaged.
• Completely unwind the power-supply cable.
- The coffee machine should sit on a flat, stable surface at least 3.94 inches (100 mm) from walls and from the counter. Keep in mind that the highest surface on the machine (the cup-warmer tray) sits at a height of at least 59 inches (1.5 meters). Make sure there is a shelf nearby for accessories.
• Room temperature must range between 50° and 90°F (10°C and 32°C).
- An electrical outlet, water connections, and a drain with siphon must be in the immediate vicinity.
- Do not install in rooms (kitchens) that are cleaned with jets of water.
- Do not obstruct openings or ventilation and heat vents.
- Do not install the machine outdoors.
- Do not install or use the machine in potentially explosive environments.
- Do not install the machine in the presence of flammable substances.

FAEMA


3. Electrical Installation Rules
Prior to installation, make sure there is a circuit breaker installed with a distance between the contacts that allows for complete disconnection when there is a category III overload and that provides protection against current leakage equal to 30 mA. The circuit breaker must be installed on the power supply in compliance with installation rules.
If the power supply is not working properly, the machine can cause transitory voltage drops.
The electrical safety of this machine is only ensured when it is correctly connected to an efficient earthing system in compliance with the electrical safety laws in force. This fundamental safety requirement must be verified. If in doubt, request that a qualified electrician inspect the system. The manufacturer cannot be held responsible for any damage caused by the lack of an earthing system on the electrical supply.
Do not use adaptors, multiple plugs, and/or extension cords.
Check that the type of connection and voltage correspond with the information on the nameplate: see illustrations chapter figure 1.


4. Water Installation Rules
WATER REQUIREMENTS
Water used in coffee machines must be potable and suitable for human consumption (see laws and regulations in force).
Check that the water inlet on the machine has pH and chloride values that comply with the laws in effect.
If the values do not fall within the limits, an appropriate water-treatment device must be inserted (respecting the local laws and compatible with the machine).
If the machine uses water with a hardness exceeding 8^ F ( 4.5^ D), a specific maintenance plan must be implemented according to the hardness detected and machine usage.
INSTRUCTIONS
Only use the supplied parts for installation. If other parts are installed, they must be new (unused tubes and gaskets for the water connection) and they must be permitted for contact with potable water suitable for human consumption (according to local laws in force).
WATER CONNECTIONS
Place the machine on a flat surface and stabilize it by adjusting and securing the feet.
Hook up the water connections as shown in the Illustrations chapter, Figure 2, respecting the hygiene, water safety, and anti-pollution laws in the country of installation.
Note: If the water pressure can rise above 87 psi (6 bar), install a pressure reducer set at 29÷43 psi (2÷3 bar). See Illustrations chapter Figure 3.
Water draining tube: place the end of the water draining tube in a drain with a siphon for inspection and cleaning.
IMPORTANT. The curves of the water-draining tube must NOT bend as shown in Illustrations chapter, Figure 4.
ATTENTION: This equipment is to be installed with adequate backflow protection to comply with the applicable federal, state or local plumbing codes having jurisdiction.


5. Installation Check-up

WARNING: AFTER INSTALLATION, CHECK IF THE MACHINE IS WORKING PROPERLY (see Installation Module C).
WATER CONNECTIONS
• No leaks from the connections or tubes
OPERATION
- Boiler and operating pressures are normal.
• The pressure gauge is working properly.
- The self-levelling device is working properly.
• The expansion valves are working properly
- Press the coffee circuit quick wash icon

HOT WATER
- Continuously dispense hot water (using the appropriate button) until at least 0.5 litres of water have been used.
STEAM (where present)
- Dispense steam from the nozzles for about a minute, using the appropriate buttons.
MILK CIRCUIT (where present)
- Press the milk circuit wash icon

and proceed as indicated on the display.
SOLUBLES CIRCUIT (where present)
- Press the soluble circuit wash icon


FAEMA

6. Operator instructions
BEFORE YOU START

WARNING: BEFORE YOU START OPERATING THE MACHINE, WASH THE INTERNAL COMPONENTS FOLLOWING THE INSTRUCTIONS INDICATED BELOW.
THESE STEPS MUST BE REPEATED AT LEAST ONCE A DAY AND WHEN THE MACHINE HAS NOT BEEN OPERATED FOR MORE THAN 8 HOURS.

Coffee circuit: Press the coffee circuit quick wash icon

Hot water: Continuously dispense hot water (using the appropriate button) until at least 0.5 litres of water have been used.
Steam (where present): Dispense steam from the nozzles for about a minute, using the appropriate buttons.
Milk circuit (where present): Press the milk circuit wash icon 📁 and proceed as indicated on the display.
Solubles circuit (where present): press the soluble circuit wash icon


FAEMA
DURING OPERATION
Coffee / cappuccino / milk dispensing
- If the machine has not been used for more than an hour, before dispensing a beverage, perform a wash by pressing the coffee circuit quick wash icon
Hot water dispensing
- If the machine has not been used for more than an hour, before making coffee, dispense water for 2 -3 seconds and discard the liquid.
Steam dispensing (where present)
- Before heating the beverage (water, milk, etc.), open the steam nozzle for at least 3 seconds and let the steam escape so that the condensation is eliminated.


7. Warnings

Danger of burns
The areas marked with this sign become hot. Great care should be taken when in the vicinity of these areas.

WARNING: Hot surface
ATTENTION: Surface chaude
The manufacturer disclaims all liability for damages to items or persons due to improper use or due to the coffee machine being used for purposes other than its intended use.
Do not operate the coffee machine with wet hands or bare feet.
Ensure that the machine is not handled by children or persons who have not been instructed in its correct use.
Danger of burns
Do not place the hands or other parts of the body close to the coffee distribution points, or near to the steam and hot-water nozzles.

MACHINE CLOSE-DOWN
When the machine is left unattended for a prolonged period (for example out of hours), carry out the following steps:
- Clean as indicated in the dedicated chapter;
- Remove the plug or turn off the main switch;
- Close the water tap.
NOTE: for machines which can be programmed to switch on and off automatically, the power must be left on only if this function is active.
Non-compliance with these safety measures exonerates the manufacturer from all liability for malfunctions, damage to property and/or injury to persons.


8. Maintenance and repair
If the machine is not working properly, turn off the machine, turn off the main off-on switch, and call the service centre.
If the power-supply cord is damaged, switch off the machine and request a replacement from the service centre.

To ensure safety during operation, it is absolutely necessary to:
• follow all the manufacturer's instructions;
• have qualified and authorized technicians periodically check that all safety devices are intact and functioning properly (the first inspection within three years of purchase and every year after that).

WARNING
Maintenance by unqualified individuals can jeopardize the safety and conformity of the machine.
Only use qualified, authorized technicians for repairs.
WARNING
Only use original replacement parts guaranteed by the manufacturer.
If original spare parts are not used, the manufacturer's warranty will no longer be valid.
WARNING
WARNING After maintenance, perform the installation CHECK-UP as indicated in the specific section of the user's manual.

FAEMA

9. Dismantling the machine
Electrical equipment cannot be disposed of as ordinary urban waste.
To protect the environment, please proceed in compliance with the local laws in force.

Suitable differentiated waste disposal so that the machine can then be recycled, treated and disposed of in an environmentally friendly manner contributes to avoiding possible negative effects on the environment and health, and encourages the reuse and/or recycling of the materials from which the machine is made.
Improper disposal of electric equipment that fails to respect the laws in force will be subject to administrative fines and penal sanctions.
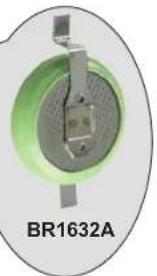
This product contains a non-rechargeable lithium (lithium manganese dioxide chemistry) button cell battery fully encapsulated in the final product. Recycle or dispose of batteries in accordance with the battery manufacturer's instructions and local/national disposal and recycling regulations.
Location of the battery

natural_image
Diagram of a coffee machine with internal components and a magnified inset showing the BR1632A device (no text or symbols on main diagram)
12 EN
USE
10. Daily operation

Before setting the machine to work, make sure that:
• the main electric power switch is on;
• the mains water tap has been turned on.
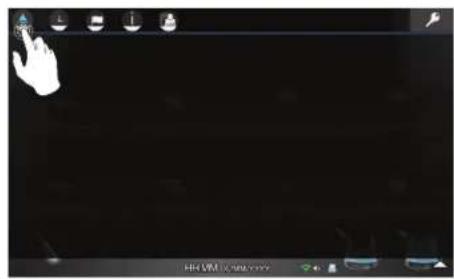
MANUAL START UP


3
The machine is not ready to use until the icon

disappears from the display.

At this stage, the following will be displayed when you press any dispensing key
When a beverage cannot be dispensed, the relative icon becomes transparent, with a bar at the base that shows heating status. These disappear when proper operating conditions for the beverage are reached.

FULL SHUT-DOWN PROCEDURE

FAEMA

1
Press the Sleep Mode button (8), located on the rear of the panel:

natural_image
3D rendering of a black and white coffee machine with two cups and a digital display, showing internal components and a close-up inset highlighting a yellow stripe (no text or symbols visible)
2
The following screen is displayed on the touch screen:

Push the ⏻ icon.
3
Start 10 second count down, after which the machine will switch off:
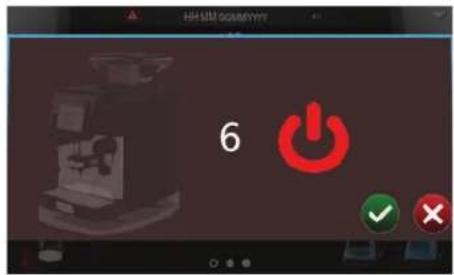
The icon can be pushed for immediate switch-off, or the ✗ icon can be pushed to cancel the operation.
4
The red LED remains lit (7):
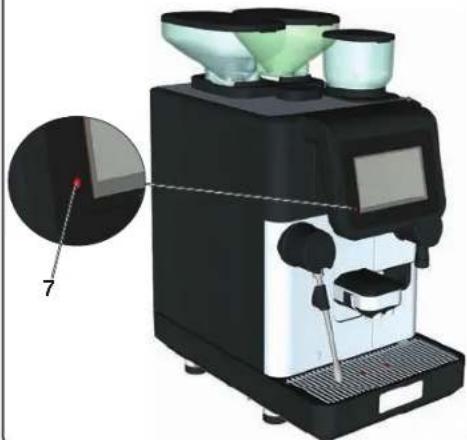
natural_image
Exterior view of a modern coffee machine with two cups and a digital display (no visible text or symbols)
5

Fully shut down the machine pressing the main switch (9) into OFF position.

FAEMA

11. Description of display symbols


Warning symbol

Warning symbol

Machine cold symbol

Machine cold symbol associated with beverage icon

WiFi connection symbols (Green = connection to PlatOne portal operating; White = WiFi connection; Empty = no connection)

Volume symbols (excluded, minimum, medium, maximum)

Technical menu access symbol

USB Pen Drive inserted symbol


Drop-down menu scrolling symbols

Grounds drawer full


No coffee (hopper 1 left, hopper 2 right)


No milk (container 1, container 2)

Decaffeinated coffee wafer

Machine switch-off (sleep mode)

Energy saving (sleep mode)


Technical access

Confirm operation

Cancel operation

Touch page

communication anomaly with payment system


Payment system symbols (Blue = system connected; Green = system connected and operational; Red = payment system has denied the transaction).
12. Beverage dispensing - Coffee - Cappuccino / milk - Chocolate/solubles
GENERAL INDICATIONS
Milk is a delicate biological product and can easily deteriorate. Heat modifies its structure. Milk must be kept at a storage temperature no higher than 41°F (5°C) from the moment the container is opened and throughout its entire period of use. Our storage appliances are suitable for this purpose.
NOTE: at the end of the work day (or not more than 24 hours from the time the container is opened), any remaining milk must be discarded.
CHOCOLATE AND SOLUBLES
These must be compatible with the machine: before use, read the instructions on the product packaging.
NOTE: the installation technician may be asked to customise the "pop-up", i.e. when this is displayed on the touch screen during beverage dispensing.
The available options are: beverage icon, image, film, physical attributes (temperatures, pressures).
During beverage dispensing, it is also possible to request that coffee dispensing time be displayed. E.g.: 7.2 s.
1
Placethe cup under the dispensing nozzle (1) and adjust the height, if necessary.
natural_image
Exterior view of a modern coffee machine with digital display and two cups (no text or symbols visible)
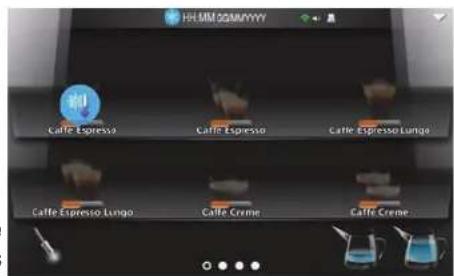
2
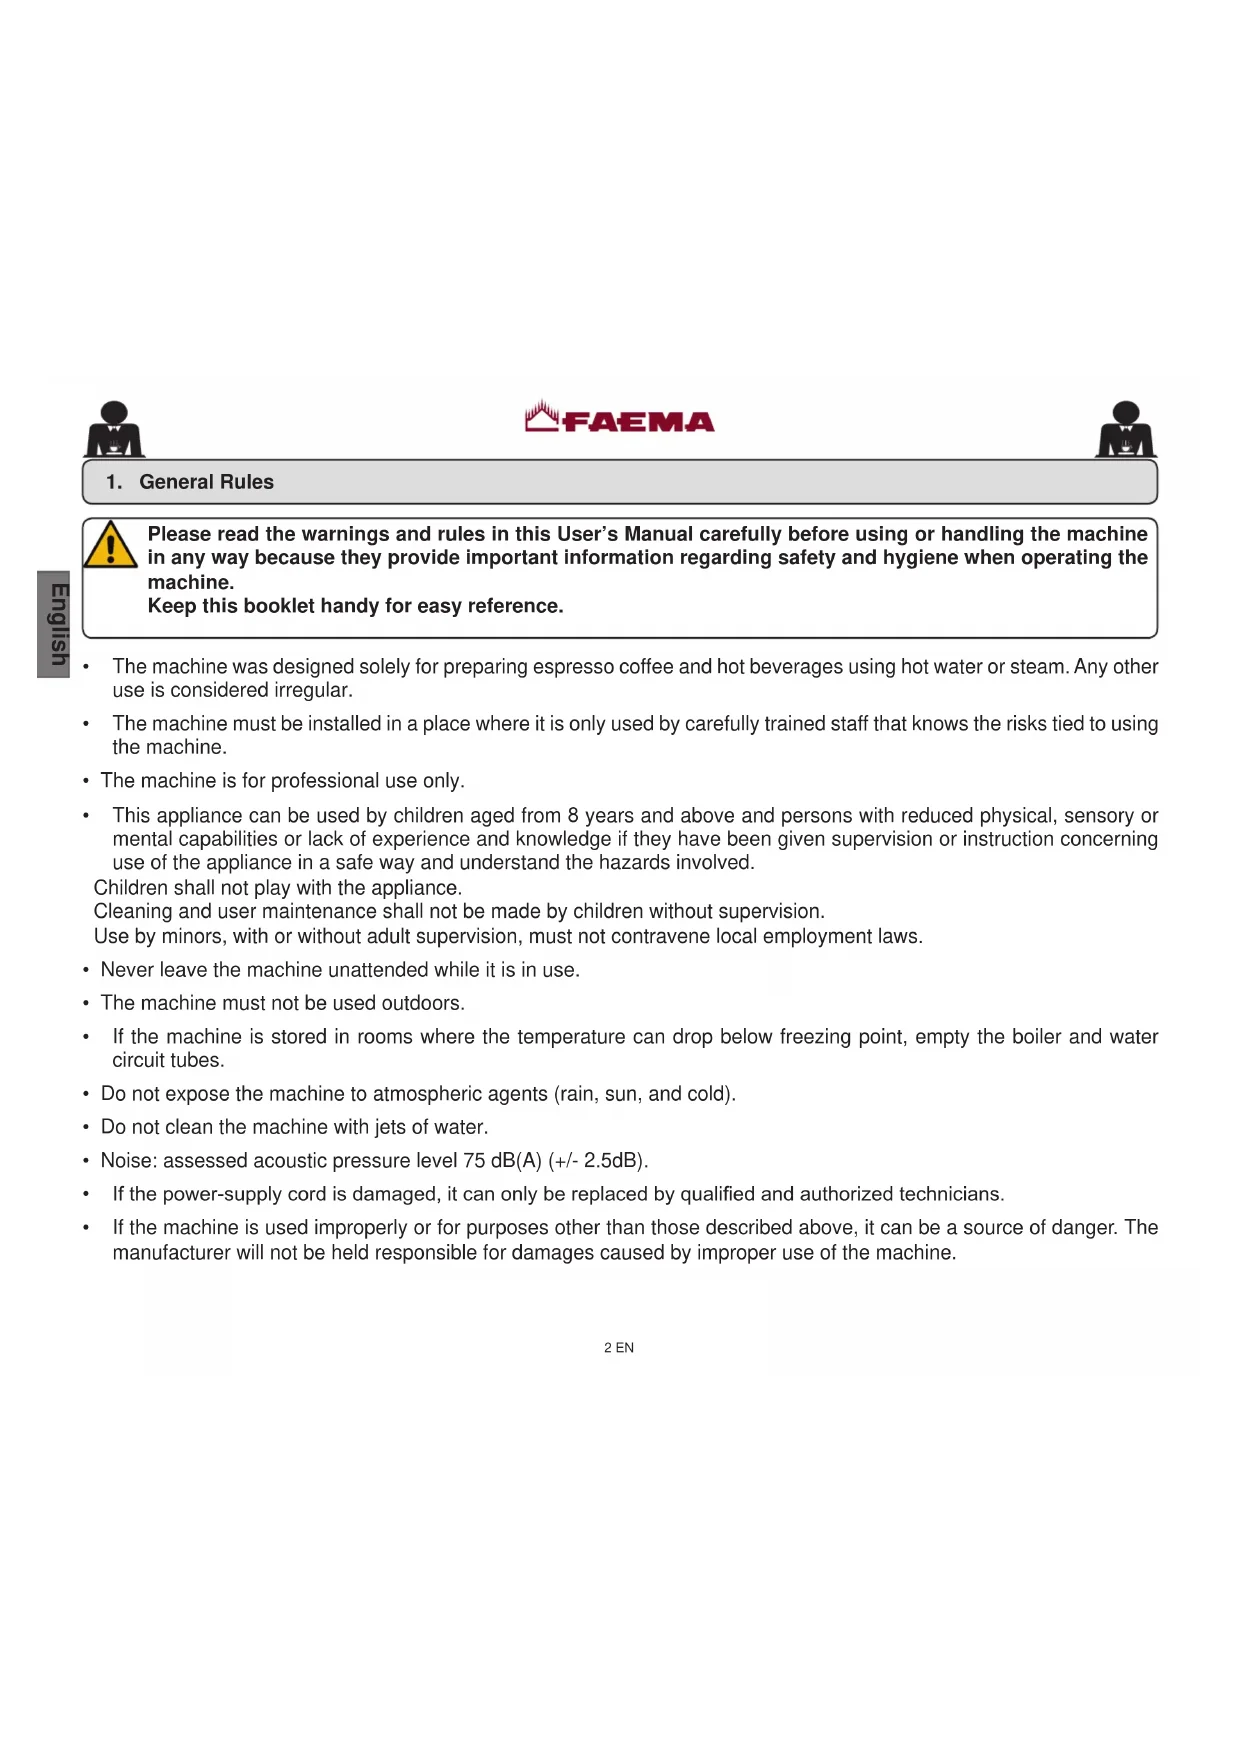
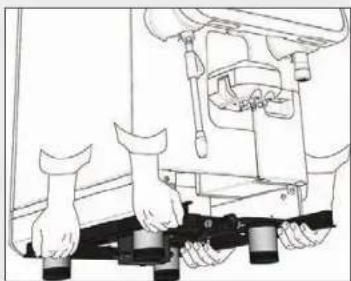
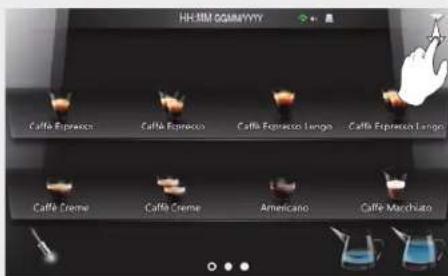
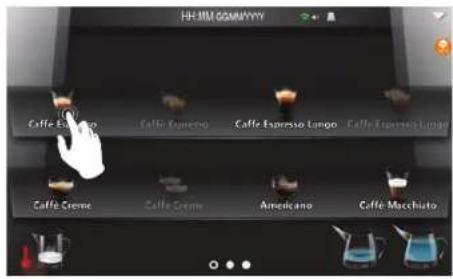
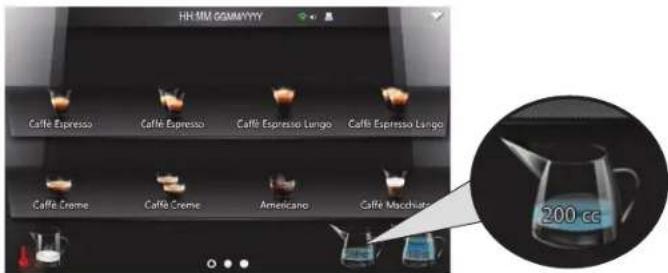
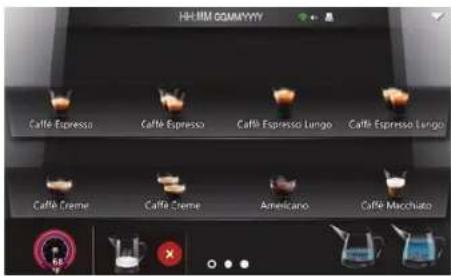
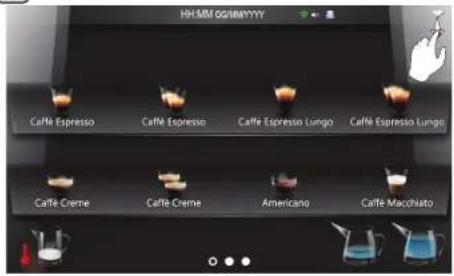
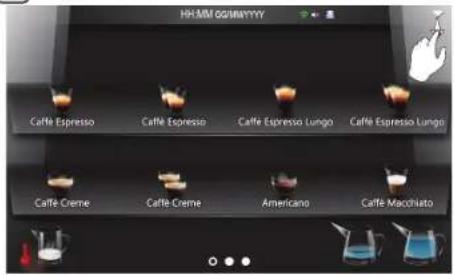
Up to 24 different beverage selections can be set in the machine, divided over several screens.
To view the types of beverages that can be dispensed, scroll through the screens as shown:

Note: the icons 📄 indicate the screen currently displayed (dark background 📄) and the total number of screens (light background 📄)


FAEMA

3
Press the icon corresponding to the selected beverage to start dispensing.

4
During dispensing, the screen will display as below:

Dispensing will stop automatically.
Press the icon ✗ to stop dispensing the beverage before reaching the programmed dose.
Press the icon to dispense again; the number indicating programmed dispensing will increase.
To reset, press and hold the icon ✗ for a few seconds.
13. Beverage dispensing - Coffee / Cappuccino with powdered coffee
1
Placethe cup under the dispensing nozzle (1) and adjust the height, if necessary.

natural_image
Illustration of a black and white coffee machine with two cups and a digital display (no text or symbols visible)
2 Open the decaffeinated coffee panel (5) and measure out a dose of powdered coffee into the tube and close the powdered coffee panel (5).

natural_image
3D rendering of a mechanical device with three cylindrical components and a labeled component '5' (no text or symbols on the device itself)
3
Only icons for coffee powder-based beverages remain visible on the touch screen. Press the icon corresponding to the selected beverage to start dispensing.
4 During dispensing, the screen will display as below:

Dispensing will stop automatically.
Press the icon ✗ to stop dispensing the beverage before reaching the programmed dose.
NOTE: coffee powder-based beverages do NOT allow repeat dispensing.
14. Beverage dispensing - Hot water
1

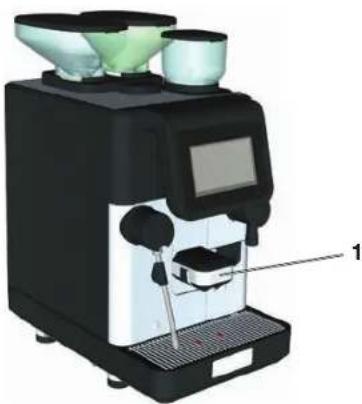
Place the appropriate container under the hot water dispenser (3). If necessary, adjust the height of the dispensing nozzle by pulling towards the basin (11).
2

Press a hot water dispensing icon

3
The programmed dose of hot water will be dispensed from the nozzle (3); it will stop automatically.

Note: dispensing can be interrupted by pressing the ✗ key.
Pressing the ✗ key does not change the programmed parameters.

NOTE
The hot water icons can be personalised with a label for easier identification. E.g.:
For activation methods, refer to the CUSTOMER PROGRAMMING/CUSTOMISATION/WATER/STEAM SETTINGS" section.
NOTE: the customisation and programming menus can only be seen if the "Customer Programming" item is enabled in the machine configuration menu, which can only be accessed by the installer technician.
15. Beverage dispensing - Steam
1

natural_image
Illustration of a modern barista machine with two cups and a digital display (no text or symbols visible)
Completely immerse the steam dispensing wand (10) in the container with the beverage to be heated.

Scalding hazard! Use the appropriate insulating devices to move the steam nozzle.
3
3 The dispensing nozzle (10) will operate for the programmed time; it will stop automatically.
Note: dispensing can be interrupted by pressing the ✗ key.
Pressing the ✗ key does not change the programmed parameters.
(*) In the case of manual steam, the user must stop dispensing.
2

Press a steam dispensing icon


Cleaning the steam wand
After each use:
- wash the outside with hot water and a clean sponge, removing any organic residue; rinse thoroughly.
- clean the inside of the wand as follows: turn the nozzle towards the cup tray and carefully activate steam dispensing at least once.


16. Cleaning and maintenance

For correct application of the food safety system (HACCP), please follow the instructions in this paragraph. Washing must be done using the original "Service Line" products. See details on the last page. Any other product could compromise the suitability of the materials which come into contact with food products.
Procedure to follow at the end of the working day or when signalled by the machine.
NOTE: the procedures described below must be carried out when the machine is on and pressurized.
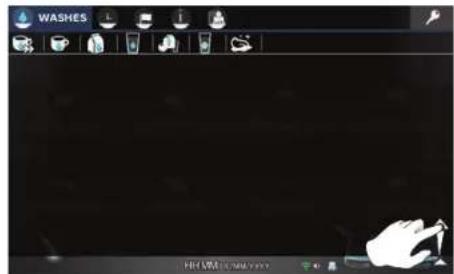
There are several types of machine washing. Please follow these rules to access to the wash menu:


FAEMA

COMPLETE WASH (duration, approx. 5') which cleans all the circuits is illustrated below.
1

Select the complete wash icon

2
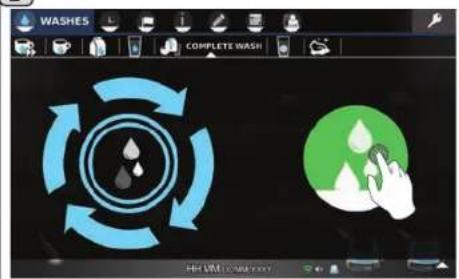
Press the icon

to start the wash sequence.
3

natural_image
Black-and-white photo of three kitchenware containers on a stove, no visible text or symbols
5
The procedure for washing the coffee circuit is shown on the touch screen and ends after the closing of the decaf door (5).
456

natural_image
3D rendered industrial machine with control panel and green circular button (no visible text or symbols)
The steps for performing a milk wash are shown on the touch screen; at the end of each phase, press the icon √.
[NO TEXT]

The image is too blurry to recognize any text content.

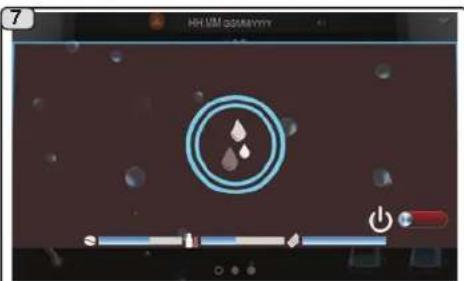
Washing starts and the progress bars below will show when it is completed.

FAEMA
IN PLACE CLEANING: CLEANING THE MILK CIRCUIT (WHERE PRESENT)


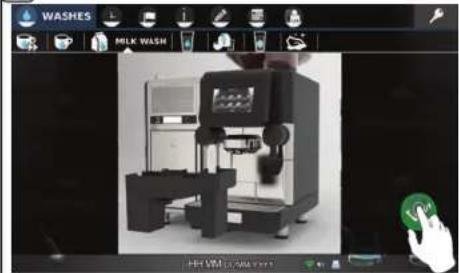
MILK WASH (duration, approx. 4')
1

Select the icon for the milk circuit wash.
2

Press the icon
3
natural_image
3D rendered industrial machine with control panel and control buttons, displayed in a design software interface (no readable text or symbols on the machine itself)
The steps for performing a milk wash are shown on the touch screen; at the end of each phase, press the icon √.
4
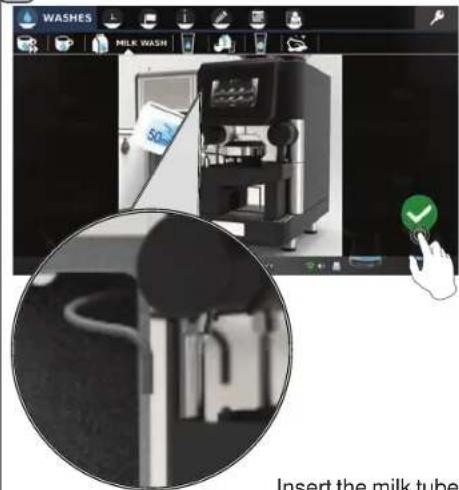
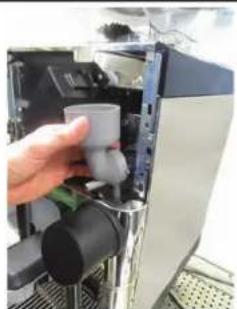
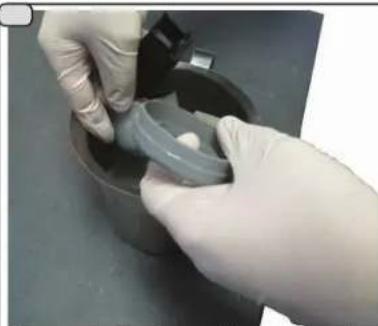
natural_image
Product photo of a milk washing machine with a hand icon and magnified inset showing its interior components (no readable text or symbols)
Insert the milk tube in the container.
5

6
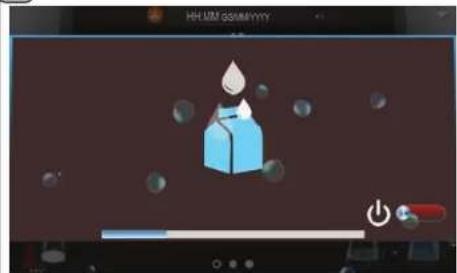
On the touch screen the milk circuit wash symbol appears, and remains visible for the entire cycle. This stage ends when the progress bar below is filled.

FAEMA

Part 1 of 2: CLEANING THE MIXER (WHERE PRESENT)
1

natural_image
Close-up of a hand pressing a blue button on a digital kitchen counter with a metal mug nearby (no visible text or symbols)
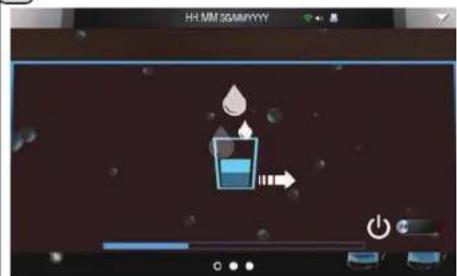
Dispense in a pot about 12 liter of hot water from the machine.
2

natural_image
Hand pouring liquid from a blue bottle into a metal mixing bowl on a flat surface (no text or symbols visible)
Prepare EcoJetSan dose and the solution.
3

natural_image
Close-up of a metal pitcher with a white liquid being poured into it, next to a blue spray bottle labeled 'co fisani' (no other text or symbols visible)
Prepare the solution.
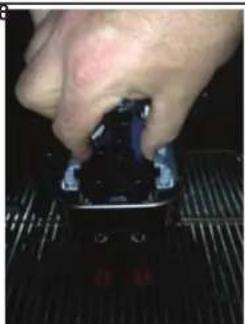
4

natural_image
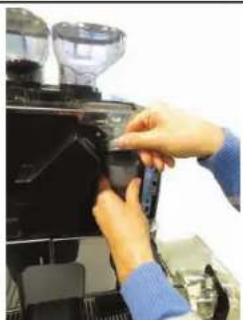
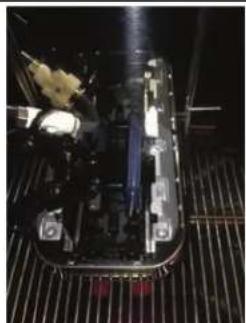
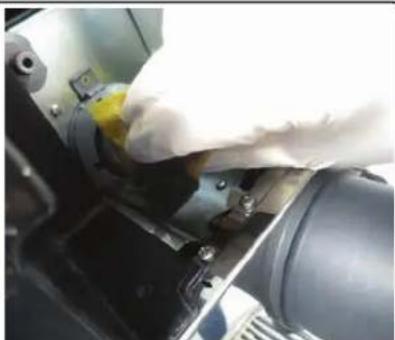
Close-up of a hand pressing down on a black industrial machine with a cloth and coffee cup (no visible text or symbols)
Push on top to open the front panel.
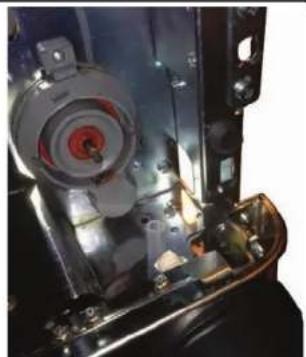
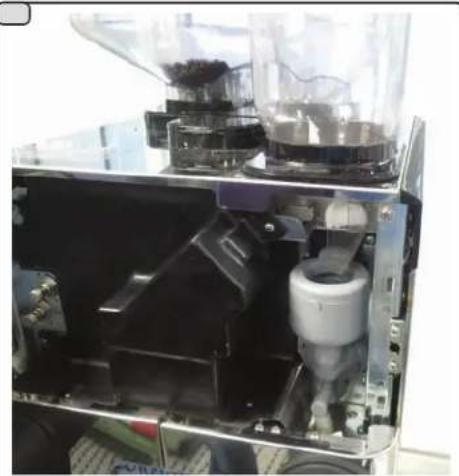
5
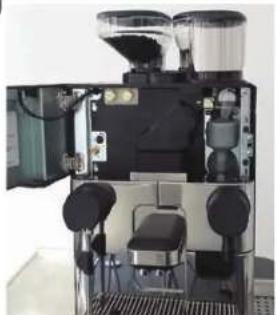
natural_image
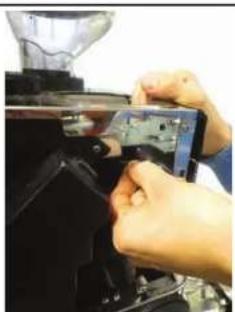
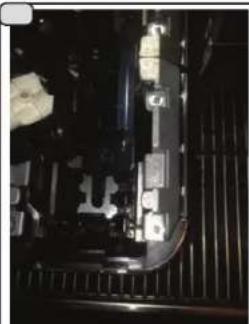
Interior view of a coffee machine with open lid and side chairs (no visible text or labels)
Open the front panel. Remo
6

natural_image
Person using a pour-over machine to press or inspecting a glass of coffee (no visible text or symbols)
powder hopper. Remove top mixer
7
natural_image
Close-up of hands using a computer to adjust or install a black electronic device (no visible text or symbols)
part
8
natural_image
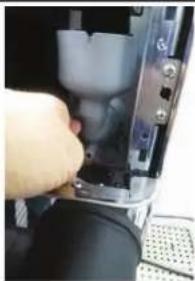
Close-up of hands assembling or adjusting a mechanical component with a blurred background (no visible text or symbols)
Remove black powder dispensing part.
9

natural_image
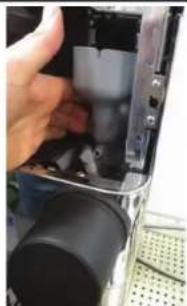
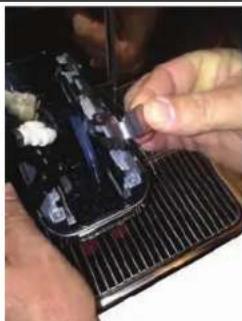
Close-up of a hand inserting a small component into a machine (no visible text or symbols)
Disconnect elbow.
1011
natural_image
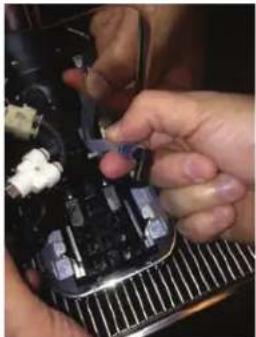
Close-up of a hand inserting a component into a device (no visible text or symbols)
Turn counterclockwise the ring of mixer assembly part.
[Non-Text]
natural_image
Close-up of a hand inserting a device into a black cylindrical component (no visible text or symbols)
Remove mixer body.
natural_image
Hand inserting a white cup into a computer tower (no visible text or symbols)

FAEMA

1213

natural_image
Close-up of hands installing a mechanical component with a knob (no visible text or symbols)
Remove wheel. Remove

natural_image
Close-up of a hand pressing down on a mechanical component with a black cylindrical part attached (no visible text or symbols)
bow from the silicone pipe.
natural_image
Close-up of a mechanical component with metallic parts and mounting brackets (no visible text or symbols)
14

natural_image
Close-up of a hand adjusting a mechanical component with a red circular feature (no visible text or symbols)
Using the brush clean the silicone pipe
1516
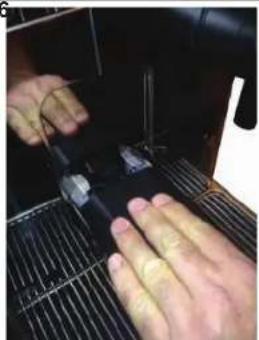
natural_image
Close-up of hands operating a mechanical device with a mesh grille (no visible text or symbols)
Remove the cover from the dispensing nozzle. Push on both

natural_image
Interior view of a battery pack with cooling fins and a metal rack (no visible text or symbols)
The image is too blurry to recognize any text content.
natural_image
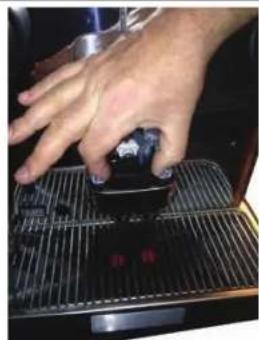
Close-up of a hand pressing down on a black appliance mounted on a metal grater (no visible text or symbols)
sides and move the coffee spout as shown above.

natural_image
Interior view of a mechanical device with exposed internal components and a transparent casing (no visible text or symbols)
1718

natural_image
Close-up of a hand pressing a small electronic component on a metal grate (no visible text or symbols)
Push on both sides and move the milk spout as shown above.
natural_image
Interior view of a vehicle chassis with visible battery pack and wiring (no text or symbols)
natural_image
Close-up of a mechanical component with visible parts and mounting brackets (no text or symbols)

natural_image
Close-up of a hand pressing down on a mechanical component with cooling fins (no visible text or symbols)
natural_image
Close-up of hands installing or adjusting a black plastic component on a metal grate (no visible text or symbols)
sh the metal lock to the front and remove it.

FAEMA

192021
natural_image
Close-up of hands assembling a mechanical component with cooling fins and heat sinks (no visible text or symbols)
Move the soluble spout as shown above.

natural_image
Close-up of hands using a tool to adjust or install a car engine component (no visible text or symbols)
Remove elbow from silicone pipe, then clean pipe with the brush.

natural_image
Close-up of hands assembling a small object on a metal grate (no visible text or symbols)

natural_image
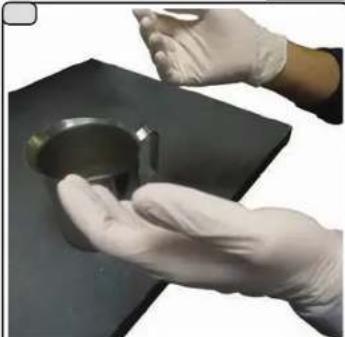
Close-up of gloved hands holding a small metallic object on a dark surface (no text or symbols visible)
Put gloves on your hands.
2223

natural_image
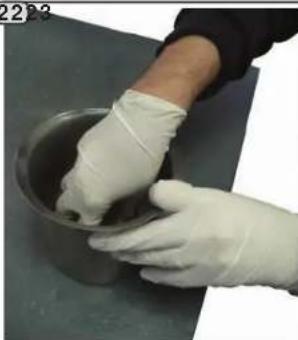
Person in gloves handling a metal bowl on a surface (no visible text or symbols)
Put a sponge in the solution and then clean the mixer fixed part.
natural_image
Close-up of a gloved hand holding a white cloth over a mechanical component (no visible text or symbols)

natural_image
Close-up of gloved hands handling a small white object in a dark container (no visible text or symbols)

natural_image
Close-up of gloved hands handling a small green object in a dark container (no visible text or symbols)
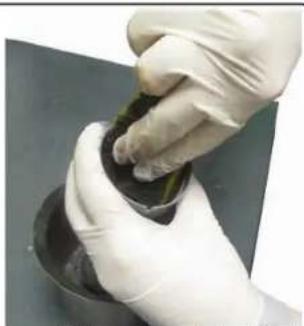
Put all the removed mixed parts (except the soluble hopper) in the solution, then clean them accurately with a sponge.
242526
CLEANING SOLUBLES HOPPER Remove any soluble powder remaining in the hopper. Wash with a damp cloth and the products and methods normally used for articles in contact with food; rinse thoroughly and dry, removing any organic residue.
Before replacing the hopper on the machine, make sure that wet or moist parts are completely dry.

natural_image
Person washing a sink with a cloth and soap, wearing gloves (no visible text or symbols)
Rinse all parts (fixed part too) with cold water accurately. Dry the

natural_image
Person washing a sink with a hand near the sink (no visible text or symbols)
The image is too blurry to recognize any text content.

natural_image
Close-up of a hand adjusting a mechanical component with a red button (no visible text or symbols)
parts.

272829

FAEMA

natural_image
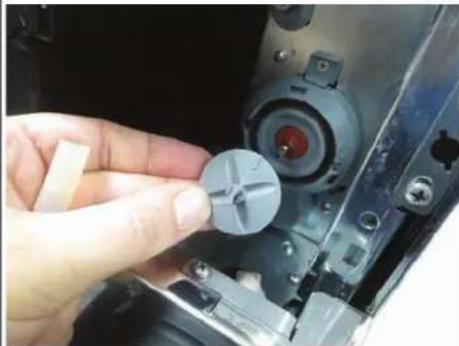
Close-up of a hand inserting a small circular component into a mechanical device (no visible text or symbols)
Put correctly the polarized wheel (the arrow must be directed to the plane part of the stainless steel motor shaft.
natural_image
Interior view of a mechanical device with internal components and no visible text or symbols
Re-assembly the other mixer parts according to disassembly rules.
natural_image
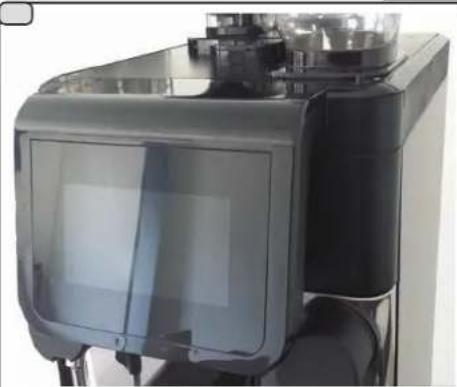
Close-up of a modern kitchen appliance with glass door and side-mounted dish (no visible text or symbols)
Close the front panel (touch screen).
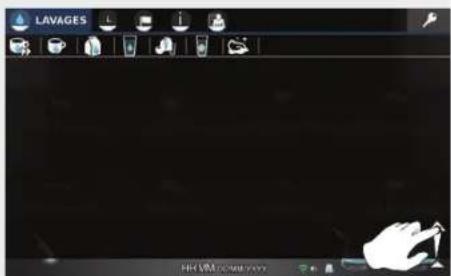
Part 2 of 2: CLEANING THE SOLUBLES CIRCUIT

SOLUBLES WASH (duration, approx. 30")
1

Select the 📄 icon for the solubles circuit wash.
2

Press the icon 🙏 to start the wash cycle.
3
On the touch screen the solubles wash symbol appears, and remains visible for the entire cycle. This stage ends when the progress bar below is filled.

TOUCH SCREEN

FAEMA


To avoid accidental activation of the touch screen during cleaning:
Warning: to clean the touch panel, use only a dry anti-static microfibre cloth.
Do not use: • detergents or liquids in general; • paper or rough cloths.
1

Select the 📄 icon related to cleaning the touch screen.
2

Press the icon displayed at the centre of the screen.
3

natural_image
Dark blue background with scattered white circular spots and the number '8' in the center (no text or symbols beyond the numeral)
A 15-second countdown will begin in which to clean the touch screen.
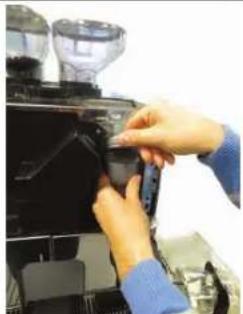
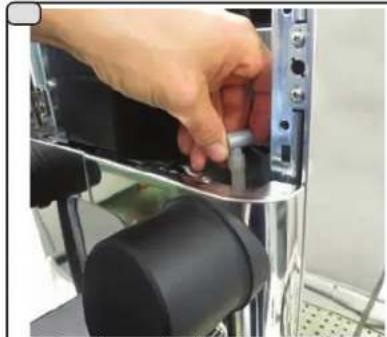
GROUNDS DRAWER (2)
1
To remove, lift the hot water dispensing spout (3). Note: the need to empty the grounds drawer is also highlighted by the
icon on the touch screen.
natural_image
Close-up of a coffee machine with a stand and control panel (no visible text or symbols)
After the icon appears, 10 more coffee-based beverages can be dispensed, after which an animation will be seen on the touch screen to empty the drawer. Any additional dispensing is blocked and the grounds drawer must be emptied.
2
Pull out the grounds drawer (2), empty it and wash it under running water.
Thoroughly clean the drawer housing area (2) with a damp cloth, removing any organic residue.
natural_image
Close-up of a laboratory instrument with labeled parts (no visible text or symbols)
NOTE: if confirmation mode has been activated by the technician, the operator must confirm drawer emptying before removing the drawer. If confirmed using the icon √, the grounds count is reset.

FAEMA

NOTE: the procedures described below must be carried out when the machine is switched off.
CUP TRAY (11)
1
At the end of the working day, pour a jug of hot water into the basin (11) to remove any encrustation in the drain; remove it and wash it with running water.
natural_image
Close-up of a coffee machine with a hand holding a small object, no visible text or symbols
2
To remove it, grip and pull the basin (11) lifting it slightly.
Do not use abrasive products; do not put in the dishwasher.
natural_image
Mechanical setup showing a coffee machine with a side panel and base tray (no visible text or symbols)
DECAFFEINATED DOOR (5)
Use a damp sponge to remove any residue on the inside of the door and in the decaf coffee conduit.

natural_image
3D rendering of a robotic device with labeled components and an inset close-up of a mechanical assembly (no text or symbols visible)
BODYWORK
Warning: the shiny parts of the bodywork must be cleaned using a soft cloth and cleaning products WITHOUT ammonia or abrasives, removing any organic residue present in the work area. In the case of tough dirt, use a damp sponge and dry with a soft cloth.
Note: DO NOT spray liquid in the slots of the body panels and DO NOT use paper or rough cloth for cleaning.

natural_image
Modern barista machine with black and white casing, green bowl, and digital display (no visible text or symbols)


Maintenance to be performed every 7 days
CLEANING THE COFFEE HOPPER (6a - 6b)
The coffee hoppers (6a and 6b) must be cleaned regularly, roughly once a week. Depending on consumption and the type of coffee, more frequent cleaning may be required.
To clean, proceed as follows:


Remove any coffee remaining in the hopper. Wash with a damp cloth and the products and methods normally used for articles in contact with food; rinse thoroughly and dry, removing any organic residue.
Before replacing the hopper on the grinder/dispenser, ensure that wet or moist parts are completely dry.
17. Diagnostics messages
There are 2 types of messages that are displayed by the machine:
- Explicit messages: they appear on the screen accompanied by an explanatory clip or are shown in the form of an icon in the upper right-hand corner of the display.
- Coded messages: they are placed in the upper left-hand corner and are represented by the unit's numerical error code.
If there are several errors, they are represented one after another on the display.
For a detailed description of messages in code, refer to the technical manual, "Defects - Malfunctions" section.
Explicit messages

| MESSAGE CAUSE: when displayed SOLUTION | |
| Machine cold | 1. This message is displayed when the dispensing key is pressed when:- service boiler pressure is 12 psi (0.8 bar) less than the setting;- boiler temperature is 68^ ( 20^ ) less than the setting. The icon represents machine cold status. Once the appropriate pressure and temperature are reached, it automatically disappears.2. When the service boiler or boiler respectively cannot reach the operating pressure or temperature due to a problem, an error code appears on the display which identifies the defective component causing the problem. The icon represents machine cold status. Once the appropriate pressure and temperature are reached, it automatically disappears.2. When the service boiler or boiler respectively cannot reach the operating pressure or temperature due to a problem, an error code appears on the display which identifies the defective component causing the problem. | 2. Consult the Technical Manual to find the specific error code to resolve the problem. |
| Grounds drawer full |  The icon informs the user that the grounds drawer is full. Ten coffee based beverages can still be dispensed (10 single or 5 double) before the machine stops. The icon informs the user that the grounds drawer is full. Ten coffee based beverages can still be dispensed (10 single or 5 double) before the machine stops. | Empty the drawer to clear the message or continue until the machine displays the message "Empty grounds drawer".Refer to the Technical Manual to program the grounds limit after which the message is displayed. |
| Empty grounds drawer | The machine counts down from the limit set for grounds. The message (along with a film) is shown on the display when it reaches zero. The machine is blocked and does not allow any dispensing. | Remove and empty the grounds drawer. Return the drawer to its proper position. While carrying out this operation, the message "grounds drawer removed" will be displayed. |
| Grounds drawer removed | This message (along with a film) is always shown when the rear side of the drawer is not in place. | If the message appears with the drawer inserted, check that the drawer is properly placed. |


FAEMA

| Maintenance necessary | This message is displayed when the machine requires maintenance. To temporarily eliminate the message, press the ✗ icon. The message will appear again the next time the machine is turned on. | Contact an authorised technician. The message will be displayed until the maintenance is performed. Consult the Technical Manual to program maintenance times and cycles. |
| Regenerate resins | This message is displayed when the resins in the water softener require regeneration. (See water softener maintenance instructions). | The icons √ and ✗ remain active:- press √ to clear the message and the next regeneration request will appear one minute after the limit for litres dispensed is reached;- press ✗ and the appearance of the request is postponed for one hour.A similar situation occurs with the water filter replacement message: press the confirmation key and the counter adds 25 litres to the limit set by the technician. |
| Machine off | When the machine is in sleep mode, the red LED on the left side of the display remains on. | Press the button on the back of the display to reactivate the machine. |
| Messages regarding washing | Graphic messages requesting the various washes appear on the display. | See the "Cleaning and maintenance" section in this manual. |
| No coffee |  The icons ate that one or more of the hoppers are almost empty. The icons ate that one or more of the hoppers are almost empty. | Add coffee to the hopper(s). |
| No milk |  The icons hown only if the machine is equipped with a refrigeration unit and with presence sensors of milk: indicates that one or both of the milk containers are empty. The icons hown only if the machine is equipped with a refrigeration unit and with presence sensors of milk: indicates that one or both of the milk containers are empty. | Fill one or both of the milk containers. |


18. Defects - Malfunctions
Direct action by the customer
Before calling service personnel, to avoid unnecessary expense, check whether the machine problem corresponds to one of the cases listed below.
| PROBLEM CAUSE SOLUTION | | |
| The coffee machine does not work and the touch screen (4) is off. | No electricity supply. | Check the electricity supply.Check the position of the ON/OFF switch (9). |
| Water leaking from the cup tray (11). Drain clogged. Clean. | |
| Coffee dispensing time too short. Low coffee dose.Coffee too old.* Coffee ground too coarse. | Increase the dose.Use new coffee.* Use a finer grind. |
| Coffee drips out of machine. High coffee dose.* Coffee ground too fine. | Decrease the dose.* Use a coarser grind. |
| Loss of water under the machine. Discharge clogged up.Discharge basin hole blocked. | Clean. |
| Machine heated up, but it does not dispense coffee. | Water supply or water softener tap closed.No water in system. | Open.Wait until water is available or call the service centre. |
| The automatic level-control devices remain in operation. | Same causes as above. Same solution as above. |
* These operations are possible ONLY if the "User Programming" item is enabled in the machine configuration menu, which can only be accessed by the installer technician.
CUSTOMER PROGRAMMING

DATE AND TIME
1
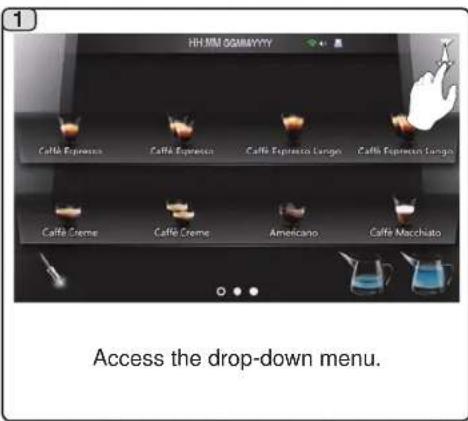
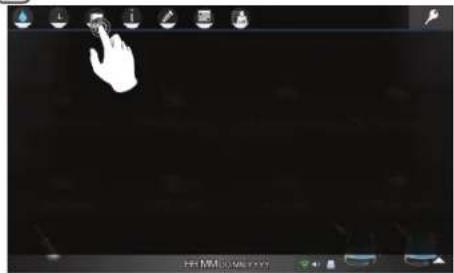
Programming is accessed through the drop-down menu.
2

Select the 📁 icon to see the associated menu.

LANGUAGE
1
Select the 📄 icon, relative to the "LANGUAGE" menu.
3
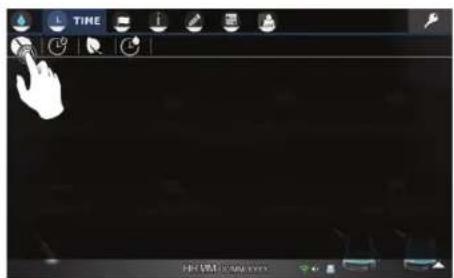
Select the icon ➤ for the "DATE AND TIME" menu.
4

Set the date and time and confirm with the icon √.
2

Set the menu language; confirmation is immediate.
5
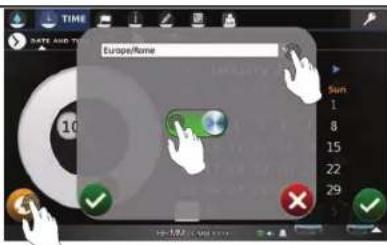
NOTE: date and time can be automatically synchronized through connection to a Network Time Protocol (NTP) server, if the machine is connected to the internet via WiFi.

FAEMA
Index
Page
Page
Page
PROGRAMMATION CLIENT
2.1 Transport et manutention
Emballage
natural_image
Line drawing of a person's hands operating a mechanical device with gears and levers (no text or symbols)
CONDITIONS HYDRAULIQUES REQUISES

FAEMA


FAEMA

7. Attention

Danger de brûlure
WARNING: Hot surface
ATTENTION: Surface chaude
natural_image
Exterior view of a modern coffee machine with dual cups and control panel (no visible text or symbols)

natural_image
3D cutaway view of a black plastic enclosure showing internal components and mounting holes (no text or symbols)
natural_image
Close-up of a green circular electronic component with metallic pins, labeled BR1632A (no other text or symbols visible)
12 FR
UTILISATION
natural_image
3D rendering of a black and white coffee machine with a close-up inset showing a red laser beam and a numbered label '8' (no text or symbols on the machine itself)
2
Appuyer sur l'icône
3
natural_image
3D rendering of a black and white coffee machine with three cups and a side panel, showing internal components (no text or symbols visible)
5

Energy saving (mode veille)


ès technicien

INDICATIONS GENERALES
natural_image
Exterior view of a modern coffee machine with two cups and a digital display (no text or symbols visible)
natural_image
Illustration of a modern coffee machine with two cups and a digital display (no text or symbols visible)
2
natural_image
3D rendered mechanical component with three cylindrical components and a labeled part '5' (no text or symbols on the object itself)
3
natural_image
Black and white photo of three large cylindrical objects on a surface, possibly lavages or containers, with no visible text or symbols.
natural_image
3D rendering of a mechanical device with no visible text or symbols on the device itself
The image is too blurry to recognize any text content.

natural_image
3D rendering of a mechanical device with no visible text or symbols on the device itself
natural_image
Close-up of a hand pressing a blue button on a digital coffee machine, with a metal mug and tray nearby (no visible text or symbols)
natural_image
Hand pouring liquid from a blue bottle into a metal mixing bowl on a flat surface (no text or symbols visible)
natural_image
Close-up of a metal mixing bowl with a white liquid being poured into it, next to a blue spray bottle labeled 'COEISANI' (no other text or symbols visible)
Préparer la solution.
4

natural_image
Close-up of a hand operating a black coffee machine with a pour-over filter (no visible text or symbols)
natural_image
Interior view of a coffee machine with open lid, black tray, and control panel (no visible text or symbols)
natural_image
Person using a coffee machine to press coffee beans (no visible text or symbols)
Retirer la trémie du soluble. Re
7
natural_image
Close-up of hands installing or adjusting a black mechanical component with a brush (no visible text or symbols)
natural_image
Close-up of hands using a computer to adjust or install electronic components on a coffee machine (no visible text or symbols)
natural_image
Close-up of a hand inserting a small component into a machine (no visible text or symbols)
natural_image
Close-up of a hand inserting a component into a device (no visible text or symbols)
natural_image
Close-up of a hand holding a mechanical component with a black cylindrical part inserted, no visible text or symbols.
Retirer le corps mixeur.

natural_image
Hand inserting a white cup into a machine (no visible text or symbols)

FAEMA

1213

natural_image
Close-up of hands installing a mechanical component into a device (no visible text or symbols)
Retirer la roue.
natural_image
Close-up of a hand inserting a small component into a device, with no visible text or symbols.
natural_image
Close-up of a mechanical assembly with metallic components and mounting holes (no visible text or symbols)
14

natural_image
Close-up of a hand adjusting a mechanical component with a red circular feature (no visible text or symbols)
natural_image
Close-up of hands operating a mechanical device with a mesh grille (no visible text or symbols)
natural_image
Close-up of a black plastic container with white contents, placed on a metal grate (no visible text or symbols)
The image is too blurry to recognize any text content.

natural_image
Close-up of hands operating a black appliance on a metal grater (no visible text or symbols)
natural_image
Interior view of a mechanical device with exposed internal components and metallic casing (no visible text or symbols)
1718
natural_image
Close-up of a hand pressing a small black component on a metal grate (no visible text or symbols)
natural_image
Interior view of a vehicle chassis under assembly, showing internal components and wiring (no visible text or symbols)

natural_image
Close-up of a mechanical component with visible parts and mounting brackets (no text or symbols)

natural_image
Close-up of a hand pressing down on a computer motherboard with cooling fins (no visible text or symbols)

natural_image
Close-up of hands installing or adjusting a black plastic component on a metal grate (no visible text or symbols)
natural_image
Close-up of hands assembling a mechanical component with a tool, no visible text or symbols
natural_image
Close-up of hands using a tool to adjust or install a car engine component (no visible text or symbols)
natural_image
Close-up of hands assembling a small object on a metal grate (no visible text or symbols)
natural_image
Close-up of gloved hands holding a small metallic object on a dark surface (no text or symbols visible)
Porter des gants.
2223
natural_image
Close-up of gloved hands handling a metallic bowl on a surface (no text or symbols visible)
natural_image
Close-up of a mechanical component with a gloved hand holding a yellow object, no visible text or symbols
natural_image
Close-up of gloved hands handling a small white object in a dark container (no visible text or symbols)
natural_image
Close-up of gloved hands handling a dark container with a green object (no visible text or symbols)
natural_image
Person in gloves washing a white object in a basin with water spray (no visible text or symbols)
natural_image
Person washing a sink with a hand in a glove (no visible text or symbols)
natural_image
Close-up of a hand pressing a button on a mechanical component (no visible text or symbols)
natural_image
Close-up of a hand inserting a small circular component into a mechanical device (no visible text or symbols)
natural_image
Interior view of a mechanical device with internal components and no visible text or symbols
natural_image
Close-up of a modern kitchen appliance with glass door and side-mounted kitchen equipment (no visible text or symbols)
natural_image
Close-up of a coffee machine with a side panel and control panel (no visible text or symbols)
natural_image
Close-up of a laboratory instrument with labeled parts (no visible text or symbols)
natural_image
Close-up of a coffee machine with a hand operating the cup (no visible text or symbols)
2
natural_image
Mechanical setup showing a coffee machine with a side panel and base tray (no visible text or symbols)
VOLET DÉCAFÉINÉ (5)
natural_image
3D rendering of a medical imaging machine with a close-up inset showing internal components (no text or symbols visible)
CARROSSERIE
natural_image
Exterior view of a modern barista machine with digital display and two cups (no text or symbols visible)

PROGRAMMATION CLIENT

DATE ET HEURE
1
- see Installation Rules chapters
- voir chapitres
A) possible water treatment device
natural_image
Diagram of a pipe with ribbed ends and a cross symbol indicating a knot or connection (no text or labels present)
Fig. 4
∅ 3/8 GAS

Fig. 3
Install a water feeding tap installer un Robinet alimentation eau
WATER MAINS MAX. PRESSURE
PRESSION MAX. EAU DE VILLE
87 psi - 6 bar - 0,6 MPa
(for pressure beyond this value, install a pressure reducer) (pour pression plus haute installer un détendeur)
DRAIN
VIDANGE DU
LOCAL
Min.
∅ 2 inches (50 mm).


FAEMA
EN GRUPPO CIMBALI reserves the right to make changes to the machines in accordance with the needs of individual countries and on the basis of technological progresses.
This publication may not, either in whole or in part, be used, copied or published without the written authorisation of GRUPPO CIMBALI S.p.A. © Copyright by GRUPPO CIMBALI S.p.A., Milan, Italy All rights reserved
© Copyright by GRUPPO CIMBALI S.p.A., Milano
The GRUPPO CIMBALI Company's client service, the aim of which is to assure top coffee-machine performance for its clients at all times, also makes available its ECO LINE, a series of specific cleaning products expressly designed for this purpose.
ECO LINE - Cleaning products
A) 610-004-159 For cappuccino makers in liquid form
B) 610-004-270 For dispensers, filter-holders, coffee cups in powder form
C) 610-004-244 For dispensers, filter-holders, coffee cups in small envelops
D) 610-004-217 For superautomatic-machine dispensers in tablet form
Order directly from your local distributor and refer to the particular item you require by its number, as shown above.
FR GRUPPO CIMBALI et la "SERVICE LINE"
C

D