IAN 346914 - Dollhouse Playtive - Free user manual and instructions
Find the device manual for free IAN 346914 Playtive in PDF.
| Product type | Dollhouse |
| Brand | Playtive |
| Model | IAN 346914 |
| Dimensions (L x H x D) | Approx. 64 x 80 x 31 cm |
| Power supply | 4 CR1632 batteries (included) |
| Recommended age | From 3 years |
| Number of pieces | 33 accessories, 10 stickers |
| Main functions | Sound doorbell, light-up lamps (auto-off after 1 min), staircase, elevator, balcony |
| Assembly | By an adult, tool required: screwdriver and Allen key |
| Care and cleaning | Wipe with a dry cloth; wash textiles in cold water |
| Safety | Not suitable for children under 36 months (small parts). Adult supervision required. Do not climb. |
| Battery type | CR1632, non-rechargeable |
| Warranty | 3 years from date of purchase |
| After-sales service France | 0800 919270, deltasport@lidl.fr |
| After-sales service Belgium | 070 270 171 (€0.15/min), deltasport@lidl.be |
| Date of manufacture | 07/2020 |
| Intended use | Toy for private indoor use |
Frequently Asked Questions - IAN 346914 Playtive
User questions about IAN 346914 Playtive
0 question about this device. Answer the ones you know or ask your own.
Ask a new question about this device
Download the instructions for your Dollhouse in PDF format for free! Find your manual IAN 346914 - Playtive and take your electronic device back in hand. On this page are published all the documents necessary for the use of your device. IAN 346914 by Playtive.
USER MANUAL IAN 346914 Playtive
Instructions for use
M
POPPENHOIS
GebruksdorWzng
DOMEČEK PRO PANENKY XXL
Nevod k pouzil


B
Before reading, fold out the ilustration page and get to know all of the functions of your unit.
()
PE/AT/CH Seepuys and Sishechshinwase 96
GSE Usage and safety Information Page 10
$$ 3 V = = C R 1 6 3 2 $$

You have chosen to purchase a high-quality product. Familiarise yourself with the product before using it for the first time.

Read the following instructions for use carefully.
Use the product only as described and only for the given areas of application. Store these instructions for use carefully. When passing the product on to third parties, please also hand over all accompanying documents.
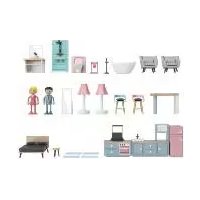
Scope of delivery (fig. A)
1 × ground floor base plate (1)
1 x first floor base plate (2)
1 x second floor base plate (3)
1 × partition wall (4)
1xcolumn (5)
1 x staircase (6a)/(6b)
1x lift (7)
1 x first floor wall (8)
1 x ground floor wall (9)
1 x second floor wall (10)
2× parapets (11)
1x wall to the balcony (12)
1 x wall with window (13)
1x roof plate (14)
1 x roof plate with recess (15)
1 x house wall with lift function (16)
1 x house wall with window (17)
15× screws 4mm× 30mm (18)
10× screws 4mm× 18mm (19)
2× screws 6mm× 14mm (20)
2× screw sleeves (21)
1 x allen key (22)
1 x awning rod (23)
1 x awning cloth (24)
1 x bell (25)
1 x nameplate (26)
3× lamps (27)
4x batteries (3V=1632) (included with the product)
33×accessories
10 × adhesive strip
1x instructions for use
Technical data
Dimensions:
approx. 64 × 80 × 31cm (W × H × D)
Power supply battery:
3V = = CR1632

Symbol for DC voltage

Date of manufacture (month/year): 07/2020
Correct use
This product is a toy for private use and for children aged 3 years and above.

Safety instructions
- Warning. Not suitable for children under 36 months. Choking hazard. Small parts.
- Warning. Neither the packaging/mounting materials nor the 'SUPER DRY' pouch (desiccant) are a constituent part of the toy and they must be removed before the product is given to children to play with.
- Warning. Desiccant contains calcium chloride (CAS 10043-52-4). Keep out of reach of children.
Children should only play with the toy under adult supervision.
Adult assembly required. Ensure that the product and all components are not given to children until after assembly. - The product is not for climbing or is not a play equipment.
- Please ensure that no one, children in particular, stands on the article or uses as a leverage. The article could tip over.
- Place the product on a level, horizontal surface in order to prevent tipping.
- Check the product for damage and wear before each use. The product may only be used in good order and condition!
- Only use the battery type: CR1632.

Warnings on batteries!
- Remove the batteries if they are empty or if the product is not going to be used for an extended period.
- Do not use different battery types or brands, new and used batteries in combination, or batteries with different capacities, as they leak and can thus cause damage.
- Observe the polarity (+/-) when inserting batteries.
- Change all batteries at the same time and dispose of the old batteries properly.
- Warning! Batteries may not be charged or reactivated in any way. They may not be dismantled, thrown into fire, or short-circuited.
- Always keep batteries out of the reach of children.
- Do not use rechargeable batteries!
- The cleaning and user-maintenance may not be carried out by children without supervision.
- Clean the batteries and the device contacts as necessary and before inserting the batteries.
- Do not expose the batteries to extreme conditions (e.g. radiators or direct sunlight). Otherwise there is an increased risk of leaks.
- Batteries can endanger life if swallowed. Keep batteries out of the reach of small children for this reason. Seek medical help immediately if a battery is swallowed.

Danger!
- Handle a damaged or leaking battery with extreme care and dispose of it properly and immediately. Wear gloves to handle the battery.
If you come into contact with battery acid then wash the affected area with soap and water. If battery acid gets in your eye rinse it out with water and seek medical help immediately! - Do not short-circuit the terminals.
Assembly
In order to assemble the product please follow the individual steps as shown in figures B - H.
- You will also need a screwdriver and a second Allen key to assemble the product.
Note: We recommend attaching the product to a wall using suitable mounting materials.
Attaching and activating the bell (fig. 1)
- Write on the nameplate (26) and glue the nameplate to the bell (25).
- Stick the adhesive strips to the back of the bell (25).
- Remove the protective paper and stick the bell to the desired location on the doll's house.
- Press on the bell to activate the sound.
Attaching and activating the lamps (fig. J)
- Stick the adhesive strips to the back of the lamps (27).
- Remove the protective paper and stick the lamps (27) to the desired location on the doll's house.
- Press the button (27d) on the lamp in order to activate the light.
Note: The light switches off automatically after approx. 1 minute.
Changing the battery (fig. K)
WARNING! Follow these instructions in order to avoid mechanical and electrical damage.
There are batteries in the bell (25) and in the lamps (27).
You can change the batteries if they stop working.
- Carefully remove the bell or the lamp from the doll's house and release the relevant screw (25a)/(27a) using a screwdriver.
- Remove the cover (25b)/(27b).
- Carefully remove the empty battery from the battery compartment (25c)/(27c) and exchange it for a new battery.
Note: Pay attention to the plus and minus poles on the batteries and that they are inserted correctly.
The batteries must be located entirely inside the battery compartment.
- Tighten the screws on the covers of the bell (25) or the lamp (27) and attach the bell or lamp back on the doll's house.
Storage, cleaning
When not in use, always store the product dry, clean, without batteries and at room temperature. Wipe clean with a dry cloth only. Wash textiles with cold water only and let dry at room temperature.
IMPORTANT! Never clean the product with harsh cleaning agents.
Disposal

In the interest of protecting the environment, do not throw your product into the household waste once you are finished with it, but rather take it to a
specialty disposal facility. Find out about collection sites and their hours of operation from your local authority.
Defective or used batteries must be recycled pursuant to Directive 2006/66/EC and changes to it. Return batteries and/or the product via the collecting sites provided. Packaging materials, such as plastic bags, must be kept away from children. Keep the packaging materials out of reach of children.

Environmental damage caused by improper disposal of batteries! Batteries may not be disposed of with household They may contain toxic heavy metals and bject to hazardous waste treatment. The cal symbols of the heavy metals are as s: Cd = cadmium, Hg = mercury, Pb = Dispose of used batteries at a municipal ion site.

Dispose of the product and packaging in an environmentally friendly manner.

Note the label on the packaging materials when separating waste, as these are labelled with abbreviations (a) and
numbers (b) with the following meaning: 1-7: plastics/20-22: paper and cardboard/80-98: composite materials.
The product and the packaging materials can be recycled, dispose of them separately for better treatment of waste. The Triman logo only applies to France. Find out how to dispose of the used product from your municipal or city administration.
Notes on the guarantee and service handling
The product was produced with great care and under constant supervision. You receive a three-year warranty for this product from the date of purchase. Please retain your receipt.
The warranty applies only to material and workmanship and does not apply to misuse or improper handling. Your statutory rights, especially the warranty rights, are not affected by this warranty.
With regard to complaints, please contact the following service hotline or contact us by e-mail.
Our service employees will advise as to the subsequent procedure as quickly as possible.
We will be personally available to discuss the situation with you.
Any repairs under the warranty, statutory guarantees or through goodwill do not extend the warranty period. This also applies to replaced and repaired parts. Repairs after the warranty are subject to a charge.
IAN:346914_2001
GB
Service Great Britain
Tel.: 0800 404 7657
E-Mail: deltasport@lidl.co.uk
IE
Service Ireland
Tel.: 1890 930 034
(0,08 EUR/Min., (peak))
(0,06 EUR/Min., (off peak))
E-Mail: deltasport@lidl.ie
Felicitations!
$$ 3 V = = C R 1 6 3 2 $$

Symbole de tension continue

$$ 3 V = = C R 1 6 3 2 $$