
RP631SSE0UK - Fridge TCL - Free user manual and instructions
Find the device manual for free RP631SSE0UK TCL in PDF.
| Brand | TCL |
| Model | RP631SSE0UK |
| Product type | Two-door fridge-freezer, freestanding |
| Total volume | 631 L |
| Refrigerator volume | 396 L |
| Freezer volume | 192 L (including 43 L two-star compartment) |
| Dimensions (W x D x H) | 920 x 735 x 1768 mm |
| Weight | 95 kg |
| Power supply | 220-240 V ~ 50 Hz, 1.7 A |
| Climate class | SN / N / ST / T (10 to 43 °C) |
| Refrigerant | R600a, 84 g |
| Noise level | 40 dB(A) |
| Main functions | Electronic temperature control, frost-free fan cooling, frequency inverter, Fast Cool, Fast Freeze, Smart, Refrigerator off, Door alarm, Power failure memory, Child lock, Display protection |
| Lighting | LED, 4 W |
| Water dispenser | Yes, with internal tank (2.5 L recommended per week) |
| Included accessories | 3 refrigerator shelves, 5 freezer shelves, 1 water container, 2 vegetable drawer covers, 2 vegetable drawers, 1 ice cube tray, 1 egg box, 3 refrigerator bottle holders, 4 freezer bottle holders, 2 freezer drawers, 1 manual |
| Maintenance and cleaning | Clean monthly with a damp cloth and neutral detergent; automatic defrosting; replace LED lamp by a professional |
| Safety | Child lock, automatic stop in case of anomaly, compressor protection (5 min delay after power cut), comply with ventilation and leveling instructions |
| Spare parts and repairability | Contact TCL after-sales service for any spare parts; repair by specialist only; LED lamp not replaceable by user |
| General information | Eco-friendly refrigerant R600a, 80% recyclable materials, compliant with European standards, manual available in multiple languages |
Frequently Asked Questions - RP631SSE0UK TCL
User questions about RP631SSE0UK TCL
0 question about this device. Answer the ones you know or ask your own.
Ask a new question about this device
Download the instructions for your Fridge in PDF format for free! Find your manual RP631SSE0UK - TCL and take your electronic device back in hand. On this page are published all the documents necessary for the use of your device. RP631SSE0UK by TCL.
USER MANUAL RP631SSE0UK TCL
■Please carefully read the operation instructions before power on, and keep it properly.
The products may subject to changes without notice.

The Creative Life
Air-cooled & Frost-free Household Refrigerator Operating Instructions
RP631SSE0
Contents
Thank you for buying TCL refrigerator. We hereby express our thanks.
Welcome to use TCL refrigerator. We will do our best to provide you with quality
service.
Safety instructions P2
Product introduction P5
Handling and placement P6
Preparations prior to use P7
Operation keys P8
Operation and diagram of display board P8
Food storage P11
Ice-making P11
Disassembly and assembly method of accessory P12
Care and maintenance P13
Failure analysis P14
Non-failure P14
Technical parameter and Packing list P15
Safe recovery instructions P16
Description of climate types P16
- This appliance is not intended for use by persons (including children) with reduced physical, sensory or mental capabilities, or lack of experience and knowledge, unless they have been given supervision or instruction concerning use of the appliance by a person responsible for their safety. Children should be supervised to ensure that they do not play with the appliance.
- If the supply cord is damaged, it must be replaced by the manufacturer, its service agent or similarly qualified persons in order to avoid a hazard.
- This appliance can be used by children aged from 8 years and above and persons with reduced physical, sensory or mental capabilities or lack of experience and knowledge if they have been given supervision or instruction concerning use of the appliance in a safe way and understand the hazards involved. Children shall not play with the appliance. Cleaning and user maintenance shall not be made by children without supervision.
- WARNING: Keep ventilation openings, in the appliance enclosure or in the built-in structure, clear of obstruction.
- WARNING: Do not use mechanical devices or other means to accelerate the defrosting process, other than those recommended by the manufacturer.
- WARNING: Do not damage the refrigerant circuit.
- WARNING: Do not use electrical appliances inside the food storage compartments of the appliance, unless they are of the type recommended by the manufacturer.
- Do not store explosive substances such as aerosol cans with a flammable propellant in this appliance.
- This appliance is intended to be used in household and similar applications such as
Staff kitchen areas in shops, offices and other working environments;
Farm houses and by clients in hotels, motels and other residential type environments;
Bed and breakfast type environments;
- Catering and similar non-retail applications.
Safety instructions
1. Warning
Warning: No barrier is allowed around the appliance or in the embedded structure in order to ensure the free ventilation.
Warning: It is forbidden to speed up the defrosting process with any mechanical equipment or by other method except for the method recommended by the manufacturer.
Warning: Never damage the refrigerating circuit.
Warning: Never use any electric apparatus in the food chamber of the appliance except for the type recommended by the manufacturer.
Warning: Never place the liquid beverage or food contained with glass container in the freezing chamber for fear of cracking.
Warning: If powered off, the refrigerator shall be powered on 5min later for fear of damaging the compressor.
Warning: If any live part, abnormal noise, smell, smoke or other abnormality is found during use, it is necessary to power off the appliance immediately and contact the after-sales service department of the Company timely.
Warning: Never place your finger or hand under the refrigerator, especially rear bottom of refrigerator; otherwise, you may be hurt by the sharp matter.
Warning: The children must not play or climb the refrigerator. The operation by the children must be supervised by their parents for fear of danger.
Warning: Never place your hand between the doors to open or close door for fear of jamming your finger. The door handle shall be used to open or close the door.
Warning: Under the rated climate types SN, N and ST, the operating ambient range of the appliance is 10^ 38^ ; under the climate types SN, N, ST and T, the operating ambient range of the appliance is 10^ 43^ . If the appliance operates outside the rated climate type (ambient temperature range), the appliance may not maintain the satisfying interior temperature.

Warning: Risk of fire / flammable materials
Warning: When positioning the appliance, ensure the supply cord is not trapped or damaged.
Warning: Do not locate multiple portable socket-outlets or portable power supplies at the rear of the appliance.
Children aged from 3 to 8 years are allowed to load and unload refrigerating appliances Opening the door for long periods can cause a significant increase of the temperature in the compartments of the appliance.
Clean regularly surfaces that can come in contact with food and accessible drainage systems. Clean water tanks if they have not been used for 48h ; flush the water system connected to a water supply if water has not been drawn for 5 days.
Store raw meat and fish in suitable containers in the refrigerator, so that it is not in contact with or drip onto other food.
Two-star frozen-food compartments are suitable for storing pre-frozen food, storing or making ice-cream and making ice cubes.
One-, two- and three-star compartments are not suitable for the freezing of fresh food. If the refrigerating appliance is left empty for long periods, switch off, defrost, clean, dry, and leave the door open to prevent mould developing within the appliance.
2. Cautions
Cautions: The power supply of this product must be uniform with the power supply mentioned on the nameplate, and the standard independent 3-hole socket shall be used (above 10A, and reliably grounded). One socket must not be shared by more than one appliance; otherwise, fire may be caused due to overheat.
Cautions: Never pull the power wire by hand. It is necessary to hold and unplug the power connector from the socket to disconnect the power supply. The power wire or connector must not be touched by the wet hand for fear of electric shock.
Cautions: The power wire must not be squeezed by the refrigerator or any heavy load, and the power wire shall not be bent extremely. The damage or peeling of power wire may result in fire or electric shock. If the power wire is broken or cut, please contact the after-sales service department immediately.
Cautions: No flammable or explosive matter or corrosive acid or alkaline matter is allowed in the refrigerator.
Safety instructions
EN
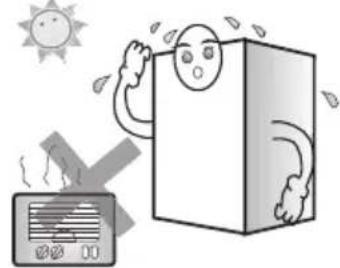
Cautions: The refrigerator must not be used in the rain or under the sunshine.
Cautions: It is forbidden to place the container with fluid on the refrigerator because the breakage or turnover of the container may affect the electrical insulation of refrigerator and result in electric shock or fire.
Cautions: The refrigerator must not be disassembled or modified without permission. The repair of refrigerator must be performed by the specialist.
Cautions: In case of leakage of any flammable gas such as coal gas, it is necessary to close the leaking valve first and then open the window for ventilation, and forbidden to unplug the refrigerator connector immediately for fear of fire or explosion due to electric spark.
Cautions: Refrigerating appliances – in particular a refrigerator-freezer Type I – might not operate consistently (possibility of defrosting of contents or temperature becoming too warm in the frozen food compartment) when sited for an extended period of time below the cold end of the range of temperatures for which the refrigerating appliance is designed;
Cautions: The fact that effervescent drinks should not be stored in food freezer compartments or cabinets or in low-temperature compartments or cabinets, and that some products such as water ices should not be consumed too cold.
Cautions: The need to not exceed the storage time(s) recommended by the food manufacturers for any kind of food.
Cautions: The precautions necessary to prevent an undue rise in the temperature of the frozen food while defrosting the refrigerating appliance, such as wrapping the frozen food in several layers of newspaper.
Cautions: The fact that a rise in temperature of the frozen food during manual defrosting, maintenance or cleaning could shorten the storage life.
Cautions: The care required with regard to frozen food in storage in the event of an extended non-running of the refrigerating appliance (interruption of power supply or failure of the refrigerating system).
Cautions: The action to be taken when the refrigerating appliance is switched off and taken out of service temporarily or for an extended period (e.g. emptied, cleaned and dried, and the door(s) or lid(s) propped ajar).
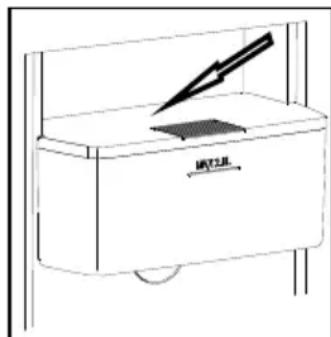
The pictures are for reference only. Please refer to the object
Features
- Intelligent temperature control by computer, fan-cooled and frost-free
Computer temperature control is adopted, visual operation, intelligent and convenient; equipped with fan-cooled and frost-free system, safe and efficient;
-- Green and environmental friendly refrigerant
CFC-free materials are adopted, green and environmental friendly material R600a, 80% main materials can be recycled;
-- Generate air by swinging left and right, uniform cooling;
-630mm ultra-thin machine body, easy in and out; - 90^ opening door, barrier-free drawer pulling:
-- Frequency conversion technology;
Warm prompt:
If your product is improved product, it may not be totally same as that in the instructions. But it will not change the performance and method of application. Please feel relieved about usage.
Handling and placement
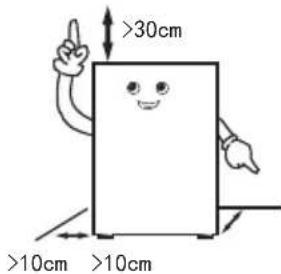
Certain space shall be left around the refrigerator, shown in the figure.
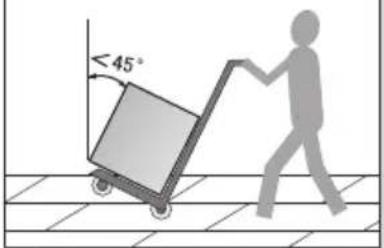
During handling, the door side of the refrigerator shall not contact with the handling tools
The refrigerator shall be placed in an environment which is dry, has good ventilation, far from direct sunshine and heat source.
The refrigerator shall be placed on the flat and firm surface. If the ground is not flat, adjust the adjusting leg to keep it level.

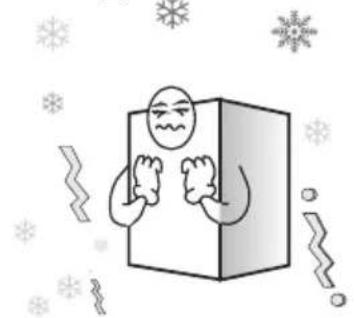
Never place the refrigerator into a too cold environment that may get frozen.
Removing the foam base is beneficial for bottom heat dissipation and can avoid fire.
Warm prompt:
--When handling the refrigerator, at least two persons are required - one lifts the top of rear part, the other one handles the bottom (if one part is clamped, it is quite dangerous and may cause accident).
--When moving the refrigerator, the lower runner may damage and scratch the floor. If you need to move the refrigerator for a long distance, the internal accessories shall be fixed using adhesive tape. Otherwise, the accessories may get damaged due to crashing each other.
--Please place the refrigerator in the position with small vibration or little exposed to vibration. For users in the area where earthquake often occurs, please fix the refrigerator against the wall or pole. Otherwise, the falling of refrigerator will cause accident.
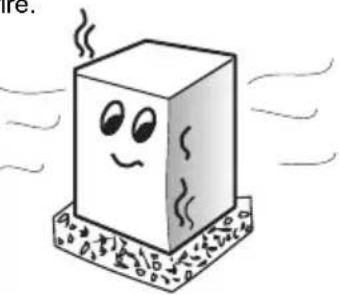
--Sufficient clearance shall be left around. If the clearance is too small or place goods on the top or close to the side, or paste on the sides, the heat dissipation of refrigerator will be affected, and thus to cause unnecessary electric energy waste as well as burn out of the wall and other goods; the contact between the back and wall will cause vibration and noise;
--Adjust the front part and adjusting leg of the refrigerator to level it. Unlevel of the refrigerator will cause vibration and noise.
Handling and placement
This refrigerator can not be used as a built-in appliance.
The outline dimension of the product and the space needed by the use of product are shown in the following.
pictures:
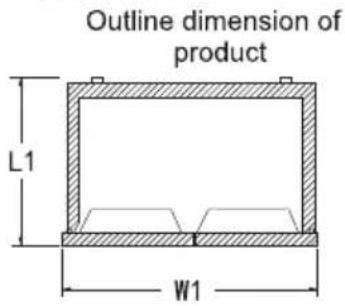
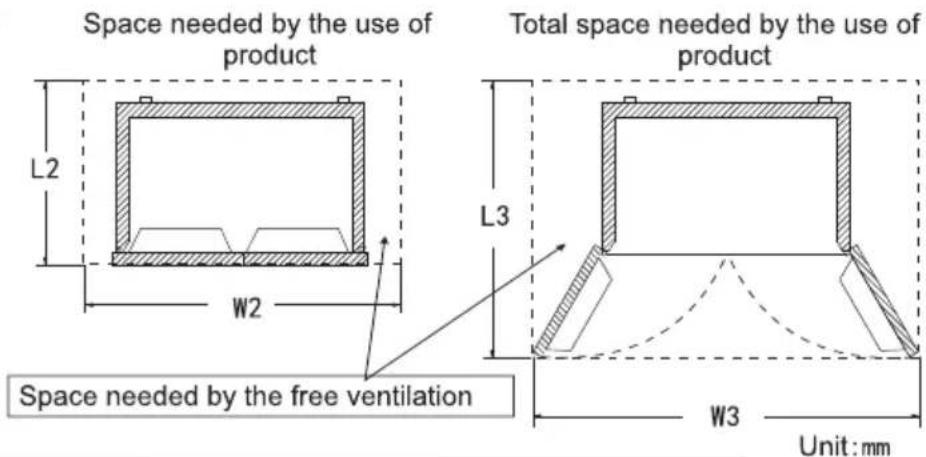
| Outline dimension of product | Space needed by the use of product | Total space needed by the use of product | |||
| L1 | W1 | L2 | W2 | L3 | W3 |
| 735 | 920 | >L1+100 | =W1+200 | >L1+380 | =W1+600 |
Preparations prior to use
- Remove all packing assemblies such as case fixing tape etc., especially the foam base.
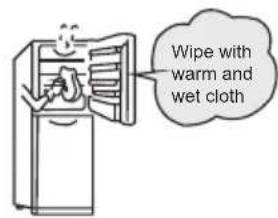
- Use warm wet cloth to clean both interior and exterior of the refrigerator, (neutral detergent can be added in warm water).
-
After leveling and cleaning the refrigerator, stand it for about 2 hours before plugging the power plug for powering on, and cool the refrigerator for 2 to 3 hours before storing foods.
-
Remove fixing tape
In hot summer, 24 hours are needed to fully freeze the food. Check the refrigerating condition on the second day.
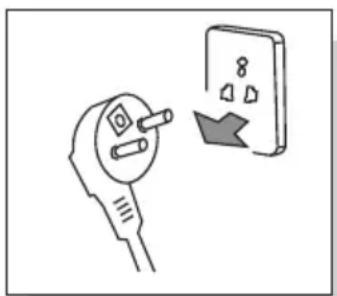
2. Connect to power
- Store food after connecting to power for 2-3 hours
The plastics deodorant will disappear automatically after freezing for a while.
Operation keys
- Remove all packing assemblies such as case fixing tape etc., especially the foam base.
- Use warm wet cloth to clean both interior and exterior of the refrigerator, (neutral detergent can be added in warm water).
- After leveling and cleaning the refrigerator, stand it for about 2 hours before plugging the power plug for powering on, and cool the refrigerator for 2 to 3 hours before storing foods.
Operation keys
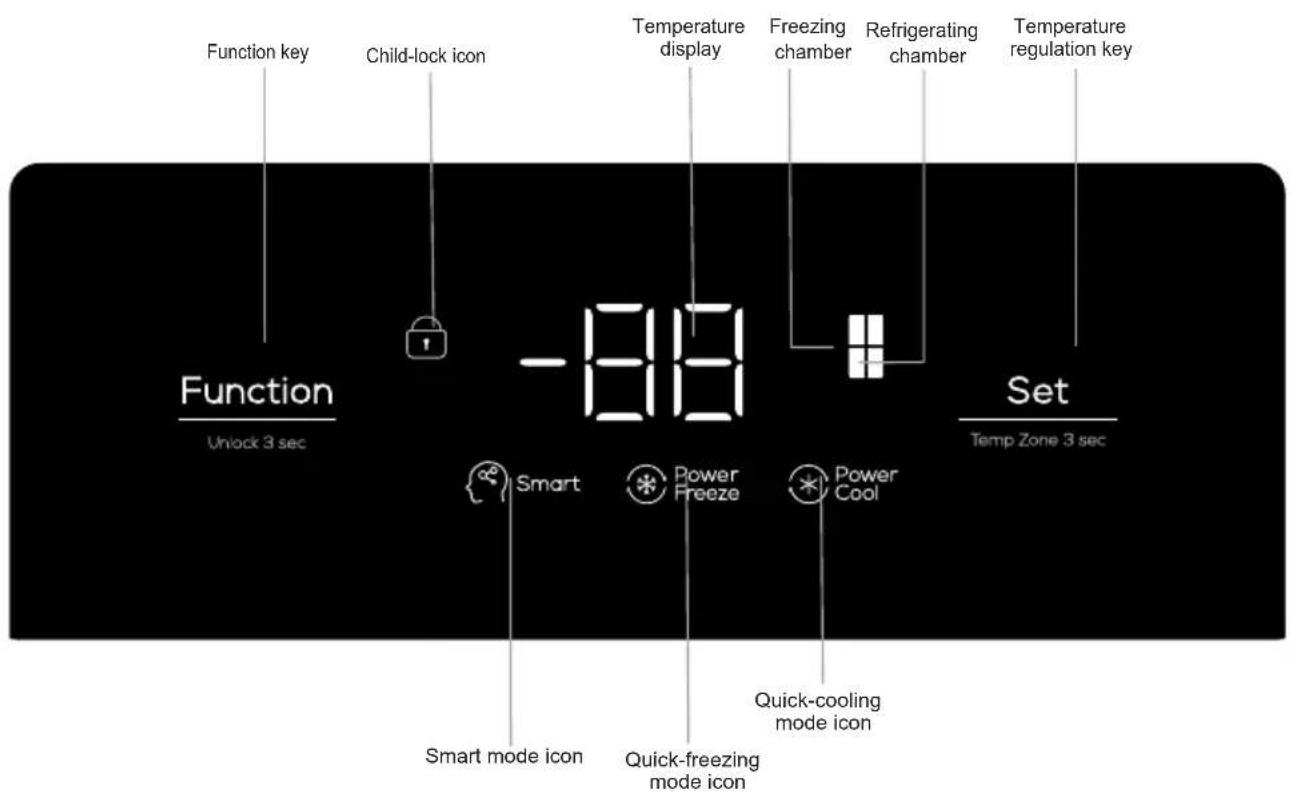
Operation and diagram of display board
The above is the computer control board of the product
EN
First time to electricity
The first time to electricity, the cooling room runs at the 5^ and the freezing room runs at the -18^
The function of adjusting the temperature manually
Temperature adjustment in cooling room (2^ - 8^)
Under unlock status, long press" SET " key for 3 seconds until the icon switches to refrigerator compartment. Press" SET " key to adjust temperature in refrigerator compartment. And then the temperature drops by 1^ every time press " SET " key. The shift of refrigerator compartment stalls recycles around "08" - "07" - "06" - "05" - "04" - "03" - "02" - "OF" - "08". Stop button operation and wait for 5 seconds after appropriate temperature is selected, and then set the temperature shift for confirmation.
Temperature adjustment of freezer compartment (-22^ - - 15^)
Under unlock status, long press "SET" key for 3 seconds until the icon switches to freezer compartment. Press "SET" key to adjust temperature in freezer compartment. And then the temperature drops by 1^ every time press "SET" key. The shift of freezer compartment stalls recycles around "-15" "-16" "-17" "-18" "-19" "-20" "-21" "-22" "-15". Stop button operation and wait for 5 seconds after appropriate temperature is selected, and then set the temperature shift for confirmation.
Quick refrigerating function
Under unlock status, repeatedly press "Function" key until the "Power Cool" icon flashes. Stop key operation and wait for 5 seconds to enter quick refrigerating function of refrigerator compartment. Manually exit quick refrigerating function through the same operation. Automatically exit quick refrigerating function after two hours. When the "Power" function is on, set temperature to 2^ for refrigerator compartment, until the function exits. (Under quick refrigerating status, adjust set temperature of refrigerator compartment to automatically exit quick refrigerating function. Open refrigerator door over three minutes exit quick refrigerating function under quick refrigerating status.)
Quick freezing function
Under unlock status, repeatedly press " Function " key until the " Power Freeze " icon flashes. Stop key operation and wait for 5 seconds to enter quick freezing function of freezer compartment. Manually exit quick freezing function through the same operation. Automatically exit quick freezing function after four hours in high freezing status.
When the "Power" function is on, set temperature to -24^ for freezer compartment, until the function exits. (Under quick freezing status, adjust set temperature of freezer compartment to automatically exit quick freezing function. Open freezer door over three minutes exit quick freezing function under quick freezing status.)
Intelligent function
Under unlock status, repeatedly press "Function" key until the "Smart" icon flashes. Stop key operation and wait for 5 seconds to enter intelligent function. Manually exit intelligent function through the same operation. When the "Smart" function is on, the refrigerator will automatically monitor the status of all compartments and run efficiently. Under intelligent status, the refrigerator can automatically enter quick-refrigerating or quick freezing function according to the temperature in refrigerator and freezer compartments. (Setting other functions under intelligent status can automatically exit intelligent function.)
Child lock function
Under unlock status, enter " function:
Automatically on: the child lock function is automatically on after no key operation for 30 seconds, " icon is lit, and the key board is locked;
Exit child lock: when the " l " icon is lit, long press " Function " key for 3 second to unlock.
Refrigerating close function
Under unlock status, long press "SET" key for 3 seconds until the temperature icon switches to refrigerator compartment, press "SET" key to adjust temperature for refrigerator compartment. Stop key operation and wait for 5 seconds when the shift of refrigerator compartment is at "OF" to enter refrigerating close function. Refrigerating close function exits when the shift of refrigerator compartment is not at "OF". (Setting other functions under refrigerating close status can automatically exit refrigerating close function.
Attention: take the food out of refrigerator compartment before the refrigerating close function is on.)
The refrigerator compartment enters close status when the "Refrigerating close" function is on.
Power-ofmemory
When the power is cut off, the instantaneous working state of blackout will be locked and resume the state after power on.
Door alarm
When the refrigerator or freezer door is not well closed or open for over 1 minute, the buzzer siren will send off sound. Press down any key to stop alarming and the siren sounds "beep, beep, beep" again after I minute; close refrigerator or freezer door to stop alarming.
Freezer compartment temperature reminder
When the temperature of freezer compartment is higher than -12^ , the corresponding temperature area is lit, the digital area flashes. Press down any key to display temperature of freezer compartment when the power is on, press again or wait for 10 seconds to restore normal display state.
Display protection function
The refrigerator will enter display protection function without any key operation for 30 seconds, and the key board is locked automatically. Under display protection mode, press any key to exit display protection function.
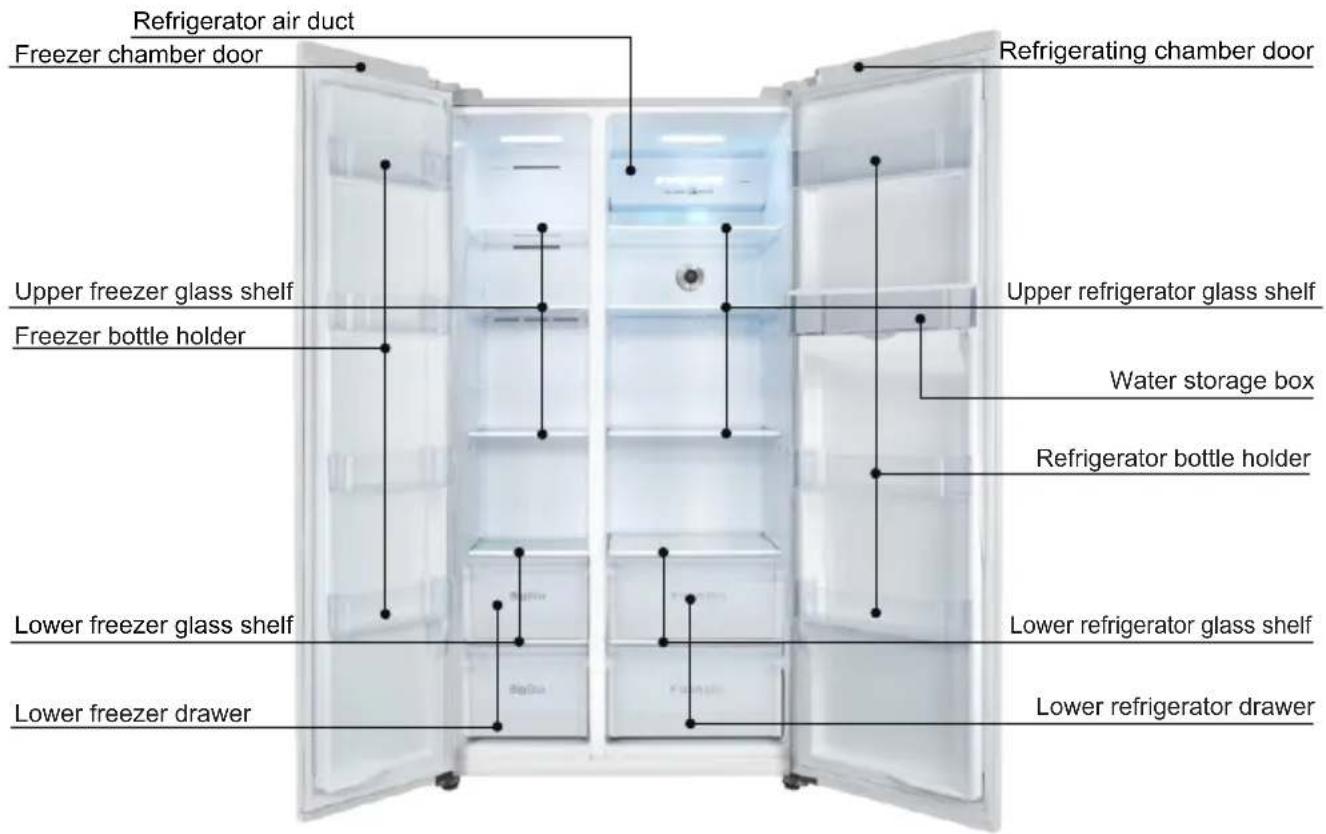
Foods storage
Refrigerating chamber (2^ 8^)
--The refrigerating chamber is mainly used for storing short-term foods, like milk, eggs and bottled drink.
--Vegetables, melons and fruits shall be put into the fruit and vegetable box to prevent water loss.
--The cooked foods shall be put into the refrigerator after packaging with the preservative bags, to prevent the back from frosting and the power from increasing.
Freezing chamber (-22^ -15^)
--The freezing chamber is used for the foods to be stored for long-term.
--Fish and meat to be frozen shall be cut into small pieces, packaged with preservative bags separately and then put into the frozen drawer.
--The glass container or the sealed container filled with liquid shall not be stored in the freezing chamber, to prevent the risk of burst due to freezing.
--The fresh foods shall not be stored together with the frozen foods.
--Do not place food close to inside wall in freezer lest food and wall should be frozen together.
Warm tips:
The stored food, if any, shall not block the air duct outlet and return port for fear of affecting the refrigerating effect.
Before being stored in the refrigerator, the overheated water and food shall be cooled to the room temperature.
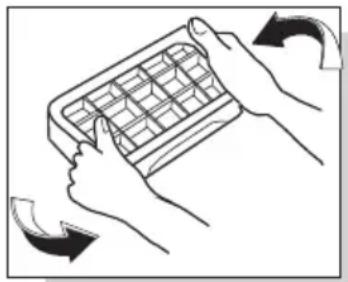
Ice-making (If the appliance has it)
Fill the ice-making box with 4/5 water and put the box into the freezing chamber. After the water in the box turns into ice, twist the box slightly to separate the ice from the box. However, don't bend the box. When separating the ice, wrap the box with dry box to avoid finger frostbite.
Operation keys
Disassembly and assembly method of accessory
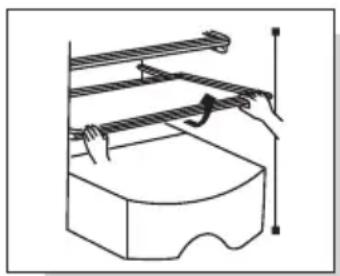
--Glass shelf in the refrigerating chamber: the height of the shelf is adjustable, which facilitates the storage of articles with different volumes. Pull the shelf outwardly and upwardly in a slight way to take out.
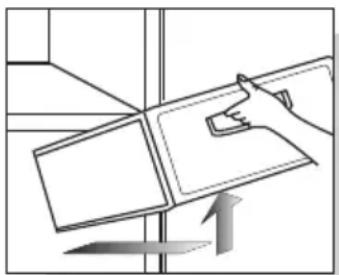
--Fruit and vegetable box: for storing vegetables and fruits. It can be taken out by pulling outwardly.
--Drawer in the freezing chamber: storing foods to be preserved for long-term, such as meat and fish. It can be taken out by pulling outwardly and lifting upwardly.
Kindly tips: It is recommended to put into the large piece of meat after being cut into small pieces, to avoid difficult cutting after being frozen. The quick-freezing foods shall be distributed uniformly and stored together after being frozen.
--Bottle pedestal at the refrigerating door: storing eggs, various bottled drinks and other sundries. It can be taken out by being lifted up slightly.
Note: Don't pull out the bottle pedestal at the refrigerating door forcibly during disassembly, to avoid damaging the refrigerator.
--Components of water storage box: Used for storing the water yield needed by the water dispenser for the purpose of taking the drinkingwater.
--Water-adding of water storage box: Firstly, open the box cover of water storage box by hand, then, pour the water into the water storage box from the container with water. After adding the water, close the box cover of water storage box. --Installation of components of water storage box: Before installing the water storage box, firstly, cover the water storage box firmly and reliably, then hold the both sides of the water storage bucket by hand with balanced force, and slowly press along the arrow direction until it cannot be pressed. It indicates that the water storage box is installed well, otherwise, please continue to install.
--Disassembly of components of water storage box: The disassembly method of the water storage box is same with the installation method. Just implement it in the reverse direction.
★★Warm prompt:
When adding the water in the water storage box, the water addition cannot exceed the tip line of maximum water storage scale;
To ensure the water quality, it is suggested to clean the water storage bucket and outlet water pipe regularly.
During the maintenance and cleaning of water storage box and pipes, it is suggested to disconnect power supply to avoid the accident.
Pay attention to the operating strength when opening the door, lest the water in the storage tank overflowed by opening the door too fast.
Take out by pulling upwardly and outwardly in a slight way
Take out by pulling outwardly and upwardly in a slight way
Gently pull and get out along the reverse direction of arrow
Operation keys
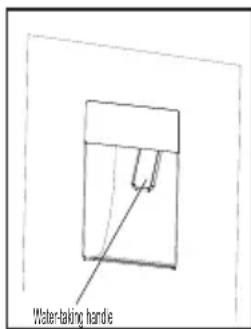
-- Water dispenser: The users can take the drinking water through the equipment at any time according to the own needs,
- Water taking: When the users want to drink water, they need to press (extrude) the water-taking handle or use the rigid container to press (extrude) the water-taking handle until the water outlet flows the water and after meeting the needs. After taking water, stop pressing(extruding), release the water-taking handle, and the water stops flowing.
Warm prompt:
Before taking water, please ensure the water storage box has enough drinking water;
Please ensure the water quality in the water storage box is better without impurities and foreign matters, etc., to avoid blocking the water outlet.
The users are suggested to use 2.5L of drinking water at least in one week to ensure the fresh water source in the water way system.
When taking water, it is suggested to close the door with water dispenser to avoid the shaking of refrigerator door, sprinkling of water and other accidents in the process of taking water.
Due to the different areas and seasons, as well as the instability of indoor environment temperature and humidity, it is the normal phenomenon if the water dispenser has water droplets and condensation in other places except for the water outlet. Please wipe it with towel and duster cloth, will not affect the usage.
Changing the Light
Any replacement or maintenance of the LED lamps is intended to be made by the manufacturer or its service agent or related technical person.
Care and maintenance
It is suggested to maintain the refrigerator once per month; --Unplug the power plug to prevent from electric shock;
--Use wet cloth or neutral detergent (cleanser essence) to wipe off the oil contamination and other dirt. Then completely wipe off the detergent.
--Do not use alkaline detergent, soap powder, gasoline and alcohol, talcum powder etc.; otherwise the coats or plastics may be damaged;
--Regularly clean the refrigerator body and clear the ground dusts to keep the refrigerator clean.
Inspections after maintenance:
- Whether there are damages to the power line and plug; 2. Whether there are dusts on the power plug; 3. Whether there is abnormal heat on the plug; 4. Whether the socket is loose; 5. Whether the plug is totally inserted.
Note:
If the power line and plug is damaged and there exist dusts, electric shock or fire may occur;
After unplugging the plug, 5 minutes must pass before re-plugging it;
Do not put your hands under the refrigerator to avoid getting hurt.
Unplug the refrigerator plug before cleaning
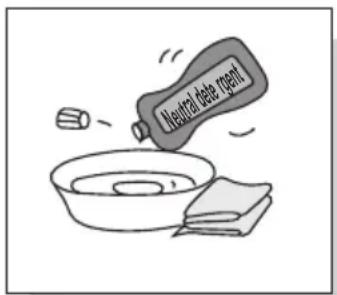
Please use neutral detergent
Failure analysis
EN
The following items shall be inspected before occurring failures which require maintenance:
Failures: Refrigerator does not work, The refrigeration effect is poor
Causes:1. Check the connection of power supply. 2. Check whether the refrigerator is exposed to direct sunlight or whether there is heat source nearby. 3. Check whether there is heat dissipation space around refrigerator.
Remedies:1. Connect the power supply. 2. Move the refrigerator to a place without direct sunlight and heat source. 3. Leave sufficient space between refrigerator and wall.
Failures:Foods in refrigerating chamber are frozen
Causes:1. Check whether the setting temperature is too low. 2. Check whether foods with too much water are too close to the rear wall.
Remedies:1. Adequately increase the temperature. 2. Move the foods with too much water to the door side of glass shelf
Failures:There is abnormal sound in refrigerator
Causes:1. Check whether the bottom of refrigerator is stable. 2. Check whether the refrigerator is too close to the wall. 3. Check whether the refrigerator touches other objects.
Remedies:1. Adjust the bottom adjusting leg to stabilize the refrigerator. 2. Leave sufficient space around refrigerator. 3. Remove the obstacles.
Failures:There is abnormal odor in refrigerator
Causes:1. Check whether the foods are sealed for storage. 2. Check whether the refrigerator is clean. 3. Check whether the foods are stored for too long time.
Remedies:1. Sealed foods for storage. 2. Regularly clean the refrigerator. 3.Do not store foods for too long time.
Non-failures
Phenomenon:Fever or hot on two sides and spacing part surface between refrigerating chamber and freezing chamber.
Cause: Refrigerator pipes (condenser, anti-fog pipes) are on two sides and front part of refrigerator for heat dissipation and to prevent from condensation.
Phenomenon:The door is too tight and not easy to open
Cause: Reopening of the door immediately after closing it is hard because hot air enters the refrigerator and contracts to produce pressure difference. It is easy to open the door after a while.
Phenomenon:There is water ripple in refrigerator
Cause: When starting or stopping the compressor, the refrigerant will make such sound; Water produced after defrosting will also make such sound.
Phenomenon:There is "Click" sound or tick sound in refrigerator
Cause:Shrinkage and swelling of case will make such sound;When the case is cold or the door is opened, this sound will occur; Phenomenon:There is hum sound in refrigerator
Cause: Running of compressor will make such sound (if the refrigerator is not leveled, this sound will be louder)
Phenomenon:There is condensation or frosting freezing chamber door surface or food surface
Cause: Temperature or humidity around the refrigerator is high; The door is opened for too long time; The foods with too much water are not sealed or tightly wrapped
Phenomenon:There is condensation on the built-in light surface
Cause: Light will produce heat after being lit, and the door is opened for too long time. So there is temperature difference, and thus the light case will have condensation.
Phenomenon:There is condensation and water mist on body
Cause: Humidity around refrigerator is high, and the moisture in the air will gather in the case to form condensation
EN
| Model | RP631SSE0 | |||||
| Climate type | SN/N/ST/T | |||||
| Electric shock resistance | I | |||||
| Star sign | * * * * | |||||
| Total Storage Volume | 631L | |||||
| 396L | ||||||
| Storage Volume of Freezer | 192L | |||||
| Storage Volume of two stars Freezer | 43L | |||||
| Power type | 220-240V~150Hz | |||||
| Rated current | 1.7A | |||||
| Lamp power | 4W | |||||
| Weight | 95kg | |||||
| Dimension | 920x735x1768mm | |||||
| Refrigerant and charge amount | R600a,84g | |||||
| Noise Volume | 40dB(A) |
Packing list
| Annex\Model | RP631SSE0 | |||||
| Refrigerating shelf | 3 | |||||
| Freezing shelf | 5 | |||||
| Drinking water box | 1 | |||||
| Fruit and vegetable box cover | 2 | |||||
| Fruit and vegetable box | 2 | |||||
| Ice-making box | 1 | |||||
| Egg box | 1 | |||||
| Refrigerating door bottle bracket | 3 | |||||
| Freezer door bottle bracket | 4 | |||||
| Freezing drawer | 2 | |||||
| Operating instruction | 1 |
Safe recovery instructions
EN
Disposal
Old appliances still have some surplus value. An environmentally friendly approach will ensure that valuable raw materials are recycled.
The refrigerants used in your equipment and insulation materials require special handling procedures. Make sure there is no pipe damage on the back of the equipment before handling. Up-to-date information on the options for disposing of old equipment and packaging from old equipment can be obtained from the local municipal office.
Correct Disposal of this product.
This marking indicates that this product should not be disposed with other household wastes throughout the EU. To prevent possible harm to the environment or human health from uncontrolled waste disposal, recycle it responsibly to promote the sustainable reuse of material resources. To return your used device, please use the return and collection systems or contact the retailer where the product was purchased. They can take this product for environmental safe recycling.
Description of climate types
Table 1 Climate classes
| Class | Symbol | Ambient temperature ranges°C |
| Extended temperate | SN | +10 to +32 |
| Temperate | N | +16 to +32 |
| Subtropical | ST | +16 to +38 |
| Tropical | T | +16 to +43 |
Extended temperate: 'this refrigerating appliance is intended to be used at ambient temperatures ranging from 10^ to 32^ ;
temperate: 'this refrigerating appliance is intended to be used at ambient temperatures ranging from 16 °C to 32 °C';
Subtropical: 'this refrigerating appliance is intended to be used at ambient temperatures ranging from 16^ to 38^ ';
Tropical: 'this refrigerating appliance is intended to be used at ambient temperatures ranging from 16^ to 43^' ;
Dear customer
if you need customer service, please check warranty card for further information.
TCL
The Creative Life
- etire todos los conjuntos de embalaje, como la cinta de fijacion de la caja, etc., especially la base de espuma.
- se un paño humedo tibio para limpar tanto el interior como el exterior del refrigerador (se puedaregarar detergente neutro en agua tibia).
3.阶段性措施 3.1. 30 minutes before the beginning of the project, to ensure that all the equipment and materials are properly installed and ready for use. 3.2. 30 minutes after the beginning of the project, to ensure that all the equipment and materials are properly installed and ready for use. 3.3. 30 minutes after the beginning of the project, to ensure that all the equipment and materials are properly installed and ready for use. 3.4. 30 minutes after the beginning of the project, to ensure that all the equipment and materials are properly installed and ready for use. 3.5. 30 minutes after the beginning of the project, to ensure that all the equipment and materials are properly installed and ready for use. 3.6. 30 minutes after the beginning of the project, to ensure that all the equipment and materials are properly installed and ready for use. 3.7. 30 minutes after the beginning of the project, to ensure that all the equipment and materials are properly installed and ready for use. 3.8. 30 minutes after the beginning of the project, to ensure that all the equipment and materials are properly installed and ready for use. 3.9. 30 minutes after the beginning of the project, to ensure that all the equipment and materials are properly installed and ready for use. 3.10. 30 minutes after the beginning of the project, to ensure that all the equipment and materials are properly installed and ready for use. 3.11. 30 minutes after the beginning of the project, to ensure that all the equipment and materials are properly installed and ready for use. 3.12. 30 minutes after the beginning of the project, to ensure that all the equipment and materials are properly installed and ready for use. 3.13. 30 minutes after the beginning of the project, to ensure that all the equipment and materials are properly installed and ready for use. 3.14. 30 minutes after the beginning of the project, to ensure that all the equipment and materials are properly installed and ready for use. 3.15. 30 minutes after the beginning of the project, to ensure that all the equipment and materials are properly installed and ready for use. 3.16. 30 minutes after the beginning of the project, to ensure that all the equipment and materials are properly installed and ready for use. 3.17. 30 minutes after the beginning of the project, to ensure that all the equipment and materials are properly installed and ready for use. 3.18. 30 minutes after the beginning of the project, to ensure that all the equipment and materials are properly installed and ready for use. 3.19. 30 minutes after the beginning of the project, to ensure that all the equipment and materials are properly installed and ready for use. 3.20. 30 minutes after the beginning of the project, to ensure that all the equipment and materials are properly installed and ready for use. 3.21. 30 minutes after the beginning of the project, to ensure that all the equipment and materials are properly installed and ready for use. 3.22. 30 minutes after the beginning of the project, to ensure that all the equipment and materials are properly installed and ready for use. 3.23. 30 minutes after the beginning of the project, to ensure that all the equipment and materials are properly installed and ready for use. 3.24. 30 minutes after the beginning of the project, to ensure that all the equipment and materials are properly installed and ready for use. 3.25. 30 minutes after the beginning of the project, to ensure that all the equipment and materials are properly installed and ready for use. 3.26. 30 minutes after the beginning of the project, to ensure that all the equipment and materials are properly installed and ready for use. 3.27. 30 minutes after the beginning of the project, to ensure that all the equipment and materials are properly installed and ready for use. 3.28. 30 minutes after the beginning of the project, to ensure that all the equipment and materials are properly installed and ready for use. 3.29. 30 minutes after the beginning of the project, to ensure that all the equipment and materials are properly installed and ready for use. 3.30. 30 minutes after the beginning of the project, to ensure that all the equipment and materials are properly installed and ready for use. 3.31. 30 minutes after the beginning of the project, to ensure that all the equipment and materials are properly installed and ready for use. 3.32. 30 minutes after the beginning of the project, to ensure that all the equipment and materials are properly installed and ready for use. 3.33. 30 minutes after the beginning of the project, to ensure that all the equipment and materials are properly installed and ready for use. 3.34. 30 minutes after the beginning of the project, to ensure that all the equipment and materials are properly installed and ready for use. 3.35. 30 minutes after the beginning of the project, to ensure that all the equipment and materials are properly installed and ready for use. 3.36. 30 minutes after the beginning of the project, to ensure that all the equipment and materials are properly installed and ready for use. 3.37. 30 minutes after the beginning of the project, to ensure that all the equipment and materials are properly installed and ready for use. 3.38. 30 minutes after the beginning of the project, to ensure that all the equipment and materials are properly installed and ready for use. 3.39. 30 minutes after the beginning of the project, to ensure that all the equipment and materials are properly installed and ready for use. 3.40. 30 minutes after the beginning of the project, to ensure that all the equipment and materials are properly installed and ready for use. 3.41. 30 minutes after the beginning of the project, to ensure that all the equipment and materials are properly installed and ready for use. 3.42. 30 minutes after the beginning of the project, to ensure that all the equipment and materials are properly installed and ready for use. 3.43. 30 minutes after the beginning of the project, to ensure that all the equipment and materials are properly installed and ready for use. 3.44. 30 minutes after the beginning of the project, to ensure that all the equipment and materials are properly installed and ready for use 4:15 4:16 4:17 4:18 4:19 4:20 4:21 4:22 4:23 4:24 4:25 4:26 4:27 4:28 4:29 4:30 4:31 4:32 4:33 4:34 4:35 4:36 4:37 4:38 4:39 4:40 4:41 4:42 4:43 4:44 4:45 4:46 4:47 4:48 4:49 4:50 4:51 4:52 4:53 4:54 4:55 4:56 4:57 4:58 4:59 4:60 4:61 4:62 4:63 4:64 4:65 4:66 4:67 4:68 4:69 4:70 4:71 4:72 4:73 4:74 4:75 4:76 4:77 4:78 4:79 4:80 4:81 4:82 4:83 4:84 4:85 4:86 4:87 4:88 4:89 4:90 4:91 4:92 4:93 4:94 4:95 4:96 4:97 4:98 4:99 5: 100
Teclas de operación

- Air-cooled & Frost-free Household Refrigerator Operating Instructions
- Contents
- Thank you for buying TCL refrigerator. We hereby express our thanks.
- Welcome to use TCL refrigerator. We will do our best to provide you with quality
- service.
- Safety instructions
- Warning
- Cautions
- Features
- Warm prompt:
- Handling and placement
- This refrigerator can not be used as a built-in appliance.
- Preparations prior to use
- Operation keys
- First time to electricity
- The function of adjusting the temperature manually
- Temperature adjustment in cooling room (2°C - 8°C)
- Temperature adjustment of freezer compartment (-22°C - - 15°C)
- Quick refrigerating function
- Quick freezing function
- Intelligent function
- Child lock function
- Refrigerating close function
- Power-ofmemory
- Door alarm
- Freezer compartment temperature reminder
- Display protection function
- Foods storage
- Refrigerating chamber (2°C 8°C)
- Freezing chamber (-22°C -15°C)
- Warm tips:
- Ice-making (If the appliance has it)
- Disassembly and assembly method of accessory
- ★★Warm prompt:
- Changing the Light
- Care and maintenance
- Note:
- Failure analysis
- Failures: Refrigerator does not work, The refrigeration effect is poor
- Failures:Foods in refrigerating chamber are frozen
- Failures:There is abnormal sound in refrigerator
- Failures:There is abnormal odor in refrigerator
- Non-failures
- Phenomenon:Fever or hot on two sides and spacing part surface between refrigerating chamber and freezing chamber.
- Phenomenon:The door is too tight and not easy to open
- Phenomenon:There is water ripple in refrigerator
- Phenomenon:There is "Click" sound or tick sound in refrigerator
- Phenomenon:There is condensation or frosting freezing chamber door surface or food surface
- Phenomenon:There is condensation on the built-in light surface
- Phenomenon:There is condensation and water mist on body
- Safe recovery instructions
- Disposal
- Correct Disposal of this product.
- Description of climate types
- Dear customer
- TCL
- Teclas de operación
Brand : TCL
Model : RP631SSE0UK
Category : Fridge