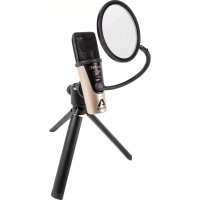
HypeMiC - Microphone Apogee - Free user manual and instructions
Find the device manual for free HypeMiC Apogee in PDF.


| Brand | Apogee |
| Model | HypeMiC |
| Product Type | USB Condenser Microphone |
| Capsule Type | Large diaphragm (35 mm) |
| Polar Patterns | Cardioid, omnidirectional, figure-8 |
| Frequency Response | 20 Hz – 20 kHz |
| Sensitivity | -40 dB FS/Pa |
| Noise Equivalent | 22 dB(A) |
| Maximum SPL | 130 dB SPL |
| Connectivity | USB-C |
| Headphone Output | Yes, 3.5 mm mini-jack, volume control |
| Gain Control | Yes, rotary gain knob |
| Blend Control | Yes, 5 settings (0%–100% mic/headphone mix) |
| Power Supply | USB Bus (5V) |
| Dimensions | 165 x 50 mm (height x diameter) |
| Weight | 0.5 kg |
| Material | Aluminum and plastic |
| Included Accessories | USB cable, boom arm, windshield |
| Care and Cleaning | Wipe with a soft, dry cloth. Do not use solvents. |
| Safety | Do not expose to moisture, liquids, or extreme temperatures. |
| Spare Parts and Repairability | Repair only by a qualified technician. Contact Apogee customer service. |
| Country of Manufacture | China |
| Warranty | 1 year (depending on retailer) |
| Recommended Use | Streaming, podcast, vocals, narration, acoustic instruments |
| Compatibility | Mac, PC, iPad (with adapter), iPhone (with adapter) |
Frequently Asked Questions - HypeMiC Apogee
User questions about HypeMiC Apogee
0 question about this device. Answer the ones you know or ask your own.
Ask a new question about this device
Download the instructions for your Microphone in PDF format for free! Find your manual HypeMiC - Apogee and take your electronic device back in hand. On this page are published all the documents necessary for the use of your device. HypeMiC by Apogee.
USER MANUAL HypeMiC Apogee
natural_image
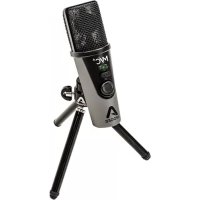
Close-up of a HypeMiC audio recording microphone with APOGEE logo and control buttons (no readable text beyond branding)For iOS, macOS and Windows

APOGEE
Product Tour Apogee HypeMiC


In The Box
- Apogee HypeMiC
- Desktop tripod
- Microphone stand adapter
- Pop filter
-
Carry case
-
Micro-USB to USB-C cable
- Micro-USB to USB-A cable
- Micro B-to-Lightning cable
- Quick start guide
Product Tour Apogee HypeMiC
Status & Input Level Indicator LEDs
1 Single Blue = Powered but not connected to recording software
2 Single Green = Connected and working with recording software
3 Green left-to-right = Audio level meter
4 Green + Orange = Approaching maximum input level
5 Red = Input Overload, Gain should be lowered
6 Purple = See Hype Mode setting page 8
7 White = See Blend Control page 10

natural_image
Vertical sequence of colored oval shapes with dots and a sun icon at the bottom (no text or symbols)1 Nur blau = Eingeschaltet, aber nicht mit Recorder-Programm verbunden Azul único = Alimentado pero no conectado al software de grabación Bleu = Sous alimentation mais non connecté au logiciel d'enregistrement Solo Blu = Acceso ma non collegato al software di registrazione Apenas 1 azul = Ligado, mas não conectado ao software de gravação
2 Nur grün = Verbunden und funktioniert mit dem Recorder-Programm Verde único = Conectado y funcionando con software de grabación Vert = Connecté et fonctionnant avec le logiciel d'enregistrement Solo Verde = Collegato e in funzione con il software di registrazione Apenas 1 verde = Conectado e funcionando com o software de gravação
3 Grün von links nach rechts = Audiopegel-Anzeige
Verde de izquierda a derecha = Medidor de nivel de sonido
Vert clignotant de gauche à droite = Indicateur de niveau audio
Verde da sinistra a destra = Misuratore del livello audio
Verde da esquerda para a direita = Medidor de nivel de áudio
4 Grün + orange = Nähert sich dem maximalen Eingangspegel
Verde + Naranja = Se acerca al nivel máximo de entrada
Vert + Orange = Approche du niveau d'entrée maximum
Verde + Arancione = Vicino al livello di entrata massimo
Verde + Laranja = Aproximando-se do nível máximo de entrada
5 Rot = Eingangspegel übersteuert, Verstärkung sollte verringert werden
Rojo = Sobrecarga de entrada y debe reducirse la ganancia
Rouge = Surcharge, le gain doit être abaissé
Rosso = Sovraccarico all'entrata, abbassare il guadagno (Gain)
Vermelho = Sobrecarga de entrada, o ganho deve ser reduzido
Lila = Siehe Hype-Modus-Einstellung Seite 8
Viola = Vedi impostazione modalità Hype pag. 8
Violet = Voir le réglage du mode Hype page 8
Púrpura = Consulte configuración del modo Hype en la página 8
Violeta: veja a configuração Modo Hype na página 8
7 Weiß = Siehe Mischungssteuerung Seite 10
Bianco = Vedi regolazione blend pag. 10
Blanc = Voir le contrôle Blend page 10
Blanco = Consulte control de mezcla en la página 10
Branco: veja o Controle de Mistura na página 10
Connecting to the Computer/iOS Apogee HypeMiC
1 Connect cable

2 Open a recording program and set up track

natural_image
Row of app icons including CD, guitar, music player, Live, and DP (no text or symbols)1 Connectez le câble Kabel anschließen Collegare il cavo Conecta el cable Ligue o cabo
2 Ouvrez le programme d'enregistrement et créez une piste audio Aufnahme-programm öffnen und spur einrichten Aprire il programma di registrazione e impostare la traccia Abrir el programa de grabación y configurar la pista Abra o programa de gravação e configure a track/faixa
Connecting to the Computer/iOS Apogee HypeMiC
3 Connect Headphones to HypeMiC

natural_image
Black hardcover headphones with earbuds and black headband (no visible text or symbols)4 Adjust Gain & Blend
5 Record
6 Use volume buttons on computer/iOS device to adjust playback level
Indicators and Controls Apogee HypeMiC
Input Gain Knob
1 Turn Input Gain knob to adjust input signal level

2 Less Gain ← More Gain

natural_image
Simple diagram with three colored circles inside a rounded rectangle (no text or symbols)3 LEDs progressively light green to indicate the signal strength
4 Push Gain knob to toggle Hype Mode settings


5 Shape - Subtle/smooth setting that makes a great starting point
6 Squeeze - Intermediate setting that adds excitement and warmth
7 Smash - Extreme coloration ideal for spoken word, radio broadcast/podcasting
1 Eingangsverstärker-Knopf drehen, um Eingangssignalpegel anzupassen
Gire la perilla de entrada de ganancia para ajustar el nivel de la señal de entrada
Tournez le bouton Gain d'entrée pour régler le niveau du signal d'entrée
Gira la manopola del guadagno d'entrata per regolare il livello del segnale
Gire o botão Input Gain para ajustar o nível do sinal recebido
2 Weniger Verstärkung Mehr Verstärkung
Menos ganancia - Más ganancia
Moins de Gain Plus de Gain
Meno guadagno Più guadagno
Menos ganho Mais ganho
3 Die LEDs leuchten nach und nach grün, um die Signalstärke anzuzeigen
I LED si illuminano di verde per indicare la potenza del segnale
Les LED s'allument progressivement en vert pour indiquer l'intensité du signal
Los LEDs se iluminan progresivamente en verde para indicar la intensidad de la señal
LEDs acendem progressivamente em verde para indicar a intensidade do sinal
4 Drücken Sie den Gain-Knopf, um die Einstellungen für den Hype-Modus umzuschalten Premi il pomello "Gain" per commutare le impostazioni della modalità Hype Appuyez sur le bouton Gain pour basculer entre les paramètres du mode Hype Presione la perilla de ganancia para alternar la configuración del modo Hype Utilize o knob Ganho para ajustar as configurações do Modo Hype
5 Shape - Dezente/sanfte Einstellung, die einen guten Ausgangspunkt darstellt Forma - Impostazione discreto/carezzevole che fa un gran punto di partenza Shape - Un réglage subtil et doux qui constitue un excellent point de départ Forma: configuración sutil / suave que hace un buen punto de partida Moldar - Configuração sutil/suave que proporciona um excelente ponto de partida
6 Squeeze - Mittlere Einstellung, die Aufregung und Wärme hinzufügt
Pressione - Impostazione intermedia che aggiunge esaltazione e calore
Squeeze - Un réglage intermédiaire qui ajoute de l'excitation et de la chaleur
Squeeze: configuración intermedia que agrega entusiasmo y calidez
Apertar - Configuração intermediária que adiciona harmônicos e som mais quente
7 Smash - Extreme Farbgebung, ideal für gesprochenes Wort, Rundfunk/Podcasting Frastuono - Colorazione estrema ideale per la voce alta, podcasting o trasmissione radio Smash - Une coloration extrême idéale pour la narration, la radiodiffusion et les podcasts Smash: coloración extrema ideal para oratoria, transmisiones de radio / podcasting Esmagar - Coloração extrema ideal para voz falada, transmissão de rádio ou podcast
Indicators and Controls Apogee HypeMiC Blend Control Button

natural_image
Simple line drawing of a double arrow symbol inside an rounded rectangle (no text or labels)1 Push Blend to change low-latency monitoring setting
2 Each press toggles through 5 different Blend settings NOTE: Blend setting shown for 1 second
3 Mostly input signal (90%) Some app audio mixed in (10%)
4 Strong input signal (75%) App audio mixed in (25%)
5 Equal amount of input signal (50%) Equal app audio mixed in (50%)
6 Less input signal (25%) Strong app audio mixed in (75%)
7 Blend Off= No input signal (0%) Full app audio (100%) If using HypeMiC's high-quality headphone output for listening to music, video, etc.
1 Drücken Sie auf Blend, um die Einstellung für die Überwachung mit niedriger Latenzzeit zu ändern
Premi "Blend" per modificare l'impostazione di monitoraggio a bassa latenza
Appuyez sur Blend pour modifier le réglage du contrôle à faible latence
Presione Mezclar para cambiar la configuración de monitoreo de baja latencia
Pressione Mistura para alterar a configuração de monitoramento de baixa latência
Declarations of Conformity
This device complies with Part 15 of the FCC Rules. Operation is subject to the following two conditions:
(1) This device may not cause harmful interference and (2) This device must accept any interference received, including interference that may cause undesired operation. This equipment has been tested and found to comply with the limits of a Class B digital device, pursuant to Part 15 of the FCC Rules.
CAUTION: Changes or modifications not expressly approved by Apogee Electronics Corporation compliance could void the user's authority to operate the equipment.
Rating: 3.3-5V 100mA USB 2.0
Industry Canada Notice
Declaration of Conformity – CE
Apogee Electronics Corporation hereby declares that the product, HypeMiC, to which this declaration relates, is in material conformity with the following standards or other normative documents:
| Document Brief description | Issued /Version | |
| 2014/30/EU EMC Directive | 2014/30/EU Electromagnetic Compatibility | 2014-02 |
| EN 55103-2 Product family | standard for audio, video, audio-visual and Entertainment lighting control apparatus for professional use- Part 2: Immunity | 2009 |
| EN 55032 Electromagnetic | Compatibility of Multimedia Equipment - Emission Requirements | 2012 + AC: 2013 |
| 2011/65/EU RoHS Directive | 2011/65/EU Restriction of the use of certain hazardous substances | |
| EN 50581 Technical document | entation for the assessment of electrical and electronic products with respect to the restriction of hazardous substances | 2012-09 |
Declaration of Conformity – Japan
Apogee Electronics Corporation hereby declares that HypeMiC, to which this declaration relates, is in material conformity with the VCCI Class A standard.
Declaration of Conformity – Australia
Apogee Electronics Corporation hereby declares that the HypeMiC is in material conformity with AN/NZS standard requirements.
Use of the “Made for iPhone”, “Made for iPad”, and “Made for iPod” badge means that an accessory has been designed to connect specifically to the Apple product(s) identified in the badge, and has been certified by the developer to meet Apple performance standards. Apple is not responsible for the operation of this device or its compliance with safety and regulatory standards. Please note that the use of this accessory with an Apple product may affect wireless performance.
Registration Information
Be sure to register your HypeMiC by completing the on-line registration form at our Web site: www.apogeedigital.com/register
The benefits of registering include access to free, expert technical support by email or phone, important email notifications regarding new features and important updates, and new Apogee product notifications before they're announced to the public.
Please address any inquiries to your dealer or directly to Apogee at: APOGEE ELECTRONICS CORPORATION 1715 Berkeley St Santa Monica, CA 90404, USA TEL: (310) 584-9394, FAX: (310) 584-9385
Web site: www.apogeedigital.com
Knowledgebase: www.apogeedigital.com/knowledgebase
Support: www.apogeedigital.com/support
APOGEE Hype M/C

APOGEE
www.apogeedigital.com
© 2018, Apogee Electronics Corp. All Rights Reserved PN: 0070-0014-0000 Rev. 1.0 | AN: 2740-0060-0000 Rev. 1.0
- Product Tour Apogee HypeMiC
- In The Box
- Status & Input Level Indicator LEDs
- Connecting to the Computer/iOS Apogee HypeMiC
- Connect cable
- Open a recording program and set up track
- Connectez le câble Kabel anschließen Collegare il cavo Conecta el cable Ligue o cabo
- Ouvrez le programme d'enregistrement et créez une piste audio Aufnahme-programm öffnen und spur einrichten Aprire il programma di registrazione e impostare la traccia Abrir el programa de grabación y configurar la pista Abra o programa de gravação e configure a track/faixa
- Connect Headphones to HypeMiC
- Adjust Gain & Blend
- Record
- Use volume buttons on computer/iOS device to adjust playback level
- Indicators and Controls Apogee HypeMiC
- Input Gain Knob
- Indicators and Controls Apogee HypeMiC Blend Control Button
- Declarations of Conformity
- Declaration of Conformity – Japan
- Declaration of Conformity – Australia
- Registration Information
- APOGEE Hype M/C
- APOGEE
Brand : Apogee
Model : HypeMiC
Category : Microphone