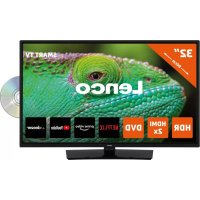
DVL3273 - Television LENCO - Free user manual and instructions
Find the device manual for free DVL3273 LENCO in PDF.


| Product type | 32-inch LED TV with built-in DVD player |
| Screen size | 32 inches (81 cm) |
| Resolution | HD (1366 x 768 pixels) |
| Dimensions with stand (WxHxD) | 734 x 483 x 184 mm |
| Dimensions without stand (WxHxD) | 734 x 435 x 78 mm |
| Power supply | 220-240 V AC, 50 Hz |
| Power consumption | 65 W (max) |
| Network standby power consumption | Less than 2 W |
| Audio power | 2 x 6 W RMS |
| Tuner | DVB-T2/C/S2 (terrestrial, cable, satellite) |
| Connectivity | HDMI (x2), USB (x2), Ethernet LAN, Wi-Fi 802.11 a/b/g/n, headphone jack, digital audio output S/PDIF |
| Smart TV features | HbbTV, Smart Center, Built-in Alexa, Google Assistant, Netflix, YouTube, Prime Video, Rakuten TV, Twitch |
| Supported video formats (USB) | MPEG, AVI, MKV, MOV, etc. |
| Supported audio formats (USB) | MP3, AAC, WMA, etc. |
| Supported image formats (USB) | JPEG, PNG, BMP |
| USB recording | Scheduled and direct recording, timeshift mode |
| Picture functions | HDR/HLG, dynamic contrast, noise reduction, game mode |
| Speakers | Stereo, Dolby Audio |
| Parental control | Child lock, PIN code |
| Included accessories | Remote control, AAA batteries (x2), user manual, quick start guide |
| Care and cleaning | Clean with a soft, dry cloth. Do not use solvents. |
| Spare parts and repairability | Contact Lenco after-sales service or an authorized dealer. |
Frequently Asked Questions - DVL3273 LENCO
User questions about DVL3273 LENCO
0 question about this device. Answer the ones you know or ask your own.
Ask a new question about this device
Download the instructions for your Television in PDF format for free! Find your manual DVL3273 - LENCO and take your electronic device back in hand. On this page are published all the documents necessary for the use of your device. DVL3273 by LENCO.
USER MANUAL DVL3273 LENCO
DELAWSCHIK, 2016, 1984
- Producten
- Batterij
Specifications
m = 311
[Europese Unie]
Deze symbolen
- It went yesterday on September 27 (to be
KLASSE 1 LASER PRODUCT
natural_image
Illustration of a hand holding a circular object and a cross-shaped tool on a ring (no text or symbols)- Do not place any heat sources such as electric heaters, radiators, etc. near the TV set. - Do not place the TV on the floor and inclined
surfaces.
To avoid danger of suffocation, keep plastic bag
out of the reach of the babies, children and domestic
animals.
Carefully attach the stand to the TV. If the stand is provided with screws, tighten the screws firmly to
prevent the TV from tilting. Do not over-tighten the
screws and mount the stand rubbers properly.
- Do not dispose of the batteries in fire or with
hazardous or flammable materials. WARNING
Batteries must not be exposed to excessive heat such as sunshine, fire or the like.
Excessive sound pressure from earphones or
headphones can cause hearing loss.
ABOVE ALL - NEVER let anyone, especially
children, push or hit the screen, push anything into holes, slots or any other openings in the case.
| Caution | Serious injury or death risk |
| Risk of electric shock | Dangerous voltage risk |
| Maintenance | Important maintenance component |
Markings on the Product
The following symbols are used on the product as
a marker for restrictions and precautions and safety
instructions. Each explanation shall be considered
where the product bears related marking only. Note
such information for security reasons.
Class II Equipment: This appliance is
designed in such a way that it does not require
a safety connection to electrical earth.
Hazardous Live Terminal: The marked
7 terminal(s) is/are hazardous live under normal
operating conditions.
Caution, See Operating Instructions: The
marked area(s) contain(s) user replaceable
coin or button cell batteries.
Class 1 Laser Product: This
CLASS 1 product contains Class 1
CLASS 1 laser source that is safe under LASER PRODUCT
reasonably foreseeable
conditions of operation.
[Non-Text]
[Non-Text]
[Non-Text]
[Non-Text]
[Non-Text]
[Non-Text]
[Non-Text]
[Non-Text]
Safety Information

CAUTION: TO REDUCE THE RISK OF ELECTRIC SHOCK DO NOT REMOVE COVER (OR BACK). NO USER-SERVICEABLE PARTS INSIDE. REFER SERVICING TO QUALIFIED SERVICE PERSONNEL.
In extreme weather (storms, lightning) and long inactivity periods (going on holiday) disconnect the TV set from the mains.
The mains plug is used to disconnect TV set from the mains and therefore it must remain readily operable. If the TV set is not disconnected electrically from the mains, the device will still draw power for all situations even if the TV is in standby mode or switched off. Note: Follow the on screen instructions for operating the related features.
IMPORTANT - Please read these instructions fully before installing or operating
WARNING: This device is intended to be used by persons (including children) who are
capable / experienced of operating such a device
unsupervised, unless they have been given supervision or instruction concerning the use of
the device by a person responsible for their safety.
• Use this TV set at an altitude of less than 5000 meters
above the sea level, in dry locations and in regions
with moderate or tropical climates.
• The TV set is intended for household and simila
indoor use but may also be used in public places.
• For ventilation purposes, leave at least 5cm of free
space around the TV.
• The ventilation should not be impeded by covering
or blocking the ventilation openings with items, such
as newspapers, table-cloths, curtains, etc.
• The power cord plug should be easily accessible. D
not place the TV, furniture, etc. on the power cord.
A damaged power cord/plug can cause fire or give
you an electric shock. Handle the power cord by the
plug, do not unplug the TV by pulling the power cord.
Never touch the power cord/plug with wet hands as
this could cause a short circuit or electric shock
Never make a knot in the power cord of tie it with other cords. When damaged it must be replaced, this
other cords. When damaged it must be replaced, this should only be done by qualified personnel.
should only be done by qualified personnel.
• Do not expose the TV to dripping or splashing of
liquids and do not place objects filled with liquids, such as vaces, guns, etc. or over the TV /e.g.
such as vases, cups, etc. on or over the TV (e.g., on shelves above the unit).
on shelves above the unit).
- Do not expose the TV to direct sunlight or do not place open flames such as lit candles on the top of
place open flames such as lit candles on the top of or near the TV.
Connecting Other Wireless Devices 31
Connectivity Troubleshooting 32
Using Audio Video Sharing Network Service 32
Using Audio Video Sharing Network Service ..... 62 Anne 32
Apps 32
Internet Browser 33
HBBTV System.... 33
Smart Center 34
Alexa Ready 35
Google Assistant 37
Google Assistant.... 57 BVR Mark.... 28
DVD Mode 38
Safety Information 38
Notes on Discs 38
How to Watch a DVD 38
DVD Control Panel Buttons 38
SVD Control Panel Buttons ..... 36
General Playback 38
DVD Troubleshooting 39
Specifications 40
DVB functionality information 43
Contents
Safety Information ......
Markings on the Produc
Environmental Informati
Environmental information
Features ......
Accessories Included....
Standby Notifications ...
TV Control Button & Op
Using Main TV Menu ...
Inserting the Batteries in
Inserting the Batteries in
Power Connection .....
Antenna Connection .....
License Notification .....
Disposal Information
Switching On/Off ......
First Time Installation
Media Playback via USB
Media Playback via OSL
USB Recording ....
Media Browser......
FollowMe TV ......
CEC
E-Manual
Settings Menu Content
Settings Menu Content
General TV Operation ..
Using the Channel List.
Configuring Parental Se
Electronic Programme
Teletext Services
Teletext Services ......
Software Upgrade......
Troubleshooting & Tips
PC Input Typical Display
AV and HDMI Signal Co
Supported File Formats
Supported the Formation Mile, File, E-mail
video File Formats ......
Picture File Formats .....
Audio File Formats ......
Subtitle File Formats.....
Supported DVI Resolution
Supported DVD Resolat Connectivity
Connectivity ....
wired Connectivity......
Wireless Connectivity ...
Networked Standby Mod
Wireless Display ......
| WARNINGDo not ingest the battery, Chemical Burn HazardThis product or the accessories supplied with the product may contain a coin/button cell battery. If the coin/button cell battery is swallowed, it can cause severe internal burns in just 2 hours and can lead to death.Keep new and used batteries away from children.If the battery compartment does not close securely, stop using the product and keep it away from children.If you think batteries might have been swallowed or placed inside any part of the body, seek immediate medical attention.———————A television may fall, causing serious personal injury or death. Many injuries, particularly to children, can be avoided by taking simple precautions such as:ALWAYS use cabinets or stands or mounting methods recommended by the manufacturer of the television set.ALWAYS use furniture that can safely support the television set.ALWAYS ensure the television set is not overhanging the edge of the supporting furniture.ALWAYS educate children about the dangers of climbing on furniture to reach the television set or its controls.ALWAYS route cords and cables connected to your television so they cannot be tripped over pulled or grabbed.NEVER place a television set in an unstable location.NEVER place the television set on tall furniture (for example, cupboards or bookcases) without anchoring both the furniture and the television set to a suitable support.NEVER place the television set on cloth or other materials that may be located between the television set and supporting furniture.NEVER place items that might tempt children to climb, such as toys and remote controls, on the top of the television or furniture on which the television is placed.The equipment is only suitable for mounting heights ≤2 m.If the existing television set is going to be retained and relocated, the same considerations as above should be applied.———————Apparatus connected to the protective earthing of the building installation through the MAINS connection or through other apparatus with a connection to protective earthing – and to a television distribution system using coaxial cable, may in some circumstances create a fire hazard. Connection to a television distribution system has therefore to be provided through a device providing electrical isolation below a certain frequency range (galvanic isolator) | WALL MOUNTING WARNINGSRead the instructions before mounting your TV on the wall.The wall mount kit is optional. You can obtain from your local dealer, if not supplied with your TV.Do not install the TV on a ceiling or on an inclined wall.Use the specified wall mounting screws and other accessories.Tighten the wall mounting screws firmly to prevent the TV from fall. Do not over-tighten the screws. | OSD menu systemBack AV inputs for external devices (such as DVD Players, PVR, video games, etc.)Stereo sound systemTeletextHeadphone connectionAutomatic programming systemManual tuningAutomatic power down after up to eight hoursSleep timerChild lockAutomatic sound mute when no transmissionNTSC playbackAVL (Automatic Volume Limiting)PLL (Frequency Search)PC inputGame Mode (Optional)Picture off functionProgramme recordingProgramme timeshiftingEthernet (LAN) for Internet connectivity and service802.11 a/b/g/n built in WLAN SupportAudio Video SharingHbbTVHigh Dynamic Range (HDR) / Hybrid Log-Gamma (HLG)Using this feature the TV can reproduce greater dynamic range of luminosity by capturing and then combining several different exposures. HDR/HLG promises better picture quality thanks to brighter, more realistic highlights, more realistic colour and other improvements. It delivers the look that filmmakers intended to achieve, showing the hidden areas of dark shadows and sunlight with full clarity, colour and detail. HDR/HLG contents are supported via native and market applications, HDMI, USB inputs and over DVB-S broadcasts.Accessories IncludedRemote ControlBatteries: 2 x AAAInstruction BookQuick Start GuideStandby NotificationsIf the TV does not receive any input signal (e.g. from an aerial or HDMI source) for 3 minutes, it will into standby. When you next switch-on, the following message will be displayed: "TV switched to stand-by mode automatically because there was no signal | for a long time." You can disable this functionality by setting the No Signal Timer option in the Settings>System>Device Settings menu accordingly.The Auto Power Down option(in the Settings>System >More menu) could have been set to a value between 1 and 8 hours by default. If this setting is not set as Off and the TV has been left on and not been operated during the set time, it will switch into standby mode after the set time has expired. When you next switch-on the TV, the following message will be displayed. "TV switched to stand-by mode automatically because no operation was made for a long time." Before the TV switches into standby mode a dialogue window will be displayed. If you do not press any button the TV will switch into the standby mode after a waiting period of about 5 minutes. You can highlight Yes and press OK to switch the TV into standby mode immediately. If you highlight No and press OK, the TV will remain on. You can also choose to cancel the Auto Power Down function from this dialogue. Highlight Disable and press OK, the TV will remain on and the function will be cancelled. You can enable this function again by changing the setting of the Auto Power Down option from the Settings>System>More menu.TV Control Button & Operation[IMAGE]Note: The position of the control button may differ depending on the model.Your TV has a single control button. This button allows you to control the Standby-On / Source / Programme and Volume functions of the TV.Operating with the Control ButtonPress the control button to display the function options menu.Then press the button consecutively to move the focus to the desired option if needed.Press and hold the button for about 2 seconds to activate the selected option. The icon colour of the option changes when activated.Press the button once again to use the function or enter the sub menu.To select another function option, you will need to deactivate the last activated option first. Press and |
| Figures and illustrations in this user manual are provided for reference only and may differ from the actual product appearance. Product design and specifications may be changed without notice.Environmental InformationThis television is designed to be environment friendly. To reduce energy consumption, you can follow these steps:If you set the Energy Saving to Minimum, Medium, Maximum or Auto the TV will reduce the energy consumption accordingly. If you like to set the Backlight to a fixed value set as Custom and adjust the Backlight (located under the Energy Saving setting) manually using Left or Right buttons on the remote. Set as Off to turn this setting off.Note: Available Energy Saving options may differ depending on the selected Mode in the Settings>Picture menu.The Energy Saving settings can be found in the Settings>Picture menu. Note that some picture settings will be unavailable to be changed.If pressed Right button or Left button consecutively, "Screen will be off in 15 seconds." message will be displayed on the screen. Select Proceed and press OK to turn the screen off immediately. If you don't press any button, the screen will be off in 15 seconds.AtPress any button on the remote or on the TV to turn the screen on again.Note: Screen Off option is not available if the Mode is set to Game.When the TV is not in use, please switch off or disconnect the TV from the mains plug. This will also reduce energy consumption.FeaturesRemote controlled colour TVFully integrated digital terrestrial/cable/satellite TV (DVB-T-T2/C/S2)HDMI inputs to connect other devices with HDMI socketsUSB input |
WALL MOUNTING WARNINGS
USB Input
| 3. TV3.1. GuideYou can access the electronic programme guide menu using this option. Refer to Electronic Programme Guide section for more information.3.2. ChannelsYou can access the Channels menu using this option. Refer to Using the Channel List section for more information.3.3. TimersYou can set timers for future events using the options of this menu. You can also review the previously created timers under this menu.To add a new timer select the Add Timer tab using the Left/Right buttons and press OK. Set the sub-menu options as desired and when finished press OK. A new timer will be created.To edit a previously created timer, highlight that timer, select the Edit Selected Timer tab and press OK. Change the sub-menu options as desired and press OK to save your settings.To cancel an already set timer, highlight that timer, select Delete Selected Timer tab and press OK. A confirmation message will be displayed. Highlight Yes and press OK to proceed. The timer will be cancelled.It is not possible to set timers for two or more events that will broadcast in different channels at the same time interval. In this case you will be asked to choose one of these timers and cancel others. Highlight the timer you want to cancel and press OK, Options menu will be displayed. Then highlight Set/Cancel and press OK to cancel that timer. You will have to save changes after that. In order to do that press OK, highlight Save Changes and press OK again.3.4. RecordingsYou can manage your recordings using the options of this menu. You can playback, edit, delete or sort previously recorded events. Highlight a tab by using the Left or Right direction button and press OK to see available options.3.5. More AppsIn order to manage the apps installed on your TV, you can use this option. Highlight and press OK. You can add an installed app to Home menu, launch or remove it. Highlight an app and press OK to see the available options.3.6. MarketYou can add new apps from the application market using this option. Highlight and press OK. Available apps will be displayed. You can also access the application market from within the More Apps menu. | 3.7. AccessibilityYou can access the accessibility settings menu directly using this option.3.8. Privacy SettingsYou can access the privacy settings menu directly using this option. This option may not be available depending on the model of your TV and the selected country during the first time installation process.4. SettingsYou can manage the settings of your TV using the options of this menu. Refer to Settings Menu Content section for more information.You can reset your customisations on the Home menu to defaults using the Reset Apps option (availability depends on TV model and its features). Highlight and press OK. A confirmation message will be displayed. Highlight Yes and press OK to proceed. Note that you will not be able to perform this operation again within the next few minutes.5. SourcesYou can manage your input source preferences using the options of this menu. To change the current source highlight one of the options and press OK.5.1. Source SettingsYou can access the source settings menu directly using this option. Edit the names, enable or disable selected source options.Inserting the Batteries into the RemoteThe remote may have a screw that secures the battery compartment cover onto the remote control (or this may be in a separate bag). Remove the screw, if the cover is screwed on previously. Then remove the battery compartment cover to reveal the battery compartment. Insert two 1.5V - size AAA batteries. Make sure the (+) and (-) signs match (observing correct polarity). Do not mix old and new batteries. Replace only with same or equivalent type. Place the cover back on. Secure the cover again with the screw, if any.A message will be displayed on the screen when the batteries are low and must be replaced. Note that when the batteries are low, the performance of the remote control may be impaired.Batteries should not be exposed to excessive heat such as sunshine, fire or the like.Power ConnectionIMPORTANT: The TV set is designed to operate on a 220-240V AC, 50 Hz supply. After unpacking, allow the TV set to reach the ambient room temperature before you connect the set to the mains. Plug the power cable to the mains socket outlet. |
| hold the button to deactivate it. The icon colour of the option changes when deactivated.To close the function options menu do not press the button for a period of about 5 seconds. The function options menu will disappear.To turn the TV off:Press the control button to display the function options menu, the focus will be on the Standby option. Press and hold the button for about 2 seconds to activate this option. The icon colour of the option changes when activated. Then press the button once again to turn the TV off.To turn on the TV:Press the control button, the TV will turn on.To change volume:Press the control button to display the function options menu and then press the button consecutively to move the focus to Volume + or Volume - option. Press and hold the button for about 2 seconds to activate the selected option. The icon colour of the option changes when activated. Then press the button to increase or decrease the volume.To change channel:Press the control button to display the function options menu and then press the button consecutively to move the focus to Programme + or Programme - option. Press and hold the button for about 2 seconds to activate the selected option. The icon colour of the option changes when activated. Then press the button to switch to the next or previous channel in the channel list.To change source:Press the control button to display the function options menu and then press the button consecutively to move the focus to Source option. Press and hold the button for about 2 seconds to activate this option. The icon colour of the option changes when activated. Then press the button once again to display the sources list. Scroll through the available sources by pressing the button. TV will automatically switch to the highlighted source.Note:Main menu OSD cannot be displayed via the control button.Operation with the Remote ControlPress the Menu button on your remote control to display main menu. Use the directional buttons and OK button to navigate and set. Press Return/Back or Menu button to quit a menu screen.Input SelectionOnce you have connected external systems to your TV, you can switch to different input sources. Press the Source button on your remote control consecutively to select the different sources.Changing Channels and VolumeYou can change the channel and adjust the volume by using the Programme +/- and Volume +/- buttons on the remote. | Using Main TV MenuWhen the Menu button is pressed, the main TV menu will appear on the screen. You can navigate through the menu items using the directional buttons on the remote. To select an item or see the sub-menu options of the highlighted menu press OK button. When you highlight a menu option some of the sub-menu items of this menu may appear on the upper side of the menu bar for quick access. To use a quick access item highlight it, press OK and set as desired using the Left/Right directional buttons. When finished press OK or Back/Return button to exit.You can also see information on location, weather, time and date on the main TV menu screen. The green small icons indicate the current status for time, network and sync for apps. If these icons appear in green, it means that the time information is updated, network is connected and sync is completed in success. Otherwise the icons will appear in white.Depending on the country selection made during first time installation, TV's life time information in hours can be displayed by pressing the Menu button and then the Blue button. Concerned about the quality of our products, televisions are subject to rigorous checks before being put on the market, therefore it is possible that this value is not at 0 during the first installation.Press Exit button to close the main menu.1.HomeWhen main menu is opened Home menu bar will be highlighted. The content of the Home menu can be customised. In order to do 'stgo to the TV menu, highlight the Edit Home option and press OK. The Home menu will switch to edit mode. In edit mode you can delete or change the position of any item in the Home menu. Highlight an option and press OK. Select Delete or Move option and press OK. In order to move a menu item use the Right, Left, Up and Down direction buttons to select the position that you want the item to move to and press OK.You can also add options from other menus to Home menu. Just highlight an option and press the Down direction button on the remote. If you see Add to Home option you can add it to the Home menu.2.SearchYou can search for Channels, Guide, TV menus, Applications, Web, YouTube and Videos using this option. Press OK and enter a key word using the virtual keyboard. Then highlight OK and press OK to start the search. Results will be displayed on the screen. Highlight the desired result using the directional buttons and press OK to open. |
Wireless LAN Transmitter Specifications
| Frequency Ranges Max Output Power | |
| 2400 - 2483,5 MHz (CH1-CH13) < | 100 mW |
| 5150 - 5250 MHz (CH36 - CH48) < | 200 mW |
| 5250 - 5350 MHz (CH52 - CH64) < | 200 mW |
| 5470 - 5725 MHz (CH100 - CH140) | < 200 mW |
Country Restrictions
This device is intended for home and office use in all EU countries (and other countries following the relevant EU directive) without any limitation except for the countries mentioned below.
| Country Restriction | |
| Bulgaria | General authorization required for outdoor use and public service |
| Italy | If used outside of own premises, general authorization is required |
| Greece | In-door use only for 5470 MHz to 5725 MHz band |
| Luxembourg | General authorization required for network and service supply(not for spectrum) |
| Norway | Radio transmission is prohibited for the geographical area within a radius of 20 km from the centre of Ny-Ålesund |
| Russian Federation | In-door use only |
| Israel | 5 GHz band only for 5180 MHz-5320 MHz range |
The requirements for any country may change at any time. It's recommended that user checks with local authorities for the current status of their national regulations for 5 GHz wireless LAN's.
Specification
| TV Broadcasting | PAL BG/II/DKSECAM BG/DK |
| Receiving Channels | VHF (BAND I/III) - UHF(BAND U) - HYPERBAND |
| Digital Reception | Fully integrated digital terrestrial-cable-satellite TV(DVB-T-C-S)(DVB-T2, DVB-S2 compliant) |
| Number of Preset Channels | 11 000 |
| Channel Indicator On Screen Display | |
| RF Aerial Input 75 Ohm (unbalanced) | |
| Operating Voltage 220-240V AC, 50Hz. | |
| Audio German+Nicam Stereo | |
| Audio Output Power (WRMS.) (10% THD) | 2 x 6 |
| Power Consumption (W) | 65W |
| Networked Standby Mode Power Consumption (W) | < 2 |
| TV Dimensions DxLxH (with stand) (mm) | 184 x 734 x 483 |
| TV Dimensions DxLxH (without stand) (mm) | 51/78 x 734 x 435 |
| Display | 32" |
| Operation temperature and operation humidity | 0°C up to 40°C, 85% humidity max |
decline an upgrade, you will not be able to access content that requires the upgrade.
The “CI Plus” Logo is a trademark of CI Plus LLP. This product is protected by certain intellectual property rights of Microsoft Corporation. Use or distribution of such technology outside of this product is prohibited without a license from Microsoft or an authorized Microsoft subsidiary.
Disposal Information
[European Union]
These symbols indicate that the electrical and electronic equipment and the battery with this symbol should not be disposed of as general household waste at its end-of-life. Instead, the products should be handed over to the applicable collection points for the recycling of electrical and electronic equipment as well as batteries for proper treatment, recovery and recycling in accordance with your national legislation
and the Directive 2012/19/EU and 2013/56/EU. By disposing of these products correctly, you will help to conserve natural resources and will help to prevent potential negative effects on the environment and human health which could otherwise be caused by inappropriate waste handling of these products.
For more information about collection points and recycling of these products, please contact your local municipal office, your household waste disposal service or the shop where you purchased the product. Penalties may be applicable for incorrect disposal of this waste, in accordance with national legislation.
[Business users]
If you wish to dispose of this product, please contact your supplier and check the terms and conditions of the purchase contract.
[Other Countries outside the European Union] These symbols are only valid in the European Union.
Contact your local authority to learn about disposal and recycling.
The product and packaging should be taken to your local collection point for recycling.
Some collection points accept products free of charge. Note: The sign Pb below the symbol for batteries indicates that this battery contains lead.
Antenna Connection
Connect the aerial or cable TV plug to the aerial input (ANT) socket or satellite plug to the satellite input (LNB) socket located on the rear side of the TV. Rear side of the TV
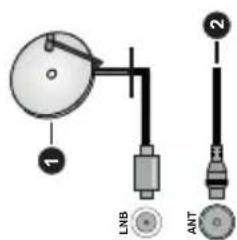
1. Satellite
2. Aerial or cable
If you want to connect a device to the TV, make sure that both the TV and the device are turned off before making any connection. After the connection is done, you can turn on the units and use them.


Manufactured under license from Dolby Laboratories. Dolby, Dolby Audio, and the double-D symbol are trademarks of Dolby Laboratories Licensing Corporation. YouTube and the YouTube logo are trademarks of Google Inc.
This product contains technology subject to certain intellectual property rights of Microsoft. Use of distribution of this technology outside of this product is prohibited without the appropriate license(s) from Microsoft. Content owners use Microsoft PlayReady™ content access technology to protect their intellectual property,
including copyrighted content. This device uses PlayReady technology to access PlayReady-protected content and/or WMDRM-protected content. If the device fails to properly enforce restrictions on content usage, content owners may require Microsoft to revoke the device's ability to consume PlayReady-protected content. Revocation should not affect unprotected content or content protected by other content access technologies. Content owners may require you to upgrade PlayReady to access their content. If you
Remote Control
-
Standby: Switches On / Off the TV
-
Numeric buttons: Switches the channel, enters a number or a letter in the text box on the screen.
- Language: Switches among sound modes (analogue TV), displays and changes audio/subtitle language and turns subtitles on or off (digital TV, where available)
- Mute: Completely turns off the volume of the TV
-
Volume +/-
-
Netflix: Launches the Netflix application
-
Guide: Displays the electronic programme guide
-
Directional buttons: Helps navigate menus,
content etc. and displays the subpages in TXT mode when pressed Right or Left
-
OK: Confirms user selections, holds the page (in TXT mode), views Channels menu (DTV mode)
-
Back/Return: Returns to previous screen, previous
menu, opens index page (in TXT mode). Quickly cycles between previous and current channels
cycles between previous and current channels or sources
-
Prime Video: Launches the Amazon Prime Video application
-
Twitch: Launches the Twitch application
-
Coloured Buttons: Follow the on-screen instruc-
tions for coloured button functions 14. Box-and-Move frames backwords in media ore
-
Rewind: Moves frames backwards in media such as movies
-
Record: Records programmes
-
Play: Starts to play selected media
-
Pause: Pauses the media being played, starts
timeshift recording
-
Stop: Stops the media being played
-
Fast Forward: Moves frames forward in media such as movies
-
My Button 1 (*)
-
Rakuten TV: Launches the Rakuten TV application
-
Exit: Closes and exits from
returns to previous screen
- Info: Displays information about on-screen content,
shows hidden information (reveal - in TXT mod
- YouTube: Launches the You
-
Menu: Displays TV menu
-
Programme +/-
-
Text: Displays teletext (where available), press
again to superimpose the teletext over a normal broadcast picture (mix)
- Source: Shows available broadcast and content
sources
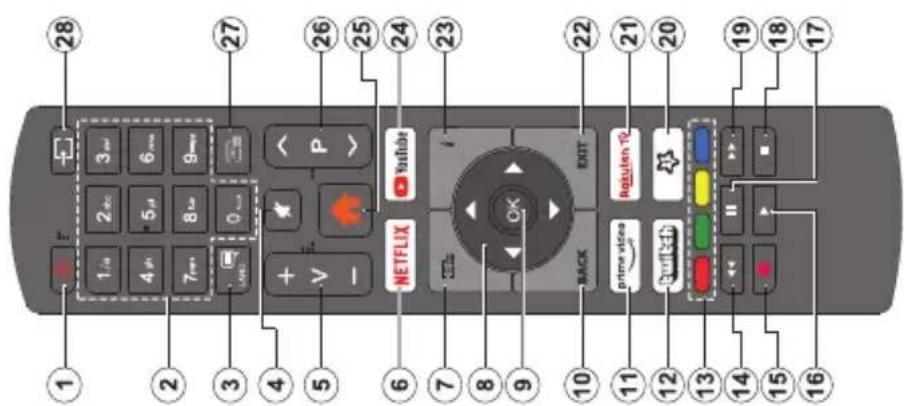
(\*) MY BUTTON 1:
This button may have default function depending on the model. However you can set a special function to this button by pressing on it for more than three seconds when on a desired source, channel or application. A confirmation message will be displayed on the screen. Now the My Button 1 is associated with the selected function. Note that if you perform First Time Installation, My Button 1 will return to its default function.
| clear the checkbox by pressing OK after moving the focus on the desired broadcast type option.Digital Aerial: If D. Aerial broadcast search option is turned on, the TV will search for digital terrestrial broadcasts after other initial settings are completed.Digital Cable: If D. Cable broadcast search option is turned on, the TV will search for digital cable broadcasts after other initial settings are completed. A message will be displayed before starting to search asking if you want to perform cable network search. If you select Yes and press OK you can select Network or set values such as Frequency, Network ID and Search Step on the next screen. If you select No and press OK you can set Start Frequency, Stop Frequency and Search Step on the next screen. When finished, highlight Next and press OK button to continue.Note: Searching duration will change depending on the selected Search Step.Satellite: If Satellite broadcast search option is turned on, the TV will search for digital satellite broadcasts after other initial settings are completed. Before satellite search is performed some settings should be made. A menu will be displayed where you can select to start an M7 operator installation or a standard installation. To start an M7 operator installation set the Install Type as Operator and the Satellite Operator as the related M7 operator. Then highlight Preferred Scan option and set as Automatic channel scan and press OK to start the automatic search. These options can be preselected depending on the Language and Country selections that you made in the earlier steps of the first time installation process. You may be asked to select HD/SD or country specific channel list according to your M7 operator type. Select one and press OK to proceed.Wait till the scan is finished. Now the list has been installed.While performing an M7 operator installation, if you want to use the satellite installation parameters that differ from the default settings select the Preferred Scan option as Manual channel scan and press the OK button to proceed. Antenna Type menu will be displayed next. After selecting the antenna type and the desired satellite in the following steps press OK in order to change the satellite installation parameters in the sub-menu.In order to search for satellite channels other than M7 channels you should start a standard installation. Select the Install Type as Standard and press the OK button to proceed. Antenna Type menu will be displayed next.There are three options for antenna selection. You can select Antenna Type as Direct, Single Satellite Cable or DiSEqC switch by using Left or Right buttons. After selecting your antenna type press OK to see | the options to proceed. Continue, Transponder list and Configure LNB options will be available. You can change the transponder and LNB settings using the related menu options.Direct: If you have a single receiver and a direct satellite dish, select this antenna type. Press OK to continue. Select an available satellite on the next screen and press OK to scan for services.Single Satellite Cable: If you have multiple receivers and a single satellite cable system, select this antenna type. Press OK to continue. Configure settings by following instructions on the next screen. Press OK to scan for services.DiSEqC switch: If you have multiple satellite dishes and a DiSEqC switch, select this antenna type. Then set the DiSEqC version and press OK to continue. You can set up to four satellites (if available) for version v1.0 and sixteen satellites for version v1.1 on the next screen. Press OK button to scan the first satellite in the list.Analogue: If Analogue broadcast search option is turned on, the TV will search for analogue broadcasts after other initial settings are completed.After the initial settings are completed TV will start to search for available broadcasts of the selected broadcast types.While the search continues current scan results will be displayed at the bottom of the screen. After all the available stations are stored, Channels menu will be displayed. You can edit the channel list according to your preferences using the Edit tab options or press the Menu button to quit and watch TV.While the search continues a message may appear, asking whether you want to sort channels according to the LCN(*) . Select Yes and press OK to confirm. (*) LCN is the Logical Channel Number system that organizes available broadcasts in accordance with a recognizable channel number sequence (if available).Notes:To search for M7 channels after the First Time Installation, you should perform the first time installation again. Or press the Menu button and enter the Settings>Installation>Automatic channel scan>Satellite menu. Then follow the same steps mentioned above in the satellite section.Do not turn off the TV while initializing first time installation. Note that, some options may not be available depending on the country selection.Media Playback via USB InputYou can connect 2.5" and 3.5" inch (HDD with external power supply) external hard disk drives or USB memory stick to your TV by using the USB inputs of the TV.IMPORTANT! Back up the files on your storage devices before connecting them to the TV. Manufacturer will not be responsible for any file damage or data loss.Certain types of USB devices (e.g. MP3 Players) or USB hard disk drives/memory sticks may not be |
| Switching On/OffTo Switch the TV OnConnect the power cord to a power source such as a wall socket (220-240V AC, 50 Hz).To switch on the TV from standby mode either:Press the Standby button, Programme +/- or a numeric button on the remote control.Press the control button on the TV.To Switch the TV OffPress the Standby button on the remote control.Press the control button on the TV, the function options menu will be displayed. The focus will be on the Standby option. Press and hold the button for about 2 seconds to activate this option. The icon colour of the option will change. Then press the button once again, the TV will switch into standby mode.To power down the TV completely, unplug the power cord from the mains socket.Note: When the TV is switched into standby mode, the standby LED can blink to indicate that features such as Standby Mode Search, Over Air Download or Timer is active. The LED can also blink when you switch on the TV from standby mode.First Time InstallationWhen turned on for the first time, the language selection screen is displayed. Select the desired language and press OK. In the following steps of the installation guide, set your preferences using the directional buttons and OK button.After the language selection, you will be asked whether you want to change accessibility settings. Highlight Yes and press OK to change. Refer to System Menu Content section for detailed information on available options.Set your country preference on the next screen. Depending on the Country selection you may be asked to set and confirm a PIN at this point. The selected PIN cannot be 0000. You have to enter it if you are asked to enter a PIN for any menu operation later.Note: M7(*) operator type will be defined according to the Language and Country selections that you made in the First Time Installation.(*) M7 is a digital satellite service provider.You can activate Store Mode option in the next step. This option will configure your TV's settings for store environment and depending on the TV model being used, the supported features of it may be displayed on the side of the screen as an info banner or the pre-installed video file may be played back. This option is intended only for store use. It is recommended to select Home Mode for home use. This option will be available in Settings>System>More menu and your | preference for this setting can be changed later. Make your selection and press OK to continue.The picture mode selection screen will then be displayed. In order for your TV to consume less energy and be more environmentally friendly select Natural and press OK to continue. You can change your selection later using the Mode option in the Settings>Picture menu.Depending on the model of your TV and the country selection Privacy Settings menu may appear at this point. Using this menu you can set your privacy privileges. Highlight a feature and press OK to enable or disable. Read the related explanations displayed on the screen for each highlighted feature before making any changes. You can press the Right directional button to highlight the text and use the Programme +/- or Up/Down directional buttons to scroll up and down to read the entire text. You will be able to change your preferences at any time later from the Settings>System>Privacy>Privacy Settings menu. If the Internet Connection option is disabled Network/Internet Settings screen will be skipped and not displayed. If you have any questions, complaints or comments regarding this privacy policy or its enforcement, please contact by email at smarttvsecurity@vosshub.com.Highlight Next and press OK button on the remote control to continue and the Network/Internet Settings menu will be displayed. Please refer to Connectivity section to configure a network connection. If you want your TV to consume less power in standby mode, you can disable the Networked Standby Mode option by setting it as Off. After the settings are completed highlight Next and press OK button to continue.On the next screen the Devices menu will be displayed. You can connect external wireless audio devices, keyboards and mice to your TV. For audio devices use the Audio Link option, for wireless keyboards and mice use theInput Device option.Refer to the Connectivity section for more information on connecting wireless devices. To continue highlight Next and press OK.On next screen you can set broadcast types to be searched, set your encrypted channel searching and time zone (depending on the country selection) preferences. Additionally you can set a broadcast type as your favourite one. Priority will be given to the selected broadcast type during the search process and the channels of it will be listed on the top of the channel list. When finished, highlight Next and press OK to continue.About Selecting Broadcast TypeTo turn a search option for a broadcast type highlight it and press OK. The checkbox next to the selected option will be checked. To turn the search option off |
English - 14 -
| Start early: You can set recording timers' starting time end later by using this setting. end later by using this setting. to start earlier by using this setting. End late: You can set recording timers' and time to Sources men. You can also press the source button on the remote and then select your USB storage device from the list of sources. You can set your media browser preferences by using the settings menu. Settings menu can be accessed via the information bar which is displayed on the bottom of the screen while playing back a video or an audio file or displaying a picture file. Presses the info button if the information bar has disappeared, options are approximate for the timestamp recording. Available options are approximate for the actual recording will remain in practice depending on the broadcast. may change in practice depending on the broadcast. The reserved and free storage space values will the reserved and free storage space values will the reserved and free storage space values will the reserved and free storage space values will the reserved and free storage space values will the reserved and free storage space values will the reserved and free storage space values will the reserved and free storage space values will the reserved and free storage space values will the reserved and free storage space values will the reserved and free storage space values will the reserved and free storage space values will theReserved and free storage space values will theReserved and free storage space values will theReserved and free storage space values will theReserved and free storage space values will theReserved and free storage space values will theReserved and free storage space values will theReserved and free storage space values will theReserved and free storage space values will theReserved and free storage space values will theReserved and free storage space values will theReserved and free storage space values will theReservedand free storage space values will theReserved and free storage space values will theReserved and free storage space values will theReserved and free storage space values will theReserved and free storage space values will theReserved and free storage space values will theReserved and free storage space values will theReserved and free storage space values will theReserved and free storage space values will theReserved and free storage space values will theReserved and free storage space values will theReserved and Free Storage Space Values Will theReserved and Free Storage Space Values Will theReserved and Free Storage Space Values Will theReserved and Free Storage Space Values Will theReserved and Free Storage Space Values Will theReserved and Free Storage Space Values Will theReserved and Free Storage Space Values Will theReserved and Free Storage Space Values Will theReserved and Free Storage Space Values Will theReserved and Free Storage Space Values Will theReserved and Free Storage Space Values Will theReserved and Free Storage Space Values Will | |
| Start playback and activate | All files in the list will be continued played in the same random order |
| Star playback and activate | All files in the list will be continued played once in random order |
| Star playback and activate | All files in the list will be played once in random order |
| Star playback and activate | The same file will be played continuously (repeat) |
| Star playback and activate | The same file will be continued played continuously (repeat) |
| Star playback and activate | All files in the list will be continued played in original order |
| Star playback and activate | All files in the list will be continued played in the same random order |
| To use the functions on the information bar highlight the symbol of the function and press OK. To change the status of a function highlight the symbol of the function and press OK as much as needed. If the symbol is marked with a red cross, that means it is deadivalated. | |
| For further information on using this feature refer to the instructions of the application you use. Note: Depending on model, your TV may not support this function. The application may not be compatible with all mobile devices. UHD (4K, Ultra HD) canines are not supported and both of the devices must be connected to the same network. CEC | |
| This function allows to control the CEC-enabled devices, that are connected through HDMI ports by using the remote control of the TV. The CEC option in the SettingsSystemDevice settings mean should be set as Enabled afterst Press the Source button and select the HDMI input of the set. | |
| Media Browser You can play back music and movie files and display photo files stored on a USB storage device by connecting it to your TV. Connect a USB storage device not meet the speed requirements. Try connecting another USB disk. Important: Formating your USB drive will erase ALL the data on it and its system will be convected a recording, try resstarting the recording. If you still get recording, no successful reading. If you still get not meet the speed requirements. Any more USB disk does another USB disk. I / USB disk writing speed too slow to record" another USB disk. IMPORTANT: Formating your USB drive will erase all the data on it and its system will be convected after a format but you will lose ALL your data. if . USB disk writes speed too slow to record" another USB disk. (-) Default PIN could have been set to 0000 or 1234. If you have damaged the PIN(s requested depending on the country selection) during the First Time Installation use the PIN that you have damaged. without damaged the PIN(s requested depending on the country selection) during the First Time Installation use the PIN that you have damaged. without damaged the PIN(s requested depending on the country selection) during the First Time Installation use the PIN that you have damaged. without damaged the PIN(s requested depending on the country selection) during the First Time Installation use the PIN that you have damaged. without damaged the PIN(s requested depending on the country selection) during the First Time Installation use you have damaged. without damaged the PIN(s requested depending on the country selection) during the First Time Installation use the PIN that you have damaged. without damaged the PIN(s requested depending on the country selection) during the First Time Installation use the PIN that you have damaged. without damaged the PIN(s requested depending on the country selection) during the First Time Installation use the PIN that you have damaged. without damaged the PIN(s requested depending on the country selection)during the First Time Installation use the PIN that you have damaged. without damaged the PIN(s requested depending on the country selection) during the First Time Installation use the PIN that you have damaged. without damaged the PIN(s requested depending on the country selection) during the First Time Installation use the PIN that you have damaged. without damaged the PIN(s requested depending on the country selection) during the First Time Installation use the PIN that you have damaged. without damaged the PIN(s suggested depending on the country selection) during the First Time Installation use the PIN that you have damaged. without damaged the PIN(s suggested depending on the country selection) during the First Time Installation use the PIN that you have damaged. without damaged the PIN(s suggested depending on the country selection) during the First Time Installation use the PIN that you have damaged. without damaged the PIN(s suggested depending on the country selection) during the First Time Installation use the PIN that you had damaged. without damaged the PIN(s suggested depending on the country selection) during the First Time Installation use the PIN that you have damaged. without damaged the PIN(s suggested depending on the country selection) during the First Time Installation use the PIN that you have damaged. without damaged the PIN(s suggested depending on the country selection) during the First Time Installation use the PIN that you have damaged. without damaged the PIN(s suggested depending on the country selection) during the FirstTime Installation use the PIN that you have damaged. without damaged the PIN(s suggested depending on the country selection) during the First Time Installation use the PIN that you have damaged. without damaged the PIN(s suggested depending on the country selection) during the First Time Installation use the PIN that you have damaged. without damaged the PIN(s suggested depending on the country selection) during the First Time Installation use the PIN that you have damaged. without damaged the PIN(s suggested depending onthe country selection) during the First Time Installation use the PIN that you have damaged. without damaged the PIN(s suggested depending on the country selection) during the First Time Installation use the PIN that you have damaged. without damaged the PIN(s suggested depending on the country selection) during the First Time Installation use the PIN that you have damaged. without damaged the PIN(s suggested depending on the country selection) during the First Time Installation use the PIN that you have damaged. Without damaged the PIN(s suggested depending on the country selection) during the First Time Installation use the PIN that you have damaged. without damaged the PIN(s suggested depending on the country selection) during the First Time Installation use the PIN that you have damaged. without damaged the PIN(s suggested depending on the country selection) during the First Time Installation use the PIN that you have damaged. without damaged the PIN(s suggested depending on the country selection) during the First Time Installation use you have damaged. without damaged the PIN(s suggested depending on the country selection) during the First Time Installation use the PIN that you have damaged. without damaged the PIN(s suggested depending on the country selection) during the First Time Installation use the PIN that you have damaged. without damaged the PIN(s suggested depending on the country selection) during the First Time Installation use the PIN that you have damaged. without damaged the PIN(s suggested depending on the country selection) During the First Time Installation use the PIN that you have damaged. without damaged the PIN(s suggested depending on the country selection) during the First Time Installation use the PIN that you have damaged. without damaged the PIN(s suggested depending on the country selection) during the First Time Installation use the PIN that you have damaged. without damaged the PIN(s suggested depending on the country selection) during the First Time Installation use the PIN that you have damaged. without damaged the PIN(s rounded depending on the country selection) during the First Time Installation use the PIN that you have damaged. without damaged the PIN(s rounded depending on the country selection) during the First Time Installation use the PIN that you have damaged. without damaged the PIN(s rounded depending on the country selection) during the First Time Installation use the PIN that you have damaged. without damaged the PIN(s rounded depending on the country selection) during the First Time Installation use the PIN that you had damaged. without damaged the PIN(s rounded depending on the country selection) during the First Time Installation use the PIN that you have damaged. without damaged the PIN(s rounded depending on the country selection) during the First Time Installation use the PIN that you have damaged. without damaged the PIN(s rounded depending on the country selection) during the First Time Installation use the PIN that you have damaged. without damaged the PIN(s rounded depending on the country selection) during the FirstTime Installation use the PIN that you have damaged. without damaged the PIN(s rounded depending on the country selection) during the First Time Installation use the PIN that you have damaged. without damaged the PIN(s rounded depending on the country selection) during the First Time Installation use the PIN that you have damaged. without damaged the PIN(s rounded depending on the country selection) during the First Time Installation use the PIN that you have damaged. without damaged the PIN(s rounded depending onthe country selection) during the First Time Installation use the PIN that you have damaged. without damaged the PIN(s rounded depending on the country selection) during the First Time Installation use the PIN that you have damaged. without damaged the PIN(s rounded depending on the country selection) during the First Time Installation use the PIN that you have damaged. without damaged the PIN(s rounded depending on the country selection) during the First Time Installation use the PIN that you have damaged. Without damaged the PIN(s rounded depending on the country selection) during the First Time Installation use the PIN that you have damaged. without damaged the PIN(s rounded depending on the country selection) during the First Time Installation use the PIN that you have damaged. without damaged the PIN(s rounded depending on the country selection) during the First Time Installation use the PIN that you have damaged. without damaged the PIN(s rounded depending on the country selection) during the First Time Installation use the selected one's version of the function which is not set to None. in order to any other version of the function which is not set to None. in order to any other version of the function which is not set to None. in order to any other version of the function which is not set to None. in order to any other version of the function which is not set to None. in order to any other version of the function which is not set to None. in order to any other version of the function which is not set to None. in orderto any other version of the function which is not set to None. in order to any other version of the function which is not set to None. in order to any other version of the function which is not set to None. in order to any other version of the function which is not set to None. in order to any other version of the function which is not set to None. in order to any other version of the function which is not set to None. In order to any other version of the function which is not set to None. in order to any other version of the function which is not set to None. in order to any other version of the function which is not set to None. in order to any other version of the function which is not set to None. in order to any other version of the function which is not set to None. in order to any other version of the function which is not set toNone. in order to any other version of the function which is not set to None. in order to any other version of the function which is not set to None. in order to any other version of the function which is not set to None. in order to any other version of the function which is not set to None. in order to any other version of the function which is not set to None. in order to any other version of the function which is notset to None. in order to any other version of the function which is not set to None. in order to any other version of the function which is not set to None. in order to any other version of the function which is not set to None. in order to any other version of the function which is not set to None. in order to any other version of the function which is not set to None. in order to any other version of the function whichis not set to None. in order to any other version of the function which is not set to None. in order to any other version of the function which is not set to None. in order to any other version of the function which is not set to None. in order to any other version of the function which is not set to None. in order to any other version of the function which is not set to None. in order to any other version of the function<|content_end|> | |
English - 13 -
| USB Recording | |
| Recording a Programme | |
| IMPORTANT: When using a new USB hard disk drive, it is recommended that you first format the disk using your TV's Format Disk option in the drive. This is recommended an error message will be displayed. It is compatible an error message will be displayed. The recordings only via your TV. Record programs are saved into the connected USB disk. If desired, you can store/copy recordings and use USB hard disk drives (HDD's). Record programs are saved into 4GB packages. If the writing speed of the connected USB disk is not sufficient, the recording may fail and the timestamping feature may not be available. It is recommended to use USB hard disk drives. Record program should have 2 GB tree space and be USB 2.0 compatible. If the USB drive she has have 2 GB tree time switch on the TV to enable the recording feature. To record long duration programmes such as movies, it is recommended an error message will be displayed. To record long duration programmes such as movies, it is compatible an error message will be displayed. To record long duration programmes such as movies, it is recommended an error message will be displayed. To record long duration programmes such as movies, it is compatible an error message will be displayed. To record long duration programmes such as movies, it is recommended an error message will be displayed. To record long duration programmes such as movies, it is recommended an error message will be displayed. To record long duration programmes such as movies, it is recommended an error message will be displayed. To record long duration programmes such as movies, it is recommended an error message will be displayed. To record long duration programmes such as movies, it is recommended an error message will be displayed. To record long duration programmes such as movies, it is recommended an error message willbe displayed. To record long duration programmes such as movies, it is recommended an error message will be displayed. To record long duration programmes such as movies, it is recommended an error message will be displayed. To record long duration programmes such as movies, it is recommended an error message will be displayed. To record long duration programmes such as movies, it is recommended an error message will be displayed. To record long duration programmes such as movies, it is recommended an error message will be displayed. To record longer durations programmes such as movies, it is recommended an error message will be displayed. To record longer durations programmes such as movies, it is recommended an error message will be displayed. To record longer durations programmes such as movies, it is recommended an error message will be displayed. To record longer durations programmes such as movies, it is recommended an error message will be displayed. To record longer durations programmes such as movies, it is recommended an error message will be displayed. To record longer durations programmes such as movies. It is recommended an error message will be displayed. To record longer durations programmes such as movies, it is recommended an error message will be displayed. To record longer durations programmes such as movies, it is recommended an error message will be displayed. To record longer durations programmes such as movies, it is recommended an error message will be displayed. To record longer durations programmes such as movies, it is recommended an error message will be displayed. To record longer durations programmes such as movies, it is recommended an errormessage with the USB hard disk input(s). I is recommended to use the TV's USB input(s) USB device. Note: When viewing image files the Media Browser menu can only display 1000 image files stored on the connected . I am only display 1000 image files stored on the connected USB device. | |
| USB Recording | |
| Timeshift Recording | |
| Presse Pause button while watching a broadcast to accivate timestamping mode. In timestamping mode, the programme is paused and simultaneously recorded to the connected USB disk. Presses Play button again to resume the paused programme from where you stopped. Presses the Stop button to stop timestamp recording and return to the live broadcast. | |
| Timeshift Recording | |
| Timeshift cannot be used while in radio mode. Normal playback or fast forward option. | |
| Instant Recording | |
| cup to ten hours. Recorded programmes are split into 4GB partitions. If the writing speed of the connected USB disk is not sufficient, the recording may not be available. It is recommended to use USB hard disk drives for recording HD programmes. Is recommended to use USB hard disk drives for recording HD programmes. may harm the connected USB/HDD. Multipartition support is available. A maximum of two different partitions are supported. The first partition of the USB disk is used for USB recording ready for the USB disk is not available. It also must be formatted as the primary features. It also must be formatted as the primary features. Of the USB disk is not available. Different partitions are supported. The first partition of the USB and press settings lab by using Left or Right button and press settings OK. Then select the desired item in the sub-menu and setting by using Left or Right button. | |
| without playing a file. | |
| You can use USB hubs with your TV's USB inputs. External power supplied USB hubs are recommended in such a case. | |
| with NTFS formatted disks. | |
| While formatting USB hard drives which have written 7TB (Tera Style) storage space you may experience problems in the formallng process. As the player may still be reading files. Failure to do more than 1TB (Tera Style) storage space you may have been done. | |
| Wait a little while before each plugging and unplugging so may cause physical damage to the USB player and the USB device itself. Do not pull out your drive. | |
Settings Menu Content
| Devices Menu Content | ||
| CEC | With this setting you can enable and disable CEC functionality completely. Press Left or Right button to enable or disable the feature. | |
| CEC Auto Power On | This function allows the connected HDMI-CEC compatible device to turn on the TV and switch to its input source automatically. Press Left or Right button to enable or disable the feature. | |
| Audio Link | Press OK to open the Audio Link menu screen. Using this screen you can discover and connect the sound devices to your TV wirelessly. | |
| Input Device | Press OK to open the Input Device menu screen. Using this screen you can discover and connect keyboards and mice to your TV wirelessly.Note: Your TV may not be compatible with all keyboard and mouse models in the market. For more information contact your local dealer or retail outlet where you bought your TV. | |
| Virtual Remote | Enable or disable the virtual remote feature. | |
| Audio Video Sharing | This feature allows you to share files stored on your smartphone or tablet pc. If you have a compatible smartphone or tablet pc and the appropriate software is installed, you can share/play photos on your TV. See instructions of your sharing software for more information. | |
| Timer of No Signal | If your TV does not receive any input signal (e.g. from an aerial or HDMI source) for 3 minutes, it will go into standby mode. You can enable or disable this functionality by setting this option accordingly. | |
| Picture Menu Content | ||
| Mode | You can change the picture mode to suit your preference or requirements. Picture mode can be set to one of these options: Cinema, Game(optional), Sports, Dynamic and Natural. | |
| Contrast | Adjusts the light and dark values on the screen. | |
| Brightness | Adjusts the brightness values on the screen. | |
| Sharpness | Sets the sharpness value for the objects displayed on the screen. | |
| Colour | Sets the colour value, adjusting the colours. | |
| Energy Saving | For setting the Energy Saving to Custom, Minimum, Medium, Maximum, Auto, Screen Off or Off.Note: Available options may differ depending on the selected Mode. | |
| Backlight | This setting controls the backlight level. The backlight function will be inactive if the Energy Saving is set to an option other than Custom. | |
| Picture Zoom | Sets the desired image size format. | |
| Picture Shift | This option may be available depending on the Picture Zoom setting. Highlight and press OK, then use directional buttons to shift the picture upwards or downwards. | |
| PC Position | Appears only when the input source is set to VGA/PC. | |
| Autoposition | If the image is not centered in VGA mode use this option to automatically adjust the position of the image. Press OK to start the auto adjustment. | |
| H Position | This item shifts the image horizontally to the right hand side or left hand side of the screen | |
| V Position | This item shifts the image vertically towards the top or bottom of the screen. | |
| Dot Clock | Dot Clock adjustments correct the interference that appear as vertical banding in dot intensive presentations like spreadsheets or paragraphs or text in smaller fonts. | |
| Phase | Depending on the input source(computer etc.) you may see a hazy or noisy picture on the screen. You can use phase to get a clearer picture by trial and error. | |
| Advanced Settings | ||
connected CEC device from the Sources List menu. When new CEC source device is connected, it will be
listed in source menu with its own name instead of the connected HDMI ports name(such as DVD Player.
Recorder 1 etc.).
The TV remote is automatically able to perform the
main functions after the connected HDMI source has
been selected. To terminate this operation and control the TV via the remote again, press and hold the "0-Zero" button on the remote control for 3 seconds.
You can disable the CEC functionality by setting the related option under the Settings>System>Device
Settings menu accordingly.
The TV supports ARC (Audio Return Channel). This
feature is an audio link meant to replace other cables between the TV and an audio system (A/V receiver or speaker system).
When ARC is active, the TV will mute its other audio
outputs, except the headphone jack, automatically and volume control buttons are directed to connected
audio device. To activate ARC set the Sound Output option in the Settings>Sound menu as HDMI ARC.
Note: ARC is supported only via the HDMI2 input.
System Audio Control
Allows an Audio Amplifier/Receiver to be used with the TV. The volume can be controlled using the remote
TV. The volume can be controlled using the remote control of the TV. To activate this feature set th
Sound Output option in the Settings>Sound menu
as HDMI ARC. When HDMI ARC option is selected,
CEC option will be set as Enabled automatically, if it is not already set. The TV snacker will be muted and
is not already set. The TV speakers will be muted and the sound of the watched source will be provided from the connected sound system.
the connected sound system. Note: The audio device should support System Audio Control
feature.
E-Manual
You can find instructions for your TV's features in the
E-Manual. To access the E-Manual enter Settings menu, select
To access the E-Manual, enter Settings menu, select Manuals and press OK. For quick access press Menu button and then Info button
button and then info button.
By using the directional buttons select a desire
category. Every category includes different topics. Select a topic and press OK to read instructions.
Select a topic and press OR to read instructions. To close the E-Manual screen press, the Exit or Menu.
to close the E manual screen press the EXIT of Monday button.
Note: Depending on model, your TV may not support this
function. The contents of the E-Manual may vary according
to the model.
Settings Menu Content
| Sound Menu Content | |
| Dolby Audio | Smart, Movie, Music, News and Off options will be available. Set as Off to disable.Note: Some items in Sound menu will be grayed out and unavailable if set to an option other than Off. |
| Surround Sound | Surround Sound mode can be changed as On or Off. |
| Audio Link | Press OK to open the Audio Link menu screen. Using this screen you can discover and connect the sound devices to your TV wirelessly. |
| Sound Output | Sets the sound output preference. TV, S/PDIF, HDMI ARC, Headphone Only and Lineout options will be available. There will be no sound output except through the selected option and the headphone jack.When you connect an external amplifier to your TV using the headphone jack, you can select this option as Lineout. If you have connected headphones to the TV, set this option as Headphone Only. Please ensure before using headphones that this menu item is set to Headphone Only. If it is set to Lineout, the output from the headphone socket will be set to maximum which could damage your hearing.If HDMI ARC option is selected, CEC feature will be enabled.Note: Depending on the selected option some items in Sound menu will appear as grayed out and will be unavailable. |
| AVL (Automatic Volume Limiting) | Sets the sound to obtain fixed output level between programmes.If the Dolby Audio menu item is set to an option other than Off the AVL setting options will change. Auto, Night, Normal and Off options will be available. In Auto mode the TV will switch to Normal or Night mode automatically according to the current time information. If no time information is available this option will always function as Normal. When the TV switches to Night mode for the first time after setting this option as Auto, an information bar will pop up on the screen.Please note that compared to Normal mode Night mode provides more aggressive dynamic compression control which is suitable for silent environments. |
| Advanced Settings | |
| Equalizer | Selects the equalizer mode. Custom settings can be made only when in User mode. |
| Dynamic Bass | Enables or disables the Dynamic Bass. |
| Sound Mode | You can select a sound mode (If the viewed channel supports). |
| Digital Out | Sets digital out audio type. |
| Headphone | Sets headphone volume. This option will not be available if the Sound Output option is set as Lineout.Please ensure before using headphones that the headphone volume is set to a low level, to prevent damage to your hearing. |
| Reset | Resets some of the sound settings to factory defaults. |
| Dynamic Contrast | You can change the dynamic contrast ratio to desired value. | |
| Colour Temp | Sets the desired colour temperature value. Cool, Normal, Warm and Custom options are available. | |
| White Point | If the Colour Temp option is set as Custom, this setting will be available. Increase the 'warmth' or 'coolness' of the picture by pressing Left or Right buttons. | |
| Blue Stretch | White colour enhancement function that makes white colour more cooler in order to make more bright picture. Set as On to enable. | |
| Micro Dimming | Low, Medium, High and Off options are available. While Micro Dimming is active, it will enhance contrast locally for each defined zone. | |
| Noise Reduction | Low, Medium, High and Off options are available. If the signal is weak and the picture is noisy, use the Noise Reduction setting to reduce the amount of noise. | |
| Film Mode | Films are recorded at a different number of frames per second to normal television programmes. Turn this feature on when you are watching films to see the fast motion scenes clearly. | |
| Skin Tone | Skin tone can be changed between -5 and 5. | |
| Colour Shift | Adjust the desired colour tone. | |
| Colour Tuner | Opens colour tuner settings. Set the Colour Tuner as enabled to adjust the Hue, Colour and Brightness values manually. | |
| Gamut Mapping | You can use this option to set the range of colours displayed on your TV screen. When set as On, colours are set according to the source signal. When set as Off, the TV's maximum colour capacity is used by default (recommended option).Note: This option may not be available depending on the TV model and its features. | |
| HDMI Full Range | While watching from a HDMI source, this feature will be visible. You can use this feature to enhance blackness in the picture. | |
| Reset | Resets the picture settings to factory default settings (except Game mode). | |
| While in VGA (PC) mode, some items in Picture menu will be unavailable. Instead, VGA mode settings will be added to the Picture menu while in PC mode. | ||
| Installation Menu Content | |
| Automatic channel scan (Retune) | Displays automatic tuning options. D. Aerial: Searches and stores aerial DVB stations. D. Cable: Searches and stores cable DVB stations. Analogue: Searches and stores analogue stations. Satellite: Searches and stores satellite stations. |
| Manual channel scan | This feature can be used for direct broadcast entry. |
| Network channel scan | Searches for the linked channels in the broadcast system. D. Aerial: Searches for aerial network channels. D. Cable: Searches for cable network channels. Satellite: Searches for satellite network channels. |
| Analogue fine tune | You can use this setting for fine tuning analogue channels. This feature is not available if no analogue channels are stored and if currently watched channel is not an analogue channel. |
| Satellite Settings | Displays satellite settings. Satellite list: Displays available satellites. You can Add, Delete satellites or Edit satellite settings on the list. Antenna installation: You can change satellite antenna settings and/or start a satellite scan. |
| Installation Settings (optional) | Displays installation settings menu. Standby Mode Search (*): Your TV will search for new or missing channels while in standby. Any new found broadcasts will be shown. Dynamic Channel Update(*): If this option is set as Enabled, the changes on the broadcasts such as frequency, channel name, subtitle language etc., will be applied automatically while watching. (*) Availability depends on model. |
| Setup Home Transponder (*) | Using this menu, you can edit the main and backup home transponder parameters, including the Pid of the related M7 operator, which are used to download the channel list. Set your preferences and press the Green button to save the settings. Then start an M7 operator installation using the Automatic channel scan>Satellite menu. (*) This menu option will only be available if an M7 operator installation is performed. |
| Clear Service List | Use this setting to clear channels stored. This setting is visible only when the Country option is set to Denmark, Sweden, Norway or Finland. |
| Select Active Network | This setting allows you to select only the broadcasts within the selected network to be listed in the channel list. This feature is available only for the country option of Norway. |
| Signal Information | You can use this menu item to monitor signal related information such as signal level/ quality, network name,etc. for available frequencies. |
| First time installation | Deletes all stored channels and settings, resets TV to factory settings. |
| Network Menu Content | |
| Network Type | Disable the network connection or change the connection type. |
| Scan Wireless Networks | Start a search for wireless networks. This option will be available if the Network Type is set as Wireless Device. |
| Disconnect | To disconnect from a wireless network and delete your saved wireless network profile (if previously saved), highlight this option and press OK. This option will not be available if you did not connect to a wireless network. Refer to Connectivity section for more information. |
| Press WPS on your wifi router | If your modem/router device has WPS, you can directly connect to it using this option. Highlight this option and press OK. Go to your modem/router device and press the WPS button on it to make the connection. This option will be available if the Network Type is set as Wireless Device. |
| Internet Speed Test | Start a speed test to check your connection bandwidth. The result will be displayed on the screen when finished. |
| Advanced Settings | Change the IP and DNS configurations of your TV. |
| Networked Standby Mode | Enable or disable this feature by setting it as On or Off. |
| Note: For detailed information on the options of this menu refer to the Connectivity section. | |
| Parental | Enter correct password to change parental settings. You can easily adjust Menu Lock, Maturity Lock, Child Lock or Guidance in this menu. You can also set a new PIN or change the Default CICAM PIN using the related options.Note: Some menu options may not be available depending on the country selection in the First Time Installation. Default PIN could have been set to 0000 or 1234. If you have defined the PIN(is requested depending on the country selection) during the First Time Installation use the PIN that you have defined. | ||
| Date/Time | Sets date and time. | ||
| Sources | Edit the names, enable or disable selected source options. | ||
| Netflix | If this feature is supported by your TV, you can view your ESN(*) number and deactivate Netflix.(*) ESN number is an unique ID number for Netflix, created especially to identify your TV. | ||
| Samba ACR | Samba Interactive TV powers recommendations and other apps by gathering data regarding consumption of specific on-screen content to enhance your viewing experience. Using this option you can access Samba Interactive TV settings menu, review Samba TV's Terms of Service, Privacy Policy and manage your advertising preferences, etc. Internet connection will be required in order to access HTML based settings. You can enable or disable Interactive TV at any time from the Settings>System>Privacy>Privacy Settings menu by checking or unchecking the check box next to the related item. This option may not be available depending on the selected country during the First Time Installation process, the model of your TV and its features. | ||
| Device Settings | |||
| CEC | With this setting you can enable and disable CEC functionality completely. Press Left or Right button to enable or disable the feature. | ||
| CEC Auto Power On | This function allows the connected HDMI-CEC compatible device to turn on the TV and switch to its input source automatically. Press Left or Right button to enable or disable the feature. | ||
| Input Device | Press OK to open the Input Device menu screen. Using this screen you can discover and connect keyboards and mice to your TV wirelessly.Note: Your TV may not be compatible with all keyboard and mouse models in the market. For more information contact your local dealer or retail outlet where you bought your TV. | ||
| No Signal Timer | If your TV does not receive any input signal (e.g. from an aerial or HDMI source) for 3 minutes, it will go into standby mode. You can enable or disable this functionality by setting this option accordingly. | ||
| Voice Assistant | |||
| Alexa Built-in | Starts the setup process for this feature manually. If the setup is priorly completed Alexa Language, Alexa On Standby Mode, Alexa Alarm Volume and Sign Out options will be available. Refer to Alexa Ready section for more information. | ||
| Alexa Language | Sets the language preference for Alexa. | ||
| Alexa On Standby Mode | Enables or disables Alexa On Standby Mode feature. If enabled Alexa will be available while the TV is in standby mode.Note: This feature may affect your TV's power consumption. | ||
| Alexa Home Screen | Set as Off to disable this feature or choose one of the inactivity periods to enable. 15 min, 30 min, 1 hour and 2 hour options will be available. | ||
| Alexa Alarm Volume | Sets the volume level for Alexa alarms. | ||
| Sign Out | You can use this option to sign out. If you sign out Alexa Built-in feature will be disabled.. | ||
| Works With Alexa | Starts the setup process for this feature manually. If the setup is priorly completed Sign Out option will be available. Refer to Alexa Ready section for more information. | ||
| Sign Out | You can use this option to sign out. If you sign out Works With Alexa feature will be disabled. | ||
| System Menu Content | ||
| Accessibility | Displays accessibility options of the TV. | |
| High Contrast | Increase the contrast of the menu options and texts to make them easier to read. White Text, Yellow Text and Off options will be available. | |
| Hard of Hearing | Enables any special feature sent from the broadcaster. | |
| Audio Description | Anarration track will be played for the blind or visually impaired audience. Press OK to see all available Audio Description menu options. This feature is available only if the broadcaster supports it.Note: Audio description sound feature is not available in recording or time shifting mode. | |
| Dialogue Enhancement | This feature provides sound post-processing options for speech-gated dialogue enhancement. Off, Low, Medium and High options will be available. Set according your preference.Note: This feature has an effect only if input audio format is AC-4 and this effect only applies to TV loudspeaker output. | |
| Spoken Subtitles | Default preference of spoken subtitles is selected with this setting option. To make spoken subtitles priority higher than normal ones, this option should be set to On.This option may not be available depending on the model of your TV and is only visible when the source is set to TV. | |
| Magnification | Enables the use of button combinations to magnify the screen. On and Off options will be available. Set as On to enable.Magnification support will be enabled or disabled with long-press of the numeric button 5. First top-left quadrant of the screen will be zoomed. After the magnification support is enabled, long-press of the numeric buttons 2, 4, 6, 8 will move the zoomed area to up, left, right and down. | |
| Minimap | Minimap is enabled and deactivated by default. It will be activated when Magnification feature is enabled. With this option, you can prevent magnification feature from displaying the minimap. | |
| Click Sound | This option enables the key click sound on TV menu. Set to On to enable. | |
| Highlight programmes with | ||
| [S] Subtitle | If this option is enabled and if any electronic programme guide event has "Subtitle" access service, this events will be highlighted with another colour. | |
| [SL] Sign Language | If this option is enabled and if any electronic programme guide event has "Sign Language" access service, this events will be highlighted with another colour. | |
| [AD] Audio Description | If this option is enabled and if any electronic programme guide event has "Audio Description" access service, this events will be highlighted with another colour. | |
| Language | You may set a different language depending on the broadcaster and the country. | |
| Conditional Access | Controls conditional access modules when available. | |
| Privacy | Manage your privacy privileges for smart TV related applications. Press OK to enter the menu and set according to your preferences. | |
| Privacy Settings | Manage your privacy privileges for smart TV related applications. Press OK to enter the menu and set according to your preferences. | |
| Show All Coo-kies | Displays all saved cookies. | |
| Delete All Co- okies | Deletes all saved cookies. | |
| Do Not Track | You can set your preference regarding the tracking behaviour for HbbTV services using this option. | |
| General TV OperationUsing the Channel ListThe TV sorts all stored stations in the channel list. You can edit this channel list, set favourites or set active stations to be listed by using the Channels menu options. Press the OK button to open the channel list. You can filter the listed channels or make advanced changes in the current list using the Filter and Edit tab options. Highlight the tab you want and press OK to see available options.In order to add the channel you are currently watching to the Home menu, highlight the Add to Home option in the Edit tab in the Channels menu and press OK.Note: The commands Move to position, Delete and Edit name in the TV>Channels>Edit menu are not available for channels that are being broadcasted from an M7 operator.Managing the Favourite ListsYou can create four different lists of your favourite channels. Enter the TV>Channels menu or press the OK button in order to open the Channels menu. Highlight the Edit tab and press OK to see the editing options and select the Tag/Untag channel option. Select the desired channel on the list by pressing the OK button while the channel is highlighted. You can make multiple choices. You can also use the Tag/ Untag all option to select all channels on the list. Then press Back/Return button to return to the Edit menu options. Select Add/Remove Favourites option and press the OK button again. Favourite channel list options will be displayed. Set the desired list option to On. The selected channel/s will be added to the list. In order to remove a channel or channels from a favourite list follow the same steps and set the desired list option to Off.You can use the filtering function in the Channels menu to filter the channels in the channel list permanently according to your preferences. For instance, using the options of the Filter tab, you can set one of your four favourite lists to be displayed every time the channel list is opened. The selected filtering options will be shown on the top of the Channels menu screen.Configuring Parental SettingsThe Parental menu options can be used to prohibit users from viewing of certain programmes, channels and using of menus. These settings are located in the Settings> System>Parental menu.To display parental lock menu options, a PIN should be entered. After coding the correct PIN, Parental menu will be displayed.Menu Lock: This setting enables or disables access to all menus or installation menus of the TV.Maturity Lock: If this option is set, TV gets the maturity information from the broadcast and if this maturity level is disabled, prohibits access to the broadcast. | Note: If the country option in the First Time Installation is set as France, Italy or Austria, Maturity Lock's value will be set to 18 as default.Child Lock: If this option is set to On, the TV can only be controlled by the remote control. In this case the control buttons on the TV will not work.Internet Lock: If this option is set to ON, the internet using applications will be disabled. Set to OFF to release these applications again.Set PIN: Defines a new PIN number.Default CICAM PIN: This option will appear as greyed out if no CI module is inserted into the CI slot of the TV. You can change the default PIN of the CI CAM using this option.TV PIN(*) : By enabling or disabling this option you can allow or restrict some M7 operator channels to send PIN queries. These PIN queries provide an access control mechanism for related channels. If this option is set as On, the channels which send PIN queries can not be accessed without entering the right PIN first. (*) This menu option will only be available if an M7 operator installation is performed.Note: Default PIN could have been set to 0000 or 1234. If you have defined the PIN(is requested depending on the country selection) during the First Time Installation use the PIN that you have defined.Some options may not be available depending on the model and/or on the country selection in the First Time Installation.Electronic Programme GuideBy means of electronic programme guide function of your TV you can browse the event schedule of the currently installed channels on your channel list. It depends on the related broadcast whether this feature is supported or not.To access the programme guide, press the Guide button on your remote. You can also use the Guide option under TV menu.There are 2 different types of schedule layouts available, Timeline Schedule and Now/Next. To switch between these layouts highlight the tab with the name of the alternative layout on the upper side of the screen and press OK.Use the directional buttons to navigate through the programme guide. Use the Back/Return button to use the tab options on the upper side of the screen.Timeline ScheduleIn this layout option, all events of the listed channels will be displayed by timeline. You can use the directional buttons to scroll through the list of the events. Highlight an event and press OK to display event options menu. Press Back/Return button to use available tab options. Highlight Filter tab and press OK to see the filtering options. To change the layout highlight Now/Next and press OK. You can use the Previous Day and Next | |
| Google Assistant | Starts the setup process to enable your TV to work with Google Assistant devices. Highlight Start and press OK. If the setup is priorly completed Sign Out option will be available. If you sign out Google Assistant feature will be disabled. Refer to Google Assistant section for more information. | |
| More | Displays other setting options of the TV. | |
| Menu Timeout | Changes timeout duration for menu screens. | |
| Standby Mode LED | If set as Off the standby mode LED will not light up when the TV is in standby mode. | |
| Software Upgrade | Ensures that your TV has the latest firmware. Press OK to see the menu options. | |
| Application Version | Displays current software version. | |
| Auto Power Down | Sets the desired time for the TV to automatically go into standby mode when not being operated. This option can be set from 1 to 8 hours in steps of 1 hour. You can also disable this option by setting as Off. | |
| Subtitle Mode | This option is used to select which subtitle mode will be on the screen (DVB subtitle / Teletext subtitle) if both is available. Default value is DVB subtitle. This feature is available only for the country option of Norway. | |
| Biss Key | Biss is a satellite signal scrambling system that is used for some broadcasts. If you need to enter Biss key on a broadcast, you can use this setting. Highlight Biss Key and press OK to enter keys on the desired broadcast. | |
| Store Mode | Select this mode for store display purposes. Whilst Store Mode is enabled, some items in the TV menu may not be available. | |
| Audio Video Sharing | This feature allows you to share files stored on your smartphone or tablet pc. If you have a compatible smartphone or tablet pc and the appropriate software is installed, you can share/play photos on your TV. See instructions of your sharing software for more information. | |
| Power Up Mode | This setting configures the power up mode preference. Last State and Standby Mode options are available. | |
| Virtual Remote | Enable or disable the virtual remote feature. | |
| OSS | Displays Open Source Software license information. | |
| Application Priority | You can set your preference regarding the priority between the broadcast applications and CICAM AppMMI applications using this option. In case a CICAM is inserted into the TV and a contention occurs between the applications the priority will be given to the selected type of application. | |
| Note: Some options may not be available depending on the model of your TV and the selected country in the First Time Installation. | ||
| AV and HDMI Signal Compatibility | |||
| Source Supported Signals Available | |||
| Back AV | PAL O | ||
| SECAM O | |||
| NTSC4.43 | O | ||
| NTSC3.58 | O | ||
| YPbPr | 480i, 480p | 60Hz | O |
| 576i, 576p | 50Hz | O | |
| 720p | 50Hz,60Hz | O | |
| 1080i | 50Hz,60Hz | O | |
| HDMI | 480i, 480p | 60Hz | O |
| 576i, 576p | 50Hz | O | |
| 720p | 50Hz,60Hz | O | |
| 1080i | 50Hz,60Hz | O | |
| 1080p | 24Hz, 25Hz,30Hz, 50Hz,60Hz | O | |
English - 26 -
| Day options to display the events of the previous and next day.Highlight Extras tab and press OK to access below options.Highlight Genre: Displays Highlight Genre menu.Select a genre and press OK. The events in the programme guide matching the selected genre will be highlighted.Guide Search: Displays searching options. Using these options, you can search the programme guide database in accordance with the selected criteria. Matching results will be listed.Now: Displays current event of the highlighted channel.Zoom: Highlight and press OK to see events in a wider time interval.Now/Next ScheduleIn this layout option, only the current and next events of the listed channels will be displayed. You can use the directional buttons to scroll through the list of the events.Press Back/Return button to use available tab options.Highlight Filter tab and press OK to see the filtering options. To change the layout highlight Timeline Schedule and press OK.Event OptionsUse the directional buttons to highlight an event and press OK button to display Options menu. The following options are available.Select Channel: Using this option, you can switch to the selected channel in order to watch it. The programme guide will be closed.More Info: Display detailed information on the selected event. Use up and down directional buttons to scroll through the text.Set Timer on Event / Delete Timer on Event: Select Set Timer on Event option and press OK. You can set timers for future events. To cancel an already set timer, highlight that event and press the OK button. Then select Delete Timer on Event option. The timer will be cancelled.Record / Delete Rec. Timer: Select the Record option and press the OK button. If the event is going to be broadcasted at a future time, it will be added to Timers list to be recorded. If the selected event is being broadcasted at the moment, recording will start immediately.To cancel an already set record timer, highlight that event and press the OK button and select the option Delete Rec. Timer. The record timer will be cancelled.IMPORTANT: Connect a USB disk to your TV while the TV is switched off. You should then switch on the TV to enable the recording feature.Notes: You cannot switch to any other channel while there is an active recording or timer on the current channel.It is not possible to set timer or record timer for two or more individual events at the same time interval. | Teletext ServicesPress the Text button to enter. Press again to activate mix mode, which allows you to see the teletext page and the TV broadcast at the same time. Press once more to exit. If available, sections in the teletext pages will become colour-coded and can be selected by pressing the coloured buttons. Follow the instructions displayed on the screen.Digital TeletextPress the Text button to view digital teletext information. Operate it with the coloured buttons, cursor buttons and the OK button. The operation method may differ depending on the contents of the digital teletext. Follow the instructions displayed on the digital teletext screen. When the Text button is pressed again, the TV returns to television broadcast.Software UpgradeYour TV is capable of finding and updating the firmware automatically via the broadcast signal or via Internet.Software upgrade search via user interfaceOn the main menu select Settings, then navigate to Software Upgrade and press the OK button. Then select Scan for upgrade and press OK button to check for a new software upgrade. The Software Upgrade option is also available in the Settings>System>More menu.If a new upgrade is found, it starts to download the upgrade. After the download is completed, a warning will be displayed, press OK button to complete software upgrade process and restart TV.3 AM search and upgrade modeYour TV will search for new upgrades at 3:00 o'clock if Automatic scanning option is set to Enabled and if the TV is connected to an aerial signal or to Internet. If a new software is found and downloaded successfully, it will be installed at the next power on.Note: Do not unplug the power cord while led is blinking during the reboot process. If the TV fails to come on after the upgrade, unplug, wait for two minutes then plug it back in.All updates are automatically controlled. If a manual search is carried out and no software is found then this is the current version.Troubleshooting & TipsTV will not turn onMake sure the power cord is plugged in securely to a wall outlet. Press the Power button on the TV.Poor pictureCheck if you have correctly tuned the TV.Low signal level can cause picture distortion. Please check antenna connections.Check if you have entered the correct channel frequency if you have performed manual tuning. |
Supported File Formats for USB Mode
| External Subtitles | |
| Extension | Specification |
| .ssa SubStation Alpha | |
| .ass Advanced SubStation Alpha | |
| .srt | Subripper |
| .sub Micro DVD / SubViewer | |
| .sub + .idx | VOBSub |
| .txt | Micro DVD / TMPlayer / MPL2 |
| .mpl MPL2 | |
| .smi Sami | |
| .jss | JACOSUB |
| .ttml TTML | |
| .txt / .sub | DVDSUBTITLE |
| .lrc | - |
| Internal Subtitles | |
| Extension | Specification |
| .mkv | VOBSub |
| .mkv | ASS / SSA / TEXT |
| .dat, .mpg, .mpeg, .vob | DVD Subtitle |
| .mp4 DVD Subtitle, TEXT | |
Supported DVI Resolutions
When connecting devices to your TV's connectors by using DVI converter cable(DVI to HDMI cable - not supplied), you can refer to the following resolution information.
| 56Hz | 60Hz | 66Hz | 70Hz | 72Hz | 75Hz | |
| 640x400 | x | |||||
| 640x480 | x | x | x | x | ||
| 800x600 | x | x | x | x | x | |
| 832x624 | x | |||||
| 1024x768 | x | x | x | x | ||
| 1152x864 | x | x | ||||
| 1152x870 | x | |||||
| 1280x768 | x | |||||
| 1360x768 | ||||||
| 1280x960 | x | |||||
| 1280x1024 | x | x | ||||
| 1400x1050 | x | x | ||||
| 1440x900 | x | |||||
| 1600x1200 | x | |||||
| 1680x1050 | x | |||||
| 1920x1080 | x |
Video File Formats
| Extension Video Codec Max. Resolution & Frame Rate & Bit Rate | ||
| .mpg, .mpeg, .dat, .vob | MPEG1/2, H.264, VC1 | H.264: 1080Px2@30fps - 50Mbps, 1080P@60fps - 50Mbps Other: 1080P@60fps - 50Mbps |
| .ts, .trp, .m2ts | ||
| .avi MPEG1/2, MPEG4, H.264 | 4, MJPEG | |
| .mp4, .m4a, .m4v, .mov, .qt, .3gp, .3g2, .3gpp | MPEG1/2, H.263, MPEG4, H.264 | |
| .mkv MPEG 1/2, MPEG4, H.264 | 264 | |
| .flv Sorenson Sp, MPEG4, H.264 | 264 | |
| .asf, .wmv MPEG4, WMV3, VC1 | HEVC/H.265 | |
| .webm VP9, VP8 | ||
| .mp4, .mov, .3gpp, .3gp, .ts, .trp, .tp, .mkv | ||
Picture File Formats
| Extension Specification Resolution (width x height) | ||
| .jpg, .jpeg | Baseline 8192 x 8192 | |
| Progressive 3000 x 3000 | ||
| .bmp | RGB 1/4/8/16/24/32 bit | 8192 x 8192 |
| RLE 4/8 bit | ||
| .png | Grayscale, 24/32 bit per pixel | |
| Interlace format | ||
| Progressive | ||
Audio File Formats
| Extension Format | |
| .mp3 .mp3 | |
| .ac3 .ac3 | |
| .aac .AAC | |
| .wma .WMA | |
| .amr .AMR-NB, .AMR-WB | |
| .wav .MPEG La, .AAC, .PCM |
| • The location where the transmission is most effectivediffers depending on the usage environment.• The Wireless feature of the TV supports 802.11 a,b g& n type modems. It is highly recommended thatyou should use the IEEE 802.11n communicationprotocol in order to avoid any possible problemswhile watching videos.• You must change your modem's SSID when thereare any other modems around with the same SSID.You can encounter connection problems otherwise.Use a wired connection if you experience problemswith a wireless connection.Configuring Wireless Device SettingsOpen the Network menu and select Network Type asWireless Device to start connection process.Highlight Scan Wireless Networks option and pressOK to start a search for available wireless networks.All found networks will be listed. Highlight your desirednetwork from the list and press OK to connetwork with hidden SSID can not be detected byother devices. If you want to connect to a network withhidden SSID, scroll down the list of detected wirelessnetworks, highlight the Add New Network option andpress OK. Enter the name of the network and selectthe security type using the related options to connect.Note: If the modem supports N mode, you should set Nmode settings.If the selected network is password-protected, enterthe correct key by using the virtual keyboard. You canuse this keyboard via the directional buttons and theOK button on the remote control.Wait until the IP address is shown on the screen.This means that the connection is now established.To disconnect from a wireless network, hightlnetwork Type and press Left or Right buttons to setas Disabled.If you have connected to a wireless network Disconnect option will appear in the Network menu andyour wireless network profile will also be saved, thusyour TV will connect to the same network automatically whenever you switch to wireless connection. Todisconnect from a wireless network andsaved wireless network profile, highlight Disconnectand press OK.If your router has WPS, you can directly connect to themodem/router without entering a password or addingthe network first. Highlight Press WPS on your wifirouter option and press OK. Go to your modem/routerdevice and press the WPS button on it to make theconnection. You will see a connection confirmation onyour TV once the devices have paired. Select OK toproceed. No further configuration is required.Highlight Internet Speed Test and press the OK buttonto check your internet connection speed. | Advanced Settings and press the OK button toopen the advanced setting menu. Use directional andnumeric buttons to set. Highlight Save and press theOK button to save settings when complete.Other InformationThe status of the connection will be displayedConnected or Not Connected and the current IPaddress, if a connection is established.Connecting to your mobile device via WLAN• If your mobile device has WLAN feature, you canconnect it to your TV via a router, in order to accessthe content in your device. For this, your mdevice must have an appropriate sharing software.Connect your TV to your router following the stepsmentioned in the sections above.Afterwards, connect your mobile device to the routerand then activate the sharing software on your mobiledevice. Then, select files that you want to share withconn your TV.If the connection is established correctly, you willbe able to access the shared files installed on yourmobile device via the Audio Video Sharing featureof your TV.Highlight the Audio Video Sharing option in theSources menu and press OK, available media serverdevices in the network will be displayed. Select yourmobile device and press the OK button to continue.• If available, you can download a virtual remotecontroller application from the server of your mobiledevice application provider.Note: This feature may not be supported on all mobiledevices.Networked Standby ModeNetworked Standby Mode is standard that allowsa device to be turned on or woken up by a networkmessage. The message is sent to the device by aprogram executed on a remote device connected tothe same local area network, such as a smartphone.Your TV is WoL and WoWLAN compatible. This featuremight be disabled during the First Time Installationprocess. To enable this feature set the NetworkedStandby Mode option in the Network menu as On.It is necessary that both the device, from which thenetwork message will be sent to the TV, and theTV are connected to the same network. NetworkedStandby Mode feature is only supported for AndroidOS devices and can only be used via YouTube andNetflix applications.In order to use this feature the TV and the remotedevice should be connected at least once while theTV is on. If the TV is powered off, the connectionshould be re-established, the next time it is switchedon. Otherwise this feature will be unavailable. ThisHighlight |
English - 30 -
English - 29 -
Internet Speed Test
Highlight Internet Speed Test and press the OK button. TV will check the internet connection bandwidth and display the result when complete.
- You must have a modem/router connected to an Advanced Settings
Highlight Advanced Settings and press the OK button. On the next screen you can change the IP and DNS settings of the TV. Highlight the desired one and press Left or Right button to change the setting from Automatic to Manual. Now you can enter the IP and / or DNS values manually. Select the related item in the drop down menu and enter the new values using the numeric buttons of the remote. Highlight Save and press the OK button to save settings when complete.
Wireless Connectivity
To Connect to a Wireless Network
The TV cannot connect to the networks with a hidden SSID. To make your modem's SSID visible, you should change your SSID settings via the modem's software.
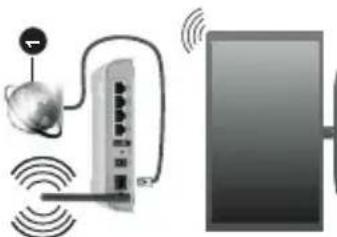
natural_image
Illustration of a network device with wireless signal and globe, above a monitor (no text or symbols)- Broadband ISP connection
A Wireless-N router (IEEE 802.11a/b/g/n) with simultaneous 2.4 and 5 GHz bands is designed to increase bandwidth. These are optimized for smoother and faster HD video streaming, file transfers and wireless gaming.
• The frequency and channel differ depending on the area.
• The transmission speed differs depending on the distance and number of obstructions between the
transmission products, the configuration of these products, the radio wave conditions, the line traffic
and the products that you use. The transmission may also be cut off or may get disconnected depending
on the radio wave conditions, DECT phones or any other WLAN 11b appliances. The standard values of the transmission speed are the theoretical maximum values for the wireless standards. They are not the actual speeds of data transmission.
Connectivity
Wired Connectivity
To Connect to a Wired Network
• You must have a modem/r active broadband connection.
- Connect your TV to your modem/router via Ethernet cable. There is a LAN port at t (back) of your TV.
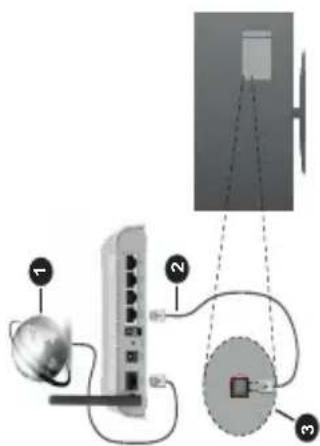
- Broadband ISP connection
-
LAN (Ethernet) cable
-
LAN input on the rear side of the TV
To configure wired settings refer to the Network section in the Settings menu.
You might be able to connect your TV to your LAN depending on your network's configuration. In such a case, use an Ethernet cable to connect your TV directly to the network wall outlet.
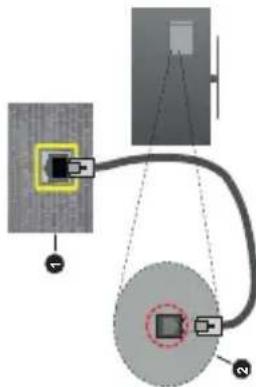
-
Network wall socket
-
LAN input on the rear side of the TV Configuring Wired Device Settings Network Type
The Network Type can be selected as Wired Device, Wireless Device or Disabled, in accordance with the active connection to the TV set. Select this as Wired Device if you are connecting via an Ethernet cable.
| Connectivity TroubleshootingWireless Network Not AvailableEnsure that any firewalls of your network allow the TV wireless connection.Try searching for wireless networks again, using the Network menu screen.If the wireless network does not function properly, try using the wired network in your home. Refer to the Wired Connectivity section for more information on the process.If the TV does not function using the wired connection, check the modem (router). If the router does not have a problem, check the internet connection of your modem.Connection is SlowSee the instruction book of your wireless modem to get information on the internal service area, connection speed, signal quality and other settings. You need to have a high speed connection for your modem.Disruption during playback or slow reactionsYou could try the following in such a case:Keep at least three meters distance from microwave ovens, mobile telephones, bluetooth devices or any other WLAN compatible devices. Try changing the active channel on the WLAN router.Internet Connection Not Available / Audio Video Sharing Not WorkingIf the MAC address (a unique identifier number) of your PC or modem has been permanently registered, it is possible that your TV might not connect to the internet.In such a case, the MAC address is authenticated each time when you connect to the internet. This is a precaution against unauthorized access. Since your TV has its own MAC address, your internet service provider cannot validate the MAC address of your TV. For this reason, your TV cannot connect to the internet.Contact your internet service provider and request information on how to connect a different device, such as your TV, to the internet.It is also possible that the connection may not be available due to a firewall problem. If you think causes your problem, contact your internet service provider. A firewall might be the reason of a connectivity and discovery problem while using the TV in Video Sharing mode or while browsing via Audio Video Sharing feature.Invalid DomainEnsure that you have already logged on to your PC with an authorized username/password and also ensure that your domain is active, prior to sharing any files in your media server program on your PC. If the domain is invalid, this might cause problems while browsing files in Audio Video Sharing mode. | Using Audio Video Sharing Network ServiceAudio Video Sharing feature uses a standard the eases the viewing process of digital electronics and makes them more convenient to use on a home network.This standard allows you to view and play photos, music and videos stored in the media server connected to your home network.1. Server Software InstallationThe Audio Video Sharing feature cannot be used if the server programme is not installed onto your PC or if the required media server software is not installed onto the companion device. Prepare your PC with a proper server programme.2. Connect to a Wired or Wireless NetworkSee the Wired/Wireless Connectivity chapters for detailed configuration information.3. Enable Audio Video SharingEnter the Settings>System>More menu and enable the Audio Video Sharing option.4. Play Shared Files via Media BrowserHighlight the Audio Video Sharing option in the Sources menu by using the directional buttons and press OK. Available media server devices in the network will be listed. Select one and press OK to continue. The media browser will then be displayed.Refer to the Media Browser menu section for further information on file playback.If a problem occurs with the network, switch your television off at the wall socket and back on again.Trick mode and jump are not supported with the Audio Video Sharing feature.PC/HDD/Media Player or any other devices that are compatible should be used with a wired connection for higher playback quality.Use a LAN connection for quicker file sharing between other devices like computers.Note: There may be some PC's which may not be able to utilize the Audio Video Sharing feature due to administrator and security settings (such as business PC's).AppsthisYou can access the applications installed on your TV from the Home menu. Press the Menu button on the remote, Home menu will be displayed. Highlight an Audio app and press OK to launch.In order to manage the apps installed on your TV, you can use the More Apps option in the TV menu. You can add an installed app to Home menu, launch or remove it. Highlight an app and press OK to see the available options.You can add new apps from the application market. To access the market highlight the Market option in the TV menu and press OK. Available apps will be displayed. |
English - 32 -
| does not apply, when the TV is switched into the standby mode.The performance of some devices in the market, may vary due to the software architecture. In order to use Networked Standby Mode feature with a better performance, please make sure that your device has latest firmware version.If you want your TV to consume less power in standby mode, you can disable this feature by setting the Networked Standby Mode option as Off.Wireless DisplayWireless Display is a standard for streaming video and sound content. This feature provides the ability to use your TV as wireless display device.Using with mobile devicesThere are different standards which enable sharing of screens including graphical, video and audio content between your mobile device and TV.Then press the Source button on the remote and switch to Wireless Display source.A screen appears stating that the TV is ready for connection.Open the sharing application on your mobile device. These applications are named differently for each brand, refer to the instruction manual of your mobile device for detailed information.Scan for devices. After you select your TV and connect the screen of your device will be displayed on your TV.Note:This feature can be used only if the mobile device supports this feature. If you experience problems with the connection check if the operating system version you use supports this feature. There may be incompatibility problems with the operating system versions which are released after the production of this TV. Scanning and connecting processes differ according to the programme you use.Connecting Other Wireless DevicesYour TV supports another short range wireless connection technology too. A pairing is required before using these kind of wireless devices with the TV set. You should do the following to pair your device with the TV:Set the device to pairing modeStart device discovery on the TVNote:Refer to the user manual of the wireless device to learn how to set the device to pairing mode.You can connect audio devices, keyboards and mice wirelessly to your TV. Unplug or switch off any other connected audio device in order for wireless connection feature to work correctly. For audio devices you should use the Audio Link option, for keyboards and mice the Input Device option in the Settings>Devices menu. Select the menu option and press the OK button to open the related menu. Using this menu you can discover and connect the | devices that use the same wireless technology and start to use them. Follow the on-screen instructions.Start the device discovery. A list of available wireless devices will be displayed. Select the device you want to connect from the list and press the OK button to connect. If "Device connected" message is displayed, the connection is successfully established. If the connection fails try it again.Note:Your TV may not be compatible with all keyboard and mouse models in the market. For more information contact your local dealer or retail outlet where you bought your TV.Image transfer and audio streamingYou can also use this type of connection to transfer images or stream audio from your mobile device to your TV.Pair the mobile device and the TV as described before. Start a device search in your hand-held device. Select your TV from listed devices. Confirm the request for connection on your TV screen and do the same on your hand held device screen. If no pairing is done, image transfer or audio streaming to the TV will not be possible.The images sent by mobile device will be displayed on the TV without confirmation request, if the image file is suitable. You can also save the image file to a connected USB memory drive or set as boot logo, if this feature is supported and the file is suitable. Press the Exit button to terminate displaying the image.The audio will be routed through the speakers of the TV, after confirmation is given. To start audio streaming unpair the device from your TV if it is paired with your TV previously. After pairing is completed, a confirmation message will be displayed asking whether you want to start audio streaming from your mobile device. Select Yes and press the OK button on the remote of the TV. If the connection is succeeded, all audio will be routed through the speakers of the TV. A symbol will appear on the upper side of the TV screen as long as the audio streaming connection is active. To terminate the audio streaming, you should turn off the wireless connection of your mobile device.Close all running applications and all the menus on the TV for a trouble-free transfer. Only image files with sizes smaller than 5 MB and in the following file formats are suitable; jpg, .jpeg, .png, bmp. If a file sent by the mobile device does not suit these requirements, it will not be displayed on the TV.If the Audio Video Sharing option in the Settings>System>More menu is disabled, the TV will ignore pairing requests and no information message will be displayed on the screen. If a device is already paired prior to disabling the Audio Video Sharing with the TV even if the Audio Video Sharing option is disabled.Note:Wireless devices may operate within the same radio frequency range and may interfere with one another. To |
| both ways or one of them. If the platform does not have an operational broadband connection, the platform can still launch applications transmitted on broadcast.The autostart red button applications generally provide links to other applications. The user then can switch to other applications by using the links provided.The applications should provide a way to terminate themselves, usually Exit button is used for this.HbbTV applications use keys on the remote control to interact with the user. When an HbbTV application is launched, the control of some keys are owned by the application. For example, numeric channel selection may not work on a teletext application where the numbers indicate teletext pages.HbbTV requires AV streaming capability for the platform. There are numerous applications providing VOD (video on demand) and catch-up TV services. The user can use play, pause, stop, forward, and rewind keys on the remote control to interact with the AV content.Note: You can enable or disable this feature from the Privacy Settings menu in Settings>System menu. | MY CHANNELS: The programmes of first four channels from the channel list retrieved from the TV are shown. You can change the listed channels. Press on the channel thumbnail and hold. A list of channels will be displayed and you can choose your desired channel to be replaced.TV: You can watch content through the TV tab. In this mode you can navigate through the channel list retrieved from your TV and click on thumbnails to view the detail pages.RECORDINGS: You can view your active recordings(if available) and reminders through this tab. To delete any item, simply press on the delete icon found on each row.EPG(Electronic programme guide): You can view the broadcast schedules of selected channel lists through this tab. You can also navigate through channels by pressing on the selected channel on the EPG grid. Please note that updating / refreshing the EPG information may take a while depending on your network and web service quality.Note: Internet connection is required for WEB based EPG information. |
| Smart CenterSmart Center is a mobile application running on iOS and Android platforms. With your mobile device, you can easily stream your favourite live shows and programmes from your smart TV. Also; you can launch your applications, use your mobile device as a remote control for your TV and share media files.Note: Being able to use all functions of this application depends on the features of your TV. | SETTINGS: Configure the application to your liking. You can change;Auto-enable FollowMeTV: FollowMeTV function (if available) will start automatically when this setting is enabled. Default is disabled.Auto-connection to TV: When enabled, your mobile device will automatically connect to last connected TV and skips the TV search screen.Change TV: Shows the currently connected TV. You can press on this setting to go to the “TV search” screen and change to a different TV. |
| Getting StartedTo be able to use internet based features, your modem router must be connected to the internet. | Edit custom channel list: You can edit your custom channel list using this setting.Choose channel list source: You can choose the channel list source to be used in the application. The options are “TV List” and “Custom List”. Additionally you can activate “Remember my choice” option to set the selected channel list source as a constant choice. In this case if the selected source is available it will be used in the application.Version No: Displays the current version of the application. |
| IMPORTANT: Make sure the TV and mobile device are connected to the same network.For media sharing feature Audio Video Sharing option should be enabled(if available). Press the Menu button on the remote, select Settings>System>More menu and press OK. Highlight Audio Video Sharing and change as Enabled. Your TV is ready to connect to your mobile device now.Install the Smart Center application onto your mobile device.Start the Smart Center application. If all connections are configured properly, you will see your TV’s name on your mobile device. If your TV’s name doesn’t appear on the list, wait a while and tap on the Refresh widget.Select your TV from the list.Mobile Device screenOn the main screen you can find tabs to access various features.The application retrieves actual channel list from TV first when it starts. | Detail PageTo open detail page tap on a programme. On the detail page screen you can get detailed information of the programmes you select. There are “Details”, “Cast&Crew” and “Videos” tabs to find on this page.DETAILS: This tab provides summary and information about the selected programme. |
| You can also access the application market from within the More Apps menu.You can reset your customisations on the Home menu, including app-related ones, to defaults using the Reset Apps option in the Settings menu (availability depends on TV model and its features). Highlight this option and press OK. A confirmation message will be displayed. Highlight Yes and press OK to proceed. Note that you will not be able to perform this operation again within the next few minutes.Notes:Possible application dependent problems may be caused by the content service provider.Third party internet services may change, be discontinued or restricted at any time.Internet BrowserTo use the internet browser, enter the Home menu first. Then launch the internet browser application has an orange coloured logo with earth symbol on it.In the initial screen of the browser, the thumbnails of the predefined (if any) links to web sites available will be displayed as Speed Dial options along with the Edit Speed Dial and the Add to Speed Dial options.To navigate the web browser, use the directional buttons on the remote or a connected mouse. To see the browser options bar, move the cursor to the top of the page. History, Tabs and Bookmarks options and the browser bar which contains previous/next buttons, the refresh button, the address/search bar, the Speed Dial and the Vewd buttons are available.To add a desired website to the Speed Dial list for quick access, move the cursor to the top of the page or press. The browser bar will appear. Highlight the Speed Dial button and press the OK button. Then select Add to Speed Dial option and press the OK button. Fill in the blanks for Name and Address, highlight OK and press the OK button to add. Whilst you are on the site you wish to add to the Speed Dial list, highlight the Vewd button and press the OK button. Then highlight Add to Speed Dial option in the submenu and press the OK button again. Name and Address will be filled automatically according to the site you are visiting. Highlight OK and press the OK button to add.You can also use the Vewd menu options to manage the browser. Highlight the Vewd button and press the OK button to see available page specific and general options.There are various ways to search or visit websites using the web browser.Enter the address of a website(URL) into the search/address bar and highlight the Enter button on the virtual keyboard and press the OK button to visit the site. | Enter keyword/s into the search/address bar and highlight the Enter button on the virtual keyboard and press the OK button to start a search for the related websites.Highlight a Speed Dial thumbnail and press the OK button to visit the related website.Your TV is compatible with USB mice. Plug your mouse or wireless mouse adaptor into the USB input of your TV for easier and quicker navigation.Some web pages include flash content. These are not supported by the browser.Your TV does not support any download processes from the internet via the browser.All sites on the internet might not be supported. According to the site; content problems may occur. In some circumstances video contents might not be able to be played.HBBTV SystemHbbTV (Hybrid Broadcast Broadband TV) is a new industry standard that seamlessly combines TV services delivered via broadcast with services delivered via broadband and also enables access to Internet only services for consumers using connected TVs and set-top boxes. Services delivered through HbbTV include traditional broadcast TV channels, catch-up services, video-on-demand, electronic programme guide, interactive advertising, personalisation, voting, games, social networking and other multimedia applications.HbbTV applications are available on channels where they are signalled by the broadcaster. The broadcaster marks one application as “autostart” and this one is started by the platform automatically. The autostart applications are generally launched with a small red button icon to notify the user that there is an HbbTV application on that channel. Press the red button to open the application page. After the page is displayed you can go back to the initial red button icon state by pressing the red button again. You can toggle between the red button icon mode and full UI mode of the application via pressing red button. It should be noted that the red button switching capability is provided by the application and some application may behave differently (other colour buttons such as green, yellow, blue, may be defined for some other functions, e.g. shortcuts).If you switch to another channel while an HbbTV application is active (either in red button icon mode or full UI mode), the following scenarios can occur.The application can continue running.The application can be terminated.The application can be terminated and another autostart red button application can be launched.HbbTV allows the applications to be retrieved both from broadband or broadcast. The broadcaster may enable |
| CAST&CREW: Shows all the people contributed to the current programme.VIDEOS: Provides videos on Youtube related to the selected programme.Note: For some functions an internet connection may be required.FollowMe TV Feature (if available)Tap on the FOLLOW ME TV widget located at the upper right of the screen of your mobile device to change the layout for FollowMe TV feature.Tap the play icon to start streaming of the content from the TV to your mobile device. Available if your device is in your routers operation range.Mirror ModeThis mode of FollowMe TV feature is enabled by default and allows streaming the content from any other selected TV sources and Media Browser.Notes:Note that only digital(DVB-T/C/S) SD and HD channels are supported.Multilanguage audio support and subtitle on/off features are not functional.The streaming performance may change depending on the quality of your connection.Media Share PageTo access the Media Share widget tap on the Uparrow on the upper right side of the screen.If the Media Share widget is pressed, a screen is displayed where you can select the media file type to share with your TV.Note: Not all image file formats are supported. This function will not work if Audio Video Sharing feature is not supported.Smart Remote FeatureYou can use your mobile device as a remote control for your TV once it has connected to the TV. To access smart remote's full features you can use the menu at the bottom middle of the screen.Voice RecognitionYou can tap on the Microphone(1) widget and manage your application, giving voice commands such as "Volume Up/Down!", "Programme Up/Down!".Note: This feature is only for android based devices available.Keyboard PageThe keyboard page can be opened in two ways; by pressing the Keyboard(2) widget on the application screen or automatically by receiving a command from the TV.Requirements1. Smart TV2. Network connection | 3. Mobile Device based on Android or iOS platform (Android OS 5.1 or higher; IOS 12 or higher version)4. Smart Center app.(to be found on online application stores based on Android and iOS platforms)5. Router modem6. USB storage device in FAT32 format (required for USB Recording feature, if available)Notes:For Android devices, Normal(mdpi), Large(hdpi) and Extra Large(xhdpi) screen sizes are supported. Devices with 3" or smaller screen sizes are not supported.For iOS devices, all screen sizes are supported.User interface of the Smart Center application is subject to change according to version installed on your device.Alexa ReadyAlexa is Amazon's cloud-based voice service available on many voice controlled assistant devices. By means of the Alexa built-in and Works With Alexa features you can use your TV as an Alexa device and control the functions of your TV with Alexa.Alexa Built-inYou can use your TV as an Alexa device. In order to do this, a Microphone Box(*) will be required. After connecting your Microphone Box to your TV the setup process should be completed. The setup can be carried out in the ways described below.(*) The Microphone Box can be purchased separately if not supplied with the unit. For more information contact your local dealer or retail outlet where you bought your TV.• Connect your Microphone Box to your TV• Use the Alexa Built-in option in the Settings>Sys-tem>Voice Assistant menu• Carry out first time installation on your TV. The setup wizard will be displayed after the installation process is completedThe wizard will guide you through the setup process.Refer to the user manual of the Microphone Box for detailed information.Alexa Home ScreenOnce the setup is complete, Alexa Home Screen feature will be integrated. This feature is an ambient screen which appears when no user activity is detected. A background image, time and date information and voice command suggestions will be displayed on the Alexa Home Screen.You can use the Alexa Home Screen option in the Settings>System>Voice Assistant>Alexa Built-in menu to configure the settings of this feature. You can set to one of the inactivity periods to enable or set to Off to disable. | Alexa Home Screen is displayed only when web browser or any other video on demand application except Netflix is running. It appears when no user activity is detected during the predefined inactivity period unless a media playback is in progress. Watching a movie, for example, is not considered as user inactivity.You can press remote control buttons to make disappear. As an exception you can use the Volume +/- buttons to control volume level even when Alexa Home Screen is running.Works With AlexaYou can control the functions of your TV with Alexa. In order to do this, the setup process should be completed. The setup can be carried out in the ways described below.• Use the Works With Alexa option in the Settings>System>Voice Assistant menu• Carry out first time installation on your TV. The setup wizard will be displayed after the installation process is completedSetup processThe wizard will guide you through the setup process.• If you carry out first time installation on your TV, the Alexa setup wizard will be displayed after the installation process is completed. On the first screen highlight Learn More option and press OK. On the next screen you will be informed about the feature. Highlight Start and press OK to proceed.If you skip the setup wizard after the first time installation you can use the Works With Alexa option in the Settings>System>Voice Assistant menu to carry out the setup later manually. On the first screen you will be informed about the feature. Highlight Start and press OK to proceed.• An authentication code will be created and displayed on the screen. Use your computer or any other device with internet access to go to the internet address (URL) shown on the screen. You will be directed to a page where you can sign in to your Amazon account first, if you are not already signed in. Then you will be directed to a page where you can enter the authentication code you see on the TV and link your TV to your Amazon account.• If the linking process was successful you will be asked to determine a name for your TV, called 'Friendly Name'(FN). A 'Friendly Name' is a name that reminds you of your TV, such as 'Living Room TV', 'Kitchen TV', 'Dining Room TV', etc. Choose an easy-to-say name. You will say this name to tell Alexa which TV to control. When you are done, highlight OK and press OK.• Examples about the use of the feature will be displayed on the next screen. Press OK to finish the setup. | If you carried out the setup after the first time installation you will return to the first screen of the setup wizard when you press OK. In that case press Exit or highlight Setup Later and press OK in order to exit the setup.Once the setup is complete, you will be able to control the functions of your TV with Alexa.Note: Make sure that the devices are connected to the internet.Example CommandsHere are some voice commands that you can use:Command FunctionAlexa, resume 'FN' Resumes media playbackAlexa, stop 'FN' Stops media playbackAlexa, fast forward on 'FN' Advances media in fast forward modeAlexa, rewind on 'FN' Rewinds mediaAlexa, set the volume of 'FN' to 50 Sets the volume to the specified levelAlexa, turn the volume up on 'FN' Increases volume by 10 unitsAlexa, turn the volume down on 'FN' Decreases volume by 10 unitsAlexa, mute 'FN' Mutes soundAlexa, unmute 'FN' Unmutes soundAlexa, change the input to "input_name" on 'FN' The TV switches to the input source with the specified name (e.g., HDMI 1)Alexa, change channel to "channel_number" on 'FN' The TV switches to the channel with the specified number (e.g., channel 200)Alexa, change channel to "channel_name" on 'FN' The TV switches to the channel with the specified nameAlexa, channel up on 'FN' The TV switches to the next higher channel, if any availableAlexa, channel down on 'FN' The TV switches to the next lower channel, if any availableAlexa, next channel on 'FN' The TV switches to the next channel on the channel list |
| Command Function | |
| turn on 'FN' Powers on the TV | |
| turn off 'FN' Powers off the TV | |
| pause on 'FN' Pauses media playback | |
| resume on 'FN' Resumes media playback | |
| stop on 'FN' Stops media playback | |
| volume up on 'FN' Increases volume | |
| volume down on 'FN' Decreases volume | |
| set mute volume on 'FN' Mutes sound | |
| switch input to "input_name" on 'FN' | The TV switches to the input source with the specified name (e.g., HDMI 1) |
| switch to "input_name" on 'FN' | |
| change channel to "channel_number" on 'FN' | The TV switches to the channel with the specified number (e.g., channel 200) |
| change channel to "channel_name" on 'FN' | The TV switches to the channel with the specified name |
| channel up on 'FN' | The TV switches to the next higher channel, if any available |
| channel down on 'FN' | The TV switches to the next lower channel, if any available |
| Licence Notification |
| This product incorporates copyright protection technology that is protected by U.S. patents and other intellectual property rights. Use of this copyright protection technology must be authorized by Rovi Corporation, and is intended for home and other limited viewing uses only unless otherwise authorized by Rovi Corporation. Reverse engineering and disassembly are prohibited. |
| How to Watch a DVD |
| When placing a disc into the loader, labelled side of the disc should be on the front. |
| When TV set is turned on, first switch to DVD source by using the Source button on the remote control. Press play on the remote control, or directly press play button on the side panel. If there is no disc inside the loader, place a DVD first and press play. |
| Note:If you switch to another source by pressing Source or Programme +/- buttons on the remote control, DVD playback will be paused automatically. You should press Play button and resume the playback manually when you switch to DVD mode. |
| DVD Control Panel Buttons |
| /Play / Pause) |
| plays/pauses the disc. When DVD menu (root menu) is active, this button functions as "button select" (selects the highlighted item in menu) if this is not prohibited by the disc. |
| Stop playing disc / Eject or Load the disc. |
| Note: |
| You cannot eject the disc via the remote control. |
| While playing a file, you should press Stop button three times to eject. |
| General Playback |
| Basic Play |
| 4. Cross the Standby button |
Disc Types Compatible with This Unit
| Disc Types (Logos) | Recording Types | Disc Size | Max. Playing Time | Characteristics |
| DVD[IMAGE] | Audio+Video | 12 cm | Single-sided; 240 min.Double-sided; 480 min. | DVD contains excellent sound and video due to Dolby Digital and MPEG-2 System.Various screen and audio functions can be easily selected through the on screen menu. |
| AUDIO-CD[IMAGE] | Audio 12 cm | 74 min. | An LP is recorded as an analog signal with more distortion. CD is recorded as a digital signal with better audio quality, less distortion and less deterioration of audio quality over time. | |
| MP3-CD[IMAGE] | Audio(xxxx.mp3) | 12 cm | It depends on MP3 quality. | MP3 is recorded as a digital signal with better audio quality, less distortion and less deterioration of audio quality over time. |
| PICTURE-CD[IMAGE] | Video(still picture) | 12 cm | It depends on JPEG quality. | JPEG is recorded as a digital signal with better picture quality over time. |
For proper operation, only 12 cm discs must be used.
DVD is a trademark of DVD Format/Logo Licensing Corporation registered in the U.S., Japan and other countries.
Specifications
| Types of Discs Supported | DVD: SS/SL 4.7" (DVD-5)SS/DL 4.7" (DVD-9)DS/SL 4.7" (DVD-10)DS/DL 4.7" (DVD-18) | CD-DACD-RCD-RWMP-3/JPEG |
| Video Type | MPEG-2 Video Standard Decoding (MPEG-1 supported)Full-Screen Video Display of 720 x 576 (PAL) & 720 x 480 (NTSC) pixels50 and 60 Hz frame refresh rates (PAL & NTSC)Digital bit-stream processing rate up to 108Mbits/secLine resolution more than 500 lines | |
| Audio Type | MPEG Multichannel DecodingLPCM | |
| Audio Output | Analog Outputs:24 bit /48, 44.1kHz down-sampling DAC | |
DVD Troubleshooting
| Poor picture quality (DVD) |
| Make sure the DVD disc surface is not damaged. (Scratch, fingerprint etc.) |
| Clean the DVD disc and try again. See instructions described in "Notes on Discs" to clean your disc properly. |
| Ensure that the DVD disc is in the tray with the label facing forward. |
| A damp DVD disc or condensation may affect the equipment. Wait for 1 to 2 hours in Stand-by to dry the equipment. |
Disc does not play
| No disc in the machine. Place a disc into the loader.Disc incorrectly loaded.Note: Ensure that the DVD disc is in the tray with the label facing forward.Wrong type of disc. The machine cannot play CD-ROMS etc. The region code of the DVD must match the player. |
Wrong OSD languag
| Select the language in the set-up menu. |
| The language for the sound or subtitles on a DVD cannot be changed. |
• Multilingual sound and/or subtitles not recorded on the DVD.
| Try to change the sound or subtitles using DVD's title menu. Some DVD's do not allow the user to change these settings without using the disc's menuThese functions are not available on the DVD. |
No picture
| Make sure you have pressed the correct buttons on the remote control. Try once more. |
| No soundCheck if volume is set to an audible level.Make sure the sound isn't turned off by mistake. |
| Distorted sound |
- Check that th
| is correct. | |
| If nothing works | |
| If you have tried the above solutions and none seem to work, try switching your TV-DVD off and on again. If this does not work, contact your supplier or TV-DVD repair technician. Never attempt to repair a defective TV-DVD yourself. | |
- Insert a disc into the loader.
| The disc will be automatically loaded and play will commence if the disc does not have any menus recorded on it.A menu may appear on the TV screen after a few moments or the film may start immediately. This behaviour depends on the disc content and may change.Note: Step 3 and 4 are available only when a menu is recorded on the disc. |
| 3. Press Down / Up / Left / Right or the numeric button (s) to select the preferred title. |
| 4. Press OK to confirm the selected item. |
The played item may
| For your referenceIf an action corresponding to a button is prohibited the "∅" symbol appears. |
| Notes on Playback1. No sound will be heard during fast forward orrewind. |
Towina.
| 2. No sound will be heard during slow motion play. |
| 3. Reverse slow motion play may not be available depending on the DVD content. |
| 4. In some cases, the subtitle language is not |
changed immediately to the selected one.
| 5. When the preferred language is not selected even after pressing the button several times, it means that the language is not available on the disc. |
| 6. When the player is restarted or the disc is changed, the subtitle selection is automatically |
changed back to the initial settings.
| 7. If a language is selected, not supported by the disc, the subtitle language will automatically be set to the disc's priority language. |
| 8. Usually a circulation will happen while switching to another language, that is you can cancel the subtitle by pressing the Language button |
number of tim
| on the screen. | |
| 9. | When the power is turned on or the disc is removed, the language heard is the one selected at the initial settings. If this language is not recorded on the disc, only the available language on the disc will be heard. |
| 10. | Some DVDs may not contain root and/or title menus. |
| 11. | Reverse stepping is not available. |
| 12. | For your convenience: |
| If you attempt to enter a number greater than the total time of the current title, the time search box disappears and "Input Invalid" message appears on upper-left corner of screen. |
| 13. Slide Show is disabled when the ZOOM mode is on. |
Overview of the Remote Control
You can operate DVD, movie CD, music or picture CD's content by using the proper buttons on your remote control. Below are main functions of commonly used remote control buttons.
| Buttons DVD | Playback Movie | Playback Picture | Playback Music | Playback |
| Play Play Play Play | ||||
| Pause Pause | Pause Pause | |||
| Stop | Stop | Stop | Stop | |
| Skip backward/forward | Skip backward/forward | Rotate | Skip backward/forward | |
| ▼/▲ | Highlights a menu item / Shifts the zoomed picture up or down (if available). | |||
| Rapid advance / Rapid reverse | ||||
| GUIDE | Displays time / Views main setup menu | |||
| INFO | Time counter mode selection (during playback). Press repeatedly to switch between modes. | |||
| LANGUAGE | Press Language button to change the audio language. | X | X | |
| MENU | Displays TV menu. | |||
| OK | Enter / View / Play | |||
| GREEN BUTTON | Displays repeat options. | |||
| RETURN/BACK | Returns back to the previous menu (if available). | |||
| YELLOW BUTTON | Goes back to the root folder (if available). | |||
| TEXT | Press Text button to change the subtitle language or turn off the subtitles. | X | X | |
| BLUE BUTTON | Displays disc menu (if available). | Displays disc menu (if available). | X | X |
| RED BUTTON Zooms picture. Press repeatedly to switch between zoom options. | ||||
| Other Functions – Button Combinations (During playback) | |
| + | Slow forward |
| ( + ) + | Sets slow forward speed |
| + | Sets rapid advance speed |
| + | Sets rapid reverse speed |
| + | Confirms stop command |
(*) You can switch to title by pressing numeric keys directly. You need to press 0 and then digit key to switch one digit titles (example: to select 5, press 0 and 5).
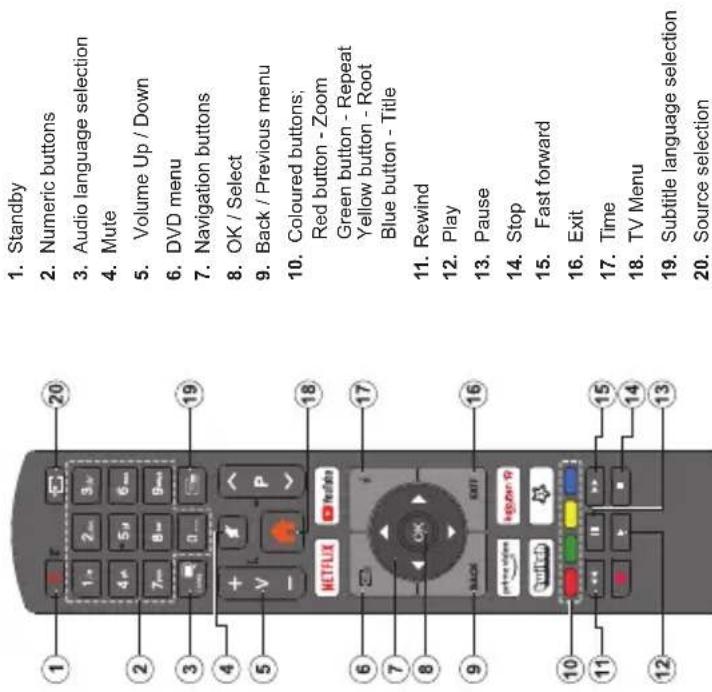
DVB functionality information
Lenco offers service and warranty in accordance to European law, which means that in case of repairs (both during and after the warranty period) you should contact your local dealer. Important note: it is not possible to send products that need repairs to Lenco directly. Important note: if this unit is opened or accessed by a non-official service center in any way, the warranty expires. This device is not suitable for professional use. In case of professional use, all warranty obligations of the manufacturer will be voided.
2. Disclaimer
Updates to Firmware and/or hardware components are made regularly. Therefore some of the instruction, specifications and pictures in this documentation may differ slightly from your particular situation. All items described in this guide for illustration purposes only and may not apply to particular situation. No legal right or entitlements may be obtained from the description made in this manual.
3. Service
For more information and helpdesk support, please visit www.lenco.com Lenco Benelux BV, Thermiekstraat 1a, 6361 HB Nuth, The Netherlands.
- Produkte
- Batterie
KLASSE 1 LASER-PRODUKT
STROMSCHLAGGEFAHR
Water Source: Water is available for water quality.
Four points are connected to a point by the following:
propres installations.
The image contains no discernible text or characters. The horizontal line is a stylistic or background element and must be ignored according to the rules.
PRODUIT LASER DE CLASSE 1
RISQUE DE CHOC ÉLECTRIQUE
natural_image
Illustration of two hands holding a circular object, one with a cross mark, the other with a plus sign (no text or symbols)- Produkter
- Batteri
Specifikationer
Institute Online Exchange
The Ground Truth image displays a single, solid horizontal line. According to Rule 2 (UNDERSCORE & LINE RULES), if the GT contains lines used for stylistic emphasis or as background (like ruled paper), the OCR result must ignore them. The provided OCR content is "____", which consists of four underscores. This is incorrect because underscores are not equivalent to a solid line and are not permitted under the “Stylistic/Background Lines (Ignore)” rule. Outputting underscores for a stylistic line violates the rule and constitutes an error. Therefore, the OCR result is inconsistent with the Ground Truth.
[Non-Text]
[Non-Text]
[Non-Text]
[Non-Text]
[Non-Text]
[Non-Text]
[Non-Text]
[Non-Text]
[Non-Text]
[Non-Text]
[Non-Text]
[Non-Text]
[Non-Text]
[Non-Text]
[Non-Text]
Dansk - 26 -
The Ground Truth image displays a single, solid horizontal line. According to Rule 2 (UNDERSCORE & LINE RULES), if the GT contains lines used for stylistic emphasis or as background elements (like a ruled line), the OCR result must ignore them. The provided OCR content is "____", which consists of four underscores. This is incorrect because underscores are not equivalent to a solid line and are not permitted under the “Stylistic/Background Lines (Ignore)” rule. Outputting underscores for a stylistic line violates the rule and constitutes an error. Therefore, the OCR result is inconsistent with the Ground Truth.
smi Sami
(No text)
iss IACOSUB
1
html HTML
term TIME
(No text)
txt / .sub DVD-UNDERTEKSII
(No text)
lrc -
1
The Ground Truth image displays a single, solid horizontal line. According to Rule 2 (UNDERSCORE & LINE RULES), this is a stylistic or background line, not a placeholder underscore. Therefore, the OCR result must ignore it and output nothing or only meaningful text. The provided OCR content is "____", which consists of four underscores. This is an incorrect interpretation of the line as a placeholder, violating the rule that stylistic lines must be ignored. The OCR has hallucinated underscores where none should exist based on the GT's visual context. Hence, the OCR result is inconsistent with the Ground Truth.
The Ground Truth image displays a single, solid horizontal line. According to Rule 2 (UNDERSCORE & LINE RULES), if the GT contains lines used for stylistic emphasis or as background elements (like ruled paper), the OCR result must ignore them. The line in the GT is clearly a stylistic or background line, not a placeholder for text. Therefore, the OCR should not have output any underscores. Outputting `____` constitutes an error under Rule 2, as it hallucinates placeholder symbols where none are semantically intended. Hence, the OCR result is inconsistent with the Ground Truth.
Interno underteketer
In terms under the
The Ground Truth image displays a single, solid horizontal line. According to Rule 2 (UNDERSCORE & LINE RULES), if the GT contains lines used for stylistic emphasis or as background elements (like ruled paper), the OCR result must ignore them. The line in the GT is clearly a stylistic or background line, not a placeholder for text. Therefore, the OCR should not have output any underscores. Outputting `____` constitutes an error under Rule 2, as it hallucinates placeholder symbols where none are semantically intended. Hence, the OCR result is inconsistent with the Ground Truth.
Ovidelse | Spe
The Ground Truth image displays a single, solid horizontal line. According to Rule 2 (UNDERSCORE & LINE RULES), if the GT contains lines used for stylistic emphasis or as background elements (like a ruled line), the OCR result must ignore them. The provided OCR content is "____", which consists of four underscores. This is incorrect because underscores are not equivalent to a solid line and are not permitted under the “Stylistic/Background Lines (Ignore)” rule. Outputting underscores for a stylistic line violates the rule and constitutes an error. Therefore, the OCR result is inconsistent with the Ground Truth.
mky VORSub
-
-
-
-
-
-
-
-
-
-
-
-
-
-
-
-
-
-
-
-
-
-
-
-
-
-
-
-
-
-
-
-
-
-
-
-
-
-
-
-
-
-
-
-
-
-
-
-
-
-
-
-
-
-
-
-
-
-
-
-
-
-
-
-
-
-
-
-
-
-
-
-
-
-
-
-
-
-
-
-
-
-
-
-
-
-
-
-
- 90.
-
-
-
-
-
-
-
-
-
-
-
-
-
-
-
-
-
-
-
-
-
-
-
-
-
-
-
-
-
-
-
-
-
-
-
-
-
-
-
-
-
-
-
-
-
-
-
-
-
-
-
-
-
-
-
-
-
-
-
-
-
-
-
-
-
-
-
-
-
-
-
-
-
-
-
-
-
-
-
-
-
-
-
-
-
-
-
mky ASS/SSA/TEXT
(No text)
det mpg mpeq yoh DVD-llUnder
- 1.0. 1.0.
mp4 DVD undertekst. TEKS II
| A | VESA WALL MOUNT MEASUREMENTS | ||
| B | Hole Pattern Sizes (mm) | W | H |
| 75 | 75 | ||
| C | Screw Sizes | ||
| D | Length (X) | min. (mm) 5 | |
| max. (mm) | 8 | ||
| E | Thread (Y) | M4 | |
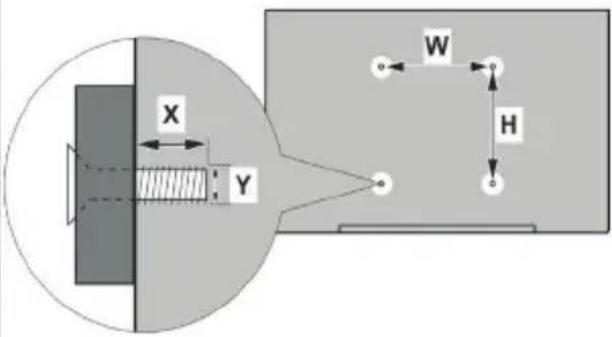
| A B C D E | |||||||
| English VESA WALL MOUNT MEASUREMENTS | Hole Pattern Sizes (mm) Screw Sizes Length (X) Thread (Y) | ||||||
| Deutsch | MASSANGABEN FÜR VESA-WANDMONTAGE | Lochmustergrößen (mm) | Schraubengrößen | Länge (X) | Gewinde (Y) | ||
| Français | DIMENSIONS DU SUPPORT DE FIXATION MURALE VESA | Dimensions des modèles de trous de montage (mm) | Dimensions des vis | longueur (X) | Filetage (Y) | ||
| Italiano | Misurazioni installazione a parete VESA | Dimensioni schema foro (mm) | Dimensioni vite | lunghezza (X) | Filettatura (Y) | ||
| Português | MEDIÇÕES DE MONTAGEM MURAL VESA | Dimensões do molde de furação (mm) | Tamanhos do parafuso | Comprimento (X) | Rosca (Y) | ||
| Español | MEDIDAS DEL MONTAJE DE PARED VESA | Tamaños de patrón para agujero (mm) | Tamaños de tornillo | Longitud (X) | Rosca (Y) | ||
| Türkçe | VESA DUVARA MONTAJ APARATI ÖLÇÜLERİ | Açılacak Delik Ölçüleri (mm) | Vida Ölçüleri | Jzunluk (X) | Yüzey (Y) | ||
| Ελληνικ | ΔΙΑΣΤΑΣΕΙΣ ΒΑΣΗΣ ΤΟΙΧΟΥ VESA | Μεγέθη σχήματος οπών (mm) | Μεγέθη βιδών | Μήκος (X) | Σπείρωμα (Y) | ||
| Polski | WYMIARY DO MONTAZU NAŚCIENNEGO VESA | Rozmiary szablonu otworów (mm) | Rozmiary wkrętów | Długość (X) | Gwint (Y) | ||
| čeština | ROZMĚRY DRŽÁKU NA ZEŐ VESA | Rozměry velikosti děr (mm) | Rozměry śroubú | Délka (X) | Závit (Y) | ||
| Magyar | VESA FALI TARTÓ MÉRETEK | Lyukak méretének nagysága(mm) | Csavar méret | hossz (X) | Menet (Y) | ||
| Română MĂSU | RĂTORI SUPORT PERETE VESA | Dimensiuni tipar gaură (mm) | Dimensiuni şuruburi | Lungime (X) | Filet (Y) | ||
| Svenska | VESA VÄGGMONTERINGSMÄTT | Hålmönsterstorlear (mm) | Skruvstorlekar | Längd (X) | Tråd (Y) | ||
| Nederlands | VESA WANDMONTAGE METINGEN | Grootte booropening (mm) | Schroefgroote | Lengte (X) | Draad (Y) | ||
| Suomi | VESA-SEINÄASENNUKSEN MITAT | Reikäkuvion koot (mm) | Ruuvinkoot | Pituus (x) | Kierre (Y) | ||
| Norsk | VESA VEGGMONTERINGSMÄL | Hullmønster størrelser (mm) | Skruestørrelser | Lengde (x) | Tråd (Y) | ||
| Dansk | VESA VÆGMONTERINGSMÄL | Hulmønster-størrelser (mm) | Skruestørrelser | Længde(X) | Tråd (Y) | ||
| Русский | РАЗМЕРЫ НАСТЕННОГО КРЕПЛЕНИЯ VESA | Размеры системы отверстий | Размеры винтов | Длина(X) | Резьба (Y) | ||
| беларуская | ТАМЕРЫ НАСЦЕННАГА МАЦАВАННЯ VESA | Тамеры сістэмы адтулін | Тамеры вінтоў | Даўжыня (X) | Разьба (Y) | ||
| македонски | МЕРКИ ЗА МОНТИРАЊЕ НА СИД ЗА „BECA“ | Шема на големини на дупката (мм) | Големина на шрафот | Должина (X) | Навој (Y) | ||
| українська | РОЗМИРИ НАСТИННОГО КРИПЛЕННЯ VESA | Відстань між кріпильними отворами, мм | Розміри гвинтів | Довжина (X) | Діаметр різьби (Y) | ||
| Srpski | DIMENZIJE VESA ZIDNOG NOSAČA | Dimenzije šablona za bušenje | Dimenzije zavrtnjeva | Dužina (X) | Navoj (Y) | ||
| Slovenčina | ROZMERY DRŽIAKA NA STENU VESA | Rozmery velkosti dier (mm) | Rozmery skrutiek | Dĺžka (X) | Závit (Y) | ||
| Slovenščina | MERE STENSKEGA NOSILCA VESA | Velikosti vzorca lukeni (mm) | Velikosti vijakov | Dolžina (X) | Navoi (Y) | ||
| Hrvatski | VESA MJERE ZIDNOG DRŽAČA | Veličine uzorka otvora (mm) | Veličine vijka | Dužina (X) | Navoji (Y) | ||
| Bosanski | DIMENZIJE VESA ZIDNOG NOSAČA | Dimenzije šablona za bušenje | Dimenzije vijaka | Dužina (X) | Navoj (Y) | ||
| Български | РАЗМЕРИ ЗА КОМПЛЕКТ ЗА МОНТАЖ НА СТЕНА VESA | Размери на отвора (mm) | Размер на болта | Дължинат (X) | Резба (Y) | ||
| Lietuvių | VESA TVIRTINIMO PRIE SIENOS MATAVIMAI | Angos šablono dydis (mm) | Varžtu dydis | Igis (X) | Sriegis (Y) | ||
| Latviešu | VESA SIENAS STIPRINĀJUMA IZMĒRI | Caurumu šablona izmērs (mm) | Skrūvju izmēri | Garums (X) | Vitne (Y) | ||
| Eesti | VESA SEINALE KINNITAMISE MÕÖDUD | Kruvi suuruse mõõt (mm) | Kruvi suurus | Kõrgus(x) | Keere (Y) | ||
| Shqip | PËRMASAT E NJÊSISË SË MONTIMIT NË MUR VESA | Madhësitë modele të vrimave (mm) | Madhësitë e vidhave | Gjatësla (X) | Filetimi (Y) | ||
| عربي | مEqaiysis للتشیت على الجدار | (أحاجام التقوب (ام) | (أحاجام الراقي) | (Х) اطول (Y) | ( Luxury (Y) | ||
| لازلازلازلازلازلازلازلازلازلازلازلازلازلازلازلازلازلازلازلازلازلازلازلازلازلازلازلازلازلازلازلازلازلازلازلازلازلازلازلازلازلازلازلازلازلازلازلازلازلازلا�لازلازلازلازلازلازلازلازلازلازلازلازلازلازلازلازلازلازلازلازلازلازلازلازلازلازلازلازلازلازلازلازلازلازلازلازلازلازلازلازلازلازلازلازلازلازلازلازلازلاازلازلازلازلازلازلازلازلازلازلازلازلازلازلازلازلازلازلازلازلازلازلازلازلازلازلازلازلازلازلازلازلازلازلازلازلازلازلازلازلازلازلازلازلازلازلازلازلازلازلاızلازلازلازلازلازلازلازلازلازلازلازلازlaزلازlaزlaزlaزlaزlaزlaزlaزlaزlaزlaزlaزlaزlaزlaزlaزlaزlaزlaزlaزlaزlaزlaزlaزlaزlaزlaزlaزlaزlaزlaزlaزlaزlaزlaزlaزlaزlaزlaزlaزlaزlaزlaزlaزlaزlaزlaزlaزlaزlaزlaزлаزlaزlaزlaزlaزlaزlaزlaزlaزlaزlaزlaزlaزlaزlaزlaزlaزlaزlaزlaزlaزlaزlaزlaزlaزlaزlaزlaزlaزlaزlaزlaزlaزlaزlaزlaزlaزlaزlaزlaزlaزlaزlaزlaزlaزlaزlaزlaزlaزlaزLaزlaزlaزlaزlaزlaزlaزlaزlaزlaزlaزlaزlaزlaزlaزlaزlaزlaزlaزlaزlaزlaزlaزlaزlaزlaزlaزlaزlaزlaزlaزlaزlaزlaزlaزlaزlaزlaزlaزlaزlaزlaزlaزlaزlaزlaزlaزlaزlaزlaز laزlaزlaزlaزlaزlaزlaزlaزlaزlaزlaزlaزlaزlaزlaزlaزlaزlaزlaزlaزlaزlaزlaزlaزlaزlaزlaزlaزlaزlaزlaزlaزlaزlaزlaزlaزlaزlaزlaزlaزlaزlaزlaزlaزlaزlaزlaزlaزlaزlaزLAZ | (اللهاللهاللهاللهاللهاللهاللهاللهاللهاللهاللهاللهاللهاللهاللهاللهاللهاللهاللهاللهاللهاللهاللهاللهاللهاللهاللهاللهاللهاللهاللهاللهاللهاللهاللهاللهاللهاللهاللهاللهاللهاللهاللهاللهاللهاللهاللهاللهاللهاللهال Milkاللهال Milkال Milkال Milkال Milkال Milkال Milkال Milkال Milkال Milkال Milkال Milkال Milkال Milkال Milkال Milkال Milkال Milkال Milkال Milkال Milkال Milkال Milkال Milkال Milkال Milkال Milkال Milkال Milkال Milkال Milkال Milkال Milkال Milkال Milkال Milkال Milkال Milkال Milkال Milkال Milkال Milkال Milkال Milkال Milkال Milkال Milkال Milkال Milkال Milkال Milkال milkال Milkال Milkال Milkال Milkال Milkال Milkال Milkال Milkال Milkال Milkال Milkال Milkال Milkال Milkال Milkال Milkال Milkال Milkال Milkال Milkال Milkال Milkال Milkال Milkال Milkال Milkال Milkال Milkال Milkال Milkال Milkال Milkال Milkال Milkال Milkال Milkال Milkال Milkال Milkال Milkال Milkال Milkال Milkال Milkال Milkال Milkال Milkال Milkال Milkال Sheepال Milkال Milkال Milkال Milkال Milkال Milkال Milkال Milkال Milkال Milkال Milkال Milkال Milkال Milkال Milkال Milkال Milkال Milkال Milkال Milkال Milkال Milkال Milkال Milkال Milkال Milkال Milkال Milkال Milkال Milkال Milkال Milkال Milkال Milkال Milkال Milkال Milkال Milkال Milkال Milkال Milkال Milkال Milkال Milkال Milkال Milkال Milkال Milkال Milkال Silkال Milkال Milkال Milkال Milkال Milkال Milkال Milkال Milkال Milkال Milkال Milkال Milkال Milkال Milkال Milkال Milkال Milkال Milkال Milkال Milkال Milkال Milkال Milkال Milkال Milkال Milkال Milkال Milkال Milkال Milkال Milkال Milkال Milkال Milkال Milkال Milkال Milkال Milkال Milkال Milkال Milkال Milkال Milkال Milkال Milkال Milkال Milkال Milkال Milkال Iceال Iceال Iceال Iceال Iceال Iceال Iceال Iceال Iceال Iceال Iceال Iceال Iceال Iceال Iceال Iceال Iceال Iceال Iceال Iceال Iceال Iceال Iceال Iceال Iceال Iceال Iceال Iceال Iceال Iceال Iceال Iceال Iceال Iceال Iceال Iceال Iceال Iceال Iceال Iceال Iceال Iceال Iceال Iceال Iceال Iceال Iceال Iceال Iceال IceالIceال Iceال Iceال Iceال Iceال Iceال Iceال Iceال Iceال Iceال Iceال Iceال Iceال Iceال Iceال Iceال Iceال Iceال Iceال Iceال Iceال Iceال Iceال Iceال Iceال Iceال Iceال Iceال Iceال Iceال Iceال Iceال Iceال Iceال Iceال Iceال Iceال Iceال Iceال Iceال Iceال Iceال Iceال Iceال Iceال Iceال Iceال Iceال Iceال IceالICEال Iceال Iceال Iceال Iceال Iceال Iceال Iceال Iceال Iceال Iceال Iceال Iceال Iceال Iceال Iceال Iceال Iceال Iceال Iceال Iceال Iceال Iceال Iceال Iceال Iceال Iceال Iceال Iceال Iceال Iceال Iceال Iceال Iceال Iceال Iceال Iceال Iceال Iceال Iceال Iceال Iceال Iceال Iceال Iceال Iceال Iceال Iceال Iceال Iceال iceال Iceال Iceال Iceال Iceال Iceال Iceال Iceال Iceال Iceال Iceال Iceال Iceال Iceال Iceال Iceال Iceال Iceال Iceال Iceال Iceال Iceال Iceال Iceال Iceال Iceال Iceال Iceال Iceال Iceال Iceال Iceال Iceال Iceال Iceال Iceال Iceال Iceال Iceال Iceال Iceال Iceال Iceال Iceال Iceال Iceال Iceال Iceال Iceال Iceال ICEALICULAN | (أيْأيْأيْأيْأيْأيْأيْأيْأيْأيْأيْأيْأيْأيْأيْأيْأيْأيْأيْأيْأيْأيْأيْأيْأيْأيْأيْأيْأيْأيْأيْأيْأيْأيْ أيْأيْأيْأيْأيْأيْأيْأيْأيْأيْأيْأيْأيْأيْأيْأيْأيْأيْأيْأيْأيْأيْأيْأيْأيْأيْأيْأيْأيْأيْأيْأيْأيْأиْأيْأيْأيْأيْأيْأيْأيْأيْأيْأيْأيْأيْأيْأيْأيْأيْأيْأيْأيْأيْأيْأيْأيْأيْأيْأيْأيْأيْأيْأيْأيْأيْأيُأيْأيْأيْأيْأيْأيْأيْأيْأيْأيْأيْأيْأيْأيْأيْأيْأيْأيْأيْأيْأيْأيْأيْأيْأيْأيْأيْأيْأيْأيْأيْأيْأيْ“أيْأيْأيْأيْأيْأيْأيْأيْأيْأيْأيْأيْأيْأيْأيْأيْأيْأيْأيْأيْأيْأيْأيْأيْأيْأيْأيْأيْأيْأيْأيْأيْأيْаِأيْأيْأيْأيْأيْأيْأيْأيْأيْأيْأيْأيْأيْأيْأيْأيْأيْأيْأيْأيْأيْأيْأيْأيْأيْأيْأيْأيْأيْأيْأيْأيْأيْa.u.a.u.a.u.a.u.a.u.a.u.a.u.a.u.a.u.a.u.a.u.a.u.a.u.a.u.a.u.a.u.a.u.a.u.a.u.a.u.a.u.a.u.a.u.a.u.a.u.a.u.a.u.a.u.a.u.a.u.a.u.a.u.a.u.a.u.a.u.a.u.a.u.a.u.a.u.a.u.a.u.a.u.a.u.a.u.a.u.a.u.a.u.a.u.a.u.a.u.a.u.u.a.u.a.u.a.u.a.u.a.u.a.u.a.u.a.u.a.u.a.u.a.u.a.u.a.u.a.u.a.u.a.u.a.u.a.u.a.u.a.u.a.u.a.u.a.u.a.u.a.u.a.u.a.u.a.u.a.u.a.u.a.u.a.u.a.u.a.u.a.u.a.u.a.u.a.u.a.u.a.u.a.u.a.u.a.u.a.u.a.u.a.u.a.u.a.u.a.u.suaiaa | (أيْأيْأيْأيْأيْأيْأيْأيْأيْأيْأيْأيْأيْأيْأيْأيْأيْأيْأيْأيْأيْأيْأيْأيْأيْأيْأيْأيْأيْأيْأيْأيْأиْаِأиْаِأиْаِأиْаِأиْаِأиْаِأиْаِأиْаِأиْаِأиْаِأиْаِأиْаِأиْаِأиْаِأиْаِأиْаِأиْаِأиْаِأиْаِأиْаِأиْаٍ | (أيْأيْأиْаِأиْаِأиْаِأиْаِأиْаِأиْаِأиْаِأиْаِأиْаِأиْаِأиْаِأиْаِأиْаِأиْаِأиْаِأиْаِأиْаِأиْаِأиْa.u.a.u.a.u.u.u.u.u.u.u.u.u.u.u.u.u.u.u.u.u.u.u.u.u.u.u.u.u.u.u.u.u.u.u.u.u.u.u.u.u.u.u.u.u.u.u.u.u.u.u.u.u.u.u.u.u.u.u.u.u.u.u.u.u.u.u.u.u.u.u.u.u.u.u.u.u.u.u.u.u.u.u.u.u.u.u.u.u.u.u.u.u.u.u.u.u.u.u.u.u.u.u.u. | (أيْأيْأيْأيْأيْأيْأيْأيْأيْأيْأيْأيْأيْأيْأيْأيْأيْأيْأيْأيْأيْأيْأيْأيْأيْأيْأيْأيْأيْأيْأيْأيْأi ^1 | (أيْأيْأيْأيْأيْأيْأيْأيْأيْأيْأيْأيْأيْأيْأيْأيْأيْأيْأيْأيْأيْأيْأيْأيْأيْأيْأيْأيْأيْأيْأيْأيْأii ^1 | (أيْأيْأيْأيْأيْأيْأيْأيْأيْأيْأيْأيْأيْأيْأيْأيْأيْأيْأيْأيْأيْأيْأيْأيْأيْأيْأيْأيْأيْأيْa.u.a.u.a.u.u.u.u.u.u.u.u.u.u.u.u.u.u.u.u.u.u.u.u.u.u.u.u.u.u.u.u.u.u.u.u.u.u.u.u.u.u.u.u.u.u.u.u.u.u.u.u.u.u.u.u.u.u.u.u.u.u.u.u.u.u.u.u.u.u.u.u.u.u.u.u.u.u.u.u.u.u.u.u.u.u.u.u.u.u.u.u.u.u.u.u.u.U.S.A.S.A.S.A.S.A.S.A.S.A.S.A.S.A.S.A.S.A.S.A.S.A.S.A.S.A.S.A.S.A.S.A.S.A.S.A.S.A.S.A.S.A.S.A.S.A.S.A.S.A.S.A.S.A.S.A.S.A.S.A.S.A.S.A.S.A.S.A.S.A.S.A.S.A.S.A.S.A.S.A.S.A.S.A.S.A.S.A.S.A.S.A.S.A.S.A.S.A.S.S.A.S.A.S.A.S.A.S.A.S.A.S.A.S.A.S.A.S.A.S.A.S.A.S.A.S.A.S.A.S.A.S.A.S.A.S.A.S.A.S.A.S.A.S.A.S.A.S.A.S.A.S.A.S.A.S.A.S.A.S.A.S.A.S.A.S.A.S.A.S.A.S.A.S.A.S.A.S.A.S.A.S.A.S.A.S.A.S.A.S.A.S.A.S.A.S.A.S. A.S.A.S.A.S.A.S.A.S.A.S.A.S.A.S.A.S.A.S.A.S.A.S.A.S.A.S.A.S.A.S.A.S.A.S.A.S.A.S.A.S.A.S.A.S.A.S.A.S.A.S.A.S.A.S.A.S.A.S.A.S.A.S.A.S.A.S.A.S.A.S.A.S.A.S.A.S.A.S.A.S.A.S.A.S.A.S.A.S.A.S.A.S.A.S.A.S.A.SA.S.A.S.A.S.A.S.A.S.A.S.A.S.A.S.A.S.A.S.A.S.A.S.A.S.A.S.A.S.A.S.A.S.A.S.A.S.A.S.A.S.A.S.A.S.A.S.A.S.A.S.A.S.A.S.A.S.A.S.A.S.A.S.A.S.A.S.A.S.A.S.A.S.A.S.A.S.A.S.A.S.A.S.A.S.A.S.A.S.A.S.A.S.A.S.A.S.A.S.C.A.S.A.S.A.S.A.S.A.S.A.S.A.S.A.S.A.S.A.S.A.S.A.S.A.S.A.S.A.S.A.S.A.S.A.S.A.S.A.S.A.S.A.S.A.S.A.S.A.S.A.S.A.S.A.S.A.S.A.S.A.S.A.S.A.S.A.S.A.S.A.S.A.S.A.S.A.S.A.S.A.S.A.S.A.S.A.S.A.S.A.S.A.S.A.S.A.S.A.s.A.S.A.S.A.S.A.S.A.S.A.S.A.S.A.S.A.S.A.S.A.S.A.S.A.S.A.S.A.S.A.S.A.S.A.S.A.S.A.S.A.S.A.S.A.S.A.S.A.S.A.S.A.S.A.S.A.S.A.S.A.S.A.S.A.S.A.S.A.S.A.S.A.S.A.S.A.S.A.S.A.S.A.S.A.S.A.S.A.S.A.S.A.S.A.S.A.S.A[S.A.S.A.S.A.S.A.S.A.S.A.S.A.S.A.S.A.S.A.S.A.S.A.S.A.S.A.S.A.S.A.S.A.S.A.S.A.S.A.S.A.S.A.S.A.S.A.S.A.S.A.S.A.S.A.S.A.S.A.S.A.S.A.S.A.S.A.S.A.S.A.S.A.S.A.S.A.S.A.S.A.S.A.S.A.S.A.S.A.S.A.S.A.S.A.S.A.S.A,S.A.S.A.S.A.S.A.S.A.S.A.S.A.S.A.S.A.S.A.S.A.S.A.S.A.S.A.S.A.S.A.S.A.S.A.S.A.S.A.S.A.S.A.S.A.S.A.S.A.S.A.S.A.S.A.S.A.S.A.S.A.S.A.S.A.S.A.S.A.S.A.S.A.S.A.S.A.S.A.S.A.S.A.S.A.S.A.S.A.S.A.S.A.S.A.S.A.S.A. S.A.S.A.S.A.S.A.S.A.S.A.S.A.S.A.S.A.S.A.S.A.S.A.S.A.S.A.S.A.S.A.S.A.S.A.S.A.S.A.S.A.S.A.S.A.S.A.S.A.S.A.S.A.S.A.S.A.S.A.S.A.S.A.S.A.S.A.S.A.S.A.S.A.S.A.S.A.S.A.S.A.S.A.S.A.S.A.S.A.S.A.S.A.S.A.S.A.S.A(S.A.S.A.S.A.S.A.S.A.S.A.S.A.S.A.S.A.S.A.S.A.S.A.S.A.S.A.S.A.S.A.S.A.S.A.S.A.S.A.S.A.S.A.S.A.S.A.S.A.S.A.S.A.S.A.S.A.S.A.S.A.S.A.S.A.S.A.S.A.S.A.S.A.S.A.S.A.S.A.S.A.S.A.S.A.S.A.S.A.S.A.S.A.S.A.S.A.S.A/S.A.S.A.S.A.S |
EU - DECLARATION OF CONFORMITY
We, the undersigned,
| Company | Lenco Benelux B.V. |
| Address, City | Thermiekstraat 1A, 6361 HB Nuth |
| Country | The Netherlands |
Declare under our sole responsibility as the manufacturer that the following product:
| Product description / Intended use | Television |
| Name / model | Lenco DVL-3273BK |
Conforms to the essential requirements of the European Union. The object of the declaration is in conformity with the relevant European Union harmonised legislation:
| 2014/53/EU (RED art 3.1a) | EN 62368-1:2014 + A11 :2017EN IEC 62311:2020 | ||
| 2014/53/EU (RED art 3.1b) | EN 55032:2015+A1:2020+A11:2020EN 55035:2017+A11:2020EN IEC 61000-3-2:2019EN 61000-3-3:2013+A1:2019ETSI EN 301 489 - 1 V.2.2.3 (2019-11)ETSI EN 301 489 - 17 V3.2.4 (2020-09) | ||
| 2014/53/EU (RED art 3.2) | EN 300 328 V2.2.2 (2019-07)ETSI EN 303 340 V1.1.2 (2016-09)ETSI EN 301 893 V2.1.1 (2017-05)ETSI EN 303 372-2 V1.1.1 (2016-04) | ||
| Type:WiFiBluetoothTuner | Frequency range:2402 ~ 2480 MHz5150 ~ 5725 MHz2402 ~ 2480 MHz48.25 ~ 887.25 MHz (PAL BG)49.75 ~ 855.25 MHz (PAL DK)49.75 ~ 855.25 MHz (SECAM DK)49.75 ~ 887.25 MHz (PAL I)114 ~ 858 MHz (DVB-V)177.5 ~ 858 MHz (DVB-T(2))950 ~ 2150 MGz DVB-S(2)) | ||
| 2009/125/EC (ErP) | (EU) No 2019/2021 | ||
| 2011/65/EU + (EU) 2015/$63 (ROHS) | |||
| Drawn up in | Nuth |
| Date | 28 March 2022 |
 | |
| Name and position | Peter BrulsCompliance Officer |

- Specifications
- [Europese Unie]
- KLASSE 1 LASER PRODUCT
- Markings on the Product
- Safety Information
- Contents
- WALL MOUNTING WARNINGS
- Country Restrictions
- Disposal Information
- [European Union]
- [Business users]
- Antenna Connection
- Satellite
- Aerial or cable
- Remote Control
- (\*) MY BUTTON 1:
- English - 14 -
- English - 13 -
- E-Manual
- Wireless Connectivity
- Overview of the Remote Control
- DVB functionality information
- Disclaimer
- Service
- KLASSE 1 LASER-PRODUKT
- STROMSCHLAGGEFAHR
- PRODUIT LASER DE CLASSE 1
- RISQUE DE CHOC ÉLECTRIQUE
- Specifikationer
- EU - DECLARATION OF CONFORMITY
Brand : LENCO
Model : DVL3273
Category : Television