
Hydrovac XL WD101 - Vacuum Cleaner SHARK - Free user manual and instructions
Find the device manual for free Hydrovac XL WD101 SHARK in PDF.
| Product Type | 3-in-1 Cleaner (Vacuum and Washer) |
| Brand | Shark |
| Model | Hydrovac XL WD101 |
| Power Supply | 120 V, 60 Hz |
| Power | 200 W |
| Cleaning Modes | Hard Floor, Area Rug |
| Self-Cleaning Cycle | Yes, 2 minutes |
| Dirty Water Tank | With solid debris separator and Easy Pour spout |
| Cleaning Solution Tank | With WATER and HYDROVAC CONCENTRATE marks |
| Rotating Brush | Removable and washable, recommended replacement every 6 months |
| Filter | Washable foam filter, recommended replacement every 6 months |
| Warranty | 3-year limited |
| Grounding | Yes, grounded plug |
| Use | Indoor only |
| Recommended Cleaning Products | Shark HydroVac Concentrate and Disinfectant only |
| Replacement Parts | Filter, rotating brush, concentrate, disinfectant |
| Customer Service | 1-800-798-7398, sharkclean.com/support |
| Included Accessories | Storage tray, cord wrap |
| Safety | Do not immerse, unplug before maintenance |
Frequently Asked Questions - Hydrovac XL WD101 SHARK
User questions about Hydrovac XL WD101 SHARK
0 question about this device. Answer the ones you know or ask your own.
Ask a new question about this device
Download the instructions for your Vacuum Cleaner in PDF format for free! Find your manual Hydrovac XL WD101 - SHARK and take your electronic device back in hand. On this page are published all the documents necessary for the use of your device. Hydrovac XL WD101 by SHARK.
USER MANUAL Hydrovac XL WD101 SHARK
IMPORTANT SAFETY INSTRUCTIONS
To reduce the risk of fire, electric shock, injury, or property damage:
- If the power cord plug does not fit fully into the outlet, reverse the plug. If it still does not fit, contact a qualified electrician. DO NOT force into outlet or try to modify to fit.
- To reduce the risk of shock and unintended operation, unplug before servicing.
- This 3-in-1 Cleaner consists of a motorized nozzle, main body pole, and handle. These components contain electrical connections, electrical wiring, and moving parts that potentially present risk to the user.
- Before each use, carefully inspect all parts for any damage. If a part is damaged, discontinue use.
- Use only identical replacement parts.
- DO NOT use the 3-in-1 Cleaner for any purpose other than those described in this Owner's Guide.
- DO NOT immerse or spray water on the body of the 3-in-1 Cleaner. To clean the surface, wipe with a dry cloth.
- Keep the 3-in-1 Cleaner's cord out of reach of children. DO NOT allow the appliance to be used by children. DO NOT allow to be used as a toy. Close supervision is necessary when used near children.
- This appliance can be used by persons with reduced physical, sensory or mental capabilities or lack of experience or knowledge if they have been given supervision or instruction concerning use of the appliance in a safe way and understand the hazards involved. Cleaning and user maintenance shall not be done by children.
- DO NOT handle plug or 3-in-1 Cleaner with wet
hands.
- DO NOT use without the dirty water tank, clean solution tank, filter, brushroll, and brushroll cover in place.
- Use only identical replacement parts. Only use Shark ^® branded filters and accessories.
- DO NOT put any objects into nozzle openings. DO NOT use with any opening blocked; keep free of dust, lint, hair, and anything that may reduce airflow.
- DO NOT use if nozzle airflow is restricted. If the air paths or the motorized floor nozzle become blocked, turn the 3-in-1 Cleaner off. Remove all obstructions before you turn on the unit again. Keep nozzle and all 3-in-1 Cleaner openings away from hair, face, fingers, uncovered feel, or loose clothing. See Checking for Blockages for more information.
- DO NOT use if 3-in-1 Cleaner is not working as it should, or has been dropped, damaged, left outdoors, or dropped into water.
- Use extra care when cleaning on stairs.
- DO NOT leave the 3-in-1 Cleaner unattended while plugged in.
- When using on any surface, always keep the 3-in-1 Cleaner moving to avoid damaging the surface (e.g., carpet fibers).
- DO NOT place 3-in-1 Cleaner on unstable surfaces such as chairs or tables.
- DO NOT use to pick up:
a) Large objects.
b) Hard or sharp objects (glass, nails, screws, or coins).
c) Large quantities of dust (e.g., drywall dust).
d) Smoking or burning objects (hot coals, cigarette butts, or matches).
e) Flammable or combustible materials (lighter fluid, gasoline, or kerosene).
f) Toxic materials (chlorine bleach, ammonia, or drain cleaner).
- DO NOT use in the following areas:
a) Poorly lit areas.
b) Outdoor areas.
c) Spaces that are enclosed and may contain explosive or toxic fumes or vapors (lighter fluid, gasoline, kerosene, paint, paint thinners, mothproofing substances, or flammable dust).
-
Turn off the 3-in-1 Cleaner before any adjustment, cleaning, maintenance, or troubleshooting.
-
During cleaning or routine maintenance, DO NOT cut anything other than hair, fibers, or string wrapped around the brushroll.
- Allow all filters to air-dry completely before reinstalling them in the 3-in-1 Cleaner to prevent liquid from being drawn into electric parts.
- DO NOT modify or attempt to repair the 3-in-1 Cleaner yourself.
DO NOT use the 3-in-1 Cleaner if it has been modified or damaged.
- Turn off all controls before unplugging.
- Use only Shark brand cleaning fluids intended for use with this appliance to prevent internal component damage.
-
Do not pull or carry by cord, use cord as a handle, close a door on cord, or pull cord around sharp edges or corners. Do not run appliance over cord. Keep cord away from heated surfaces.
-
Do not unplug by pulling on cord. To unplug, grasp the plug, not the cord.
- Use indoors only.
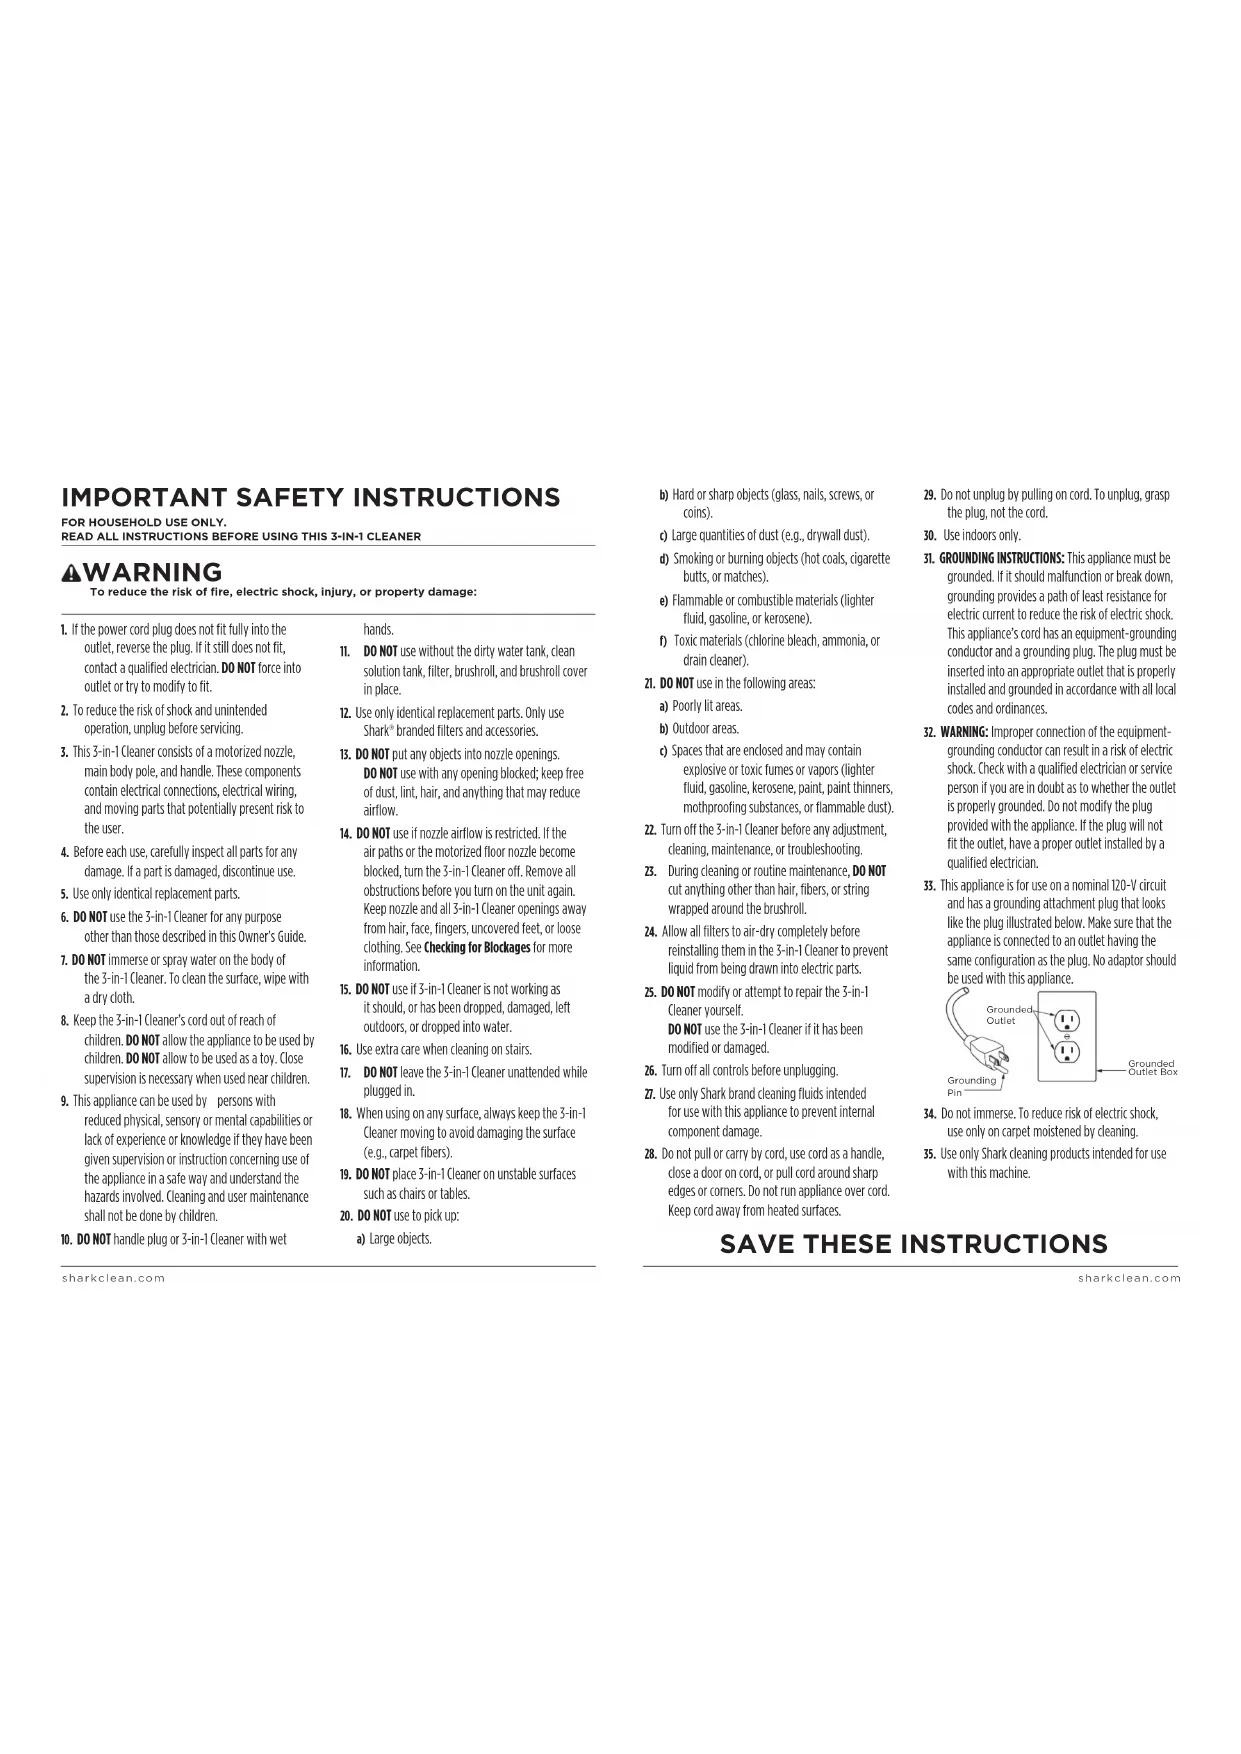
- GROUNDING INSTRUCTIONS: This appliance must be grounded. If it should malfunction or break down, grounding provides a path of least resistance for electric current to reduce the risk of electric shock. This appliance's cord has an equipment-grounding conductor and a grounding plug. The plug must be inserted into an appropriate outlet that is properly installed and grounded in accordance with all local codes and ordinances.
- WARNING: Improper connection of the equipment-grounding conductor can result in a risk of electric shock. Check with a qualified electrician or service person if you are in doubt as to whether the outlet is properly grounded. Do not modify the plug provided with the appliance. If the plug will not fit the outlet, have a proper outlet installed by a qualified electrician.
- This appliance is for use on a nominal 120-V circuit and has a grounding attachment plug that looks like the plug illustrated below. Make sure that the appliance is connected to an outlet having the same configuration as the plug. No adaptor should be used with this appliance.
- Do not immerse. To reduce risk of electric shock, use only on carpet moistened by cleaning.
- Use only Shark cleaning products intended for use with this machine.
SAVE THESE INSTRUCTIONS
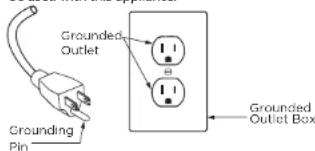
ASSEMBLY
- Align the Pole with the opening in the Main Body and insert firmly until it clicks into place.
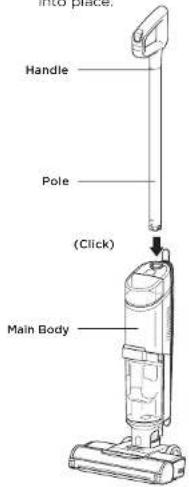
- Place the Storage Tray on the floor near a wall outlet. Place the 3-in-1 Cleaner on the tray.
NOTE: To remove the handle press the release button located on the back of the unit with a thin tool while pulling up on the handle.
NOTE: When assembling your HydroVac, there may be a little water in or around the water tanks. This is because we test all our HydroVacs before you buy them to ensure the highest quality.
USING YOUR 3-IN-1 CLEANER
To use, unwrap the power cord from the back of the unit. Plug the prongs in to a safe outlet. Make sure the prongs are not wet before plugging into an outlet. When you are done cleaning, unplug the cord and wrap it around the cord-wrap hooks.
USING YOUR 3-IN-1 CLEANER
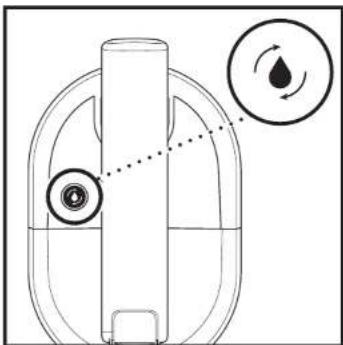
FILLING THE CLEAN SOLUTION TANK
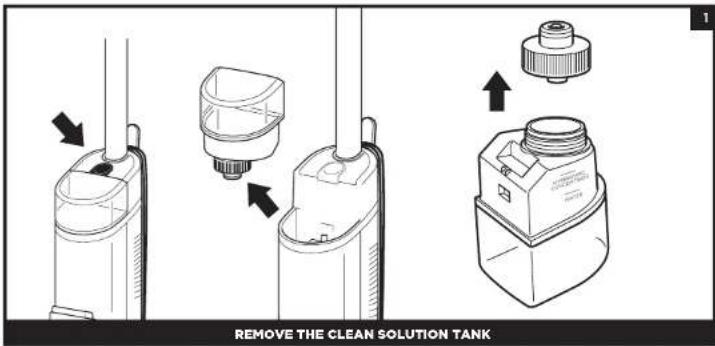
Press the release button and lift off the Clean Solution Tank.
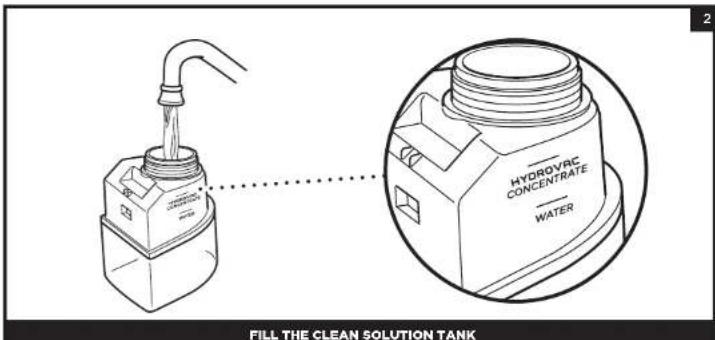
Unscrew the cap and add water to the tank, up to the WATER line. Next, add Shark HydroVac™ Multi-Surface Concentrate, filling to the HYDROVAC CONCENTRATE line. Replace the cap and reinsert the tank until it clicks into place. The top of the tank should be flush with the top of the body.
NOTE: Only use Shark HydroVac Multi-Surface Concentrate, Shark HydroVac Disinfectant, and water with this product.
NOTE: If the clean solution tank is empty, the unit may make a pumping sound. This is normal. Refill the clean solution tank to continue.
NOTE: Be sure to not overfill the Clean Solution Tank with more HydroVac Multi Surface Concentrate than instructed, as this may cause streaking.
NOTE: The 3-in-1 Cleaner will not run without sufficient water supply in the clean solution tank.
USING YOUR 3-IN-1 CLEANER
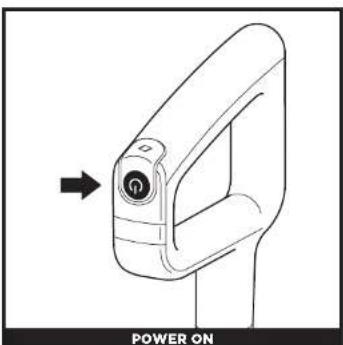
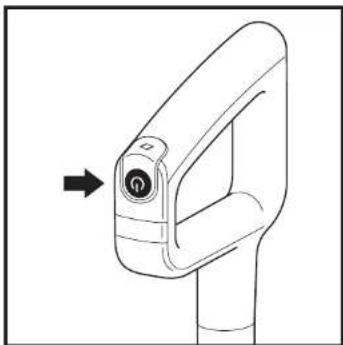
CONTROLS
natural_image
Line drawing of a car door handle with an arrow pointing to the left side (no text or symbols on the diagram itself)Press and release the Power button on the handle to turn on power.
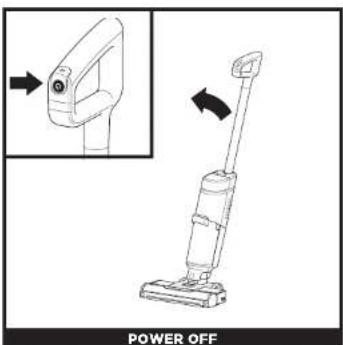
Press and release the Power button on the handle to turn off power. Raise handle to upright position.
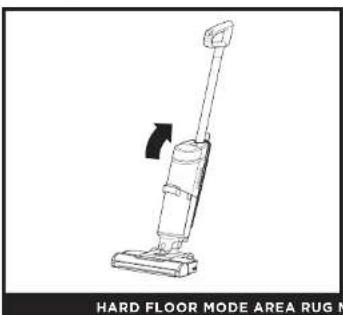
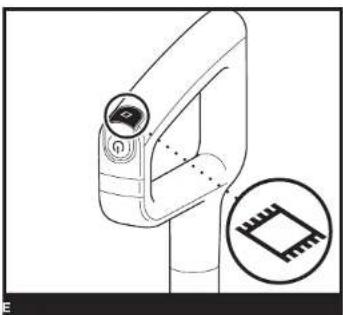
CLEANING MODES
natural_image
Line drawing of a vacuum cleaner with a handle and lever mechanism (no text or symbols on the device itself)Use Hard Floor mode for powerful cleaning on bare floors. To activate Hard Floor mode, turn on the unit and tilt the handle back.
natural_image
Technical line drawing of a mechanical device with an inset showing a microchip (no text or symbols)Area Rug mode always uses fluid and suction simultaneously to optimally clean your rugs. To switch to Area Rug mode, press the Area Rug icon on top of the handle. The Area Rug light on the main body will illuminate. Press the icon again to switch back to Hard Floor mode.
NOTE: To prevent leakage, DO NOT place the main body on the floor. The nozzle should always be kept flat on the floor. NOTE: If you encounter a difficult stain, use Area Rug mode for improved stain cleaning. NOTE: If you encounter a stubborn odor on your floor or area rug, continue to clean in Area Rug mode until the odor is gone. NOTE: If your floors are cloudy, streaky, or spotty after cleaning, it may be due to accumulated soap or grease residue. The floor may require several cleanings with the Hydrovec.
MAINTAINING YOUR 3-IN-1 CLEANER
SELF-CLEAN CYCLE
The self-clean cycle automatically cleans the system and the brushroll.
Recommended after every use
natural_image
Diagram of a mechanical device with internal components and two circular arrows indicating flow or movement (no text or symbols)RECOMMENDED AFTER EVERY USE
- Place the unit on the storage tray,
- Empty the Dirty Water Tank and make sure the clean solution tank is at least half full.
- Press the Power Button to start the self-clean cycle. The icon will pulse for the full 2-minute duration of the cycle.
- DONOT remove the unit from the storage tray during the self-clean cycle. The icon will turn off when the cycle is complete.
- Empty the dirty water tank,
natural_image
Line drawing of a mechanical device with an arrow pointing to the component (no text or symbols present)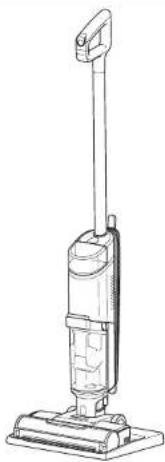
natural_image
Line drawing of a vacuum cleaner with vertical arm and base (no text or symbols)NOTE: Make sure the clean solution tank is at least half full and that the dirty water tank is empty before running the self-clean cycle. NOTE: You will not be able to run a self-clean cycle until battery is sufficiently charged (I solid bar or higher).
MAINTAINING YOUR 3-IN-1 CLEANER
MANUALLY CLEANING THE BRUSHROLL
You can clean the brushroll by hand as an alternative to the self-clean cycle, and to remove debris or hair wrapped around the brushroll.
natural_image
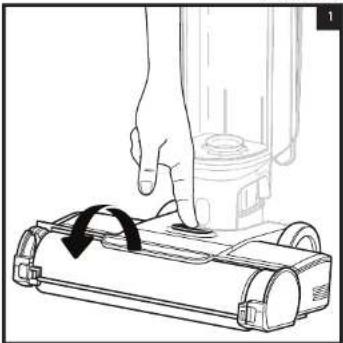
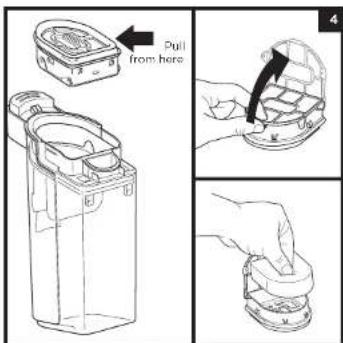
Line drawing of a hand pressing down on a vacuum cleaner's base with a black arrow indicating rotation (no text or symbols)- To access the brushroll, press the button on the top of the nozzle and lift off the brushroll cover.
natural_image
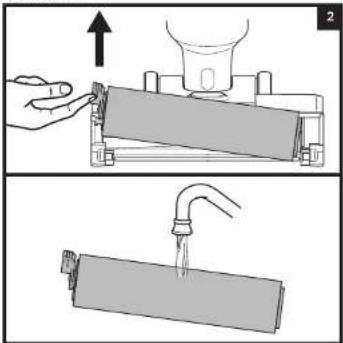
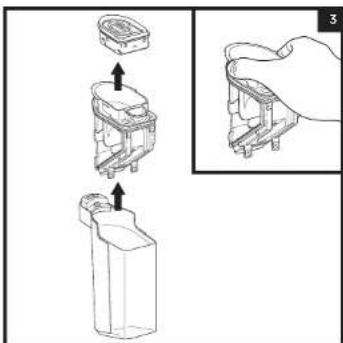
Two-step diagram showing a hand pressing down on a cylindrical object with an upward arrow, and a drop falling into a rectangular container (no text or symbols)- Remove the brushroll by pulling up on the pull tab on the left side of the nozzle. Wipe away any debris stuck on the back wall Wash thoroughly with warm water. Allow the brushroll to air-dry completely in a well-ventilated area for at least 24 hours.
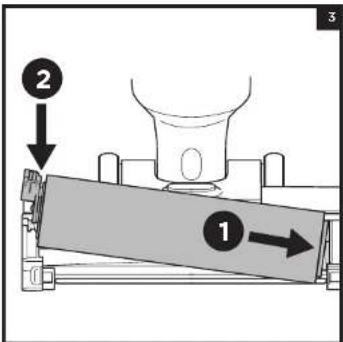
- Reinsert the brushroll by lining up the grooves on the end of the brushroll with the helix on the inner right side of the nozzle, then press down on the left side of the brushroll. When properly installed, the brushroll tab will be flush with the left side of the nozzle
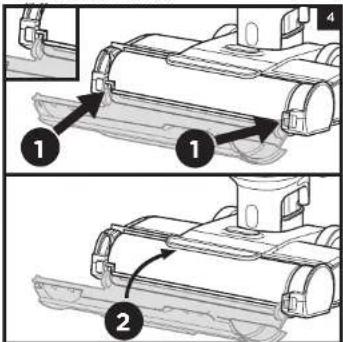
- To reinstall the brushroll cover, insert the tabs on the cover into the slots on the nozzle. Press down on the cover until it clicks into place.
NOTE: Do not place brushroll in washing machine or dishwasher. Replace the brushroll after 6 months.
MAINTAINING YOUR 3-IN-1 CLEANER
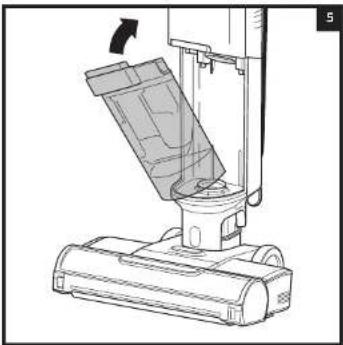
CLEANING THE DIRTY WATER TANK
natural_image
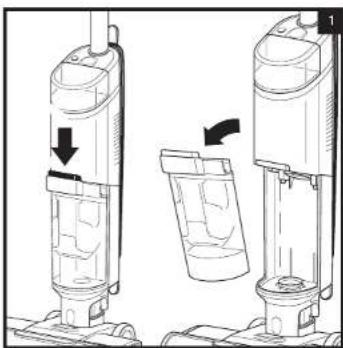
Diagram showing two views of a vacuum cleaner with directional arrows indicating motion (no text or symbols)- To remove the dirty water tank, press the release button and pull out the tank.
natural_image
Line drawing of a hand pouring liquid into a cylindrical container (no text or symbols)- To dispose of liquid waste only, pour it out through the Easy Pour spout on the back of the dirty water tank.
natural_image
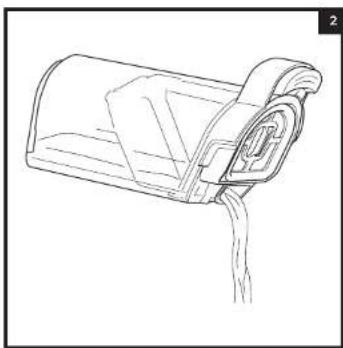
Diagram showing a hand holding a small electronic component with an inset close-up view (no text or symbols)- To dispose of solid debris, lift out the Solids Separator. Grasp the recessed areas on the sides of the separator and lift it out. Empty the solid debris into the trash. If any liquid waste remains in the tank, pour it down a drain. To clean, rinse the separator and the tank with water.
- Clean the filter housing and the foam filter after ovory use. Pull out the foam filter and hand-wash with warm water and soap. Allow the foam filter to air-dry completely in a well-ventilated area for 24 hours before reinstalling back into the unit.
NOTE: Replace the filter every 6 Months.
NOTE: Do not place dirty water tank in washing machine or dishwasher.
MAINTAINING YOUR 3-IN-1 CLEANER
natural_image
Technical line drawing of a vacuum cleaner's lift assembly (no text or symbols)- After cleaning the dirty water tank and the solids separator, allow them to air-diry in a well-ventilated area for at least 24 hours. To reinstall the tank, insert the bottom into the opening in the main body, then tilt the tank back until it clicks into place.
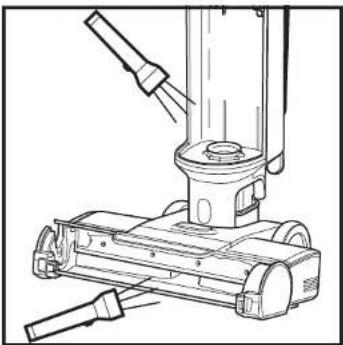
CHECKING FOR BLOCKAGES
If you are experiencing poor performance, or if you run over a hard or sharp object, or notice a noise change while using your unit, check for blockages or objects caught in the brushroll, nozzle chamber, or inlet hose.
natural_image
Technical line drawing of a mechanical device with lever and base mount (no text or symbols)- Turn off the power.
- Remove the brushroll cover, brushroll, and dirty water tank.
- Check the openings and remove all debris.
- When finished, reinstall the brushroll and the cover.

WARNING: To reduce the risk of shock and unintended operation, turn off power before servicing.
LED INDICATOR WHAT IT MEANS WHAT TO DO
The Water Droplet LED is pulsing red. | The dirty water tank is full. | Empty the fluid in the dirty water tank.If this is a false error, remove solids separator and clean completely. Allow part to dry for 24 hours or dry manually. |
| The Water Droplet LED is pulsing aqua. | The clean solution tank is empty. | Fill the clean solution tank.Refer to the "filling the Clean Solution Tank" section. |
The Area Rug Icon and the three water droplet lights are flashing red at the same time. | Brushroll cover is not installed properly. | Refer to the "Cleaning the Brushroll" section, step 4 |
The Area Rug Icon and the three water droplet lights are flashing red out of sync. | The brushroll is jammed. | Turn off the power before cleaning the brushroll and any debris that may be causing the jam. Refer to the "Cleaning the Brushroll" section |
Self-Clean Icon and droplets are flashing blue. | Not enough solution to run Self-Clean Cycle. | Fill clean solution tank to allow self-clean cycle to run. |
| Self-Clean icon and droplets are flashing red. | Dirty water tank is full and preventing Self-Clean Cycle to run. | Empty dirty water tank to allow self-clean cycle to run. |
NOTE: If 3-in-1 Cleaner still does not operate properly, contact Customer Service at 1800 798 7398 or sharkclean.com/support
MAINTAINING YOUR 3-IN-1 CLEANER
Ordering Refills and Parts
Replace the filter and brushroll every 6 months.
Only use Shark HydroVac™ Disinfectant, Shark HydroVac Concentrate, or water with the Shark HydroVac.
To order brushrolls, filters, Shark HydroVac Multi-Surface Concentrate, and Shark HydroVac Disinfectant, please visit sharkclean.com or scan the QR code below.

Shark | NINJA
THREE (3) YEAR LIMITED WARRANTY
The Three (3) Year Limited Warranty applies to purchases made from authorized retailers of SharkNinja Operating LLC. Warranty coverage applies to the original owner and to the original product only and is not transferable.
SharkNinja warrants that the unit shall be free from defects in material and workmanship for a period of three (3) years from the date of purchase when it is used under normal household conditions and maintained according to the requirements outlined in the Owner's Guide, subject to the following conditions and exclusions:
What is covered by this warranty?
- The original unit and/or non-wearable parts deemed defective, in SharkNinja's sole discretion, will be repaired or replaced up to three (3) years from the original purchase date.
- In the event a replacement unit is issued, the warranty coverage ends six (6) months following the receipt date of the replacement unit or the remainder of the existing warranty, whichever is later. SharkNinja reserves the right to replace the unit with one of equal or greater value.
What is not covered by this warranty?
- Normal wear and tear of wearable parts (such as Shark Cleaner, Pad, etc.), which require regular maintenance and/or replacement to ensure the proper functioning of your unit, are not covered by this warranty. Replacement parts are available for purchase at sharkaccessories.com.
- Any unit that has been tampered with or used for commercial purposes.
- Damage caused by misuse (e.g., vacuuming up water or other liquids), abuse, negligent handling, failure to perform required maintenance (e.g., not cleaning the filters or not removing debris from the brushroll), or damage due to mishandling in transit.
- Consequential and incidental damages.
- Defects caused by repair persons not authorized by SharkNinja. These defects include damages caused in the process of shipping, altering, or repairing the SharkNinja product (or any of its parts) when the repair is performed by a repair person not authorized by SharkNinja.
- Products purchased, used, or operated outside North America.
How to get service
If your appliance fails to operate properly while in use under normal household conditions within the warranty period, visit sharkclean.com/support for product care and maintenance self-help. Our Customer Service Specialists are also available at 1-800-798-7398 to assist with product support and warranty service options, including the possibility of upgrading to our VIP warranty service options for select product categories. So we may better assist you, please register your product online at registryyourshark.com and have the product on hand when you call.
SharkNinja will cover the cost for the customer to send in the unit to us for repair or replacement. A fee of \$25.95 (subject to change) will be charged when SharkNinja ships the repaired or replacement unit.
How to initiate a warranty claim
You must call 1-800-798-7398 to initiate a warranty claim. You will need the receipt as proof of purchase. We also ask that you register your product online at registeryourshark.com and have the product on hand when you call, so we may better assist you. A Customer Service Specialist will provide you with return and packing instruction information.
How state law applies
This warranty gives you specific legal rights, and you also may have other rights that vary from state to state. Some states do not permit the exclusion or limitation of incidental or consequential damages, so the above may not apply to you.
REGISTER YOUR PURCHASE

registryyourshark.com

NOTES
RECORD THIS INFORMATION
Model Number: ____
Date Code: ____
Date of Purchase: ____
(Keep receipt)
Store of Purchase: ____
TIP: You can find the model and serial numbers on the QR code label on the bottom of the back of the 3-in-1 Cleaner.
TECHNICAL SPECIFICATIONS
Voltage: 120V ≈ 60Hz
Power: 200W
PLEASE READ CAREFULLY AND KEEP FOR FUTURE REFERENCE.
This Owner's Guide is designed to help you keep your Shark Hydrovac 3-in-1 Cleaner running at peak performance.
CONSIGNES DE SÉCURITÉ IMPORTANTES
POUR UN USAGE DOMESTIQUE UNIQUEMENT.
LISEZ TOUTES LES INSTRUCTIONS AVANT D'UTILISER CE NETTOYEUR 3-EN-1
▲AVERTISSEMENT
natural_image
Line drawing of a vacuum cleaner with a black arrow indicating rotation (no text or symbols)natural_image
Technical line drawing of a mechanical device with a close-up inset showing a microchip (no text or symbols)natural_image
Diagram of a mechanical component with circular features and a water drop symbol (no text or labels)RECOMMANDÉ APRÉS CHAQUE UTILISATION
natural_image
Line drawing of a mechanical device with an arrow pointing to the component (no text or symbols present)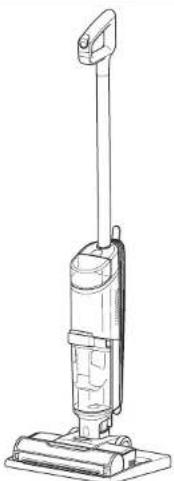
natural_image
Line drawing of a vacuum cleaner with vertical arm and base (no text or symbols)natural_image
Illustration of a hand pressing down on a small robotic device with a black arrow indicating rotation (no text or symbols)natural_image
Two-step diagram showing a hand pressing down on a cylindrical object with an upward arrow, and a close-up of a pipe being inserted into a rectangular container (no text or symbols)natural_image
Diagram showing two views of a vacuum cleaner with directional arrows indicating motion (no text or symbols)natural_image
Line drawing of a mailbox with a flag partially inserted (no text or symbols)natural_image
Line drawing of a vacuum cleaner's internal structure with no text or symbolsnatural_image
Technical line drawing of a mechanical device with no visible text or symbolsnatural_image
Line drawing of a vacuum cleaner with an inset showing the component being adjusted (no text or symbols)natural_image
Diagram of a mechanical device with internal components and directional arrows indicating motion (no text or symbols)RECOMENDADO DESPUÉS DE CADA USO
natural_image
Line drawing of a mechanical device with an arrow pointing to the component (no text or symbols present)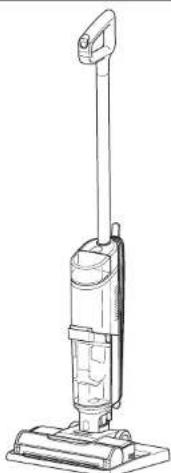
natural_image
Line drawing of a vacuum cleaner with vertical arm and base (no text or symbols)natural_image
Illustration of a hand pressing down on a small robotic vacuum cleaner with a black arrow indicating rotation (no text or symbols)natural_image
Two-step diagram showing a hand pressing down on a cylindrical object with an upward arrow, and a close-up of a pipe being inserted into a rectangular container (no text or symbols)natural_image
Diagram of two different vacuum cleaner designs with directional arrows indicating process flow (no text or symbols)natural_image
Line drawing of a mailbox with a handle and spout (no text or symbols)natural_image
Technical line drawing of a vacuum cleaner's lift assembly (no text or symbols)natural_image
Technical line drawing of a mechanical device with lever and base mount (no text or symbols)PLEASE READ CAREFULLY AND KEEP FOR FUTURE REFERENCE.
This Owner's Guide is designed to help you get a complete understanding of your new Shark HydroVac™ Corded 3-in-1 Cleaner.
SharkNinja Operating LLC
US: Needham, MA 02494
CAN: Ville St-Laurent, QC H4S 1A7
1-800-798-7398
sharkclean.com
Illustrations may differ from actual product. We are constantly striving to improve our products, therefore the specifications contained herein are subject to change without notice.
This product may be covered by one or more U.S. patents. See sharkninja.com/patents for more information.
All testing on carpet (e.g., per ASTM-F608) shall be conducted in Area Rug mode.
VEUILLEZ LIRE ATTENTIVEMENT LE PRÉSENT DOCUMENT ET LE CONSERVER À TITRE DE RÉFÉRENCE.
SharkNinja Operating LLC
US : Needham, MA 02494
SharkNinja Operating LLC
© 2022 SharkNinja Operating LLC. SHARK is a registered trademark of SharkNinja Operating LLC. SHARK HYDROVAC is a trademark of SharkNinja Operating LLC.
- IMPORTANT SAFETY INSTRUCTIONS
- SAVE THESE INSTRUCTIONS
- ASSEMBLY
- USING YOUR 3-IN-1 CLEANER
- MAINTAINING YOUR 3-IN-1 CLEANER
- SELF-CLEAN CYCLE
- MANUALLY CLEANING THE BRUSHROLL
- CLEANING THE DIRTY WATER TANK
- CHECKING FOR BLOCKAGES
- Ordering Refills and Parts
- Shark | NINJA
- THREE (3) YEAR LIMITED WARRANTY
- What is covered by this warranty?
- What is not covered by this warranty?
- How to get service
- How to initiate a warranty claim
- How state law applies
- RECORD THIS INFORMATION
- TECHNICAL SPECIFICATIONS
- CONSIGNES DE SÉCURITÉ IMPORTANTES
- ▲AVERTISSEMENT
- PLEASE READ CAREFULLY AND KEEP FOR FUTURE REFERENCE.
- VEUILLEZ LIRE ATTENTIVEMENT LE PRÉSENT DOCUMENT ET LE CONSERVER À TITRE DE RÉFÉRENCE.
Brand : SHARK
Model : Hydrovac XL WD101
Category : Vacuum Cleaner