
07023 - Vacuum Cleaner Cleanmaxx - Free user manual and instructions
Find the device manual for free 07023 Cleanmaxx in PDF.
User questions about 07023 Cleanmaxx
0 question about this device. Answer the ones you know or ask your own.
Ask a new question about this device
Download the instructions for your Vacuum Cleaner in PDF format for free! Find your manual 07023 - Cleanmaxx and take your electronic device back in hand. On this page are published all the documents necessary for the use of your device. 07023 by Cleanmaxx.
USER MANUAL 07023 Cleanmaxx
natural_image
Black and white photo of a vacuum cleaner with coiled cord (no text or symbols visible)Z 07338
DE
Gebrauchsanleitung
ab Seite 3
EN
Instruction manual
starting on page 16
FR
Mode d'emploi
www.service-shopping.de
natural_image
Close-up of a black plastic component with a downward arrow indicating a feature or adjustment (no text or symbols visible)natural_image
Two black plastic cylindrical objects with a right-pointing arrow indicating transformation (no text or symbols)natural_image
Metal pipe fitting with a curved cutaway section (no text or symbols visible)natural_image
Cross-sectional view of a mechanical component or housing (no visible text or symbols)natural_image
Black plastic T-shaped object with a cylindrical protrusion (no text or symbols visible)natural_image
Close-up of a silver vacuum cleaner with a black arrow pointing to the cable (no text or symbols visible)natural_image
Close-up of a curved pipe with a black arrow pointing downward (no text or symbols)natural_image
Close-up of a mechanical component with a black arrow pointing to a small cylindrical feature (no text or symbols visible)natural_image
Close-up of a vacuum cleaner with a black arrow pointing to the handle (no visible text or symbols)natural_image
Close-up of a black curved pipe with a double-headed arrow indicating vertical displacement (no text or symbols)
natural_image
Close-up of a silver vacuum cleaner with a black arrow pointing to the handle (no visible text or symbols)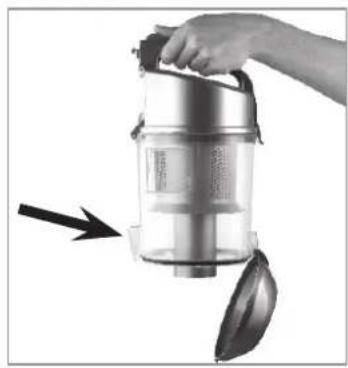
natural_image
Hand holding a compact vacuum cleaner with a handle and spool, no visible text or symbols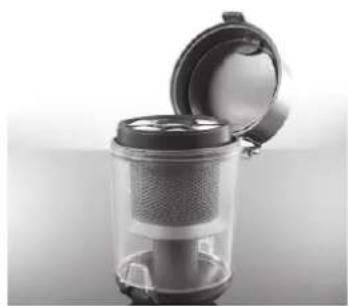
natural_image
Close-up of a transparent cylindrical device with a lid open, showing internal mesh structure (no text or symbols visible)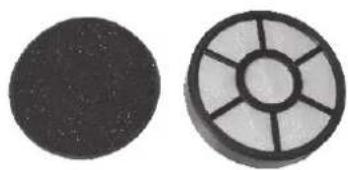
natural_image
Two circular objects: a solid black circle and a circular grid with radial lines (no text or symbols)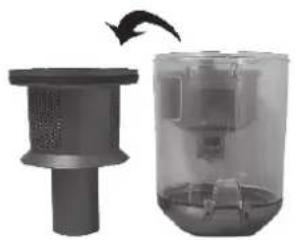
natural_image
Two views of a mechanical device: one showing a cylindrical component with a side outlet, the other showing a transparent container filled with internal components (no text or symbols visible)natural_image
Close-up of a silver vacuum cleaner with a black arrow pointing to the side (no text or symbols visible)natural_image
Close-up of a mechanical device with a black arrow pointing to a component (no visible text or symbols)natural_image
Cross-sectional view of a mechanical component with an arrow indicating rotational motion (no text or symbols)natural_image
Close-up of a hand holding a small object with an arrow pointing to it, no visible text or symbolsnatural_image
Close-up of a mechanical component with a curved handle and flange (no visible text or symbols)Safety instructions 17
Product contents and device overview 20
Assembly 22
Operation 23
Cleaning the device 24
Storage 27
Troubleshooting 27
Technical data 28
Disposal 28
Explanation of Symbols

Safety instructions:
Please read these carefully and comply with them in order to prevent personal injury and damage to property.
Supplementary information

Dear Customer,
We are delighted that you have decided to purchase the Vacuum Cleaner.
Before using the device for the first time, please read the instructions through carefully and keep them for future reference. If the device is given to someone else, these instructions should also be handed over with it.
The manufacturer and importer do not accept any liability if the information in these instructions is not complied with.
If you have any questions about the device and about spare parts/accessories, contact the customer service department via our website:
www.service-shopping.de
Proper use
This device is designed for vacuuming up normal household dust.
- Do not in any case vacuum up the following:
–Liquids or wet materials (such as wet carpet shampoo)
—smouldering ashes, cigarette butts, matches etc.
-fl ammable or ignitable materials
– very fine dust (e.g. cement dust), ash or toner
-hard, pointy objects such as bigger glass shards
This device may be used by children aged 8 and over and by people with reduced physical, sensory or mental abilities or a lack of experience and/or knowledge if they are supervised or have recei-
ved instruction on how to use the device safely and have understood the dangers resulting from this. Children may not play with the device. Cleaning and user maintenance may not be performed by children, unless they are supervised.
■ The device is intended for domestic, not commercial, use.
- Only use the device as described in these instructions. Any other use is deemed improper.
■ Defects arising due to improper handling, damage or attempts at repair are excluded from the warranty. This also applies to normal wear and tear.
Safety instructions

Risks of injury
- Risk of suffocation! Keep the packaging material away from children and animals.
- Keep the device, cord and plug away from water or other liquids in order to avoid the risk of electrical shock. Never touch the mains plug, cord or device with wet or damp hands.
- Keep animals, hair, jewellery, loose fitting clothing, fingers and all other body parts away from the device's nozzles. They could be caught in the vacuum cleaner. If something does get caught in the vacuum cleaner, immediately turn off the device.
■ Take special care to avoid falling when cleaning stairs.
■ Wear firm footwear during use. - Only use and store the device out of the reach of children. Improper use may result in injury and electrical shock. The mains cord may also not be accessible for children.

Proper connection
- Only connect the device to a properly installed socket. The socket must also be easily accessible after the device has been connected. The mains voltage must correspond to the technical data of the device (see chapter “Technical data”). Only use proper extension cords, whose technical data correspond to those of the device.
■ Make sure that the connected mains cable does not get pinched, pose a tripping hazard or get kinked and that it does not come into contact with hot surfaces.

Proper use
■ Only use and store the device in enclosed areas. Do not use the device outdoors, in rooms with high humidity or on hot surfaces.
- Check the device and accessories for damages prior to each use. If the device, cord, plug, the accessories or a filter are visibly damaged do not use the device. Do not attempt to repair the device or to replace parts yourself. In the event of damage, contact customer service.
- Do not use the device if it malfunctions, has vacuumed up liquids or objects that do not comply with the proper use of the device (see chapter “Propter Use”) or has fallen down. Have the device repaired by a qualified professional.
- Only use the device if it has been completely and correctly assembled! The dust bin and the filter must be in place and not be damaged! The dust bin must be shut in order for it to be inserted properly.
- Do not subject the device to extreme temperatures, severe changes in temperatures, open flames, direct sunlight, moisture or wetness.
- Do not allow the device to fall and do not subject it to strong percussions.
■ Never place heavy objects on the device.
- Do not submerge the device in water or other liquids in order to avoid electrical shocks. Do not fill the dust bin with liquids.
■ Never touch the device, the cord or the plug with wet hands.
- Do not insert anything in the device's openings/nozzles and ensure that they are not plugged.
- Never leave the device unattended when on or when connected to a power supply.
- Turn the device off by pulling the mains plug out of the socket – if you stop using the device,
– if you are finished using the device,
—before you change any accessories,
-if an error or fault occurs during operation,
-if liquids or foreign debris have penetrated the device,
-before a storm,
—before you clean the device parts and accessories.
- The device must be deactivated when you pull the mains plug out of the socket or insert it in the socket.
■ Always pull on the plug itself and never on the cable!
■ Never move the device by pulling it by the cord. Use the handles. - Do not attempt to grease the wheels with lubricants or oil. Otherwise, this may cause more dust or dirt to accumulate on the wheels.
■ Empty the dust bin after every use. The filters must also be cleaned regularly to prevent the motor from being overloaded. - Allow the dust bin and the filter to dry completely before you reinstall them in the device.
■ Only use original spare parts provided by the manufacturer. - Store the device in a cool, dry area that is not accessible to children and animals when not in use.
Product contents and device overview
text_image
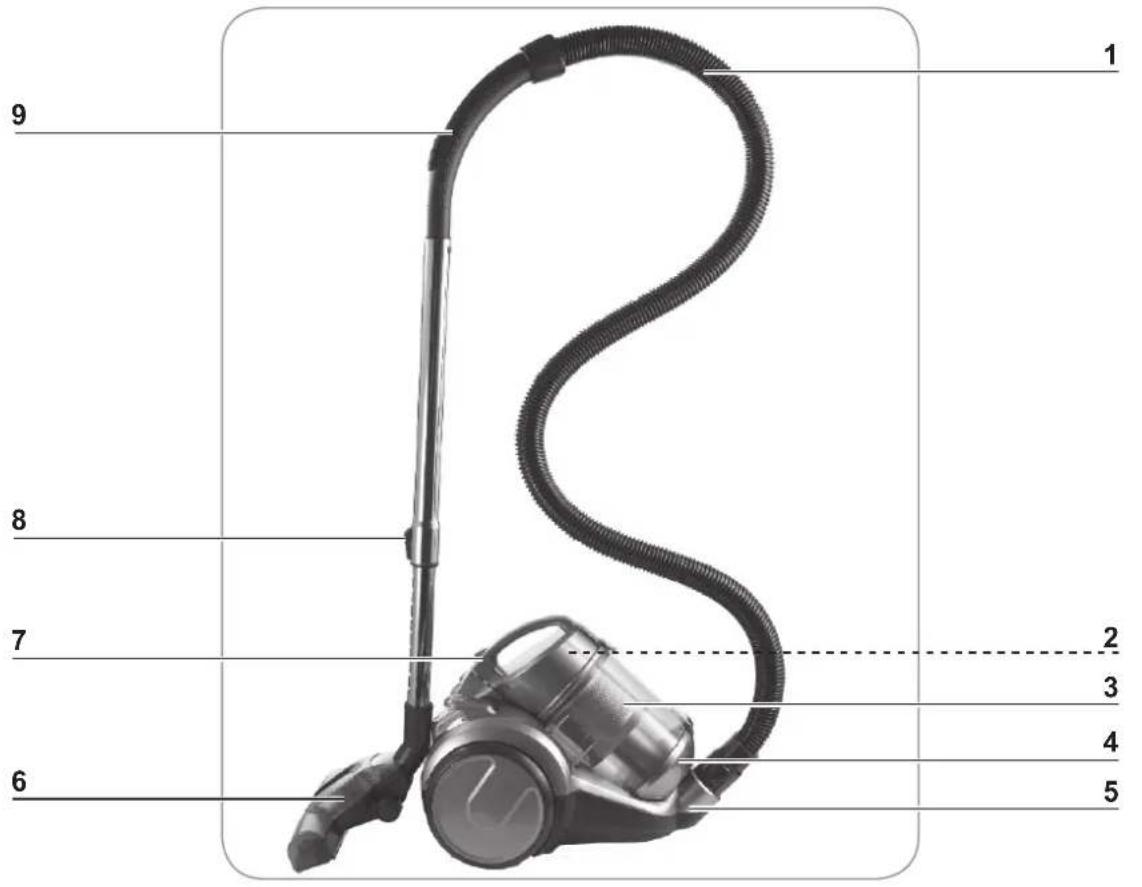
1 2 3 4 5 6 7 8 91 Suction hose
2 Dust filter (located inside the lid of the dust bin)
3 Dust bin
4 Dust bin bottom
5 Suction hose connector
6 Floor nozzle
7 Dust bin cover with handle
8 Telescoping tube
9 Auxiliary air valve o
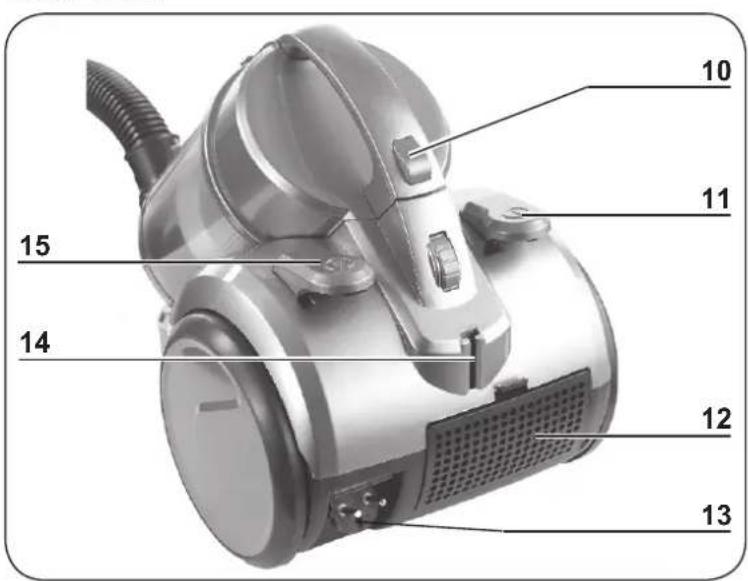
Rear view
text_image
10 11 15 14 12 1310 Release button for dust bin
11 On/Off switch ①
12 Exhaust filter compartment
13 Mains plug
14 Bracket for hooking in the floor nozzle
15 Button ⏻ for cable winder
Suction nozzles

ATTENTION!
■ Always turn off the vacuum cleaner first before changing the nozzles.
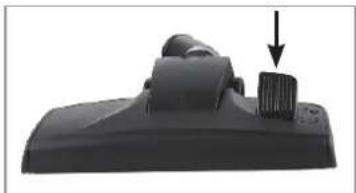
Floor nozzle
natural_image
Close-up of a black plastic electronic component with a downward arrow indicating a component (no text or symbols visible)Crevice and Brush Nozzle
natural_image
Two black plastic spray holders with a right-hand rule showing the change from left to right (no text or symbols)Animal hair floor nozzle
natural_image
Close-up of a metallic mechanical component with a U-shaped groove (no text or symbols visible)Turbo Nozzle
natural_image
Cross-sectional view of a mechanical component or housing (no visible text or symbols)Hard Floor Nozzle
natural_image
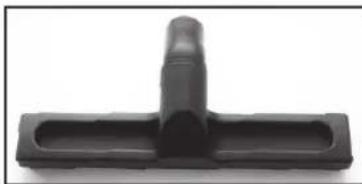
Black plastic T-shaped object with a cylindrical protrusion (no text or symbols visible)The floor nozzle is suitable both for carpets and smooth floors.
With the foot switch, you can switch between a smooth floor and a carpet. A brush is deployed on the device bottom for smooth floors.
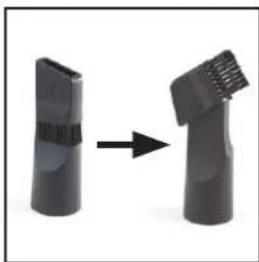
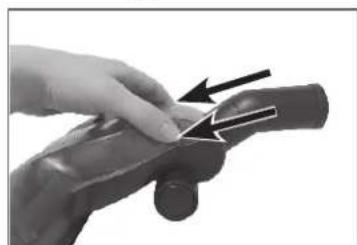
Fold over the end piece in the direction of the arrow to convert the crevice nozzle into a brush nozzle:
- The crevice nozzle is suitable for upholstery, cleaning the inside of cars and for all nooks and crannies that cannot be reached with the other nozzles.
- The brush nozzle is suitable for all uneven objects, furniture, lamps, profi les and skirting boards, window ledges, etc.
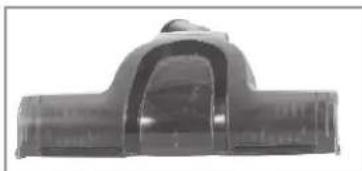
The animal hair floor nozzle is designed to remove animal hair, e.g. from blankets, carpets, sofas and tiles.
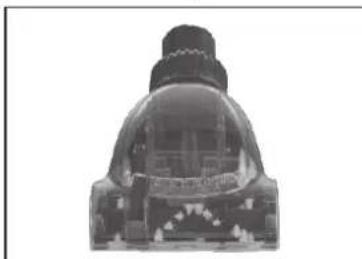
The turbo nozzle allows you to easily remove animal hairs and similar soiling as well as to clean mattresses, beds, blankets and carpets.
The hard floor nozzle is suitable for smooth surfaces such as parquet floors and tiles.

Visit our website to reorder original spare parts/accessories:
www.service-shopping.de
Assembly
Unpacking the product contents

ATTENTION!
Risk of suffocation! Keep the packaging material away from children and animals.
■ Make sure that the device is not connected to the power supply before you attach or remove any accessories.
Unpack all parts and make sure that the scope of delivery is complete (see chapter "Product contents and device overview") and check for any damages from transport. If you identify damages to the components, do not use them (!), instead contact our customer service centre.
Inserting/removing the hose
natural_image
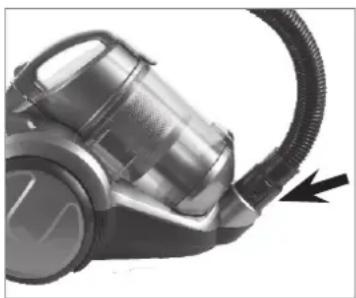
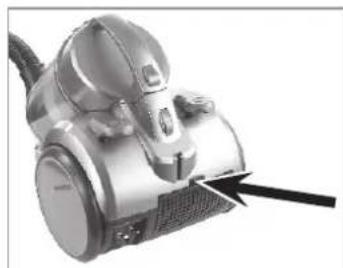
Close-up of a vacuum cleaner with a black cable and arrow indicator (no text or symbols visible)- Insert the suction hose connector into the suction opening on the device. It must audibly lock into place.
- To remove the suction hose push the knobs on the connector and pull the suction hose out.
Inserting/removing the telescoping tube
natural_image
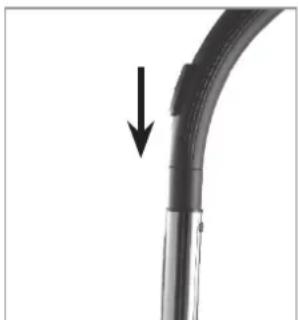
Close-up of a curved pipe with a black arrow pointing downward (no text or symbols)- Insert the open end of the handle into the corresponding opening on the telescoping tube. In the process, turn the handle back and forth somewhat. Check to make sure that the connection is secure.
- To remove the telescoping tube pull it off of the handle.
Adjusting the length of the telescoping tube
natural_image
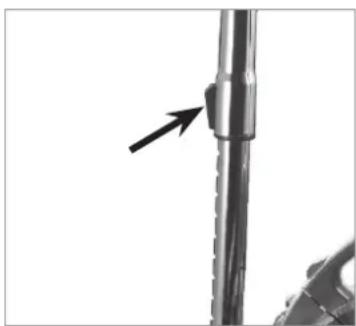
Close-up of a mechanical component with a black arrow pointing to a cylindrical feature (no text or symbols visible)- Push the slider on the telescoping tube down and set the desired length.
- Release the slider and move the tube forward until it locks into place.
Mounting/removing suction nozzles
- Insert the open end of the telescoping tube in one of the enclosed suction nozzles up to the stop. Turn the nozzle back and forth slightly in the process.
- The suction nozzles can also be attached directly to the suction hose without the telescoping tube for more fl exibility.
• To remove a suction nozzle pull it off.

Information regarding the animal hair floor nozzle:
When the animal hair floor nozzle is removed it can happen that the adapter sleeve remains in place on the telescopic tube. Please note that the other suction nozzles can only be applied to the telescopic tube when the adapter sleeve has been removed from the tube!
Removing/inserting the dust bin

natural_image
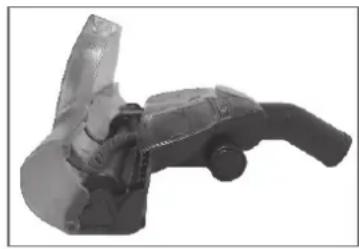
Close-up of a silver vacuum cleaner with a black arrow pointing to the handle (no visible text or symbols)- Removal: Push the release button on the dust bin and take it out of the device by the handle.
- Insertion: Take the dust bin by the handle and first place the bottom of the bin in the device (the bottom is facing down and handle is facing up). Then push the against the device housing until the dust bin audibly locks into place. Hold the device by the handle and lift it to check whether the dust bin is properly seated.
Operation
ATTENTION!
During use, always keep the nozzles away from body parts and animals and do not reach into them. You could be caught or injured. If something does get caught in the vacuum cleaner, turn it off immediately (depress the On/Off switch ①).
- Only turn on the vacuum cleaner once you are sure that all parts have been completely mounted and that the dust bin and the filter have been properly inserted.
To prevent the cord from becoming too hot when in use, pull at least two thirds of its entire length out of the device before you switch on the vacuum cleaner. Do not forcefully pull out the cord up to the stop point (no further than up to the red mark on the cord) in order to prevent damage!
■ Always turn off the device first and pull the mains plug out of the socket before you change a nozzle!
- Do not in any case vacuum up the following:
– Liquids or wet materials (such as wet carpet shampoo)
– smouldering ashes, cigarette butts, matches etc.
- flammable or ignitable materials
– very fine dust (e.g. cement dust), ash or toner
– hard, pointy objects such as bigger glass shards
- Make sure that the respective accessory is properly mounted on the device (see chapter "Assembly").
- Pull the mains cord only as far out of the housing as you need, ideally up to the yellow mark, but no further than up to the red mark on the cord!
- Insert the mains plug in a properly installed socket that is easily accessible.
-
Press the On/Off switch ① to turn the vacuum cleaner on.
-
Move the nozzle over the surface you want to clean. You can pull the vacuum cleaner like a sled when vacuum cleaning.
natural_image
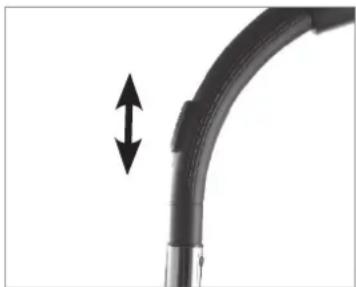
Close-up of a black curved pipe with a double-headed arrow indicating vertical displacement (no text or symbols)
Am An auxiliary air valve is located on the handle. Slide the cover to open it, thereby reducing the suction power if you want to vacuum off cushions, carpets or light-weight, moveable objects or materials. Normally, the auxiliary air valve is closed so as not to unnecessarily reduce the suction power.
- After vacuum cleaning, press the On/Off switch ① again to turn off the vacuum cleaner.
- Pull the mains plug out of the socket, firmly hold the mains cord and push the button ⏻ for the cord winder down with your foot. By holding the mains cord, you prevent the cord from "lashing" against your legs for example.
- If you used the floor nozzle, hook it into the bracket on the back of the device.
- To ensure optimum performance of the device, empty the dust bin each time after using the device and clean the filter regularly (see chapter "Cleaning the device").
Cleaning the device

ATTENTION!
■ Empty the dust bin when it is full and clean the filters regularly to avoid overheating the motor.
Before cleaning the device, always pull the power plug out of the socket.
- Keep the device, cord and mains plug away from water or other liquids in order to avoid electrical shocks. When cleaning, make sure that no liquid penetrates the device. Only the black dust filter, exhaust filters and the plastic filter may be cleaned with water. However, they must be completely dry when being placed back in the device.
The filters are not suitable for the washing machine, dishwasher or dryer! Only air dry the filters and do not in any case use a hair dryer.
- Do not use any scouring or abrasive cleaners or cleaning pads for cleaning. They could damage the surface.
- Clean the dust filter and exhaust filter regularly or if you notice that the suction power is declining.
- If needed, clean the housing with a damp, soft cloth. Then dry it with a soft cloth.
- Regularly remove hairs and lint from the nozzles.

- The filters may discolour over time. This is normal and also does not affect functionality.
- If the filter is damaged or worn, you can order a new filter at www.service-shopping.de.
Emptying the dust container and cleaning the dust filter
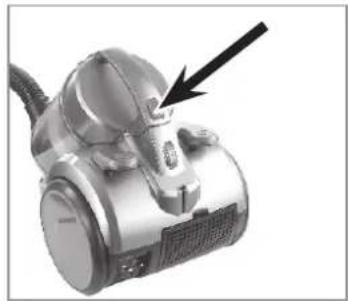
natural_image
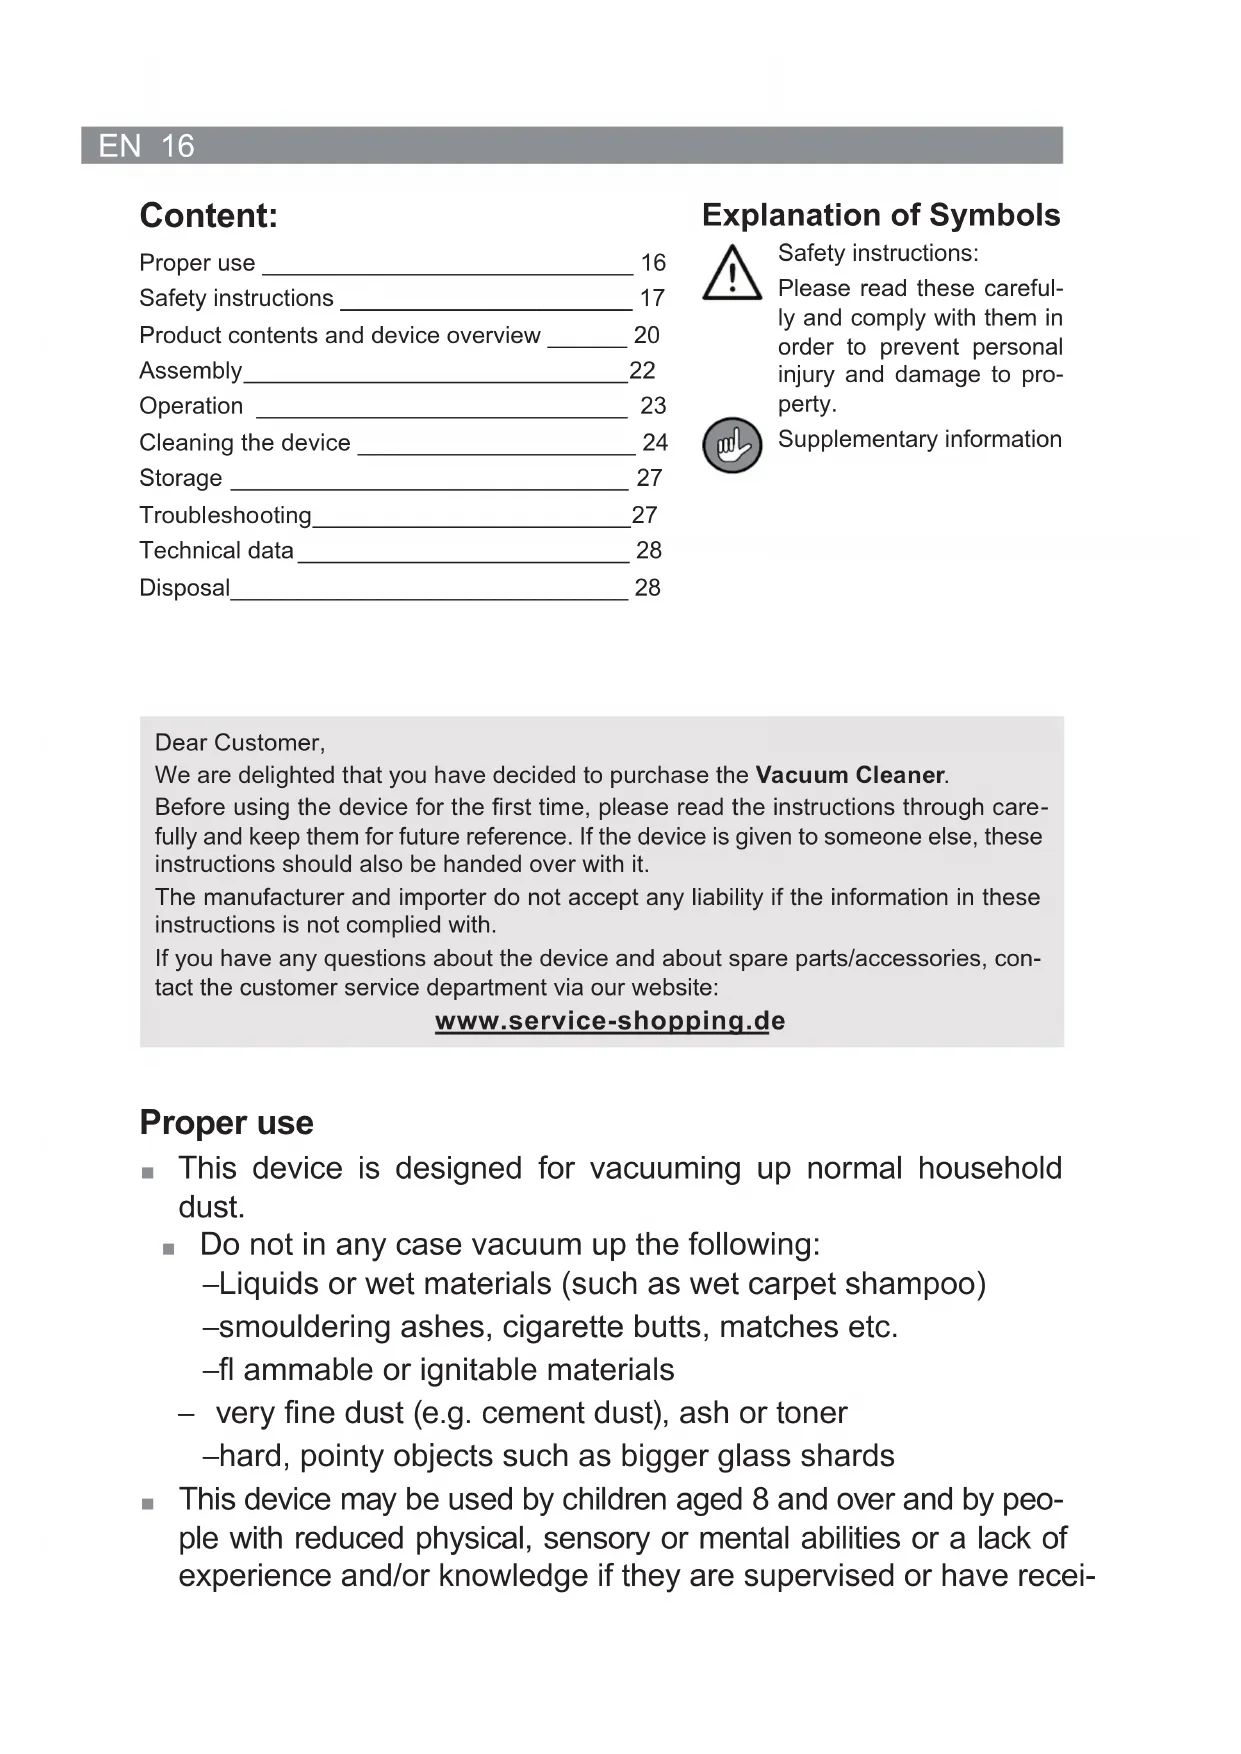
Close-up of a silver vacuum cleaner with a black arrow pointing to the handle (no visible text or symbols)-
Push the release button on the dust bin and pull it out of the device by the handle.
-
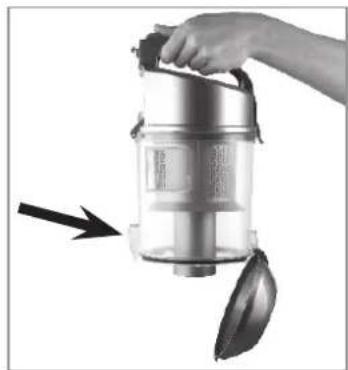
Hold the dust bin over an open garbage bin. The dust bin should be as close as possible to the garbage bin so that dust from the dust bin only falls into the garbage bin and is not dispersed in the surrounding area.
-
Push the button to open the dust bin. The bottom of the dust bin will open and the dirt will fall out.
-
Shut the bottom of the dust bin again. The fastener must audibly lock into place.
-
If necessary, thoroughly rinse the dust container and the plastic dust fi iter with clear, lukewarm water.
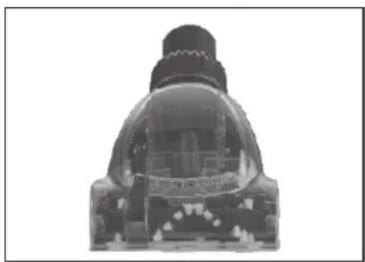
-Open the dust container lid by releasing the catch on the handle and fl ipping up the lid.
natural_image
Hand holding a stainless steel vacuum cleaner with a lid, emitting black smoke (no text or symbols visible)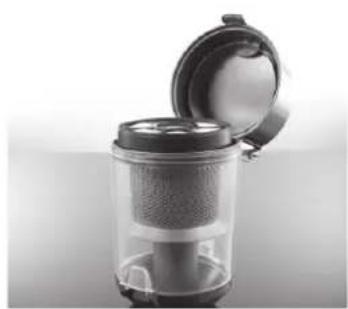
natural_image
Close-up of a transparent cylindrical device with lid open, showing internal mesh structure (no text or symbols visible)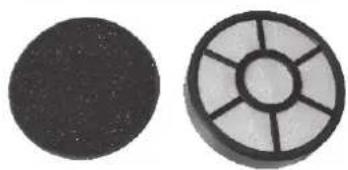
natural_image
Two circular objects: a solid black circle on the left and a segmented circular object with radial lines on the right (no text or symbols)
natural_image
Two grayscale images showing a cylindrical device and a transparent container with internal components, one with an arrow indicating rotation (no text or symbols)- Remove the white dust filter and the black foam dust filter. Tap out the contents of the filter over a dustbin and brush off the loose dirt. Never clean the white dust filter with water! If necessary, the black foam dust filter may be cleaned clear, lukewarm water. CAUTION: Do not under any circumstances clean the filter in a washing machine or dishwasher! Shake off any excess water and allow the dust filter to dry completely in the air before reinstalling them.
- Remove the plastic dust filter by pulling it out of the dust container. If necessary, thoroughly rinse the dust container and the plastic dust filter with clear, lukewarm water. CAUTION: Do not under any circumstances clean the dust container or the plastic dust filter in a washing machine or dishwasher! Shake off any excess water and allow the dust container and the plastic dust filter to dry completely in the air. Place the plastic dust filter back into the dust container when it is completely dry.
- Insert the dust container in the device: Take hold of it by the handle and insert the bottom of the bin in the device first. Then push the handle against the device housing until the dust bin audibly locks into place. Hold the device by the handle and lift it to check whether the dust bin is properly seated.
Cleaning the exhaust fi Iter
The device has two exhaust fl iters
- One exhaust filter is located in the compartment on the rear side of the vacuum cleaner (see chapter "Product contents and device overview", section "Rear view").
natural_image
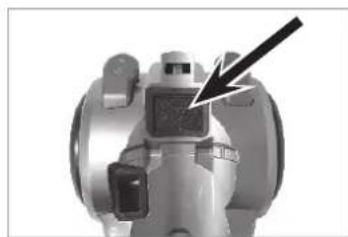
Close-up of a vacuum cleaner with a black arrow pointing to the handle (no visible text or symbols)- Press the catch toward the compartment cover and remove the cover.
- Remove the exhaust filter from the compartment.
-
Tap the exhaust filter out over a garbage bin and brush off any loose dirt. If necessary, wipe out the compartment with a damp cloth.
-
If necessary, rinse out the exhaust filter thoroughly with clean, lukewarm water. ATTENTION: Do not in any case clean the filter in the washing machine or dishwasher! Then shake off any remaining water and let the filter air dry completely before reinstalling it.
- Once all parts are dry, place the exhaust filter back into the filter compartment.
- Fit the compartment cover again and press it down until it engages audibly.
• The other exhaust filter is located beneath the dust container.
natural_image
Close-up of a mechanical valve component with a black arrow pointing to a specific part (no visible text or symbols)- Push the release button on the dust bin and pull it out of the device by the handle.
- Remove the exhaust filter from the compartment.
-
Tap the exhaust filter out over a garbage bin and brush off any loose dirt. If necessary, wipe out the compartment with a damp cloth.
-
If necessary, rinse out the exhaust filter thoroughly with clean, lukewarm water. ATTENTION: Do not in any case clean the filter in the washing machine or dishwasher! Then shake off any remaining water and let the filter air dry completely before reinstalling it.
Cleaning turbo nozzle
natural_image
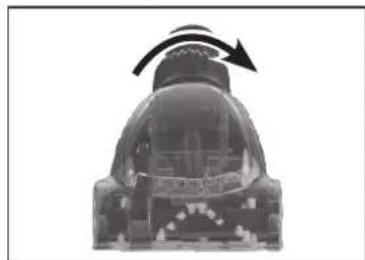
Cross-sectional view of a mechanical component with an arrow indicating rotational motion (no text or symbols)- To make it easy to clean the turbo nozzle, you can open the nozzle: To do this, twist the ring on the end piece of the nozzle anticlockwise.
- Carefully take off the top housing part. Now you can remove hair, dust etc. from the brush.
- After cleaning, put the nozzle back together again and turn the ring in the clockwise direction until it clicks audibly into place.
Cleaning the animal hair floor nozzle
natural_image
Close-up of a hand holding a cylindrical object with an arrow indicating direction (no text or symbols visible)- Open the cover by pushing the two release buttons on both sides of the cover and flip it open.
natural_image
3D rendered mechanical component with a curved handle and flanged end (no visible text or symbols)- You can now remove hair, dust etc. from the brush.
- After cleaning, close the cover. It has to click audibly into place.
Storage
- You can push the telescoping tube together as far as possible and hook the floor nozzle into the bracket on the back of the device for convenient storage.
- Store the vacuum cleaner in a dry, cool indoor room that is not accessible for children and animals.
Troubleshooting
If your device no longer functions properly, exhibits damages or requires a spare part, please contact our customer service centre. For your own safety, do not perform any repairs yourself. The following table gives you tips on how to resolve minor problems yourself.
| Problem Potential cause/solution/tips | |
| The vacuum cleaner has no suction power. | Is the mains plug not correctly connected with the socket? Correct the position of the mains plug.Is the socket defective? Try another socket.Check the fuse for your mains connection.Are the filters plugged? Clean them. |
| The suction power is weak. | Is the auxiliary air valve on the handle open? Close it.Is the dust bin too full? Empty the bin.Are the filters very dirty? Clean them.Is the nozzle, telescoping tube or suction hose plugged? Turn the device off, pull the mains plug out of the socket and remove the obstruction (also see chapter “Assembly”). |
| The suction nozzles cannot be attached properly on the telescopic tube. | Have you used the animal hair nozzle? When removing the animal hair nozzle it can happen that the adapter sleeve remains in place on the telescopic tube. Please note that the other suction nozzles can only be applied to the telescopic tube when the adapter sleeve has been removed from the tube! |
| The device emits dust when vacuuming. | Has the dust bin not been closed properly and/or is it not (properly) inserted in the device? Correct this. |
| The power cord cannot be wound up completely. | The cord has not been properly wound up in the device. Pull it out somewhat and then push the button for engaging the cord winder again. |
| An unpleasant odour develops when vacuuming. | Are you using the device for the first time? An odour often develops when using new devices for the first time. The odour should disappear once you have used the device a few times. |
Technical data
Model number: AC-1107-3
Product number: Z 07338
Voltage supply: 220 – 240 V\~, 50 Hz
Output: 900 W
Safety class: II
Customer Service / Importer:
DS Produkte GmbH
Am Heisterbusch 1
19258 Gallin
Germany
Tel.: +49 38851 314650
(Calls subject to a charge. The cost varies depending on the service provider.)
Disposal

The packaging material can be recycled. Dispose of the packaging in an environmentally-friendly manner and make it available to the collection service for recyclable materials.

Dispose of the device in an environmental-friendly manner. The device does not belong in the household waste. Dispose of it at a recycling centre for old electrical and electronic devices.
For more information, please contact the administration in your community.
Contenu
www.service-shopping.de
natural_image
Close-up of a black plastic component with a downward arrow pointing to a small cylindrical feature (no text or symbols visible)natural_image
Two black cylindrical objects with a striped handle, shown in transformation from left to right (no text or symbols)natural_image
Close-up of a metallic pipe fitting with a U-shaped groove (no text or symbols visible)natural_image
Cross-sectional view of a mechanical component or housing (no visible text or symbols)natural_image
Black plastic T-shaped connector or connector with a cylindrical shaft (no text or symbols visible)natural_image
Close-up of a silver vacuum cleaner with a black cord and arrow indicator (no text or symbols)natural_image
Close-up of a curved black pipe with a downward arrow indicating a change or motion (no text or symbols present)natural_image
Close-up of a mechanical component with a black arrow pointing to a cylindrical feature (no text or symbols visible)natural_image
Close-up of a vacuum cleaner with a black arrow pointing to the component (no visible text or symbols)natural_image
Close-up of a curved black pipe with a double-headed arrow indicating vertical displacement (no text or symbols)
natural_image
Close-up of a silver vacuum cleaner with a black arrow pointing to the handle (no visible text or symbols)natural_image
Hand holding a stainless steel vacuum cleaner with a handle and spool, no visible text or symbolsnatural_image
Close-up of a compact vacuum cleaner with lid open, showing internal mesh structure (no text or symbols visible)natural_image
Two circular objects: a black textured circle and a gray circular grid with radial lines (no text or symbols)natural_image
Two 3D printing machines showing internal components, one with a curved arrow indicating rotation (no text or symbols visible)natural_image
Close-up of a vacuum cleaner with a black arrow pointing to the handle (no visible text or symbols)natural_image
Close-up of a mechanical valve component with a black arrow pointing to a specific part (no visible text or symbols)natural_image
Cross-sectional diagram of a mechanical device with an arrow indicating rotational motion (no text or symbols)natural_image
Close-up of a hand holding a cylindrical object with an arrow pointing to it, no visible text or symbolsnatural_image
Mechanical component with handle and lever mechanism (no visible text or symbols)www.service-shopping.de
natural_image
Close-up of a black plastic component with a small knob and an arrow pointing to it (no text or symbols visible)natural_image
Two black plastic cylindrical objects with internal patterns, one being cut and the other tilted upward (no text or symbols)natural_image
Metal pipe fitting with a U-shaped groove (no text or symbols visible)Turbo mondstuk
natural_image
Cross-sectional view of a mechanical component with teeth and housing (no visible text or symbols)natural_image
Black plastic T-shaped connector or connector component (no text or symbols visible)natural_image
Close-up of a vacuum cleaner with a black arrow pointing to the cable (no text or symbols visible)natural_image
Close-up of a curved pipe with a black arrow pointing downward (no text or symbols)natural_image
Close-up of a mechanical component with a black arrow pointing to a cylindrical feature (no text or symbols visible)natural_image
Close-up of a vacuum cleaner with a black arrow pointing to the handle (no visible text or symbols)natural_image
Close-up of a curved black pipe with a double-headed arrow indicating vertical displacement (no text or symbols)