
OKS 100 - Kitchen scales OK - Free user manual and instructions
Find the device manual for free OKS 100 OK in PDF.

| Product type | Kitchen scale |
| Brand | OK |
| Model | OKS 100 |
| Power supply | 1 CR2032 battery (3 V) |
| Maximum capacity | 5 kg (11 lb) |
| Precision (increments) | 1 g (0.35 oz) |
| Weight units | Grams (g), ounces (oz), pounds (lb), milliliters (ml) |
| Functions | Simple weighing, tare function, auto-off (1 min), unit switching |
| Display | LCD screen |
| Platform material | Not specified (plastic or glass depending on variant) |
| Cleaning and maintenance | Wipe with a slightly damp soft cloth; do not immerse |
| Safety | Respect battery polarities; do not open the housing; use on a flat and stable surface |
| Power off | Automatic after 1 minute of inactivity; manual by holding ON/TARE |
| Low battery indication | "Lo" icon on the screen |
| Overload indication | Specific icon on the screen |
| Use with container | Possible: place empty container, turn on, then weigh |
| Intended use | Weighing food items up to 5 kg |
Frequently Asked Questions - OKS 100 OK
User questions about OKS 100 OK
0 question about this device. Answer the ones you know or ask your own.
Ask a new question about this device
Download the instructions for your Kitchen scales in PDF format for free! Find your manual OKS 100 - OK and take your electronic device back in hand. On this page are published all the documents necessary for the use of your device. OKS 100 by OK.
USER MANUAL OKS 100 OK
M.00130 Pwiml 74


2017.1.4
10 OKS100 Frontline 5/2019/14 x.46 PM

A. Wiegeplattform
D. Anzeige
B. Batteriefach
E. Taste ON/TARE
C. Taste UNIT
Thanks for your purchase of this ok. product.
IMPORTANT SAFETY INSTRUCTIONS. READ CAREFULLY AND KEEP FOR FUTURE REFERENCE.
-
This appliance can be used by children aged from 8 years and above and persons with reduced physical, sensory or mental capabilities or lack of experience and knowledge if they have been given supervision or instruction concerning use of the appliance in a safe way and understand the hazards involved. Children shall not play with the appliance. Cleaning and user maintenance shall not be made by children without supervision.
-
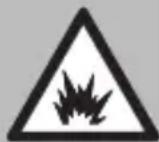
Caution! Danger of explosion if battery is incorrectly inserted.
-
Danger of explosion! The batteries may not be charged, re-activated by other means, disassembled, thrown into fire or short-circuited.
- Read this instruction manual carefully before using the product. It contains important information for your safety as well as operating and maintenance advice.
- Observe all safety instructions to avoid damage through improper use! Follow all warnings on the appliance.
- Keep this instruction manual for future use. Should this appliance be passed on to a third party, then this instruction manual must be included.
- No liability will be accepted for damage resulting from improper use or non-compliance with these instructions.
- Do not open the appliance casing under any circumstances. Do not insert any foreign objects into the inside of the casing.
- Do not expose batteries to extreme temperatures, like direct sunlight or fire. Do not place the appliance on any heat source. Leaking battery acid may cause harm.
- Always insert the battery correctly with regard to the polarities (+ and −) marked on the battery and the battery compartment.
- Replace batteries only with the same or equivalent type.
EN
- If batteries should leak, remove them with a cloth from the battery compartment. Dispose of batteries according to the regulations. If battery acid has leaked avoid contact to skin, eyes and mucous membranes. Rinse affected areas immediately after contact with the acid and wash with plenty of clean water. Visit a physician.
- Swallowed batteries are lethal. Keep batteries out of reach of children and pets. Immediately ask for medical assistance if a battery is swallowed.
- Do not allow children to replace batteries without adult supervision.
- Batteries shall be stored in well-ventilated, dry and cool conditions.
- Remove the battery if you will not be using the appliance for an extended period of time.
- Exhausted batteries should be immediately removed from equipment and properly disposed of.
- Only use the appliance on level and firm surfaces.
- Do not place the scale in an environment with strong electromagnetic disturbances.
INTENDED USE
This kitchen scale is designed for weighing foodstuff up to 5 kg only.
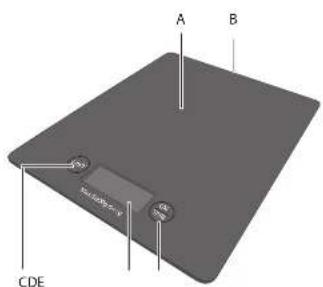
COMPONENTS
Fold out front and rear page for product illustrations.

A. Weighing platform
B. Battery compartment
C. UNIT key
D. Display
E. ON/TARE key
The product may be available in different colours.
BEFORE FIRST TIME USE
- Remove all packaging materials.
- Check for completeness and transport damage. In case of damages or incomplete delivery please contact your dealer.
- Clean the appliance (Cleaning and care).
INSTALLATION
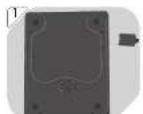
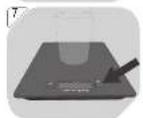
1 Open the battery compartment cover underneath the scale.
2 Insert 1x CR2032 battery (provided) with the + polarity facing upwards into the battery compartment.
3 Close the battery compartment cover. Place the appliance on an even and firm surface.
Notes:
- If the battery level is low, L_0 will appear on the display. Replace with a new battery of the same type.
- Remove the battery if the scale is not to be used for a long period of time, as battery leakage may cause damage.
OPERATION
Using the scale without a container
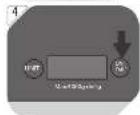
4 Switching on: Press the ON/TARE key.
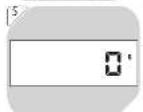
5 Wait until appears on the display. The scale is now ready for use.
6 Place the foodstuff to be weighed directly on the weighing platform. The weight of the foodstuff appears on the display.
Using the scale without a container
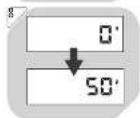
7 Put a suitable container (not provided) on the switched-off scale. Press the ON/TARE key to switch the scale on.
8 Wait until appears on the display. The appliance is now ready for use. Place the foodstuff to be weighed directly on the weighing platform. The weight of the foodstuff appears on the display.
- Switching off (automatically): After about 1 minute of inactivity.
- Switching off (manually): Press and hold the ON/TARE key for a few seconds until the display goes off.
Toggling between weight units
9 Press the ON/TARE key. Then, press UNIT key.
10 Press the UNIT key repeatedly to toggle between weight units (grams, ounces, pounds, millilitres).
EN
Tare function
11 This function is designed to weigh additional items separately without removing previous ones from the scale.
12 Weigh the first item as previously stated. Press the ON/TARE key once. The weight reading changes to □
13 Add a second item and get its weight. Press the ON/TARE key again. Tare appears on the display and the weight reading changes to again. Repeat the above steps to weigh further items.
14 Note: When the TARE items are removed from the appliance, the weight reading is then negative.
15 Attention! The maximum loading weight of the scale is 5 kg. If the appliance is overloaded, it appears on the display. Remove some items to avoid damaging the appliance.
CLEANING AND CARE
16 Never immerse the appliance in water or other liquids.
- Switch the appliance off before cleaning it.
- Clean the appliance with a soft, slightly damp cloth. Make sure that no moisture is entering the appliance during cleaning.
- Never use corrosive detergents, wire brushes, abrasive scourers, metal or sharp implements to clean your appliance.
• Dry the appliance thoroughly after cleaning.
• Store the appliance in a cool and dry place, away from children and pets.
TECHNICAL DATA
Power supply (battery) : 3 V, (CR2032)
Max. loading weight : 5 kg (11 lb)
Weight increments : 1 g (0.35 oz)
DISPOSAL
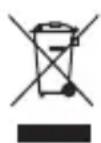
The crossed-out wheeled bin logo requires the separate collection of waste electric and electronic equipment (WEEE). Electric and electronic equipment may contain dangerous and hazardous substances. Do not dispose of this appliance as unsorted municipal waste. Return it to a designated collection point for the recycling of WEEE. By doing so, you will help to conserve resources and protect the environment. Contact your retailer or local authorities for more information.
FELICIDADES
A. Mérési platform
D. Kijelző
B. Elemtartó rekesz
E. ON/TARE gomb
C. UNIT gomb
A. Weegplatform
D. Display
B. Batterijvak
E. ON/TARE toets
C. UNIT toets
A. Vågplatta
B. Batterifack
C. UNIT-knapp
D. Display
E. ON/TARE-knapp
A. Tartı platformu
B. Pil yuvası
C. UNIT tuşu