
Infinity Rebel 54 HE - Vacuum Cleaner DIRT DEVIL - Free user manual and instructions
Find the device manual for free Infinity Rebel 54 HE DIRT DEVIL in PDF.



| Product type | Bagless multi-cyclonic canister vacuum cleaner |
| Model | Infinity Rebel 54 HE (DD 5254) |
| Supply voltage | 220-240 V ~, 50/60 Hz |
| Rated power | 800 W |
| Dust bin capacity | 1.8 L |
| Power cord length | 6.0 m |
| Weight | 5.0 kg |
| Filtration system | Motor protection filter + air outlet filter (non-washable) |
| Compatible floor types | Carpets, rugs, hard floors, furniture (depending on accessory) |
| Included accessories | Combined brush, furniture brush, cushion nozzle, crevice tool |
| Optional accessories | Mini turbo brush, parquet brush, hard floor brush, flexible long crevice tool |
| Features | Mechanical power variator, cord rewind, emptying indicator |
| Safety | Overheat protection, automatic shut-off |
| Maintenance | Washable bin and filters (air outlet filter non-washable), regular cleaning recommended |
| Warranty | Legal warranty according to Directive 1999/44/EC |
Frequently Asked Questions - Infinity Rebel 54 HE DIRT DEVIL
User questions about Infinity Rebel 54 HE DIRT DEVIL
0 question about this device. Answer the ones you know or ask your own.
Ask a new question about this device
Download the instructions for your Vacuum Cleaner in PDF format for free! Find your manual Infinity Rebel 54 HE - DIRT DEVIL and take your electronic device back in hand. On this page are published all the documents necessary for the use of your device. Infinity Rebel 54 HE by DIRT DEVIL.
USER MANUAL Infinity Rebel 54 HE DIRT DEVIL
natural_image
Illustration of a vacuum cleaner with internal gear and handle (no text or symbols)GB Operating Manual bagless multi-cyclonic vacuum cleaner
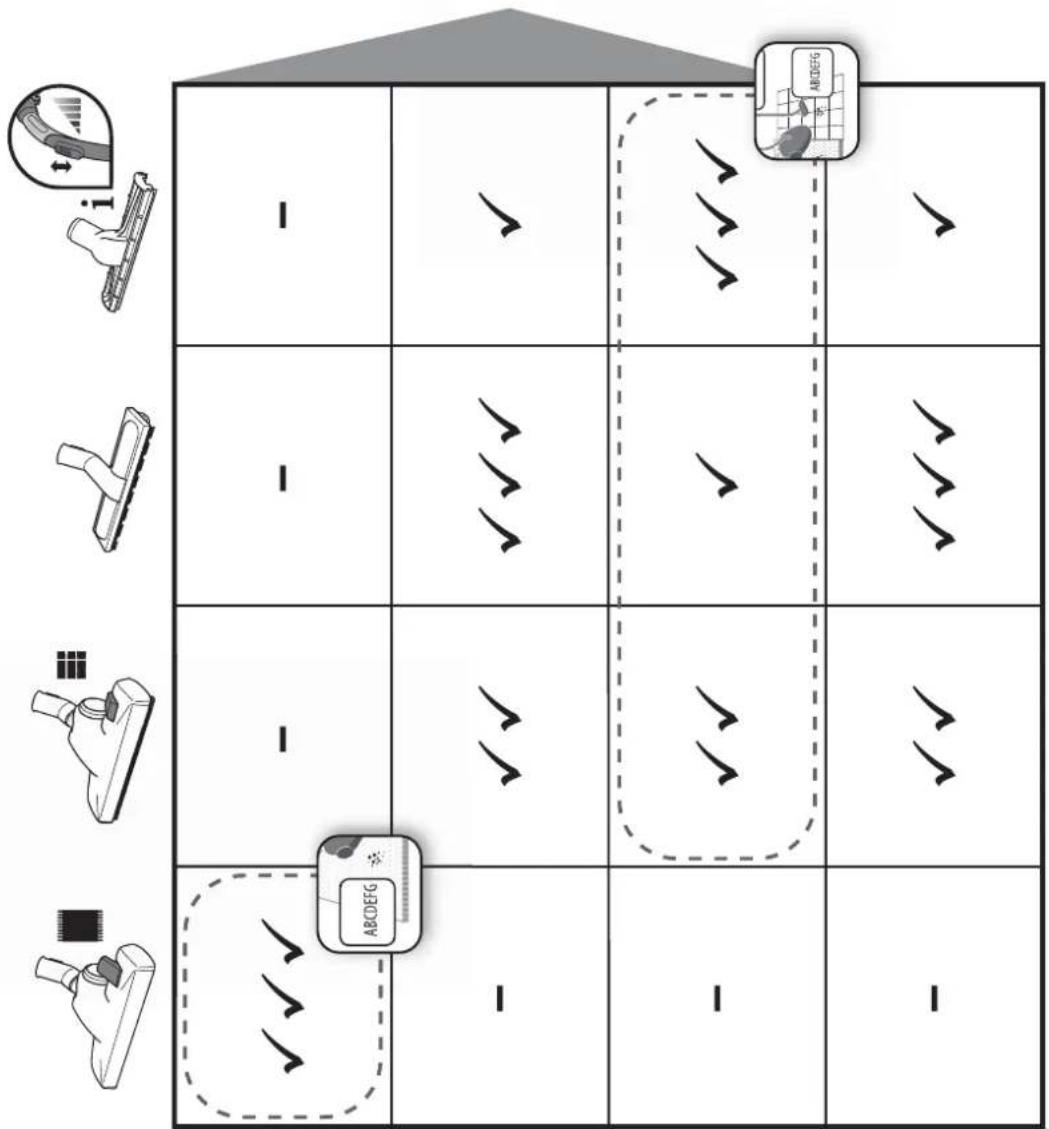

Teppich Carpet Tapis Tapijt Alfombras Tappeti Hall
Hartboden
Hard floor
Sols durs
Harde vloer
Suelos duros
Pavimenti duri
Sert zemin
Fugen
Crevices
Joints
Voegen
Juntas
Fughe
Ek yerleri

bodenschonend
sensitive
sensible
gevoelig
sensible
delicato
hassas
natural_image
Close-up of a robotic vacuum cleaner with mesh grille and hand holding a tool (no visible text or symbols)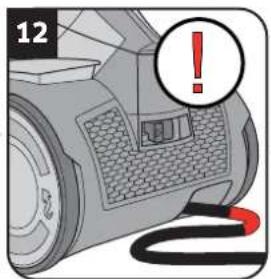
natural_image
Close-up of a vacuum cleaner's head with a yellow cable and a circular icon labeled '13' (no text or symbols on the device itself)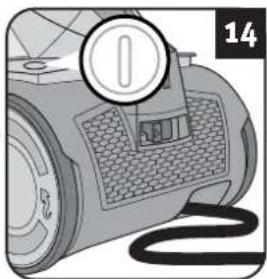
natural_image
Illustration of a portable radio with a circular badge and cord (no text or symbols)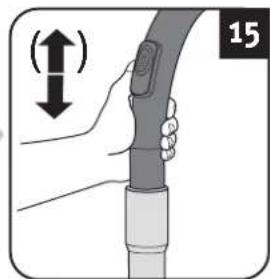
natural_image
Illustration of a hand holding a device with a vertical arrow indicating upward motion (no text or symbols)! WARNING:
natural_image
Illustration of a camera lens with red starburst effect (no text or symbols)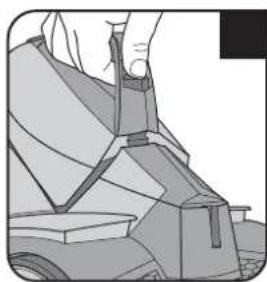
natural_image
Illustration of a hand adjusting a mechanical component (no text or symbols visible)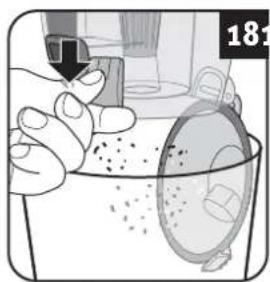
natural_image
Illustration of hands cleaning a container with a lid and scattered particles (no text or symbols)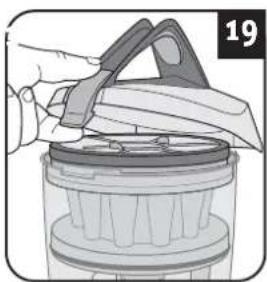
natural_image
Illustration of a hand using a tool to lift or spread material into a container (no text or symbols visible)
natural_image
Illustration of a hand placing a lid into a container with a filter structure (no text or symbols)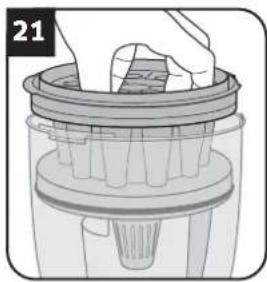
natural_image
Illustration of a hand placing a component into a cylindrical container (no text or symbols visible)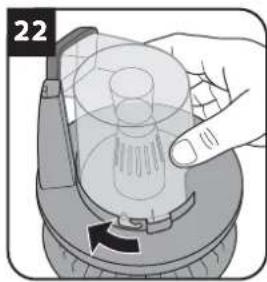
natural_image
Hand pressing a button on a mechanical component, showing internal threading and motion arrows (no text or symbols)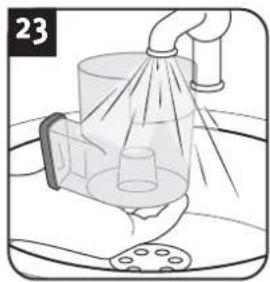
natural_image
Illustration of a showerhead spraying water onto a surface with a pipe and plate nearby (no text or symbols)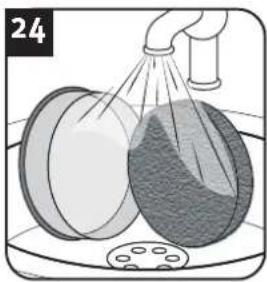
natural_image
Illustration of a spray bottle dispensing liquid into a container with a lid, no text or symbols present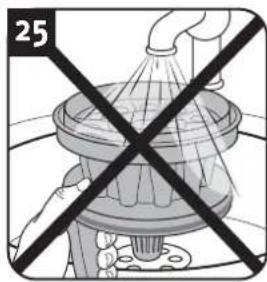
natural_image
Diagram of a showerhead with a cross-section showing water flow, no text or symbols present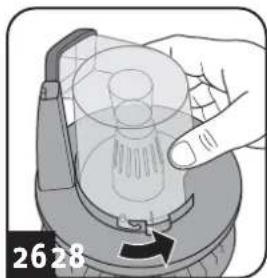
natural_image
Illustration of a hand pressing down on a mechanical component with a finger pointing to it (no text or symbols)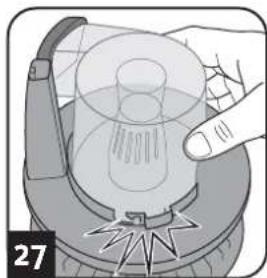
natural_image
Illustration of a hand pressing a circular object with internal lines, no text or symbols present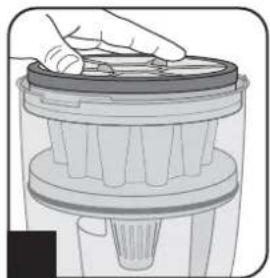
natural_image
Illustration of a hand holding a lid with a plastic container (no text or symbols visible)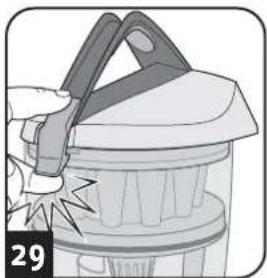
natural_image
Illustration of a hand holding a tool interacting with a container (no text or symbols visible)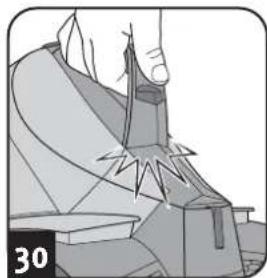
natural_image
Illustration of a hand using a tool to cut or mark a mechanical component, no text or symbols presentHINWEIS:
natural_image
Illustration of a hand pressing down on a mechanical component with a grid pattern (no text or symbols visible)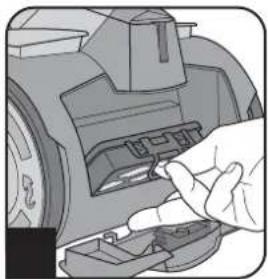
natural_image
Close-up of a hand inserting a component into a car's wheel (no visible text or symbols)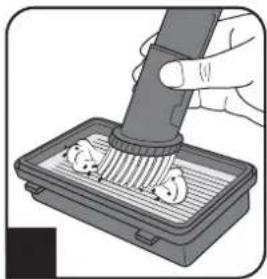
natural_image
Illustration of a hand using a pipette to clean or brush inside a tray with food items (no text or symbols visible)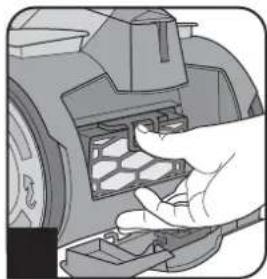
natural_image
Hand inserting a component into a vehicle's wheel (no text or symbols visible)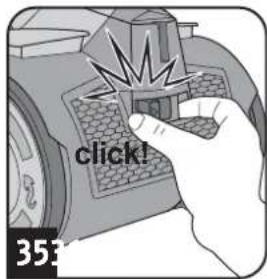
ACHTUNG:
natural_image
Illustration of hands using a handheld device to adjust a tool (no text or symbols visible)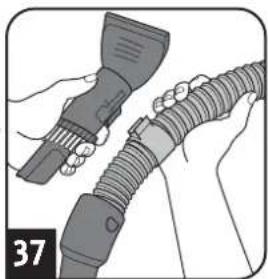
natural_image
Illustration of hands holding a handheld device connected to a coiled cable or hose (no text or symbols visible)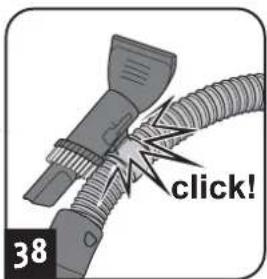
natural_image
Mechanical component diagram showing a valve or actuator assembly with no visible text or symbolsWARNING:
1.1 About the operating manual
Read the operating manual completely before working with the appliance. Keep the operating manual in a safe place. Include the operating manual if you pass the appliance on to a third party. Failure to comply with this operating manual can lead to serious injuries or damage to the appliance. We take no responsibility for damage due to failure to comply with this operating manual. Always comply with the notices marked as follows to avoid accidents and damage to the appliance.

WARNING:
Warns of health hazards and identifies possible risks of injury.

CAUTION:
Indicates possible dangers to the appliance or other objects.
NOTE:
Highlights tips and information for you.
1.2 Concerning certain groups of persons
These appliances can be used by children of 8 years and upwards and persons with impaired physical, sensory or mental abilities, or insufficient experience or knowledge, providing they are supervised or have been instructed in the proper use of the appliance and understand the risks involved.
Children must not play with the appliance. Children must not perform cleaning or user maintenance tasks without supervision. Children under the age of eight should be kept away from the appliance and the connection cable whilst it is switched on or cooling down.
- Packing material must not be used for playing. There is danger of suffocation.
1.3 Information on power supply
The appliance is operated with electrical power, which means there is always a risk of electric shock. Therefore, please comply with the following:
- Never immerse the appliance in water or other liquids; keep it away from rain and moisture. Never touch the plug with wet hands. Do not operate the appliance outdoors or in rooms with a high level of humidity.
Take care that the power cord is not kinked, pinched, or rolled over and ensure it does not come into contact with heat sources. Also take care that it does not become a stumbling hazard.
Before connecting to the power supply, make sure that the voltage stated on the type plate matches the voltage of your plug socket.
■ Always check the power cord for possible damage before using the appliance. - Never carry the appliance by its power cord. It could be damaged.
Before you clean or maintain the appliance, switch off the appliance and pull the mains plug from the socket. Always pull directly on the plug when you disconnect the appliance from the mains. Do not pull on the power cord as this could damage it.
If possible, do not use extension cords. If you must use an extension cord, use only safety-certified, water-protected single extension cords (no multi-socket distributors) designed for the power consumption of the appliance.
1.4 Information on proper use
The cylinder vacuum cleaner is intended for home use only.
It is not suitable for commercial use.
Use the cylinder vacuum cleaner only for cleaning dry, normally soiled floors and carpet floorings. Depending on which nozzle you have attached (▷ chapter 2.1, „Assemble appliance and adjust nozzles to surface“), you can also use the appliance to vacuum furniture or non-sensitive upholstery.
Any other use is considered improper use and is prohibited.
Also prohibited:
Vacuuming of:
- Persons, animals, plants, especially hair, fingers and other parts of the body as well as pieces of clothing worn on the body. These might be drawn in. This could result in injuries.
- Water and other fluids, especially damp carpet cleaners. Moisture inside the appliance can cause a short-circuit.
- Toner (for laser printers, copying machines, etc.). There is danger of fire or explosion.
- Hot ashes, burning cigarettes or matches. There is a danger of fire.
- Pointed objects, such as glass shards, nails, etc. They can damage the appliance.
- Rubble, plaster, cement, fine drilling-dust, make-up, etc. These might damage the appliance.
■ To use the appliance near explosive or highly-flammable substances. There is a risk of fire or explosion.
Use of the appliance outdoors. Rain and dirt may damage the appliance.
■ Sticking objects into the appliance's openings. It could overheat.
■ To modify or repair the appliance yourself.
1.5 About the optionally included turbo brush
The bristles of the optionally included turbo brush rotate very rapidly. There is a danger of injury.
- Do not use the turbo brush on persons, animals or plants. Keep body parts away from the rotating brush roller.
- Switch off the vacuum cleaner before cleaning or detaching the turbo brush.
- Never run over cables. Otherwise, the insulation could get damaged.
The turbo brush is not suitable to clean sensitive surfaces. This may cause damage. Comply with the care and cleaning instructions provided by the manufacturer.
1.6 If the appliance is defective
Never use a defective appliance or operate an appliance with a defective power cord. If the power cord of this appliance is damaged, it must be replaced by the manufacturers, their authorised service representative or a similarly qualified person to avoid danger. Hand over a defective appliance to a specialist dealer or send it to the Dirt Devil customer service department for repairs (▷Page 46, 'International Service').
2.1 Assemble appliance and adjust nozzles to surface
WARNING:
Danger of injury! Only attach the appliance parts when the appliance is not connected to the power supply. Otherwise the machine might start up and parts of your body, hair or pieces of clothing might be sucked in.
CAUTION:
Before assembling, make sure that the fitted nozzle suits the surface to be cleaned. Do not clean e.g. any floors or objects with a brush with rotating bristles that you would not clean without a second thought with a conventional brush. Also observe the flooring manufacturer's recommendations.
NOTE:
You might have to twist the parts when connecting them so they are securely in place. Ensure that installed parts are secure by trying to pull them apart.
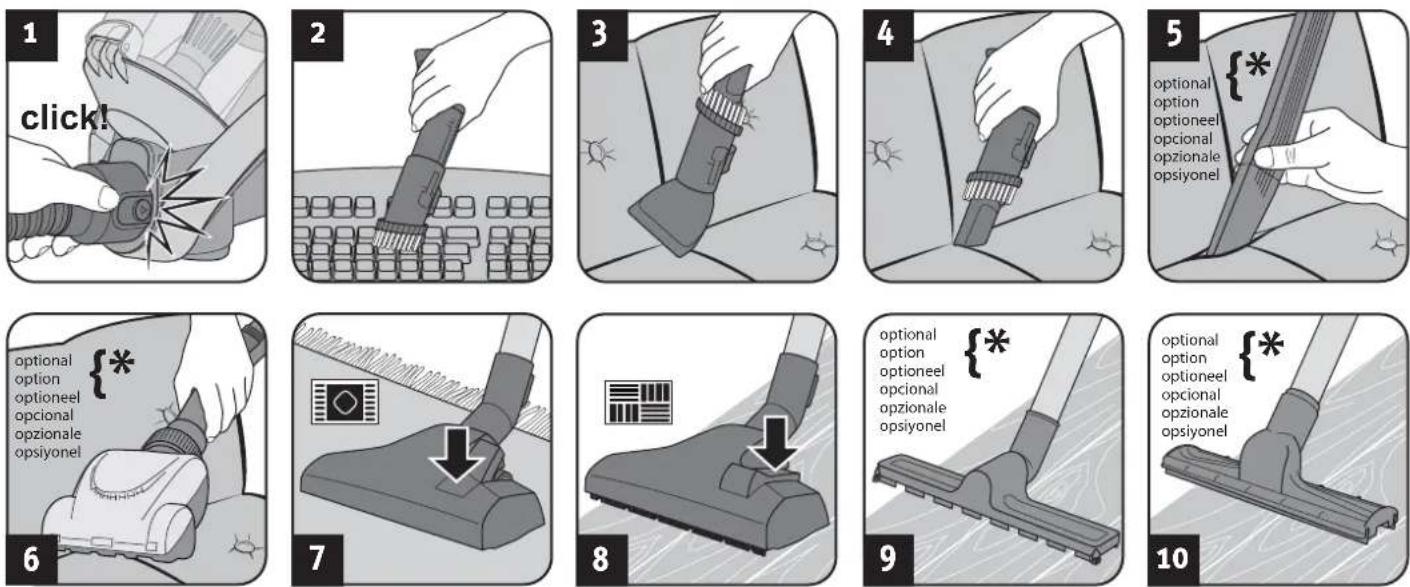
- Connect suction hose and appliance (Fig. 1).
-
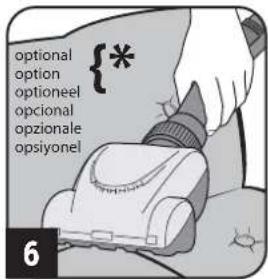
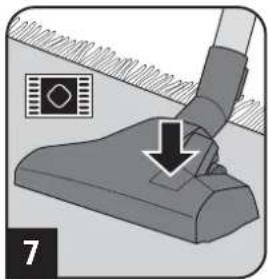
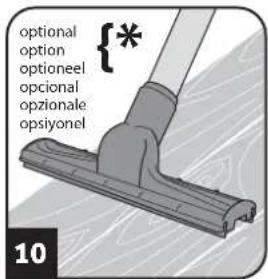
Insert the accessory included in the scope of delivery onto the handle (Fig. 2 - 10) depending on what type of surface you want to vacuum:
-
Furniture brush (Fig. 2) for objects with a sensitive surface
- Upholstery nozzle (Fig. 3) for upholstery, mattresses, and the like
- Crevice nozzle (Fig. 4) or optional long flexible crevice nozzle (Fig. 5) for crevices in upholstery
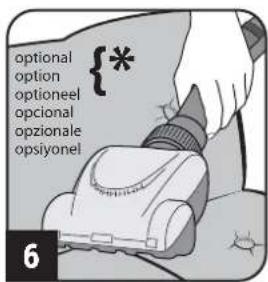
- Optional mini turbo brush (Fig. 6) for non-sensitive upholstery, runner, mats, and the like
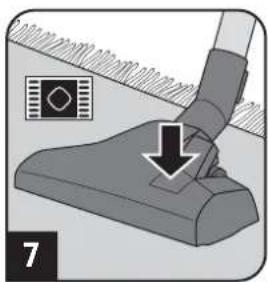
- Floor nozzle with switch position as in Fig. 7 for carpets
- Floor nozzle with switch position as in Fig. 8 for hard floors
- Optional parquet brush (Fig. 9) for sensitive hard floors
-
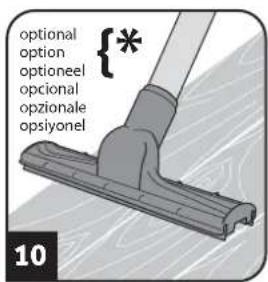
Optional hard floor nozzle (Fig. 10) for hard floors with crevices
-
Ensure that the bypass vent is closed (Fig. 15).
-
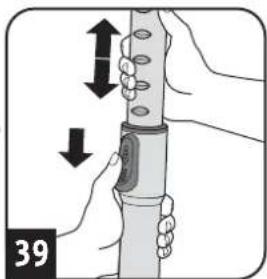
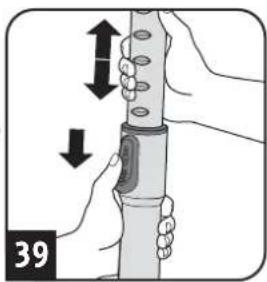
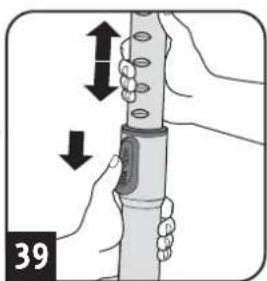
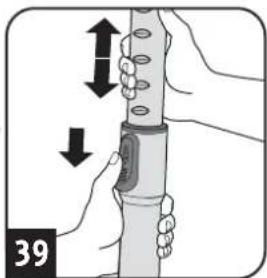
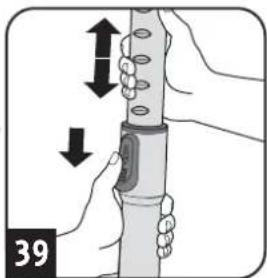
If you use the telescopic tube, adjust its length.
2.2 Vacuum cleaning
natural_image
Close-up of a hand holding a small object next to a mechanical component (no visible text or symbols)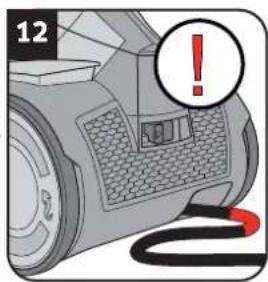
natural_image
Close-up of a mechanical component with a warning symbol and a red cable, no readable text or labels present.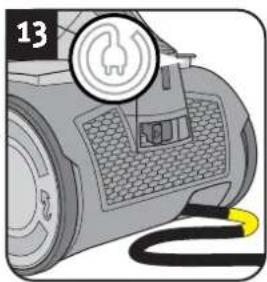
natural_image
Close-up of a vacuum cleaner's side panel with a circular button and cable, no visible text or symbols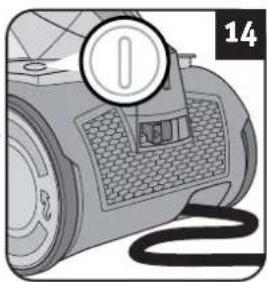
natural_image
Close-up of a portable electronic device with a circular badge and coiled cable (no visible text or symbols)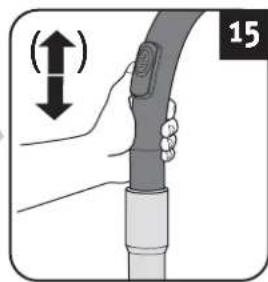
natural_image
Illustration of a hand holding a cable with a sensor device, showing a vertical motion indicator (no text or symbols)WARNING:
Danger of injury! Check appliance and power cord before each use. A damaged appliance must never be used.
CAUTION:
Only use the appliance with all filters undamaged, dry and correctly fitted. Make sure that no objects obstruct the telescopic tube, the suction hose or other openings.
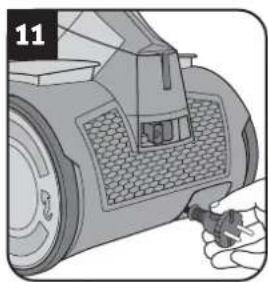
- Pull the cable out of the appliance (Fig. 11) and plug into a socket.
WARNING:
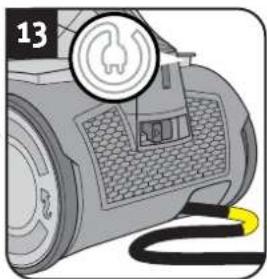
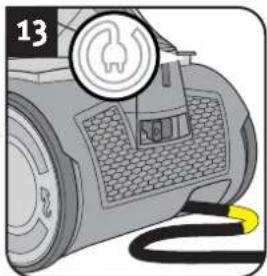
Danger of electric shock! If the red marking shows (Fig. 12) retract the cord by pressing the retraction button () to pull in the cord up to the yellow mark (Fig. 13) again.
- Switch on the appliance using the on/off switch ( ) (Fig. 14).
NOTE:
The auxiliary air regulator (Fig. 15) must be completely closed for vacuum cleaning. With the auxiliary air regulator you can quickly reduce the suction power, to release objects (such as curtains) that have been sucked in. If the hard floor nozzle (Fig. 10) has become stuck to the floor, you can reduce the suction power just as easily using the bypass vent (Fig. 15).
- Vacuum clean.
WARNING:
Danger of injury! Especially when vacuum-cleaning stairs make sure that you always stand on a higher level than the appliance.
3.1 Emptying and cleaning the dust container
CAUTION:
Switch off the appliance before removing the dust container. This will prevent dust from damaging the appliance.
NOTE:
You can dispose of the content of the dust container with your domestic waste as long as the dirt does not contain any substances prohibited for domestic waste.
natural_image
Illustration of a camera lens with red starburst effect (no text or symbols)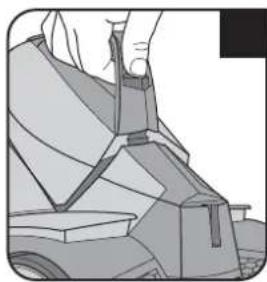
natural_image
Illustration of a hand using a tool to lift a vehicle (no text or symbols visible)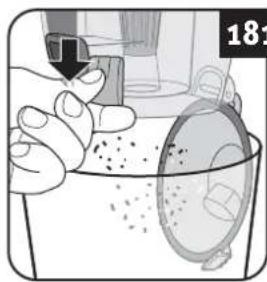
natural_image
Illustration of a hand using a spray gun to clean granular material in a container (no text or symbols)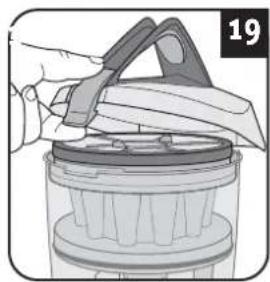
natural_image
Illustration of a hand using a tool to lift or spread a cylindrical object into a container (no text or symbols visible)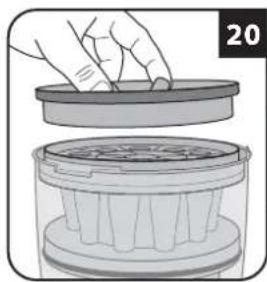
natural_image
Illustration of a hand placing a lid onto a container with a filter (no text or symbols)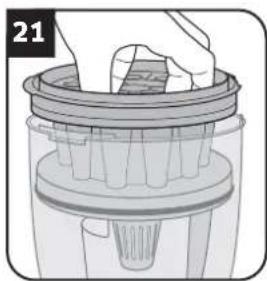
natural_image
Illustration of a hand placing a component into a cylindrical container (no text or symbols visible)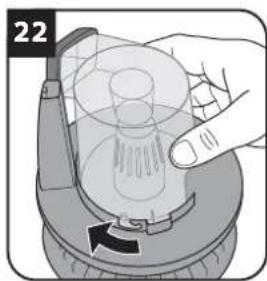
natural_image
Hand pressing a button on a mechanical component, showing internal structure and motion arrow (no text or symbols)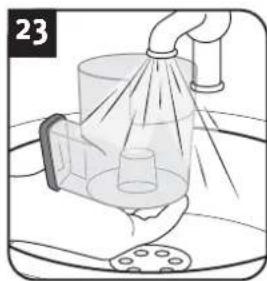
natural_image
Illustration of a showerhead spraying water onto a surface with a bucket (no text or symbols)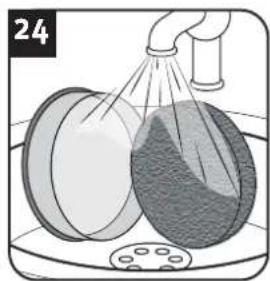
natural_image
Illustration of a cleaning or dust removal process with two circular containers and a pipe pouring liquid (no text or symbols)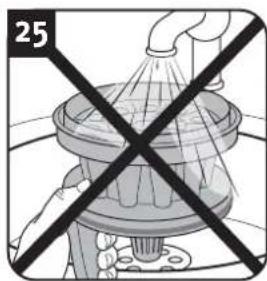
natural_image
Diagram of a showerhead spraying water, no text or symbols present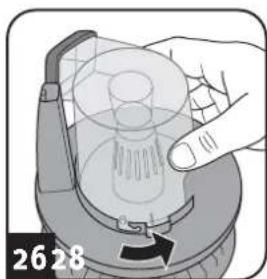
natural_image
Illustration of a hand pressing down on a mechanical component with a finger pointing to it (no text or symbols)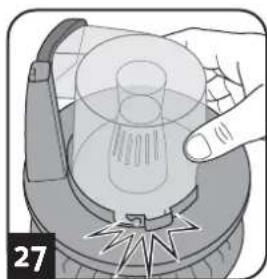
natural_image
Illustration of a hand pressing a circular object with a lightning bolt, no text or symbols present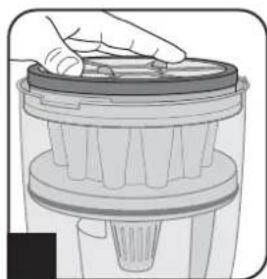
natural_image
Illustration of a hand placing a component into a cylindrical container (no text or symbols visible)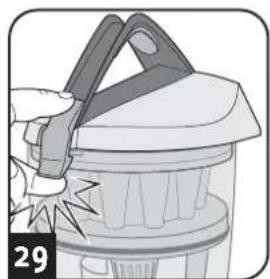
natural_image
Illustration of a hand holding a tool over a container with a handle, showing mechanical components and motion arrows (no text or symbols)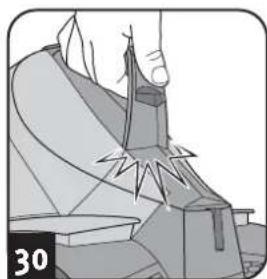
natural_image
Illustration of a hand cutting a mechanical part with visible cutting edge and angle markings (no text or symbols)NOTE:
The dust container has to be emptied and cleaned regularly. Otherwise emptying it will become harder and harder or smells and bacteria may develop, depending on what you have vacuumed up.
It is best to empty the dust container module after each vacuuming session.
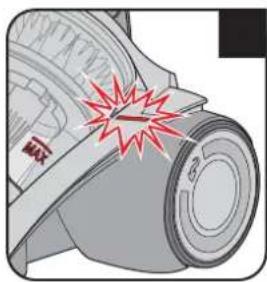
■ Empty and clean the dust container as the latest as soon as it is filled up to the MAX mark or the cleaning/emptying display lights up (fig. 16).
Also empty and clean the dust container at least every 3 months, before storing the appliance for a longer period or before returning it.
- Switch off the appliance ( ).
- Pull the plug out of the plug socket.
- Remove the dust container (fig. 17).
- Empty the dust container (fig. 18).
- Take this opportunity to check the filter elements (fig. 20 and 22) and the cyclone unit (fig. 21).
CAUTION:
The cyclone unit is not washable (fig. 25). If the cyclone unit comes into contact with water, soiling may adhere to the inside. Clean the cyclone unit by carefully tapping it out.
- If the filter elements (fig. 23 and 24) are soiled, clean them under cold or lukewarm running water until all the soiling has been removed.
CAUTION:
The filter elements (fig. 23 and 24) are washable but must not be cleaned in the dishwasher or washing machine.
Do not use cleaning agents or brushes with hard bristles to clean the filter elements.
Leave the filter elements to dry after cleaning them with water (approx. 24 hours at room temperature).
Do not re-install them until they are completely dry.
- Replace damaged or deformed filters immediately (for ordering information see ▷Chapter 3.4, 'Spare parts and accessories').
- Leave the filter elements to dry after cleaning them with water (approx. 24 hours at room temperature).
CAUTION:
Never operate the appliance without correctly installed filter elements. Never operate the appliance with damaged filter elements.
- Reinsert the filter elements and cyclone unit (fig. 26-29).
NOTE:
The filter elements and the cyclone unit are constructed so that they can only be inserted and drop fully into place if they are in the correct position. Do not use force when inserting. If you do not manage it immediately, try again.
- Re-insert the dust container (fig. 30). You must be able to feel and hear it click into place.
3.2 Cleaning/replacing the exhaust filter
natural_image
Illustration of a hand pressing a component on a computer monitor (no text or symbols visible)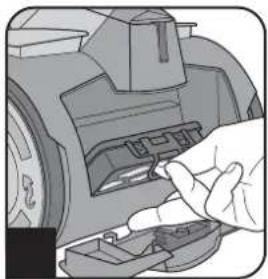
natural_image
Close-up of a hand inserting a component into a car's wheel (no visible text or symbols)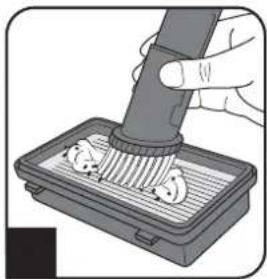
natural_image
Illustration of a hand using a pipette to clean or brush on a tray with circular objects (no text or symbols)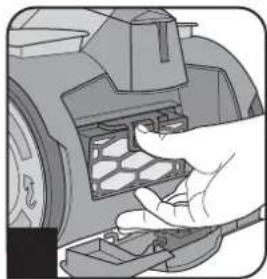
natural_image
Hand inserting a component into a vehicle's wheel (no text or symbols visible)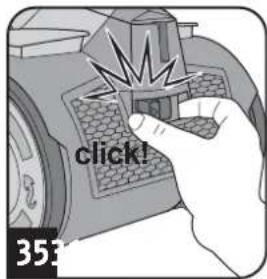
CAUTION:
Clean the filter each time you clean the dust filter. Replace the filter if it is damaged or deformed (see ▷ Chapter 3.4, 'Spare parts and accessories' for ordering information).
CAUTION:
The exhaust filter cannot be washed.
NOTE:
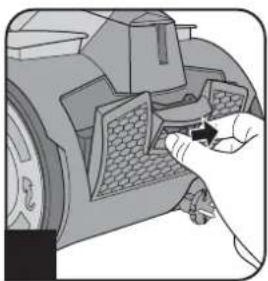
The exhaust filter cover can be locked more easily if you hold the release mechanism (fig. 35) and do not release it until the exhaust filter cover is in its final position.
- Switch off the appliance ( ).
- Pull the plug out of the plug socket.
- Release the exhaust filter cover as shown (fig. 31).
- Remove the exhaust filter using the tab provided (fig. 32).
- Tap out the exhaust filter over a dustbin.
- Then brush out the exhaust filter with a soft brush, e.g. the furniture brush included in the scope of delivery (fig. 33).
- Push the exhaust filter back into its console, so that the tab audibly clicks into place (fig. 34).
- Attach the exhaust filter cover at the bottom first.
- Lock the exhaust filter cover (fig. 35).
3.3 Storage
natural_image
Illustration of hands using a handheld device to adjust a tool, with arrows indicating movement (no text or symbols)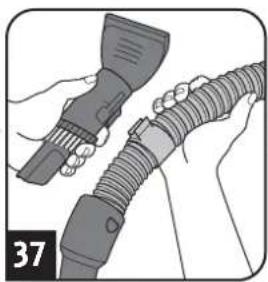
natural_image
Illustration of hands holding a handheld device connected to a coiled cable or hose (no text or symbols visible)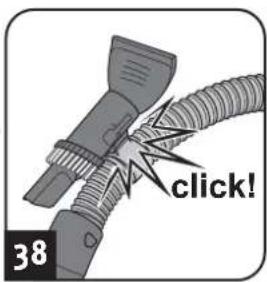
natural_image
Mechanical assembly diagram showing a valve or actuator component with no visible text or symbolsWARNING:
Risk of injury! Switch off the appliance after vacuuming () and wind up the power cord () When winding up the cord, keep the plug in your hand so that the cord does not thrash about and cannot injure you.
WARNING:
Risk of injury! Always keep the appliance out of the reach of children.
CAUTION:
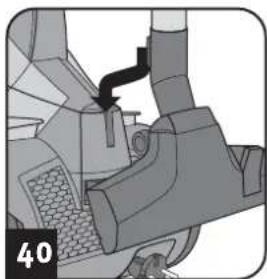
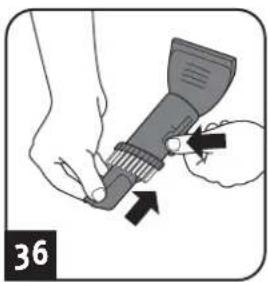
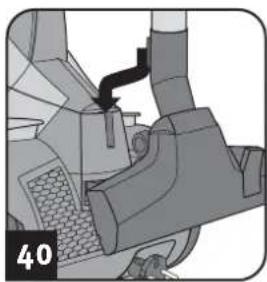
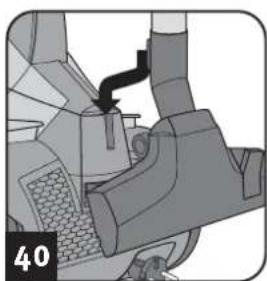
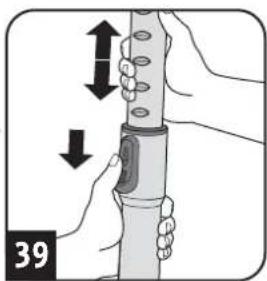
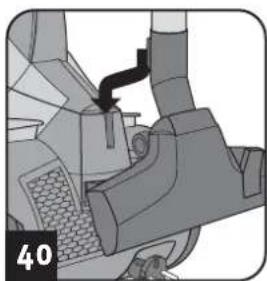
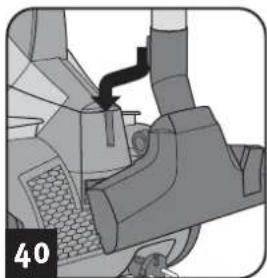
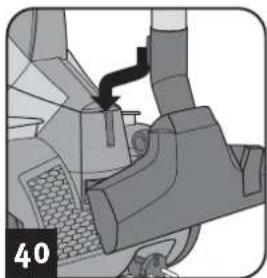
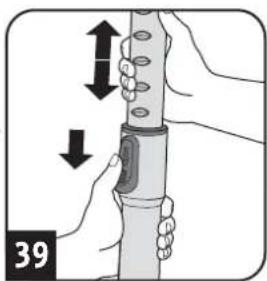
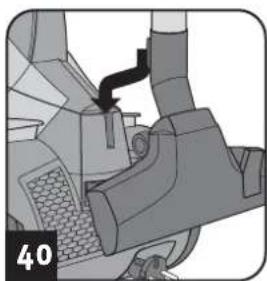
Never store the appliance directly next to heat sources (e.g. heater, oven). Avoid exposure to direct sunlight. Keep the appliance and accessories in a cool, dry place where it does not take up too much space (fig. 36 - 40).
CAUTION:
If you intend to store the appliance for a longer period, empty and clean the dust container and its filter elements ▷ Chapter 3.1, 'Emptying and cleaning the dust container'.
3.4 Spare parts and accessories
You can order accessories and spare parts in various ways:
CAUTION:
Only use original spare parts from the scope of delivery or those which you have purchased by reordering.
▷Page 46, 'International Service'
The following accessories and spare parts can be reordered:
Item number Content
5254001 Filter set consisting of:
1 motor protection filter (fig. 24)
1 exhaust filter (fig. 33)
M203-5 1 parquet brush
M219 1 mini-turbo brush "Fellino"
M221 1 midi-turbo brush
M232 1 long, flexible crevice nozzle
M236-1 1 hard floor nozzle
4.1 Before you send in the appliance

WARNING:
Danger of injury! Never use a defective appliance! Always switch off the appliance and disconnect it from the mains before starting troubleshooting.
Before contacting us or even sending the appliance to us, use the table to check whether you can correct the problem yourself.
Problem Possible cause / solution
| The cleaning results are unsatisfactory in spite of the appliance working correctly. | The bypass vent (fig. 15) is open. Close the bypass vent (fig. 15). |
| The attached nozzle is unsuitable. Change the nozzle, ▷ Chapter 2.1, ‘Assemble appliance and adjust nozzles to surface’. | |
| The collar brush of the floor nozzle is not in a position appropriate to the type of floor (figures 7 – 8). Adjust the position of the collar brush to the type of floor using the floor nozzle switch (figures 7 – 8). | |
| The dust container is full. Empty and clean the dust container ▷ Chapter 3.1, ‘Emptying and cleaning the dust container’. | |
| The filters are dirty. Clean the filters, ▷ Chapter 3.1, ‘Emptying and cleaning the dust container’ that is ▷ Chapter 3.2, ‘Cleaning/replacing the exhaust filter’. | |
| Nozzle, telescopic tube or suction hose is blocked. Remove the obstruction. If necessary, use a long wood-en stick (e.g. a broomstick) to do this. |
Problem Possible cause / solution
| Cleaning / emptying display lights up (fig. 16). | The dust container is full.Empty and clean the dust container ▷Chapter 3.1, ‘Emptying and cleaning the dust container’. |
| The filters are soiled.Clean the filters, ▷Chapter 3.1, ‘Emptying and cleaning the dust container’ or ▷Chapter 3.2, ‘Cleaning/replacing the exhaust filter’. | |
| Nozzle, telescopic tube or suction hose is blocked.Remove the obstruction. If necessary, use a long wooden stick (e.g. a broomstick) to do this. | |
| The vacuum cleaner stops suddenly. | The overheating protection has tripped (possibly due to blocked suction channels, filters, or similar).1. Switch the appliance off and pull the plug out of the socket.2. Remove the cause of overheating (e.g. by disassembling telescopic tube and suction hose and removing the obstacle and/or cleaning filters).3. Wait approx. 45 minutes until the appliance has cooled off.4. After the appliance has cooled off, you may switch it on again. |
NOTE:
If you cannot solve the problem following these instructions, contact our customer services (▷ Page 46, 'International Service').
4.2 Warranty
The statutory warranty regulations in accordance with the EU Directive 1999/44/EC apply.
In non-EU countries the minimum requirements of the warranty in the respective country apply.
4.3 Disposal
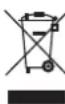
Dispose of the appliance in compliance with the environmental protection laws of your country. Electrical waste may not be disposed of together with domestic waste. Use local old-appliance collection points instead.
The filters are made from environment-friendly materials. You can dispose of these — as opposed to the appliance — in your domestic waste unless you have cleaned up substances that are prohibited from disposal in this way.
4.4 Technical data
Type of appliance : bagless multi-cyclonic
vacuum cleanerr
Model name
: Infinity Rebel54
Model : DD 5254 (-0/-1/.../-8/-9)
Voltage : 220-240 V \~, 50/60 Hz
Power : 800 W nom.
Maximum usable volume of the dust container
Power cord length : approx. 6.0 m
Weight : approx. 5.0 kg



Technical and design specifications may be changed in the course of continuous product improvement.
© Royal Appliance International GmbH
natural_image
Illustration of a vacuum cleaner with internal components and handle (no text or symbols)1.1 Mode d'emploi
natural_image
Illustration of a hand using a handheld tool to clean or store digital modules (no text or symbols visible)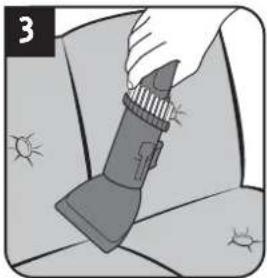
natural_image
Illustration of a hand holding a flashlight with sun icons nearby (no text or symbols)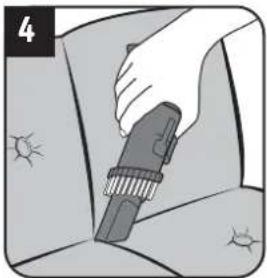
natural_image
Illustration of a hand holding a flashlight with sunburst patterns on the background (no text or symbols)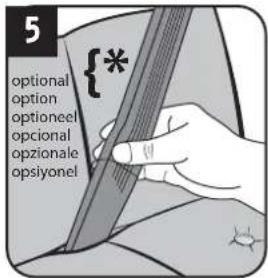
natural_image
Mechanical component diagram showing a lever pressing a block with a downward arrow indicating force or motion (no text or symbols present)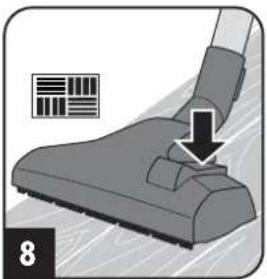
natural_image
Illustration of a foot pushpin with a downward arrow indicating compression (no text or symbols)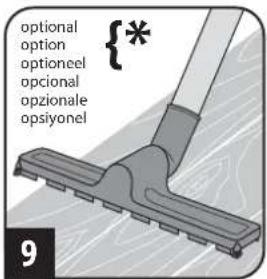
AVERTISSEMENT:
natural_image
Illustration of a hand using a tool to clean or store items around a mechanical component (no text or symbols visible)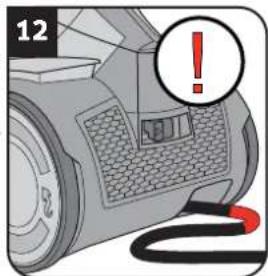
natural_image
Close-up of a vacuum cleaner with a power button and cable, no visible text or symbols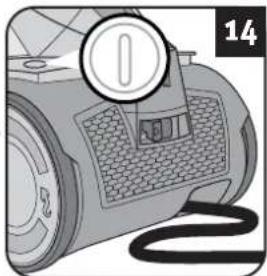
natural_image
Close-up of a mechanical device with a circular badge and textured surface, no visible text or symbols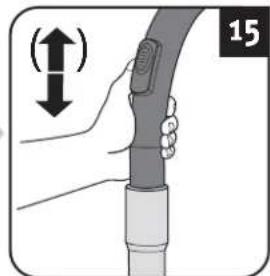
natural_image
Illustration of a hand holding a cable with a device, showing a vertical motion indicator (no text or symbols)AVERTISSEMENT:
natural_image
Illustration of a mechanical device with red starburst effect (no text or symbols)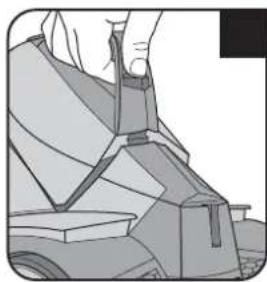
natural_image
Illustration of a hand using a tool to lift a vehicle (no text or symbols visible)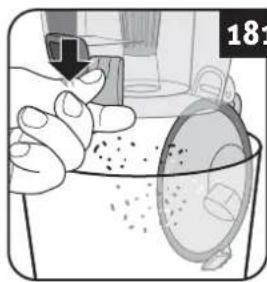
natural_image
Illustration of hands cleaning a container with a lid and scattered particles (no text or symbols)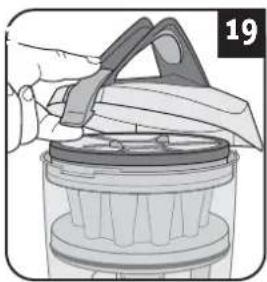
natural_image
Illustration of a hand using a knife to lift a cylindrical container (no text or symbols visible)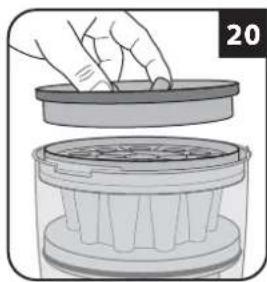
natural_image
Illustration of a hand placing a lid onto a container with a side view (no text or symbols)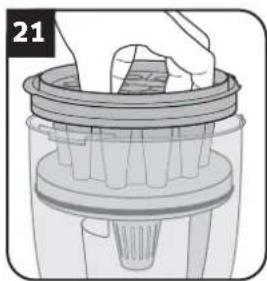
natural_image
Illustration of a hand placing a component into a cylindrical container (no text or symbols visible)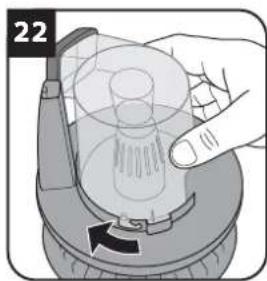
natural_image
Illustration of a hand pressing down on a mechanical component with a finger pointing to it (no text or symbols)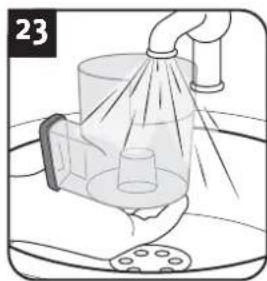
natural_image
Illustration of a showerhead spraying water onto a surface with a pipe and plate nearby (no text or symbols)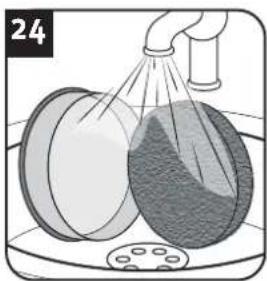
natural_image
Illustration of a spray bottle dispensing liquid into a container with a lid, no text or symbols present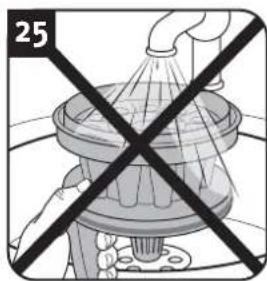
natural_image
Diagram of a showerhead spraying water, no text or symbols present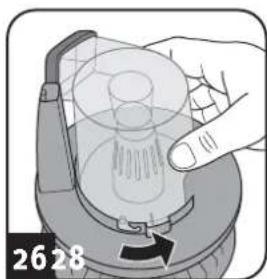
natural_image
Illustration of a hand pressing down on a mechanical component with a finger pointing to it (no text or symbols)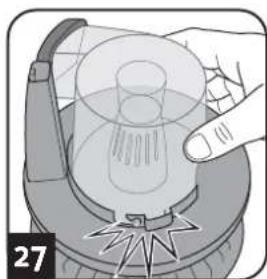
natural_image
Illustration of a hand holding a transparent cylindrical object with internal lines, next to a mechanical component (no text or symbols)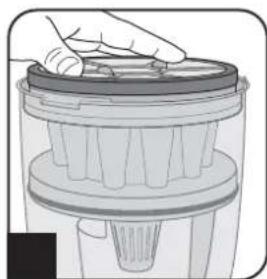
natural_image
Illustration of a hand holding a lid over a mechanical component (no text or symbols visible)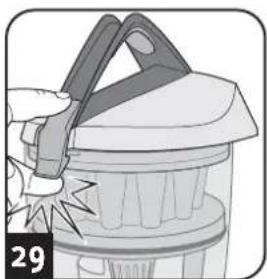
natural_image
Illustration of a hand holding a tool interacting with a mechanical device (no text or symbols visible)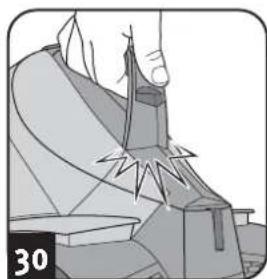
natural_image
Illustration of a mechanical component with a hand and triangular structure, no visible text or symbolsREMARQUE:
natural_image
Hand inserting a component into a device (no visible text or symbols)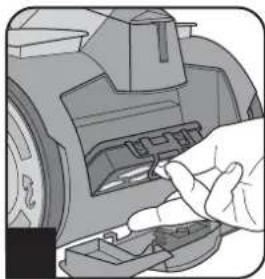
natural_image
Close-up of a hand inserting a component into a vehicle's engine compartment (no visible text or symbols)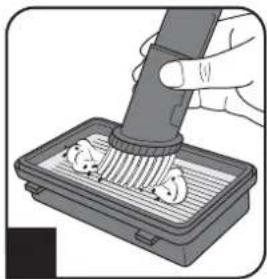
natural_image
Illustration of a hand using a pipette to clean or brush inside a tray with circular objects (no text or symbols)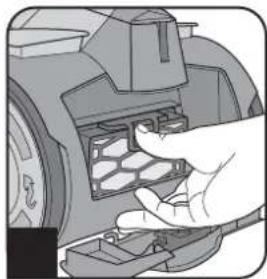
natural_image
Hand inserting a component into a vehicle chassis (no visible text or symbols)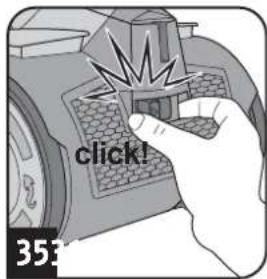
ATTENTION:
natural_image
Illustration of hands using a handheld device to interact with a tool, showing motion arrows (no text or symbols)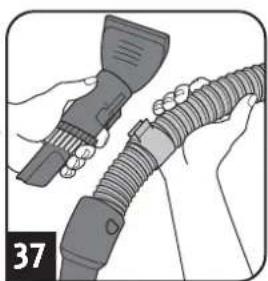
natural_image
Illustration of hands holding a handheld device with a hose and cable (no text or symbols)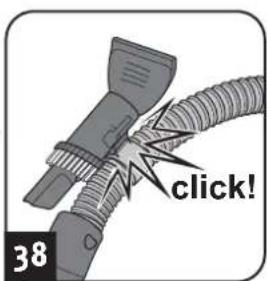
natural_image
Mechanical component diagram showing a pipe inserted into a housing (no text or symbols visible)AVERTISSEMENT:
natural_image
Illustration of a vacuum cleaner with internal components and handle (no text or symbols)natural_image
Close-up of a hand using a tool to clean or adjust a mechanical component (no visible text or symbols)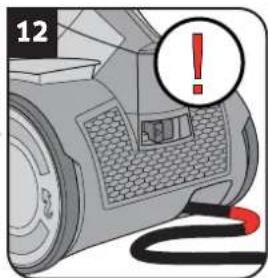
natural_image
Close-up of a vacuum cleaner's wheel with a warning symbol and a red cable, no readable text or labels present.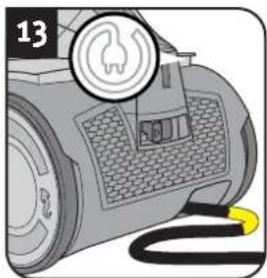
natural_image
Close-up of a vacuum cleaner's air purifier with a power button and cable (no text or symbols visible)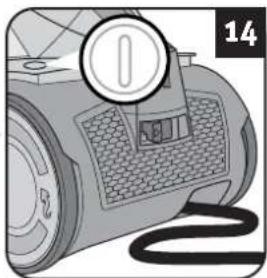
natural_image
Close-up of a portable electronic device with a circular badge and textured surface (no visible text or symbols)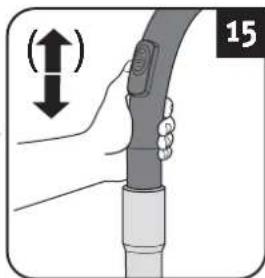
natural_image
Illustration of a hand holding a cylindrical device with a lock, showing a vertical motion indicator (no text or symbols)⚠ WAARSCHUWING:
natural_image
Illustration of a camera lens with red starburst effect (no text or symbols)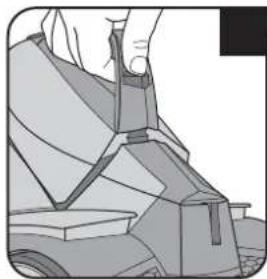
natural_image
Illustration of a hand using a tool to lift a mechanical component (no text or symbols visible)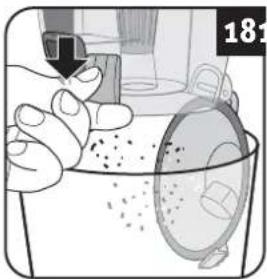
natural_image
Illustration of a hand holding a small object over a container with scattered particles, next to a circular container (no text or symbols)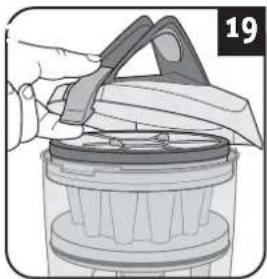
natural_image
Illustration of a hand using a knife to lift a cylindrical container (no text or symbols visible)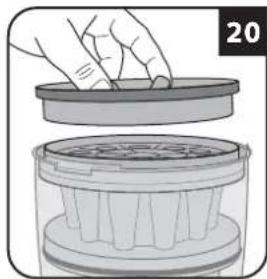
natural_image
Illustration of a hand placing a lid onto a container with a filter structure (no text or symbols)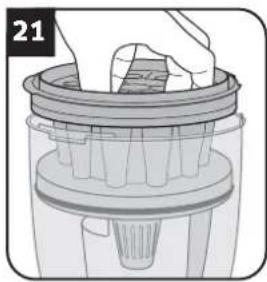
natural_image
Illustration of a hand placing a component into a cylindrical container (no text or symbols visible)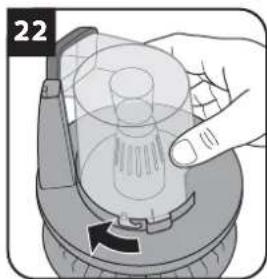
natural_image
Hand pressing a button on a mechanical component, showing internal threading and motion arrows (no text or symbols)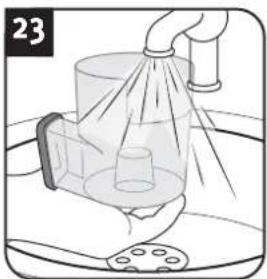
natural_image
Illustration of a showerhead spraying water onto a sink with a pipe and filter (no text or symbols)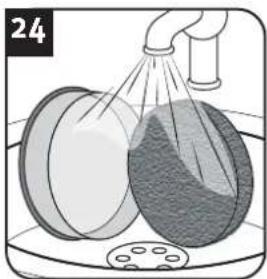
natural_image
Illustration of a hand pouring liquid into two containers, one with a cloth and the other with a dark liquid, on a surface (no text or symbols)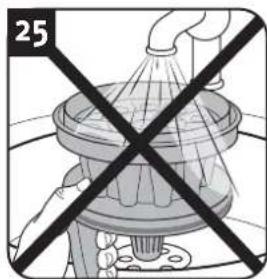
natural_image
Diagram of a showerhead with a crosshair overlay, no text or symbols present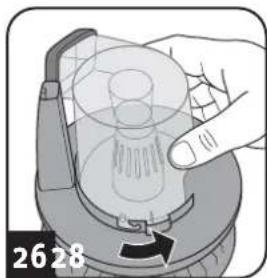
natural_image
Illustration of a hand pressing down on a mechanical component with a finger pointing to it (no text or symbols)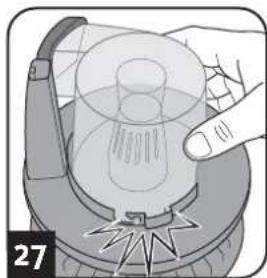
natural_image
Illustration of a hand holding a transparent dome-shaped object with internal lines, next to a mechanical component (no text or symbols)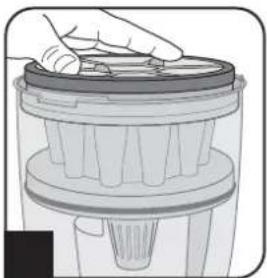
natural_image
Illustration of a hand holding a lid with a plastic container (no text or symbols visible)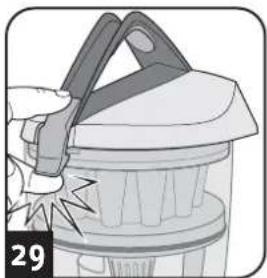
natural_image
Illustration of a hand holding a tool interacting with a mechanical component (no text or symbols visible)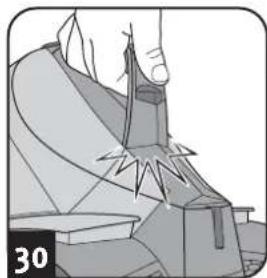
natural_image
Illustration of a hand using a tool to cut or mark a mechanical component, no text or symbols presentAANWIJZING:
natural_image
Illustration of a hand inserting a component into a computer mouse (no text or symbols visible)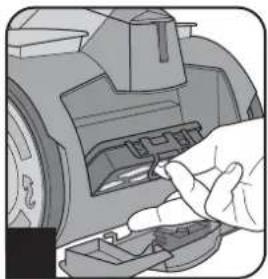
natural_image
Close-up of a hand inserting a component into a vehicle's engine compartment (no visible text or symbols)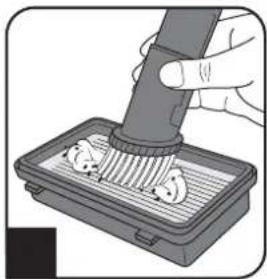
natural_image
Illustration of a hand using a pipette to clean or brush inside a tray with small objects (no text or symbols visible)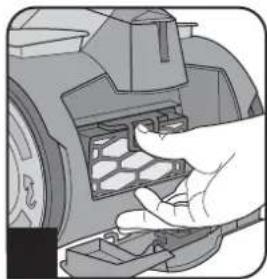
natural_image
Hand inserting a component into a vehicle's engine compartment (no text or symbols visible)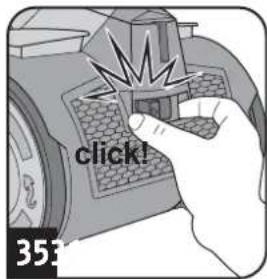
OPGELET:
natural_image
Illustration of hands holding a device with arrows indicating motion (no text or symbols)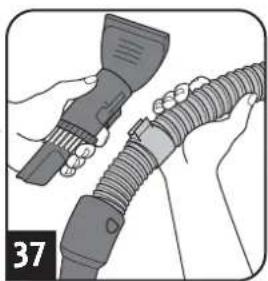
natural_image
Illustration of hands holding a flashlight and a coiled cable (no text or symbols)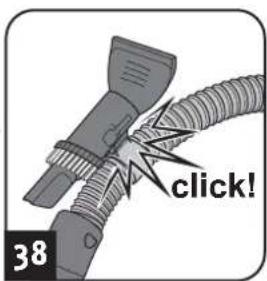
natural_image
Mechanical component diagram showing a valve or valve assembly with a black arrow indicating direction (no text or symbols present)WAARSCHUWING:
natural_image
Line drawing of a vacuum cleaner device with internal components and handle (no text or symbols)natural_image
Close-up of a hand holding a small object next to a mechanical component (no visible text or symbols)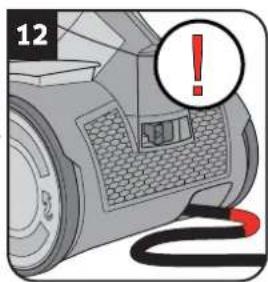
natural_image
Close-up of a car interior with a warning icon and cable, no readable text or symbols present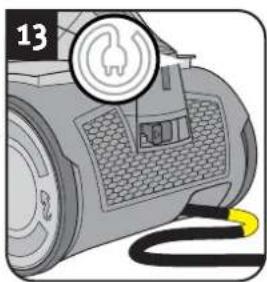
natural_image
Illustration of a vacuum cleaner with a circular dial indicator and yellow cable (no text or symbols)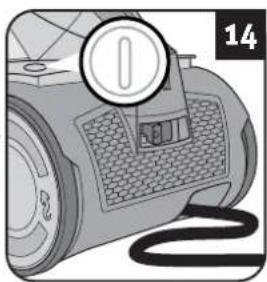
natural_image
Illustration of a vacuum cleaner with a circular badge and cord (no text or symbols)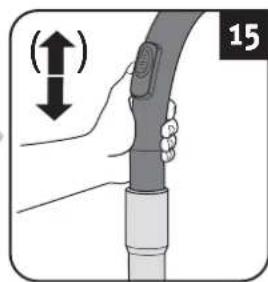
natural_image
Illustration of a hand holding a cable with a sensor, showing a vertical motion indicator (no text or symbols)! AVISO:
natural_image
Illustration of a mechanical device with a red starburst effect on its side (no text or symbols)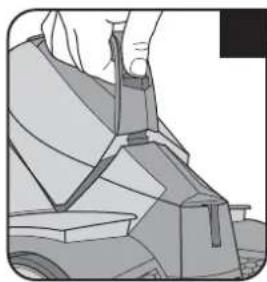
natural_image
Illustration of a hand using a tool to lift a vehicle (no text or symbols visible)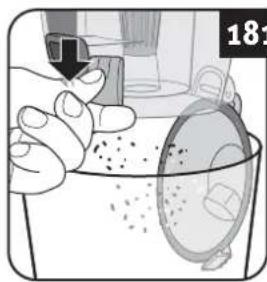
natural_image
Illustration of a hand cleaning a container with a lid and scattered particles (no text or symbols)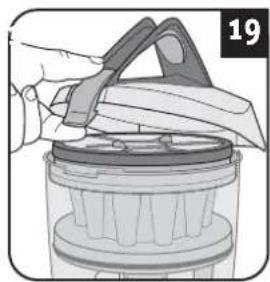
natural_image
Illustration of a hand using a tool to lift or spread a cylindrical object into a container (no text or symbols visible)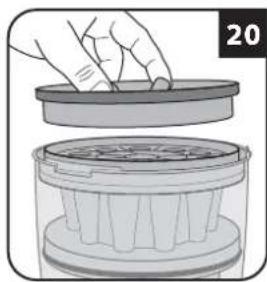
natural_image
Illustration of a hand placing a lid onto a container with a side view (no text or symbols)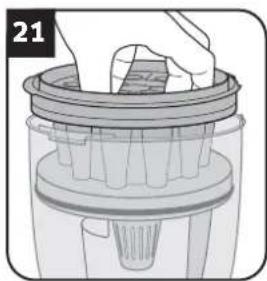
natural_image
Illustration of a hand placing a component into a cylindrical container (no text or symbols visible)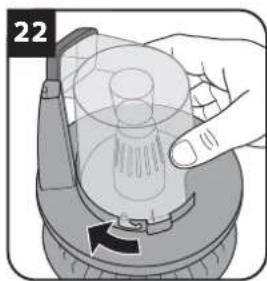
natural_image
Illustration of a hand pressing down on a mechanical component with a circular feature, showing no text or symbols.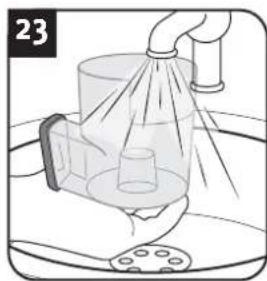
natural_image
Illustration of a showerhead spraying water onto a surface with a pipe and plate nearby (no text or symbols)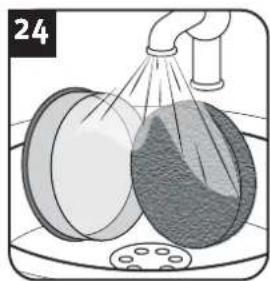
natural_image
Illustration of a spray bottle dispensing liquid into a container with a lid, no text or symbols present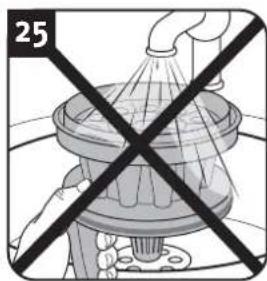
natural_image
Diagram of a showerhead with a cross-section showing water flow, no text or symbols present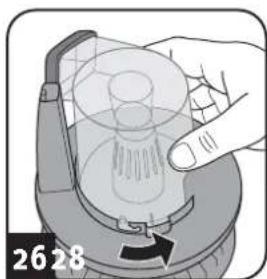
natural_image
Illustration of a hand holding a mechanical component with a finger pointing to it, showing no text or symbols.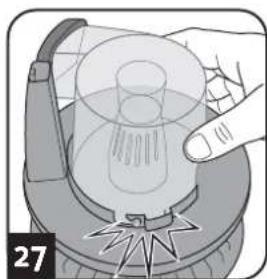
natural_image
Illustration of a hand pressing a light bulb on a device (no text or symbols visible)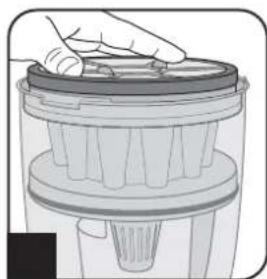
natural_image
Illustration of a hand holding a lid over a mechanical component (no text or symbols visible)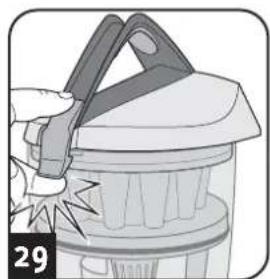
natural_image
Illustration of a hand holding a tool interacting with a container (no text or symbols visible)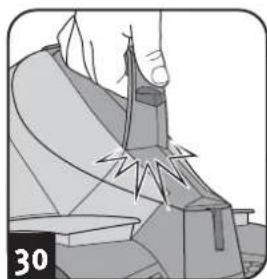
natural_image
Illustration of a hand using a tool to cut or mark a mechanical component, no text or symbols presentADVERTENCIA:
natural_image
Illustration of a hand pressing a component on a vehicle (no text or symbols visible)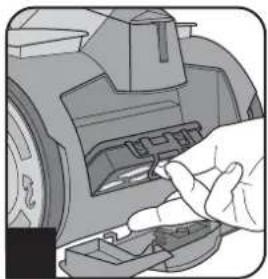
natural_image
Close-up of a hand inserting a component into a car's wheel (no visible text or symbols)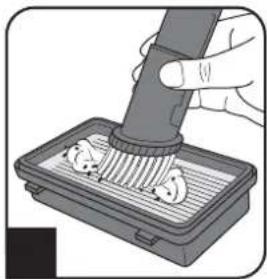
natural_image
Illustration of a hand using a pipette to clean or brush inside a tray with circular objects (no text or symbols)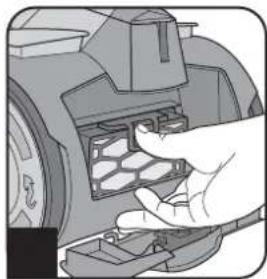
natural_image
Hand inserting a component into a vehicle's engine compartment (no text or symbols visible)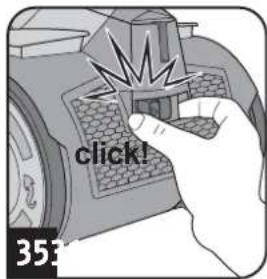
ATENCIÓN:
natural_image
Illustration of hands using a tool to adjust a device (no text or symbols visible)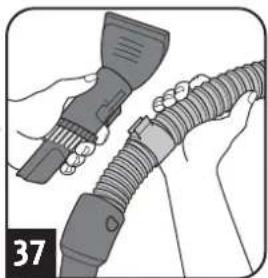
natural_image
Illustration of hands holding a handheld device connected to a coiled cable or hose (no text or symbols visible)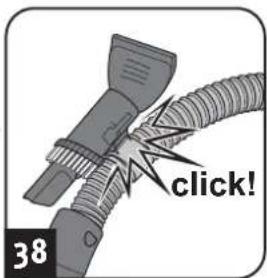
natural_image
Mechanical component diagram showing a pipe or duct assembly with no visible text or symbolsAVISO:
Peso : aprox. 5,0 kg



natural_image
Illustration of a vacuum cleaner with handle and control panel (no text or symbols)natural_image
Illustration of a robotic arm with mesh head and handle, no text or symbols present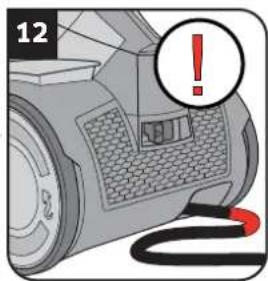
natural_image
Illustration of a car tire with a warning symbol and a red cable, no text or symbols present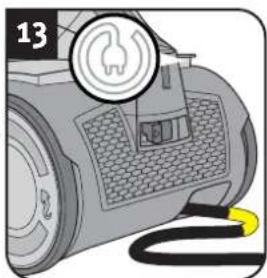
natural_image
Close-up of a vacuum cleaner's engine with a power button and cable (no text or symbols visible)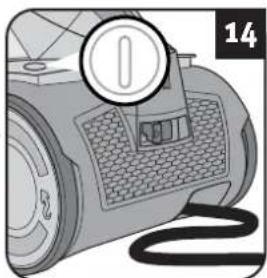
natural_image
Illustration of a portable radio with a circular badge and cord (no text or symbols)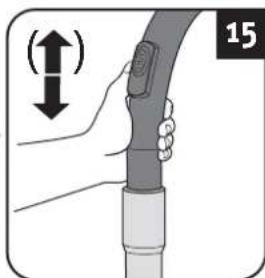
natural_image
Illustration of a hand holding a cable with a sensor, showing a vertical motion indicator (no text or symbols)AVVERTIMENTO:
natural_image
Illustration of a mechanical device with a red starburst effect on its side (no text or symbols)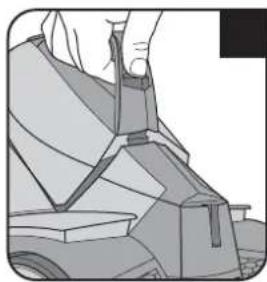
natural_image
Illustration of a hand using a tool to lift a vehicle (no text or symbols visible)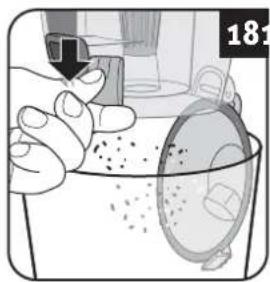
natural_image
Illustration of a hand holding a container with particles, next to a circular object (no text or symbols)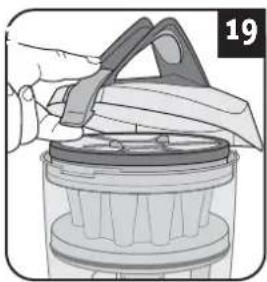
natural_image
Illustration of a hand using a tool to lift or spread material into a container (no text or symbols visible)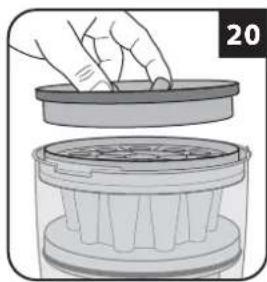
natural_image
Illustration of a hand placing a lid onto a container with a side view (no text or symbols)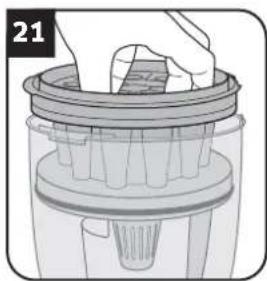
natural_image
Illustration of a hand placing a component into a cylindrical container (no text or symbols visible)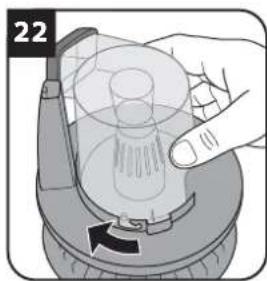
natural_image
Illustration of a hand pressing down on a mechanical component with a circular feature, showing no text or symbols.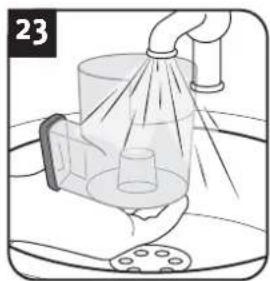
natural_image
Illustration of a showerhead spraying water onto a sink with a bucket (no text or symbols)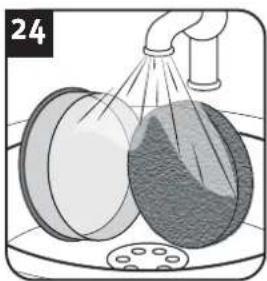
natural_image
Illustration of a spray bottle dispensing liquid into a container with two circular containers (no text or symbols)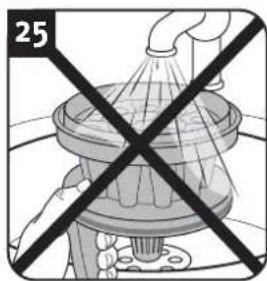
natural_image
Diagram of a showerhead with a cross-section showing water flow, no text or symbols present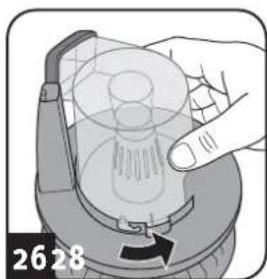
natural_image
Illustration of a hand pressing down on a mechanical component with a black arrow indicating rotation (no text or symbols)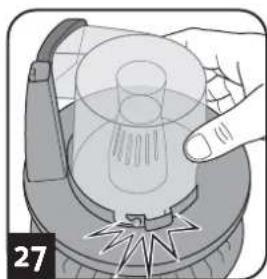
natural_image
Illustration of a hand pressing a light bulb on a device (no text or symbols visible)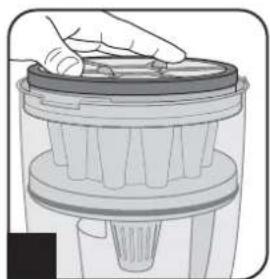
natural_image
Illustration of a hand placing a lid into a container with a plastic lid (no text or symbols visible)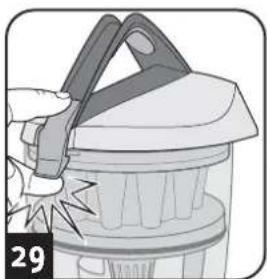
natural_image
Illustration of a hand holding a tool interacting with a container (no text or symbols visible)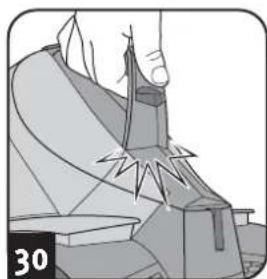
natural_image
Illustration of a hand using a tool to cut or mark a mechanical component (no text or symbols visible)INDICAZIONE:
natural_image
Hand inserting a component into a device (no visible text or symbols)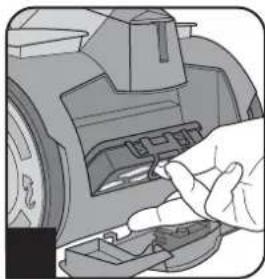
natural_image
Close-up of a hand inserting a component into a vehicle's engine compartment (no visible text or symbols)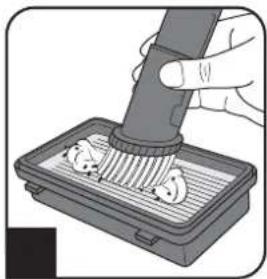
natural_image
Illustration of a hand using a pipette to clean food items in a tray (no text or symbols visible)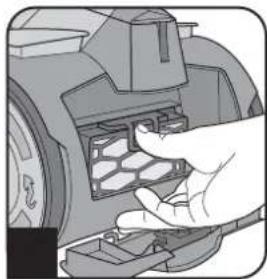
natural_image
Hand inserting a component into a vehicle chassis (no visible text or symbols)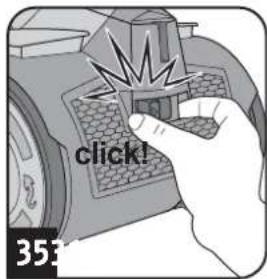
ATTENZIONE:
natural_image
Illustration of hands using a flashlight to interact with a device (no text or symbols visible)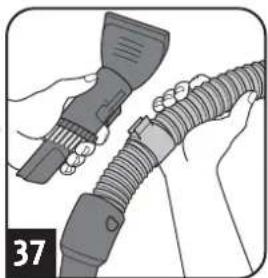
natural_image
Illustration of hands holding a handheld device connected to a coiled cable or hose (no text or symbols visible)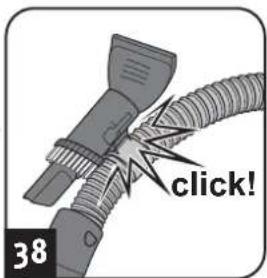
natural_image
Mechanical component diagram showing a pipe or duct assembly with no visible text or symbolsAVVERTIMENTO:
natural_image
Line drawing of a vacuum cleaner device with internal components and handle (no text or symbols)natural_image
Illustration of a hand using a handheld tool to clean or brush over a grid of small objects (no text or symbols visible)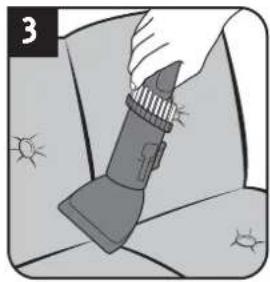
natural_image
Illustration of a hand holding a flashlight with sun icons nearby (no text or symbols)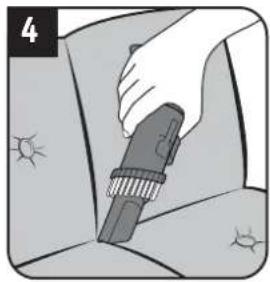
natural_image
Illustration of a hand holding a handheld device with a textured surface (no text or symbols)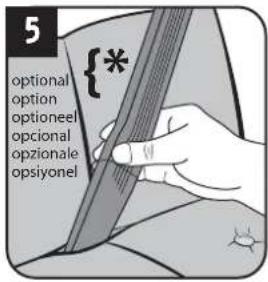
natural_image
Mechanical component diagram showing a lever pressing a button with a downward arrow, no text or symbols present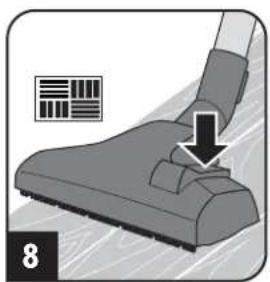
natural_image
Illustration of a foot pushpin with a downward arrow indicating compression (no text or symbols)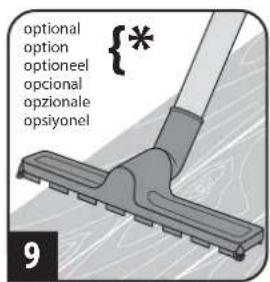
Uyari:
natural_image
Close-up of a robotic vacuum cleaner with mesh grille and hand holding tool (no visible text or symbols)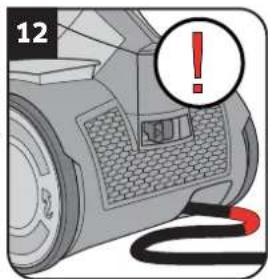
natural_image
Close-up of a vacuum cleaner's wheel with a warning symbol and cable, no readable text or labels present.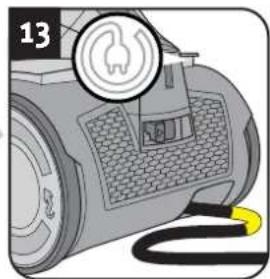
natural_image
Close-up of a vacuum cleaner with a power button icon and cable (no text or symbols visible)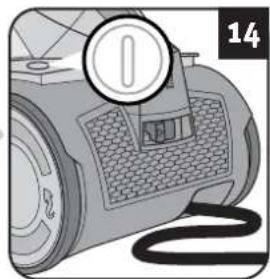
natural_image
Illustration of a portable electronic device with a circular badge and cord (no text or symbols)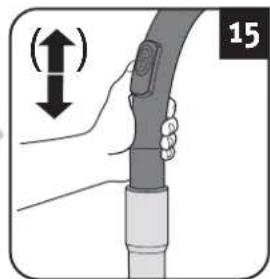
natural_image
Illustration of a hand holding a cable with a device, showing a vertical motion indicator (no text or symbols)⚠️ Uyari:
natural_image
Illustration of a camera lens with red starburst effect (no text or symbols)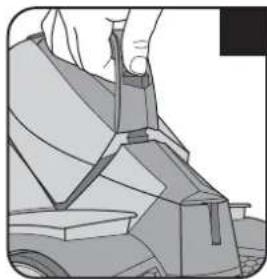
natural_image
Illustration of a hand using a tool to lift a mechanical component (no text or symbols visible)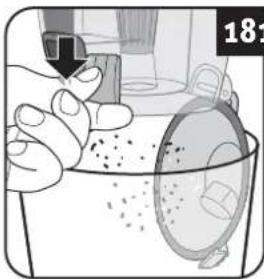
natural_image
Illustration of a hand holding a container with particles, next to a circular object (no text or symbols)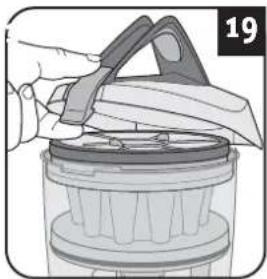
natural_image
Illustration of a hand using a knife to lift a cylindrical container (no text or symbols visible)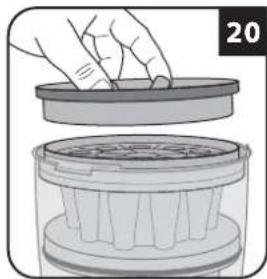
natural_image
Illustration of a hand placing a lid onto a container with a side view showing internal structure (no text or symbols)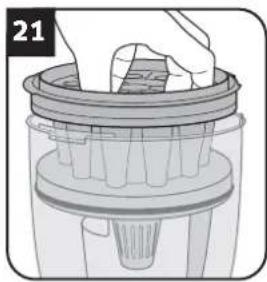
natural_image
Illustration of a hand placing a component into a cylindrical container (no text or symbols visible)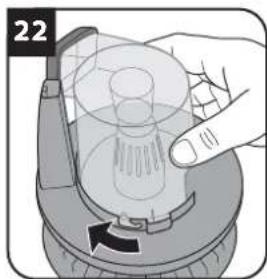
natural_image
Hand holding a mechanical component with a circular component and directional arrow (no text or symbols)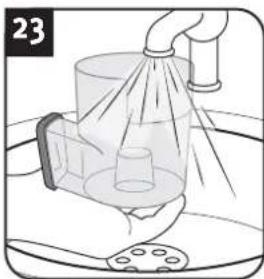
natural_image
Illustration of a showerhead spraying water onto a sink with a lid nearby (no text or symbols)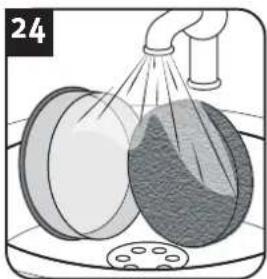
natural_image
Illustration of a hand pouring liquid into two containers, one with a lid and the other with a mesh cap (no text or symbols)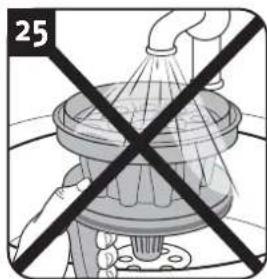
natural_image
Diagram of a showerhead with a crosshair overlay, no text or symbols present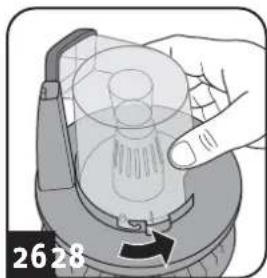
natural_image
Illustration of a hand pressing down on a mechanical component with a finger, showing no text or symbols.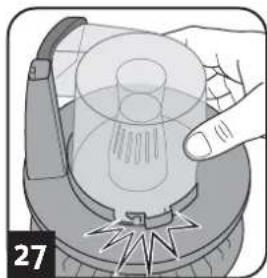
natural_image
Illustration of a hand holding a transparent container with internal components, no text or symbols present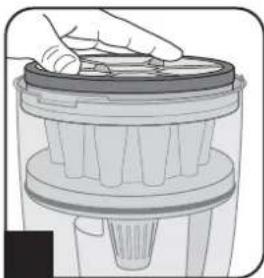
natural_image
Illustration of a hand using a tool to press or install a mechanical component (no text or symbols visible)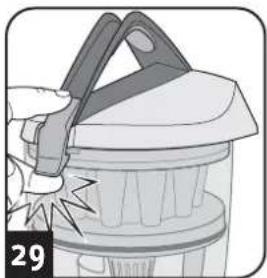
natural_image
Illustration of a hand holding a tool interacting with a container (no text or symbols visible)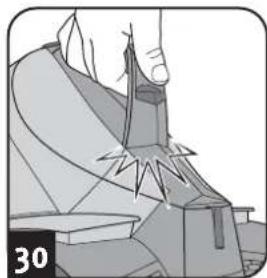
natural_image
Illustration of a hand using a tool to cut or mark a mechanical component (no text or symbols visible)Açıklama:
natural_image
Illustration of a hand pressing a component on a vehicle (no text or symbols visible)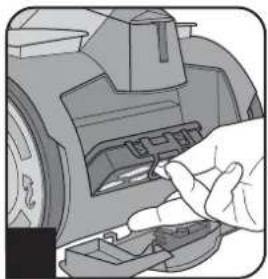
natural_image
Close-up of a hand inserting a component into a car's wheel (no visible text or symbols)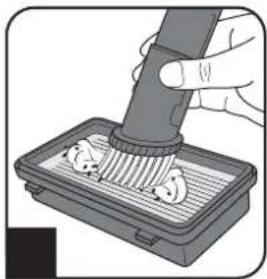
natural_image
Illustration of a hand using a pipette to clean food items on a tray (no text or symbols visible)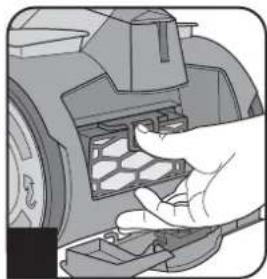
natural_image
Hand inserting a component into a vehicle's engine compartment (no text or symbols visible)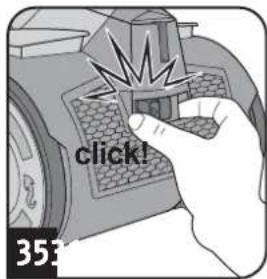
Dikkat:
natural_image
Illustration of hands using a flashlight to adjust a device (no text or symbols visible)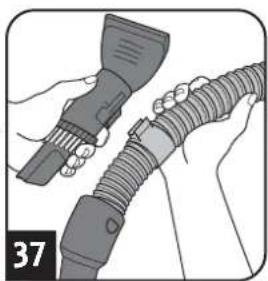
natural_image
Illustration of hands holding a handheld device with coiled cable (no text or symbols visible)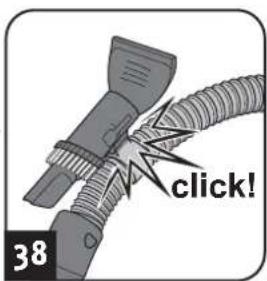
natural_image
Mechanical component diagram showing a pipe or duct assembly with no visible text or symbols⚠️ Uyari:
▷ Sayfa 46, "International Service"
natural_image
Illustration of a vacuum cleaner with internal components and handle (no text or symbols)DE
Royal Appliance International GmbH
Abt. Kundenservice
Jagenbergstraße 19
41468 Neuss
DEUTSCHLAND

de@dirtdevil-service.eu
www.dirtdevil.de

0049 (0) 180 - 501 50 50*

0049 (0) 2131 - 60906095
BE

be@dirtdevil-service.eu

0032 - 2 - 80 85 065**
DK

dk@dirtdevil-service.eu

0045 - 78 - 77 44 95**
FI

fi@dirtdevil-service.eu

00358 - 9 - 42 45 04 12**
GR

gr@dirtdevil-service.eu

0030 - 2 - 11 19 81 203**
IT

it@dirtdevil-service.eu

0039 - 06 - 94 80 16 18**
NL

nl@dirtdevil-service.eu

0031 - 20 - 80 85 408**
PT

pt@dirtdevil-service.eu

00351 - 21 - 11 41 327**
AT

at@dirtdevil-service.eu

0043 - 720 - 88 49 54**
CH

ch@dirtdevil-service.eu

0041 - 31 - 52 80 557 **
CZ

cz@dirtdevil-service.eu

00420 - 2 - 46 01 95 41**
ES

es@dirtdevil-service.eu

0034 - 91 - 19 82 787**
FR

fr@dirtdevil-service.eu

0033 - 9 - 75 18 30 17**
HU

hu@dirtdevil-service.eu

0036 - 1 - 84 80 686**
LU

lu@dirtdevil-service.eu

00352 - 2 - 08 80 506**
PL

pl@dirtdevil-service.eu

0048 - 22 - 39 70 223**
DE
natural_image
Illustration of a vacuum cleaner with labeled model DD 5254 (no other text or symbols)Fehlerbeschreibung • Description of the malfunction • Description du problème • Omschrijving van de fout • Descripción del fallo • Descrizione del difetto • Hata tanimi:
Royal Appliance International GmbH
Jagenbergstraße 19
41468 Neuss
Germany
servicecenter@dirtdevil.de
www.dirtdevil.de
+49 (0) 1805 - 10 90 19*
+49 (0) 2131 - 60 90 60 95
DE
* € 0.14 per minute from German landlines, maximum German mobile phone tariff € 0.42 per minute.
The cost of calls from abroad—outside Germany—depend upon the current prices of the respective foreign telephone company.
FR
- ! WARNING:
- HINWEIS:
- ACHTUNG:
- WARNING:
- About the operating manual
- CAUTION:
- NOTE:
- Concerning certain groups of persons
- Information on power supply
- Information on proper use
- Also prohibited:
- About the optionally included turbo brush
- If the appliance is defective
- Assemble appliance and adjust nozzles to surface
- Vacuum cleaning
- Emptying and cleaning the dust container
- Cleaning/replacing the exhaust filter
- Storage
- Spare parts and accessories
- Item number Content
- Before you send in the appliance
- Warranty
- Disposal
- Technical data
- Mode d'emploi
- AVERTISSEMENT:
- REMARQUE:
- ATTENTION:
- ⚠ WAARSCHUWING:
- AANWIJZING:
- OPGELET:
- WAARSCHUWING:
- ! AVISO:
- ADVERTENCIA:
- ATENCIÓN:
- AVISO:
- AVVERTIMENTO:
- INDICAZIONE:
- ATTENZIONE:
- Uyari:
- ⚠️ Uyari:
- Açıklama:
- Dikkat:
- DE
- Royal Appliance International GmbH
- BE
- DK
- FI
- GR
- IT
- NL
- PT
- AT
- CH
- CZ
- ES
- FR
- HU
- LU
- PL
Brand : DIRT DEVIL
Model : Infinity Rebel 54 HE
Category : Vacuum Cleaner