FW85BZ40H - Monitor SONY - Free user manual and instructions
Find the device manual for free FW85BZ40H SONY in PDF.
| Product Type | LCD monitor with LED backlight |
| Brand | Sony |
| Model | FW85BZ40H |
| Screen size (diagonal) | 85 inches (214.8 cm) |
| Display resolution | 3840 x 2160 pixels (4K) |
| Dimensions with stand (W x H x D) | 1899 x 1162 x 441 mm |
| Dimensions without stand (W x H x D) | 1899 x 1089 x 72 mm |
| Weight with stand | 47.7 kg |
| Weight without stand | 45.8 kg |
| Power supply | 220-240 V AC, 50/60 Hz (except Taiwan) |
| Power consumption (Standard mode) | 221.3 W |
| Power consumption (Intense mode) | 318 W |
| Standby power consumption | 0.50 W |
| Main connectivity | 4x HDMI (including 1 ARC), 2x USB, 1x optical, 1x LAN, 1x RS-232C, 1x headphone, 1x VIDEO IN |
| Wireless network | Wi-Fi 802.11a/b/g/n/ac, Bluetooth 4.2 |
| Professional functions | Pro mode, IP control, RS-232C, PIN lock, input restriction |
| Audio output | 10 W + 10 W |
| Compatible wall mount | SU-WL850, SU-WL500, SU-WL450 (not supplied) |
| Operating temperature | 0°C to 40°C |
| Manual contents | 132 pages, includes safety, installation, troubleshooting, specifications |
Frequently Asked Questions - FW85BZ40H SONY
User questions about FW85BZ40H SONY
0 question about this device. Answer the ones you know or ask your own.
Ask a new question about this device
Download the instructions for your Monitor in PDF format for free! Find your manual FW85BZ40H - SONY and take your electronic device back in hand. On this page are published all the documents necessary for the use of your device. FW85BZ40H by SONY.
USER MANUAL FW85BZ40H SONY
Connection Diagram....4
Remote Control and LCD Monitor. . . .6
Settings....7
Pro mode....7
Recommended settings....8
Control functions .....9
RS-232C 9
IP 10
Appendix 12
Extended software ..... 12
Installing the LCD Monitor to the Wall....13
Troubleshooting....15
Specifications 15
About Manuals
This LCD Monitor comes with the following manuals. Please retain the manuals for future reference.
Setup Guide
• LCD Monitor installation and setup.

Reference Guide (this manual) / Safety
Documentation
- Safety information, remote control, troubleshooting, wall-mount installation, specification, etc.

Help
Find more troubleshooting and other useful information directly from your LCD Monitor. Press HELP on the remote control to display a list of topics.

IMPORTANT - Read the End User Software Licence
Agreement before using your Sony product. Using your product indicates your acceptance of the End User Software Licence Agreement. The software licence agreement between you and Sony is available online at Sony website (http://www.sony.net/tv-software-licenses/) or on your product screen. Go to [Settings] → [Device Preferences] → [About] → [Legal information] → [Notices and licences].
Note
- Before operating the LCD Monitor, please read the "Safety Information".
- Read the supplied safety documentation for additional safety information.
- Instructions about "Installing the LCD Monitor to the Wall" are included within this LCD Monitor's instruction manual.
- Images and illustrations used in the Setup Guide and this manual are for reference only and may differ from the actual product.
Location of the identification label
Labels for the LCD Monitor Model No. and Power Supply rating are located on the rear of the LCD Monitor.
Safety Information
Installation/Set-up
Install and use the LCD Monitor in accordance with the instructions below in order to avoid any risk of fire, electric shock or damage and/or injuries.
Installation
- The LCD Monitor should be installed near an easily accessible AC power outlet (mains socket).
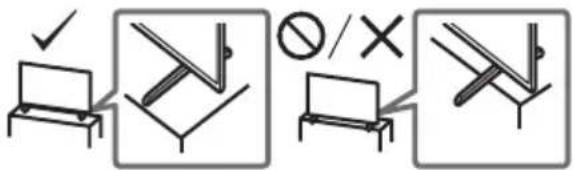
- Place the LCD Monitor on a stable, level surface to prevent it from falling over and causing personal injury or property damage.
• Install the LCD Monitor where it cannot be pulled, pushed, or knocked over. - Install the LCD Monitor so that the LCD Monitor's Table-Top Stand does not protrude out from the LCD Monitor stand (not supplied). If the Table-Top Stand protrudes out from the LCD Monitor stand, it may cause LCD Monitor set to topple over, fall down, and cause personal injury or damage to the LCD Monitor.
text_image
Diagram illustrating four different types of lighting or fixture installation methods, including check, no/×, and various lighting fixtures.Transporting
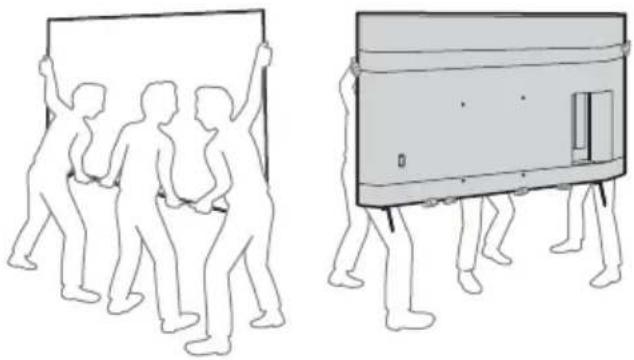
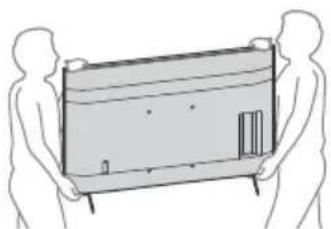
- Before transporting the LCD Monitor, disconnect all cables.
- Two or more people (three or more people for FW-85BZ40H) are needed to transport a large LCD Monitor.
- When transporting the LCD Monitor by hand, hold it as shown below. Do not put stress on the LCD panel and the frame around the screen.
FW-85BZ40H
natural_image
Two line drawings of human figures carrying a large rectangular object, no text or symbols presentFW-75BZ40H / 65BZ40H / 55BZ40H

natural_image
Illustration of two silhouetted figures holding a rectangular device (no text or symbols visible)- When transporting the LCD Monitor, do not subject it to jolts or excessive vibration.
- When transporting the LCD Monitor for repairs or when moving, pack it using the original carton and packing material.
Topple prevention
(Models with supplied support belt kit)
Refer to the Setup Guide on top of the cushion. The supplied wood screw is only for affixing to a solid object made of wood.
(Except models with supplied support belt kit)
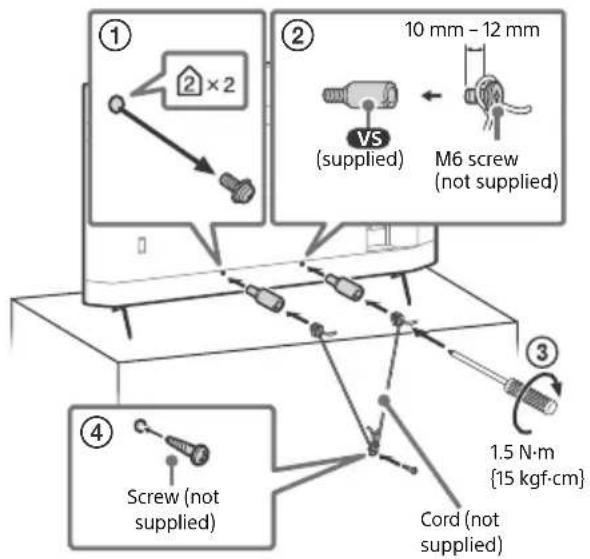
text_image
① ② 10 mm - 12 mm VS (supplied) M6 screw (not supplied) ③ 1.5 N·m {15 kgf·cm} Cord (not supplied) ④ Screw (not supplied)Notice for customer in UAE
TRA
REGISTERED No: ER73578/19
DEALER No: DA0105422/13
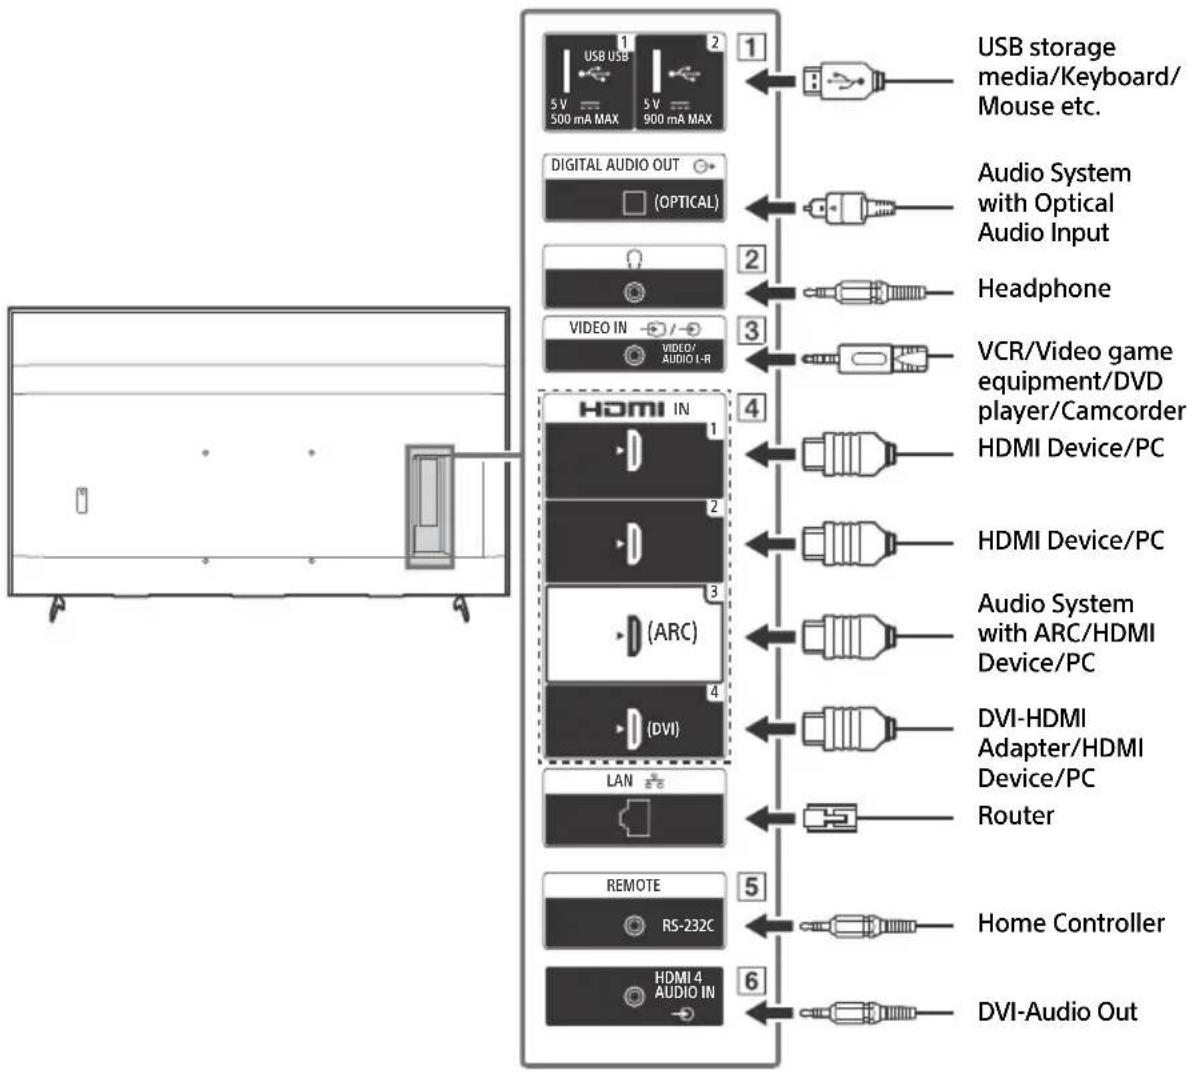
Connection Diagram
flowchart
graph TD
    A["Home Device"] --> B["USB storage media/Keyboard/Mouse etc."]
    A --> C["Audio System with Optical Audio Input"]
    A --> D["Headphone"]
    A --> E["VCR/Video game equipment/DVD player/Camcorder HDMI Device/PC"]
    A --> F["HDMI Device/PC"]
    A --> G["Audio System with ARC/HDMI Device/PC"]
    A --> H["DVI-HDMI Adapter/HDMI Device/PC Router"]
    A --> I["Home Controller"]
    A --> J["DVI-Audio Out"]

    subgraph Home_During
        K["USB USB 5V 500 mA MAX"] --> L["1"]
        M["5V 900 mA MAX"] --> N["2"]
        O["OPTICAL"] --> P["3"]
        Q["VIDEO IN"] --> R["4"]
        S["VIDEO AUDIO I-R"] --> T["5"]
        U["(ARC)"] --> V["6"]
        W["(DVI)"] --> X["7"]
        Y["LAN"] --> Z["8"]
        AA["REMOTE"] --> AB["9"]
        AC["RS-232C"] --> AD["10"]
        AE["HDMI 4 AUDIO IN"] --> AF["11"]
    end

    style Home_During fill:#f9f,stroke:#333
    style Home_During fill:#ccf,stroke:#333
1 USB 1, USB 2
- Connecting a large USB device may interfere with other connected devices beside it.
2 Ⓞ (Headphone)
• Supports 3-pole stereo mini jack only.
- You cannot output sound from both the headphone and the LCD Monitor speakers at the same time.
3 7 VIDEO IN
- For a composite connection, use an Analogue Extension Cable (not supplied).
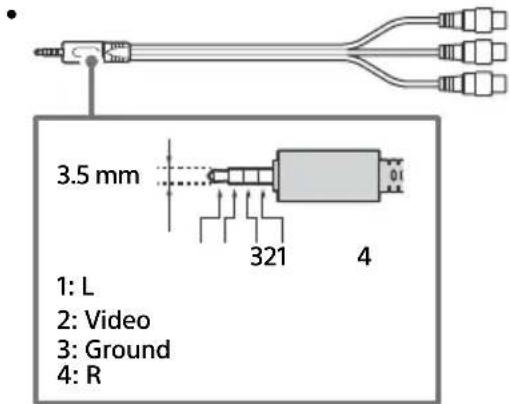
text_image
3.5 mm 1: L 2: Video 3: Ground 4: R4 HDMI IN 1/2/3/4
- HDMI interface can transfer the digital video and audio on a single cable.
- If the device has a DVI jack, connect it to HDMI IN 4 through a DVI - HDMI adaptor interface (not supplied), and connect the device's audio out jack to HDMI 4 AUDIO IN.
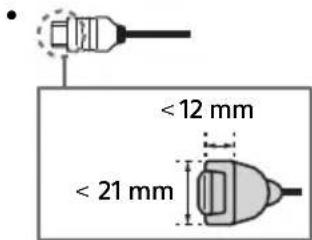
text_image
< 12 mm < 21 mm• HDMI IN 3 ARC (Audio Return Channel)
Connect your audio system to the HDMI IN 3 to route LCD Monitor audio to your audio system. An audio system that supports HDMI ARC can send video to the LCD Monitor, and receive audio from the LCD Monitor via the same HDMI cable. If your audio system does not support HDMI ARC, an additional connection with DIGITAL AUDIO OUT (OPTICAL) is necessary.
5 REMOTE RS-232C
- Terminal for serial communication. For details, see "Control functions".
6 HDMI 4 AUDIO IN
- If the device has a DVI jack, connect it to HDMI IN 4 through a DVI - HDMI adaptor interface (not supplied), and connect the device's audio out jack to HDMI 4 AUDIO IN.
Remote Control and LCD Monitor
The remote control shape, location, availability and function of remote control buttons may vary depending on your region/country/LCD Monitor model.
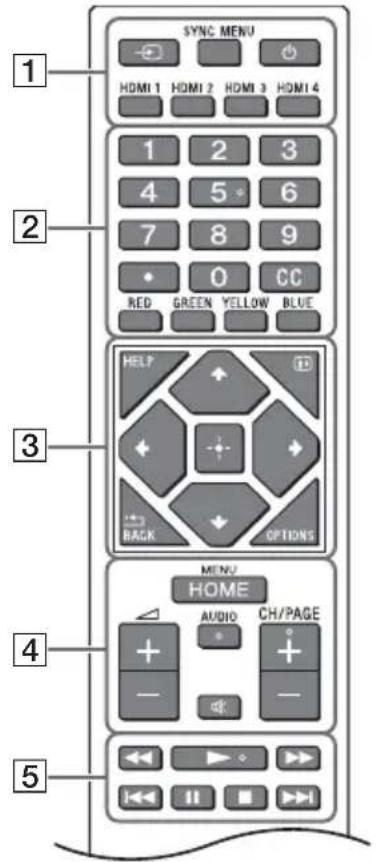
text_image
SYNC MENU HDMI 1 HDMI 2 HDMI 3 HDMI 4 1 2 3 4 5 6 7 8 9 0 CC RED GREEN YELLOW BLUE HELP BACK OPTIONS MENU HOME AUDIO CH/PAGE + - - - - - - - - - - - - - - - - - - - - - - - - - - - - - - - - - - - - - - - - - - - - - - - - - - - - - - - - - - - - - - - - - - - - - - - - - - -1 (Input select): Display and select the input source, etc.
SYNC MENU: Display the BRAVIA Sync Menu.
(Monitor standby) HDMI 1/2/3/4
2 Number buttons
(dot)
CC
Colour buttons
3 HELP: Display the Help menu.
i+ (Screen display): Display information.
/BACK
OPTIONS: Displays a list of functions that can be used at that time.
////+ (Navigation D-Pad): On screen menu navigation and selection.
4 HOME/MENU
$$ \triangle + / - (\text { Volume }) $$
AUDIO: Select the sound of multilingual source or dual sound (depend on programme source).
O × (Mute)^*
CH/PAGE +/-
5
flowchart
graph TD
    A["6"] --> B["Process Box"]
    C["7"] --> B
    B --> D["Output"]
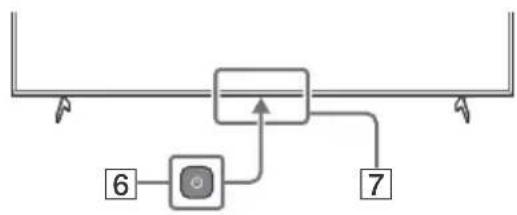
6 ⏻ (Power)
7 Remote Control sensor / Light sensor / LED
* Accessibility shortcut is available by pressing and holding ☑ (Mute).
Settings
Pro mode
In [Pro mode], you can use various convenient functions for professional use. Here, we introduce how to change to [Pro mode] and typical functions of [Pro mode].
Pro mode
Normal mode: This is the default mode. [Pro mode] functions are not available in this mode.
Pro settings mode: This mode allows you to set various settings of [Pro mode] functions.
Pro mode: This is the operation mode for professional use where you can use the [Pro mode] functions.
How to change the mode
When the Monitor is in Normal mode and Pro settings mode
- Go to [Home (Menu)] [Apps] [Pro mode tool], then select the mode you want to change.
When the Monitor is in the Pro mode
- Press the activation keys described below on the remote control in order within a one second interval.
After restarting the Monitor, the mode changes to [Pro settings mode].
Activation key: i+ (Screen display) / ☐ (Mute) / △ +/- (Volume +) / HOME/MENU
*Initially you cannot change the mode from [Pro mode tool] in [Pro mode]. If you want to change the mode from [Pro mode tool], go to [Pro settings] → [Function restrictions] → [Apps] and change [Pro mode tool] to [Enable] in [Pro settings mode].
Introduction of the Pro mode functions
In [Pro mode], you can use various convenient functions. Typical [Pro mode] functions are introduced below.
—Setting Monitor operation when turning the AC power on
You can set the operation of the Monitor when unplugging and reinserting the AC power plug.
—Optimized display of the PC input screen
The screen displays the PC input screen with optimum size according to the PC format.
—Power supply control and automatic input switching by HDMI signal detection
If you turn on the Monitor when the HDMI device is connected, you can change to the connected HDMI input automatically.
—Settings of the displaying menu when pressing the HOME/MENU button
You can select the menu displayed when pressing the HOME/MENU button on the remote control.
—Initial input source designation when starting the Monitor
You can designate the initial input source when starting the Monitor.
—Pro mode lock
You can protect the settings of [Pro mode] by using a PIN.
-Initial/maximum volume setting
You can set the initial and maximum volume of the Monitor.
—Restriction of the Monitor operation on the remote control
You can restrict the Monitor operation using the remote control.
—Restriction of external inputs
You can restrict the use of external inputs.
—Restriction of using applications
You can restrict the use of Monitor applications.
How to set Pro mode functions
Go to [Home (Menu)] → [Settings] → [Pro settings] when the Monitor is in [Pro settings mode].*
*Varies depending on the version of the OS.
Recommended settings
This section introduces recommended settings when using the Monitor for professional use.
Setting ECO features
1 Go to [Settings] → [Device Preferences] → [Power].
- Set [Idle TV standby] to [Off].
Setting IP features
2 Go to [Settings] → [Network & Internet] → [Home network setup] → [IP control].
- Set [Authentication] to [Normal and Pre-Shared Key].
- Set [Simple IP control] to [On].
Automatic Software Download
3 Go to [Settings] → [Device Preferences] → [About] → [System software update].
- Set [Automatically check for update] to [Off].
Picture settings
4 Go to [Settings] → [Display & Sound] → [Picture].
- Set [Light sensor] to [Off].
- Select [Picture mode] according to usage.
[Vivid]: When using the digital signage display
[Custom]: When displaying the original image as is
[Graphics]: When displaying the PC screen
Setting values of [Picture mode]
The following is the initial value of each setting item of [Picture mode].
| Items | [Picture mode] | |||
| [Vivid] [Standard] [Custom]* [Graphics]* | ||||
| [Brightness] Max.(50) | 40 40 40 | |||
| [Colour] 60 60 50 50 | ||||
| [Contrast] Max.(100) | 90 90 90 | |||
*Since the Monitor responds faster in [Graphics] mode than it does in [Custom] mode, the Monitor can display the mouse movement smoothly when operating the PC screen in [Graphics] mode.
Note
Each setting value is subject to change without notice.
Control functions
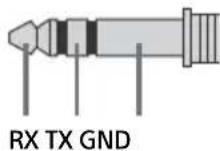
RS-232C
You can control the Monitor from an external service via RS-232C. The RS-232C connection is briefly explained in this page.
Interface
Establish the RS-232C connection to the Monitor by using a 3.5 mm stereo mini plug.
TIP: Monitor → Controller
RING: Controller → Monitor
Connection settings
When establishing the RS-232C connection, make connection settings as below.
| Baud rate 9,600 bps |
| Data 8 bit |
| Parity None |
| Start bit 1 bit |
| Stop bit 1 bit |
| Flow control None |
Data format
We introduce the data format for the RS-232C communication below.
(a) Requests from the controller to the Monitor
| No. Item Value | |||
| 1 Header 0x8C : Control | |||
| 2 | Category | 0x00 | (fixed) |
| 3 Function | 0xXX | ||
| 4 | Length | 0xXX | (=Data X+1 byte) |
| 5 | Data 1 | 0xXX | |
| : | : | 0xXX | |
| : | : | 0xXX | |
| X+4 | Data X | 0xXX | |
| X+5 | Check Sum | 0xXX | |
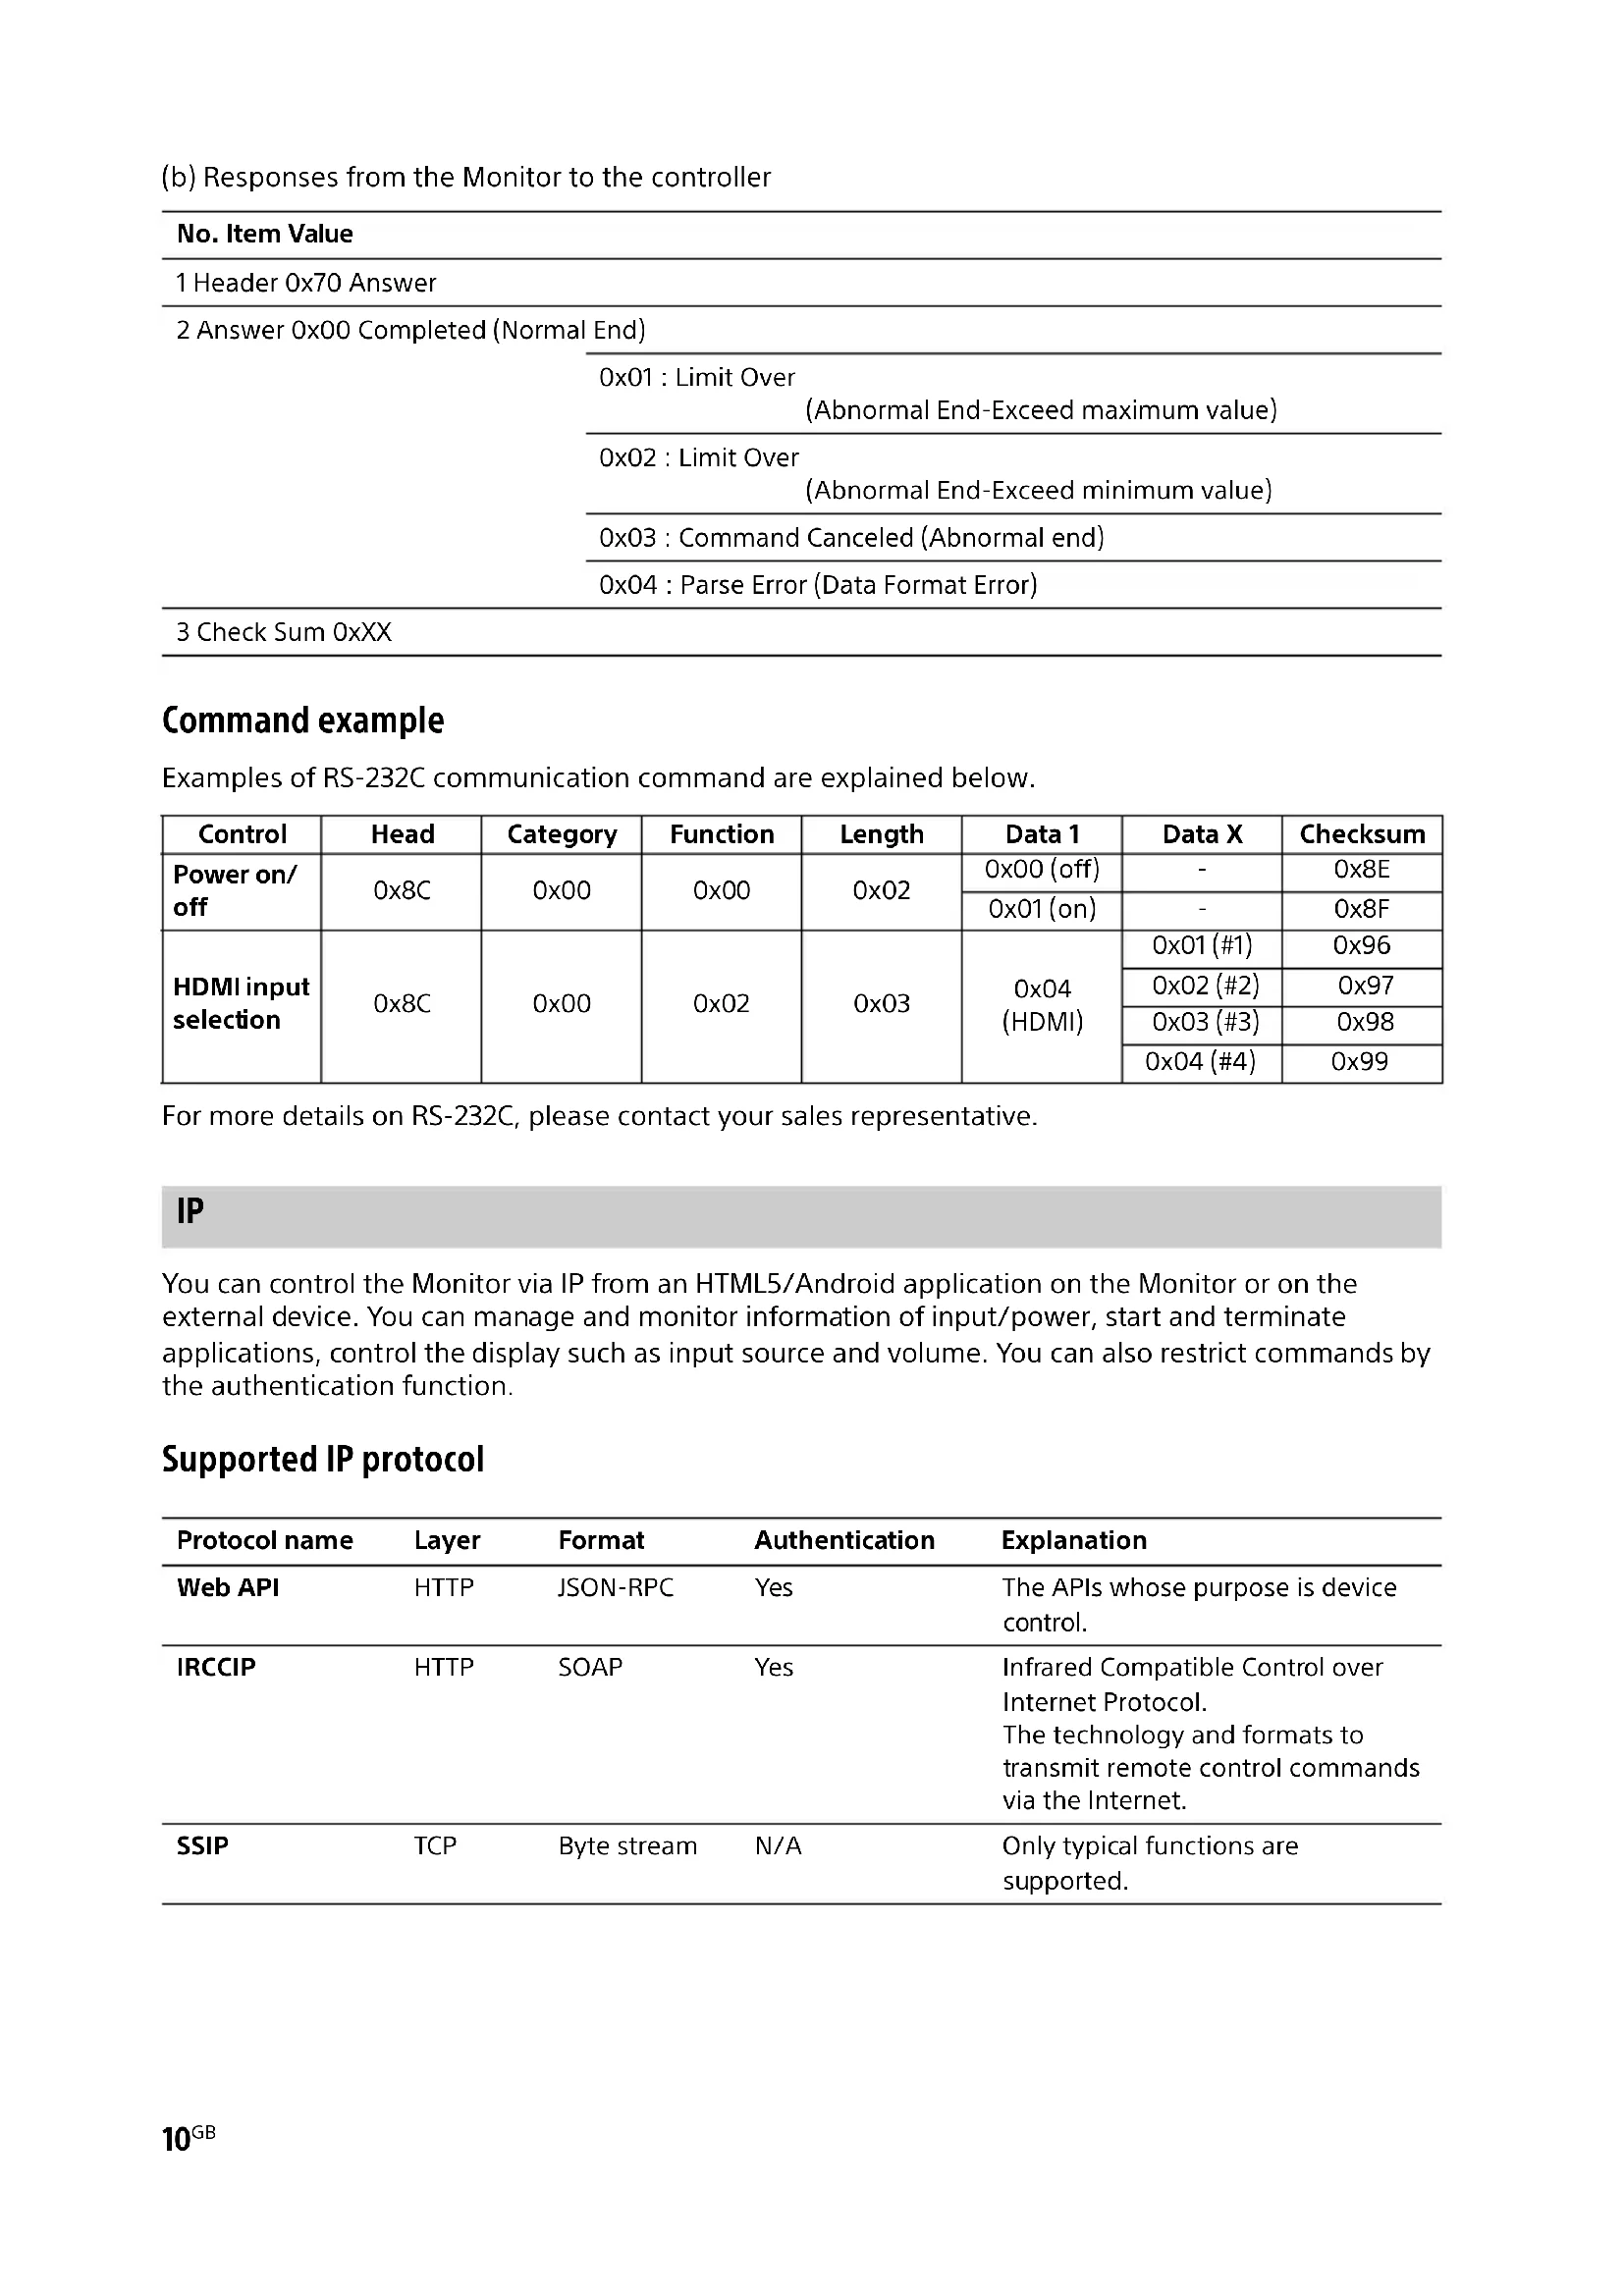
(b) Responses from the Monitor to the controller
| No. Item Value | |
| 1 Header 0x70 Answer | |
| 2 Answer 0x00 Completed (Normal End) | |
| 0x01 : Limit Over(Abnormal End-Exceed maximum value) | |
| 0x02 : Limit Over(Abnormal End-Exceed minimum value) | |
| 0x03 : Command Canceled (Abnormal end) | |
| 0x04 : Parse Error (Data Format Error) | |
| 3 Check Sum 0xXX | |
Command example
Examples of RS-232C communication command are explained below.
| Control | Head | Category | Function | Length | Data 1 | Data X | Checksum |
| Power on/off | 0x8C | 0x00 | 0x00 | 0x02 | 0x00 (off) | - | 0x8E |
| 0x01 (on) | - | 0x8F | |||||
| HDMI input selection | 0x8C | 0x00 | 0x02 | 0x03 | 0x04 (HDMI) | 0x01 (#1) | 0x96 |
| 0x02 (#2) | 0x97 | ||||||
| 0x03 (#3) | 0x98 | ||||||
| 0x04 (#4) | 0x99 |
For more details on RS-232C, please contact your sales representative.
IP
You can control the Monitor via IP from an HTML5/Android application on the Monitor or on the external device. You can manage and monitor information of input/power, start and terminate applications, control the display such as input source and volume. You can also restrict commands by the authentication function.
Supported IP protocol
| Protocol name | Layer | Format | Authentication | Explanation |
| Web API | HTTP | JSON-RPC | Yes | The APIs whose purpose is device control. |
| IRCCIP | HTTP | SOAP | Yes | Infrared Compatible Control over Internet Protocol.The technology and formats to transmit remote control commands via the Internet. |
| SSIP | TCP | Byte stream | N/A | Only typical functions are supported. |
Monitor settings
When using [IP control], set the Monitor as follows first.
Go to [Settings] → [Network & Internet] → [Home network setup] → [IP control].
- Set [Authentication] to [Normal and Pre-Shared Key].
- Set [Pre-Shared Key].
Example of HTTP request and response for Web API
Here is the example of a request and response to acquire the power status to the Monitor (IP address: 192.168.0.1 Pre-shared Key "1234").
URL
http://192.168.0.1/sony/system
Request
POST /sony/system HTTP/1.1
Host: 192.168.0.1
Content-Type: application/json; charset=UTF-8
Content-Length: 70
X-Auth-PSK: 1234
{"method": "getPowerStatus", "params": [], "id": 50, "version": "1.0"}
Response
HTTP/1.1 200 OK
Content-Type: application/json; charset=UTF-8
Content-Length: 44
{"result": [{"status": "active"}], "id": 50}
For more details on [IP control], please contact your sales representative.
Appendix
Extended software
You can use the Monitor more conveniently by using extended software. This page introduces an example of extended software.
For more details, please contact your sales representative.
Software for office Monitors
Provides convenient functions for using the Monitor as an office Monitor connected to a PC in a conference room or the like.
Function examples:
- Power management/Power supply monitoring functions.
- White board function.
- System linked with the conference room reservation system (Supports the Microsoft Exchange Server reservation table, Gsuite).
- Presentation timer.
- You can change inputs or turn the power on/off without the remote control.
Software for digital signage
When using the Monitor as a digital signage display, the software provides convenient functions.
Function examples:
- Digital signage distribution management function to multiple Monitors via the network.
- Easy signage playback function with USB memory.
- Contents and playlist management function.
- Flexible delivery schedule setting by time and day of the week.
Installing the LCD Monitor to the Wall
Using the optional Wall-Mount Bracket (SU-WL850, SU-WL500 or SU-WL450)\* (not supplied)
To Customers:
For product protection and safety reasons, Sony strongly recommends that installation of your LCD Monitor be performed by Sony dealers or licensed contractors. Do not attempt to install it yourself.
To Sony Dealers and Contractors:
Provide full attention to safety during the installation, periodic maintenance and examination of this product.
Wall-Mount Bracket Installation Information
This LCD Monitor's instruction manual only provides the steps to prepare the LCD Monitor for Wall-Mount installation before it is installed on the wall. For instructions on Wall-Mount Bracket installation, see the Installation Information (Wall-Mount Bracket) on the product page for your LCD Monitor model. https://www.sony-asia.com/support
Preparing for Wall-Mount Installation
Make sure to attach the Table-Top Stand before installing the LCD Monitor to the wall by referring to the Setup Guide.
- Prepare the LCD Monitor for the Wall-Mount Bracket before making cable connections.
- Follow the instruction guide provided with the Wall-Mount Bracket for your model. Sufficient expertise is required in installing this LCD Monitor, especially to determine the strength of the wall for withstanding the LCD Monitor's weight.
- Be sure to entrust the attachment of this product to the wall to Sony dealers or licensed contractors and pay adequate attention to safety during the installation. Sony is not liable for any damage or injury caused by mishandling or improper installation.
- The screws for Wall-Mount Bracket are not supplied.
- Only qualified service personnel should carry out wall-mount installations.
- For safety reasons, it is strongly recommended that you use Sony accessories, including: —Wall-Mount Bracket SU-WL850
—Wall-Mount Bracket SU-WL500
—Wall-Mount Bracket SU-WL450
- Be sure to use the screws supplied with the Wall-Mount Bracket when attaching the Wall-Mount Bracket to the LCD Monitor. The supplied screws are designed as indicated by illustration when measured from the attaching surface of the Wall-Mount Bracket.
The diameter and length of the screws differ depending on the Wall-Mount Bracket model. Use of screws other than those supplied may result in internal damage to the LCD Monitor or cause it to fall, etc.
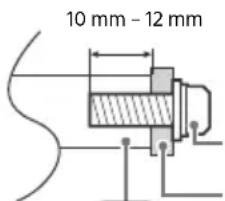
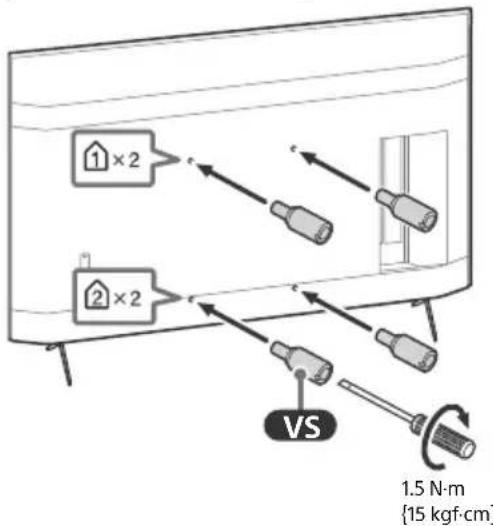
text_image
10 mm - 12 mmVS
Screw (M6)
Wall-Mount Bracket
- Be sure to store the unused screws and Table-Top Stand in a safe place until you are ready to attach the Table-Top Stand. Keep the screws away from small children.
* Only on limited region/country/LCD Monitor model.
1 Remove the screws from the rear of the LCD Monitor.
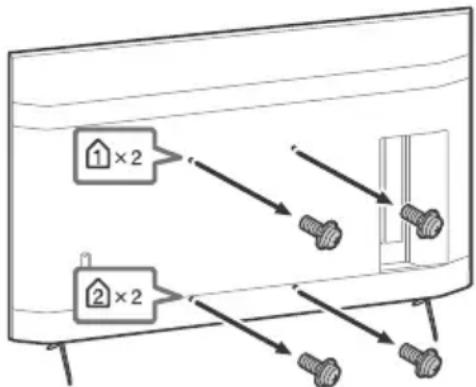
text_image
1×2 2×22 Attach the Wall-Mount Attachment (supplied with the LCD Monitor) to the rear of the LCD Monitor (to make it parallel with the wall).
text_image
1×2 2×2 VS 1.5 N·m {15 kgf·cm}Note
- If using an electric screwdriver, set the torque at approximately 1.5 N·m {15 kgf·cm}.
- Be sure to fasten the Wall-Mount Attachment when attaching them to the LCD Monitor. Use only a flat head screwdriver to install the Wall-Mount Attachment. Use of another tool might result in over torqueing the Wall-Mount Attachment and damaging the LCD Monitor.
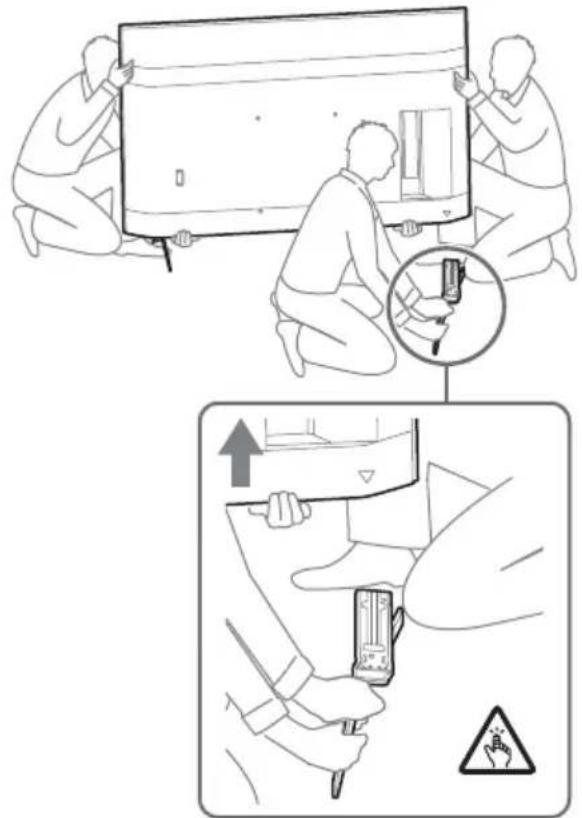
Detaching the Table-Top Stand from the LCD Monitor
1 Remove one side of the Table-Top Stand at a time. Firmly hold the Table-Top Stand securely with both hands while the other people lift up the LCD Monitor.
text_image
Diagram illustrating a procedure for installing or adjusting an appliance, with steps including cleaning and safety instructions.2 Repeat the previous step and remove the other side of the Table-Top Stand.
Note
- Three or more people are required to detach the Table-Top Stand.
- Be careful not to use excessive force while detaching the Table-Top Stand from the LCD Monitor as it may cause the LCD Monitor to fall resulting in personal injury or physical damage to the LCD Monitor.
• Take care when handling the Table-Top Stand to prevent damage to the LCD Monitor. - Be careful when lifting the LCD Monitor as the Table-Top Stand is detached, the Table-Top Stand may topple over and cause personal injury.
• Take care when removing the Table-Top Stand from the LCD Monitor to prevent it from falling over and damaging the surface that the LCD Monitor is sitting on.
Troubleshooting
General troubleshooting for issues like: black screen, no sound, frozen picture, LCD Monitor does not respond, or network is lost, do the following steps.
1 Restart your LCD Monitor by pressing the power button on the remote control for about five seconds. The LCD Monitor will restart. If the LCD Monitor does not recover, try unplugging the AC power cord (mains lead). Then press the power button on the LCD Monitor, and release it. Wait for two minutes, and plug in the AC power cord (mains lead).
2 Refer to the Help menu by pressing HELP on the remote control.
3 Connect your LCD Monitor to the Internet and perform a software update. Sony recommends you to keep your LCD Monitor software updated. Software updates provide new features and performance improvements.
When you plug in the LCD Monitor, the LCD Monitor may not be able to turn on for a while even if you press the power button on the remote control or the LCD Monitor.
It takes time to initialize the system. Wait for about one minute, then operate it again.
The remote control does not function.
- Replace the batteries.
Specifications
System
Panel system: LCD (Liquid Crystal Display) Panel, LED Backlight
Sound output: 10 W + 10 W
Wireless technology
Protocol IEEE 802.11a/b/g/n/ac
Bluetooth® Version 4.2
Input/Output jacks
→/→VIDEO IN
Video/Audio input (mini jack)
HDMI IN 1/2/3/4 (support 4K resolution, HDCP
2.3-compatible)
Video:
4096 × 2160p (50, 60 Hz)^12, 4096 × 2160p
(24 Hz) ^1 , 3840 × 2160p (50, 60 Hz) ^2 , 3840 ×
2160p (24, 25, 30 Hz), 1080p (30, 50, 60, 100,
120 Hz), 1080/24p, 1080i (50, 60 Hz), 720p
(30, 50, 60 Hz), 720/24p, 576p, 480p, PC Formats
Audio:
5.1 channel linear PCM: 32/44.1/48/88.2/96/
176.4/192 kHz 16/20/24 bits, Dolby Audio, Dolby Atmos, DTS
ARC (Audio Return Channel) (HDMI IN 3 only)*3
Two channel linear PCM: 48 kHz 16 bits, Dolby Audio, Dolby Atmos, DTS
→ DIGITAL AUDIO OUT (OPTICAL)
Digital optical jack (Two channel linear PCM: 48 kHz 16 bits, Dolby Audio, DTS)
HDMI 4 AUDIO IN
USB port 1 supports High Speed USB (USB 2.0)
USB port 2 supports Super Speed USB (USB 3.1 Gen 1)
LAN
10BASE-T/100BASE-TX connector (Depending on the operating environment of the network, connection speed may differ. The communication rate and quality are not guaranteed.)
REMOTE
RS-232C, mini jack
This jack is for receiving the external control signal.
Power and others
Power requirements
110 V AC, 60 Hz (Taiwan only)
220 V - 240 V AC, 50/60 Hz (Except Taiwan)
Energy Efficiency Class ^4
(For Egypt only)
FW-85BZ40H: C
FW-75BZ40H: C
FW-65BZ40H: C
FW-55BZ40H: C
Screen size (measured diagonally) (Approx.)
FW-85BZ40H: 85 inches / 214.8 cm
FW-75BZ40H: 75 inches / 189.3 cm
FW-65BZ40H: 65 inches / 163.9 cm
FW-55BZ40H: 55 inches / 138.8 cm
Power consumption
Indicated on the rear of the LCD Monitor
Power consumption ^4
In [Standard] mode
(For Egypt only)
FW-85BZ40H: 221.3 W
FW-75BZ40H: 179.6 W
FW-65BZ40H: 141.2 W
FW-55BZ40H: 112.9 W
In [Vivid] mode
FW-85BZ40H: 318 W
FW-75BZ40H: 277 W
FW-65BZ40H: 214 W
FW-55BZ40H: 173 W
Annual energy consumption ^4
(For Egypt only)*5
FW-85BZ40H: 647 kWh per year
FW-75BZ40H: 525 kWh per year
FW-65BZ40H: 413 kWh per year
FW-55BZ40H: 330 kWh per year
Standby power consumption ^46*7
0.50 W
Display resolution
3,840 pixels (horizontal) × 2,160 lines (vertical)
Output Rating
USB 1
5 V = 500 mA MAX
USB 2
5 V = 900 mA MAX
Dimensions (Approx.) (w × h × d) (mm)
with Table-Top Stand (without Table-Top Stand)
FW-85BZ40H: 1,899 × 1,162 × 441 (1,899 × 1,089 × 72)
FW-75BZ40H: 1,674 × 1,034 × 410 ( 1,674 × 961 × 71 )
FW-65BZ40H: 1,450 × 903 × 338 ( 1,450 × 833 × 70 )
FW-55BZ40H: 1,231 × 780 × 338 (1,231 × 710 × 70)
Mass (Approx.) (kg)
with Table-Top Stand (without Table-Top Stand)
FW-85BZ40H: 47.7 (45.8)
FW-75BZ40H: 34.4 (32.9)
FW-65BZ40H: 23.2 (22.2)
FW-55BZ40H: 17.5 (16.5)
Others
Optional accessories
Wall-Mount Bracket: SU-WL850
(FW-75BZ40H / 65BZ40H / 55BZ40H only)
Wall-Mount Bracket: SU-WL500
Wall-Mount Bracket: SU-WL450
Camera and Microphone Unit: FWA-CE100
Operating temperature: 0 °C – 40 °C
*1 When 4096 × 2160p is input and [Wide mode] is set to [Normal], the resolution is displayed as 3840 × 2160p . To display 4096 × 2160p , set [Wide mode] setting to [Full 1] or [Full 2].
*2 To support 18 Gbps, set [HDMI signal format] to [Enhanced format].
*3 Connect your audio system to the HDMI IN 3 to route LCD Monitor audio to your audio system.
*4 This information is for EU and other countries whose relevant regulation is based on EU energy labelling regulation.
*5 Energy consumption in kWh per year, based on the power consumption of the LCD Monitor operating 8 hours per day for 365 days. The actual energy consumption will depend on how the LCD Monitor is used.
*6 Specified standby power is reached after the LCD Monitor finishes necessary internal processes.
*7 Standby power consumption will increase when your LCD Monitor is connected to the network.
Note
- Optional accessories availability depends on countries/region/LCD Monitor model/stock.
- Design and specifications are subject to change without notice.
- Some of the on-screen instructions may not apply to your LCD Monitor model.
Trademark Information
- The terms HDMI, HDMI High-Definition Multimedia Interface, and the HDMI Logo are trademarks or registered trademarks of HDMI Licensing Administrator, Inc.
- Dolby, Dolby Vision, Dolby Atmos, Dolby Audio, and the double-D symbol are trademarks of Dolby Laboratories. Manufactured under license from Dolby Laboratories. Confidential unpublished works. Copyright © 2012-2018 Dolby Laboratories. All rights reserved.
- Vewd® Core. Copyright 1995-2020 Vewd Software AS. All rights reserved.
- Google, Google Play, Chromecast, YouTube, Android TV and other related marks and logos are trademarks of Google LLC.
- Wi-Fi®, Wi-Fi Alliance® and Wi-Fi Direct® are registered trademarks of Wi-Fi Alliance.
- The Wi-Fi CERTIFIED™ Logo is a certification mark of Wi-Fi Alliance.
- For DTS patents, see http://patents.dts.com. Manufactured under license from DTS, Inc. DTS, the Symbol, DTS and the Symbol together, and Digital Surround are registered trademarks or trademarks of DTS, Inc. in the United States and/or other countries. © DTS, Inc. All Rights Reserved.
- The Bluetooth® word mark and logos are registered trademarks owned by the Bluetooth SIG, Inc. and any use of such marks by Sony Corporation is under license. Other trademarks and trade names are those of their respective owners.
- TUXERA is a registered trademark of Tuxera Inc. in the US and other countries.
- Covered by one or more claims of the HEVC patents listed at patentlist.accessadvance.com.
- All other trademarks are the property of their respective owners.
目录
安全信息 2
连接示意图 4
text_image
Diagram illustrating four different methods for using a computer, including check, checkmark, no/×, and cross symbols.搬运
natural_image
Line drawing of three human silhouettes holding a blank board (no text or symbols)
natural_image
Line drawing of a person walking toward a rectangular device with a door and window (no text or symbols)FW-75BZ40H / 65BZ40H / 55BZ40H
natural_image
Illustration of two silhouetted figures holding a rectangular device with internal components (no text or symbols)text_image
< 12 mm < 21 mmhttp://192.168.0.1/sony/system
请求
POST /sony/system HTTP/1.1
Host: 192.168.0.1
Content-Type: application/json; charset=UTF-8
Content-Length: 70
X-Auth-PSK: 1234
{"method": "getPowerStatus", "params": [], "id": 50, "version": "1.0"}
响应
HTTP/1.1 200 OK
Content-Type: application/json; charset=UTF-8
Content-Length: 44
{"result": [{"status": "active"}], "id": 50}
https://www.sony-asia.com/support
准备挂壁式安装
text_image
Diagram illustrating a procedure for installing or adjusting a device, with steps including cleaning and safety warning.→ DIGITAL AUDIO OUT (OPTICAL)
FW-85BZ40H: 1899 × 1162 × 441 (1899 ×
1089 × 72)
FW-75BZ40H: 1674 × 1034 × 410 (1674 ×
961 × 71)
FW-65BZ40H: 1450 × 903 × 338 (1450 ×
833 × 70)
FW-55BZ40H: 1231 × 780 × 338 (1231 ×
710 × 70)
质量(约)(kg)
含台式底座(不含台式底座)
FW-85BZ40H: 47.7 (45.8)
FW-75BZ40H: 34.4 (32.9)
FW-65BZ40H: 23.2 (22.2)
FW-55BZ40H: 17.5 (16.5)
其他
选购附件
挂壁式支架:SU-WL850
text_image
Diagram illustrating four different methods for using a table, including check, no/×, and checkmark symbols.搬動
natural_image
Two line drawings of human figures carrying a large rectangular object, no text or symbols presentFW-75BZ40H / 65BZ40H / 55BZ40H

natural_image
Illustration of two silhouetted figures holding a rectangular device (no text or symbols visible)http://192.168.0.1/sony/system
CT
請求
POST /sony/system HTTP/1.1
Host: 192.168.0.1
Content-Type: application/json; charset=UTF-8
Content-Length: 70
X-Auth-PSK: 1234
{"method": "getPowerStatus", "params": [], "id": 50, "version": "1.0"}
響應
HTTP/1.1 200 OK
Content-Type: application/json; charset=UTF-8
Content-Length: 44
{"result": [{"status": "active"}], "id": 50}
https://www.sony-asia.com/support
準備壁掛式安裝
text_image
Illustration showing two steps of installing a wall-mounted device, with one step highlighting the component and another indicating a warning sign.→ DIGITAL AUDIO OUT (OPTICAL)
FW-75BZ40H: 34.4 (32.9)
FW-65BZ40H: 23.2 (22.2)
FW-55BZ40H: 17.5 (16.5)
其他
選用的配件
壁掛式支架:SU-WL850
(僅限 FW-75BZ40H / 65BZ40H / 55BZ40H)
壁掛式支架:SU-WL500
壁掛式支架:SU-WL450
攝影機與麥克風組件:FWA-CE100
操作温度:0 ℃ - 40 ℃
- Vewd® Core. Copyright 1995–2020 Vewd Software AS. All rights reserved.
text_image
Diagram illustrating four different techniques for using a table, including check, no/×, and cross symbols.Vận chuyển
natural_image
Two line drawings of human figures carrying a large rectangular object, no text or symbols presentFW-75BZ40H / 65BZ40H / 55BZ40H

natural_image
Illustration of two silhouetted figures holding a rectangular device (no text or symbols visible)text_image
< 12 mm < 21 mm• HDMI IN 3 ARC (Audio Return Channel)
http://192.168.0.1/sony/system
Yêu cầu
POST /sony/system HTTP/1.1
Host: 192.168.0.1
Content-Type: application/json; charset=UTF-8
Content-Length: 70
X-Auth-PSK: 1234
{"method": "getPowerStatus", "params": [], "id": 50, "version": "1.0"}
Phần hồi
HTTP/1.1 200 OK
Content-Type: application/json; charset=UTF-8
Content-Length: 44
{"result": [{"status": "active"}], "id": 50}
https://www.sony-asia.com/support
text_image
1×2 2×2 VS1,5 N·m {15 kgf·cm}
Lưu ý
text_image
Illustration showing two-step installation of a device: one being handled with a monitor, the other using a handheld device to install a device with warning symbol.2160p (24, 25, 30 Hz), 1080p (30, 50, 60, 100,
120 Hz), 1080/24p, 1080i (50, 60 Hz), 720p
→ DIGITAL AUDIO OUT (OPTICAL)
text_image
Diagram illustrating four different types of lighting or fixture installation methods, including check, no/×, and various lighting fixtures.Transport
natural_image
Two line drawings of human figures carrying a large rectangular object, no text or symbols presentFW-75BZ40H / 65BZ40H / 55BZ40H

natural_image
Line drawing of two figures holding a rectangular device (no text or symbols)text_image
< 12 mm < 21 mmhttp://192.168.0.1/sony/system
Requête
POST /sony/system HTTP/1.1
Host: 192.168.0.1
Content-Type: application/json; charset=UTF-8
Content-Length: 70
X-Auth-PSK: 1234
{"method": "getPowerStatus", "params": [], "id": 50, "version": "1.0"}
Réponse
HTTP/1.1 200 OK
Content-Type: application/json; charset=UTF-8
Content-Length: 44
{"result": [{"status": "active"}], "id": 50}
—Support de fixation murale SU-WL850
—Support de fixation murale SU-WL500
—Support de fixation murale SU-WL450
text_image
Technical illustration showing installation procedure with workers installing a large electronic panel and a hand holding a device, accompanied by safety warning symbols.2160p (24, 25, 30 Hz), 1080p (30, 50, 60, 100,
120 Hz), 1080/24p, 1080i (50, 60 Hz), 720p
(30, 50, 60 Hz), 720/24p, 576p, 480p,
Formats PC
Audio :
→ DIGITAL AUDIO OUT (OPTICAL)
FW-75BZ40H:34,4(32,9)
FW-65BZ40H:23,2(22,2)
FW-55BZ40H:17,5(16,5)
Autres
Accessoires en option
Support de fixation murale : SU-WL850
(FW-75BZ40H / 65BZ40H / 55BZ40H uniquement)
text_image
Diagram illustrating four different types of electrical circuit symbols: check, switch, no/×, and switch symbol.การขนย้าย
natural_image
Two line drawings of human figures carrying a large rectangular object, no text or symbols presentFW-75BZ40H / 65BZ40H / 55BZ40H

natural_image
Illustration of two human figures holding a rectangular device (no text or symbols visible)http://192.168.0.1/sony/system
คำขอ
POST /sony/system HTTP/1.1
Host: 192.168.0.1
Content-Type: application/json; charset=UTF-8
Content-Length: 70
X-Auth-PSK: 1234
{"method": "getPowerStatus", "params": [], "id": 50, "version": "1.0"}
การตอบสนอง
HTTP/1.1 200 OK
Content-Type: application/json; charset=UTF-8
Content-Length: 44
{"result": [{"status": "active"}], "id": 50}
https://www.sony-asia.com/support
text_image
1×2 2×2 VS1.5 N·m {15 kgf·cm}
หมายเหตุ
text_image
Technical illustration showing installation procedure with workers installing a device and inspecting a device, including safety warning symbol.→ DIGITAL AUDIO OUT (OPTICAL)
FW-75BZ40H: 34.4 (32.9)
FW-65BZ40H: 23.2 (22.2)
FW-55BZ40H: 17.5 (16.5)
อื่น ๆ
อุปกรณ์เสริม
อุปกรณ์ยืดติดผนัง: SU-WL850 (FW-75BZ40H / 65BZ40H /
55BZ40H เท่านั้น)
text_image
Diagram illustrating four different mechanical or electrical protection states: check, switch, no/unknown, and disassembly.Mengangkut
natural_image
Two line drawings of human figures carrying a large rectangular object, no text or symbols presentFW-75BZ40H / 65BZ40H / 55BZ40H

natural_image
Illustration of two human figures holding a rectangular device (no text or symbols visible)text_image
< 12 mm < 21 mm• HDMI IN 3 ARC (Audio Return Channel)
—Pembatasan operasi Monitor di remote control
UJUNG: Monitor → Pengontrol
CINCIN: Pengontrol → Monitor
http://192.168.0.1/sony/system
Permintaan
POST /sony/system HTTP/1.1
Host: 192.168.0.1
Content-Type: application/json; charset=UTF-8
Content-Length: 70
X-Auth-PSK: 1234
{"method": "getPowerStatus", "params": [], "id": 50, "version": "1.0"}
Responses
HTTP/1.1 200 OK
Content-Type: application/json; charset=UTF-8
Content-Length: 44
{"result": [{"status": "active"}], "id": 50}
https://www.sony-asia.com/support
text_image
Diagram illustrating a procedure for installing or adjusting an appliance, with steps including cleaning and lighting.Sistem panel: Panel LCD (Liquid Crystal Display), LED backlight
2160p (24, 25, 30 Hz), 1080p (30, 50, 60, 100,
120 Hz), 1080/24p, 1080i (50, 60 Hz), 720p
(30, 50, 60 Hz), 720/24p, 576p, 480p, PC Formats
Audio:
PCM linear saluran 5,1: 32/44,1/48/88,2/96/
176,4/192 kHz 16/20/24 bit, Dolby Audio,
Dolby Atmos, DTS
ARC (Audio Return Channel) (Hanya
HDMI IN 3)*3
Dua saluran linear PCM: 48 kHz 16 bit, Dolby Audio, Dolby Atmos, DTS
→ DIGITAL AUDIO OUT (OPTICAL)
Jack Digital optikal (Dua saluran linear PCM: 48 kHz 16 bit, Dolby Audio, DTS)
HDMI 4 AUDIO IN
FW-65BZ40H: 214 Watt
FW-55BZ40H: 173 Watt
Suhu pengoperasian: 0 °C – 40 °C
(22.2) 23.2 : FW-65BZ40H
(16.5) 17.5 : FW-55BZ40H
أخرى
Vewd Software AS. All rights reserved.
Android TV, YouTube, Chromecast, Google Play, Google
163.9 / 65 :FW-65BZ40H
138.8 / بوصة 55 :FW-55BZ40H
(71×961×1,674) 410×1,034×1,674:FW-75BZ40H
(70×833×1,450) 338×903×1,450:FW-65BZ40H
(70×710×1,231) 338×780×1,231:FW-55BZ40H
المواصفات الفنية
النظام
DIGITAL AUDIO OUT (OPTICAL)
text_image
Illustration showing two steps of installing a monitor and a hand using a handheld device, with warning symbols indicating hazard.- أعلى الطAUOLة.
ملاحظة
text_image
Diagram showing two identical 2x2 screw installations in a container with arrows indicating direction of movement or assembly.text_image
1×2 2×2 VS1.5 {15} کجم ق.سم
https://www.sony-asia.com/support
. LCD cdot the image of the image is a graphic design and does not contain any text, mathematical formulas, tables, or diagrams.
.(192.168.0.1 Pre-shared Key "1234" :IP (عنوان
URL
http://192.168.0.1/sony/system
الطلب
POST /sony/system HTTP/1.1
Host:192.168.0.1
Content-Type: application/json; charset=UTF-8
Content-Length: 70
X-Auth-PSK: 1234
{"method": "getPowerStatus", "params": [], "id": 50, "version": "1.0"}
الاستجابة
HTTP/1.1 200 OK
Content-Type: application/json; charset=UTF-8
Content-Length: 44
{"result": [{"status":"active"}], "id": 50}
text_image
p0 12 > p0 21 >(Audio Return Channel) HDMI IN 3 ARC
natural_image
Illustration of two silhouetted figures holding a rectangular device (no text or symbols visible)و اعتزازات عنيفة.
text_image
Diagram illustrating four different types of lighting or fixture installation methods, including check, no/×, and various lighting fixtures.النقل
natural_image
Line drawing of three human figures holding a blank board (no text or symbols)