633809 - Lifting Equipment SILVERLINE - Free user manual and instructions
Find the device manual for free 633809 SILVERLINE in PDF.
User questions about 633809 SILVERLINE
0 question about this device. Answer the ones you know or ask your own.
Ask a new question about this device
Download the instructions for your Lifting Equipment in PDF format for free! Find your manual 633809 - SILVERLINE and take your electronic device back in hand. On this page are published all the documents necessary for the use of your device. 633809 by SILVERLINE.
USER MANUAL 633809 SILVERLINE
natural_image
Orange hand truck with chain and hook, no visible text or symbols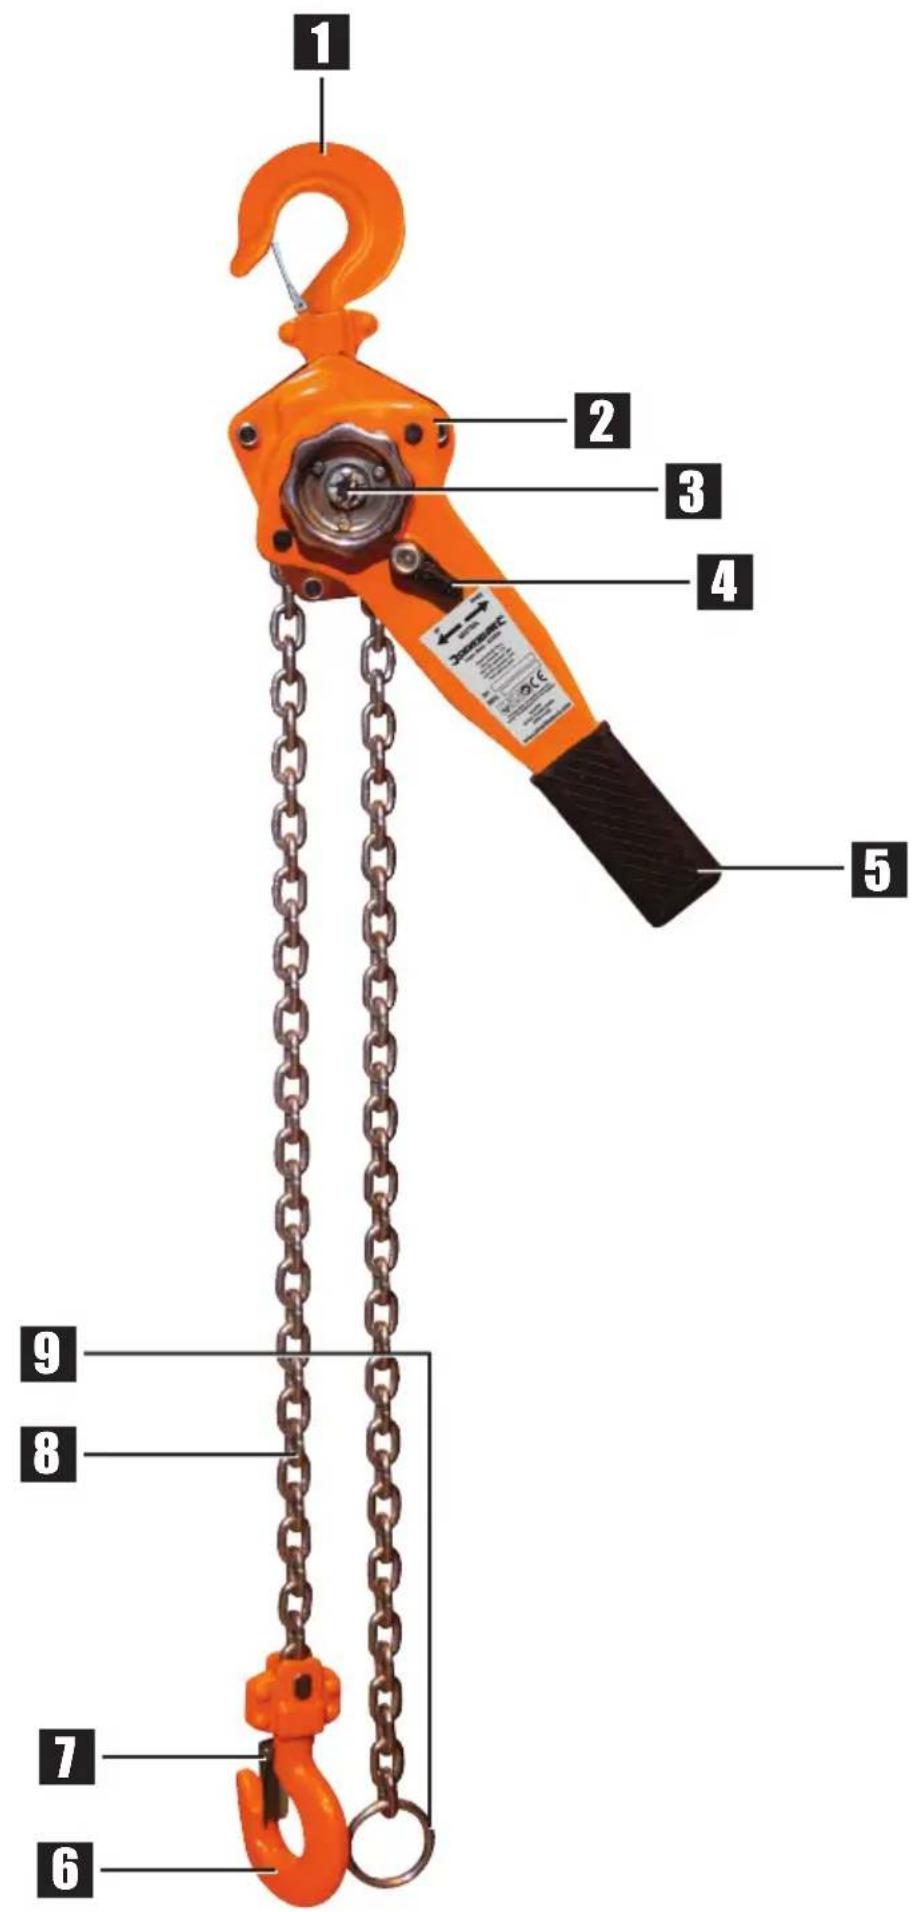
REGISTER ONLINE® SILVERLINEC® or Hoist
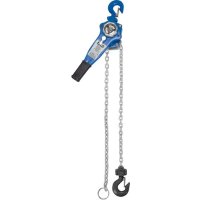
Lever Hoist
750kg
English 4
Français 8
Deutsch 12
Español ...... 16
Italiano 20
Nederlands......24
Description of Symbols
The rating plate on your tool may show symbols. These represent important information about the product or instructions on its use

Wear hearing protection
Wear eye protection
Wear breathing protection
Wear head protection

Wear hand protection

Read instruction manual

Conforms to relevant legislation and safety standards
Specification
Working Load Limit (WLL): 750kg
Test load (WLL+50%) 1125kg
Standard lifting height: 1.5m
Load chain specification: 6 x 18mm
Operating effort to lift rated load: 14kg
Hook opening: 27mm
Lever length: 285mm
Minimum distance between hooks: 325mm
Dimensions (LxWxH): 370 x 140 x140mm
Net weight....7kg
Operating temperature range ...... -10 to +50°C
As part of our ongoing product development, specifications of Silverline products may alter without notice.
General Safety
WARNING Read all safety warnings and all instructions. Failure to follow the warnings and instructions may result in a serious injury.
WARNING: This tool is not intended for use by persons (including children) with reduced, physical or mental capabilities or lack of experience or knowledge unless they have been given supervision or instruction concerning use of the tool by a person responsible for their safety. Children must be supervised to ensure that they do not play with the tool.
Save all warnings and instructions for future reference.
1) Work area safety
a) Keep work area clean and well lit. Cluttered or dark areas invite accidents.
b) Do not operate tools in explosive atmospheres, such as in the presence of flammable liquids, gases or dust.
c) Keep children and bystanders away while operating or using this tool. Distractions can cause you to lose control.
2) Personal safety
a) Stay alert, watch what you are doing and use common sense when operating or using this tool. Do not operate or use the tool while you are tired or under the influence of drugs, alcohol or medication. A moment of inattention while operating or using the tool may result in serious personal injury. Work sensibly at all times with regular breaks if necessary.
b) Use personal protective equipment. Always wear eye protection. Protective equipment such as dust mask, non-skid safety shoes, hard hat, or hearing protection used for appropriate conditions will reduce personal injuries.
c) Remove any adjusting key or wrench before operating the tool. A wrench or a key left attached to a rotating part of the tool may result in personal injury.
d) Do not overreach. Keep proper footing and balance at all times. This enables better control of the tool in unexpected situations.
e) Dress properly. Do not wear loose clothing or jewelry. Keep your hair, clothing and gloves away from moving parts. Loose clothes, jewelry or long hair can be caught in moving parts.
3) Tool use and care
IMPORTANT: Tools used outdoors may require more regular cleaning and surface treatment to prevent corrosion, as well as replacement grease or oil on moving parts to maintain them in good working condition.
a) Maintain tools. Check for misalignment or binding of moving parts, breakage of parts and any other condition that may affect the tool's operation. If damaged, have the tool repaired before use. Many accidents are caused by poorly maintained tools.
b) Keep cutting tools sharp and clean. Properly maintained cutting tools with sharp cutting edges are less likely to bind and are easier to control.
c) Use the tool's accessories and tool bits etc. in accordance with these instructions, taking into account the working conditions and the work to be performed. Use of the tool for operations different from those intended could result in a hazardous situation.
4) Service
a) Have your tool serviced or repaired by a qualified repair person using only identical replacement parts. This will ensure that the safety of the tool is maintained.
Lifting Tool Safety
Inspect the equipment
- Before use, check the condition of the equipment, paying particular attention to cables, locking mechanisms, and hydraulic fittings. Cables should be free from kinks and should not show any evidence of fraying or cutting. Locking mechanisms should work freely and should be clean of excessive dirt or grease. Hydraulic fittings should be in good condition and free from leaks
- Any additional supports should be capable of taking the full weight of the object to be lifted, along with some additional capacity as a precautionary measure
- All safety devices (including automatic) should be tested before use
- Check that the hooks are sound. If a hook has more than a 10^ twist out of true, or has an excessive throat opening, it should be replaced
- Check all hook safety latches are not damaged or bent and completely seal the hook openings
- If any part of the lifting equipment is found to be damaged or worn, it must be repaired with genuine replacement parts at an authorised service centre before the equipment is used
- Lifting equipment should be inspected by a qualified person at least once each year and the results of the inspection recorded in an inspection book for future reference
- The brake on a lifting tool should never come into contact with oil or grease
- DO NOT modify any lifting equipment. Any attempt to tamper with this equipment will invalidate its guarantee and could result in serious injury to yourself or others around you
Locating the lifting tool
- Locate the lifting tool in a suitable, well-lit work area
- Keep work area clean and tidy and free from unrelated materials
- Never use a lifting tool in wet, explosive or corrosive environments
Attaching a load
- Any load must only be attached/supported by the proper lifting points
- Winches/jacks should not be used in conjunction with any other lifting device/s
- The load must be free to lift. If the load is caught, or restricted during lifting, overloading of the lifting equipment will result
- Before attaching a load, ensure that it is stable, and will remain stable throughout the lifting process
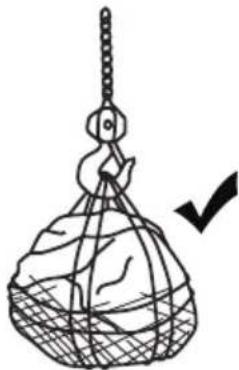
- Never wrap the chain around a load, or use the load chain as a sling
Danger area
- When an object is being lifted, the areas directly below and around the area should be considered highly dangerous. DO NOT reach into, or enter this area
- Lifting equipment must be operated from a position where the operator is not at risk from a falling load (i.e. outside of the danger area)
- Protective headgear (e.g. hardhat) and protective footwear, should be worn by the operator, and any person near to the danger area
- Never use a lifting tool or any other overhead lifting equipment for lifting persons
During a lift
- The operator should have constant eye contact with the load. If it is impractical for the operator to have constant eye contact, then the danger area should be sealed off, and additional persons with full view of the operating area must be used to relay instructions to the operator
- Lifting equipment must only be operated by persons who are clearly familiar with the operating instructions
- DO NOT change from lifting to lowering rapidly. Allow the load to come to a complete stop before changing direction
- If the lifting equipment is unable to raise a load, stop immediately. The lift load capacity has been exceeded
- When lowering a load, make allowance for the fact that a load will usually run on for a few centimetres after the mechanism has been stopped
- Lifting equipment must never be used for any purpose other than vertical lifts
- DO NOT lift an object to a greater height than is absolutely necessary
- Never leave a suspended load unattended
- If you are in any way unsure about the safe method of using this equipment, DO NOT use it
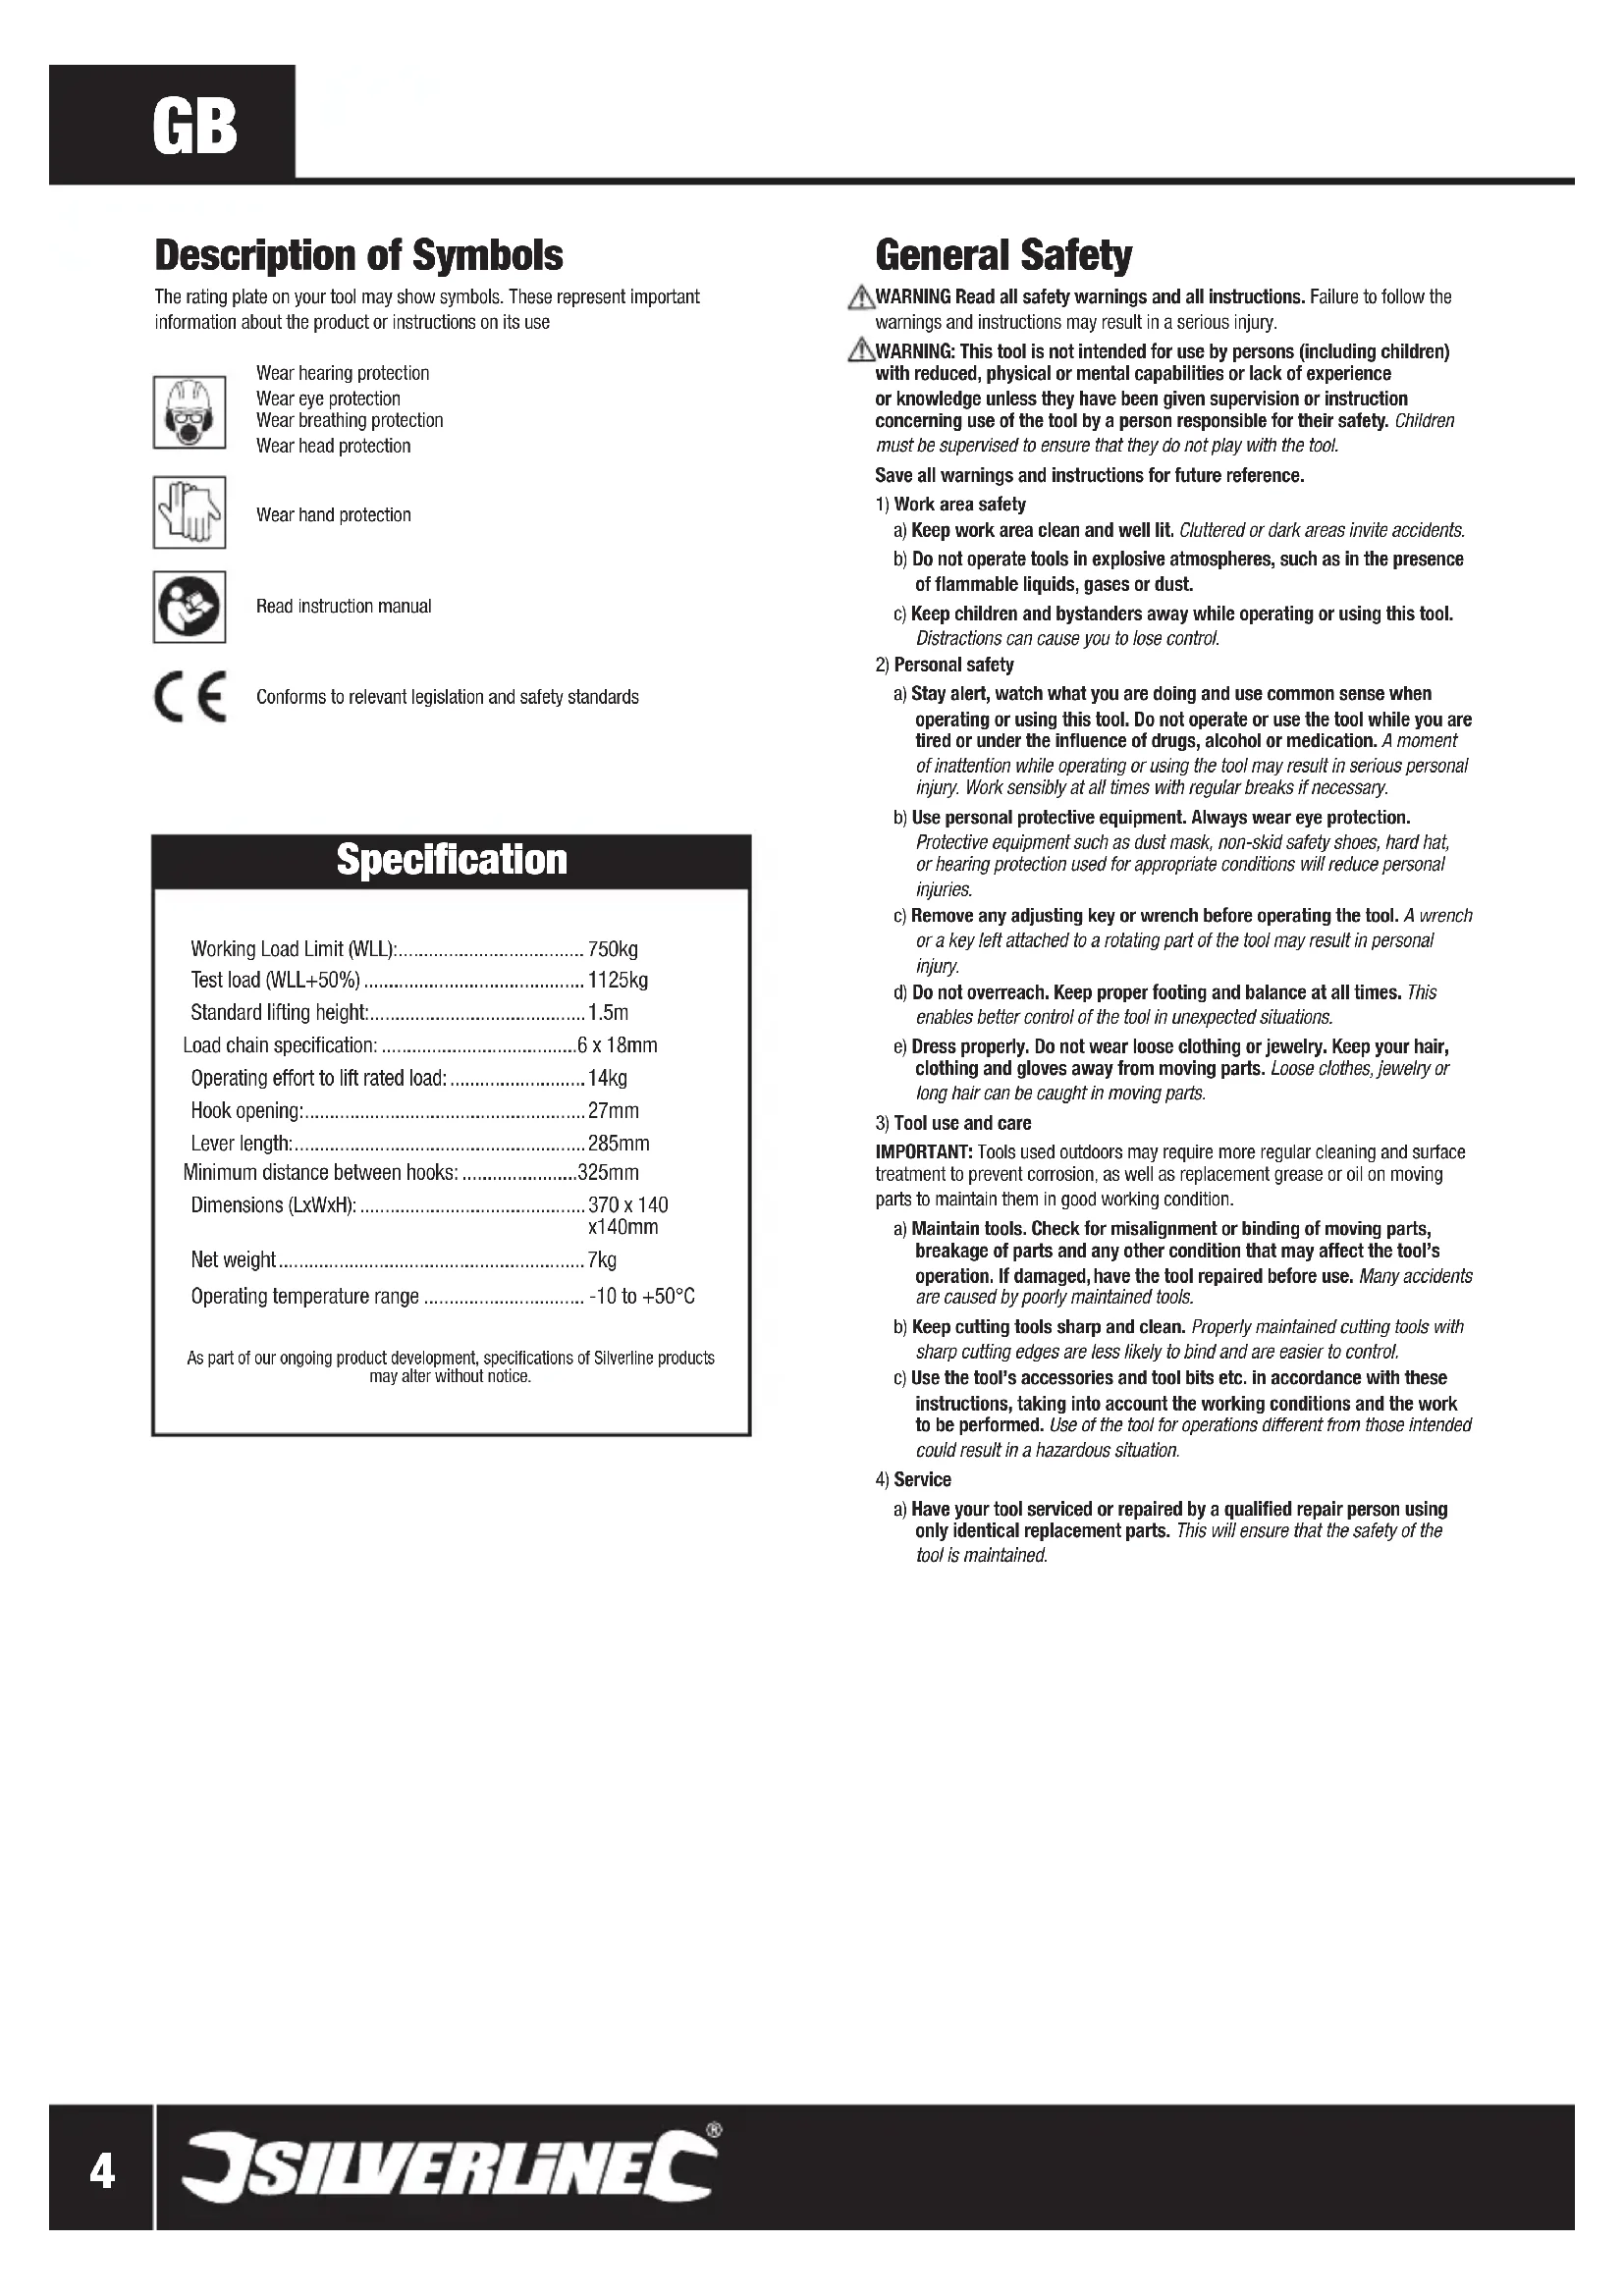
Product Familiarisation
1 Mounting Hook
2 Drum
3 Chain Brake Dial
4 Direction Control
5 Lever
6 Load Hook
7 Safety Bar
8 Load Chain
9 Chain End Stop
Intended Use
Portable, hand-operated manual lever hoist, for vertical lifting of loads. This device is designed for temporary operation only, and should not be used for permanent suspension of loads. Domestic use only.
Unpacking Your Tool
- Carefully unpack and inspect your tool. Familiarise yourself with all its features and functions
- Ensure that all parts of the tool are present and in good condition. If any parts are missing or damaged, have such parts replaced before attempting to use this tool
Before Use
Installing the lever hoist
WARNING: Ensure the lever hoist is suspended from a structure capable of supporting a load of at least 1½ x the safe working load of the lever hoist.
- Install the lever hoist, so the lever sits in a position where it can be easily reached and safely operated
- The user must be able to operate the lever safely, from a location to the side of the suspended load
Attaching the load
WARNING: DO NOT use the chain as a sling. This may cause damage to the chain.
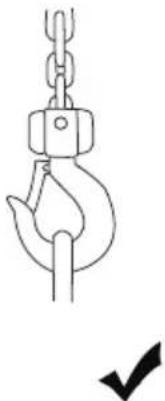
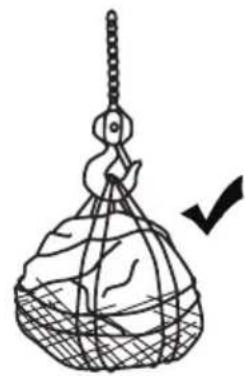
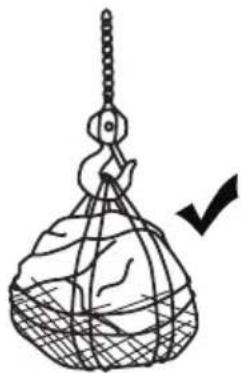
- Attach load to Load Hook (6), using slings, chains or other lifting devices, suitable for the type, shape and weight of the load (see Fig.1)
• Centre the load on the Load Hook correctly (see Fig.1)
WARNING:
- NEVER load the Load Hook in front of the Safety Bar (see Fig. 3-A)
• NEVER load the Load Hook tip (See Fig. 3-B) - NEVER load the Load Hook off the centre line (See. Fig. 3-C)
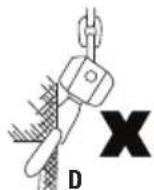
• NEVER load the Load Hook sideways (See Fig. 3-D)
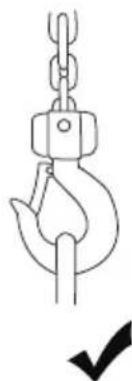
WARNING: ALWAYS ensure that the Mounting Hook (1) is fully engaged, with its Safety Bar (7) securely closed.
Operation
Note: This lifting device must ONLY be used by competent operators. All users must be trained in the use of lifting equipment. Inexperienced users must receive instruction prior to using this device. A risk assessment must be carried out before undertaking any lifting operations.
WARNING: ALWAYS wear personal protective equipment appropriate for the work area and type of load, including but not limited to eye protection, gloves, hard hat, protective shoes and hearing protection.
Free-chaining (neutral mode)
WARNING: NEVER attempt to switch the Direction Control to 'NEUTRAL' when a load is attached to the lever hoist. This may result in property damage and/or serious, even fatal injury.
Note: In free-chaining mode the chain may be freely pulled through the Drum (2) in either direction, either by pulling on the chain, or by rotating the Chain Brake Dial (3). This mode can be used to adjust the chain prior to attaching a load.
- Toggle the Direction Control (4) lever into the 'NEUTRAL' position
- Rotate the Chain Brake Dial (3) anticlockwise, to disengage the brake
Lifting
WARNING: ALWAYS evacuate bystanders from the immediate lifting area. Clearly communicate when lifting commences and finishes. NEVER allow anybody to stand under a suspended load.
WARNING: Raise and lower in a smooth, controlled manner. DO NOT shock load the lever hoist by allowing the attached load to fall freely, even for very short distances. Ensure the chain moves freely and does not twist.
WARNING: The brake may become hot during prolonged use of the lever hoist. Stop using the tool intermittently to ensure the brake does not overheat.
- Ensure the lever hoist is not set to free-chaining mode (see 'Free-chaining')
- Switch the Direction Control (4) into the 'UP' position
- With the load safely attached as described in 'Attaching the load', operate the Lever (5) until the Load Chain (8) is taut. Confirm that it is vertical (i.e. not pulling at an angle)
- Start to raise the load by further operation of the Lever. Check that it is level with no possibility of the load tilting and/or slipping from its restraints
- If necessary, switch the Direction Control to 'DOWN', lower the load by operating the Lever, and readjust slings to obtain a safe, level lift
- Continue to raise load to required height in a slow and controlled manner. DO NOT raise the load so far that the Load Hook (5) comes into contact with the Drum (2)
- To lower the load, switch the Direction Control to 'DOWN', and operate the lever. Again, lower smoothly and slowly and DO NOT lower so far as to completely extend the full length of the Load Chain. Stop before the Chain End Stop (9) reaches the Drum
Accessories
- Additional lifting equipment and accessories, including lifting slings, are available from your Silverline stockist
Maintenance
Note: All lifting equipment must be regularly inspected and maintained by a competent person, in accordance with local laws and regulations (e.g. Lifting Equipment Regulations, etc.). Maintenance must be recorded in a dedicated service record (see end of this manual).
WARNING: Carry out a visual inspection of all components, every time the lever hoist is used, and listen for any unusual sounds during operation. Perform an in-depth examination every time the device has not been used for some time. Should any damage be detected, remove the device from service immediately, and return it to an authorised Silverline service centre for repairs. If the device is beyond repair, it must be rendered unusable and discarded.
WARNING: Inspect and test the brake mechanism before every use.
WARNING: This tool does not contain any user-serviceable parts. Never disassemble the lever hoist. Always return the device to an authorised Silverline service centre for maintenance and repairs.
Cleaning
- Keep your tool clean at all times. Dirt and dust will cause internal parts to wear quickly, and shorten the device's service life. Clean the body of your machine with a soft brush, or dry cloth. If available, use clean, dry, compressed air to blow through the ventilation holes (where applicable)
Lubrication
- Lubricate all moving parts with a suitable lubricant spray, at regular intervals
- Keep the load chain and both hook shanks clean and lubricated
WARNING: Never allow oil or grease to come into contact with the brake mechanism.
Storage
- Store this tool carefully in a secure, dry place out of the reach of children
Disposal
- Tools may contain traces of tool oil, other lubricants and pollutants. Therefore, tools should not be disposed of with household waste
- Contact your local waste disposal authority for information on the correct way to dispose of this tool
natural_image
Simple line drawing of a hanging bag with a mesh pattern and a small object inside (no text or symbols)WRONG RIGHT

natural_image
Simple line drawing of a crane lifting a large bag with a checkmark indicating selection (no text or symbols)
natural_image
Simple line drawing of a hook with a chain and hook, no text or symbols presentFigure 1
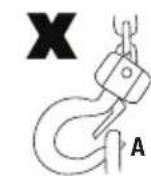
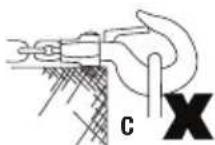
Figure 2
Silverline Tools Guarantee
This Silverline product comes with a 3 year guarantee
Register this product at www.silverlinetools.com within 30 days of purchase in order to qualify for the 3 year guarantee. Guarantee period begins according to the date of purchase on your sales receipt.
Registering your purchase
Registration is made at silverlinetools.com by selecting the Guarantee Registration button. You will need to enter:-
- Your personal details
• Details of the product and purchase information
Once this information is entered your guarantee certificate will be created in PDF format for you to print out and keep with your purchase.
Terms & Conditions
Guarantee period becomes effective from the date of retail purchase as detailed on your sales receipt.
PLEASE KEEP YOUR SALES RECEIPT
If this product develops a fault within 30 days of purchase, return it to the stockist where it was purchased, with your receipt, stating details of the fault. You will receive a replacement or refund.
If this product develops a fault after the 30 day period, return it to:
Silverline Tools Service Centre
PO Box 2988
Yeovil
BA21 1WU, UK
The guarantee claim must be submitted during the guarantee period.
You must provide the original sales receipt indicating the purchase date, your name, address and place of purchase before any work can be carried out.
You must provide precise details of the fault requiring correction.
Claims made within the guarantee period will be verified by Silverline Tools to establish if the deficiencies are related to material or manufacturing of the product.
Carriage will not be refunded. Items for return must be in a suitably clean and safe state for repair, and should be packaged carefully to prevent damage or injury during transportation. We may reject unsuitable or unsafe deliveries.
All work will be carried out by Silverline Tools or its authorized repair agents.
The repair or replacement of the product will not extend the period of guarantee
Defects recognised by us as being covered by the guarantee shall be corrected by means of repair of the tool, free of charge (excluding carriage charges) or by replacement with a tool in perfect working order.
Retained tools, or parts, for which a replacement has been issued, will become the property of Silverline Tools.
The repair or replacement of your product under guarantee provides benefits which are additional to and do not affect your statutory rights as a consumer.
What is covered:
The repair of the product, if it can be verified to the satisfaction of Silverline Tools that the deficiencies were due to faulty materials or workmanship within the guarantee period.
If any part is no longer available or out of manufacture, Silverline Tools will replace it with a functional replacement part.
Use of this product in the EU.
What is not covered:
Silverline Tools does not guarantee repairs required as a result of:
Normal wear and tear caused by use in accordance with the operating instructions eg blades, brushes, belts, bulbs, batteries etc.
The replacement of any provided accessories drill bits, blades, sanding sheets, cutting discs and other related items.
Accidental damage, faults caused by negligent use or care, misuse, neglect, careless operation or handling of the product.
Use of the product for anything other than normal domestic purposes.
Change or modification of the product in any way.
Use of parts and accessories which are not genuine Silverline Tools components.
Faulty installation (except installed by Silverline Tools).
Repairs or alterations carried out by parties other than Silverline Tools or its authorized repair agents.
Claims other than the right to correction of faults on the tool named in these guarantee conditions are not covered by the guarantee.
CE Declaration of Conformity
The undersigned: Mr Darrell Morris
as authorised by: Silverline Tools
Declares that the
Identification code: 633809
Description: Lever Hoist
Conforms to the following Directives:
• Machinery Directive 2006/42/EC
• EN13157+A1:2009
Notified body: TUV Rheinland
The technical documentation is kept by: Silverline Tools
Date: 13/12/13
Signed by:

Name and address of the manufacturer:
Powerbox Ltd., Boundary Way, Lufton Trading Estate, Yeovil, Somerset, BA22 8HZ, United Kingdom
natural_image
Simple line drawing of a hanging bag with a mesh pattern and a small object attached (no text or symbols)MAUVAIS
natural_image
Simple line drawing of a crane lifting a large cylindrical object with a checkmark arrow (no text or symbols)CORRECT
natural_image
Simple line drawing of a hook with a chain and hook attachment (no text or symbols)Figure 1
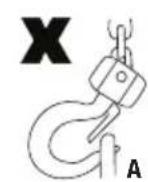
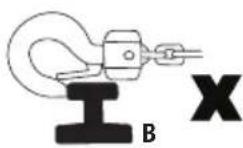
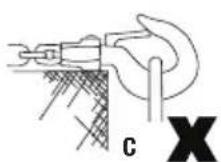
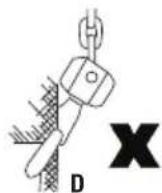
Figure 2
Garantie Silverline
Silverline Tools Service Centre
PO Box 2988
Yeovil
Powerbox International Ltd, Boundary Way, Lufton Trading Estate, Yeovil,
natural_image
Two hand-drawn diagrams showing a rope tied to a bag, one with a mesh pattern and the other with a hook and checkmark (no text or symbols)FALSCH
RICHTIG
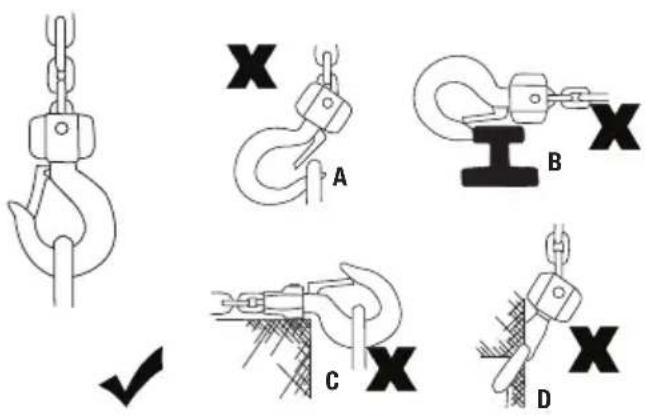
Abb 1
Abb 2
Silverline-Tools-Garantie
Silverline Tools Service Centre
PO Box 2988
Yeovil
Powerbox International Ltd, Boundary Way, Lufton Trading Estate, Yeovil,
natural_image
Simple line drawing of a hanging bag with a mesh pattern inside, no text or symbols present.INCORRECTO
natural_image
Simple line drawing of a crane lifting a large pile of sand (no text or symbols)CORRECTO
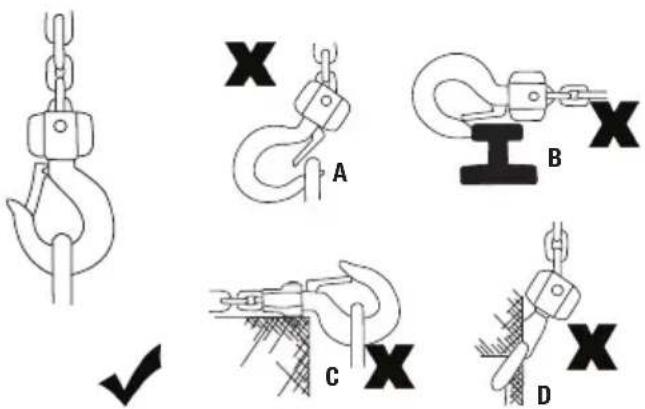
Figura 1
Figura 2
Garantía
natural_image
Simple line drawing of a hanging bag with a mesh pattern inside, no text or symbols present.TORTO
natural_image
Simple line drawing of a crane lifting a large pile of material with a checkmark indicating possible lifting (no text or symbols)DESTRA
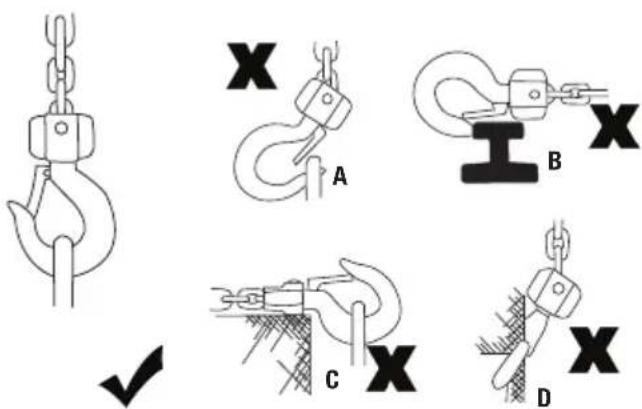
Figura 1 Figura 2
Garanzia Silverline Tools
Silverline Tools Service Centre
PO Box 2988
Yeovil
BA21 1WU, GB
Powerbox International Ltd, Boundary Way, Lufton Trading Estate, Yeovil,
Somerset, BA22 8HZ, Regno Unito
Laadketting specificaties: 6 x 18 mm
Haak opening:....27 mm
Hendel lengte:....285 mm
natural_image
Simple line drawing of a hanging bag with a mesh pattern inside, no text or symbols present.VERKEERD

natural_image
Simple line drawing of a crane lifting a large pile of material with a checkmark indicating possible lifting (no text or symbols)RECHT
Cijfer 1 Cijfer 2
Silverline Tools Garantie
Silverline Tools Service Centre
PO Box 2988
Yeovil
BA21 1WU, GB
natural_image
Orange manual leach with chain link and handle, isolated on white background (no text or symbols)
Guaranteed Forever
*Register online within 30 days. Terms & Conditions apply