RSV 300X - Water heater Nibe - Free user manual and instructions
Find the device manual for free RSV 300X Nibe in PDF.

User questions about RSV 300X Nibe
0 question about this device. Answer the ones you know or ask your own.
Ask a new question about this device
Download the instructions for your Water heater in PDF format for free! Find your manual RSV 300X - Nibe and take your electronic device back in hand. On this page are published all the documents necessary for the use of your device. RSV 300X by Nibe.
USER MANUAL RSV 300X Nibe
natural_image
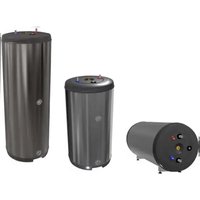
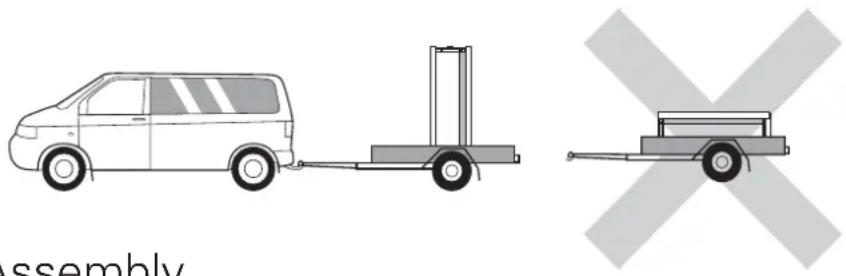
Three metallic cylindrical tanks with internal components and mounting holes, shown from different angles (no text or symbols visible)Inhoudsopgave
natural_image
Illustration of a van connected to a cargo cart with a warning symbol (no text or labels)Montage
RSH
natural_image
Illustration showing a van connected to a cargo cart and a cross symbol (no text or labels)Montage
RSH
This manual describes installation and service procedures for implementation by specialists.
The manual must be left with the customer.
This appliance can be used by children aged from 8 years and above and persons with reduced physical, sensory or mental capabilities or lack of experience and knowledge if they have been given super-vision or instruction concerning use of the appliance in a safe way and understand the hazards involved. Children shall not play with the appliance. Cleaning and user maintenance shall not be made by children without supervision.
Rights to make any design or technical modifications are reserved.
SYMBOLS

NOTE
This symbol indicates danger to person or machine.

CAUTION
This symbol indicates important information about what you need to consider when installing, servicing or maintaining the installation.
General
RSV and RSH are designed and manufactured according to good technical practice in order to ensure safe usage.
SERIAL NUMBER
The serial number can be found at the data plate.

CAUTION
Always give the product's serial number when reporting a fault.
RECOVERY

Leave the disposal of the packaging to the installer who installed the product or to special waste stations.
Do not dispose of used products with normal household waste. It must be disposed of at a special waste station or dealer who provides this type of service.
Improper disposal of the product by the user results in administrative penalties in accordance with current legislation.
INSPECTION OF THE INSTALLATION
Current regulations require the heating installation to be inspected before it is commissioned.
The inspection must be carried out by a suitably qualified person.
| Description Notes Signature Date | |||
| Heat pump | |||
| Shut off valves | |||
| Hot water | |||
| Cold water | |||
| Safety equipment | |||
| Sensors |
2 For the user
Maintenance
SAFETY VALVE (NOT SUPPLIED)
The water heater's safety valve sometimes releases a little water after hot water usage. This is because the cold water, which enters the water heater, expands when heated causing the pressure to rise and the safety valve to open.
The function of the safety valves must be regularly checked, about four times a year, to prevent clogging.
To inspect the valve, open the safety valve manually and check that water flows through the overflow pipe. If this does not happen then the safety valve is defective and must be replaced.
EMPTYING
Water heater
Draining is performed through the siphon (using hose) in the cold water connection.
Charge coil
Draining is performed through the siphon (using hose) in the docking connection, return to heat pump.
SERVICE
For service, contact the installer. Serial number (18 digits) and installation date should always be stated.
Only original replacement parts supplied may be used.
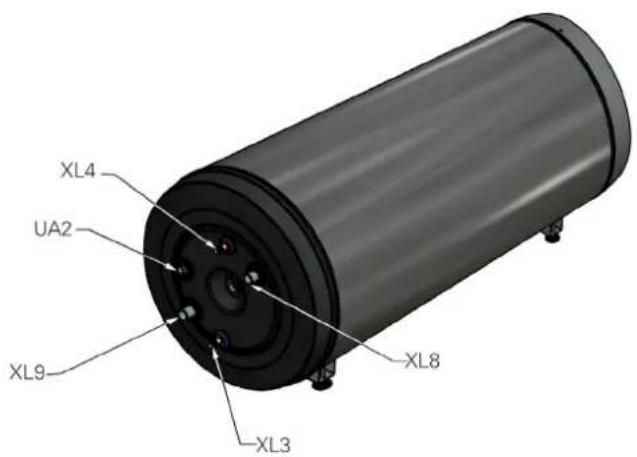
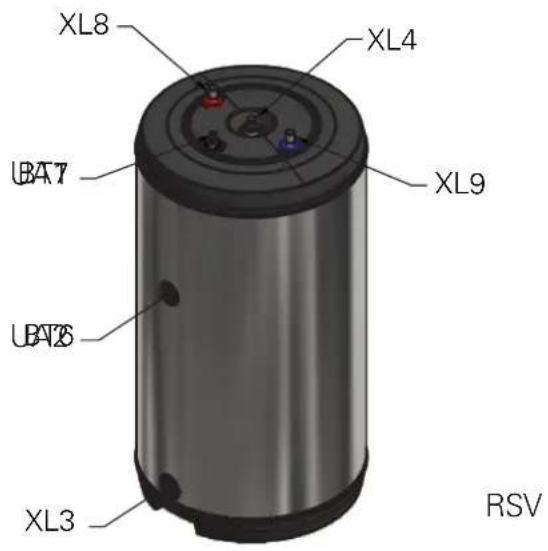
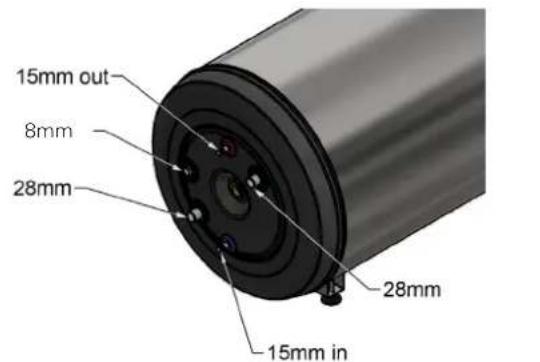
PIPE CONNECTIONS
XL3 Connection, cold water
XL4 Connection, hot water
XL8 Docking connection, supply line (from heat pump)
XL9 Docking connection, return line (to heat pump)
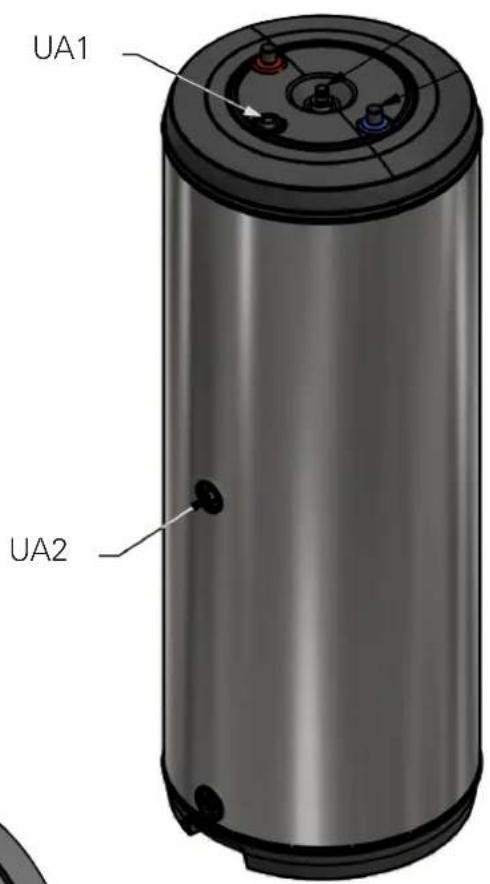
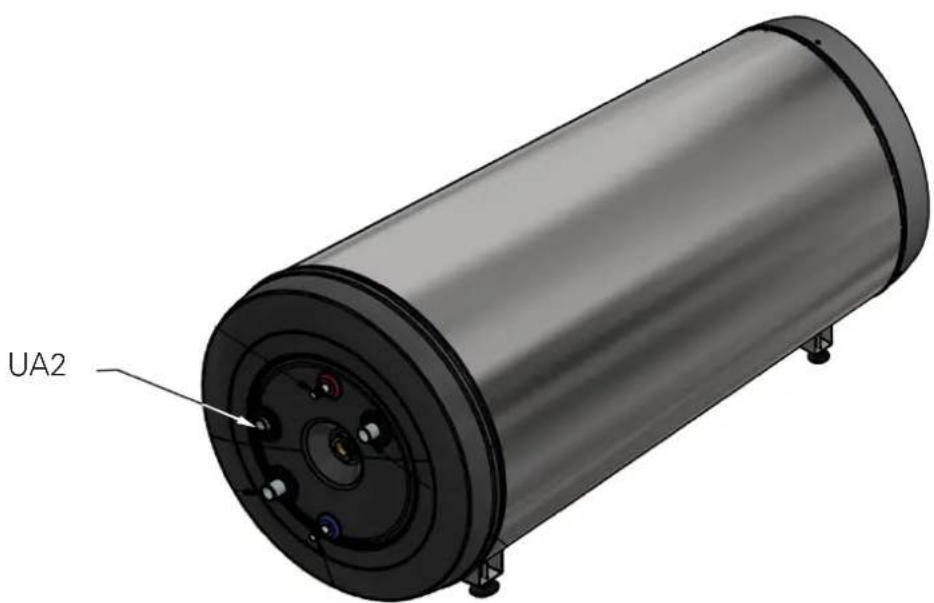
HVAC COMPONENTS
UA1 Submerged tube for hot water sensor (display) BT7
UA2 Submerged tube for hot water sensor (control) BT6
RSH
3 For the installer
General
RSV/RSH is a series water heater, that is suitable for connection to an external heat source.
The inner cylinder of the water tank is produced from pickled stainless steel for increased corrosion resistance. The water heater is equipped with a charge coil that heats the domestic water, resulting in excellent properties for hot water charging.
The water heater is designed and manufactured for a maximum cut-off pressure of 10 bar in the water heater and 10 bar on the primary side. Maximum permitted temperature is 85 °C.
The insulation is polyurethane, which provides excellent heat insulation. The outer shell of RSV/RSH has a stainless steel look. The insulation and jacket can not be removed from the tank (e.g. for transport purposes).
RSV is equipped with a submerged tube for the sensors for external control and display of hot water heating.
RSH is equipped with a submerged tube for the sensor for external control of hot water heating.
Transport
The RSV/RSH should be transported and stored vertically in a dry place.
Assembly
The RSV models are designed for upright installation. The RSH model is designed for horizontal installation.
The water heater's installation area should always have a temperature of at least 10^ (frost-free).
Position the boiler on a firm base that can take the weight, preferably on a concrete floor or foundation. Use the product's adjustable feet to obtain a horizontal and stable set-up.
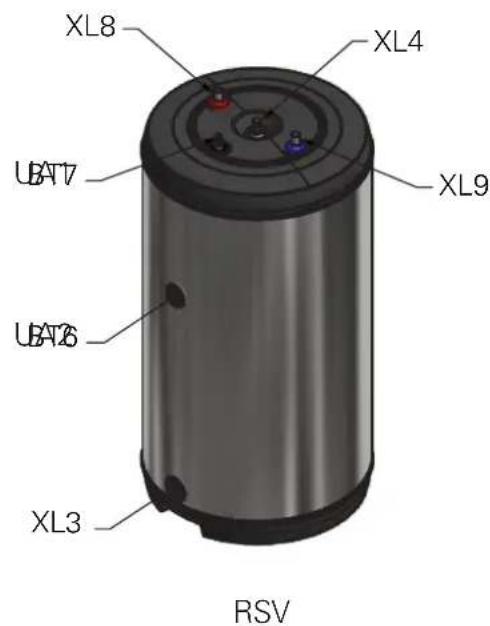
Component positions

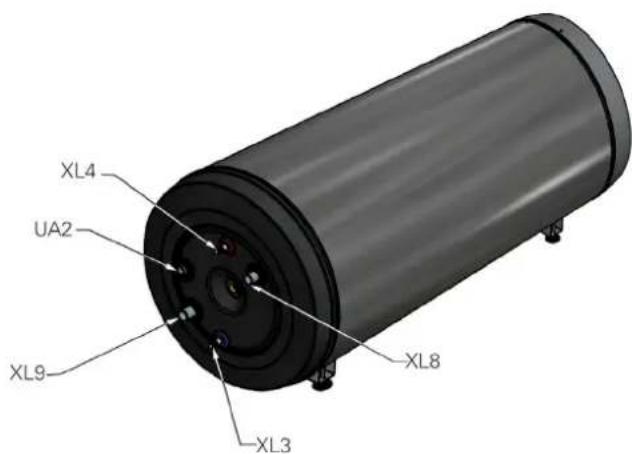
PIPE CONNECTIONS
XL3 Connection, cold water
XL4 Connection, hot water
XL8 Docking connection, supply line (from heat pump)
XL9 Docking connection, return line (to heat pump)
RSH
HVAC COMPONENTS
UA1 Submerged tube for hot water sensor (display) BT7 UA2 Submerged tube for hot water sensor (control) BT6
Pipe installation
Pipe installation must be carried out in accordance with current norms and directives.
RSV/RSH must be fitted with the requisite valves (such as a safety valve, a shut-off valve and a non-return valve) or a by Kiwa (The Netherlands) of Belgaqua (Belgium) approved safety group.
If there is a possibility that the pipes from the heat pump to the coil might contain air bubbles, eg. if there's a loop in the system, proper venting in both pipes is required.
An overflow pipe must be routed from the safety valve to a suitable drain. The overflow pipe must be the same size as the safety valve. Route the overflow pipe from the safety valve, sloping along its entire length and ensure that it is frost proof.
The mouth of the overflow pipe must be visible and not placed close to electrical components.
RSH
| Connection | RSV 200 RSV 300 RSV 300X RSH 240 | |||
| Cold water side connection 3/4" 3/4" 3/4" 15 mm | ||||
| Hot water top connection 22 mm | 22 mm 22 mm 15 mm | |||
| Recirculation connection No No No No | ||||
| CH-coil connection size | 22 mm 22 mm 28 mm 28 mm | |||
| Solar coil size connection | No No No No | |||
| Immersion heater connection | No No No No | |||
To see all the possible hydraulic systems these products can be used for, go to:
For The Netherlands:
nibe.eu/nl-nl/installateur/schemas-overzichten-en-technische-ondersteuning/principeschemas-hydraulisch
For Belgium:
Electrical installation

NOTE
Electrical installation and service must be carried out under the supervision of a qualified electrician, and in accordance with applicable electrical safety regulations.
SENSORS
The RSV boilers can be equipped with two hot water sensors: sensor BT7 for displaying the hot water temperature on the heat pump display and sensor BT6 for control. Sensor BT7 is fitted in the submerged tube at the top side of the boiler (UA1), sensor BT6 is fitted in the submerged tube in the center of the boiler (UA2). The RSH boiler can only be equipped with a hot water sensor for control (BT6). This sensor is fitted in the submerged tube at the end side of the boiler (UA2).
All sensors must be properly fixed and make good contact with the submerged tube(s). It is therefore recommended to use contact paste. Only use the sensors supplied with the heat pump (or another heat source). If sensors are not supplied, they must be ordered from the manufacturer of the heat source. The internal diameter of the submerged tubes is 8 mm.
Filling
FILLING AND VENTING
Filling the hot water heater
- Open a hot water tap in the house.
- Fill the hot water heater through the cold water connection
- When the water that comes out of the hot water tap is no longer mixed with air, the water heater is full and the tap can be closed.
Filling and venting the charge coil
Filling
- Open the filling valve (external, not included with the product). Fill the coil in the hot water heater and the rest of the climate system with water.
- Close the filling valve when the correct pressure is obtained.
Venting
- Vent the coil, for example via the additional installed vent valve and the rest of the climate system via the relevant vent valves.
- Keep topping up and venting until all air has been removed and the pressure is correct.
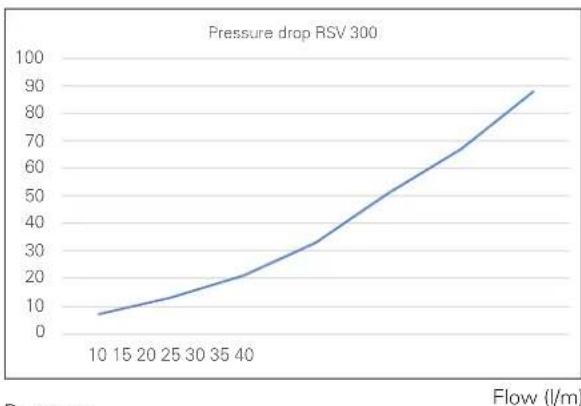
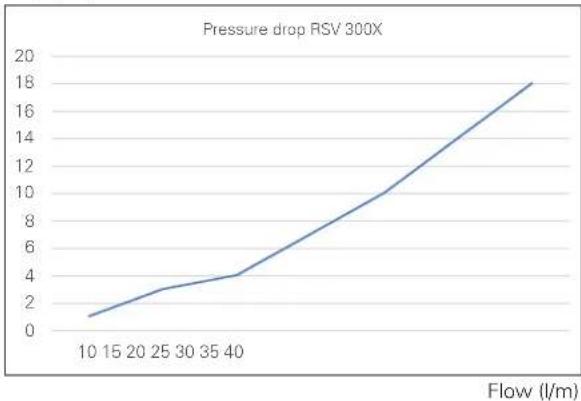
Pressure drop (kPa)
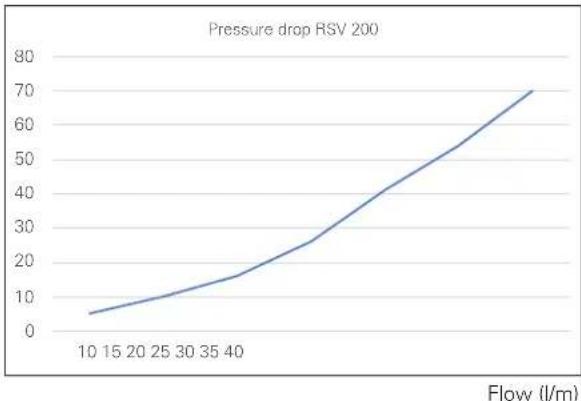
line
| Flow (l/m) | Pressure drop RSV 200 | | ---------- | --------------------- | | 10 | 5 | | 15 | 8 | | 20 | 10 | | 25 | 12 | | 30 | 15 | | 35 | 18 | | 40 | 25 | | 45 | 35 | | 50 | 45 | | 55 | 55 | | 60 | 65 | | 65 | 70 |Pressure drop (kPa)
line
| Flow (l/m) | Pressure drop RSV 300 | | ---------- | --------------------- | | 10 | 5 | | 15 | 10 | | 20 | 15 | | 25 | 20 | | 30 | 25 | | 35 | 30 | | 40 | 35 | | 45 | 40 | | 50 | 45 | | 55 | 50 | | 60 | 55 | | 65 | 60 | | 70 | 65 | | 75 | 70 | | 80 | 75 | | 85 | 80 | | 90 | 85 | | 95 | 90 | | 100 | 95 |Pressure drop (kPa)
line
| Flow (l/m) | Pressure drop RSV 300X | | ---------- | ---------------------- | | 10 | 1 | | 15 | 2 | | 20 | 3 | | 25 | 4 | | 30 | 5 | | 35 | 6 | | 40 | 7 | | 45 | 8 | | 50 | 9 | | 55 | 10 | | 60 | 11 | | 65 | 12 | | 70 | 13 | | 75 | 14 | | 80 | 15 | | 85 | 16 | | 90 | 17 | | 95 | 18 | | 100 | 19 |4 Technical data
| Unit RSV | 200 RSV 300 | RSV 300X RSH | 240 | ||
| Efficiency class C C C C | |||||
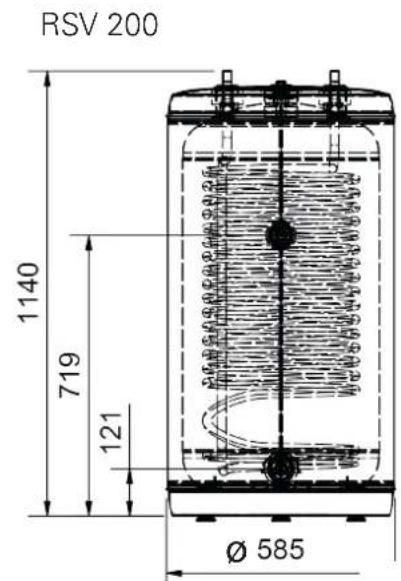
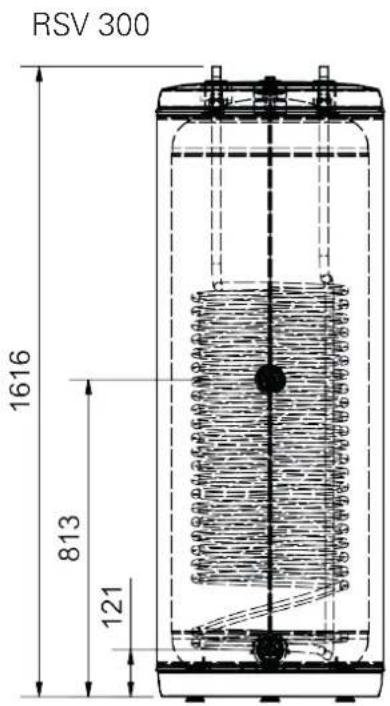
| Volume litre 186 280 272 220 | |||||
| Max operating temperature | °C | 85 | 85 | 85 | 85 |
| Max pressure primary side | bar/MPa | 10 / 1,0 | |||
| Max pressure water heater | bar/MPa | 10 / 1,0 | |||
| Compatible NIBE heat pumps | F1145-6, 8,F1155-6(PC),S1155-6(PC),F2120-8,F2040-6, 8;AMS 20-6,AMS 10-6, 8 | F1145-6, 8,10, F1155-6(PC), 12,S1155-6(PC),12, F2120-8,12, F2040-6,8, 12, AMS20-6, AMS10-6, 8, 12 | F1145-6,8, 10, 12,F1155-6(PC), 12,16, S1155-6(PC), 12,16, F2120-8,12, 16, 20*,F2040-6,8, 12, 16,AMS 20-6,AMS 10-6,8, 12, 16. | F1155-6(PC),S1155-6(PC),AMS 10-6,AMS 20-6,F2040-6 | |
| Heat transfer 60/50°C at 50°C water temperature | kW | 12,0 | 15,0 | 22,5 | 13,5 |
| Primary flow | l/h | 1050 | 1300 | 1950 | 1200 |
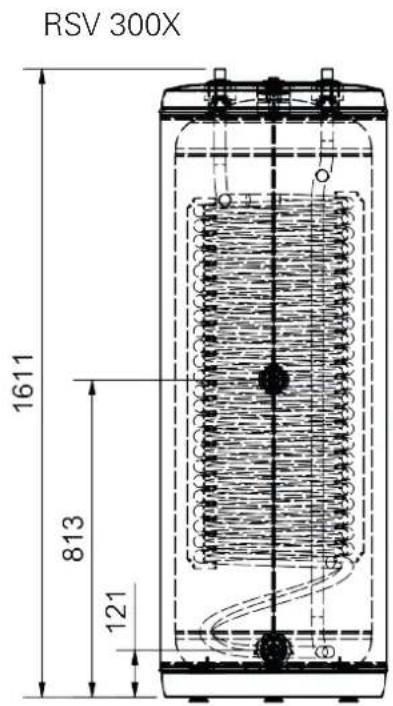
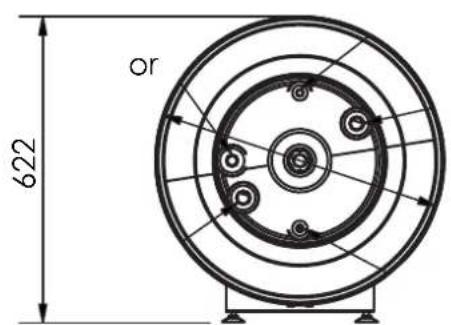
| Height | mm | 1140 | 1616 | 1611 | 622 |
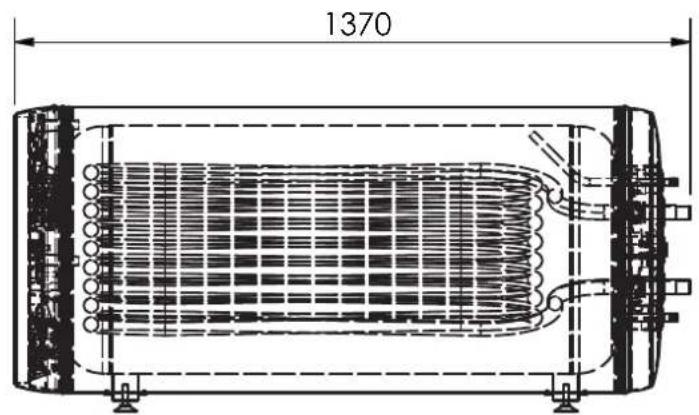
| Length | mm | - | - | - | 1370 |
| Diameter | mm | 585 | - | ||
| Net weight | kg | 44 | 62 | 75 | 61 |
| Stainless steel type | RVS 444 / AISI 444 / EN 1.4521 | ||||
| Part no. | 3113002510 | 3113002520 | 3113002530 | 3113002540 | |
^(x) With restricted power of the heat pump
EN User and installer manual
Water heater series RSV / RSH