FINEPIX XP120 - Waterproof digital camera FUJIFILM - Free user manual and instructions
Find the device manual for free FINEPIX XP120 FUJIFILM in PDF.
| Product type | Waterproof digital camera |
| Brand | FUJIFILM |
| Model | FINEPIX XP120 |
| Effective pixels | 16.4 million |
| Sensor | 1/2.3-inch CMOS with primary color filter |
| Lens | Fujinon 5x optical zoom, f=5.0–25.0 mm (35 mm equivalent: 28–140 mm) |
| Aperture | F3.9–F4.9 (wide angle) / F6.2–F8.0 (telephoto) |
| LCD screen | 7.6 cm (3.0 in.), 920,000 dots, 100% coverage |
| Waterproof | JIS Class 8 (waterproof to 20 m for 120 min) |
| Shockproof | Drop from 1.75 m per MIL-STD 810F |
| Freezeproof | Down to -10 °C |
| Power supply | Rechargeable battery NP-45S (3.7 V, 740 mAh) |
| Battery life (CIPA) | Approx. 210 shots |
| Charging time | Approx. 120 min (at 20 °C) |
| Dimensions (W×H×D) | 109.6 × 71.0 × 27.8 mm |
| Weight (with battery and card) | Approx. 203 g |
| Storage media | Internal memory ~96 MB + SD/SDHC/SDXC card |
| Image formats | JPEG (Exif 2.3), MOV (H.264) |
| Video | Full HD 1920×1080 at 60 fps, slow motion up to 320 fps |
| Connections | USB 2.0 High-Speed, micro HDMI (type D), Wi-Fi 802.11 b/g/n |
| Main features | Face detection, optical stabilization, scene modes, advanced filters, time-lapse video, Cinemagraph |
| Operating temperature | -10 °C to +40 °C |
| Care and cleaning | Rinse with fresh water after use in seawater, air dry, do not use detergents |
| Safety | Check the waterproof seal before each closure; do not open underwater |
Frequently Asked Questions - FINEPIX XP120 FUJIFILM
User questions about FINEPIX XP120 FUJIFILM
0 question about this device. Answer the ones you know or ask your own.
Ask a new question about this device
Download the instructions for your Waterproof digital camera in PDF format for free! Find your manual FINEPIX XP120 - FUJIFILM and take your electronic device back in hand. On this page are published all the documents necessary for the use of your device. FINEPIX XP120 by FUJIFILM.
USER MANUAL FINEPIX XP120 FUJIFILM
For information on related products, visit our website at
http://www.fujifilm.com/products/digital Cameras/index.html
Before You Begin
First Steps
Basic Photography and Playback
More on Photography
More on Playback
Wireless Networks
Movies
Connections
Menu
Technical Notes
Troubleshooting
Appendix
Be sure to read these notes before use.
Safety Notes
- Make sure that you use your camera correctly. Read these safety notes and your Owner's Manual carefully before use.
After reading these safety notes, store them in a safe place.
About the Icons
The icons shown below are used in this document to indicate the severity of the injury or damage that can result if the information indicated by the icon is ignored and the product is used incorrectly as a result.
| WARNING | This icon indicates that death or serious injury can result if the information is ignored. |
| CAUTION | This icon indicates that personal injury or material damage can result if the information is ignored. |
The icons shown below are used to indicate the nature of the instructions which are to be observed.
| ! | Triangular icons tell you that this information requires attention ("Important"). |
| Circular icons with a diagonal bar tell you that the action indicated is prohibited ("Prohibited"). | |
| Filled circles with an exclamation mark indicate an action that must be performed ("Required"). |
The symbols on the product represent the following:
| ~ | AC |
| ~ | DC |
| ~ | Class II equipment (The construction of the product is double-insulated.) |
Notes for waterproof products
- When not in use, this camera should be stored in a dry location.
- If liquid other than fresh water or sea water is spilled onto the camera, please wipe off with a lint free close after rinsing it with fresh water. Please check with your local service centre if unsure.
- Waterproof/dustproof products are excluded from prohibition against water/dust exposure. Keep this in mind when reading following notes and cautions.
| WARNING | |
| Unplug from power socket | If a problem arises, turn the camera off, remove the battery, and disconnect and unplug the AC power adapter. Continued use of the camera when it is emitting smoke, is emitting any unusual odor, or is in any other abnormal state can cause a fire or electric shock. Contact your FUJIFILM dealer. |
| Do not allow water or foreign objects to enter the camera. If water or foreign objects get inside the camera, turn the camera off, remove the battery, and disconnect and unplug the AC power adapter. Continued use of the camera can cause a fire or electric shock. Contact your FUJIFILM dealer. | |
| Do not use in the bathroom or shower | Do not use the camera in the bathroom or shower (excluding waterproof products). This can cause a fire or electric shock. |
| Do not disassemble | Never attempt to change or take apart the camera (never open the case). Failure to observe this precaution can cause fire or electric shock. |
| Do not touch internal parts | Should the case break open as the result of a fall or other accident, do not touch the exposed parts. Failure to observe this precaution could result in electric shock or in injury from touching the damaged parts. Remove the battery immediately, taking care to avoid injury or electric shock, and take the product to the point of purchase for consultation. |
| ○ | Do not change, heat or unduly twist or pull the connection cord and do not place heavy objects on the connection cord. These actions could damage the cord and cause a fire or electric shock. If the cord is damaged, contact your FUJIFILM dealer. |
| ○ | Do not place the camera on an unstable surface. This can cause the camera to fall or tip over and cause injury. |
| ○ | Never attempt to take pictures while in motion. Do not use the camera while you are walking or driving a vehicle. This can result in you falling down or being involved in a traffic accident. |
| ○ | Do not touch any metal parts of the camera during a thunderstorm. This can cause an electric shock due to induced current from the lightning discharge. |
| ○ | Do not use the battery except as specified. Load the battery as shown by the indicator. |
| ○ | Do not heat, change or take apart the battery. Do not drop or subject the battery to impacts. Do not store the battery with metallic products. Any of these actions can cause the battery to burst or leak and cause fire or injury as a result. |
| ○ | Use only the battery or AC power adapters specified for use with this camera. Do not use voltages other than the power supply voltage shown. The use of other power sources can cause a fire. |
| ○ | If the battery leaks and fluid gets in contact with your eyes, skin or clothing, flush the affected area with clean water and seek medical attention or call an emergency number right away. |
| ○ | Do not use the charger to charge batteries other than those specified here. The supplied battery charger is for use only with the type of battery supplied with the camera. Using the charger to charge conventional batteries or other types of rechargeable batteries can cause the battery to leak fluid, overheat or burst. |
| WARNING | |
| Danger of explosion if battery is incorrectly replaced. Replace only with the same. | |
| Do not use in the presence of flammable objects, explosive gases, or dust. | |
| When carrying the battery, install it in a digital camera or keep it in the hard case. When storing the battery, keep it in the hard case. When discarding, cover the battery terminals with insulation tape. Contact with other metallic objects or batteries could cause the battery to ignite or burst. | |
| Keep small accessories, such as memory cards and the hot shoe cover, out of reach of children and infants. There is a possibility that children and infants may accidentally swallow small accessories, such as memory cards and the hot shoe cover. Be sure to store memory cards out of the reach of small children. If a child swallows a memory card, seek medical attention or call an emergency number. | |
| Turn the camera off in crowds. The camera emits radio-frequency radiation that may interfere with pacemakers. | |
| Turn the camera off in the vicinity of automatic doors, public address systems, and other automatically controlled devices. The camera emits radio-frequency radiation that may cause these devices to malfunction. | |
| Keep the camera at least 22 cm (0.7 ft.) away from people wearing pacemakers. The camera emits radio-frequency radiation that may interfere with pacemakers. | |
| Keep out of the reach of small children. Choking or other injuries may occur if the strap or power cord accidentally becomes wound around the neck, or if an accessory is accidentally swallowed. | |
| Do not view the sun through the lens or camera viewfinders. Failure to observe this precaution can cause permanent visual impairment. | |
| Using a flash too close to a person's eyes may temporarily affect the eyesight. There is a risk of visual impairment. When using the flash to photograph a child or infant, take special care to keep enough distance. | |
| Consult with hospital or airline staff before using the camera in a hospital or on an aircraft. This camera may interfere with hospital or aviation equipment. | |
| CAUTION | |
| Do not use this camera in locations affected by oil fumes or steams. This can cause a fire or electric shock. | |
| Do not use this camera in locations affected by humidity or dust (excluding waterproof products). This can cause a fire or electric shock. | |
| Do not leave this camera in places subject to extremely high temperatures. Do not leave the camera in locations such as a sealed vehicle or in direct sunlight. This can cause a fire. | |
| Do not place heavy objects on the camera. This can cause the heavy object to tip over or fall and cause injury. | |
| Do not move the camera while the AC power adapter is still connected. Do not pull on the connection cord to disconnect the AC power adapter. This can damage the power cord or cables and cause a fire or electric shock. | |
| Do not use the AC power adapter when the plug is damaged or the plug socket connection is loose. This could cause a fire or electric shock. |
| CAUTION | |
| Do not cover or wrap the camera or the AC power adapter in a cloth or blanket. This can cause heat to build up and distort the casing or cause a fire. | |
| When you are cleaning the camera or you do not plan to use the camera for an extended period, remove the battery and disconnect and unplug the AC power adapter. Failure to do so can cause a fire or electric shock. | |
| When charging ends, unplug the charger from the power socket. Leaving the charger plugged into the power socket can cause a fire. | |
| When a memory card is removed, the card could come out of the slot too quickly. Use your finger to hold it and gently release the card. Injury could result to those struck by the ejected card. | |
| Request regular internal testing and cleaning for your camera. Build-up of dust in your camera can cause a fire or electric shock. Contact your FUJIFILM dealer to request internal cleaning every two years. Please note that this service is not free of charge. | |
| Keep the sun out of the frame when shooting backlit subjects. Sunlight focused into the camera when the sun is in or close to the frame can cause fire or burns. | |
| Do not carry the camera or lens while they are attached to a tripod. The product can fall or strike other objects, causing injury. |
The Battery and Power Supply
Note: Check the type of battery used in your camera and read the appropriate sections.
The following describes the proper use of batteries and how to prolong their life. Incorrect use can shorten battery life or cause leakage, overheating, fire, or explosion.
Li-ion Batteries
Read this section if your camera uses a rechargeable Li-ion battery.
The battery is not charged at shipment. Charge the battery before use. Keep the battery in its case when not in use.
Notes on the Battery
The battery gradually loses its charge when not in use. Charge the battery one or two days before use.
Battery life can be extended by turning the camera off when not in use.
Battery capacity decreases at low temperatures; a depleted battery may not function at when cold. Keep a fully charged spare battery in a warm place and exchange as necessary, or keep the battery in your pocket or other warm place and insert it in the camera only when shooting. Do not place the battery in direct contact with hand warmers or other heating devices.
Charging the Battery
Charging times will increase at ambient temperatures below +10^ (+50^) or above +35^ (+95^) . Do not attempt to charge the battery at temperatures above 40^ (+104^) ; at temperatures below 0^ (+32^) , the battery will not charge.
Do not attempt to recharge a fully charged battery. The battery does not however need to be fully discharged before charging.
The battery may be warm to the touch immediately after charging or use. This is normal.
Battery Life
At normal temperatures, the battery can be recharged about 300 times. A noticeable decrease in the length of time the battery will hold a charge indicates that it has reached the end of its service life and should be replaced.
Storage
Performance may be impaired if the battery is left unused for extended periods when fully charged. Run the battery flat before storing it. If the camera will not be used for an extended period, remove the battery and store it in a dry place with an ambient temperature of from +15^ to +25^ (+59^ to +77^) . Do not store in locations exposed to extremes of temperature.
Cautions: Handling the Battery
- Do not transport or store with metal objects such as necklaces or hairpins.
- Do not expose to flame or heat.
- Do not disassemble or modify.
- Use with designated chargers only.
- Do not drop or subject to strong physical shocks.
- Do not expose to water.
- Keep the terminals clean.
- The battery and camera body may become warm to the touch after extended use. This is normal.
AA/Alkaline/Rechargeable NIMH Batteries / AA lithium batteries
Read this section if your camera uses AA alkaline or rechargeable AA NiMH batteries. Information on compatible battery types may be found elsewhere in the camera manual.
Cautions: Handling the Batteries
- Do not expose to water, flame, or heat, or store in warm or humid conditions.
- Do not transport or store with metal objects such as necklaces or hairpins.
- Do not disassemble or modify the batteries or battery casing.
- Do not subject to strong physical shocks.
- Do not use batteries that are leaking, deformed, or discolored.
- Keep out of reach of infants and small children.
-
Insert in the correct orientation.
-
Do not mix old and new batteries, batteries with different charge levels, or batteries of different types.
- If the camera will not be used for an extended period, remove the batteries. Note that the camera clock will be reset.
- The batteries may be warm to the touch immediately after use. Turn the camera off and allow the batteries to cool before handling.
- Battery capacity tends to decrease at low temperatures. Keep spare batteries in a pocket or other warm place and exchange as necessary. Cold batteries may recover some of their charge when warmed.
- Fingerprints and other stains on the battery terminals can impair battery performance. Thoroughly clean the terminals with a soft, dry cloth before inserting them in the camera.

If the batteries leak, clean the battery compartment thoroughly before inserting new batteries.

If fluid from the battery comes into contact with skin or clothing, flush the affected area with water. If fluid enters your eyes, immediately flush the affected area with water and seek medical attention. Do not rub your eyes. Failure to observe this precaution could result in permanent visual impairment.
NiMH Batteries
The capacity of Ni-MH batteries may be temporarily reduced when new, after long periods of disuse, or if they are repeatedly recharged before being fully discharged. This is normal and does not indicate a malfunction. Capacity can be increased by repeatedly discharging the batteries using the discharge option in the camera setup menu and recharging them using a battery charger.
1 CAUTION: Do not use the discharge option with alkaline batteries.
The camera draws a small amount of current even when off. Ni-MH batteries that have been left in the camera for an extended period may be drawn down to the point that they no longer hold a charge. Battery performance may also drop if the batteries are run down in a device such as a flashlight. Use the discharge option in the camera setup menu to discharge Ni-MH batteries. Batteries that no longer hold a charge even after repeatedly being discharged and recharged have reached the end of their service life and must be replaced.
Ni-MH batteries can be recharged in a battery charger (sold separately). Batteries may become warm to the touch after charging. Refer to the instructions provided with the charger for more information. Use the charger with compatible batteries only.
Ni-MH batteries gradually lose their charge when not in use.
Disposal
CAUTION: Dispose of used batteries in accord with local regulations.
AC Power Adapters (Available Separately)
This section applies to all camera models. Use only FUILFILM AC power adapters designated for use with this camera. Other adapters could damage the camera.
- The AC power adapter is for indoor use only.
- Be sure the DC plug is securely connected to the camera.
- Turn the camera off before disconnecting the adapter. Disconnect the adapter by the plug, not the cable.
- Do not use with other devices.
- Do not disassemble.
- Do not expose to high heat and humidity.
- Do not subject to strong physical shocks.
- The adapter may hum or become hot to the touch during use. This is normal.
- If the adapter causes radio interference, reorient or relocate the receiving antenna.
Using the Camera
Do not aim the camera at extremely bright light sources, such as the sun in a cloudless sky. Failure to observe this precaution could damage the camera image sensor.
Take Test Shots
Before taking photographs on important occasions (such as at weddings or before taking the camera on a trip), take a test shot and view the result in the LCD monitor to ensure that the camera is functioning normally. FUJIFILM Corporation can not accept liability for damages or lost profits incurred as a result of product malfunction.
Notes on Copyright
Unless intended solely for personal use, images recorded using your digital camera system cannot be used in ways that infringe copyright laws without the consent of the owner. Note that some restrictions apply to the photographing of stage performances, entertainments, and exhibits, even when intended purely for personal use. Users are also asked to note that the transfer of memory cards containing images or data protected under copyright laws is only permissible within the restrictions imposed by those copyright laws.
Handling
To ensure that images are recorded correctly, do not subject the camera to impact or physical shocks while images are being recorded.
Liquid Crystal
In the event that the LCD monitor is damaged, care should be taken to avoid contact with liquid crystal. Take the urgent action indicated should any of the following situations arise:
- If liquid crystal comes in contact with your skin, clean the area with a cloth and then wash thoroughly with soap and running water.
- If liquid crystal enters your eyes, flush the affected eye with clean water for at least 15 minutes and then seek medical assistance.
- If liquid crystal is swallowed, rinse your mouth thoroughly with water. Drink large quantities of water and induce vomiting, then seek medical assistance.
Although the display is manufactured using extremely high-precision technology, it may contain pixels that are always lit or that do not light. This is not a malfunction, and images recorded with the product are unaffected.
Trademark Information
xD-Picture Card and are trademarks of FUJIFILM Corporation. The typefaces included herein are solely developed by DynaComware Taiwan Inc. Macintosh, Mac OS and macOS are trademarks of Apple Inc., registered in the U.S. and other countries. Windows is either a registered trademark or trademark of Microsoft Corporation in the United States and/or other countries. Wi-Fi® and Wi-Fi Protected Setup® are registered trademarks of the Wi-Fi Alliance. Adobe and Adobe Reader are either trademarks or registered trademarks of Adobe Systems Incorporated in the U.S.A. and/or other countries. The SDHC and SDXC logos are trademarks of SD-3C, LLC. The HDMI logo is a trademark. All other trade names mentioned in this manual
are the trademarks or registered trademarks of their respective owners.
Electrical Interference
This camera may interfere with hospital or aviation equipment. Consult with hospital or airline staff before using the camera in a hospital or on an aircraft.
Exif Print (Exif Version 2.3)
Exif Print is a newly revised digital camera file format in which information stored with photographs is used for optimal color reproduction during printing.
IMPORTANT NOTICE: Read Before Using the Software
Direct or indirect export, in whole or in part, of licensed software without the permission of the applicable governing bodies is prohibited.
IMPORTANT: Read the following notices before using the camera's built-in wireless transmitter.
This product, which contains encryption function developed in the United States, is controlled by the United States Export Administration Regulations and may not be exported or re-exported to any country to which the United States embargoes goods.
- Use only as part of a wireless network. FUJIFILM does not accept liability for damages resulting from unauthorized use. Do not use in applications requiring a high degree of reliability, for example in medical devices or other systems that may directly or indirectly impact human life. When using the device in computer and other systems that demand a greater degree of reliability than wireless networks, be sure to take all necessary precautions to ensure safety and prevent malfunction.
- Use only in the country in which the device was purchased. This device conforms to regulations governing wireless network devices in the country in which it was purchased. Observe all location regulations when using the device. FUIFILM does not accept liability for problems arising from use in other jurisdictions.
- Wireless data (images) may be intercepted by third parties. The security of data transmitted over wireless networks is not guaranteed.
- Do not use the device in locations subject to magnetic fields, static electricity, or radio interference. Do not use the transmitter in the vicinity of microwave ovens or in other locations subject to magnetic fields, static electricity, or radio interference that may prevent reception of wireless signals. Mutual interference may occur when the transmitter is used in the vicinity of other wireless devices operating in the 2.4 GHz band.
- The wireless transmitter operates in the 2.4 GHz band using DSSS and OFDM modulation.
Wireless Network Devices: Cautions
- This device operates on the same frequency as commercial, educational, and medical devices and wireless transmitters. It also operates on the same frequency as licensed transmitters and special unlicensed low-voltage transmitters used in RFID tracking systems for assembly lines and in other similar applications.
- To prevent interference with the above devices, observe the following precautions. Confirm that the RFID transmitter is not in operation before using this device. If the device causes interference to premises radio stations used for RFID tracking, immediately either relocate this device or stop the emission of radio waves. If you notice that this device causes interference in low-voltage RFID tracing systems, contact a FUJIFILM representative.

This sticker indicates that this device operates in the 2.4 GHz band using DSSS and OFDM modulation and may cause interference at distances of up to 40m .
About This Manual
Before using the camera, read this manual and the warnings in "For Your Safety" (ii). For information on specific topics, consult the sources below.
Table of Contents XV
The "Table of Contents" gives an overview of the entire manual. The principal camera operations are listed here.
Troubleshooting 100
Having a specific problem with the camera? Find the answer here.
Warning Messages and Displays ... 107
Find out what's behind that flashing icon or error message in the display.

Memory Cards
Pictures can be stored in the camera's internal memory or on optional SD, SDHC, and SDXC memory cards (12), referred to in this manual as "memory cards."
Frequently-Used Buttons
Deleting Pictures
To delete a picture, display it full frame and press the selector up (面).
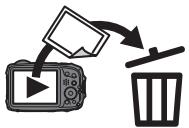
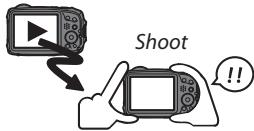
Taking Pictures During Playback
To return instantly to shooting mode, press the shutter button halfway.
View
Turning the Camera on inPlayback Mode
When the camera is off, playback can be started by pressing the button for about a second.

Product Features and Precautions for Use
Water, Dust, and Shock Resistance
1 The camera complies with JIS Class 8 water resistance and JIS Class 6 (IP68) dust resistance standards, and has passed FUJIFLM drop tests (drop height: 1.75m / 5.7 ft.; impact surface: plywood, thickness 5cm / 2.0 in.) compliant with MIL-STD 810F Method 516.5: Shock. These results were obtained through in-house testing and are not a blanket guarantee of water resistance or invulnerability to damage or destruction. The accessories supplied with the camera are not water resistant.
Before Use
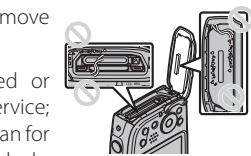
1 Inspect the water-resistant seal and adjacent surfaces and remove any dust, sand, or other foreign matter using a soft, dry cloth.
1 Have the water-resistant seal replaced if it is deformed or otherwise damaged (note that a fee is charged for this service; contact your retailer or a FUJIFILM-authorized repair technician for more information). Failure to replace the seal could result in leaks and damage to the camera.
2 Holding the battery-chamber cover closed against the camera body (①), rotate the latch until it clicks into place (②), indicating that the cover is secure.
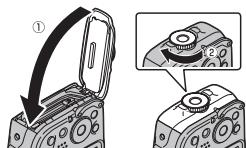
3 Check that the cover is secure by rotating the latch in the opposite direction and confirming that the cover does not open.
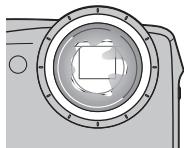
① The front surface of the camera lens is protected by a sheet of glass. Foreign matter on the glass will appear in photographs; keep the glass clean at all times.
① Be sure that the battery-chamber is fully latched. The presence of water, mud, or sand in the camera could cause malfunction.
1 Do not open or close the battery-chamber cover with wet hands or in locations that are dusty, sandy, or near water, for example while on or by a body of water.
① Be sure the camera is completely dry before inserting or removing batteries or memory cards or connecting the USB or HDMI cable.
① The camera does not float. Be sure to attach the strap and keep it around your wrist when using the camera.
During Use
① Restrict underwater use to depths of 20m (65 ft.) or less and periods shorter than 120 minutes. Clean and dry the camera within one hour of using it underwater.
① The interior of the camera is not waterproof. Do not open or close the battery-chamber cover while under water. After cleaning the camera, be sure it is completely dry before opening or closing the battery-chamber cover.
① Do not use in hot springs or heated pools.
1 The camera may lose water resistance if subjected to excessive force or vibration. Do not dive into water with the camera or otherwise subject it to excessive force. In the event the camera is subjected to strong physical shocks, contact your retailer or a FUJIFILM-authorized repair technician.
① If the camera is left on the sand, its temperature may exceed operating limits and sand may get into the speaker or microphone.
① Sunscreen, suntan lotion, or other oily substances may discolor the camera body and should be removed with a damp cloth.
① Note that the color of the supplied strap may fade or transfer to other items if it is exposed to moisture or friction.
After Use
Perform the following steps after using the camera underwater or in locations where foreign matter might adhere to the camera body.
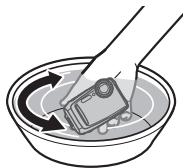
1 Securely close the battery-chamber cover and rinse the camera under the tap or leave it in a basin of fresh water for about ten minutes.
2 Remove water from the camera with a soft, dry cloth and leave it to dry in a well-ventilated location in the shade.
3 After confirming that the camera has dried and is free of water droplets, open the battery-chamber cover and use a soft, dry cloth to remove any water, dust, or other foreign matter from the battery chamber.
① Remove any foreign matter from the water-resistant seal and adjacent surfaces. Foreign matter could damage the seal, lowering water resistance.
Liquid soaps, detergents, alcohol, and other cleansers may affect water resistance and should never be used.
① After use, remove water droplets and foreign matter with a dry cloth, firmly latch the battery-chamber cover, and soak the camera in fresh water for about ten minutes. Dry the camera thoroughly after removing it from the water.
Storage and Maintenance
① Do not store at temperatures below 0^ (32°F) or above 40°C (104°F).
To ensure continued water resistance, it is recommended that you have the water-resistant seal replaced about once a year (a fee is charged for this service). Contact your retailer or a FUJIFILM-authorized repair technician for more information.
Condensation Inside the Lens
In some environments, condensation (fog) may form inside of lens. This does not indicate a malfunction. Condensation can be removed by leaving the battery-chamber cover open in a location with a steady temperature that is free of heat, humidity, sand, and dust.

Condensation
Condensation is particularly likely to occur if the camera is placed in cold water after being exposed to high temperatures or taken from a cold to a warm environment or if the battery chamber is opened in a humid location.
Cold Climates
① Battery performance drops at low temperatures, reducing the number of pictures that can be taken. Insulate the camera to keep it warm or place it in your clothing.
① Use an NP-45S battery.
① Display response may slow at low temperatures. This is not a malfunction.
Table of Contents
For Your Safety .
Safety Notes..
About This Manual ix
Frequently-Used Buttons
Product Features and Precautions for Use.
Before You Begin
Symbols and Conventions. 1
Supplied Accessories 1
Parts of the Camera 2
Camera Displays. 4
Shooting 4
Playback. 5
First Steps
Inserting the Battery and a Memory Card. 7
Compatible Memory Cards. 12
Charging the Battery 14
Turning the Camera on and Off. 17
Shooting Mode 17
Playback Mode. 17
Basic Setup 19
Basic Photography and Playback
Taking Pictures in SR (Scene Recognition) Mode.....20
Viewing Pictures 24
More on Photography
Shooting Mode. 25
Choosing a Shooting Mode 25
Shooting Mode Options 26
CINEMAGRAPH 27
ACTIONCAMERA 31
PRO LOW-LIGHT. 32
HDR HDR 33
ADVANCED FILTER 34
MOTION PANorama 360. 35
Intelligent Face Detection 37
Focus Lock. 38
Exposure Compensation 40
Macro Mode (Close-ups) 41
Using the Flash (Intelligent Flash) 42
Using the Self-Timer 44
Interval shooting (Time-lapse movie) 45
The Burst Mode Button. 49
More on Playback
Playback Options. 50
Continuous Shooting. 50
Favorites: Rating Pictures 50
Playback Zoom. 51
Multi-Frame Playback 52
删除 Pictures. 53
Image Search 54
PhotoBook Assist. 55
Creating a PhotoBook. 55
Viewing Photobooks 56
Editing and Deleting Photobooks. 56
Viewing Panoramas 57
Wireless Networks
Wireless Transfer (FUJIFLM Camera Remote/FUJIFLM
PC AutoSave) 58
Connecting with smartphones. 58
Saving Pictures to a Computer 59
Movies
Recording Movies 60
Viewing Movies 63
Connections
Viewing Pictures on High-Definition TVs. 64
Creating a DPOF Print Order 65
instax SHARE Printers 67
Establishing a Connection 67
Printing Pictures 68
Viewing Pictures on a Computer (MyFinePix Studio)...69
Windows. 69
Macintosh 69
Connecting the Camera. 70
Menu
Using the Menus: Shooting Mode. 72
Using the Shooting Menu. 72
Shooting Menu Options 72
SHOOTING MODE. 72
ISO ISO. 72
IMAGE SIZE 73
IMAGE QUALITY. 74
FINEPIX COLOR. 74
WB WHITE BALANCE 75
CONTINUOUS. 76
FACE DETECTION. 76
AF MODE. 77
MOVIE AF MODE 77
MOVIE MODE. 78
TIME-LAPSE MOVEMODE 79
WIRELESS COMMUNICATION 79
Using the Menus:Playback Mode 80
Using the Playback Menu. 80
Playback Menu Options. 80
WIRELESS COMMUNICATION 80
PC AUTO SAVE. 80
IMAGE SEARCH 80
面ERASE. 80
MOVIEEDIT. 81
CREATE CINEMAGRAPH. 82
SLIDE SHOW 82
RED EYE REMOVAL .82
PROTECT. 83
CROP. 83
RESIZE. 84
IMAGE ROTATE .84
COPY COPY 85
PHOTOBOOK ASSIST. 85
PRINT ORDER (DPOF) 85
instax PRINTER PRINT. 85
DISP ASPECT. 86
The Setup Menu 87
Using the Setup Menu. 87
Setup Menu Options .88
DATE/TIME. 88
TIME DIFFERENCE 88
言語/LANG. 88
SILENT MODE. 88
RESET. 89
FORMAT 89
IMAGE DISP. 89
FRAME NO. 90
OPERATION VOL. 91
SHUTTERTVOLUME. 91
SHUTTER SOUND. 91
PLAYBACKVOLUME 91
LCD BRIGHTNESS 91
Ps LCD POWER SAVE. 92
AUTO POWER OFF. 92
IS MODE. 92
DIGITAL IMAGE STABILIZER. 92
RED EYE REMOVAL .92
INTELLIGENT DIGITAL ZOOM. 93
MOVIE ZOOM TYPE. 94
AFILLUMINATOR. 94
AUTOROTATE PB 94
BACKGROUND COLOR. 94
WIND FILTER 94
WIRELESS SETTINGS 94
PC AUTO SAVE SETTING. 95
GEOTAGGING SET-UP 95
instax PRINTER CONNECTION SETTING 95
DATE DATE STAMP .95
Technical Notes
Optional Accessories 96
Accessories from FUJIFILM. 97
Caring for the Camera 98
Storage and Use 98
Condensation. 98
Cleaning. 99
Traveling 99
Troubleshooting
Problems and Solutions. 100
Warning Messages and Displays 107
Appendix
Memory Card Capacity 111
Specifications 112
Symbols and Conventions
The following symbols are used in this manual:
① : This information should be read before use to ensure correct operation.
Additional information that may be helpful when using the camera.
: Other pages in this manual on which related information may be found.
Menu and other text in the LCD monitor are shown in bold. In the illustrations in this manual, displays may be simplified for explanatory purposes.
Supplied Accessories
The following items are included with the camera:
NP-45S rechargeable battery
AC power adapter

Plug adapter*
USB cable
- Strap
- User Guide/ Basic Manual

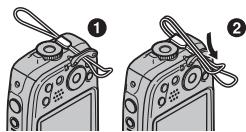
Attaching the Strap
Attach the strap as shown.
- Shape of adapter varies with region of sale.
Parts of the Camera
For more information, refer to the page listed to the right of each item.
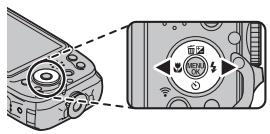
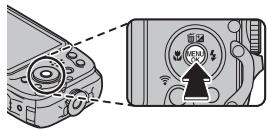
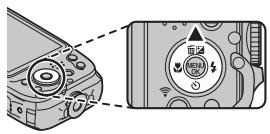
Selector button
Move cursor up

(exposure compensation) button (40)

(delete) button (x)
MENU/OK button
Move cursor left

macro) button 41
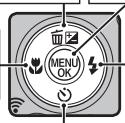
Move cursor down

(self-timer) button (44)
Move cursor right

(1 flash) button (42)
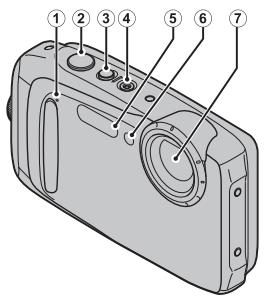
- The illustrations in this manual have been simplified for explanatory purposes.
① Microphone. 60
② Shutter button 22
③ ON/OFF button. 17
④ (movie recording) button 60
⑤ Flash 42
⑥ Self-timer lamp. 44 AF-assist illuminator .94
⑦ Lens/protective glass
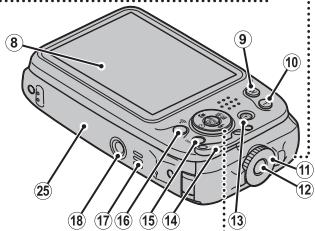
⑧ LCD monitor 4
⑨ W (zoom out) button 21, 51
⑩ T (zoom in) button 21, 51
⑪ Latch 7,10
⑫ Safety lock 7,10
13 (playback) button. 24
14 Strap eyelet 1
DISP display)/BACK button 6,19
16 Burst mode button. 49
( wireless transfer) button. 58
⑦ Speaker 63
⑱ Tripod mount
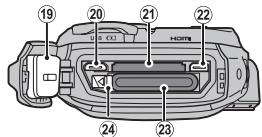
Water-resistant seal xi, 10
② Micro USB connector (Micro-B) 70
② Memory card slot 9
② Micro HDMI connector (Type D) 64
② Battery chamber. 7
24 Battery latch 8,11
Product name plate.. see below

The Product Name Plate
Do not remove the product name plate, which provides the FCC ID, KC mark, serial number, and other important information.
Camera Displays
The following types of indicator may be displayed during shooting and playback. Indicators vary with camera settings.
Shooting
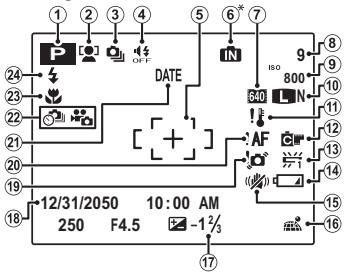
① Shooting mode 25
② Intelligent Face Detection indicator. 37
③ Continuous shooting mode. 76
④ Silent mode indicator. 88
⑤ Focus frame. 38
⑥ Internal memory indicator
⑦ Movie mode. 78
Number of available frames 111
Sensitivity. 72
⑩ Image size and quality 73,74
① Temperature warning. 108
② FINEPIX color. 74
13 White balance. 75
14 Battery level 5
15 IS mode. 92
16 Location data download status 95
⑦ Exposure compensation. 40
18 Date and time 19
19 Blur warning. 43, 107
20 Focus warning. 22, 107
② Date stamp. 95
② Self-timer indicator (Interval shooting / Time-lapse movie) 44
23 Macro (close-up) mode. 41
24 Flash mode 42
Playback
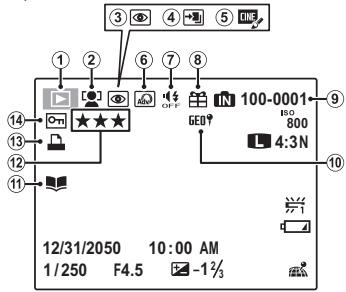
①Playbackmodeindicator. 24,50
② Intelligent Face Detection indicator. 37,82
③ Red-eye removal indicator. 82
④ Pro low-light mode, HDR 32, 33
⑤ Cinemagraph 27
⑥ Advanced filter 34
⑦ Silent mode indicator. 88
⑧ Gift image 50
⑨ Frame number 90
10 Location data 95
⑪ Photobook assist. 55
12Favorites. 50
⑬ DPOF print indicator 65
14 Protected image. 83

Battery Level
Battery level is shown as follows:
| Indicator | Description |
| (white) | Battery partially discharged. |
| (white) | Battery more than half discharged. |
| (red) | Low battery. Charge as soon as possible. |
| (blinks red) | Battery exhausted. Turn camera off and charge battery. |
Hiding and Viewing Indicators
Press DISP/BACK to cycle through shooting and playback indicators as follows:
- Shooting: Indicators displayed/indicators hidden/best framing/HD framing
- Playback: Indicators displayed/indicators hidden/ favorites
Inserting the Battery and a Memory Card
Insert the battery and memory card as described below.
① Before proceeding, confirm that the water-resistant seal is free of foreign matter as described on page xi.
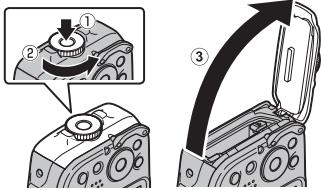
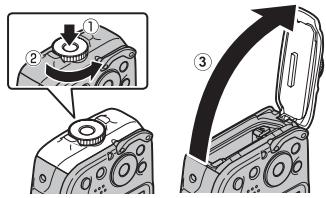
1 Open the battery-chamber cover.
Keeping the safety lock pressed (①), rotate the latch (②) and open the battery-chamber cover (③).
Be sure the camera is off before opening the battery-chamber cover.
1 Do not open the battery-chamber cover when the camera is on. Failure to observe this precaution could result in damage to image files or memory cards.
① Do not use excessive force when handling the battery-chamber cover.
① Remove water droplets and other foreign matter with a dry cloth before opening the battery-chamber cover.
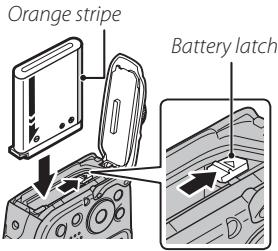
2 Insert the battery.
Align the orange stripe on the battery with the orange battery latch and slide the battery into the camera, keeping the battery latch pressed to one side. Confirm that the battery is securely latched.
① Insert the battery in the correct orientation. Do NOT use force or attempt to insert the battery upside down or backwards. The battery will slide in easily in the correct orientation.
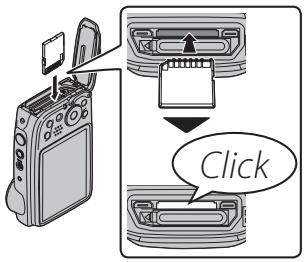
3 Insert the memory card.
Holding the memory card in the orientation shown at right, slide it in until it clicks into place at the back of the slot.
① Be sure card is in the correct orientation; do not insert at an angle or use force. If the memory card is not correctly inserted or no memory card is inserted, IN will appear in the LCD monitor and internal memory will be used for recording and playback.
① SD/SDHC/SDXC memory cards can be locked, making it impossible to format the card or to record or delete images. Before inserting an SD/SDHC/SDXC memory card, slide the write-protect switch to the unlocked position.
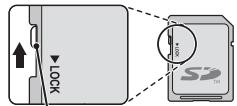
Write-protect switch
4 Close and latch the battery-chamber cover.
Holding the battery-chamber cover closed against the camera body (①), rotate the latch until it clicks into place (②), indicating that the cover is secure.
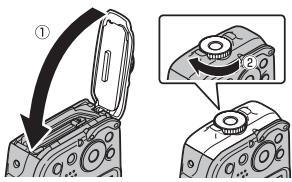
① Before closing the cover, confirm that there is no dust, sand, or other foreign matter on the water-resistant seal or adjacent surfaces.
① When closing the battery-chamber cover, do not subject it to excessive horizontal forces. Failure to observe this precaution could cause the water-resistant seal to become misaligned, allowing water into the camera.
① Check that the cover is secure by rotating the latch in the opposite direction and confirming that the cover does not open.

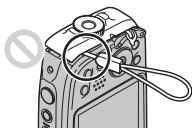
Confirming That the Cover Is Latched
Make sure that the strap is not caught in the cover and that the latch is closed.

Correct
The latch is closed.

Incorrect
The latch is open.

Removing the Battery and Memory Card
Before removing the battery or memory card, turn the camera off and open the battery-chamber cover.
To remove the battery, press the battery latch to the side, and slide the battery out of the camera as shown.
Battery latch
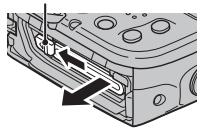
To remove the memory card, press it in and release it slowly. The card can then be removed by hand. When a memory card is removed, the card could come out of the slot too quickly. Use your finger to hold it and gently release the card.

Compatible Memory Cards
FUJIFILM and SanDisk SD, SDHC, and SDXC memory cards have been approved for use in the camera. A complete list of approved memory cards is available at http://www.fujifilm.com/support/digital Cameras/compatibility/. Operation is not guaranteed with other cards. The camera can not be used with xD Picture Cards or MultiMediaCard (MMC) devices.
① Memory Cards
- Do not turn the camera off or remove the memory card while the memory card is being formatted or data are being recorded to or deleted from the card. Failure to observe this precaution could damage the card.
- Format SD/SDHC/SDXC memory cards before first use, and be sure to reformat all memory cards after using them in a computer or other device. For more information on formatting memory cards, see "FORMAT" (89).
- Memory cards are small and can be swallowed; keep out of reach of children. If a child swallows a memory card, seek medical assistance immediately.
- miniSD or microSD adapters that are larger or smaller than the standard dimensions of an SD/SDHC/SDXC card may not eject normally; if the card does not eject, take the camera to an authorized service representative. Do not forcibly remove the card.
- Do not affix labels to memory cards. Peeling labels can cause camera malfunction.
-
Movie recording may be interrupted with some types of SD/SDHC/SDXC memory card. Use a CLASS card or better when shooting HD movies, Full HD movies or high-speed movies.
-
The data in internal memory may be erased or corrupted when the camera is repaired. Please note that the repairer will be able to view pictures in internal memory.
- Formatting a memory card or internal memory in the camera creates a folder in which pictures are stored. Do not rename or delete this folder or use a computer or other device to edit, delete, or rename image files. Always use the camera to delete pictures from memory cards and internal memory; before editing or renaming files, copy them to a computer and edit or rename the copies, not the originals.
① Batteries
- Remove dirt from the battery terminals with a clean, dry cloth. Failure to observe this precaution could prevent the battery from charging.
- Do not affix stickers or other objects to the battery. Failure to observe this precaution could make it impossible to remove the battery from the camera.
- Do not short the battery terminals. The battery could overheat.
- Read the cautions in "The Battery and Power Supply" (图 v).
- Use only battery chargers designated for use with the battery. Failure to observe this precaution could result in product malfunction.
- Do not remove the labels from the battery or attempt to split or peel the outer casing.
- The battery gradually loses its charge when not in use. Charge the battery one or two days before use.
Charging the Battery
The battery is not charged at shipment. Charge the battery before use. The camera charges the battery internally.
The camera uses an NP-45S rechargeable battery.
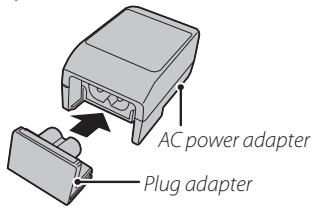
1 Attach the plug adapter to the AC power adapter.
Attach the plug adapter as shown, making sure that it is fully inserted and clicks into place on the AC power adapter terminals.
1) The plug adapter is exclusively for use with the supplied AC power adapter. Do not use it with other devices.
2 Open the battery-chamber cover.
Keeping the safety lock pressed (①), rotate the latch (②) and open the battery-chamber cover (③).
3 Charge the battery.
Connect the camera to the supplied AC power adapter using the supplied USB cable. Then plug the AC power adapter into an indoor power outlet.
① Be sure the connectors are in the correct orientation and then insert them fully.
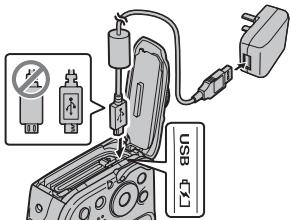
Connect to camera Micro USB connector (Micro-B)
The Self-timer Lamp
The self-timer lamp shows battery charge status as follows:

| Self-timer lamp | Battery status | Action |
| On | Battery charging. | — |
| Blinks | Battery fault. | See page 101. |
| Off | Charging complete. | — |
| Can not charge. | Unplug the AC power adapter from the power outlet and reinsert the battery in the correct orientation (101). |
① The battery will not charge while the camera is on.
The camera operates in external power mode if the camera is turned on while plugged into AC power.

Charging via a computer
The battery can be charged by connecting the camera to a computer.
Turn the camera off and connect the supplied USB cable as shown, making sure the connectors are fully inserted. Connect the camera directly to the computer; do not use a USB hub or keyboard.
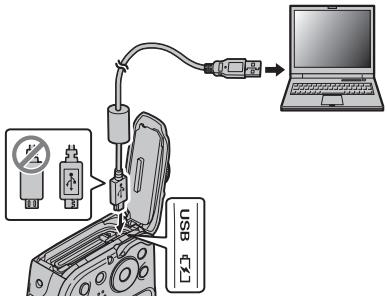
Connect to camera Micro USB connector (Micro-B)
If the camera is turned on, charging is not available.
① If the computer goes into sleep mode while charging, charging will stop. To continue charging, disable sleep mode on the computer, and disconnect and connect the USB cable.
① Charging may be impossible depending on computer specifications, settings or conditions.
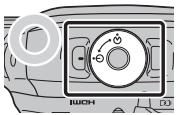
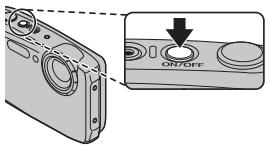
Shooting Mode
Press the ON/OFF button to turn the camera on.
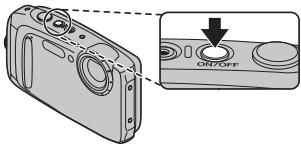
Press ON/OFF again to turn the camera off.
Switching to Playback Mode
Press the l button to start playback. Press the shutter button halfway to return to shooting mode.
You may be prompted to confirm that the battery-chamber cover is locked, but this does not indicate a malfunction.
Playback Mode
To turn the camera on and begin playback, press the button for about a second.
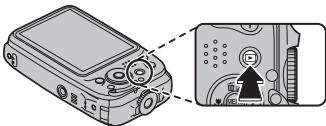
Press the l button again or press the ON/OFF button to turn the camera off.
Switching to Shooting Mode
To exit to shooting mode, press the shutter button halfway. Press the button to return to playback.
① Fingersprints and other marks on the protective glass covering the lens can affect pictures. Keep the glass clean.
① The ON/OFF button does not completely end the supply of power to the camera.
Auto Power Off
The camera will turn off automatically if no operations are performed for the length of time selected for AUTO POWER OFF (92). To turn the camera on, use the ON/OFF button or press the button for about a second.
Basic Setup
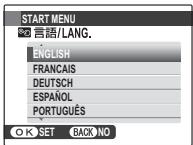
A language-selection dialog is displayed the first time the camera is turned on. Set up the camera as described below (you can reset the clock or change languages at any time using the DATE/TIME or 言語/LANG. options in the setup menu; for information on displaying the setup menu, see page 88).
1 Highlight a language and press MENU/OK.
Press DISP/BACK to skip the current step. Any steps you skip will be displayed the next time the camera is turned on.
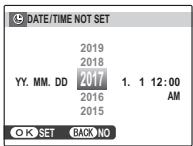
2 The date and time will be displayed. Press the selector left or right to highlight the year, month, day, hour, or minute and press up or down to change. To change the order in which the year, month, and day are displayed, highlight the date format and press the selector up or down. Press MENU/OK when settings are complete.
The Camera Clock
If the battery is removed for an extended period, the camera clock will be reset and the language-selection dialog will be displayed when the camera is turned on.
Basic Photography and Playback
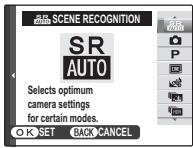
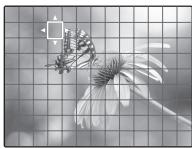
Taking Pictures in SR (Scene Recognition) Mode
This section describes how to take pictures in SR (scene recognition) mode. The camera automatically analyzes the composition and adjusts settings appropriately.
1 Turn the camera on.
Press the ON/OFF button to turn the camera on.
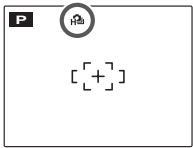
AUX shooting indicators will be displayed.

The Icon
This icon indicates that the camera continuously searches for faces to select the appropriate scene, increasing the drain on the battery.
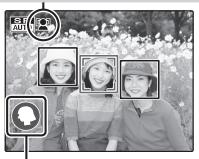

The Scene Icon
The camera selects the scene according to shooting conditions and the type of subject (the scenes in brackets are selected if the camera detects that the subject is moving): ③ PORTAIT (③), ④ LANDSCAPE (④), ⑤ NIGHT (⑤), ⑥ MACRO (⑥), ⑦ NIGHT PORTAIT (⑦), ⑧ BACKLIT PORTAIT (⑧), ⑨ AUTO (⑨).
2 Frame the picture.
Use the zoom buttons to frame the picture in the display.
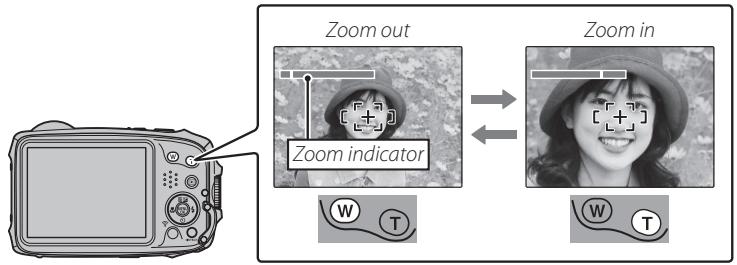

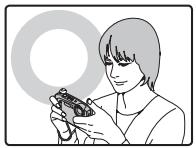
Holding the Camera
Hold the camera steady with both hands and brace your elbows against your sides. Shaking or unsteady hands can blur your shots.
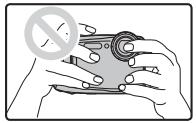
To prevent pictures that are out of focus or too dark (underexposed), keep your fingers and other objects away from the flash and from the protective glass covering the lens.
3 Focus.
Press the shutter button halfway to focus.
The lens may make a noise when the camera focuses; this is normal. If the subject is poorly lit, the AF-assist illuminator may light; see "AF AF ILLUMINATOR"(94) for information on disabling the illuminator.

If the camera is able to focus, it will beep twice.
If the camera is unable to focus, the focus frame will turn red, !AF will be displayed. Change the composition or use focus lock (图38).
4 Shoot.
Smoothly press the shutter button the rest of the way down to take the picture.
If the subject is poorly lit, the flash may fire when the picture is taken. For information on using the flash when lighting is poor, see "Using the Flash (Intelligent Flash)" (图42).


The Shutter Button
The shutter button has two positions. Pressing the shutter button halfway sets focus and exposure; to shoot, press the shutter button the rest of the way down.
Viewing Pictures
Pictures can be viewed in the LCD monitor. When taking important photographs, take a test shot and check the results.
1 Press the button.
The most recent picture will be displayed.
2 View additional pictures.
Press the selector right to view pictures in the order recorded, left to view pictures in reverse order.
Press the shutter button halfway to exit to shooting mode.
More on Photography
Shooting Mode
Choose a shooting mode according to the scene or type of subject.
Choosing a Shooting Mode
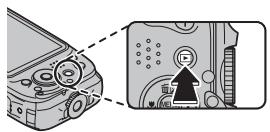
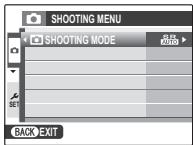
1 Press MENU/OK to display the shooting menu.
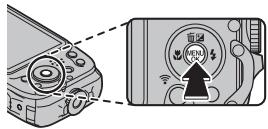
2 Highlight SHOOTING MODE and press the selector right to display shooting mode options.
3 Highlight the desired mode and press MENU/OK.
4 Press DISP/BACK to exit to shooting mode.
Shooting Mode Options
| Mode | Description |
| SCENE RECOGNITION | The camera automatically analyzes the composition and selects a scene according to shooting conditions and the type of subject. |
| AUTO | Choose for crisp, clear snapshots. This mode is recommended in most situations. |
| PROGRAM AE | The camera sets exposure automatically. |
| CINEMAGRAPH | Choose when creating a cinematograph, which is a still image with a portion that moves (◎ 27). |
| ACTION CAMERA | Record impressive photos and videos of your adventures in wide angle (◎ 31). |
| PRO LOW-LIGHT | Choose when photographing stationary subjects under low light or with the camera zoomed in (◎ 32). |
| HDR | Choose when photographing high-contrast scenes. The camera varies exposure over a series of shots and blends the results to preserve details in highlights and shadows (◎ 33). |
| NATURAL & ⓸ | The camera takes two shots: one without the flash and one with. |
| PORTRAIT | Choose for portraits. |
| LANDSCAPE | Choose for daylight shots of buildings and landscapes. |
| ADVANCED FILTER | Take photos with filter effects (◎ 34). |
| MOTION PANorama 360 | Pan the camera to record a series of shots that are joined together to form a panorama (◎ 35). |
| SPORT | Choose when photographing moving subjects. |
| NIGHT | Choose this mode for poorly lit twilight or night scenes. |
| NIGHT (TRIPOD) | Choose this mode for slow shutter speeds when shooting at night. |
| SUNSET | Choose this mode to record the vivid colors in sunrises and sunsets. |
| SNOW | Choose for crisp, clear shots that capture the brightness of scenes dominated by shining white snow. |
| BEACH | Choose for crisp, clear shots that capture the brightness of sunlit beaches. |
| UNDERWATER | Choose for underwater photography. |
| UNDER WATER (MACRO) | Choose for underwater close-ups of small objects. |
| PARTY | Capture indoor background lighting under low-light conditions. |
| FLOWER | Choose for vivid close-ups of flowers. |
| TEXT | Take clear pictures of text or drawings in print. |
CINEMAGRAPH
Create a cinematagraph, which is a still image with a portion that moves.
Recording and Editing Cinemagrams
1 Select CINEMAGRAPH for shooting mode (图25).
① You can select CINEMAGRAPH MODE by pressing the selector right. Press the selector left or right to select CINEMAGRAPH MODE, and press MENU/OK.
① When the cinemagraph is recorded to internal memory, the frame size is set to 640 × 480 (30fps).

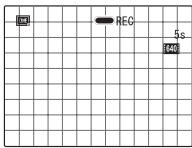
2 Press the shutter button all the way down to start recording.
① There is no need to keep the shutter button pressed during recording. The camera performs recording for up to 5 seconds.
3 Press the shutter button all the way down again to stop recording.
① Recording ends automatically after 5 seconds.
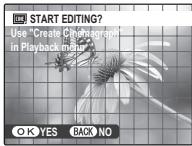
4 Press MENU/OK if you wish to edit the cinematograph immediately.
Press DISP/BACK if you wish to edit the cinemagraph later (图30).
5 Press the selector up, down, left, or right to move the selection area to the part of the image where you wish to see motion.
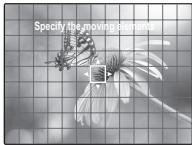
6 Press MENU/OK to set the area of motion in the image.
Repeat steps 5-6 to add another selection area.
To cancel a selected area, place another selection area on top of the previously selected area, and press MENU/OK.

Selecting the Area
The size of the selection area can be adjusted by pressing W (zoom out) or T (zoom in).
- The maximum size of the selection area is 6 × 6 squares.
- If the selection area overlaps a previously selected area when MEN / OK is pressed, the entire area encompassing the previously selected area and the newly selected area is selected.

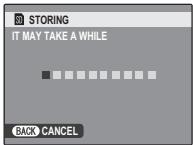
7 After pressing DISP/BACK, press the selector up or down to select START, and then press MENU/OK. When processing is complete, SUCCESSFULLY SAVED is displayed.
① It may take some time for the camera to process the image. Wait until processing is complete.
Select CANCEL to return to the selection area editing screen.
Select END to exit cinematagraph editing and return to shooting mode.
Editing Cinemagraphs Later
You can perform cinematagraph editing for movies that were recorded in CINEMAGRAPH shooting mode.
Press the button, then press the selector left or right to display the movie (unedited movie that was recorded in CINEMAGRAPH shooting mode) that you wish to edit.
The icon is displayed for movies recorded in CINEMAGRAPH shooting mode that have not been edited.
2 Press MENU/OK to display the playback menu, and press the selector up or down to select CREATE CINEMAGRAPH.
3 Press MENU/OK to display the cinematograph editing screen.
4 Perform steps 5-7 in "Recording and Editing Cinemagrams" to edit the cinemagraph (图28).
ACTION CAMERA
Record impressive photos and videos of your adventures in wide angle. Choose this mode for shooting with the camera attached to the photographer's body etc. Press the button to start or stop recording a video.
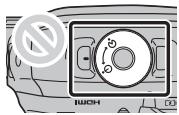
① Do not use this mode under the condition where the camera may get hard vibration, such as putting the camera directly on the bicycle.
In Action Camera Mode, the XP120's lens turns into a fixed 18mm (35mm format equivalent), and the LCD monitor automatically turns off when you start to shoot movies.
While recording a video, the LCD monitor turns off and the self-timer lamp blinks. The self-timer lamp blinks may affect the video depending on the scene.
When a video is recorded, the frame size is set to 1920×1080 (60fps), 1920×1080 (30fps), 1280×720 (60fps) or 640×480 (30fps).
PRO LOW-LIGHT
Each time the shutter button is pressed, the camera makes four exposures and combines them into a single photograph. Use to reduce noise and blur when photographing poorly lit subjects or static subjects at high zoom ratios.

A single combined photograph may not be created with some scenes or if the subject or camera moves during shooting. Do not move the camera until shooting is complete.
PRO LOW-LIGHT
1 Keep the camera steady during shooting.
1 The camera may make fewer than four exposures in some situations.
HDR
Each time the shutter button is pressed, the camera takes a series of shots, each with different exposure. These are combined into a single image, preserving detail in highlights and shadows. Choose for high-contrast scenes.
A single combined photograph may not be created with some scenes or if the subject or camera moves during shooting. Do not move the camera until shooting is complete.
D-RANGE PRIORITY
① Keep the camera steady during shooting.
ADV ADVANCED FILTER
Take photos with filter effects.
1 Select Advanced FILTER for shooting mode (25).
2 Select a filter effect and press MENU/OK.
| Filter | Description |
| TOY CAMERA | Choose for a retro toy camera effect. |
| MINIATURE*1 | The tops and bottoms of pictures are blurred for a diorama effect. |
| POP COLOR | Create high-contrast images with saturated colors. |
| HIGH-KEY | Create bright, low-contrast images. |
| LOW-KEY | Create uniformly dark tones with few areas of emphasized highlights. |
| DYNAMIC TONE*1 | Dynamic tone expression is used for a fantasy effect. |
| FISH-EYE | Create a distorting effect of a fisheye lens. |
| SOFT FOCUS*1 | Create a look that is evenly soft throughout the whole image. |
| CROSS SCREEN*1 | Create a star pattern where lines radiate out from bright objects. |
| SKETCH | Create line-drawing-like pictures with contours of subjects remained. |
| PARTIAL COLOR (RED) | Areas of the image that are the selected color are recorded in that color. All others areas of the image are recorded in black-and-white. |
| PARTIAL COLOR (ORANGE) | |
| PARTIAL COLOR (YELLOW) | |
| PARTIAL COLOR (GREEN) | |
| PARTIAL COLOR (BLUE) | |
| PARTIAL COLOR (PURPLE) |
*1 Not available when shooting movies.
Depending on the subject and camera settings, images may in some cases be grainy or vary in brightness and hue.
PANORAMA 360
Follow an on-screen guide to take photos that will automatically be joined to form a panorama. The camera zooms all the way out and remains fixed at the widest angle until shooting is complete.

1 To select the angle through which you will pan the camera while shooting, press the selector down. Press the selector left or right to highlight an angle and press MENU/OK.
2 Press the selector right to view a choice of pan directions. Press the selector left or right to highlight a pan direction and press MENU/OK.
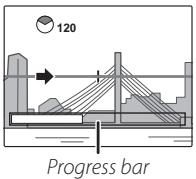
3 Press the shutter button all the way down to start recording. There is no need to keep the shutter button pressed during recording.
4 Pan the camera in the direction shown by the arrow. Shooting ends automatically when the progress bar is full and the panorama is complete.
Shooting ends if the shutter button is pressed all the way down during shooting. No panorama will be recorded if the shutter button is pressed before the camera has been panned through 120^ .
① Panoramas are created from multiple frames. The camera may in some cases record an greater or lesser angle than selected or be unable to stitch the frames together perfectly. The last part of the panorama may not be recorded if shooting ends before the panorama is complete.
① Shooting may be interrupted if the camera is panned too quickly or too slowly. Panning the camera in a direction other than that shown cancels shooting.
1 The desired results may not be achieved with moving subjects, subjects close to the camera, unvarying subjects such as the sky or a field of grass, subjects that are in constant motion, such as waves and waterfalls, or subjects that undergo marked changes in brightness. Panoramas may be blurred if the subject is poorly lit.

For Best Results
For best results, move the camera in a small circle at a steady speed, keeping the camera horizontal and being careful only to pan in the direction shown by the guides. If the desired results are not achieved, try panning at a different speed.
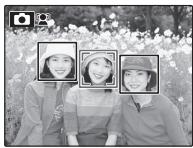
Intelligent Face Detection
Intelligent Face Detection sets focus and exposure for human faces anywhere in the frame, preventing the camera from focusing on the background in group portraits. Choose for shots that emphasize portrait subjects.
To use Intelligent Face Detection, press MENU/OK to display the shooting menu and select ON for FACE DETECTION (76). Faces can be detected with the camera in vertical or horizontal orientation; if a face is detected, it will be indicated by a green border. If there is more than one face in the frame, the camera will select the face closest to the center; other faces are indicated by white borders.
① In some modes, the camera may set exposure for the frame as a whole rather than the portrait subject.
If the subject moves as the shutter button is pressed, their face may not be in the area indicated by the green border when the picture is taken.
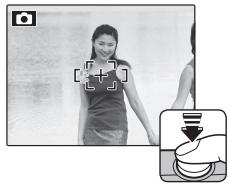
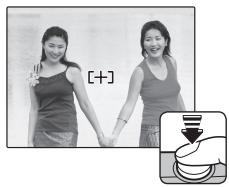
Focus Lock
To compose photographs with off-center subjects:
1 Focus: Position the subject in the focus frame (r^+) and press the shutter button halfway to lock focus and exposure. Focus and exposure will remain locked while the shutter button is pressed halfway (AF/AE lock).
2 Recompose: Keep the button pressed halfway.
3 Shoot: Press the button all the way down.


Autofocus
Although the camera boasts a high-precision autofocus system, it may be unable to focus on the subjects listed below. If the camera is unable to focus, focus on another subject at the same distance and use focus lock to recompose the photograph.
- Very shiny subjects such as mirrors or car bodies.
- Fast-moving subjects.
- Subjects photographed through a window or other reflective object.
- Dark subjects and subjects that absorb rather than reflect light, such as hair or fur.
-
Insubstantial subjects, such as smoke or flame.
-
Subjects that show little contrast with the background (for example, subjects in clothing that is the same color as the background).
- Subjects positioned in front of or behind a high-contrast object that is also in the focus frame (for example, a subject photographed against a backdrop of highly contrasting elements).
Exposure Compensation
To adjust exposure compensation when photographing very bright, very dark, or high-contrast subjects, press the selector up (图4). Press the selector up or down to choose an exposure compensation value and then press MENU/OK.
Choose positive (+) values to increase exposure
Choose negative (-) values to reduce exposure

A icon and exposure indicator are displayed at settings other than ± 0 . Exposure compensation is not reset when the camera is turned off; to restore normal exposure control, choose a value of ± 0 .
Turn the flash off when using exposure compensation.
Exposure compensation is available only when P (PROGRAM AE) is selected for shooting mode.
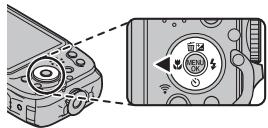
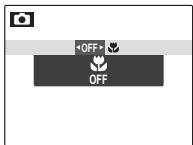
Macro Mode (Close-ups)
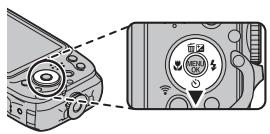
For close-ups, press the selector left ()and select .When macro mode is in effect, the camera focuses on subjects near the center of the frame. Use the zoom buttons to compose pictures (21).
To exit macro mode, press the selector left ( ) and select OFF.
Use of a tripod is recommended to prevent blur caused by camera shake.
Using the Flash (Intelligent Flash)
When the flash is used, the camera's Intelligent Flash system instantly analyzes the scene based on such factors as the brightness of the subject, its position in the frame, and its distance from the camera. Flash output and sensitivity are adjusted to ensure that the main subject is correctly exposed while preserving the effects of ambient background lighting, even in dimly-lit indoor scenes. Use the flash when lighting is poor, for example when shooting at night or indoors under low light.
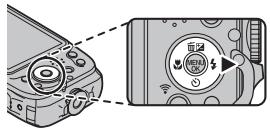
Press the selector right (4) and choose from the following flash modes:
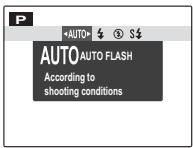
| Option | Description |
| AUTO/ AUTO (AUTO FLASH) | The flash fires when required. Recommended in most situations. |
| 4/44 (FORCED FLASH) | The flash fires whenever a picture is taken. Use for backlit subjects or for natural coloration when shooting in bright light. |
| ⓷ (SUPPRESSED FLASH) | The flash does not fire even when the subject is poorly lit. Use of a tripod is recommended. |
| $4/SLOW (SLOW SYNCHRO) | Capture both the main subject and the background under low light (note that brightly lit scenes may be overexposed). |
If the flash will fire, 1 will be displayed when the shutter button is pressed halfway (if the icon blinks yellow, the flash charging; wait for charging to complete before shooting). At slow shutter speeds, 1 will appear in the display to warn that pictures may be blurred; use of a tripod is recommended.
The flash may fire several times with each shot. Do not move the camera until shooting is complete.
The flash may cause vignetting.

Red-Eye Removal
When Intelligent Face Detection (37) and red-eye removal (82) are on, red-eye removal is available in auto (AUTO; RED EYE REDUCTION), flash on (OF; FORCED FLASH), and slow sync (SLOW; RED EYE & SLOW) modes. Red-eye removal minimizes "red-eye" caused when light from the flash is reflected from the subject's retinas as shown in the illustration at right.

To use the self-timer, press the selector down (O) and choose from the following options:

| Option | Description |
| OFF (OFF) | Self-timer off. |
| (10 SEC) | The shutter is released ten seconds after the shutter button is pressed. Use for self-portraits. The self-timer lamp on the front of the camera blinks while the timer counts down. |
| (2 SEC) | The shutter is released two seconds after the shutter button is pressed. Use to reduce blur caused by the camera moving when the shutter-release button is pressed. The self-timer lamp will blink as the timer counts down. |
| (GROUP TIMER) | The camera will start the timer when it detects the selected number of portrait subjects. Press the selector up to choose the number of subjects. ◆ To stop the timer before the picture is taken, press DISP/BACK. |
| (INTerval SHOOTING/ TIME-LAPSE MOVIE) | Shoots photos automatically at set intervals. |
Interval shooting (Time-lapse movie)
You can automatically shoot at fixed intervals.
It is possible to record only still pictures or to record a time-lapse movie and still pictures simultaneously.
1 Press (▼), and then select INTERVAL SHOOTING.
2 Press MENU/OK to display the settings screen.
3 Set the interval and the shooting duration.
Select the items by pressing or , and then set the time by pressing or .
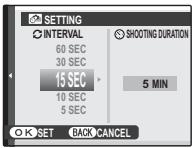
INTERVAL: Set the interval time.
SHOOTING DURATION: Set the time to stop shooting.
4 Press MENU/OK to display the next settings screen.
5 Set the recording mode.
Select the recording mode by pressing or .
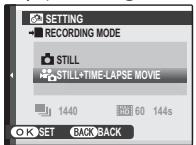
STILL: Only still pictures are recorded.
STILL+TIME-LAPSE MOVIE: A time-lapse movie (47) is recorded in addition to still pictures.
The frame size and frame rate for time-lapse movies are specified by TIME-LAPSE MOVIE MODE (79) in the shooting mode.
If there is not enough free space on the memory card, the movie's recordable time is displayed in red (time remaining is less than 1 second) or yellow (time remaining is less than 6 seconds). Check the amount of free space on the memory card.
6 Press MENU/OK.
Interval shooting is set.
7 Focus and shoot.
Press the shutter button the rest of the way down to start interval shooting. A photo is automatically taken at the interval time, and interval shooting finishes when the camera reaches the set shooting duration time.

TIME-LAPSE MOVIE
A time-lapse movie is a series of still pictures that were taken at set intervals with a fixed camera and play back like a movie. You can enjoy time-lapse movies as though watching slow-moving subjects, such as plant growth and cloud movement, in fast-forward.
If you press the shutter button before shooting ends, interval shooting stops.
The LCD monitor turns off and the self-timer lamp flashes during interval shooting. The LCD monitor turns on three seconds before shooting starts.
Only the first frame is displayed when playing back photos taken by interval shooting (50).
Use of a tripod is recommended for interval shooting.
Time-lapse movies cannot be recorded by pressing the (movie recording) button. Press the shutter button to record.
① Zooming is not available during interval shooting.
① Time-lapse movies may look like just a sequence of still pictures, depending on the TIME-LAPSE MOVIE MODE setting and the number of captured frames.
① Depending on the scene and camera settings, the interval time may not meet the specified interval time.
① Interval shooting may end suddenly if the battery runs out. Check the amount of battery remaining.
① Interval shooting may end suddenly if there is not enough free space on the memory card. Check the amount of free space on the memory card.
① Depending on shooting settings or status, settings may not be applied or interval shooting may not be possible.
① You can only use the ON/OFF button, button, DISP/BACK button, and shutter button during interval shooting.
① Continuous shooting mode is not available in interval shooting.
① When AF MODE (77) is set to TRACKING, if you select INTERVAL SHOOTING, AF MODE automatically changes to CENTER.
The Burst Mode Button
Press the burst mode button to toggle between single-frame shooting and the burst mode selected using the Continuous option in the shooting menu (图76).

- When a burst mode is selected, the camera displays the icon for the selected mode. No icon is displayed in single-frame mode.
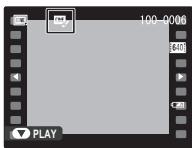
Playback Options
To view the most recent picture in the LCD monitor, press the button.


Press the selector right to view pictures in the order recorded, left to view pictures in reverse order. Keep the selector pressed to scroll rapidly to the desired frame.
Pictures taken using other cameras are indicated by a 山 ("gift image") icon during playback.
Continuous Shooting
In the case of pictures taken in continuous shooting mode, only the first frame of each series will be displayed. Press the selector down to view the other pictures in the series.
Pictures taken in continuous shooting mode have file names that start with "S". (e.g. S0010001.JPG)
Favorites: Rating Pictures
To rate the picture currently displayed in full-frame playback, press DISP/BACK and press the selector up and down to select from zero to five stars.
PlaybackZoom
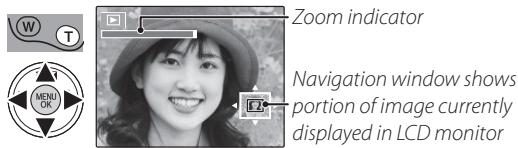
Press T to zoom in on pictures displayed in single-frame playback; press W to zoom out. When the picture is zoomed in, the selector can be used to view areas of the image not currently visible in the display.
Press DISP/BACK to exit zoom.
The maximum zoom ratio varies with image size. Playback zoom is not available with cropped or resized copies saved at a size of 640 or smaller.
Multi-Frame Playback
Pressing W when a picture is shown full-frame in the LCD monitor displays the current image with previous and following images in the background. Press W to increase the number of images displayed to two, nine, or one hundred, T to view fewer images.
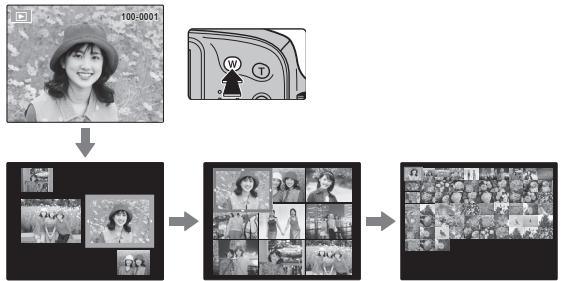
When two or more images are displayed, use the selector to highlight images and press MENU/OK to view the highlighted image full frame. In the nine- and hundred-frame displays, use the selector to view more pictures.
To delete individual pictures, multiple selected pictures, or all pictures, press the selector up (面), and choose from the options below. Note that deleted pictures can not be recovered. Copy
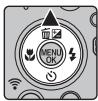
important pictures to a computer or other storage device before proceeding.
| Option | Description |
| FRAME | Press the selector left or right to scroll through pictures and press MENU/OK to delete the current picture (a confirmation dialog is not displayed). |
| SELECTED FRAMES | Highlight pictures and press MENU/OK to select or deselect (pictures that are protected or in a print order are shown by ☐). When the operation is complete, press DISP/BACK to display a confirmation dialog, then highlight OK and press MENU/OK to delete the selected pictures. |
| ALL FRAMES | A confirmation dialog will be displayed; highlight OK and press MENU/OK to delete all unprotected pictures (if a memory card is inserted, only the pictures on the memory card will be affected; the pictures in internal memory are only deleted if no memory card is inserted). Pressing DISP/BACK cancels deletion; note that any pictures deleted before the button was pressed can not be recovered. |
Protected pictures can not be deleted. Remove protection from any pictures you wish to delete (83).
Pictures can also be deleted by ERASE from playback menu.
If a message appears stating that the selected images are part of a DPOF print order, press MENU/OK to delete the pictures.
Search for pictures.
1 Select IMAGE SEARCH in the playback menu (80), highlight one of the following search criteria, and press MENU/OK:
BY DATE: Search by date.
BY FACE: Find all pictures containing faces.
BY FAVORITES: Search by rating.
- BY SCENE: Find all pictures that match a selected scene.
BY TYPE OF DATA: Find all still pictures or all movies.
2 Select a search condition. Only pictures that match the search condition will be displayed. To delete or protect selected pictures or to view the search results in a slide show, press MENU/OK and choose ERASE (图53), PROTECT (图83), or SLIDE SHOW (图82).
Create books from your favorite photos.
Creating a PhotoBook
1 Select NEW BOOK for PHOTOBOOK ASSIST in the playback menu (85) and choose from the following options:
- SELECT FROM ALL: Choose from all available pictures.
- SELECT BY IMAGE SEARCH: Choose from pictures matching selected search conditions (图54).
Neither photographs 640 or smaller nor movies can be selected for photobooks.
2 Scroll through the images and press the selector up to select or deselect. To display the current image on the cover, press the selector down. Press MENU/OK to exit when the book is complete.
The first picture selected becomes the cover image. Press the selector down to select a different image for the cover.
3 Select COMPLETE PHOTOBOOK (to select all photos or all photos matching the specified search conditions for the book, choose SELECT ALL). The new book will be added to the list in the photobook assist menu.
① Books can contain up to 300 pictures.
① Books that contain no photos are automatically deleted.
Viewing Photobooks
Highlight a book in the photobook assist menu and press MENU/OK to display the book, then press the selector left or right to scroll through the pictures.
Editing and Deleting Photobooks
Display the photobook and press MENU/OK. The following options will be displayed; select the desired option and follow the on-screen instructions.
- EDIT: Edit the book as described in "Creating a PhotoBook" (图55).
- ERASE: Delete the book.
Viewing Panoramas
If you press the selector down when a panorama is displayed full frame, the camera will play back the picture from left to right or from bottom to top. To pause playback, press the selector down; press the selector down again to resume. To exit to full-frame playback, press the selector up while panorama playback is in progress. Once displayed in full-frame playback, panoramas can be zoomed in or out using the zoom control or deleted by pressing the selector up (面).
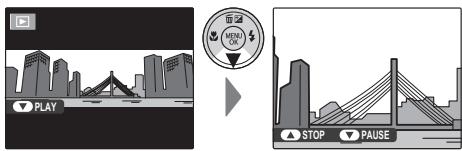
Wireless Transfer (FUJIFILM Camera Remote/FUJIFILM PC AutoSave)
Access wireless networks and connect to computers, smartphones, or tablets. For downloads and other information, visit http://fujifilm-dsc.com/wifi/.

fujifilm Wi-Fi app

Connecting with smartphones
Press the Wi-Fi button of the camera during playback to connect to smartphones via a wireless network.
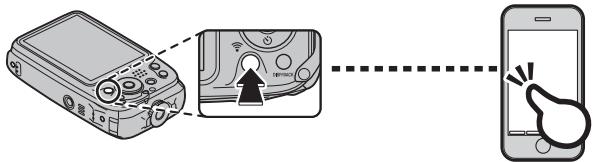
When connecting to smartphones, you can use the following functions:
- Taking pictures using smartphones
- Uploading pictures to smartphones
- Browsing and downloading the pictures on the camera using smartphones
- Downloading location data from smartphones
Before proceeding, download the free FUJIFILM Camera Remote app and install it on your smartphone.
This option can also be enabled by WIRELESS COMMUNICATION from shooting or playback menu.
Saving Pictures to a Computer
Press and hold the Wi-Fi button during playback to save pictures to a computer over a wireless network.
This option can also be enabled by PC AUTO SAVE from playback menu.
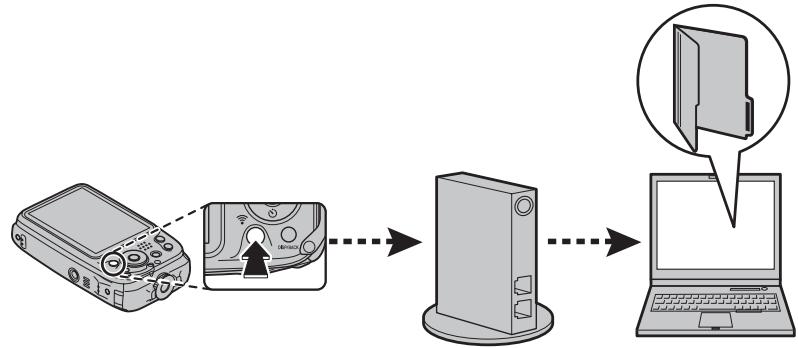
Before proceeding, install the free FUJIFILM PC AutoSave application to the destination computer and adjust settings as desired.
Recording Movies
Press to shoot a movie. During recording, the following indicators will be displayed and sound will be recorded via the built-in microphone (be careful not to cover the microphone during recording).
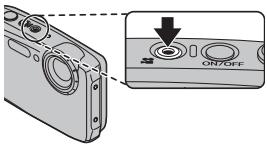
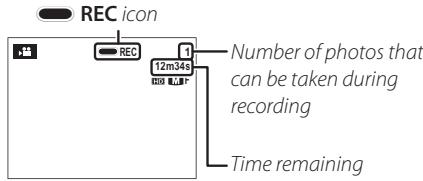
To end recording, press the button again. Recording ends automatically when the movie reaches maximum length or memory is full.

Automatic Scene Selection
In mode, the camera selects the scene according to shooting conditions and the type of subject: (portraits), (poorly-lit landscapes), (poorly-lit portraits), (landscapes), (close-ups), or (other subjects).
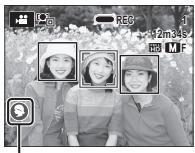
Scene icon

Taking Photographs During Recording
Press the shutter button to take a photograph during recording.
The photo is saved separately from the movie and does not appear as part of the movie.
① Photos can not be taken while a high-speed movie is being recorded.
① The number of photos that can be taken is limited.

DIGITAL IMAGE STABILIZER
You can correct camera vibrations that occur when shooting movies to shoot images with only minor vibrations using the DIGITAL IMAGE STABILIZER in the setup menu (92).
Zoom can be adjusted while recording is in progress. The type of zoom can be selected using the Movie ZOOM TYPE option in the setup menu (94).
If the subject is poorly lit, the AF-assist lamp may light to assist the focus operation. To turn the AF-assist lamp off, select OFF for AFILLUMINATOR (94).
Focus, exposure and white balance are adjusted automatically throughout recording (the focus mode can be selected using the Movie AF MODE option in the shooting menu; 77). The color and brightness of the image may vary from that displayed before recording begins.
Sounds made by the camera may be recorded.
① Do not open the battery-chamber cover during shooting or saving a movie on a memory card. Failure to observe this precaution could prevent the movie from being played back.
① Vertical or horizontal streaks may appear in movies containing very bright subjects. This is normal and does not indicate a malfunction.
Recording Movies
① The temperature of the camera may rise if it is used to record movies for an extended period or if the ambient temperature is high. This is normal and does not indicate a malfunction.
① The mode selected may vary with shooting conditions.
Viewing Movies
During playback, movies are displayed in the LCD monitor as shown at right. The following operations can be performed while a movie is displayed:

| Option | Description |
| Start/pause playback | Press the selector down to start playback. Press again to pause. |
| End playback/ delete | Press the selector up to end playback. If playback is not in progress, pressing the selector up will delete the movie. |
| Adjust speed | Press the selector left or right to adjust playback speed during playback. |
| Adjust volume | Press MENU/OK to pause playback and display volume controls. Press the selector up or down to adjust the volume and press MENU/OK to exit. Volume can also be adjusted from the setup menu. |
Playback Speed
Press the selector left or right to adjust playback speed. Speed is shown by the number of arrows (▶ or ←).
Arrow
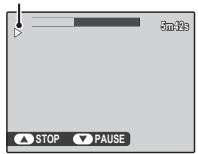
1 Do not cover the speaker during playback.
Viewing Pictures on High-Definition TVs
The camera can be connected to High-Definition (HD) devices using an HDMI cable (available separately from third-party sources).
1 Turn the camera off and connect the HDMI cable as shown below.
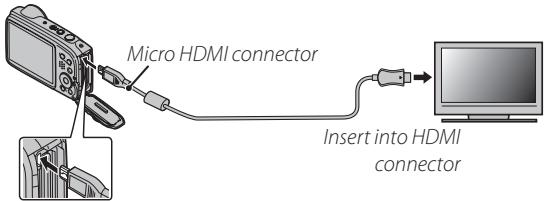
Insert into Micro HDMI connector (Type D)
① Use an HDMI cable no more than 1.5m (4.9 ft.) long with a Micro HDMI connector (Type D) for connection to the camera.
① When connecting cables, be sure the connectors are fully inserted.
When an HDMI cable is connected, pictures and sound are played back on the TV.
2 Tune the television to the HDMI input channel. See the documentation supplied with the television for details.
Press the button for about a second to turn the camera on. The camera monitor turns off and pictures and movies are played back on the TV. Note that the camera volume controls have no effect on sounds played on the TV; use the television volume controls to adjust the volume.
Some televisions may briefly display a black screen when movie playback begins.
Creating a DPOF Print Order
The PRINT ORDER (DPOF) option in the playback menu can be used to create a digital "print order" for DPOF-compatible printers.

DPOF
DPOF (Digital Print Order Format) is a standard that allows pictures to be printed from "print orders" stored in internal memory or on a memory card. The information in the order includes the pictures to be printed and the number of copies of each picture.

1 Select playback mode and press MENU/OK to display the playback menu.
2 Highlight PRINT ORDER (DPOF) and press MENU/OK.
3 Highlight one of the following options and press MENU/OK:
- WITH DATE C: Print the date of recording on pictures.
- WITHOUT DATE: Do not print the date of recording on pictures.
Some printers do not support date printing. See the printer manual for details.
4 Press the selector left or right to display a picture you wish to add to or remove from the print order.
5 Press the selector up or down to choose the number of copies (up to 99). To remove a picture from the print order, press the selector down until the number of copies is zero.
6 Repeat Steps 4-5 to complete the print order and press MENU/OK when settings are complete.
7 A confirmation dialog will be displayed. Press MENU/OK to save the print order.
Remove the memory card to create or modify a print order for the pictures in internal memory.
Print orders can contain a maximum of 999 pictures.
If a memory card is inserted containing a print order created by another camera, a message will be displayed. Create a new print order as described above.
instax SHARE Printers
Print pictures from your digital camera to instax SHARE printers.
Establishing a Connection
Select instax PRINTER CONNECTION SETTING in the camera setup menu and enter the instax SHARE printer name (SSID) and password.

The Printer Name (SSID) and Password
The printer name (SSID) can be found on the bottom of the printer; the default password is "1111". If you have already chosen a different password to print from a smartphone, enter that password instead.
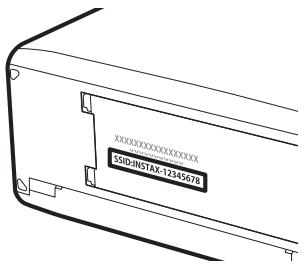
Printing Pictures
1 Turn the printer on.
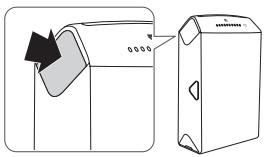
2 Select instax PRINTER PRINT in the camera playback menu. The camera will connect to the printer.
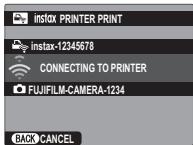
To print a frame from a burst sequence, display the frame before selecting instax PRINTER PRINT.
3 Use the selector to display the picture you want to print, then press MENU/OK.
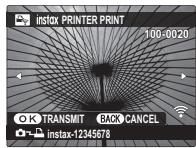
Pictures taken with other cameras can not be printed.
The area printed is smaller than the area visible in the LCD monitor.
4 The picture will be sent to the printer and printing will start.
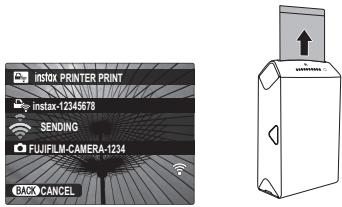
Viewing Pictures on a Computer (MyFinePix Studio)
Read this section for information on copying pictures to a computer.
Windows
Use MyFinePix Studio to copy pictures to your computer, where they can be stored, viewed, organized, and printed. MyFinePix Studio is available for download from the following website:
http://fujifilm-dsc.com/mfs/

Once download is complete, double-click the downloaded file ("MFPS_Setup.EXE") and follow the on-screen instructions to complete installation.
Macintosh
Pictures can be copied to your computer using Image Capture (supplied with your computer) or other software.
Connecting the Camera
1 If the pictures you wish to copy are stored on a memory card, insert the card into the camera.
Windows users may require the Windows CD when starting the software for the first time.
① Loss of power during transfer could result in loss of data or damage to internal memory or the memory card. Charge the battery before connecting the camera.
2 Turn the camera off and connect the supplied USB cable as shown, making sure the connectors are fully inserted. Connect the camera directly to the computer; do not use a USB hub or keyboard.
① The camera uses a Micro-B USB 2.0 connector.
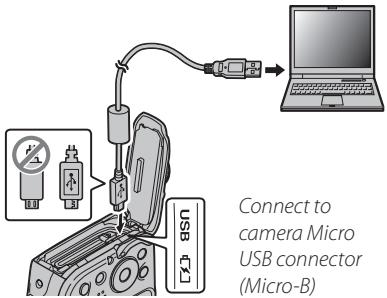
Connect to camera Micro USB connector (Micro-B)
3 Press the button for about a second to turn the camera on.
4 Copy pictures to the computer using MyFinePix Studio or applications provided with your operating system.
For more information on using the software, start the application and select the appropriate option from the Help menu.
If a memory card containing a large number of images is inserted, there may be a delay before the software starts and you may be unable to import or save images. Use a memory card reader to transfer pictures.
1) Make sure that the computer does not display a message stating that copying is in progress before turning the camera off or disconnecting the USB cable. Failure to observe this precaution could result in loss of data or damage to internal memory or the memory card.
① Disconnect the camera before inserting or removing memory cards.
① The user bears all applicable fees charged by the phone company or Internet service provider when using services that require an Internet connection.

Disconnecting the Camera
After data is saved, turn the camera off and disconnect the USB cable.
Using the Menu: Shooting Mode
Using the Shooting Menu
To display the shooting menu, press MENU/OK in shooting mode. Highlight items and press the selector right to view options, then highlight an option and press MENU/OK. Press DISP/BACK to exit when settings are complete. The options available vary with the shooting mode selected.
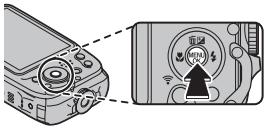
Shooting Menu Options

SHOOTING MODE
(default SR)
Choose a shooting mode according to the type of subject (25).
ISO ISO
Control the camera's sensitivity to light. Higher values can reduce blur; note, however, that mottling may appear in pictures taken at high sensitivities.
100
Bright
Less noticeable

ISO
Scene
Noise (mottling)

6400
Dark
More noticeable
| Option | Description |
| AUTO (1600)/ AUTO (800)/AUTO (400) | Sensitivity is adjusted automatically in response to shooting conditions, but will not be raised above the value in parentheses. |
| 6400/3200/1600/800/ 400/200/100 | Sensitivity is set to the specified value, which is shown in the display. |


Choose the image size (large, medium, or small) and aspect ratio 4:3 , 3:2 , 16:9 , or 1:1 at which pictures are recorded. Large pictures can be printed at large sizes with no drop in quality, while small pictures require less memory, allowing more pictures to be recorded.
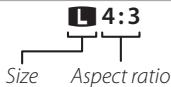
① When pictures are recorded to internal memory, the default value is set to 8 4:3.

Size Versus Aspect Ratio
| Size | |
| Option | Prints at sizes up to |
| L | 34×25 cm (13.5×10 in.) |
| M | 24×18 cm (9.5×7 in.) |
| S | 17×13 cm (7×5 in.) |
| Aspect ratio | |
| 4:3: Pictures have the same proportions as the camera display. | |
| 3:2: Pictures have the same proportions as a frame of 35 mm film. | |
| 16:9: Suited for display on High Definition (HD) devices. | |
| 1:1: Pictures are square. | |
IMAGE QUALITY
(default:N)
Choose how much image files are compressed.
| Option | Description |
| FINE | Low compression. Select for higher image quality. |
| NORMAL | High compression. Select this option to store more pictures. |
FINEPIX COLOR
(default: sio)
Enhance contrast and color saturation or take pictures in black and white.
| Option | Description |
| STANDARD | Standard contrast and saturation. Recommended in most situations. |
| CHROME | Vivid contrast and color. Choose for vivid shots of flowers or enhanced greens and blues in landscapes. |
| B&W | Take pictures in black and white. |
| SEPIA | Take pictures in sepia. |
Settings other than STANDARD are shown by an icon in the LCD monitor.
Depending on the subject, the effects of CHROME may not be visible in the LCD monitor.
WHITE BALANCE
(default: AUTO)
For natural colors, choose a setting that matches the light source.
| Option | Description |
| AUTO | White balance adjusted automatically. |
| ※ | For subjects in direct sunlight. |
| ☆ | For subjects in the shade. |
| 牀 | Use under "daylight" fluorescent lights. |
| 牀 | Use under "warm white" fluorescent lights. |
| 牀 | Use under "cool white" fluorescent lights. |
| 朵 | Use under incandescent lighting. |
| 图 | For underwater photography. |
Results vary with shooting conditions. Play pictures back after shooting to check colors in the LCD monitor.
| CONTINUOUS | (default: 2) |
Capture motion in a series of pictures.
| Option | Description |
| CONTINUOUS | The camera takes pictures while the shutter button is pressed. |
| CONTINUOUS | |
| CONTINUOUS | |
| CONTINUOUS | |
| Final | The camera shoots while the shutter button is pressed and records the last several pictures. |
| FINAL | |
| FINAL |
See page 113 for the frame rate and number of pictures taken in each mode.
Focus and exposure are determined by the first frame in each series.
In mode, IMAGE SIZE is fixed at 16:9.
The flash turns off automatically.
Frame rate varies with shutter speed.
The number of pictures that can be recorded depends on the memory available.
FACE DETECTION
Choose whether the camera automatically detects and sets focus and exposure for human portrait subjects (37).
AF MODE
This option controls how the camera selects the focus area. Regardless of the option selected, the camera will focus on the subject in the center of the LCD monitor when macro mode is on.
| Option | Description |
| CENTER | The camera focuses on the subject in the center of the frame. |
| + MULTI | When the shutter button is pressed halfway, the camera detects high-contrast subjects near the center of the frame and selects the focus area automatically. |
| + TRACKING | Position the subject in the center focus area and press the selector left. Focus will track the subject as it moves through the frame. |
Note that in mode, the camera focuses continuously, increasing the drain on the battery, and that the sound of the camera focusing may be audible.
MOVIE AF MODE
This option controls how the camera selects the focus area for movies.
| Option | Description |
| CONTENTER | The camera focuses on the subject in the center of the frame. |
| CONTINUOUS | The camera continuously adjusts focus to reflect changes in the distance to subjects near the center of the frame. |
Note that in mode, the camera focuses continuously, increasing the drain on the battery, and that the sound of the camera focusing may be audible.
| MOVIE MODE | (default: +5) |
Choose a frame size for movies.
| Option | Description |
| HS 1920×1080 (60fps) | Full HD (High Definition). |
| HS 1920×1080 (30fps) | |
| HD 1280×720 (60fps) | High Definition. |
| 440 640×480 (30fps) | Standard definition. |
| HS 640×480 (120 fps) | High speed movie. |
| HS 320×240 (240 fps) | ① Sound is not recorded, and focus, exposure, and white balance are not adjusted automatically. |
| HS 160×120 (320 fps) | ① Zoom can not be adjusted. |
① When pictures are recorded to internal memory, the default value is set to 640 × 480.
① No face is detected when shooting in 1920× 1080 (60fps).
Choose a frame size and frame rate for time-lapse movies.
| Option | Description |
| 1920×1080 (60fps) | Full HD (High Definition). |
| 1920×1080 (30fps) | |
| 1920×1080 (10fps) | |
| 1280×720 (60fps) | High Definition. |
| 1280×720 (30fps) | |
| 1280×720 (10fps) | |
| 640 640×480 (60fps) | Standard definition. |
| 640 640×480 (30fps) | |
| 640 640×480 (10fps) |
WIRELESS COMMUNICATION
When connecting to smartphones, you can use the following functions:
- Taking pictures using smartphones
- Uploading pictures to smartphones
- Browsing and downloading the pictures on the camera using smartphones
- Downloading location data from smartphones
For information on using wireless networks, visit http://fujifilm-dsc.com/wifi/.
Using the Menu:Playback Mode
Using the Playback Menu
To display the playback menu, press MENU/OK in playback mode. Highlight items and press the selector right to view options, then highlight an option and press MENU/OK. Press DISP/BACK to exit when settings are complete.
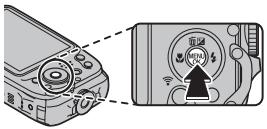
Playback Menu Options
WIRELESS COMMUNICATION
When connecting to smartphones, you can use the following functions:
- Taking pictures using smartphones
- Uploading pictures to smartphones
- Browsing and downloading the pictures on the camera using smartphones
- Downloading location data from smartphones
For information on using wireless networks, visit http://fujifilm-dsc.com/wifi/.
PC AUTO SAVE
Upload pictures to a computer over a wireless network. For information on using wireless networks, visit http://fujifilm-dsc.com/wifi/.
IMAGE SEARCH
Search for pictures (54).
ERASE
Delete all or selected pictures (53).
MOVIEEDIT
Edit movies.
1 Do not turn the camera off while editing movies.
MOVIE TRIMMING
Remove opening or ending footage to create an edited copy of the current movie.
1 Display the desired movie.
2 Select MOVIE EDIT > MOVIE TRIMMING in the playback menu. To remove footage from the start of the copy, proceed to Step 3; otherwise, proceed to Step 4.
3 Press the selector down to begin playback and press it down again when the new opening frame is reached.
4. Press MENU/OK. To remove footage from the end of the copy, proceed to Step 5; otherwise, proceed to Step 6.
5 Press the selector down to begin playback and press it down again when the new closing frame is reached.
6 Press MENU/OK to save the copy.
MOVIE JOIN
Add existing footage to the end of the current movie to create an edited copy.
1 Display the desired movie.
2 Select Movie EDIT > MOVIE JOIN in the playback menu.
3 Press the selector left or right to highlight a movie.
4. Press MENU/OK to add the highlighted footage to the end of the current movie and save the resulting copy, or press DISP/BACK to exit without creating a copy.
Both movies must have been recorded at the same frame size and frame rate.
CREATE CINEMAGRAPH
Create a cinematagraph, which is a still image with a portion that moves (30).
SLIDE SHOW
View pictures in an automated slide show. Choose the type of show and press MENU/OK to start. Press DISP/BACK at any time during the show to view on-screen help. The show can be ended at any time by pressing MENU/OK.
| Option | Description |
| NORMAL | Press selector left or right to go back or skip ahead one frame. Select FADE-IN for fade transitions between frames. |
| FADE-IN | |
| NORMAL [ ] | As above, except that camera automatically zooms in on faces selected with Intelligent Face detection. |
| FADE-IN [ ] |
The camera will not turn off automatically while a slide show is in progress.
RED EYE REMOVAL
If the current picture is marked with a icon to indicate that it was taken with Intelligent Face Detection, this option can be used to remove red-eye. The camera will analyze the image; if red-eye is detected, the image will be processed to create a copy with reduced red-eye.
1 Display the desired picture.
2 Select RED EYE REMOVAL in the playback menu.
3 Press MENU/OK.
Red eye may not be removed if the camera is unable to detect a face or the face is in profile. Results may differ depending on the scene. Red eye can not be removed from pictures that have already been processed using red-eye removal or pictures created with other devices.
The amount of time needed to process the image varies with the number of faces detected.
Copies created with RED EYE REMOVAL are indicated by a icon during playback.
PROTECT
Protect pictures from accidental deletion.
1 Select on PROTECT in the playback menu.
2 Highlight one of the following options and press MENU/OK:
- FRAME: Protect selected pictures. Press the selector left or right to view pictures and press MENU/OK to select or deselect. Press DISP/BACK when the operation is complete.
- SET ALL: Protect all pictures.
- RESET ALL: Remove protection from all pictures.
① Protected pictures will be deleted when the memory card or internal memory is formatted (89).
CROP
Create a cropped copy of the current picture.
1 Display the desired picture.
2 Select CROP in the playback menu.
3 Use the zoom buttons to zoom in and out and use the selector to scroll the picture until the desired portion is displayed.
4 Press MENU/OK to display a confirmation dialog.
5 Press MENU/OK again to save the cropped copy to a separate file.
Larger crops produce larger copies. If the size of the final copy will be 640, YES will be displayed in yellow.
RESIZE
Create a small copy of the current picture.
1 Display the desired picture.
2 Select RESIZE in the playback menu.
3 Highlight a size and press MENU/OK to display a confirmation dialog.
4 Press MENU/OK to save the resized copy to a separate file.
The sizes available vary with the size of the original image.
IMAGE ROTATE
Rotate pictures taken in tall orientation so that they are displayed in tall orientation in the LCD monitor.
1 Display the desired picture.
2 Select Q IMAGE ROTATE in the playback menu.
3 Press the selector down to rotate the picture 90^ clockwise, up to rotate it 90^ counterclockwise.
4. Press MENU/OK. The picture automatically be displayed in the selected orientation whenever it is played back on the camera.
Protected pictures can not be rotated. Remove protection before rotating pictures (图83).
The camera may not be able to rotate pictures created with other devices.
COPY
Copy pictures from internal memory to a memory card.
1 Select COPY in the playback menu.
2 Highlight one of the following options and press the selector right:
- IN INTERNAL MEMORY CARD: Copy pictures from internal memory to a memory card.
- CARD IN INTERNAL MEMORY: Copy pictures from a memory card to internal memory.
3 Highlight one of the following options and press MENU/OK:
- FRAME: Copy selected pictures. Press the selector left or right to view pictures and press MENU/OK to copy the current picture.
- ALL FRAMES: Copy all pictures.
Copying ends when the destination is full.
DPOF print information is not copied (65).
PHOTOBOOK ASSIST
Create books from your favorite photos (55).
PRINT ORDER (DPOF)
Create a digital "print order" for DPOF-compatible printers (65).
instax PRINTER PRINT
Print pictures on optional FUJIFIL instax SHARE printers (67).

DISP ASPECT
Choose how High Definition (HD) devices display pictures with an aspect ratio of 4:3 (this option is available only when an HDMI cable is connected). Select 16:9 to display the image so that it fills the screen with its top and bottom cropped out, 4:3 to display the entire image with black bands at either side.

| 16:9 | 4:3 |
Photographs with an aspect ratio of 16:9 are displayed full screen, those with an aspect ratio of 3:2 in a black frame.
Using the Setup Menu
1 Display the setup menu.
1.1 Press MENU/OK to display the menu for the current mode.

1.2 Press the selector left to highlight the tab for the current menu.
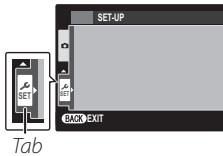
1.3 Press the selector down to highlight SET.
1.4 Press the selector right to place the cursor in the setup menu.
2 Adjust settings.
Highlight items and press the selector right to view options, then highlight an option and press MENU/OK. Press DISP/BACK to exit when settings are complete.
Setup Menu Options
DATE/TIME
Set the camera clock (图19).
TIME DIFFERENCE
(default:
Switch the camera clock instantly from your home time zone to the local time at your destination when traveling. To specify the difference between local time and your home time zone:
1 Highlight LOCAL and press the selector right.
2 Use the selector to choose the time difference between local time and your home time zone in increments of 15 minutes.
3 Press MENU/OK.
To switch between local time and your home time zone, highlight LOCAL or and press MENU/OK.
| Option | Description |
| HOME | Switch to the time currently selected for DATE/TIME (see above). |
| LOCAL | Switch to local time. If this option is selected, and the time and date will be displayed in yellow for three seconds each time the camera is turned on. |
言語/LANG.
Choose a language.
SILENT MODE
(default:OFF)
Select ON to disable the speaker, flash, and AF-assist illuminator in situations in which camera sounds or lights may be unwelcome (note that the flash will still fire in mode).

Reset all settings except DATE/TIME, TIME DIFFERENCE, and BACKGROUND COLOR to default values.
1 Highlight RESET and press the selector right to display a confirmation dialog.
2 Highlight OK and press MENU/OK.

If a memory card is inserted in the camera, this option will format the memory card. If no memory card is inserted, this option will format internal memory. Select OK to begin formatting.
1) All data—including protected pictures—will be deleted from the memory card or internal memory. Be sure important files have been copied to a computer or other storage device.
① Do not open the battery cover during formatting.

(default:1.5 SEG)
Choose how long pictures are displayed in the LCD monitor after shooting.
| Option | Description |
| 1.5 SEC | Pictures are displayed for 1.5 seconds (1.5 SEC) or 0.5 seconds (0.5 SEC). |
| 0.5 SEC | Colors may differ slightly from those in the final image. |
| ZOOM (CONTINUOUS) | Pictures are displayed until the MENU/OK button is pressed. |
| OFF | Pictures are not displayed after shooting. |
OFF has no effect in continuous shooting, ADVANCED FILTER, PRO LOW-LIGHT and HDR.
FRAME NO.
(default CONT:)
New pictures are stored in image files named using a four-digit file number assigned by adding one to the last file number used. The file number is displayed during playback as shown at right. FRAME NO. controls whether file numbering is reset to 0001 when a new memory card is inserted or the current memory card or internal memory is formatted.
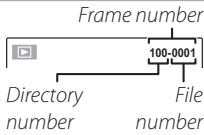
| Option | Description |
| CONTINUOUS | Numbering continues from the last file number used or the first available file number, whichever is higher. Choose this option to reduce the number of pictures with duplicate file names. |
| RENEW | Numbering is reset to 0001 after formatting or when a new memory card is inserted. |
If the frame number reaches 999-9999, the shutter release will be disabled (109).
Selecting RESET (89) sets FRAME NO. to CONTINUOUS but does not reset the file number.
Frame numbers for pictures taken with other cameras may differ.


Adjust the volume of the sounds produced when camera controls are operated. Choose OFF (mute) to disable control sounds.


Adjust the volume of the sounds produced when the shutter is released. Choose OFF (mute) to disable the shutter sound.


Choose the sound made by the shutter.


Adjust the volume for movie playback.


Control the brightness of the display.
| Option | Description |
| AUTO | Display brightness is automatically adjusted during shooting in response to ambient lighting conditions. Brightness is not adjusted during playback. |
| MANUAL | Press the selector up or down to adjust brightness and then press MENU/OK. Choose from values between -5 and +5. |
LCD POWER SAVE
(default ON)
Choose whether the display automatically dims to save power in shooting mode. This option does not take effect during playback.
| Option | Description |
| POWER SAVE ON | The display dims to save power if no operations are performed for a few seconds. Normal brightness can be restored by pressing the shutter button halfway. |
| POWER SAVE OFF | Automatic dimming off. |
AUTO POWER OFF
(default:2MIN)
Choose the length of time before the camera turns off automatically when no operations are performed. Shorter times increase battery life; if OFF is selected, the camera must be turned off manually. Note that in some situations the camera turns off automatically even when OFF is selected.
IS MODE
(default: _N )
Choose whether image stabilization is performed at all times when the camera is in shooting mode (CONTINUOUS), or only when the shutter button is pressed halfway (SHOOTING ONLY). Choose OFF to turn image stabilization off when using a tripod.
DIGITAL IMAGE STABILIZER
(default:ON)
If ON is selected, camera vibrations that occur when shooting movies are corrected, allowing you to shoot images with only minor vibrations.
Digital image stabilizer is unavailable when shooting still images.
RED EYE REMOVAL
(default:ON)
Choose ON to remove red-eye effects caused by the flash when shooting with Intelligent Face Detection.
Red-eye reduction is performed only when a face is detected.
INTELLIGENT DIGITAL ZOOM
(default OFF)
If ON is selected, selecting T at the maximum optical zoom position triggers intelligent digital zoom, further magnifying the image while processing it for sharp, high-resolution results.
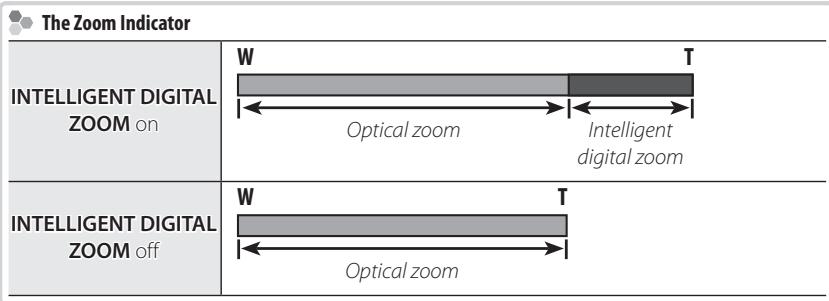
Selecting another mode may end intelligent digital zoom.
When combined with optical zoom, intelligent digital zoom offers zoom factors as high as 10×
Intelligent digital zoom may sometimes produce lower quality images than optical zoom.
The time needed to record images increases.
The effects are not visible in the display during shooting.
Intelligent digital zoom is not available in continuous mode or during movie recording.
MOVIE ZOOM TYPE (default: OPI)
Choose the type of zoom available during movie recording: DI DIGITAL or Optical.
Movies recorded using digital zoom may be slightly "grainy".
AFILLUMINATOR (default:ON)
If ON is selected, the AF-assist illuminator will light to assist autofocus.
① The camera may be unable to focus using the AF-assist illuminator in some cases. If the camera is unable to focus in macro mode, try increasing the distance to the subject.
① Avoid shining the AF-assist illuminator directly into your subject's eyes.
AUTOROTATE PB (default:ON)
Choose ON to automatically rotate "tall" (portrait-orientation) pictures during playback.
BACKGROUND COLOR
Choose a color scheme.
WIND FILTER
Choose ON to reduce the noise of the wind when shooting movies.
WIRELESS SETTINGS
Adjust settings for connection to a wireless network. For information on using wireless networks, visit http://fujifilm-dsc.com/wifi/.
PC AUTO SAVE SETTING
Choose a destination for images uploaded using PC AUTO SAVE. For information on using wireless networks, visit http://fujifilm-dsc.com/wifi/.
GEOTAGGING SET-UP
Access location data options.
| Option | Description |
| GEOTAGGING | Choose whether to save location data with pictures. |
| LOCATION INFO | Display locatin data. |
instax PRINTER CONNECTION SETTING
Adjust settings for connection to optional FUJIFILM instax SHARE printers (67).
DATE DATE STAMP
(default:OFF)
Stamp the time and/or date of recording on photographs as they are taken.
| Option | Description |
| 31+4 | Stamp new photographs with the date and time of recording. |
| 31 | Stamp new photographs with the date of recording. |
| OFF | Do not stamp the time and date on new photographs. |
① Time and date stamps can not be deleted. Turn DATE DATE STAMP off to prevent time and date stamps appearing on new photographs.
① If the camera clock is not set, you will be prompted to set the clock to the current date and time (19).
① We recommend that you turn the DPOF "print date" option off when printing images with a time and date stamp (图65).
① Date and time can not be added to the movies and the panoramas.
Technical Notes
Optional Accessories
The camera supports a wide range of accessories from FUJIFILM and other manufacturers.
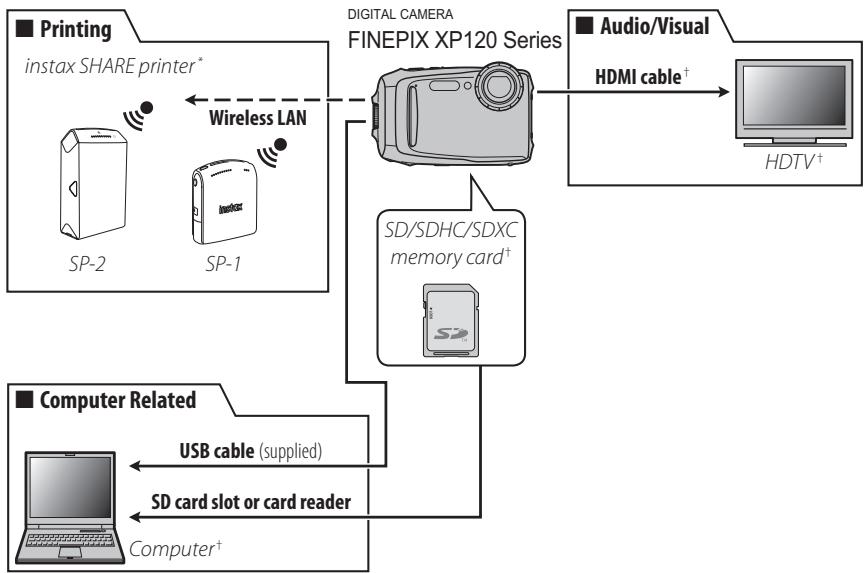
* Available separately from FUJIFILM.
† Available separately from third-party suppliers.
Accessories from FUJIFILM
The following optional accessories are available from FUJIFILM. For the latest information on the accessories available in your region, check with your local FUJIFILM representative or visit http://www.fujifilm.com/products/digital Cameras/index.html.
| Rechargeable Li-ion batteries | NP-45S: Additional large-capacity NP-45S rechargeable batteries can be purchased as required. | |
| Battery chargers | BC-45W: Replacement battery chargers can be purchased as required. The BC-45W charges an NP-45S battery in about 120 minutes at +20°C (+68°F). | |
| BC-45C: Replacement battery chargers can be purchased as required. The BC-45C charges an NP-45S battery in about 110 minutes at +20°C (+68°F). | ||
| instax SHARE printers | SP-1/SP-2: Connect via wireless LAN to print pictures on instax film. | |
Caring for the Camera
To ensure continued enjoyment of the product, observe the following precautions.
Storage and Use
If the camera will not be used for an extended period, remove the battery and memory card. Do not store or use the camera in locations that are:
exposed to rain, steam, or smoke
- very humid or extremely dusty
- exposed to direct sunlight or very high temperatures, such as in a closed vehicle on a sunny day
extremely cold
- subject to strong vibration
exposed to strong magnetic fields, such as near a broadcasting antenna, power line, radar emitter, motor, transformer, or magnet
- in contact with volatile chemicals such as pesticides
- next to rubber or vinyl products
Condensation
Sudden increases in temperature, such as occur when entering a heated building on a cold day, can cause condensation inside the camera. If this occurs, turn the camera off and wait an hour before turning it on again. If condensation forms on the memory card, remove the card and wait for the condensation to dissipate.
Cleaning
Use a blower to remove dust from the protective glass covering the lens and LCD monitor, then gently wipe with a soft, dry cloth. Any remaining stains can be removed by wiping gently with a piece of FUJIFILM lens-cleaning paper to which a small amount of lens-cleaning fluid has been applied. Care should be taken to avoid scratching the protective glass or LCD monitor. The camera body can be cleaned with a soft, dry cloth. Do not use alcohol, thinner, or other volatile chemicals.
Traveling
Keep the camera in your carry-on baggage. Checked baggage may suffer violent shocks that could damage the camera.
Problems and Solutions
Water in the Camera
| Problem | Solution |
| Water in the camera. | The battery-chamber cover was not fully closed before the camera was immersed, or was opened under water: Take the camera to a FUJIFILM-authorized service technician for repairs. Do not turn the camera on. |
Power and Battery
| Problem | Solution |
| The camera does not turn on. | ·The battery is exhausted: Charge the battery or insert a fully-charged spare battery (☐ 7, 14). ·The battery is inserted incorrectly: Reinsert in the correct orientation (☐ 8). ·The battery-chamber cover is not latched: Latch the battery-chamber cover (☐ 10). |
| The battery runs down quickly. | ·The battery is cold: Warm the battery by placing it in a pocket or other warm place and reinsert it in the camera immediately before taking a picture. ·There is dirt on the battery terminals: Clean the terminals with a soft, dry cloth. ·Is selected for shooting mode: Select ☐ mode to reduce the drain on the battery (☐ 25). ·TRACKING is selected for ☐ AF MODE: Select a different AF mode (☐ 77). ·The battery has been charged many times: The battery has reached the end of its charging life. Purchase a new battery. |
| The camera turns off suddenly. | Charge the battery or insert a fully-charged spare battery (☐ 7, 14). |
| Charging is slow. | Charge the battery at room temperature (☐ v). |
| The battery does not charge. / The self-timer lamp flashes. | Reinsert the battery in the correct orientation and make sure that the power connection is made (7, 14). · There is dirt on the battery terminals: Clean the terminals with a soft, dry cloth. · The battery has been charged many times: The battery has reached the end of its charging life. Purchase a new battery. If the battery still fails to charge, contact your FUJIFIL dealer. · The battery is too hot or too cold: Wait for the battery temperature to stabilize. |
Menu and Displays
| Problem | Solution |
| Menu and displays are not in English. | Select ENGLISH for 📝 言語/LANG. ( 19,88). |
Shooting
| Problem | Solution |
| No picture is taken when the shutter button is pressed. | ·Memory is full: Insert a new memory card or delete pictures (☑ 9, 53). ·Memory is not formatted: Format the memory card or internal memory (☑ 89). ·There is dirt on the memory card contacts: Clean the contacts with a soft, dry cloth. ·The memory card is damaged: Insert a new memory card (☑ 9). ·The battery is exhausted: Charge the battery or insert a fully-charged spare battery (☑ 7, 14). ·The camera has turned off automatically: Turn the camera on (☑ 17). |
| The camera does not focus. | ·The subject is close to the camera: Select macro mode (☑ 41). ·The subject is far away from the camera: Cancel macro mode (☑ 41). ·The subject is not suited to autofocus: Use focus lock (☑ 38). |
| Macro mode is not available. | Choose a different shooting mode (☑ 25). |
| Intelligent Face Detection is not available. | Choose a different shooting mode (☑ 25). |
| No face is detected. | ·The subject's face is obscured by sunglasses, a hat, long hair, or other objects: Remove the obstructions. ·The subject's face occupies only a small area of the frame: Change the composition so that the subject's face occupies a larger area of the frame (☑ 37). ·The subject's head is tilted or horizontal: Ask the subject to hold their head straight. ·The camera is tilted: Keep the camera level (☑ 21). ·The subject's face is poorly lit: Shoot in bright light. |
| Wrong subject is selected. | The selected subject is closer to the center of the frame than the main subject. Recompose the picture or turn face detection off and frame the picture using focus lock (☑ 38). |
| The flash does not fire. | ·The flash is not available in the current shooting mode: Choose a different shooting mode (☑ 25). ·The battery is exhausted: Charge the battery or insert a fully-charged spare battery (☑ 7, 14). ·The camera is in continuous mode: Press the burst mode button to select single-frame mode (☑ 49). ·The camera is in silent mode: Turn silent mode off (☑ 88). ·The flash is off (☑): Choose a different flash mode (☑ 42). |
| Some flash modes are not available. | ·The desired flash mode is not available in the current shooting mode: Choose a different shooting mode (☑ 25). ·The camera is in silent mode: Turn silent mode off (☑ 88). |
| The flash does not fully light the subject. | ·The subject is not in range of the flash: Position the subject in range of the flash (☑ 114). ·The flash window is obstructed: Hold the camera correctly (☑ 21). |
| Pictures are blurred. | The protective glass covering the lens is dirty: Clean the glass (99).The protective glass covering the lens is blocked: Keep objects away from the lens (21). !AF is displayed during shooting and the focus frame is displayed in red: Check focus before shooting (107). ! is displayed during shooting: Use the flash or a tripod (43). |
| Pictures are mottled. | A slow shutter speed is selected at high temperatures: This is normal and does not indicate a malfunction.The camera has been used continuously at high temperatures or a temperature warning is displayed: Turn the camera off and wait for it to cool down. |
| Vertical lines appear in pictures. | The camera has been used continuously at high temperatures. Turn the camera off and wait for it to cool down. |
| "Smear" in the form of vertical purple or white lines appears in the display. | Vertical purple or white lines may appear after the camera has been used continuously at high temperatures or when a very bright object is in the frame; this phenomenon is common to all CCD image sensors and does not indicate a malfunction. These lines are recorded in movies but do not appear in photographs. Avoid framing bright objects when filming movies. |
| Location data | Location data are incorrect. The camera has been moved since location data were last updated. |
| Sounds made by the camera are recorded with movies. | CONTINUOUS is selected for MOVIE AF MODE: Select a different AF mode (77).Zoom was adjusted during shooting: Do not adjust zoom during shooting.Intelligent Face Detection is on: Turn Intelligent Face Detection off (37). |
Playback
| Problem | Solution |
| Pictures are grainy. | The pictures were taken with a different make or model of camera. |
| Playback zoom is unavailable. | The current picture is a resized copy with a size of 640. |
| No sound in movie playback. | •Playback volume is too low: Adjust playback volume (☐91). •The microphone was obstructed: Hold the camera correctly during recording (☐21, 60). •The speaker is obstructed: Hold the camera correctly during playback (☐63). |
| Selected pictures are not deleted. | Some of the pictures selected for deletion are protected. Remove protection using the device with which it was originally applied (☐83). |
| File numbering is unexpectedly reset. | The battery-chamber cover was opened while the camera was on. Turn the camera off before opening the battery-chamber cover (☐17). |
Connections/Miscellaneous
| Problem | Solution |
| No picture or sound. | ·The camera is not properly connected: Connect the camera properly (☑ 64). ·Input on the television is set to "TV": Set input to "HDMI". ·The volume on the TV is too low: Adjust the volume. |
| The computer does not recognize the camera. | Be sure the camera and computer are correctly connected (☑ 70). |
| The camera is unresponsive. | ·Temporary camera malfunction: Remove and reinsert the battery (☑ 7). ·The battery is exhausted: Charge the battery (☑ 14) or insert a fully-charged spare battery (☑ 7). ·The camera is connecting to a wireless network: Disconnect from the wireless network. |
| The camera does not function as expected. | Remove and reinsert the battery (☑ 7). If the problem persists, contact your FUJIFILM dealer. |
| No sound. | Turn silent mode off (☑ 88). |
| Time and date stamps | ·Time and date stamps are not correct: Set the camera clock (☑ 19). ·Time and date stamps appear on photographs: Time and date stamps can not be deleted. To prevent stamps appearing on new photographs, select OFF for ☑ DATE STAMP (☑ 95). |
Wireless Networks
For information on troubleshooting wireless networks, visit http://digital-cameras/support.fujifilm.com/app?pid=x.
| Problem | Solution |
| Problem connecting or uploading pictures to smartphone. Can not shoot photos using a smartphone. | ·The smartphone is too far away: Move the devices closer. ·Nearby devices are causing radio interference: Move the camera and smartphone away from microwave ovens or cordless phones. |
| ·The smartphone is connected to another device: The smartphone and camera can connect to only one device at a time. End the connection and try again. ·There are several smartphones in the vicinity: Try connecting again. The presence of multiple smartphones can make connection difficult. | |
| The current image is a movie or was created on another device and can not be uploaded to a smartphone. | |
| Smartphone will not display pictures. | Select ON for WIRELESS SETTING > RESIZE IMAGE FOR SMARTPHONE 81. Selecting OFF increases upload times for larger images; in addition, some phones may not display images over a certain size. |
Warning Messages and Displays
The following warnings are displayed in the LCD monitor:
| Warning | Description |
| (red) | Low battery. Charge the battery (14) or insert a fully-charged spare battery (7). |
| (blinks red) | Battery exhausted. Charge the battery (14) or insert a fully-charged spare battery (7). |
| ! | Slow shutter speed. Pictures may be blurred; use the flash or a tripod. |
| ! AF (displayed in red with red focus frame) | The camera can not focus. Try one of the following solutions: · Use focus lock to focus on another subject at the same distance, then recompose the picture (38). · Use macro mode to focus when taking close-ups (41). |
| Aperture or shutter speed displayed in red | The subject is too bright or too dark and the picture will be over- or under-exposed. If the subject is dark, use the flash (42). |
| FOCUS ERROR | Camera malfunction or moving parts of lens obstructed. Turn the camera off and then on again, taking care not to touch the lens. If the message persists, contact a FUJIFILM dealer. |
| TURN OFF THE CAMERA AND TURN ON AGAIN | |
| LENS CONTROL ERROR | |
| CARD NOT INITIALIZED | · The memory card or internal memory is not formatted or the memory card was formatted in a computer or other device: Format the memory card or internal memory using the FORMAT option in the camera setup menu (89). · The memory card contacts require cleaning: Clean the contacts with a soft, dry cloth. If the message is repeated, format the card (89). If the message persists, replace the card. · Camera malfunction: Contact a FUJIFILM dealer. |
| PROTECTED CARD | The memory card is locked. Unlock the card (9). |
| BUSY | The memory card is incorrectly formatted. Use the camera to format the card (89). |
|  | Turn the camera off and wait for it to cool. If no action is taken, the camera will turn off automatically. |
| CARD ERROR | The memory card is not formatted for use in the camera. Format the card ( \( \square \) 89). |
| The memory card contacts require cleaning or the memory card is damaged. Clean the contacts with a soft, dry cloth. If the message is repeated, format the card ( \( \square \) 89). If the message persists, replace the card. | |
| Incompatible memory card. Use a compatible card ( \( \square \) 12). | |
| Camera malfunction. Contact a FUJIFILM dealer. | |
| \( \mathbf{\Pi } \) MEMORY FULL | The memory card or internal memory is full and pictures can not be recorded or copied. Delete pictures or insert a memory card with more free space. |
| \( \mathbf{\Pi } \) MEMORY FULL | |
| INTERNAL MEMORY IS FULL | |
| INSERT A NEW CARD | |
| WRITE ERROR | - Memory card error or connection error: Reinsert the card or turn the camera off and then on again. If the message persists, contact a FUJIFILM dealer. - Not enough memory remaining to record additional pictures: Delete pictures or insert a memory card with more free space. - The memory card or internal memory is not formatted: Format the memory card or internal memory ( \( \square \) 89). |
| READ ERROR | - The file is corrupt or was not created with the camera: The file can not be viewed. - The memory card contacts require cleaning: Clean the contacts with a soft, dry cloth. If the message is repeated, format the card ( \( \square \) 89). If the message persists, replace the card. - Camera malfunction: Contact a FUJIFILM dealer. |
| FRAME NO. FULL | The camera has run out of frame numbers (current frame number is 999-9999). Format the memory card and select RENEW for FRAME NO. in the setup menu. Take a picture to reset frame numbering to 100-0001, then select CONTINUOUS for FRAME NO (90). |
| DEACTIVATE SILENT MODE | An attempt was made to choose a flash mode or adjust the volume with the camera in silent mode. Exit silent mode before choosing a flash mode or adjusting the volume (88). |
| TOO MANY FRAMES | A search has returned more than 5,000 results, or more than 999 frames were selected for deletion. Perform a different search or select fewer pictures. |
| PROTECTED FRAME | An attempt was made to delete to a protected picture. Remove protection and try again (83). |
| 640 CAN NOT CROP | 640 pictures can not be cropped. |
| CAN NOT CROP | The picture is damaged or was not created with the camera. |
| M CANNOT EXECUTE | An attempt was made to create a resized copy at a size equal to or larger than the original. Choose a smaller size. |
| S CANNOT EXECUTE | |
| 640 CANNOT EXECUTE | |
| CAN NOT ROTATE | An attempt was made to rotate a picture that can not be rotated. |
| CAN NOT ROTATE | Movies can not be rotated. |
| 640 CANNOT EXECUTE | Resize or red-eye removal can not be applied to the selected picture. |
| 640 CANNOT EXECUTE | Red-eye removal can not be applied to movies. |
| NO CARD | No memory card inserted when COPY is selected in the playback menu. Insert a memory card. |
| NO IMAGE | The source selected for COPY contains no images. Select a different source. |
| NO IMAGE | |
| DPOF FILE ERROR | The DPOF print order on the current memory card contains more than 999 images. Copy the pictures to internal memory and create a new print order. |
| CAN NOT SET DPOF | The picture can not be printed using DPOF. |
| CAN NOT SET DPOF | Movies can not be printed using DPOF. |
| COMMUNICATION ERROR | A connection error occurred while pictures were being printed or copied to a computer or other device. Confirm that the device is turned on and that the USB cable is connected. |
| Ensure the battery chamber cover is locked. | Check that the battery-chamber cover is latched. Note that the cover may already be latched; this message merely encourages you to check that the cover is secure before proceeding. |
Memory Card Capacity
The following table shows the recording time or number of pictures available at different image sizes. All figures are approximate; file size varies with the scene recorded, producing wide variations in the number of files that can be stored. The number of exposures or length remaining may not diminish at an even rate. A limited number of test pictures can be taken when no memory card is inserted.
Photographs
| L | M | S | |||||||||||
| 4:3 | 3:2 | 16:9 | 1:1 | 4:3 | 3:2 | 16:9 | 1:1 | 4:3 | 3:2 | 16:9 | 1:1 | ||
| 4GB | FINE | 460 | 520 | 620 | 620 | 920 | 1,040 | 1,220 | 1,240 | 2,300 | 2,050 | 3,420 | 2,420 |
| NORMAL | 930 | 1,040 | 1,230 | 1,230 | 1,820 | 2,040 | 2,400 | 2,440 | 3,380 | 3,030 | 4,990 | 3,550 | |
| 8GB | FINE | 940 | 1,050 | 1,250 | 1,250 | 1,860 | 2,090 | 2,460 | 2,500 | 4,620 | 4,120 | 6,870 | 4,850 |
| NORMAL | 1,860 | 2,090 | 2,470 | 2,470 | 3,660 | 4,110 | 4,830 | 4,900 | 6,800 | 6,080 | 10,020 | 7,140 | |
Movies
| HS 1920×1080 (60fps)1 | HS 1920×1080 (30fps)1 | HD 1280×720 (60 ps)1 | 340 640×480 (30fps)2 | HS 640×480 (120fps)3 | HS 320×240 (240fps)3 | HS 160×120 (320fps)3 | |
| 4 GB | 36 min. | 36 min. | 40 min. | 188 min. | 64 min. | 127 min. | 141 min. |
| 8 GB | 73 min. | 73 min. | 81 min. | 378 min. | 128 min. | 255 min. | 284 min. |
1 Use a CLASS card or better. Individual movies can not exceed 29 minutes in length.
2 Individual movies can not exceed 120 minutes in length.
3 Use a CLASS card or better. Individual movies can not exceed 30 seconds in length.
Specifications
| System | |
| Model | Digital Camera FinePix XP120 Series |
| Effective pixels | 16.4 million |
| Image sensor | 1/23-in. square pixel CMOS with primary color filter |
| Storage media | · Internal memory (approx. 96 MB) · SD/SDHC/SDXC memory cards |
| File system | Compliant with Design Rule for Camera File System (DCF), Exif 2.3, and Digital Print Order Format (DPOF) |
| File format | · Still pictures: Exif 2.3 JPEG (compressed) · Movies: MOV (H.264)/Linear PCM/monaural sound |
| Image size (pixels) | · L 4:3:4,608×3,456 · L 3:2:4,608×3,072 · L 16:9:4,608×2,592 · L 1:1:3,456×3,456 · M 4:3:3,264×2,448 · M 3:2:3,264×2,176 · M 16:9:3,264×1,840 · M 1:1:2,432×2,432 · S 4:3:2,048×1,536 · S 3:2:2,304×1,536 · S 16:9:1,920×1,080 · S 1:1:1,728×1,728 |
| Lens | Fujinon 5× optical zoom lens, F3.9 (wide angle) - F4.9 (telephoto) |
| Focal length | f=5.0 mm-25.0 mm (35-mm format equivalent: 28 mm-140 mm) |
| Digital zoom | Up to about 2× with intelligent digital zoom (up to 10× when combined with optical zoom) |
| Aperture | F3.9/F6.2 (wide angle), F4.9/F8.0 (telephoto) |
| Focus range (distance from front of lens) | Approx. 60 cm (1.9 ft.)–infinity (wide angle); 1.0 m (3.2 ft.)–infinity (telephoto) · Macro: approx. 9 cm-2.0 m/3.5 in.-6.5 ft. (wide angle); 1.0 m-3.0 m/3.2 ft.-9.8 ft. (telephoto) |
| System | ||
| Sensitivity | Standard output sensitivity equivalent to ISO 100, 200, 400, 800, 1600, 3200, 6400 (image size M or S); AUTO (400), AUTO (800), AUTO (1600) | |
| Metering | 256-segment through-the-lens (TTL); MULTI | |
| Exposure control | Programmed AE | |
| Exposure compensation | -2 EV - +2 EV in increments of 1/3 EV | |
| Image stabilization | Optical stabilization (image-sensor shift) | |
| Shutter speed (combined mechanical and electronic shutter) | SR, P, Tilt, FOV, A4, A, A4, C, C, A, A, A, A, A, A, Y, Y, X, X: 1/4 S-1/2,000 S | |
| 1/8 S-1/2,000 S | ||
| 1/30 S-1/2,000 S | ||
| 4 S-1/2,000 S | ||
| Continuous | Approx. frame rate (fps)*1 | |
| 3.0 | 10 (L M), 40 (S) | |
| 5.0 | 10 (L M), 20 (S) | |
| 10 | 10 (L M), 20 (S) | |
| 60 | 70 (S 16:9) | |
| 3.0 | 10 (L M), 20 (S) | |
| 5.0 | 10 (L M), 20 (S) | |
| 10 | 10 (L M), 20 (S) | |
| *1 The frame rate varies with shooting conditions and the number of images recorded. *2 Use a CLASS card or better. | ||
| Focus | • Mode: Single AF, continuous AF • Focus-area selection: CENTER, MULTI, TRACKING • Autofocus system: Contrast-detect TTL AF | |
| White balance | Auto, direct sunlight, shade, daylight fluorescent, warm white fluorescent, cool white fluorescent, incandescent, underwater | |
| Self-timer | Off, 2 sec., 10 sec., (GROUP TIMER), INTERVAL SHOOTING, TIME-LAPSE MOVIE | |
| Time-lapse movie | · H5 1920×1080: 1080p, 60 fps · H5 1920×1080: 1080p, 10 fps · HD 1280×720: 720p, 30 fps · H40 640×480: VGA, 60 fps · H40 640×480: VGA, 10 fps | · H5 1920×1080: 1080p, 30 fps · HD 1280×720: 720p, 60 fps · HD 1280×720: 720p, 10 fps · H40 640×480: VGA, 30 fps |
| Flash | Auto flash; effective range when sensitivity is set to AUTO is approx. 70 cm-4.4 m/2.3 ft.-14.4 ft. (wide angle), 1.0 m-3.8 m/3.2 ft.-12.4 ft. (telephoto); effective range in macro mode is approx. 30 cm-2.0 m/1.0 ft.-6.5 ft. (wide angle), 1.0 m-3.0 m/3.2 ft.-9.8 ft. (telephoto) | |
| Flash mode | Auto, fill flash, off, slow sync (red-eye removal off); auto with red-eye removal, fill flash with red-eye removal, off, slow sync with red-eye removal (red-eye removal on) | |
| LCD monitor | 3.0-in. (7.6 cm), 920 k-dot color LCD monitor; frame coverage approx. 100% | |
| Movies | · H5 1920×1080: 1080p, 60 fps · HD 1280×720: 720p, 60 fps · HS 640×480: 120 fps · HS 160×120: 320 fps | · H5 1920×1080: 1080p, 30 fps · H5 640×480: VGA, 30 fps · HS 320×240: 240 fps |
| Input/output terminals | ||
| Digital input/output | USB 2.0 High-Speed, Micro USB connector (Micro-B); MTP/PTP | |
| HDMI output | Micro HDMI connector (Type D) | |
| Power supply/other | ||
| Power supply | NP-45S rechargeable battery | |
| Battery life (approximate number of frames that can be taken with a fully-charged battery) | Battery type | Approximate number of frames |
| NP-45S (type supplied with camera) | 210 | |
| CIPA standard, measured in (auto) mode using battery supplied with camera and SD memory card. Note: Number of shots that can be taken with battery varies with battery charge level and will decline at low temperatures. | ||
| Charging time | Approx. 120 minutes (+20 °C/+68 °F) | |
| Camera dimensions (W×H×D) | 109.6 mm×71.0 mm×27.8 mm/4.3 in.×2.7 in.×1.0 in., excluding projections | |
| Shooting weight | Approx. 203 g/7.1 oz., including battery and memory card | |
| Camera weight | Approx. 186 g/6.5 oz., excluding battery, accessories, and memory card | |
| Operating conditions | • Temperature: -10 °C +40 °C/+14 °F +104 °F • Humidity: 10% - 80% (no condensation) | |
| Wireless transmitter | |
| Standards | IEEE 802.11b/g/n (standard wireless protocol) |
| Operating frequency | • U.S.A., Canada, Taiwan: 2,412 MHz-2,462 MHz (11 channels) • Other countries: 2,412 MHz-2,472 MHz (13 channels) |
| Access protocols | Infrastructure |
| NP-45S rechargeable battery | |
| Nominal voltage | DC 3.7V |
| Nominal capacity | 740 mAh |
| Dimensions (W×H×D) | 31.4 mm×39.5 mm×5.8 mm/1.2 in.×1.5 in.×0.2 in. |
| Weight | Approx. 19.0 g/0.6 oz. |
| AC power adapter | |
| Rated input | 100 V-240 V AC, 50/60 Hz |
| Input capacity | • 100 V: 11.6 VA • 240 V: 15.5 VA |
| Rated output | 5.0 V DC, 1000 mA |
| Operating temperature | 0 °C-+40 °C/+32 °F-+104 °F |
| Weight | Approx. 32 g/1.1 oz. |
Weight and dimensions vary with the country or region of sale.
■ Notices
- Specifications subject to change without notice. FUJIFILM shall not be held liable for damages resulting from errors in this manual.
- Although the LCD monitor is manufactured using advanced high-precision technology, small bright points and anomalous colors may appear, particularly in the vicinity of text. This is normal for this type of LCD monitor and does not indicate a malfunction; images recorded with the camera are unaffected.
- Digital cameras may malfunction when exposed to strong radio interference (e.g., electric fields, static electricity, or line noise).
- Due to the type of lens used, some distortion may occur at the periphery of images. This is normal.
FUJIFILM
FUJIFILM Corporation
http://www.fujifilm.com/products/digital Cameras/index.html
Restrictions on Camera Settings
The options available in each shooting mode are listed below.
| Option | Shooting Mode | ||||||||||||||||||||||||||||||||
| 品名 | ☐ | P | |||||||||||||||||||||||||||||||
| 4 | OFF | AUTO | ✓ | ✓ | ✓ | ✓ | ✓ | ✓ | ✓ | ✓ | ✓ | ✓ | ✓ | ✓ | ✓ | ||||||||||||||||||
| 4 | ✓ | ✓ | ✓ | ✓1 | ✓ | ✓ | ✓ | ✓ | ✓ | ✓ | ✓ | ✓ | ✓ | ✓ | ✓ | ||||||||||||||||||
| S4 | ✓ | ✓ | ✓ | ✓ | ✓ | ✓ | |||||||||||||||||||||||||||
| ON | 2 | ✓ | ✓ | ✓ | ✓ | ✓ | ✓ | ✓3 | |||||||||||||||||||||||||
| 24 | ✓ | ✓ | ✓ | ✓1 | ✓ | ✓ | ✓ | ✓ | |||||||||||||||||||||||||
| 25 | ✓ | ✓ | ✓ | ✓ | |||||||||||||||||||||||||||||
| 3 | ✓ | ✓ | ✓ | ✓ | ✓1 | ✓1 | ✓1 | ✓1 | ✓ | ✓ | ✓ | ✓ | ✓ | ✓ | ✓ | ✓ | ✓ | ✓ | ✓ | ✓ | ✓ | ✓ | ✓ | ✓ | ✓ | ✓ | ✓1 | ✓ | |||||
| 0 | \( {\mathrm{C}}_{\mathrm{b}}/\sqrt{} \) | ✓ | ✓ | ✓ | ✓ | ✓ | ✓ | ✓ | ✓ | ✓ | ✓ | ✓ | ✓ | ✓ | ✓ | ✓ | ✓ | ✓ | ✓ | ✓ | ✓ | ✓ | ✓ | ✓ | ✓ | ✓ | ✓ | ✓ | |||||
| 2 | ✓ | ✓ | ✓ | ✓ | ✓ | ✓ | ✓ | ✓ | ✓ | ✓ | ✓ | ✓ | ✓ | ✓ | ✓ | ||||||||||||||||||
| \( {\mathrm{C}}_{\mathrm{b}}/\sqrt{} \) | ✓ | ✓ | ✓ | ✓ | ✓ | ✓ | ✓ | ✓ | ✓ | ✓ | ✓ | ✓ | ✓ | ✓ | ✓ | ✓ | ✓ | ✓ | ✓ | ✓ | ✓ | ✓ | ✓ | ||||||||||
| 9 | 9 | ✓ | ✓ | ✓ | ✓ | ✓ | ✓ | ✓ | ✓ | ✓ | ✓ | ✓1 | ✓ | ||||||||||||||||||||
| 9 | ✓ | ✓ | ✓ | ✓ | ✓ | ✓ | ✓ | ✓ | ✓ | ✓ | ✓ | ✓ | ✓ | ✓ | ✓ | ✓ | ✓ | ✓ | ✓ | ✓ | ✓ | ✓ | ✓ | ✓3 | |||||||||
| 2 | ✓ | ||||||||||||||||||||||||||||||||
| 10 | AUTO | ✓1 | ✓ | ✓1 | ✓1 | ✓1 | ✓1 | ✓1 | ✓1 | ✓1 | ✓1 | ✓1 | ✓1 | ✓1 | ✓1 | ✓1 | ✓1 | ✓1 | ✓1 | ✓1 | ✓1 | ✓1 | ✓1 | ✓1 | ✓1 | ✓1 | |||||||
| AUTO (1600) | ✓ | ||||||||||||||||||||||||||||||||
| AUTO (800) | ✓ | ||||||||||||||||||||||||||||||||
| AUTO (400) | ✓ | ||||||||||||||||||||||||||||||||
| 6400 | ✓ | ||||||||||||||||||||||||||||||||
| 3200 | ✓ | ||||||||||||||||||||||||||||||||
| 1600 | ✓ | ||||||||||||||||||||||||||||||||
| 800 | ✓ | ||||||||||||||||||||||||||||||||
| 400 | ✓ | ||||||||||||||||||||||||||||||||
| 200 | ✓ | ||||||||||||||||||||||||||||||||
| 100 | ✓ | ||||||||||||||||||||||||||||||||
| 9 | 9 | ✓ | ✓ | ✓ | ✓ | ✓ | ✓ | ✓ | ✓ | ✓ | ✓ | ✓ | ✓ | ✓ | ✓ | ✓ | ✓ | ✓ | ✓ | ✓ | ✓ | ✓ | ✓ | ✓ | ✓ | ||||||||
| 9 | ✓ | ✓ | ✓ | ✓ | ✓1 | ✓1 | ✓1 | ✓ | ✓ | ✓ | ✓ | ✓ | ✓ | ✓ | ✓ | ✓ | ✓ | ✓ | ✓ | ✓ | ✓ | ✓ | ✓ | ✓ | ✓ | ✓ | |||||||
| 9 | ✓ | ✓ | ✓ | ✓ | ✓ | ✓ | ✓ | ✓ | ✓ | ✓ | ✓ | ✓ | ✓ | ✓ | ✓ | ✓ | ✓ | ✓ | ✓ | ✓ | ✓ | ✓ | ✓ | ✓ | ✓ | ✓ | |||||||
| 2 | ✓ | ✓ | ✓ | ✓ | ✓ | ✓ | ✓ | ✓ | ✓ | ✓ | ✓ | ✓ | ✓ | ✓ | ✓ | ✓ | ✓ | ✓ | ✓ | ✓ | ✓ | ✓ | ✓ | ✓ | ✓ | ✓ | ✓ | ✓ | |||||
| 10 | 9 | ✓ | ✓ | ✓ | ✓ | ✓ | ✓ | ✓ | ✓ | ||||||||||||||||||||||||
| 9 | ✓ | ✓ | ✓ | ✓ | ✓ | ✓ | ✓ | ||||||||||||||||||||||||||
| 9 | ✓ | ✓ | ✓ | ✓ | ✓ | ✓ | ✓ | ✓ | |||||||||||||||||||||||||
| 9 | ✓ | ✓ | ✓ | ✓ | ✓ | ✓ | ✓ | ✓ | |||||||||||||||||||||||||
| 10 | ✓ | ✓3 | ✓ | ✓ | |||||||||||||||||||||||||||||
1 Automatically optimized for selected shooting mode.
2 OFF only.
3 Can be selected only when AUTO or is set.