USER MANUAL URC 801 SILVERCREST
User manual and service information
PL PILOT UNIWERSALNY
Safety Instructions 3
Operating Environment 3
Maintenance and Care 3
Children. 4
Intended Use 4
Batteries 4
Conformity 5
Disposal of Old Devices 5
Registered Trademarks. 5
Introduction 6
Package Contents. 6
About this User's Manual 6
Remote control keys 7
Inserting the Batteries 8
Programming the Remote Control 9
Programming Device Codes 9
Programming the Device Code by Manufacturer Name 9
Entering Device Codes directly. 11
Searching for Device Codes automatically. 12
Learning Function 15
Learning a Key Code Signal 15
Erasing a Key Code. 16
Erasing All Key Codes for a Device 17
Erasing All Learned Key Codes. 18
Macros 19
Programming a Macro 19
Executing a Macro 20
Erasing a Macro 21
Special Features 22
Controlling a PC 22
Consistent Volume Control 23
Switching VPT between TV and AUDIO ....23
Programming VPT Manually 24
Favourite 25
Programming Favourites. 25
Using Favourites 26
Erasing Favourites 26
Backlight 27
Contrast 27
Battery Level Indicator. 28
Setting the Time 28
Teletext Mode 29
Child lock 29
Powering All Devices On/Off 30
Appendix 31
Technical Specifications 31
Details of Guarantee. 32
Device codes 97
Safety Instructions
Before you use this device for the first time, please read the following notes in this manual and heed all warnings, even if you are familiar with handling electronic devices. Keep this manual safe for future reference. If you sell the device or pass it on, it is essential you hand over this manual also.
Operating Environment
Position the device on a stable, even surface and do not place any objects on the device. The device is not for use in environments with a high temperature or humidity (e.g. bathrooms), and must be kept free of dust. Operating temperature and operating humidity: 5^ to 45^ , max. 90% RH
Always make sure that:
- no direct heat sources (e.g. heating) can affect the device;
- no direct sunlight or artificial light reaches the device;
- contact with spray, dripping water and corrosive liquids must be avoided and the device should never be operated near water, and it must especially never be immersed (do not place any objects filled with liquids such as vases or drinks near the device);
- the device is never placed in the immediate vicinity of magnetic fields (e.g. loudspeakers);
- no fire sources (e.g. burning candles) are placed on or near the device;
- no foreign bodies are introduced into the device;
- the device should not be subject to any sharp temperature changes;
- the device is not subject to excessive shocks and vibrations;
Maintenance and Care
Servicing is required when this device has been damaged in any way, for example, when liquid has entered the product, when the product has been exposed to rain or moisture, when the product does not work normally or if the product has been dropped. If smoke, unusual noises or smells are noticed, power off the device immediately. In this case the device should not be used further and should be inspected by authorized service personnel. Please contact qualified personnel when repair is needed. Never
open the housing of the device, or the accessories. Only use a clean, dry cloth for cleaning. Never use any corrosive liquids.
Children
Electrical appliances do not belong in the hands of children. Do not allow children to use electrical devices when not under supervision. Children may not comprehend the presence of potential risks. Batteries and small parts represent potential choking hazards. Keep batteries out of reach of children. If a battery is swallowed, seek medical help immediately. Keep the packaging away from children too as there is danger of suffocation.
Intended Use
This remote control unit is an information technology device. The device may not be used outdoors or in tropical climates. This device fulfils all that relates to CE Conformity, relevant norms and standards. Any modifications to the equipment other than recommended changes by the manufacturer may result in these directives no longer being met.
If you are not using the device within the Republic of Germany, you must observe the regulations and laws in the country of use.
Batteries
Insert the batteries with the correct polarity. Never try to recharge the batteries and under no circumstances throw them into fire. Do not mix batteries (old and new or carbon and alkaline, etc.). Remove batteries when the device is not to be used for a long time. Non-intended use may cause explosion and danger to life.
Respect the environment. Old batteries do not belong in with domestic waste. They must be handed in to a collection point for old batteries.

This device fully complies with the basic and other relevant requirements of the EMC Directive 2004/108/EC and the Low-Voltage Directive 2006/95/EC.
For more information about the Conformity of this product, please visit our website www.service.targa.co.uk.
The Declaration of Conformity can also be found at the end of this User's Manual.
Disposal of Old Devices
Devices marked with this symbol are subject to the European Directive 2002/96/EC. All electric and electronic devices must be disposed of separately from household waste at established bodies.
Avoid hazards to the environment and dangers to your personal health by disposing of the device properly. For further information about proper disposal, contact your local government, disposal bodies or the shop where you bought the device.
Respect the environment. Old rechargeable batteries do not belong in with domestic waste. They must be handed in to a collection point for old batteries.
Registered Trademarks
All brand names are trademarks of their respective owners.
Introduction
Firstly, many thanks for having chosen this universal remote control with display and extensive device support URC 801. This remote control allows you to control up to eight different devices. Programming is done within a few minutes thanks to the built-in database.
This User's Manual contains a list of all supported device codes. Please keep this User's Manual in a safe place in order to allow for easy reprogramming whenever necessary (for instance, when replacing any of your AV devices).
The remote control features illuminated keys in order to make its operation easy even in dark environments.
Package Contents
First check that the package contents are complete.
Universal remote control URC 801
- User manual with service information
About this User's Manual
In the following, the remote control keys are represented in capital letters. Behind them, you'll find a number in brackets that represents the key on the inner cover page of this manual.
Key example:
OK (27)
Display messages are represented in squared brackets.
Display message example:
[CODE SETUP]
More detailed information or warnings are coloured.
Information field example:
Here you'll find more detailed information or warnings.
Remote control keys
1 On/Standby button
2 Source device selection keys (TV, SAT, AUDIO, PC, VCR, DVD, DVR, AUX) *
3 Numeric keys (0...9) and letters (A...Z)
4 Shift button for one/two-digit input
5 Mute button (MUTE)
6 Electronic Program Guide (GUIDE)
7 Increase audio volume (VOL+)
8 Reduce audio volume (VOL-)
9 Four-way directional control (, , , )
10 Information button (INFO)
11 Red function button
12 Green function button
13 Undo
14 Recording
15 Rewind
16 Stop
17 Picture-in-Picture (PIP)
18 Favourites (FAV)
19 Swap between main and secondary PIP window (SWAP)
20 Input selection (INPUT)
21 Keypad illumination *
22 Last programme (RECALL)
23 Programming (SET)
24 Menu button (MENU)
25 Next channel (CH+)
26 Previous channel (CH-)
27 Confirmation (OK)
28 Quit the menu (EXIT) *
29 Blue function button
30 Yellow function button
31 Step
32 Pause
33 Fast forward
34 Play
35 Macro programming (MACRO) *
36 Sleep timer (SLEEP)
37 Aspect ratio (ASPECT)
38 Videotext (TTX/MX)
*not programmable
To improve readability, the letters are not printed onto the numeric keypad of the remote control.
The described button functions are available only whenever the programmed device supports these functions.
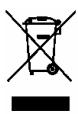
Inserting the Batteries
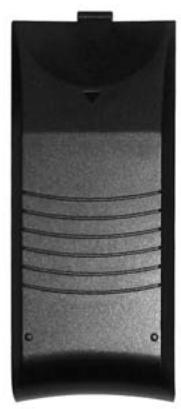
Open the battery compartment cover on the back of the remote control. To do this, hold the device firmly with one hand. Then use a finger of the other hand to slide the battery compartment cover in the direction of the arrow.
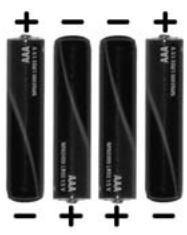
Insert any suitable batteries (size AAA, not supplied) into the remote control. Be sure to respect the polarity (see also the figure below). The polarity is indicated with the symbols + and - on the batteries and in the battery compartment on the remote control.
Slide the battery compartment cover in the opposite direction onto the remote control until it clicks into place.
Programming the Remote Control
Programming Device Codes
To be able to control a device with your universal remote control, you must first set up the corresponding device codes. For the PC device selection, please read the description starting from page 22.
There are different ways to setup the device codes.
- The easiest method is to search by manufacturer.
For a description, see below.
- You can also look for the device code in the list on page 97 of this User's Manual and program it manually.
For a description, please read from page 11
- Or use automatic search to locate the suitable device code. The type of programming takes a few minutes and is recommended only if your device is not contained in the list of preset codes.
For a description, please read from page 12
Programming the Device Code by Manufacturer Name
Power on the device for which you want to program the remote control. If your device is a VCR or a CD or DVD player, please also insert a tape or CD/DVD.
To cancel the following programming at any time, press EXIT (28) to return without saving any changes. Press the EXIT button (28) multiple times until the remote control has returned to standard mode.
Proceed as follows to program the device codes (this example refers to programming a TV set).
-
Point the remote control to the TV set while entering the commands.
-
Press the source device selection button of the device you want to program. In this example, it is the TV button (2). The display shows [TV].
-
Press and hold the SET button (23) for at least 3 seconds. The display shows [CODE SETUP]. Then release the SET button (23).
-
Press the OK button (27). The display shows [BRAND SRCH].
- Press the OK button (27). The display shows the first preset manufacturer name, e.g. [A R SYSTEM].
- Now enter the first letter of the desired manufacturer by using the numeric keypad. The letter assignment is equivalent to the keypad on a mobile phone.


For instance, press the 5 JKL button (3) if the device is made by JVC, or press the 7 PQRS button (3) if it is a Sony-branded device. The first available manufacturer name will appear on the display.
- Press the or button (9) to scroll through the alphabetical list of manufacturer names. Use this method to select the desired manufacturer name until it shows on the display.
- Point the remote control to the TV set and press any button to check if it works properly. To verify functionality, do not use (9) , OK (27), EXIT (28) or any numeric keys 0...9 (3). At this time, these buttons are reserved for programming only.
- If the device fails to respond as desired, press the button (9) to recall the next available device code. Then check its operation again. Repeat the above steps until you gain successful device control.
- If the most important device functions work correctly, press the OK button (27) to save the setting. The message [SUCCEED] will appear for a few seconds and the device returns to the previous menu [BRAND SRCH].
- Quit the programming mode by pressing the EXIT button (28) twice.
Entering Device Codes directly
Power on the device for which you want to program the remote control. If your device is a VCR or a CD or DVD player, please also insert a tape or CD/DVD.
To cancel the following programming at any time, press EXIT (28) to return without saving any changes. Press the EXIT button (28) multiple times until the remote control has returned to standard mode.
Proceed as follows to enter the device codes directly (this example refers to programming a TV set).
Search for the first available code by using the device type and manufacturer (see the list starting from page 97).
- Point the remote control to the TV set while entering the commands.
- Press the source device selection button of the device you want to program. In this example, it is the TV button (2). The display shows [TV].
- Press and hold the SET button (23) for at least 3 seconds. The display shows [CODE SETUP]. Then release the SET button (23).
- Press the OK button (27). The display shows [BRAND SRCH].
- Press (9). The display shows [CODE SET].
- Press the OK button (27). The message [TV] will blink on the display. The current device code is the 3-digit code behind it.
- Press the OK button (27) again. The first digit of the current device code starts blinking.
- Enter the three digits of the device code that you have found on the list. To do this, press the numeric keys (3).
After you have entered the information, the first digit will blink again. If you mistyped the code, you have the chance to enter it again at this time.
Only for the device type AUX, a fourth digit must be entered to set the device code. To do this, use the following list.
0 - TV
1 - VCR
2 - DVD, CD
3-SAT,CBL
4 - DVR, PVR
5-AUDIO
- Press the OK button (27) to confirm the entered device code. The message [SUCCEED] will appear for a few seconds and the device returns to the previous menu [CODE SET].
If the message [NOT FOUND] appears on the display, the entered information was wrong and has to been entered again. After a few seconds, the display will return to the device code entry mode.
- Quit the programming mode by pressing the EXIT button (28) twice.
- Verify the device functionality. If the device fails to respond as desired, try the next device code from the list.
Searching for Device Codes automatically
This method will scan all device codes for the selected device type. This may take a very long time and should be used only if the above methods do not succeed.
Power on the device for which you want to program the remote control. If your device is a VCR or a CD or DVD player, please also insert a tape or CD/DVD.
To cancel the following programming at any time, press EXIT (28) to return without saving any changes. Press the EXIT button (28) multiple times until the remote control has returned to standard mode.
Press PAUSE (32) to cancel programming at any time. Press PAUSE (32) again to resume the programming from the same point.
Proceed as follows to search for the device code automatically (this example refers to programming a TV set).
- Point the remote control to the TV set while entering the commands.
- Press and hold the SET button (23) for at least 3 seconds. The display shows [CODE SETUP]. Then release the SET button (23).
- Press the OK button (27). The display shows [BRAND SRCH].
- Press (9). The display shows [AUTO SRCH].
- Press the OK button (27). The last selected device type will show on the display. The device code behind it reads "000".
- Press the source device selection button of the device you want to program. In this example, it is the TV button (2). The display shows [TV].
- Make sure that the TV set has been powered on and that the remote control points towards the TV set.
- Press OK (27) to start the search. The remote control will send a signal from each preset device code.
- As soon as the TV set powers off, press the PAUSE button (32). This will interrupt the automatic search.
- Press (9). The remote control will send the last device code signal again.
During Pause, you may also press the or button (9) multiple times to toggle between the device codes.
- If the TV set does not power off at this time, the device code was wrong. Power the device code on manually and continue the search by pressing PAUSE (32) again.
or
If the TV set powers back on, you may have found the correct device code. Press the OK button (27) to save the device code. The message [SUCCEED] will appear for a few seconds and the device returns to the previous menu [AUTO SRCH].
- Quit the programming mode by pressing the EXIT button (28) twice.
If the TV set fails to respond properly, repeat the automatic search. Then skip the already-setup device code. You may for instance cover the remote control transmitter at the front of the remote control when the wrong code number is going to be sent.
It is possible that no proper device code is found. In this case, try to program the remote control by using the learning function (see page 14) and the original remote control unit (if you still have it).
Learning Function
For this you must have the original remote control unit of the device you want to program, and this remote control unit must be working properly.
The learning function lets you have the original remote control unit teach the different button functions to your new universal remote control.
This lets you add or edit any specific buttons that do not work properly when using a preset device code or control a device whose device code is not available.
Learning a Key Code Signal
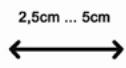
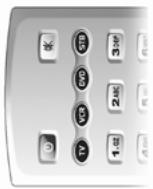
Place the original remote control unit of the device with its transmitter side (front) facing towards the universal remote control (see figure). The distance should be between 1 and 2 inches (2.5cm to 5cm).
- Press the source device selection button (2) of the device you want to program.
- Press and hold the SET button (23) for at least 3 seconds. The display shows [CODE SETUP]. Then release the SET button (23).
- Press (9) twice. The display shows [LEARNING].
- Press the OK button (27). The display shows [LEARN KEY].
- Press the OK button (27) again. The display shows [SELECT KEY].
- Press the button that you want to assign on the universal remote control. The display shows [WAITING].
- Press and hold down the button on the original remote control which you want to copy the signal from for at least 3 seconds. After releasing the button, the message [SUCCEED] or [FAILED] appears on the display.
- If you see the message [SUCCEED], the command has been programmed successfully. If necessary, you may repeat the last two steps
to copy another command and assign it to a different button.
- If you see the message [FAILED], the command could not be programmed. Repeat these steps with the same button, but keep it pressed longer.
- After all the desired buttons have been programmed, quit the programming mode by pressing the EXIT button (28).
It is not possible to exit programming while the universal remote control is still waiting for a command to be sent from the original remote control (the display shows [WAITING]).
- Quit the programming mode by pressing the EXIT button (28) three times.
Erasing a Key Code
You may erase a learned key code without altering any of the other programmed functions.
- Press the source device selection button (2) of the device for which you want to edit the programmed information.
- Press and hold the SET button (23) for at least 3 seconds. The display shows [CODE SETUP]. Then release the SET button (23).
- Press (9) twice. The display shows [LEARNING].
- Press the OK button (27). The display shows [LEARN KEY].
- Press (9). The display shows [DELETE KEY].
- Press the OK button (27). The display shows [SELECT KEY].
- Press the button whose function you want to erase. The message [SURE DELETE] will appear on the display.
- Press the OK button (27) to confirm the deletion.
- The message [DELETED] will appear for a few seconds and the device returns to the previous menu [SELECT KEY].
- If required, continue erasing more key functions by pressing the corresponding button or quit the deletion process by pressing any source device selection button (2).
Erasing All Key Codes for a Device
This function allows you to erase all manually-learned key commands for a specific device. Any buttons that have been programmed via a device code will not be erased.
- Press the source device selection button (2) of the device for which you want to erase all programmed information.
- Press and hold the SET button (23) for at least 3 seconds. The display shows [CODE SETUP]. Then release the SET button (23).
- Press (9) twice. The display shows [LEARNING].
- Press the OK button (27). The display shows [LEARN KEY].
- Press (9) twice. The dsplay shows [DELETE DEV].
- Press the OK button (27). The display shows [SELECT DEV].
- Press the source device selection button (2) of the device for which you want to erase all programmed information. The display shows [SURE DELETE].
- Press the OK button (27) to confirm the deletion.
If there is a large number of assigned key codes, the deletion may take some time. During this process, the display will show [WAITING].
- The message [DELETED] will appear for a few seconds and the device returns to the previous menu [SELECT DEV].
- Quit the process by pressing the EXIT button (28) three times.
Erasing All Learned Key Codes
This function allows you to erase all manually learned key commands for all devices. Any buttons that have been programmed via a device code will not be erased.
- Press and hold the SET button (23) for at least 3 seconds. The display shows [CODE SETUP]. Then release the SET button (23).
- Press (9) twice. The display shows [LEARNING].
- Press the OK button (27). The display shows [LEARN KEY].
- Press (9). The display shows [DELETE ALL].
- Press the OK button (27). The display shows [SURE DELETE].
- Press the OK button (27) to confirm the deletion.
If there is a large number of assigned key codes, the deletion may take some time. During this process, the display will show [WAITING].
- The message [DELETED] will appear for a few seconds and the device returns to the previous menu [DELETE ALL].
- Quit the process by pressing the EXIT button (28) twice.
Macros
Macros allow you to execute up to 16 button commands in sequence by just pressing one single button. The used buttons may correspond to multiple devices.
For instance, can press just one single button to perform the following operations:
Power-up the TV set
- Switch the TV set to the DVD player input source
Power on the DVD player
- Start DVD playback
Programming a Macro
- Press and hold the SET button (23) for at least 3 seconds. The display shows [CODE SETUP]. Then release the SET button (23).
- Press (9) three times. The display shows [MAKRO].
- Press the OK button (27). The display shows [MAKRO1].
If necessary, press the or (9) button to select another sequential macro number to save your macro. You can use the presets Makro1 to Makro6 for saving.
- Press the OK button (27). The display shows [SET UP].
If you have chosen a preset and there is already a macro stored under this position, the process will be cancelled. In this case you have to delete the existing macro first.
- Press the OK button (27). The display shows [SELECT KEY].
- First enter the source selection button of the device that you want to execute the first command. To do this, press the corresponding source selection button (2).
- Press one or more buttons in sequence whose functions shall be executed. You can execute up to 16 commands in the same macro.
If you want to execute a function for a different device, first press the corresponding source device selection button (2). Switching the device will diminish the number within the 16 programmable commands.
- After all the desired buttons have been programmed, press the OK button (27). The message [SUCCEEDS] will appear for a few seconds and the device returns to the previous level.
- Quit the process by pressing the EXIT button (28) two times.
Executing a Macro
- Press the MACRO button (35). No message will be displayed.
- Within the next 15 seconds, press any of the numeric buttons (3) 1 to 6. The numeric button 1 corresponds to Macro 1, the numeric button 2 corresponds to Macro 2, etc.
- The macro will be executed immediately. Make sure that the remote control is within reach of all devices that you want to control.
If you have enabled the backlight, it will blink during macro execution. If there is no macro assigned to the selected numeric button, the backlight blinks briefly four times.
Erasing a Macro
- Press and hold the SET button (23) for at least 3 seconds. The display shows [CODE SETUP]. Then release the SET button (23).
- Press (9) three times. The display shows [MAKRO].
- Press the OK button (27). The display shows [MAKRO1].
- Press or [9] to select the macro you want to delete.
- Press the OK button (27). The display shows [SET UP].
- Press (9). The display shows [DELETE].
- Press the OK button (27). The display shows [SURE DELETE].
- Press the OK button (27) to confirm the deletion.
- The message [DELETED] will appear for a few seconds and the device returns to the previous level.
- Quit the process by pressing the EXIT button (28) two times.
Special Features
Controlling a PC
To be able to control a computer, the universal remote control includes the command set for Microsoft Media Center. Your computer must feature a compatible infrared receiver.
- Press the source device selection button (2) and select the PC mode. The message [PC] will appear on the display.
- See the following list for the button functions. Any buttons that are not listed have no function.
1 On/Standby button
4 Enter
5 Mute
6 Guide
7 Raise volume
8 Lower volume
9 Four-way control
10 Information button
11 Red function button
12 Green function button
14 Recording
15 Rewind
16 Stop
17 Asterisk (^*)
19 Hash (#)
21 Keypad illumination
22 Back
24 DVD Menu
25 Channel up
26 Channel down
27 OK
28 Delete
29 Blue function button
30 Yellow function button
32 Pause
33 Fast forward
34 Play
The PC source commands are preset and cannot be edited.
Microsoft Media Center is included in the operating systems Microsoft Windows Vista Home Premium and Microsoft Windows Vista Ultimate.
To quit PC mode, press any other source device selection button (2).
Consistent Volume Control
The (VPT - Volume Punch Through) volume control guarantees that the volume control is always made for the TV set or Hifi equipment regardless of the sound source that you have selected. Therefore, you will not have to press the TV or AUDIO source buttons before you set the volume with the VOL+ (7), VOL- (8) or MUTE (5) buttons.
Example:
The remote control is programmed for your TV set and your DVD player. You play a DVD and the remote control is set to the DVD (2) source. This allows you to control the DVD playback using the remote control. But you can control the TV set volume without having to press the TV source selection button first.
The PC mode does not support consistent volume control.
Switching VPT between TV and AUDIO
VPT is set to TV as default. For any source that you select, the volume control will always control the TV set. But if you're using a home cinema and you output the sound via Hifi equipment, you can switch the volume control to the Hifi equipment. Proceed as follows:
- Press the AUDIO source selection button (2).
- Press and hold the SET button (23) for at least 3 seconds. The display shows [CODE SETUP]. Then release the SET button (23).
Press (9). The display shows [BASIC VPT].
- Press the OK button (27). The message [SUCCEED] will appear for a few seconds on the display.
- Quit the process by pressing the EXIT button (28).
VPT is now set to the device that is controlled via the AUDIO source selection button.
If you want to use the TV for sound output again, repeat the above steps by using the TV source selection button (2) in the first step.
Programming VPT Manually
If you want to control the volume of a specific device individually (not using VPT), this must be programmed manually.
Example:
You are using the remote control for a satellite receiver too. For all devices, VPT controls the volume via the TV set, but the sat receiver has its own volume control that you want to use.
For manual programming, proceed as follows:
- Press and hold the SET button (23) for at least 3 seconds. The display shows [CODE SETUP]. Then release the SET button (23).
- Press (9) twice. The display shows [VPT SETUP].
- Press the OK button (27). The display shows [TO DEV].
- Press the source device selection button (2) of the device for which you want to override the volume control (e.g. SAT). The display shows [FROM DEV].
- Press the source device selection button (2) of the device that you want to use for volume control (in this example also SAT). The message [SUCCEED] will appear for a few seconds and the device returns to the [VPT SETUP] level.
- Quit the process by pressing the EXIT button (28).
Please note that using VPT overrides any manually-learned key functions.
Favourite
This function lets you program up to 15 channels from any channel presets of your receivers (TV or SAT) and easily recall them.
Programming Favourites
This function supports the source device buttons TV and SAT only. It is also possible to program favourites on the AUX button, but this will have to be configured first for TV or SAT mode.
- Press the source device selection button (2) of the device for which you want to add one or more favourites.
- Press and hold the SET button (23) for at least 3 seconds. The display shows [CODE SETUP]. Then release the SET button (23).
- Press (9) three times. The display shows [FAV CH].
- Press the OK button (27). The display shows [SETUP].
- Press the OK button (27) again. The display shows [FAV-CH01].
If necessary, press the or (9) button to select another sequential number to save your favourite. You can use the presets FAV-CH01 to FAV-CH015 for saving.
- Press the OK button (27). The display shows [SELECT KEY].
- Next use the numeric buttons (3) to assign the presets of the different devices. Enter the preset channel exactly as you would do for normal operation.
If the preset requires more than one digit, use the toggle button (4) (depends on the target device operation).
- Press the OK button (27). The message [SUCCEED] will appear for a few seconds on the display. The device will switch to the enter mode for the next favourite, for example [FAV-CH02].
- Continue programming the next favourite or quit the process by pressing the EXIT button (28) three times.
Using Favourites
To use a programmed favourite, press the FAV button (18). Pressing the FAV button (18) multiple times will cycle through all available preset favourites.
Erasing Favourites
- Press and hold the SET button (23) for at least 3 seconds. The display shows [CODE SETUP]. Then release the SET button (23).
Press (9) three times. The display shows [FAV CH].
- Press the OK button (27). The display shows [SETUP].
Press (9). The display shows [DEL ALL].
- Press the OK button (27). The display shows [SURE DELETE].
- Press the OK button (27). The message [DELETED] will appear for a few seconds and the device returns to the [SETUP] level.
- Quit the process by pressing the EXIT button (28) twice.
Backlight
Press the LIGHT button (21) to switch on the backlight illumination. The backlight illumination will switch off after approx. 5 seconds. Press the button once more to switch it on again.
Press the LIGHT button (21) again to switch the backlight illumination back off.
Contrast
This function allows you to customise the display.
- Press and hold the SET button (23) for at least 3 seconds. The display shows [CODE SETUP]. Then release the SET button (23).
- Press (9). The display shows [CONFIGUE]. This message represents the word "Configure"
- Press the OK button (27). The display shows [TIME SETUP].
- Press (9). The display shows [CONTRAST].
- Press the OK button (27). The display shows the currently set contrast as a two-digit number, for instance [08].
- Press or [9] to increase or reduce contrast. You can set a value between "00" and "15".
- Press the OK button (27). The message [SUCCEED] will appear for a few seconds and the device returns to the [CONTRAST] level.
- Quit the process by pressing the EXIT button (28) twice.
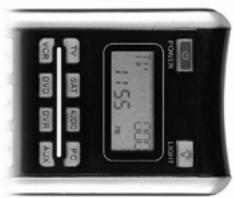
Battery Level Indicator
When the batteries are exhausted, a battery icon will appear on the display (see figure).

When this happens, replace the batteries by any new AAA-size batteries.
Setting the Time
The time is shown on the remote control display. You can set it as follows:
- Press and hold the SET button (23) for at least 3 seconds. The display shows [CODE SETUP]. Then release the SET button (23).
- Press (9). The display shows [CONFIG]. This message represents the word "Configure".
- Press the OK button (27). The display shows [TIME SETUP].
- Press the OK button (27). The display shows [TIME]. The currently-set time will appear below, and the first digit blinks.
- Enter the time via the numeric keys (3). Press or (9) to toggle between the digits. The currently-selected digit blinks.
- Press or to select between AM (before noon) and PM (afternoon).
- Press the OK button (27). The message [SUCCEED] will appear for a few seconds and the device returns to the [TIME SETUP] level.
- Quit the process by pressing the EXIT button (28) twice.
Teletext Mode
Use the TTX/MX button (38) to switch to Teletext mode. Press the TTX/MX button (38) again to exit Teletext mode.
Depending on the device that you use for Teletext reception, the mixed mode will appear first. In this case you must press the TTX/MX button (38) a third time to switch Teletext off.
The following buttons are available for Teletext control:
(3) Direct input of the Teletext page via numeric buttons
(25) Toggle to the next Teletext page
(26) Toggle to the previous Teletext page
Child lock
The child lock function lets you block the numeric keypad (3) and the buttons CH + (25) and CH- (26). This will avoid that channels can be switched. The child lock can be enabled and disabled for each source device selection button individually.
Proceed as follows to enable or disable child lock:
- Press and hold the SET button (23) for at least 3 seconds. The display shows [CODE SETUP]. Then release the SET button (23).
- Press (9). The display shows [CONFIGUE].
This message represents the word "Configure".
- Press the OK button (27). The display shows [TIME SETUP].
Press (9). The display shows [KIDS LOCK].
- Press the OK button (27). The display shows [TV OFF].
- Press the source device selection button for which you want to enable or disable the child lock function.
- Press or (9) to toggle between [ON] (child lock enabled) or [OFF] (child lock disabled).
- Press the OK button (27). The message [SUCCEED] will appear for a few seconds and the device returns to the [KIDS LOCK] level.
- Quit the process by pressing the EXIT button (28) twice.
Powering All Devices On/Off
You can power on or off all devices simultaneously. Proceed as follows:
- Press the On/Standby button (1) once.
- The remote control will send an On/Off signal to each device. This may take up to 10 seconds.
If you have enabled the backlight, it will blink during this process.
Appendix
Technical Specifications
| Model | URC 801 |
| Number of programmable devices | 8 |
| Power Supply | 4 batteries (1.5V, size AAA) |
| Programming | Via code list, learning function, macros, favourites |
Details of Guarantee
36 month warranty from date of purchase

United Kingdom
Dear Customer,
Thank you for purchasing a SILVERCREST product.
Please carefully read through the enclosed documentation or online help before putting your SILVERCREST product into service. If you have a problem, which can't be solved in this way, please contact our hotline.
If the problem cannot be solved over the phone, you will be given a reference number (FIMA), which you should enclose together with a copy of the proof of purchase. After you have packaged the unit safe for transport and in plain packaging, please send it for warranty processing, with the FIMA noted on the outside of the package, to the address given to you by our hotline employee. After receiving the unit we will correct the manufacturing and material defect free of charge.
Up-to-date information and answers to the most frequently asked questions are available on the internet from:
www.silvercrest.cc
This guarantee is valid in the UK.
Your statutory guarantees from the seller are in addition to this warranty and are not limited by it.

Manufacturer: TARGA GmbH, Postfach 2244.
D-59482 Soest
Hotline number: 0207-3650744
(Pleases have your serial number to hand)
www.silvercrest.cc
Spis tresci
- Any marked manufacturer names will appear on the remote control display in abbreviated format.
We: Targa GmbH Lange Wende 41 59494 Soest, Germany
declare our responsibility that the
product: remote control model: SilverCrest URC 801
is confirmed to comply with the requirements set out in the Council Directive on the Approximation of the Laws of the Member States relating to Electromagnetic Compatibility 2004/108/EC and the Council Directive relating to Low Voltage 2006/95/EC.
The measurements were carried out in accredited laboratories.
For the evaluation of above mentioned Council Directives for Electromagnetic Compatibility and for Low Voltage standards were consulted: