Melody 61 MKII - Keyboard ALESIS - Free user manual and instructions
Find the device manual for free Melody 61 MKII ALESIS in PDF.
| Product Type | Digital Keyboard |
| Brand | Alesis |
| Model | Melody 61 MKII |
| Number of Keys | 61 |
| Power Supply | 6 AA batteries or 9V AC adapter (included) |
| Display | LED Screen |
| Main Functions | Automatic accompaniment (one-finger or multi-finger chords), recording, rhythm programming, Dual overlay, Split separation, Sustain/Vibrato effects, transposition, metronome, demonstrations, One-Key mode |
| Connections | Microphone input (3.5mm jack), headphone output (3.5mm jack), DC power input |
| Included Accessories | Microphone, headphones, music stand, keyboard stand, bench, power cable, user guide |
| Automatic Standby | Yes, after 5 minutes of inactivity |
| Care and Cleaning | Clean with a soft, dry cloth. Avoid solvents and liquids. |
| Safety | Follow the safety instructions provided in the user guide. Do not expose to water or extreme temperatures. |
| Spare Parts and Repairability | Contact Alesis support (alesis.com/support) for spare parts or repairs. |
Frequently Asked Questions - Melody 61 MKII ALESIS
User questions about Melody 61 MKII ALESIS
0 question about this device. Answer the ones you know or ask your own.
Ask a new question about this device
Download the instructions for your Keyboard in PDF format for free! Find your manual Melody 61 MKII - ALESIS and take your electronic device back in hand. On this page are published all the documents necessary for the use of your device. Melody 61 MKII by ALESIS.
USER MANUAL Melody 61 MKII ALESIS
User Guide (English)
Introduction
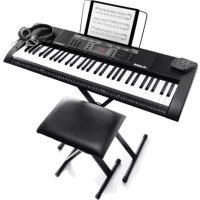
Box Contents
Melody 61 MKII
Microphone
Headphones
Music Rest
Keyboard Stand
Bench
Power Adapter
User Guide
Safety & Warranty Manual
Support
For the latest information about this product (system requirements, compatibility information, etc.) and product registration, visit alesis.com.
For additional product support, visit alesis.com/support.
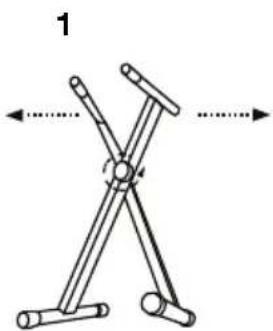
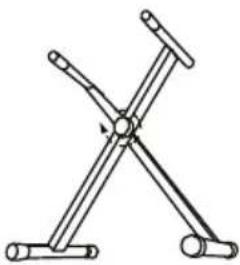
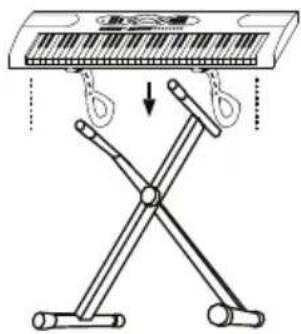
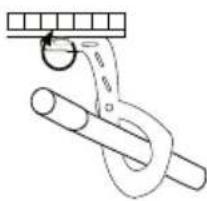
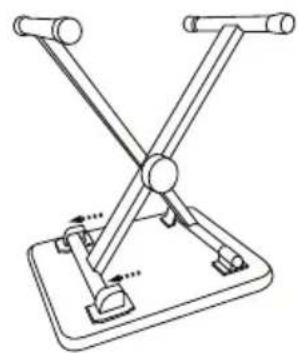
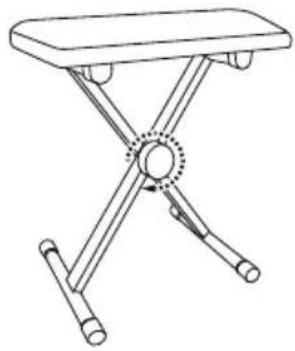
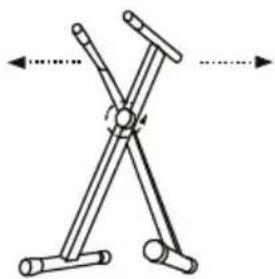
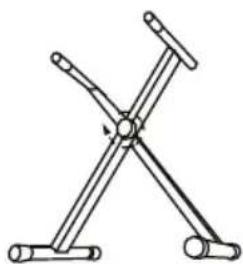
Setup
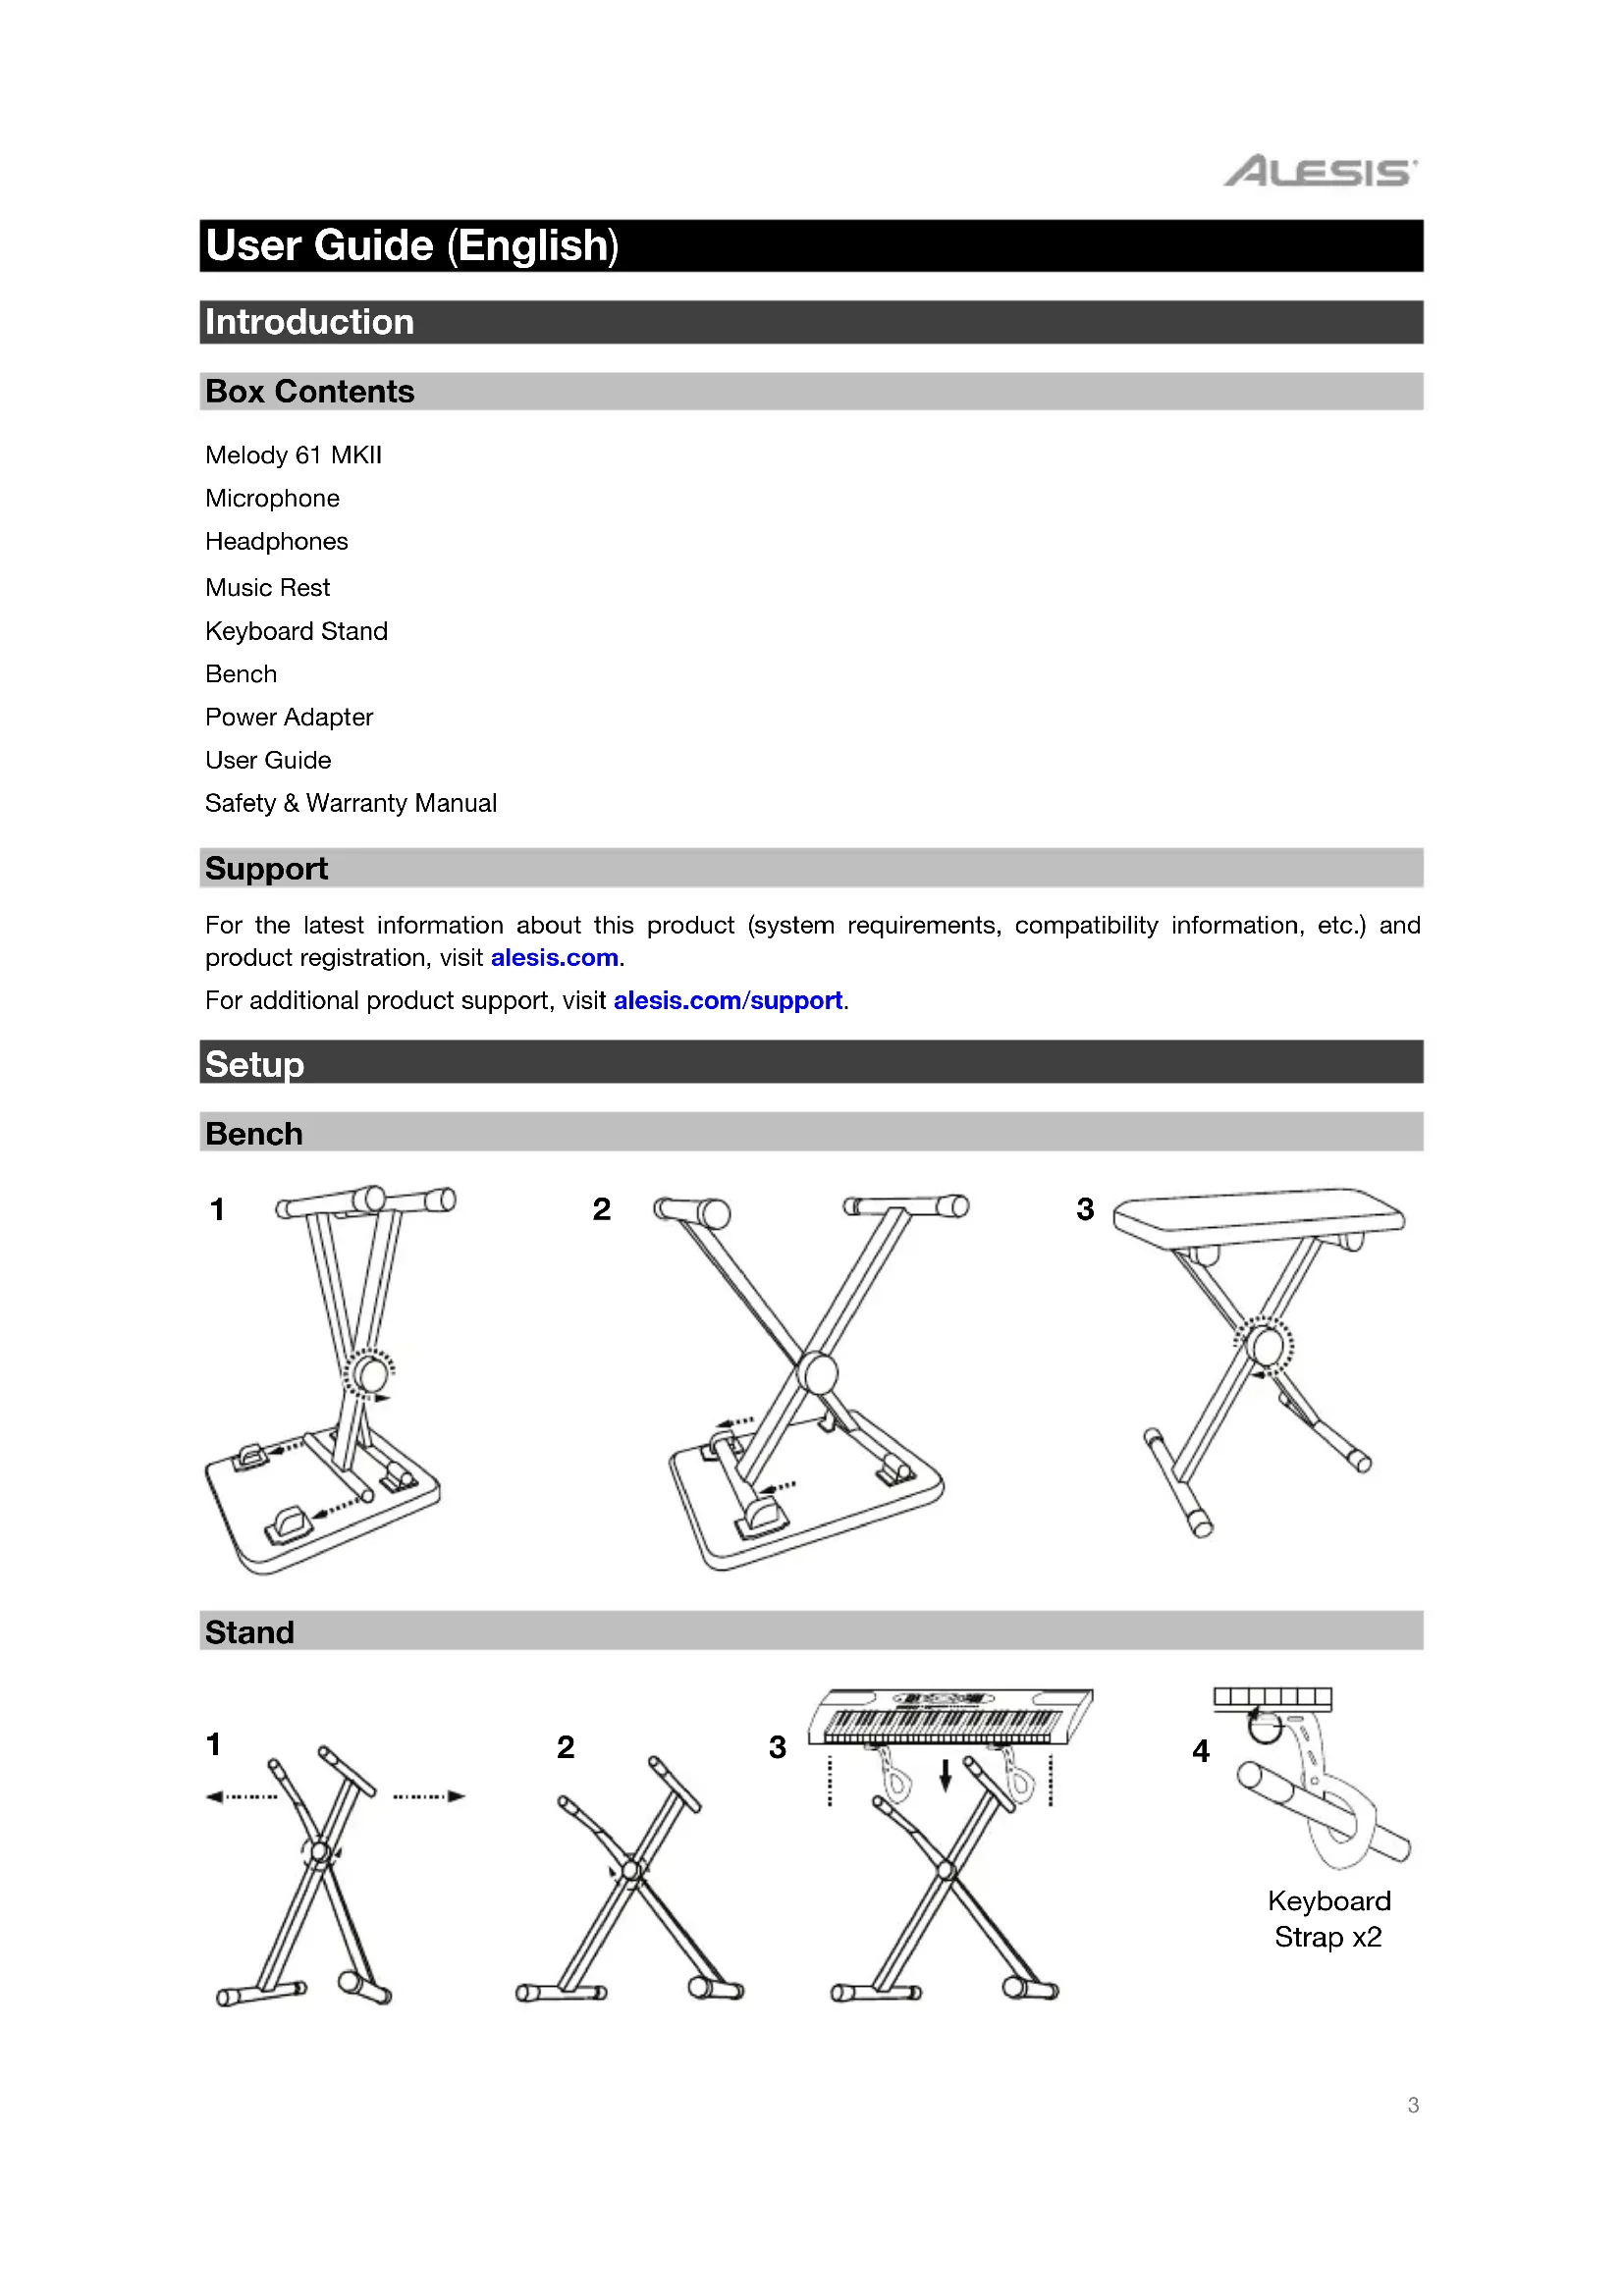
Bench
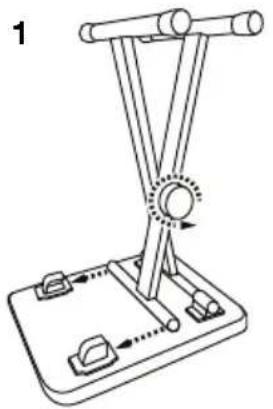
natural_image
Diagram of a mechanical device with rods and a central rotating knob (no text or symbols)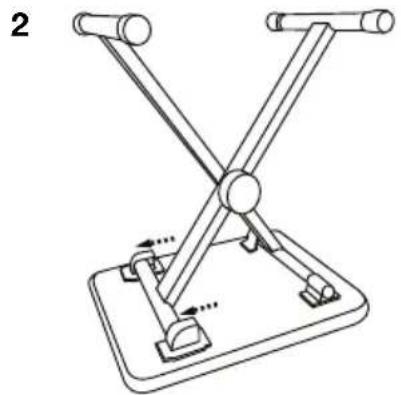
natural_image
Diagram of a mechanical device with two arms and a base, no text or symbols present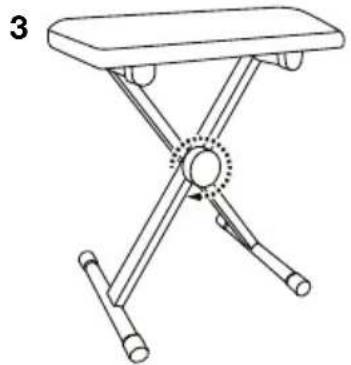
natural_image
Line drawing of a folding table with adjustable legs and a central circular knob (no text or symbols)Stand
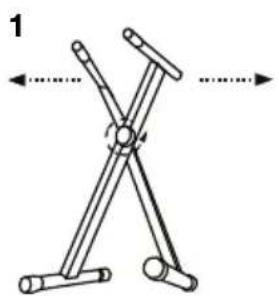
natural_image
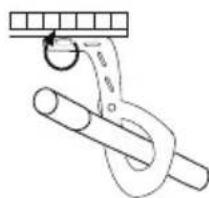
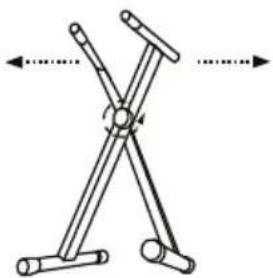
Diagram of a mechanical clamping device with two arms and a central pivot, showing motion direction (no text or symbols)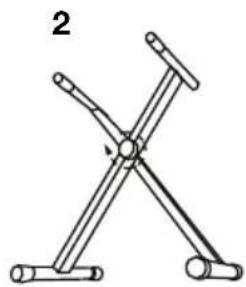
natural_image
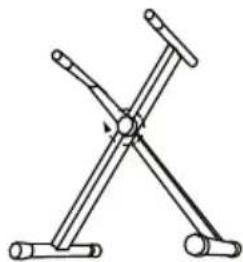
Mechanical diagram of a X-shaped clamp or bracket with two arms and a central pivot point (no text or symbols)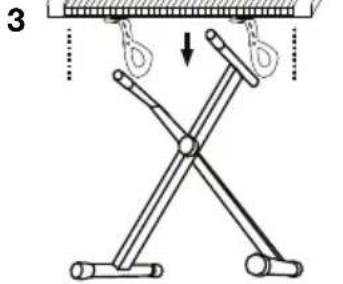
text_image
3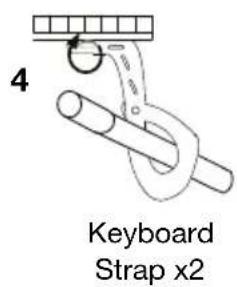
text_image
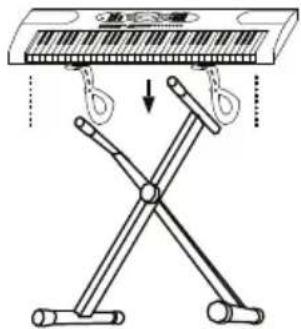
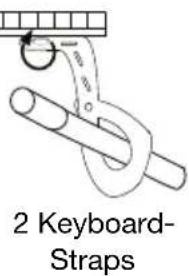
4 Keyboard Strap x2Connection Diagram
Items not listed in Introduction > Box Contents are sold separately.
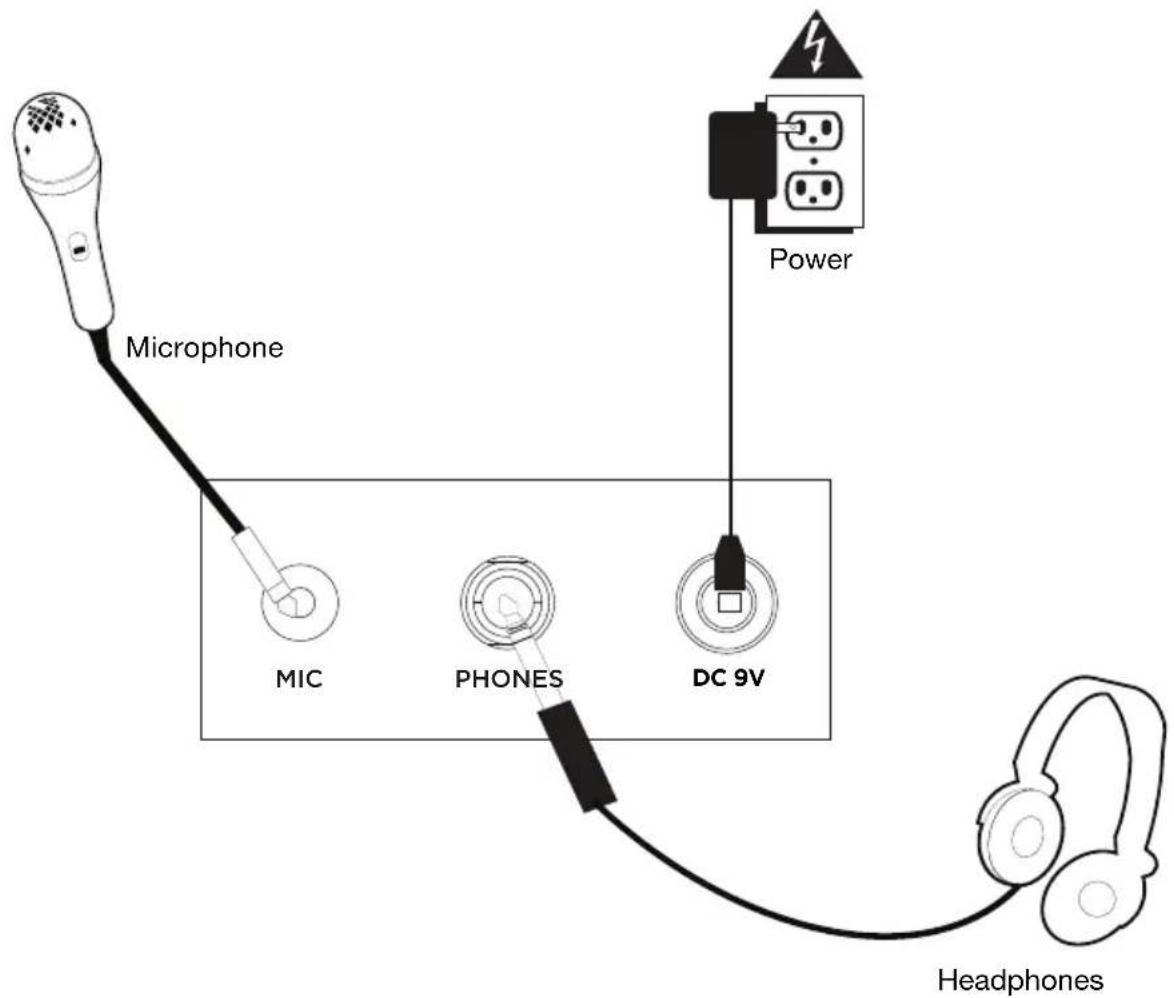
text_image
Microphone MIC PHONES DC 9V Power HeadphonesFeatures
Top Panel
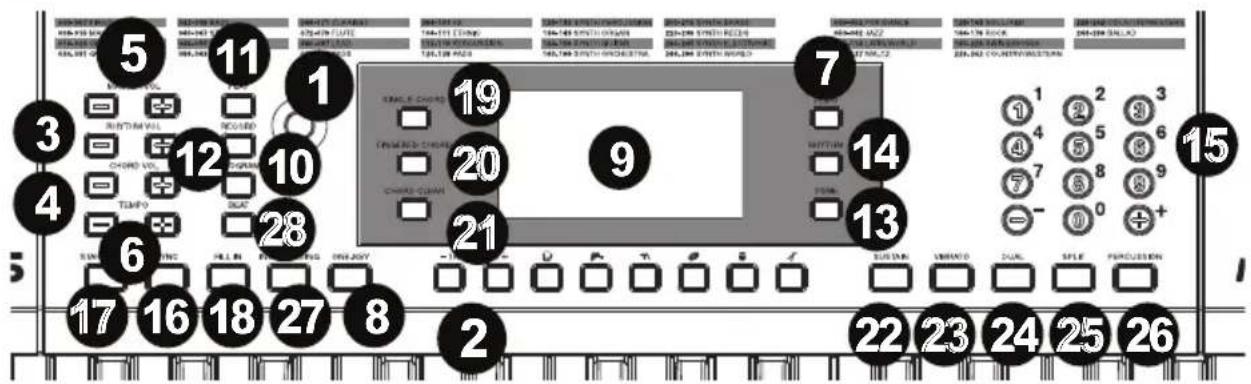
text_image
5 11 1 3 4 6 17 16 18 27 8 2 19 20 9 7 14 13 22 23 24 25 26 15 1 2 3 1 4 5 6 4 7 8 9 - 0 + SUSTAIN VIBRADO DUAL SPLE FPROVISION- Power On/Off: Press this button to turn the keyboard on or off.
- Transpose: Press the Transpose + or Transpose - button to increase or decrease the pitch of the keyboard by a half-step. Press the Transpose + and Transpose - buttons simultaneously to reset to the default value.
- Rhythm Volume: Press the Rhythm Vol + or Rhythm Vol - button to increase or decrease accompaniment rhythm volume. Press the Rhythm Vol + and Rhythm Vol - simultaneously to reset to the default value.
- Chord Volume: Press the Chord Vol + or Chord Vol - button to increase or decrease accompaniment chord volume. Press the Chord Vol + and Chord Vol - buttons simultaneously to reset to the default value.
- Master Volume: Press the Master Vol + or Master Vol - button to increase or decrease the overall volume for the sounds and rhythms. Press the Master Vol + and Master Vol - buttons simultaneously to reset to the default value.
- Tempo: Press the Tempo + or Tempo - button to increase or decrease the speed of the rhythm and chord accompaniment, demo song and/or metronome. Press the Tempo + and Tempo - buttons simultaneously to reset to the default value.
- Demo: Press this button to begin playback of the demonstration songs. Use the number buttons or + or - buttons to select another demonstration song. Press this button again to stop the playback.
- One-Key: Press this button to start the one-key function. This function lets you play along with the demo songs by pressing any key to the rhythm of the song. Use the number buttons or the + or - buttons to select another demonstration song.
- LED Display: Shows the various keyboard functions and numerical values.
- Program: Press this button to program a custom accompaniment rhythm.
- Play: Press this button to playback a custom accompaniment rhythm or recorded song.
- Record: Press this button to record a custom song.
- Tone: Press this button and then use the number buttons or the + or - buttons to select a tone.
- Rhythm: Press this button and then use the number buttons or the + or - buttons to select an accompaniment rhythm.
- Numbers: Use these buttons to select an instrument, rhythm, song, or tempo.
- Sync: Press the Sync button, and then play the keys in the lowest two octaves (corresponding to the chords/notes). The play-along feature starts immediately when playing a key, instead of having to press the Start/Stop button to start it.
- Start/Stop: Press to start or stop an accompaniment rhythm.
-
Fill In: Press this button to have a temporary rhythm play during the accompaniment rhythm.
-
Single Chord: Press this button to enable the Single automatic chord feature. This feature will generate chords for the accompaniment rhythms based on the keys you play that are the second lowest F# key or lower on the keyboard. The available chords for this function are described in Operation > Accompaniment Rhythm. Press this button again or press the Chord Clear button to disable the chord function.
- Fingered Chord: Press this button to enable the Fingered automatic chord feature. This feature will generate chords for the accompaniment rhythms based on the keys you play (the second lowest F# key or lower on the keyboard). The available chords for this function are described in Operation > Accompaniment Rhythm. Press this button again or press the Chord Clear button to disable the chord function.
- Chord Clear: Press this button to turn the Single Chord/Fingered Chord feature off.
- Sustain: Press this button to activate a sustain effect which simulates a sustain pedal when playing the keyboard. Press this button again to disable the sustain effect.
- Vibrato: Press this button to activate a pulsating change to the pitch when playing the keyboard. Press this button again to disable to vibrato effect.
- Dual: Press this button to layer two sounds together. The sound that you were using before pressing the Dual button will be used for one part of the layer. To select the other sound for the layer, enter a number for the sound or use the + and - buttons. Press the Dual button again to disable the dual-tone function.
- Split: Press this button to split the keyboard into two zones. The sound that you were using before pressing the Split button will be applied to the left-hand side of the keyboard. To select a sound for the right-hand side, enter a number for the sound or use the + and - buttons. Press the Split button again to disable the keyboard split.
- Percussion: Press this button to play the built-in drum kit and percussion sounds using the keys. Press this button again to disable this function.
- Intro/Ending: Press this button to play an intro and then start playback of an accompaniment rhythm. Press this button while the accompaniment rhythm is playing to play an outro and then stop playback of an accompaniment rhythm.
- Beat: Press this button to start the metronome. Press this button again to change the time signature of this button or turn off the metronome.
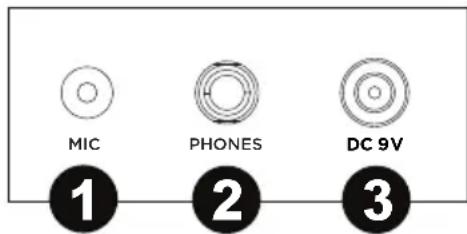
Rear Panel
- Mic: Connect the included microphone here to sing while playing the keyboard.
- Phones: Connect the included headphones here to hear the keyboard and mute the internal speakers.
- Power Input: Connect the included power adapter here.
text_image
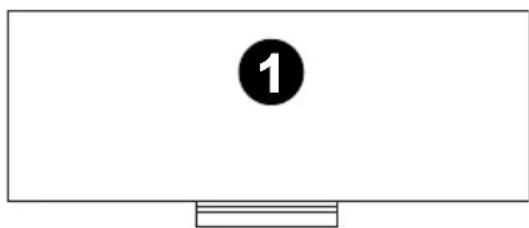
MIC PHONES DC 9V 1 2 3Bottom Panel
- Battery Compartment: Install 6 "AA" batteries here to power the keyboard if you are not using the power adapter.
text_image
1Operation
Selecting a Tone
To select a tone, press Tone then use the number buttons or the + and - buttons.
To layer two sounds together, press the Dual button. The sound that you were using before pressing the Dual button will be used for one part of the layer. To select the other sound for the layer, enter a number for the sound or use the + and - buttons. Press the Dual button again to disable the dual-tone function.
To split the keyboard into two zones, press the Split button. The sound that you were using before pressing the Split button will be applied to the left-hand side of the keyboard. To select a sound for the right-hand side, enter a number for the sound or use the + and - buttons. Press the Split button again to disable the keyboard split.
Accompaniment Rhythm
To select an accompaniment rhythm, press Rhythm then use the number buttons or the + and - buttons.
To start or stop an accompaniment rhythm, press the Start/Stop button.
To have the accompaniment rhythm play a fill, press the Fill In button.
Press the Single Chord or Fingered Chord button to enable the automatic chord features. These features will generate chords for the accompaniment rhythms based on the keys you play that are the second lowest F# key or lower on the keyboard. Press this button again or press the Chord Clear button to disable the chord function.
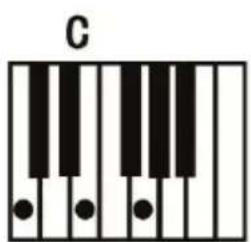
Single Chord:
When using the Single Chord feature you can use the abbreviated chord shapes shown below starting on any note to play major, minor, seventh, or minor seventh chords.
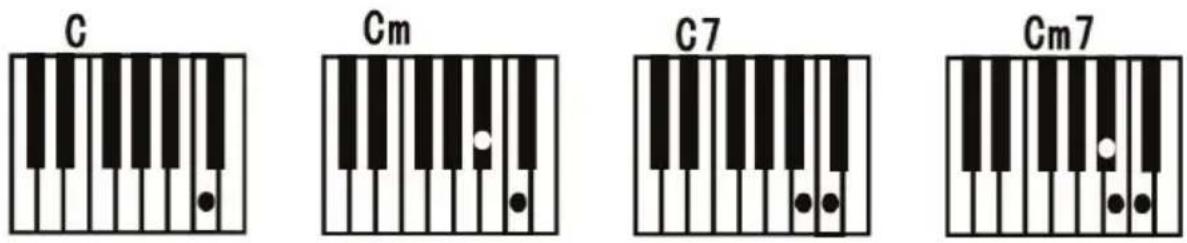
Fingered Chord:
When using the Single Chord feature you can use the full chord shapes shown below starting on any note to play major, minor, seventh, or minor seventh chords.
text_image
C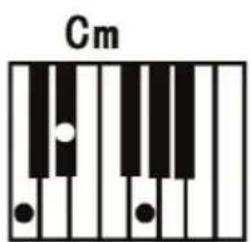
text_image
Cm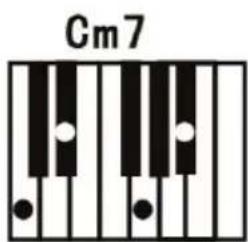
text_image
Cm7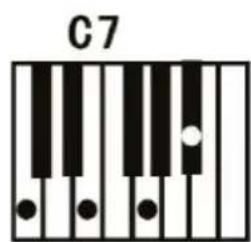
text_image
C7Recording Function
- To record your playing, press the Record button to start recording a song.
- During the recording process, press Play to stop recording. Press Play again to play the recorded song.
- Press Play again to stop playback.
Note: The recorded song will be erased when recording is started again or when the keyboard is turned off. When the memory is full, the screen will display "FUL", and recording will automatically stop.
Rhythm Programming
To create custom accompaniment rhythms using the keyboard keys:
- Press the Program button and start programming the rhythm by playing each note in the pattern, one at a time.
- Press Play to stop programming and hear the programmed rhythm.
- Press the Program button again to disable the programming function and erase the programming rhythm.
Note: The programmed rhythm will be erased when programming is performed again or if the keyboard is turned off.
Auto-power Off
After 5 minutes of inactivity, Melody 61 MKII will power off. If you press any button or key, it will turn back on.
natural_image
Diagram of a mechanical device with articulated arms and a central rotating knob (no text or symbols)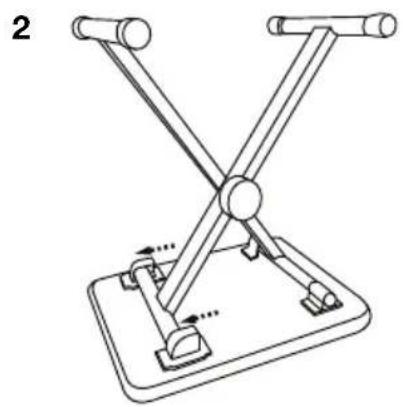
natural_image
Technical line drawing of a mechanical device with two arms and a base, no text or symbols present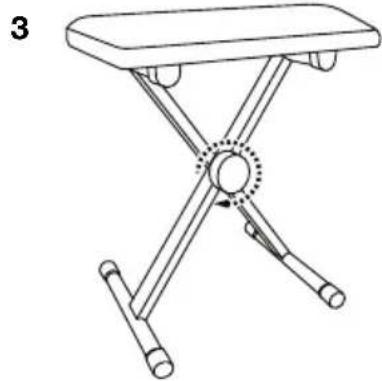
natural_image
Line drawing of a simple folding table with four legs and a central circular component (no text or symbols)Soporte
natural_image
Diagram of a mechanical linkage or clamping device with two arms and directional arrows (no text or symbols)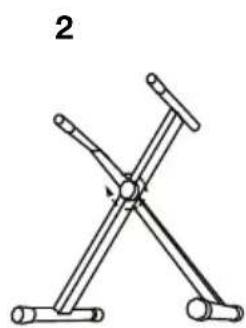
natural_image
Diagram of a mechanical clamp or clamping device with two arms and a central hub, labeled with number 2 (no text or symbols on the diagram itself)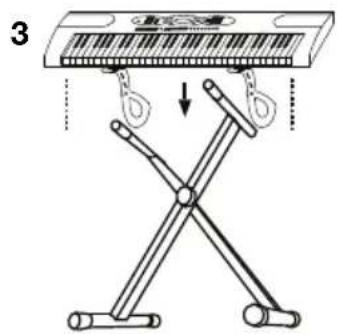
text_image
3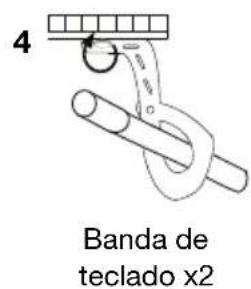
Assistance technique
natural_image
Diagram of a mechanical device with articulated arms and a central rotating knob (no text or symbols)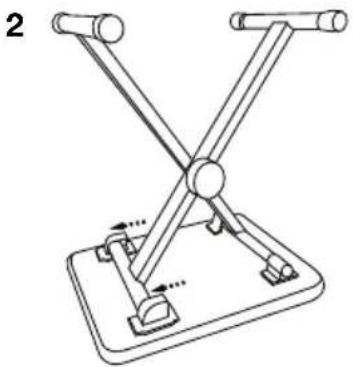
natural_image
Diagram of a mechanical device with two arms and a base, no text or symbols present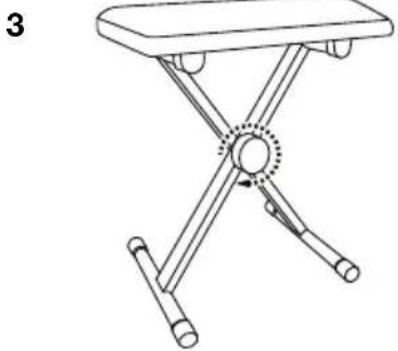
natural_image
Line drawing of a folding table with legs and arms, no text or symbols presentnatural_image
Diagram of a mechanical linkage or clamping mechanism with two arms and directional arrows (no text or labels)2
natural_image
Pure mechanical linkage diagram without any text, numbers, or symbols3
text_image
Diagram illustrating a folding mechanism with labeled parts and directional arrows indicating movement or force.4
natural_image
Simple line drawing of a rope knot with a hook and a horizontal bar (no text or symbols)natural_image
Simple line drawing of a monitor with a numbered button (1) on the screen, no text or symbols present.Fonctionnement
natural_image
Diagram of a mechanical device with lever and base components, no text or symbols present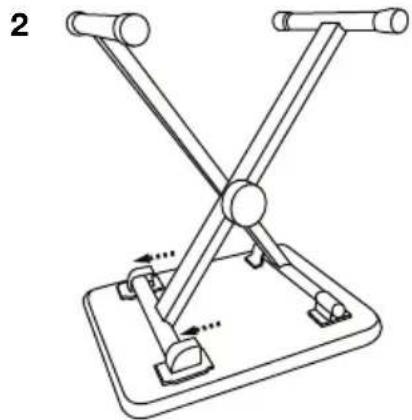
natural_image
Mechanical linkage diagram with two arms and a base platform, no text or symbols present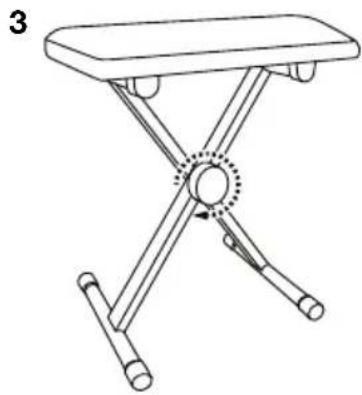
natural_image
Line drawing of a folding table with four legs and a central circular knob (no text or symbols)Supporto
1
natural_image
Diagram of a mechanical linkage or clamping mechanism with two arms and directional arrows (no text or labels)2
natural_image
Pure mechanical linkage diagram without any text, numbers, or symbols3
text_image
Diagram showing a folding table with hanging clips and a cross-shaped mechanism, indicating folding or folding process.4
natural_image
Simple line drawing of a rope being lifted by a hook (no text or symbols)text_image
Labeled diagram of a room layout with numbered compartments and icons for seating, lighting, and equipment.natural_image
Simple line drawing of a monitor with a numbered button (1) on the screen, no text or symbols present.Operazione
natural_image
Diagram of a mechanical device with lever and base, showing motion indicators (no text or symbols)2
natural_image
Technical line drawing of a mechanical support structure with no visible text or symbols3
natural_image
Line drawing of a simple folding table with four legs and a central circular seat (no text or symbols)Ständer
1
natural_image
Diagram of a mechanical linkage or clamping mechanism with two arms and directional arrows (no text or symbols)2
natural_image
Pure mechanical linkage diagram without any text, numbers, or symbols3

text_image
放三叉 ↓4
text_image
2 Keyboard- StrapsAnschlussdiagramm
Technical Specifications
| Power | 6 “AA” batteries or included power adapter (9V DC, 500 mA) |
| Dimensions | 12.4" x 37.4" x 4.1"315 x 948 x 105 mm |
| Weight | 11.0 lbs.5.0 kg |
Specifications are subject to change without notice.
Trademarks & Licenses
Alesis is a trademark of inMusic Brands, Inc., registered in the U.S. and other countries.
All other product or company names are trademarks or registered trademarks of their respective owners.
alesis.com