WDP4K - Washing machine LG - Free user manual and instructions
Find the device manual for free WDP4K LG in PDF.
Download the instructions for your Washing machine in PDF format for free! Find your manual WDP4K - LG and take your electronic device back in hand. On this page are published all the documents necessary for the use of your device. WDP4K by LG.
USER MANUAL WDP4K LG
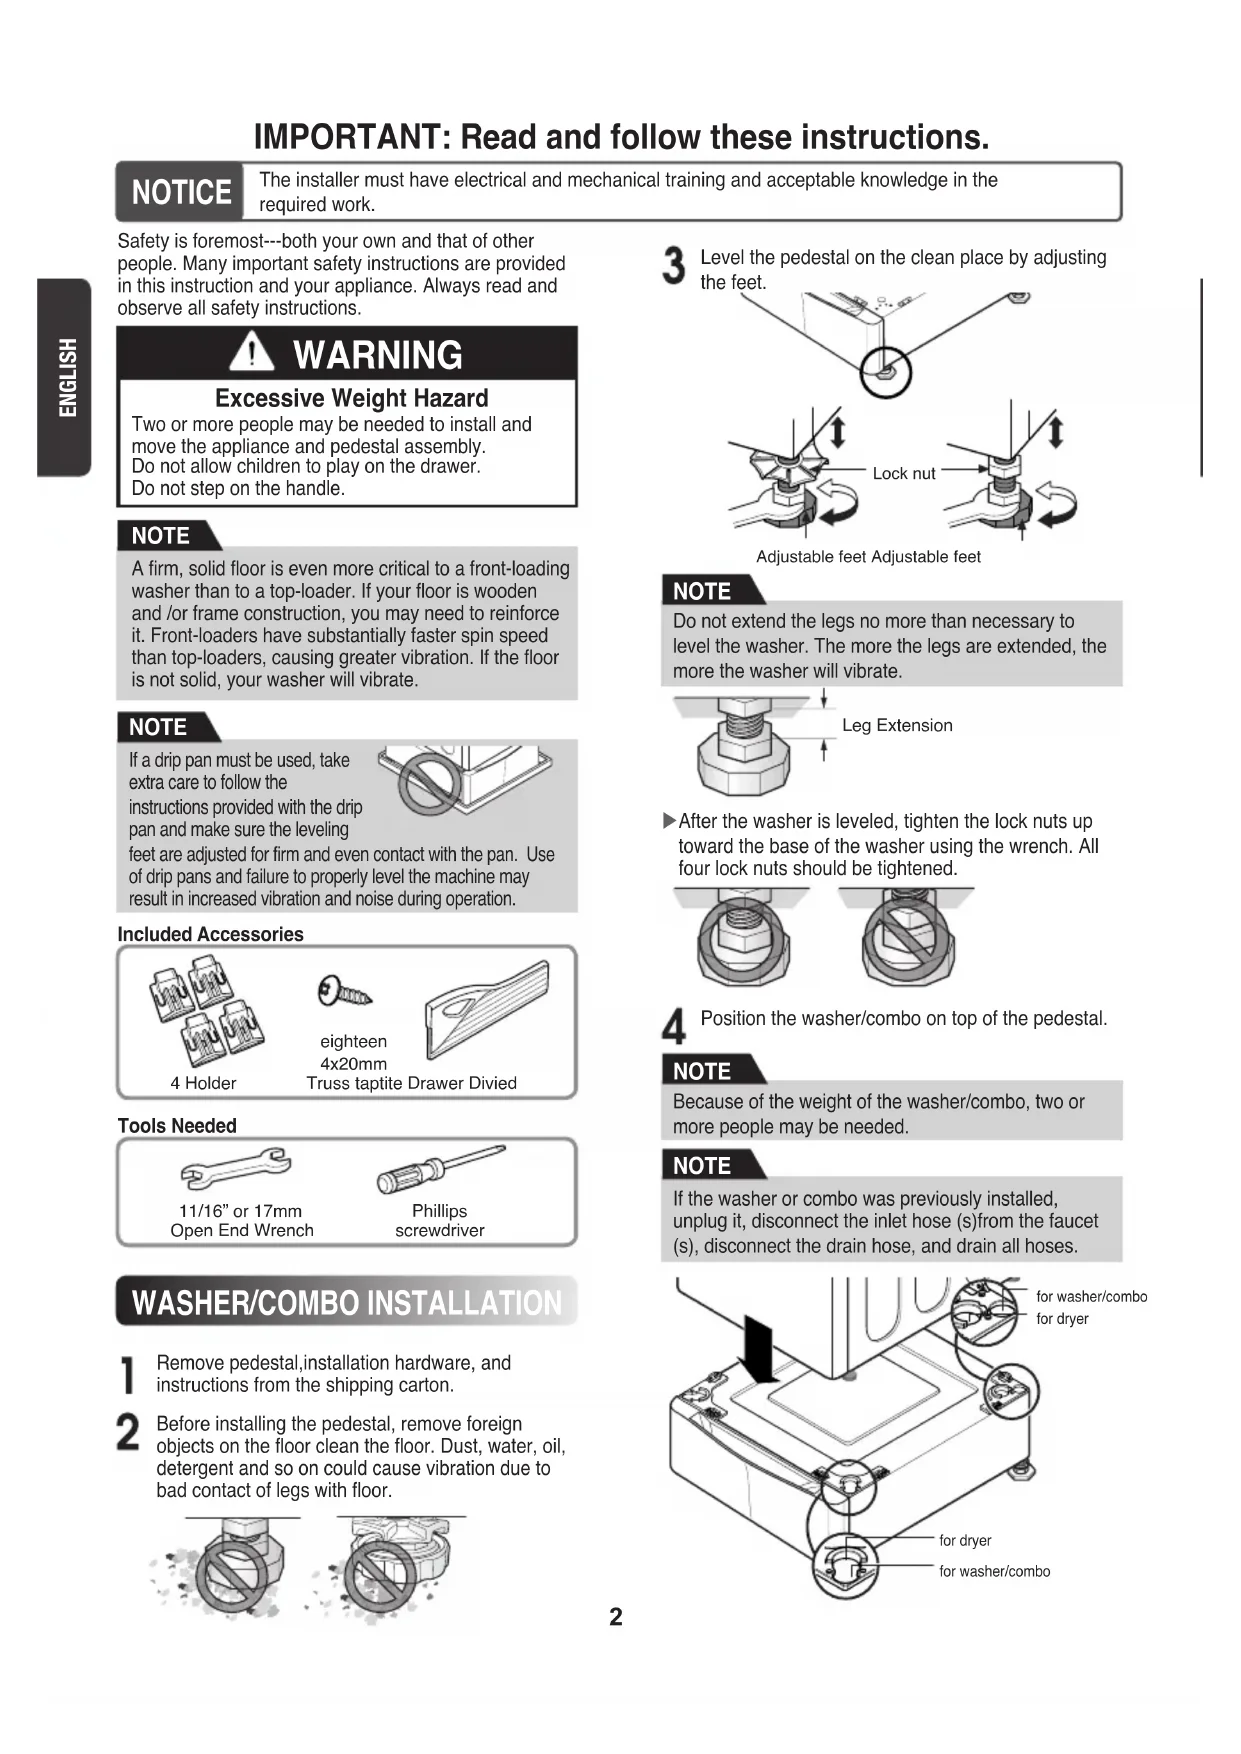
Pour machine à laver, sécheuse, et combo de 27 po2 ENGLISH for washer/combofor dryerfor dryerfor washer/comboLock nutAdjustable feet Adjustable feetLeg Extension IMPORTANT: Read and follow these instructions. NOTICE The installer must have electrical and mechanical training and acceptable knowledge in the required work.Safety is foremost---both your own and that of otherpeople. Many important safety instructions are providedin this instruction and your appliance. Always read andobserve all safety instructions.Remove pedestal,installation hardware, andinstructions from the shipping carton.Position the washer/combo on top of the pedestal. WARNING Excessive Weight Hazard Two or more people may be needed to install and move the appliance and pedestal assembly.Do not allow children to play on the drawer.Do not step on the handle.A firm, solid floor is even more critical to a front-loading washer than to a top-loader. If your floor is wooden and /or frame construction, you may need to reinforce it. Front-loaders have substantially faster spin speed than top-loaders, causing greater vibration. If the floor is not solid, your washer will vibrate.
Before installing the pedestal, remove foreign objects on the floor clean the floor. Dust, water, oil, detergent and so on could cause vibration due to bad contact of legs with floor. After the washer is leveled, tighten the lock nuts up toward the base of the washer using the wrench. All four lock nuts should be tightened.
Level the pedestal on the clean place by adjusting the feet.
NOTE If a drip pan must be used, take extra care to follow the instructions provided with the drip pan and make sure the leveling feet are adjusted for firm and even contact with the pan. Use of drip pans and failure to properly level the machine may result in increased vibration and noise during operation. NOTE Do not extend the legs no more than necessary to level the washer. The more the legs are extended, the more the washer will vibrate. NOTE Because of the weight of the washer/combo, two or more people may be needed. NOTE If the washer or combo was previously installed, unplug it, disconnect the inlet hose (s)from the faucet (s), disconnect the drain hose, and drain all hoses. NOTE 4 Holdereighteen 4x20mmTruss taptite Drawer Divied11/16” or 17mmOpen End WrenchPhillipsscrewdriverIncluded AccessoriesTools Needed3 ENGLISH Make sure the holes on the pedestal align with the holes in the appliance, then install 4 screws at each corner to securely attach the appliance to the pedestal.
Level the washer/combo on the pedestal by adjusting the feet.
Lock nutAdjustable feet Adjustable feet Move the washer/combo to the desired place.
Diagonal Check When pushing down the edges of the washing machine top plate diagonally, the machine should not move up and down at all.(Please check both directions.) If the machine rocks when pushing the machine top plate diagonally, adjust the feet again. NOTE To make sure that the washer is properly level, run the washer with a test load: place approximately 6 pounds of laundry in the machine. Then press POWER, press RINSE+SPIN, and then press the START/PAUSE button. See the following sections for additional information on cycle selection and operation. Verify that the washer does not rock or vibrate excessively during the spin cycle. If the washer vibrates or shakes, adjust the leveling feet until the washer is stable and retest. NOTE If the screws are not installed properly, noise and vibration may result. For WASHER: 16 SCREWS For DRYER: 8 SCREWS NOTE The appliance and pedestal assembly must be placed on a solid and level floor for proper operation. Adjust the legs of the appliance and pedestal by turning with a wrench. Then, adjust the lock nut toward the pedestal while holding the pedestal leg using a wrench. NOTE Lock nutAdjustable feet Adjustable feet4 ENGLISH Because of the weight of the dryer, two or more people may be needed. NOTE Remove pedestal,installation hardware, andinstructions from the shipping carton.Make sure the holes on the pedestal align with the holes in the appliance, then install 2 screws at each corner to securely attach the appliance to the pedestal. DRYER INSTALLATION
Position dryer on top of the pedestal.
Insert the T-clip of the 4 retainers into the dryer base as shown. Press up on the back of the clip and pull outward to lock into place.
for washer/combofor dryerfor dryerfor washer/comboIf dryer was previously installed, uninstall it as follows: NOTE A. Uninstalling an electric dryer: 1) Unplug the power supply cord, 2) Pull the dryer away from the wall enough to loosen the vent clamp. Loosen the clamp and carefully remove the exhaust vent from the dryer exhaust outlet. B. Uninstalling a gas dryer: 1) Unplug power supply cord. 2) Turn off the gas supply. 3) Pull the dryer away from the wall enough to loosen the vent clamp. Loosen the clamp and carefully remove the exhaust vent from the dryer exhaust outlet.
Lock nut Adjustable feet Adjustable feet Adjustable feet HigherLowerMove the dryer to the desired place.
The appliance and pedestal assembly must be placed on a solid and level floor for proper operation. Adjust the legs of the appliance and pedestal by turning with a wrench. Then, adjust the lock unt toward the pedestal while holding the pedestal leg using a wrench. NOTE If the screws are not installed properly, noise and vibration may result. NOTE T-clipRetainer5 ENGLISH
LG Electronics Inc., Will repair or at its option replace, without charge, your product if it proves to be defective material or workmanship under normal use during the warranty period set forth below, effective from the date of original consumerpurchase of the product. This limited warranty is good only to the original purchaser of the product and effective onlywhen used in the United states including Alaska, Hawail, and U.S. Territories; and Canada. WARRANTY PERIOD: 1Year from the Date of Purchase.Call 1-800-243-0000 (USA) or 1-888-LGCANADA and choose theappropriate prompt. Please have product type, model number, serial number,and ZIP code ready. HOW SERVICE IS HANDLED: THIS WARRANTY IS IN LIEU OF ANY OTHER WARRANTIES, EXPRESS OR IMPLIED, INCLUDING WITHOUTLIMITATION, ANY WARRANTY OF MERCHANTABILITY OR FITNESS FOR A PARTICULAR PURPOSE. TO THE EXTENT ANY IMPLIED WARRANTY IS REQUIRED BY LAW, IT IS LIMITED IN DURATION TO THE EXPRESS WARRANTY PERIOD ABOVE. LG WILL NOT BE LIABLE FOR ANY CONSEQUENTIAL, INDIRECT, ORINCIDENTAL DAMAGES OF ANY KIND, INCLUDING LOST REVENUSE OR PROFITS, IN CONNECTION WITH THEPRODUCT. SOME STATES DO NOT ALLOW LIMITATION ON HOW LONG AN IMPLIED WARRANTY LASTS OR THEEXCLUSION OF INCIDENTAL OR CONSEQUENTIAL DAMAGES, SO THE ABOVE LIMITATIONS OR EXCLUSIONSMAY NOT APPLY TO YOU. THIS LIMITED WARRANTY DOES NOT APPLY TO: 1. Service trips to your home to deliver, pick up, and/or install the product, instruct, or replace house fuses or correct wiring, or correction of unauthorized repairs; and2. Damages or operating problems that result from misuse, abuse, operation outside environmental specifications or contrary to the requirements or precautions in the Operating Guide, accident, vermin, fire, flood, improper installation, acts of God, unauthorized modification or alteration, incorrect electrical current or voltage, or commercial use, or usefor other than intended purpose.
3. Therefore, the cost of repair or replacement of such a defective product shall be borne by the consumer.
CUSTOMER INTER-ACTIVE CENTER NUMBERS: To Prove Warranty Coverage To Obtain Nearest Authorized Service Center or Sales Dealer, or to Obtain Product,Customer, or Service Assistance Retain your Sales Receipt to prove date of purchase.A copy of your Sales Receipt must be submitted at the time warranty serviceis provided.Call 1-800-243-0000 or 1-888-LGCANADA and choose the appropriate prompt from the menu, and have your product type, model number, serial number, and ZIP Code; or visit our website at http://www.lgservice.com WARRANTY WARNING This product contains chemicals known to the State of California to cause cancer and birth defects or other reproductive harm. Wash hands after handling. (USA only)6 FRANÇAISpour machine à laver/combopour le séchoirpour le séchoirpour machine à laver/comboÉcrou deverrouillagePied réglable Pied réglablePied Allongés IMPORTANT: Lire et suivre ces instructions à la lettre NOTICE L'installateur doit avoir une formation électrique et mécanique et une experience convenable pour cegenre de travail.La sécurité est primordiale: la vôtre et celle des autres.D'importantes instructions de sécurité sont indiquées dans ces instructions et sur votre appareil. Lire et observer attentivement toutes ces instructions de sécurité.Retirer le piédestal, les materiels d'installation et les instructions du carton de transport.Positioner la machine à laver/combo sur le haut du piédestal. AVERTISSEMENT Risque dû au poids excessif de la machine: Plus de deux personnes sont necessaires pourdéplacer et installer l'appareil et l'assemblage dupiédestal. Ne pas laisser les enfants jouer sur le tiroir.Ne pas marcher sur le manche.Un plancher robuste et solide est essentiel pour une laveuse à chargement frontal quʼun modèle à chargement sur le dessus. Si le plancher est en bois et/ou autre construction, il faudra le renforcer. La laveuse à chargement frontal effectue un essorage beaucoup plus rapide que les autres appareils, causant ainsi plus de vibrations. Si le plancher nʼest pas robuste, la laveuse peut vibrer. Lʼon entendra et sentira les vibrations dans la maison.
Insert the T-clip of the 4 retainers into the dryer base as shown. Press up on the back of the clip and pull outward to lock into place.
Net weight : 52.9 lb (24 kg) 25.4" (64.5 cm) 18.4" (46.7 cm) 2.5" (6.5 cm) 27" (68.6 cm) 13.6" (34.5 cm)