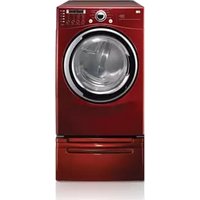
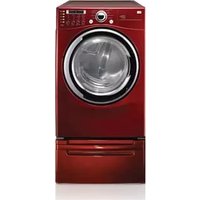
LWP273N - Tumble drier LG - Free user manual and instructions
Find the device manual for free LWP273N LG in PDF.

User questions about LWP273N LG
0 question about this device. Answer the ones you know or ask your own.
Ask a new question about this device
Download the instructions for your Tumble drier in PDF format for free! Find your manual LWP273N - LG and take your electronic device back in hand. On this page are published all the documents necessary for the use of your device. LWP273N by LG.
USER MANUAL LWP273N LG
Before beginning installation, read these instructions carefully. This will simplify installation and ensure that the pedestal is installed correctly and safely. Leave these instructions near the pedestal after installation for future reference.
For 27" washer, dryer, and combination
TROUSSE DE PIÉDESTAL
DIRECTIVES D'INSTALLATION
IMPORTANT: Read and follow these instructions.
NOTICE
The installer must have electrical and mechanical training and acceptable knowledge in the required work.
Safety is foremost---both your own and that of other people. Many important safety instructions are provided in this instruction and your appliance. Always read and observe all safety instructions.

WARNING
Excessive Weight Hazard
Two or more people may be needed to install and move the appliance and pedestal assembly. Do not allow children to play on the drawer. Do not step on the handle.
NOTE
A firm, solid floor is even more critical to a front-loading washer than to a top-loader. If your floor is wooden and/or frame construction, you may need to reinforce it. Front-loaders have substantially faster spin speed than top-loaders, causing greater vibration. If the floor is not solid, your washer will vibrate.
NOTE
If a drip pan must be used, take extra care to follow the instructions provided with the drip pan and make sure the leveling feet are adjusted for firm and even contact with the pan. Use of drip pans and failure to properly level the machine may result in increased vibration and noise during operation.
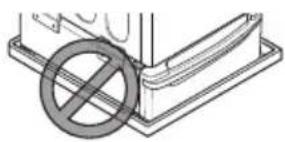
natural_image
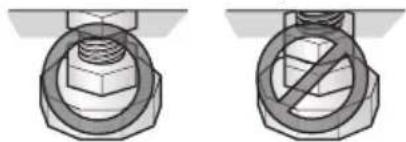
Simple line drawing of a bracket with a diagonal line and a prohibition symbol (no text or labels)WASHER/COMBO INSTALLATION
1 Remove pedestal, installation hardware, and instructions from the shipping carton.
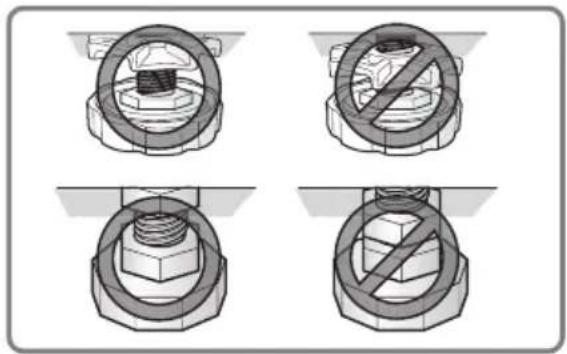
2 Before installing the pedestal, remove foreign objects on the floor clean the floor. Dust, water, oil, detergent and so on could cause vibration due to bad contact of legs with floor.
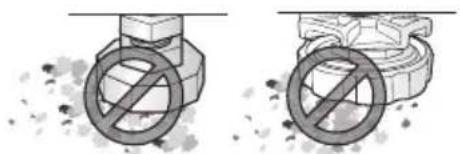
natural_image
Two diagrams showing a crossed-out circular symbol with a diagonal line and a cross symbol inside, above and below a mechanical component (no text or labels)3 Level the pedestal on the clean place by adjusting the feet.
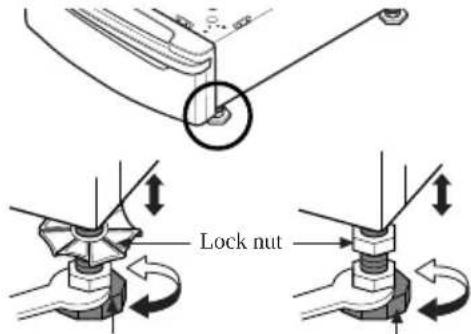
text_image
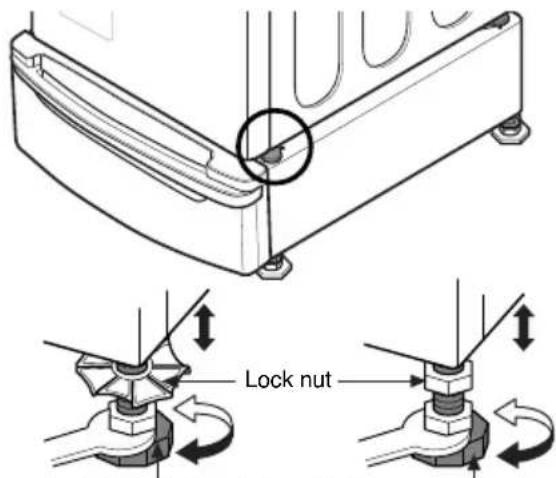
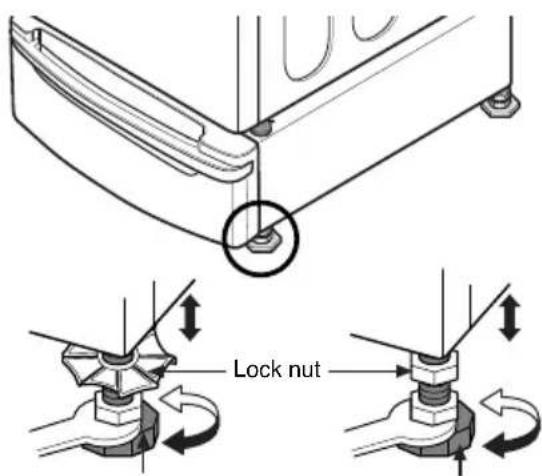
Lock nutAdjustable feet Adjustable feet
NOTE
Do not extend the legs no more than necessary to level the washer. The more the legs are extended, the more the washer will vibrate.
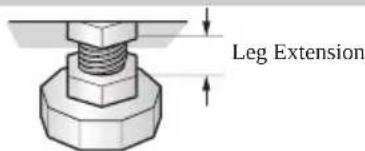
text_image
Leg Extension▶ After the washer is leveled, tighten the lock nuts up toward the base of the washer using the wrench. All four lock nuts should be tightened.
natural_image
Two technical illustrations of a bolt with a hexagonal nut and a circular hole, showing no text or symbols.4 Position the washer/combo on top of the pedestal.
NOTE
Because of the weight of the washer/combo, two or more people may be needed.
NOTE
If the washer or combo was previously installed, unplug it, disconnect the inlet hose (s) from the faucet (s), disconnect the drain hose, and drain all hoses.
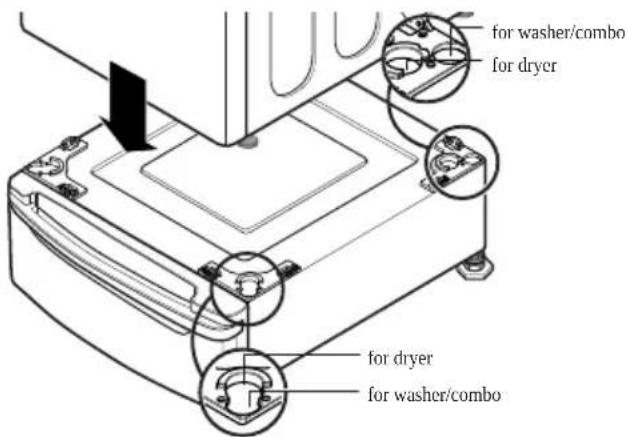
text_image
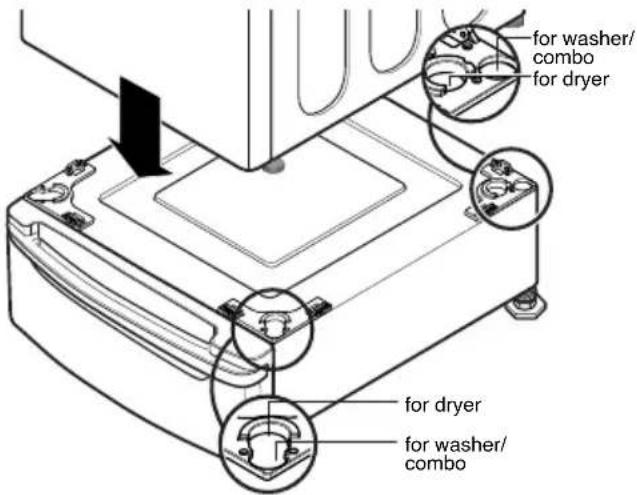
for washer/combo for dryer for dryer for washer/combo5 Level the washer/combo on the pedestal by adjusting the feet.
text_image
Lock nutAdjustable feet Adjustable feet
natural_image
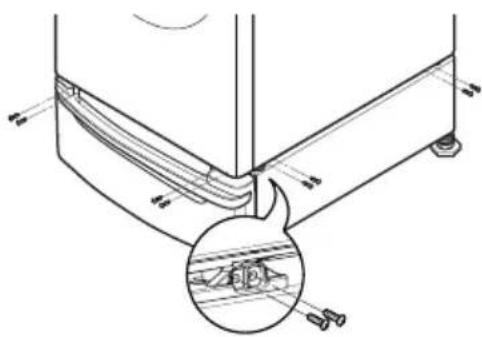
Four technical diagrams showing mechanical assembly with no visible text or symbols6 Make sure the holes on the pedestal align with the holes in the appliance, then install 4 screws at each corner to securely attach the appliance to the pedestal.
NOTE
If the screws are not installed properly, noise and vibration may result.
text_image
Technical diagram showing a mechanical assembly with labeled parts and an inset magnified view of a component detail.7 Move the washer/combo to the desired place.
NOTE
The appliance and pedestal assembly must be placed on a solid and level floor for proper operation. Adjust the legs of the appliance and pedestal by turning with a wrench. Then, adjust the lock nut toward the pedestal while holding the pedestal leg using a wrench.
text_image
Lock nutAdjustable feet Adjustable feet
natural_image
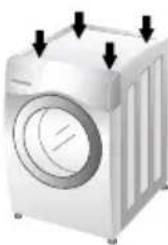
Illustration of a white washing machine with black arrows pointing to its top panel (no text or symbols)NOTE
Diagonal Check
When pushing down the edges of the washing machine top plate diagonally, the machine should not move up and down at all.(Please check both directions.) If the machine rocks when pushing the machine top plate diagonally, adjust the feet again.
NOTE
To make sure that the washer is properly level, run the washer with a test load: place approximately 6 pounds of laundry in the machine. Then press POWER, press RINSE+SPIN, and then press the START/PAUSE button. See the following sections for additional information on cycle selection and operation. Verify that the washer does not rock or vibrate excessively during the spin cycle. If the washer vibrates or shakes, adjust the leveling feet until the washer is stable and retest.
DRYER INSTALLATION
1 Remove pedestal, installation hardware, and instructions from the shipping carton.
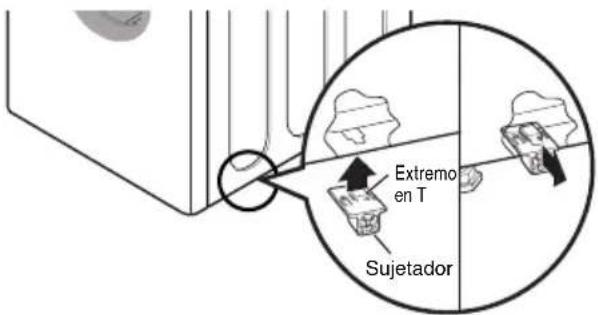
2 Insert the T-clip of the 4 retainers into the dryer base as shown. Press up on the back of the clip and pull outward to lock into place.
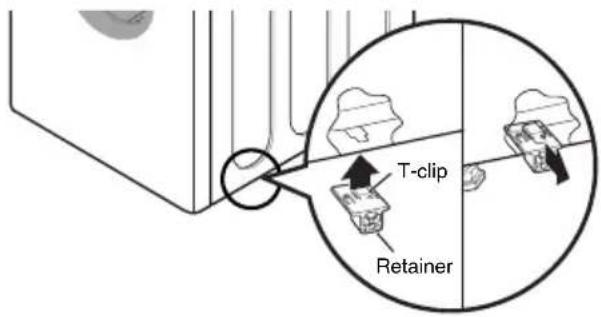
text_image
T-clip Retainer3 Position dryer on top of the pedestal.
NOTE
Because of the weight of the dryer, two or more people may be needed.
NOTE
If dryer was previously installed, uninstall it as follows:
A. Uninstalling an electric dryer:
1) Unplug the power supply cord,
2) Pull the dryer away from the wall enough to loosen the vent clamp. Loosen the clamp and carefully remove the exhaust vent from the dryer exhaust outlet.
B. Uninstalling a gas dryer:
1) Unplug power supply cord.
2) Turn off the gas supply.
3) Pull the dryer away from the wall enough to loosen the vent clamp. Loosen the clamp and carefully remove the exhaust vent from the dryer exhaust outlet.
text_image
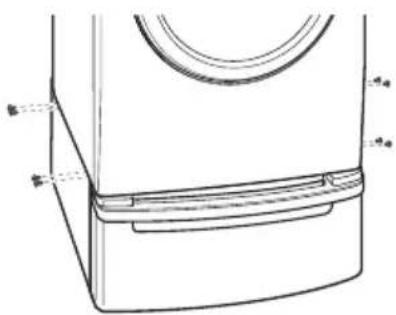
for dryer for washer/ combo for dryer for dryer for washer/ combo4 Make sure the holes on the pedestal align with the holes in the appliance, then install 2 screws at each corner to securely attach the appliance to the pedestal.
NOTE
If the screws are not installed properly, noise and vibration may result.
natural_image
Technical line drawing of a front-mounted refrigerator with lid and side panel (no text or symbols)5 Move the dryer to the desired place.
NOTE
The appliance and pedestal assembly must be placed on a solid and level floor for proper operation. Adjust the legs of the appliance and pedestal by turning with a wrench. Then, adjust the lock unt toward the pedestal while holding the pedestal leg using a wrench.
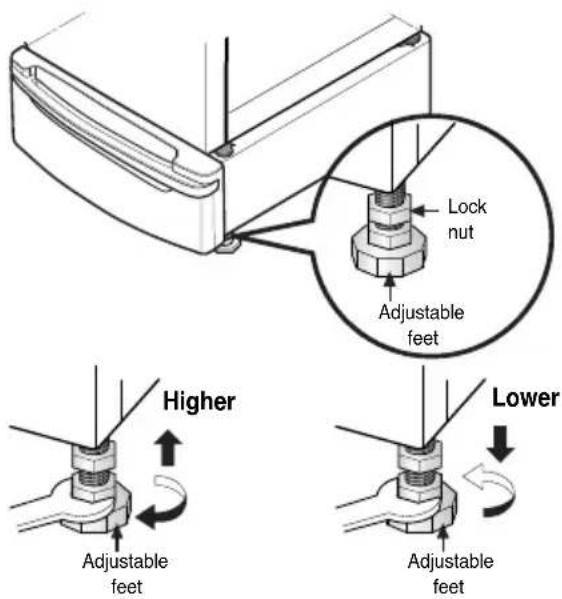
text_image
Lock nut Adjustable feet Higher Lower Adjustable feet Adjustable feetLG Electronics Inc., Will repair or at its option replace, without charge, your product if it proves to be defective material or workmanship under normal use during the warranty period set forth below, effective from the date of original consumer purchase of the product. This limited warranty is good only to the original purchaser of the product and effective only when used in the United states including Alaska, Hawaii, and U.S. Territories; and Canada.
| WARRANTY PERIOD:1Year from the Date of Purchase. | HOW SERVICE IS HANDLED:Call 1-800-243-0000 (USA) or 1-888-LGCANADA and choose the appropriate prompt. Please have product type, model number, serial number, and ZIP code ready. |
THIS WARRANTY IS IN LIEU OF ANY OTHER WARRANTIES, EXPRESS OR IMPLIED, INCLUDING WITHOUT LIMITATION, ANY WARRANTY OF MERCHANTABILITY OR FITNESS FOR A PARTICULAR PURPOSE. TO THE EXTENT ANY IMPLIED WARRANTY IS REQUIRED BY LAW, IT IS LIMITED IN DURATION TO THE EXPRESS WARRANTY PERIOD ABOVE. LG WILL NOT BE LIABLE FOR ANY CONSEQUENTIAL, INDIRECT, OR INCIDENTAL DAMAGES OF ANY KIND, INCLUDING LOST REVENUSE OR PROFITS, IN CONNECTION WITH THE PRODUCT.
SOME STATES DO NOT ALLOW LIMITATION ON HOW LONG AN IMPLIED WARRANTY LASTS OR THE EXCLUSION OF INCIDENTAL OR CONSEQUENTIAL DAMAGES, SO THE ABOVE LIMITATIONS OR EXCLUSIONS MAY NOT APPLY TO YOU.
THIS LIMITED WARRANTY DOES NOT APPLY TO:
- Service trips to your home to deliver, pick up, and/or install the product, instruct, or replace house fuses or correct wiring, or correction of unauthorized repairs; and
- Damages or operating problems that result from misuse, abuse, operation outside environmental specifications or contrary to the requirements or precautions in the Operating Guide, accident, vermin, fire, flood, improper installation, acts of God, unauthorized modification or alteration, incorrect electrical current or voltage, or commercial use, or use for other than intended purpose.
- Therefore, the cost of repair or replacement of such a defective product shall be borne by the consumer.
CUSTOMER INTER-ACTIVE CENTER NUMBERS:
| To Prove Warranty Coverage | Retain your Sales Receipt to prove date of purchase.A copy of your Sales Receipt must be submitted at the time warranty service is provided. |
| To Obtain Nearest Authorized Service Center or Sales Dealer, or to Obtain Product,Customer, or Service Assistance | Call 1-800-243-0000 or 1-888-LGCANADA and choose the appropriate prompt from the menu, and have your product type, model number, serial number, and ZIP Code; or visit our website athttp://www.lgservice.com |
natural_image
Two diagrams showing a valve with a prohibition symbol, one above and one below, against a background of scattered debris (no text or symbols)natural_image
Two technical illustrations of a bolt and nut assembly, showing no text or symbols (no readable labels or symbols)natural_image
Four technical diagrams showing mechanical assembly with no visible text or symbolstext_image
Technical diagram showing a mechanical assembly with labeled parts and an inset magnified view of a bracket detail.natural_image
Technical line drawing of a mechanical component with a circular annotation highlighting a specific feature (no text or symbols present)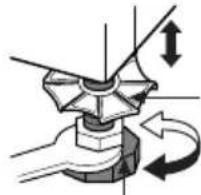
natural_image
Mechanical diagram showing a rotating component with directional arrows indicating motion (no text or symbols)natural_image
Mechanical assembly diagram showing a bolt and nut assembly with directional arrows indicating motion (no text or labels)natural_image
Illustration of a white washing machine with black arrows pointing to its top panel (no text or symbols)REMARQUE
Verification diagonale
natural_image
Line drawing of a washing machine front panel with handle and side panel (no text or symbols)CETTE GARANTIE LIMITÉE NE S'APPLIQUE PAS:
natural_image
Simple line drawing of a mechanical bracket with a circular symbol (no text or labels)natural_image
Two diagrams showing a valve with a prohibition symbol, one above and one below, against a background of debris (no text or symbols)natural_image
Two technical illustrations of a bolt and nut assembly, showing no text or symbols (no readable text or labels)4 Coloque la lavadora/combo encima del pedestal.
NOTA
natural_image
Four technical diagrams showing a bolt and nut assembly with no text or symbols, including prohibition signs (no readable text or labels)text_image
Technical diagram showing a mechanical assembly with labeled parts and an inset close-up of a component detail.natural_image
Illustration of a white washing machine with three downward arrows indicating force or pressure points (no text or symbols)NOTA
Verificacion Diagonal
2 Insert the T-clip of the 4 retainers into the dryer base as shown. Press up on the back of the clip and pull outward to lock into place.
natural_image
Technical line drawing of a front-loading washing machine (no text or symbols)text_image
25.4" (64.5cm) 18.4" (46.7 cm) 3" (7.7cm) 27" (68.6cm) 13.6" (34.5cm)text_image
25.4" (64.5 cm) 27" (68.6 cm) 18.7" (47.5 cm) 2.86" (7 cm) 7.24" (18.4 cm)*Specifications are subject to change by manufacturer.
*Las especificaciones son sujetas a cambio por el fabricante
*Données techniques sujettes à changement sans préavis

MEMO

LG Electronics Inc.
P/No.: 3828ER4001L