
V533 - Tablet LG - Free user manual and instructions
Find the device manual for free V533 LG in PDF.
| Product type | Tablet |
| Brand | LG |
| Model | V533 |
| Display | Capacitive touchscreen, compatible with reading mode reducing blue light |
| Front camera | Front camera with gesture shot and automatic selfie |
| Rear camera | Rear camera with HDR, timer, voice trigger |
| Connectivity | Wi-Fi 802.11 a/b/g/n/ac, Bluetooth 4.2, GPS, NFC (depending on region) |
| Special features | KnockON, Knock Code, Capture+, QSlide, Multi-window, Reading mode |
| Power | Integrated rechargeable lithium-ion battery, supplied mains charger (5V/1.2A typical) |
| Storage | Internal storage (32 GB depending on model), expansion via microSD card up to 2 TB |
| SIM | Nano-SIM (cellular model) |
| Operating system | Android (version according to update) |
| Sensors | Accelerometer, proximity sensor, ambient light sensor |
| Audio | Built-in speaker, 3.5mm headphone jack, stereo speaker via optional Plus Pack |
| Care and cleaning | Clean the lens with a microfiber cloth; avoid exposure to water and liquids |
| Safety | Body SAR: 1.07 W/kg; FCC/ISEDC compliance; use authentic LG accessories |
| Repairability | Non-removable battery; repairs only by an authorized LG service center |
| Included accessories | Quick start guide, USB cable, charger |
| Available options | Plus Pack (additional speaker and battery), sold separately |
Frequently Asked Questions - V533 LG
User questions about V533 LG
0 question about this device. Answer the ones you know or ask your own.
Ask a new question about this device
Download the instructions for your Tablet in PDF format for free! Find your manual V533 - LG and take your electronic device back in hand. On this page are published all the documents necessary for the use of your device. V533 by LG.
USER MANUAL V533 LG
text_image
USER GUIDE LG G Pad IV8.0 FHD LG-V533About This User Guide
Thank you for choosing LG. Please carefully read this user guide before using the device for the first time to ensure safe and proper use.
• Always use genuine LG accessories. The supplied items are designed only for this device and may not be compatible with other devices.
- This device is not suitable for people who have a visual impairment due to the touchscreen keyboard.
• Descriptions are based on the device default settings.
- Default apps on the device are subject to updates and support for these apps may be withdrawn without prior notice. If you have any questions about an app provided with the device, please contact a LG Service centre. For user-installed apps, please contact the relevant service provider.
- Modifying the device's operating system or installing software from unofficial sources may damage the device and lead to data corruption or data loss. Such actions will violate your LG license agreement and avoid your warranty.
- Some contents and illustrations may differ from your device depending on the region, service provider, software version, or OS version, and are subject to change without prior notice.
- Software, audio, wallpaper, images, and other media supplied with your device are licensed for limited use. If you extract and use these materials for commercial or other purposes, you may be infringing copyright laws. As a user, you are fully are entirely responsible for the illegal use of media.
• Additional charges may apply for data services, such as messaging, uploading, downloading, auto-syncing and location services. To avoid additional charges, select a data plan suitable to your needs. Contact your service provider to obtain additional details.
Instructional Notices

WARNING: Situations that could cause injury to the user and third parties.

CAUTION: Situations that may cause minor injury or damage to the device.

NOTE: Notices or additional information.
Table of Contents
01
Custom-designed Features
6 Comfort View
7 Gesture Shot
8 KnockON
9 Knock Code
10 Multi-tasking Feature
11 Capture+
13 QSlide
02
Basic Functions
15 Product components and accessories
16 Device Overview
19 Plus Pack Overview (optional sold separately)
21 Attaching the Tablet to the Plus Pack
22 Adjusting the Stand for Typing
23 Detaching the Tablet from the Plus Pack
23 Charging the Battery
26 Connecting a USB Device to Your Tablet
27 Installing the SIM Card or microSD Card
29 Removing the Memory Card
30 Touch Screen
33 Home Screen
40 Locking and Unlocking the Device
41 On-screen Keyboard
42 Connecting to Networks and Devices
48 Google Account Setup
49 Installing and uninstalling apps
50 App trash
03
Useful Apps
52 Contacts
54 Messaging
55 Email
57 Camera and Video
67 Music
68 Clock
69 Calculator
69 Calendar
70 Tasks
71 Audio Recorder
72 File Manager
72 Downloads
72 LG Mobile Switch
73 Google Apps
04
Settings
76 Settings
77 WIRELESS NETWORKS
79 DEVICE
84 PERSONAL
87 SYSTEM
05
Appendix
91 LG Language Settings
91 Software Update
92 FAQ
93 Anti-Theft Guide
94 More Information
06
For Your Safety
07
Safety Guidelines
01
Custom-designed Features
Comfort View
This feature reduces the amount of blue light on the screen to reduce eye strain.
Turning the Comfort View On/Off
- Slide the Status bar downward, tap√, then tap /.
OR
- Tap > Display > Comfort view, and then tap / ON.
Adjust the Blue Light Filter
1 Tap > > Display > Comfort view.
2 Select the desired blue light filter setting.
Gesture Shot
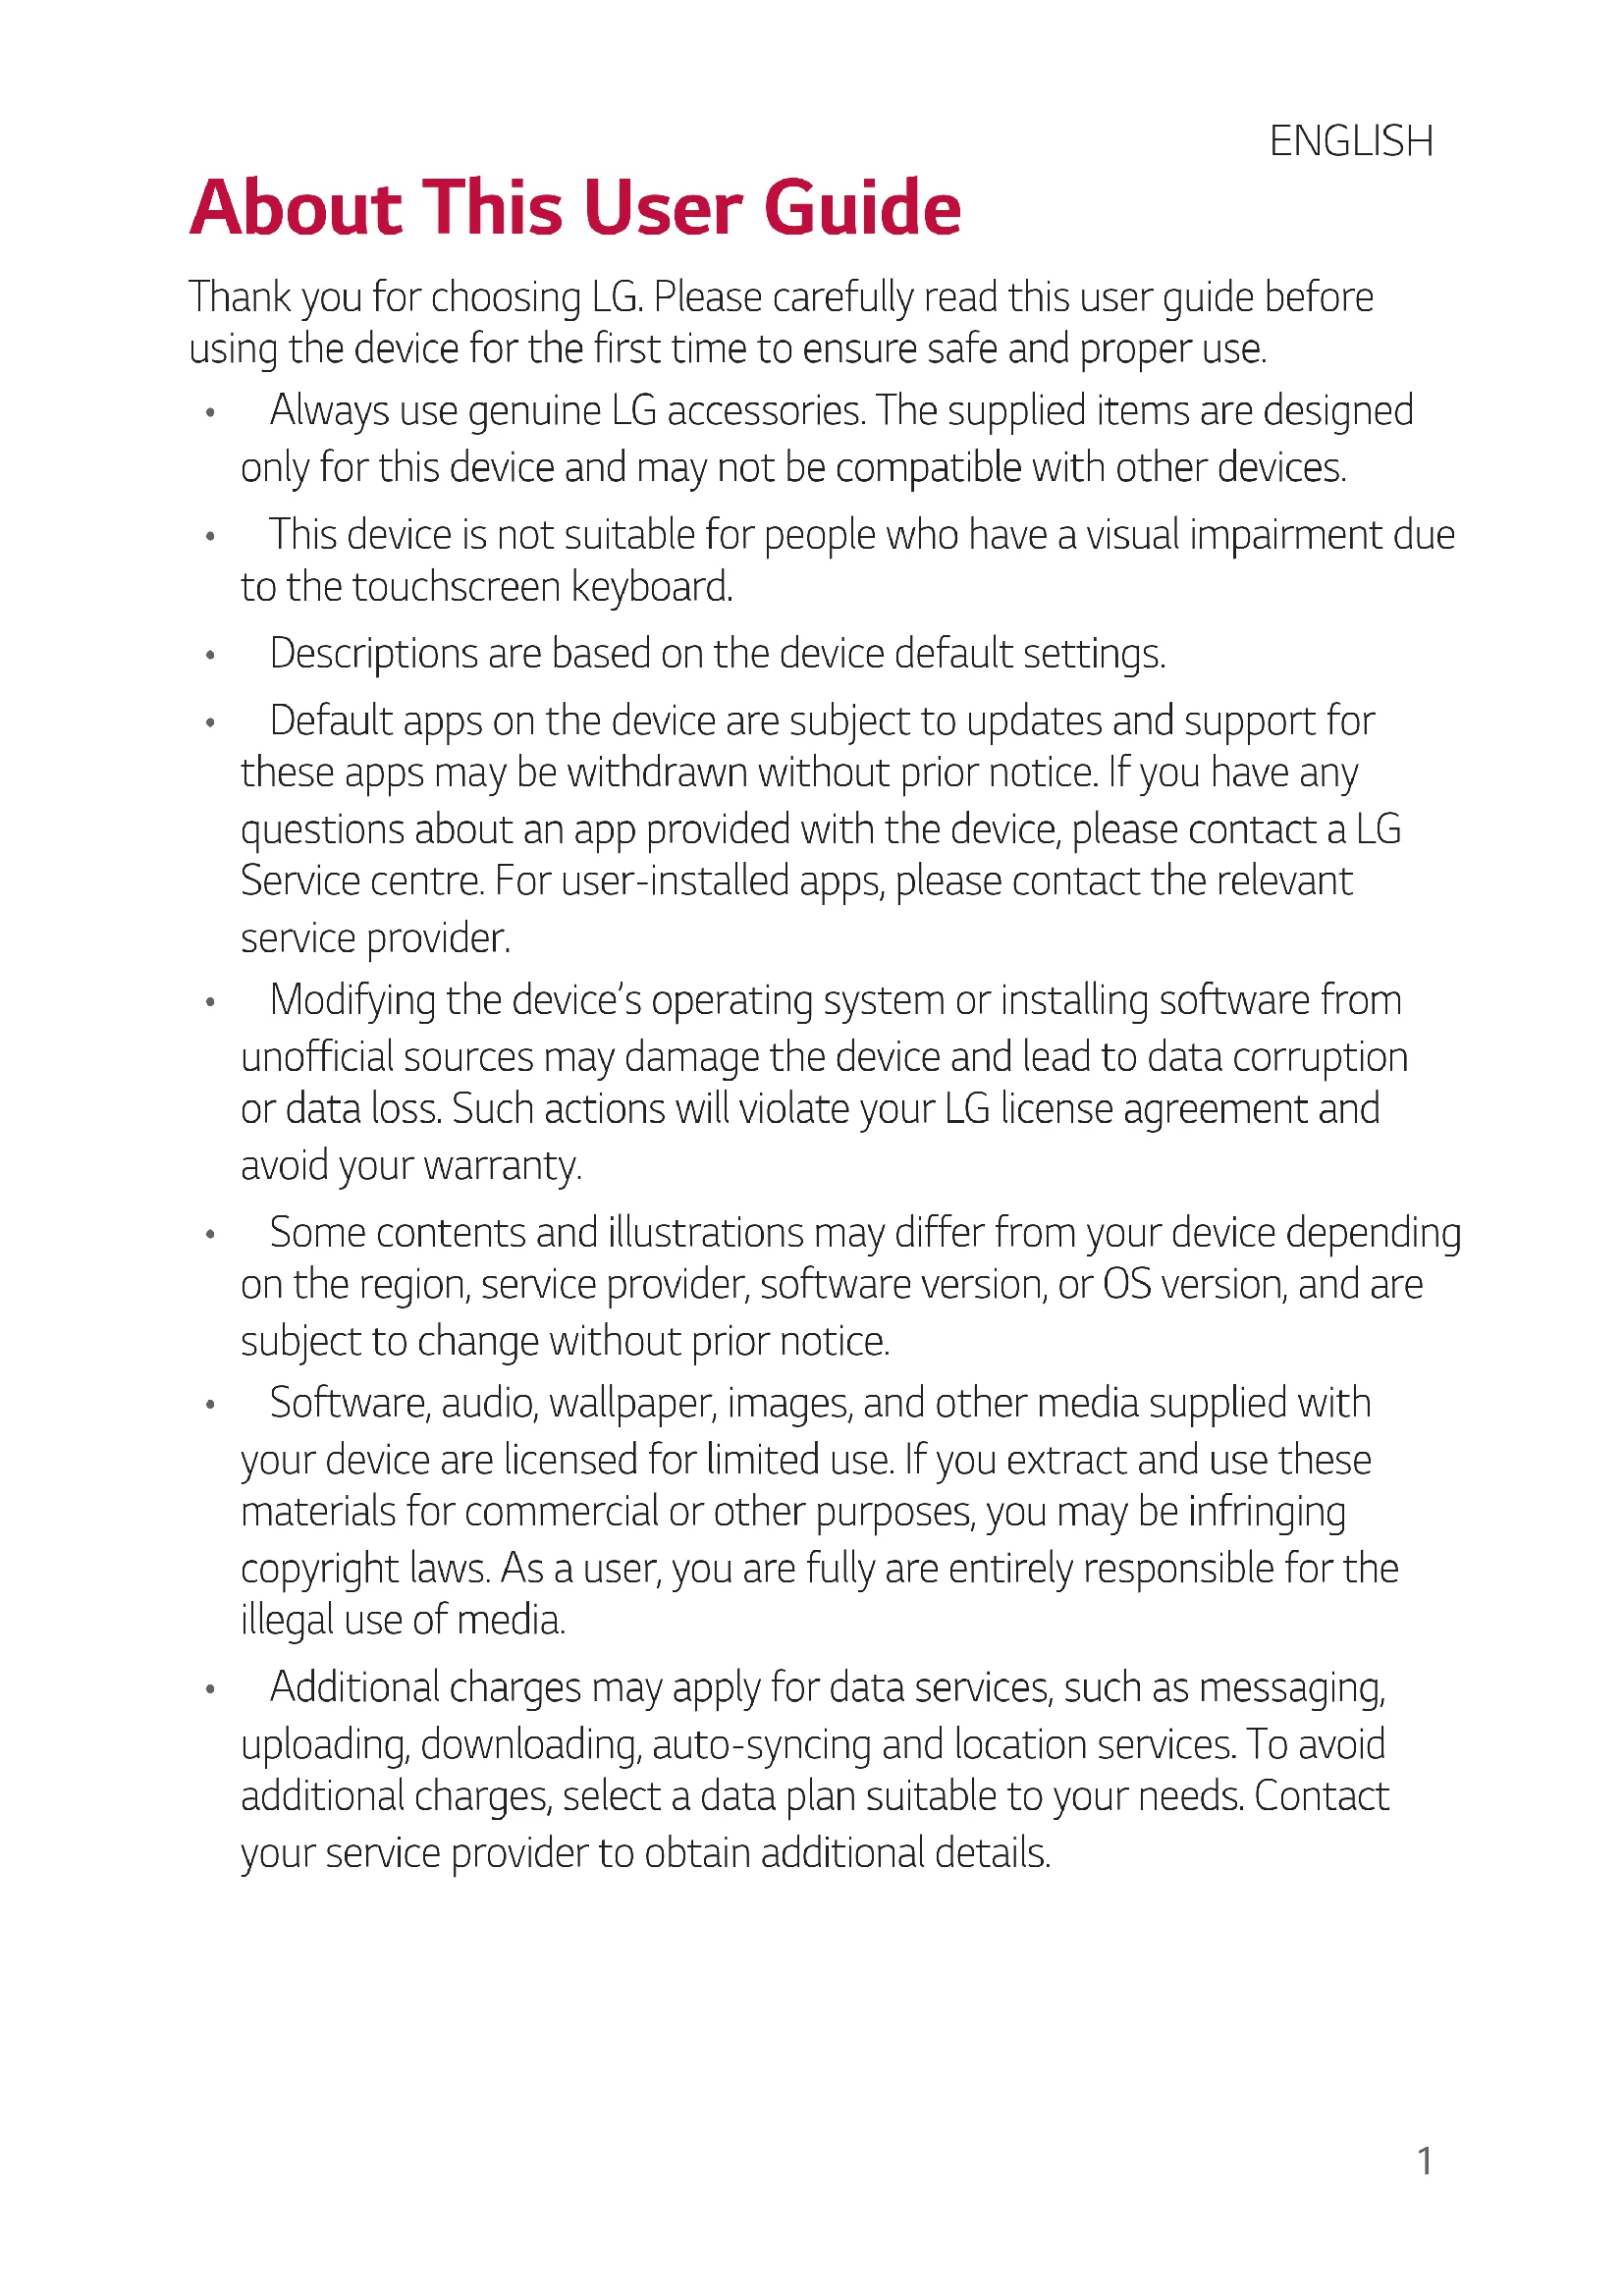
The Gesture shot feature allows you to take a picture with a hand gesture using the front camera.
To Take a Photo
There are two methods for using the Gesture shot feature.
- Raise your hand, with an open palm, until the front camera detects it and a box appears on the screen. Then close your hand into a fist to start the timer, allowing you time to get ready.
OR
- Raise your hand, in a clenched fist, until the front camera detects it and a box appears on the screen. Then unclench your fist to start the timer, allowing you time to get ready.
text_image
Illustration showing a hand holding a smartphone displaying a fingerprint, and demonstrating the right-hand rule for index finger manipulation.KnockON
The KnockON feature allows you to double-tap the screen to easily turn it on or off.
Turning the Screen On
While the screen is off, quickly double-tap the centre of the screen to turn on the backlight and display the Lock screen.
Turning the Screen Off
Quickly double-tap the Status bar, an empty area on the Home screen, or the Lock screen to turn the screen off.

- Tap on the centre area of the screen. If you tap on the bottom or the top area, the recognition rate may decrease.
Knock Code
The Knock Code feature allows you to create your own unlock code using a combination of knocks on the screen. You can access the Home screen directly when the screen is off by tapping the same sequence on the screen.

• You can use your Knock Code together with the KnockOn feature.
• Make sure to use your fingertip when tapping the screen.
Setting Up the Knock Code Feature
1 Tap ○ > Display > Lock screen > Select screen lock > Knock Code.
2 Tap the squares in a pattern to set your Knock Code. Your Knock Code pattern can be 6 to 10 taps.
Unlocking the Acreen Using the Knock Code
When the screen is off, you can unlock it by tapping the Knock Code pattern you've previously set.
Multi-tasking Feature
Multi-window
You can use two apps at the same time by separating the screen into multiple windows.
While using an app, touch and hold □ from the Home touch buttons, then select an app from the recently-used apps list.
• You can use two apps at the same time.
• To stop the Multi-Window feature, touch and hold.

text_image
7:00 +
- The Multi-Window feature is not supported by some apps, including downloaded apps.
Overview Screen
The Overview screen provides a preview of your recently-used apps.
To view the list of recently-used apps, tap □ on the Home touch buttons.
- Touch and hold an app and drag it to the top of the screen to start the app with the Multi-Window feature. You can also tap ☐ at the top of each app preview.
Capture+
The Capture+ feature allows you to create memos.
Using Capture+
You can use Capture+ function to easily and efficiently create memos with a saved picture or on the current device screen.
1 Slide the Status bar downward and tap
2 Create a memo using the following options:
| √ | Tap to save the memo you've created. |
| ← | Tap to undo the most recent action. |
| → | Tap to redo the most recently deleted action. |
| T | Tap to insert text into your memo. |
| Tap to select the pen type and colour. | |
| Tap to crop the image of memo. | |
| ⋮ | Tap to share the memo or change the background paper style. |
| Tap to hide or display the toolbar. |

- Please use a fingertip while using the Capture+ feature. Do not use your fingernail.
3 Tap √ to save the current memo to the QuickMemo+ or the Gallery.
Viewing the Saved Memo
Tap ➤ and select the Capture+ album.
OR
Tap ○ > and select the desired memo.
QSlide
You can display several apps simultaneously on the same screen and freely switch between them.
Using QSlide
1 When an app is running, tap : > QSlide.
2 The app switches to the QSlide mode. The following options are available.
| [] | Switch to full-screen mode. |
| - | Adjust the opacity of the QSlide window. If the window is transparent, you can interact with the background. |
| × | Close the QSlide window. |
| Adjust the size of the QSlide window. |

• QSlide can support up to two windows at the same time.
• This feature may not be supported by some apps.
02
Basic Functions
Product components and accessories
The following items are included with your device.
- Device
- Quick Start Guide
- USB cable
- Charger

- The items supplied with the device and any available accessories may vary depending on the area and service provider.
• Always use genuine LG Electronics accessories. Using accessories made by other manufacturers may affect your device's call performance or cause malfunctions. This may not be covered by LG's repair service.

- If any of these basic items are missing, contact the dealer from which you purchased your device.
- To purchase additional basic items, contact an LG Customer Service Centre.
- To purchase optional items, contact an LG Customer Service Centre for available dealers.
• Some items in the product box are subject to change without notice. - The appearance and specifications of your device are subject to change without notice.
• Device specifications may vary depending on the area or service provider. - Be sure to use authentic accessories provided by LG Electronics. Using third-party accessories may damage the device or cause malfunctions.
Device Overview
Front View
text_image
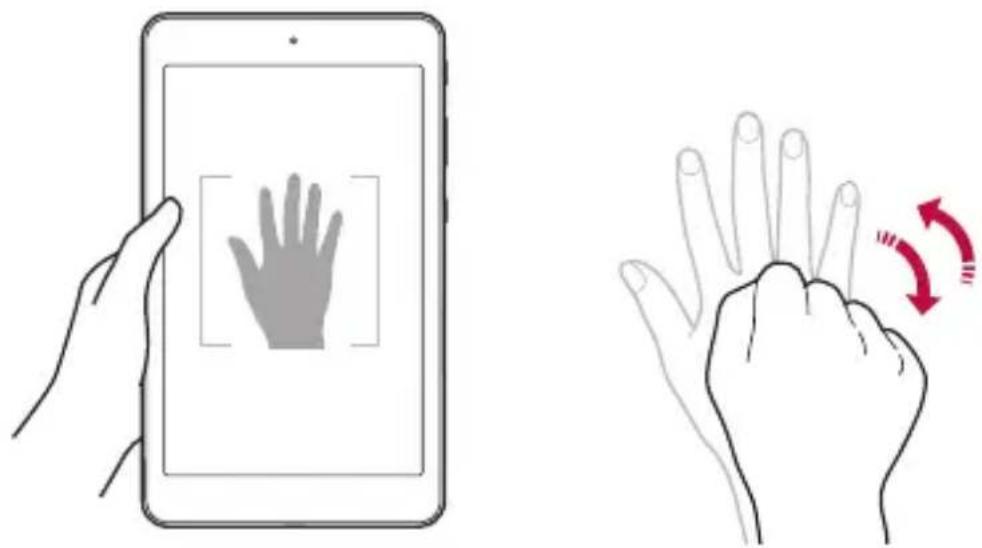
Headphone jack Speaker Front-facing camera Power/Lock key Volume keys QuickButton Microphone Charger/USB cable portBack View

text_image
Rear-facing camera SIM card/ microSD card tray Connecting terminals| Headphone jack | Allows you to plug in an optional headset for convenient, hands-free conversations. You can also plug in headphones to listen to music. |
| Speaker | Use to listen to the audio from the selected function (e.g., music, videos, sound clips, etc.). |
| Front-facing camera | Use to take pictures and record videos of yourself. You can also use this for video chatting. Keep it clean for optimal performance. |
| Power/Lock key | Press to lock/unlock the screen. Press and hold to turn the tablet on/off, restart, or activate/deactivate airplane mode. |
| Volume keys | While the screen is off:Press the Volume Up Key twice to launch Capture+.Press the Volume Down Key twice to launch the Camera.On the Home screen:Control ringer volume.During a call:Control your earpiece volume.When playing audio/video:Control volume continuously. |
| QuickButton | Press to launch an app. Press and hold to change the app you wish to get quick access to. |
| Microphone | Records your voice and allows use for voice-activated functions. |
| Charger/USB cable port | Allows you to connect the tablet and the USB cable for use with the charger adapter, your PC, or other compatible accessories. |
| Rear-facing camera | Use to take photos and record videos. Keep it clean for optimal performance. |
| SIM card/microSD card tray | Allows you to insert your SIM card and a microSD card. |
| Connecting terminals | Attach the Plus Pack (optional) matching the terminals. |
Plus Pack Overview (optional sold separately)
The Plus Pack is a portable speaker and battery pack designed for the LG G Pad IV 8.0 FHD tablet.
When attached to the tablet and turned on, you can listen to the tablet's sound through the Plus Pack and charge the tablet at the same time.

text_image
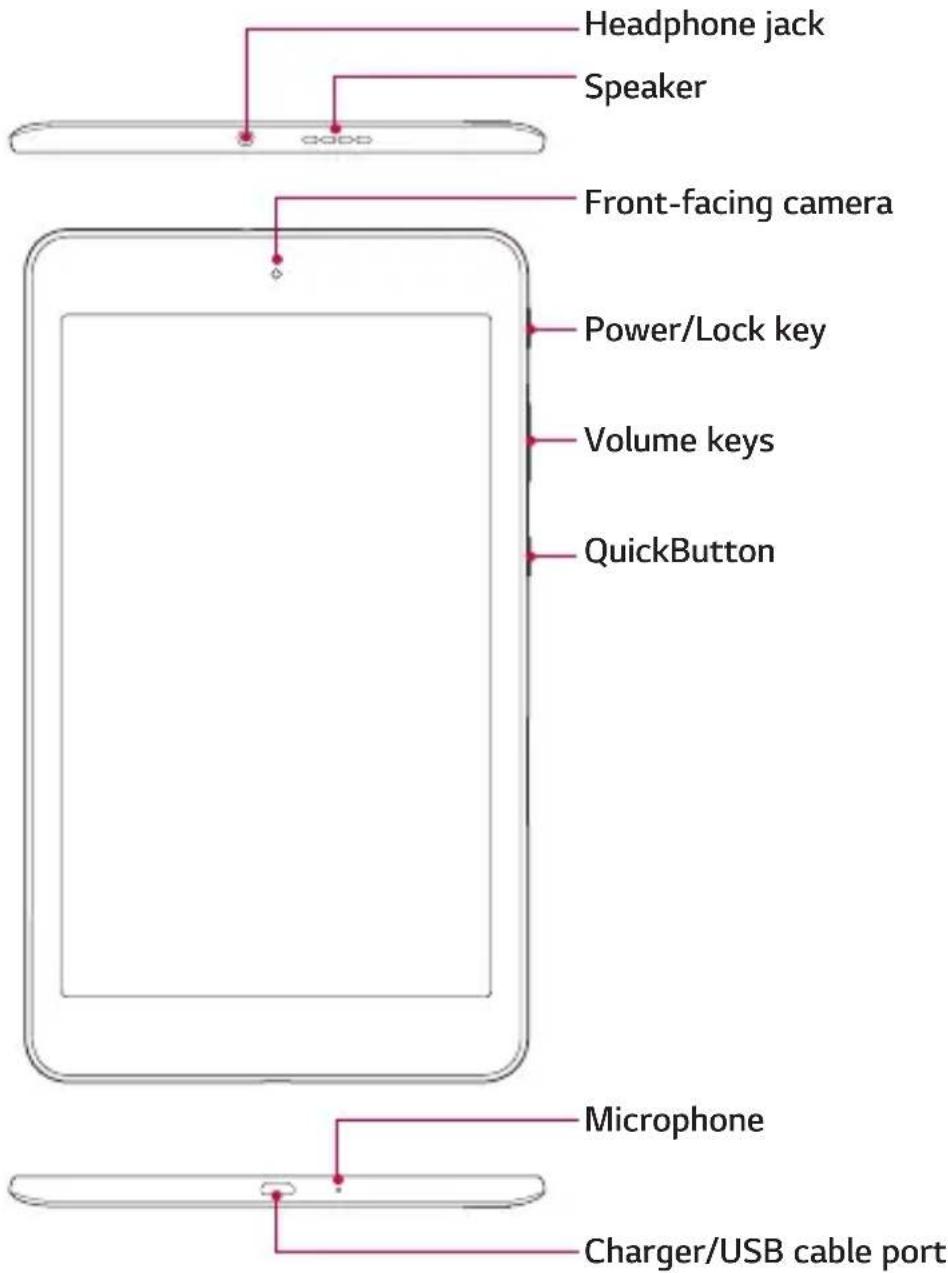
Diagram of a device rear panel with numbered labels pointing to internal components1 PowerButton
Press to turn on. Press and hold to turn off.
When the tablet is attached, it will automatically turn on. Press and hold for about 2 seconds to turn off.

• Do not detach the Plus Pack while playing music or videos.
• If the tablet is detached, the Plus Pack will automatically turn off.
- If no device is connected to the Plus Pack for 15 sec, the Plus Pack will automatically turn off.
2 LED Indicator
Indicates the charging status and battery level. It is red while charging and turns green when charging is completed.
| LED Indicator Battery Level (%) | |
| Green 40~100 | |
| Orange 15~40 | |
| Red 5~15 | |
| Red blinking 0~5 | |
3 USB Type-B Port (micro USB cable port)
Connect a cable to charge the Plus Pack alone or the Plus Pack and the tablet together (when they are attached).
4 USB Type-A Port (Output 2) (USB Peripheral Port)
Plug a USB Type-A cable into the port to connect OTG devices (such as a keyboard) or charge other devices.
5 Connecting Terminals (Output 1)
Attach the tablet by lining up the terminals, making sure that magnets on the Plus Pack are aligned properly with those of the tablet.
natural_image
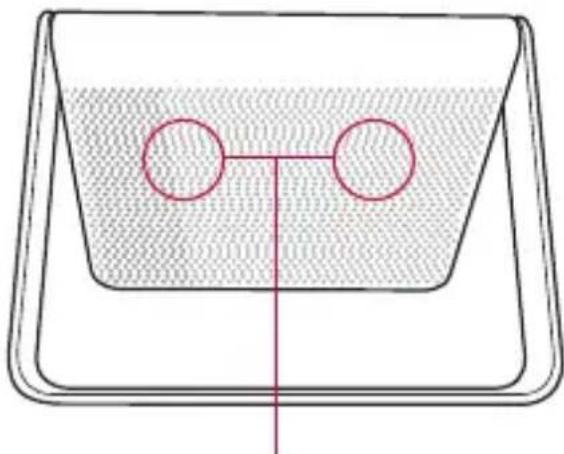
Simple line drawing of a container with two circular holes, no text or symbols presentStereo Speakers

- When you connect another device to charge using a USB cable without the tablet attached, charging will start after about 4 seconds once the device checks the output mode.
- To perform a reset of the Plus Pack, simply press and hold the Power button for about 8 seconds.

- Be careful not to spill food or liquids on the charging terminals of both the tablet and the Plus Pack. It can cause malfunctions.
- Risk of fire and burns. Do NOT open, crush, heat above 60°C/140°F or incinerate. Violation of the instructions may cause minor or serious damage to the product.
Attaching the Tablet to the Plus Pack
1 Simply line up the charging terminals on the tablet and the Plus Pack, making sure that magnets on the Plus Pack are aligned properly with those of the tablet.

natural_image
Diagram of a tablet device showing the internal structure and cable insertion process, with no text or symbols present.2 Adjust the angle of the stand holding both the tablet and the Plus Pack securely as shown below.

natural_image
Illustration of hands holding a smartphone with a red upward arrow on the screen (no text or symbols)
- They are connected by magnets. If you grab the stand alone, the Plus Pack might be separated from the tablet and the tablet might be dropped.

• Do not detach the Plus Pack while playing music or a video.
- Every time you attach or detach the Plus Pack, it is recommended that you calibrate the motion sensor. Simply hold the tablet and tilt it around making an 8 shape.
- When the tablet is attached to the Plus Pack, all the sound will come through the speaker of the Plus Pack, except for calls using VoIP.
Adjusting the Stand for Typing
When adjusting the stand, make sure that the angle is no wider than 120^ with the tablet attached. If it is wider than that, the stand might fall.

text_image
120°Detaching the Tablet from the Plus Pack
Detach the tablet holding both the tablet and the Plus Pack firmly as shown below.

natural_image
Line drawing of hands holding a tablet and a cup (no text or symbols)Charging the Battery
You can charge your tablet's battery using the included AC adapter.
Charging the Tablet
The Charger/USB cable port is located at the bottom of the device. Insert the charger and plug it into a power outlet.

natural_image
Illustration of a tablet connected to a cable with a magnified inset showing the cable being inserted (no text or symbols present)Charge the battery before using it for first time. Use the charger included with your device to charge the battery. A computer can also be used to charge the battery by connecting the device to it using the USB cable.

- Use only LG-approved chargers and cables. The use of unapproved chargers or cables may cause a battery charging delay or display a pop-up message regarding slow charging. It can also cause the battery to explode or damage the device, which is not covered by the warranty.

- Your device has an internal rechargeable battery. For your safety, do not remove the embedded battery.
• The battery must be fully charged initially to improve battery lifetime. - Remove the charger from the power socket after the device is fully charged. This prevents unnecessary power consumption.

- To perform a soft reset of your device A soft reset may be used to reset the device if the screen freezes, or the buttons, touch screen, or device are no longer responding. Simply press & hold the Volume down and Power/Lock keys until the device restarts.
Charging the Plus Pack
Plug the USB cable into the micro USB cable port (USB Type-B port) on the Plus Pack. The LED indicator turns green when the battery is fully charged.

text_image
LED IndicatorBasic Functions 24
Charging the Tablet While It's Attached to the Plus Pack
To charge the tablet and the Plus Pack at the same time, plug the USB cable into the micro USB cable port on the Plus Pack while it's attached to the tablet. When both are fully charged, the LED indicator on the Plus Pack turns green and "Battery fully charged" appears on the tablet.

text_image
LED Indicator
• Always unplug the charger from the wall socket after the device is fully charged to save unnecessary power consumption of the charger.
Using the Battery Efficiently
Battery lifespan may decrease if you keep many apps and functions running simultaneously and continuously.
Stop apps and functions from running in the background to increase battery life.
To minimize battery consumption, follow these tips:
- Turn off the Bluetooth® or Wi-Fi network function when not using them.
• Set the screen timeout to as short a time as possible.
- Minimize the screen brightness.
- Set a screen lock when the device is not in use.
- Check the battery usage details and close any downloaded apps that are draining the battery.
Connecting a USB Device to Your Tablet
Use the Plus Pack to connect a USB peripheral device.
1 Attach the tablet to the Plus Pack by matching the charging terminals.
2 Plug in the USB cable into a USB peripheral device.
3 Insert the other end of the USB cable into the USB peripheral port (Type-A port) located on the side of the Plus Pack.

natural_image
Illustration of a device being inserted into a tablet stand, showing cable and connector (no text or symbols)Some of the USB devices supported through the USB cable port include a keyboard, mouse, game controller, digital camera, and storage device (including an Android smartphone acting as external storage device). As most USB keyboards, mouse and game controllers are designed for desktop computers and operation systems, some devices may not function.

• Make sure all the USB cables are removed from the Plus Pack before folding the stand back.

- Only devices that meet the USB specs may connect to the USB peripheral port.
- If you are experiencing errors with device recognition, please use a shorter USB cable or check the USB Hub with external power supply (Self-Powered Hub).
- Only file systems such as FAT32, exFAT, and NTFS are supported for the external USB storage device.
- Transferring data through both USB devices at the same time is not supported. The first device that is connected has priority. The USB device connected second can only be charged.

- You cannot store data in the USB storage when the battery level is below 15%. Please charge the battery above 15% in order to use the USB storage function.
Installing the SIM Card or microSD Card
Before you can start exploring your new device, you need to set it up. Your device supports the use of microSD memory cards of up to 2TB capacity. Multimedia contents can be saved in the microSD card.
1 Pull out the card tray using the fingertip cutout.

natural_image
Line drawing of a tablet device with a red arrow pointing to its side panel (no text or symbols)2 Put the Nano-SIM card and a microSD card (optional) on the card tray, then slide the card tray into the slot as shown in the figure on the next page. Make sure the gold contact area on the card is facing downward.

text_image
Nano-SIM microSD card (optional-sold separately)
• This device supports only Nano SIM cards.
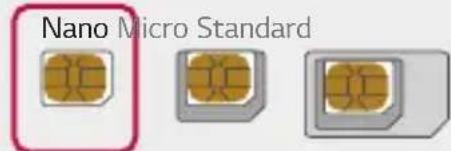
text_image
Nano Micro Standard- For problem-free performance, it is recommended to use the phone with the correct type of SIM card. Always use a factory-made SIM card supplied by the service provider.
- Do not lose your SIM card. LG is not responsible for damage and other issues caused by loss or transfer of a SIM card.
- Be careful not to damage the SIM card when you insert or remove it.
• Cards must be positioned as shown. - Do not pull out the card tray from the tablet when the tablet is turned over. The SIM card (and the microSD card) will fall off and might be lost.
• microSD card is not included. - Depending on the memory card manufacturer and type, some memory cards may not be compatible with your device.

- Some memory cards may not be fully compatible with the device. If you use an incompatible card, it may damage the device or the memory card, or corrupt the data stored in it.
Precautions when using the SIM card
- Do not lose your SIM card. LG is not responsible for damage and other issues caused by loss or transfer of a SIM card.
- Be careful not to damage the SIM card when you insert or remove it.
Removing the Memory Card
Before removing the memory card, first unmount it for safe removal.
1 Tap > > Storage > .

2 Pull out the card tray and remove the memory card.

- Do not remove the memory card while the device is transferring or accessing information. Doing so can cause data to be lost or corrupted or damage to the memory card or device. LG is not responsible for losses that result from the misuse of damaged memory cards, including the loss of data.
Touch Screen
You can familiarize yourself with how to control your device by using touch screen gestures.
Tapping
Lightly tap with your fingertip to select or run an app or option.

natural_image
Hand pointing at a circular button on a plain background (no text or symbols)Touching and holding
Touch and hold for several seconds to display a menu with available options.

natural_image
Hand pressing a red circular button on a gray background (no text or symbols)Double-tapping
Tap twice quickly to zoom in or out on a web page or map.

natural_image
Hand pointing at a red circular button on a gray background (no text or symbols)Dragging
Touch and hold an item, such as an app or widget, then move your finger to a desired location in a controlled motion. You can use this gesture to move an item.

natural_image
Hand pointing at a button with bidirectional arrows (no text or symbols)Swiping
Touch the screen with your finger and move it quickly without pausing. You can use this gesture to scroll through a list, a web page, photos, screens, and more.

text_image
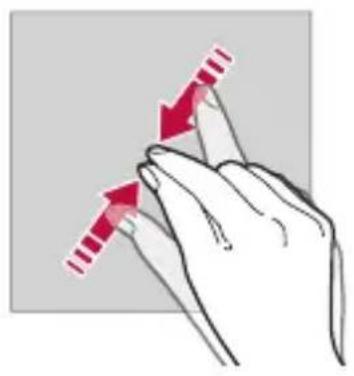
Illustration showing finger pressing a button with red arrow indicating right-hand movementPinching and spreading
Pinch two fingers to zoom out such as on a photo or map. To zoom in, spread your fingers apart.
natural_image
Illustration of a hand with two red arrows indicating movement or force direction (no text or symbols)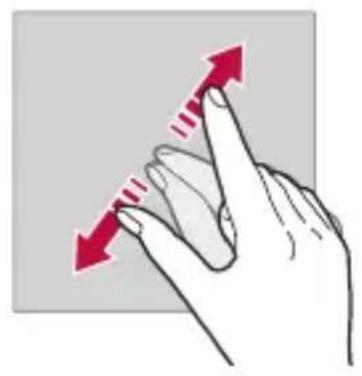
natural_image
Hand with finger pointing upward and red arrow indicating direction (no text or symbols)
- Do not expose the touch screen to excessive physical shock. You might damage the touch sensor.

- A touch screen failure may occur if you use the device near a magnetic, metallic or conductive material.
- If you use the device under bright lights, such as direct sunlight, the screen may not be visible, depending on your position. Use the device in a shady location or a location with an ambient light that is not too bright and bright enough to read books.
• Do not press the screen with excessive force.
• Gently tap with your fingertip on the option you want.
- The touch control may not work properly if you tap while wearing a glove or by using the tip of your fingernail.
- Touch control may not work properly if the screen is moist or wet.
- The touch screen may not function properly if a screen-protective film or accessory purchased from a third party store is attached to the device.
- Displaying a static image for extended periods of time may result in afterimages or screen burn-in. Turn off the screen or avoid displaying the same image for a long time when you do not use the device.
Home Screen
Home Screen Overview
The Home screen is the starting point for accessing various functions and apps on your device. Tap ○ on any screen to directly go to the Home screen.
You can manage all apps and widgets on the Home screen. Swipe the screen left or right to view all installed apps at a glance.
Home Screen Layout
You can view all apps and organize widgets and folders on the Home screen.
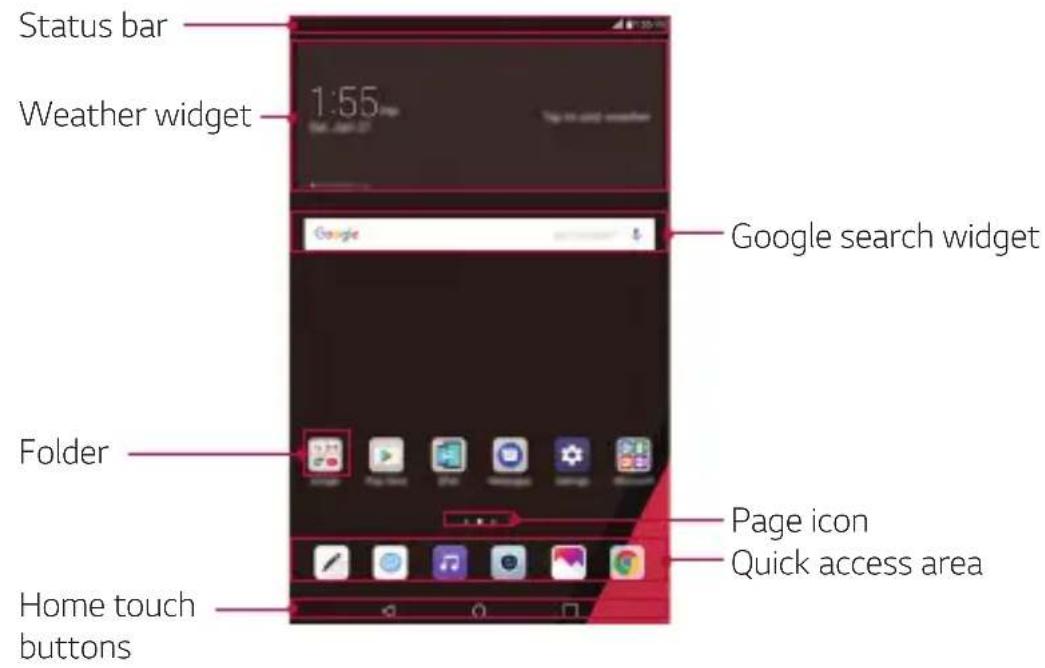
text_image
Status bar Weather widget 1:55 Google search widget Folder Page icon Quick access area Home touch buttons
- The Home screen may vary, depending on the service provider or software version.
- Status bar: View status icons, the time and the battery level.
- Weather widget: View the weather information and time for a specific area.
- Google search widget: Perform a Google search by inputting spoken or written keywords.
- Folder: Create folders to group apps by your preferences.
- Page icon: Display the total number of Home screen canvases. Tap the desired page icon to go to the page you selected. The icon reflecting the current canvas will be highlighted.
- Quick access area: Fix main apps at the bottom of the screen so that they can be accessed from any Home screen canvas.
• Home touch buttons
- ◀: Return to the previous screen. Close the keypad or pop-up windows.
- ○: Tap to go to the Home screen. To launch Google search, touch and hold.
- □: Tap to view a list of recently used apps or run an app from the list. To delete all the recently used apps, tap CLEAR ALL. To use two apps at the same time with the Multi-Window feature, touch and hold the button while using an app.
Editing the Home Touch Buttons
You can rearrange the Home touch buttons or add frequently used functions to the Home touch buttons area.
Tap ○ > 🎯 > Display > Home touch buttons > Button combination and customize the settings.
• Several functions, including QSlide, Notification panel and Capture+, are provided. A maximum of two items can be added.

text_image
Diagram showing a hand pressing a button on a device interface, with directional arrow and control buttons below.Status Icons
When there is a notification for an unread message, calendar event or alarm, the status bar displays the corresponding notification icon. Check your device's status by viewing notification icons displayed on the status bar.
| No signal | |
| Data is being transmitted over the network | |
| Alarm is set | |
| Bluetooth is on | |
| Connected to a computer via USB | |
| Battery level | |
| Airplane mode is on | |
| Wi-Fi is connected | |
| Silent mode is on | |
| GPS is on | |
| Hotspot is on | |
| No SIM card |

- Some of these icons may appear differently or may not appear at all, depending on the device's status. Refer to the icons according to the actual environment and area in which you are using the device and your service provider.
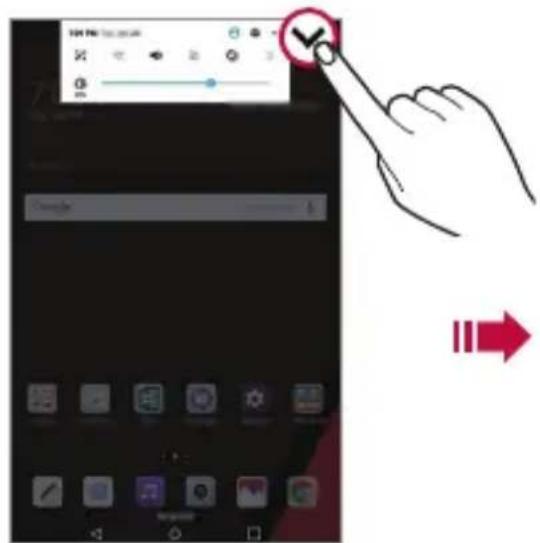
Notifications Panel
You can open the notifications panel by dragging the status bar downward on the main screen.
• To open the quick access icons list, drag the notifications panel downwards or tap √.
• To rearrange, add, or remove icons, tap EDIT.
- If you touch and hold the icon, the settings screen for the corresponding function appears.
text_image
Mobile app interface screenshot showing a hand interacting with a score display and a red arrow indicating action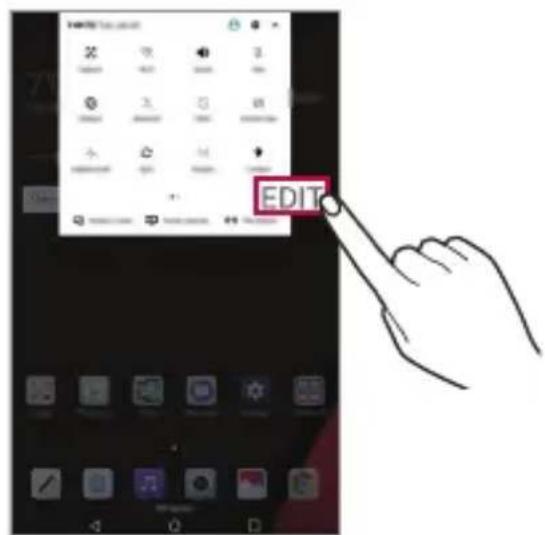
text_image
EDITSwitching the Screen Orientation
You can set the screen orientation to automatically switch, according to the device's physical orientation.
On the notification panel, tap Rotation from the quick access icon list. You can also tap ○> >Display and activate Auto-rotate screen.

natural_image
Split image showing a coastal cliff with green vegetation on the left and a coastal cliff with red double-headed arrows on the right, both against a sea and sky (no text or symbols)Basic Functions 36
Editing the Home Screen
On the Home screen, touch and hold on an empty space, then select the desired action from below.
• To rearrange the Home screen canvases, touch and hold on a canvas, then drag it to another location.
• To add a widget to the Home screen, touch and hold on a blank area of the Home screen, then select Widgets.
- To configure the Home screen settings, touch and hold on a blank area of the Home screen, then select Home screen settings. See Home Screen Settings for details.
• To view or reinstall the uninstalled apps, touch and hold on a blank area of the Home screen, then select App trash. See App trash for details.
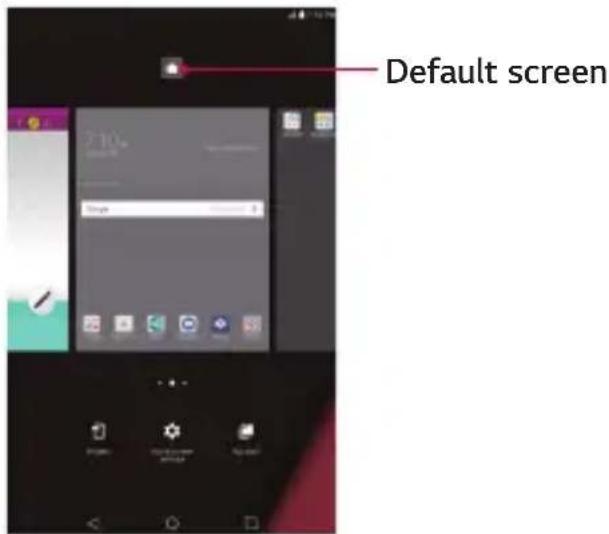
- To change the default screen, touch and hold on a blank area of the Home screen, move to a desired screen, tap 🔒, then tap the screen once more.
text_image
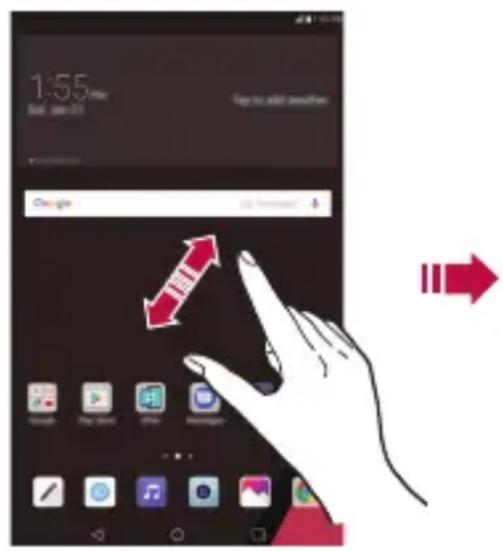
Default screenViewing the Background Theme
You can view only the background image by hiding the apps and widgets on the Home screen.
Spread two fingers apart on the Home screen.
• To return to the original screen, which displays apps and widgets, pinch your fingers on the Home screen or tap ◀
text_image
1:55 Sun, Jan 23 Get to add something Google Google Google Google Google Google Google Google Google Google Google Google Google Google Google Google Google Google Google Google Google Google Google Google Google Google Google Google Google Google Google Google Google Google Google Google Google Google Google Google Google Google Google Google Google Google Google Google Google Google Gnla Gnla Gnla Gnla Gnla Gnla Gnla Gnla Gnla Gnla Gnla Gnla Gnla Gnla
natural_image
Solid dark background with a small red triangular shape at the bottom right corner (no text or symbols)Moving Apps on the Home Screen
On the Home screen, touch and hold an app, then drag it to a desired location.
- To keep frequently used apps at the bottom (in vertical mode) or right (in horizontal mode) of the Home screen, touch and hold an app, then drag it to the quick access area at the bottom or right side.
• To remove an icon from the quick access area, drag the icon to the Home screen.
Using Folders from the Home Screen
Creating folders
On the Home screen, touch and hold an app, then drag it over another app.
• A new folder is created and the apps are added to the folder.
Editing folders
On the Home screen, tap a folder and do one of the following actions.
• To edit the folder name and colour, tap the folder name.
• To add apps, touch and hold an app, then drag it over the folder and release it.
- To remove an app from the folder, touch and hold the app and drag it to outside the folder. If there is only one app remaining in the folder, the folder is removed automatically.
- You can also add or remove apps after tapping in the folder.
Home Screen Settings
You can customize Home screen settings.
1 Tap ○> > Display > Home screen.
2 Customize the following settings:
- Select Home: Select a Home screen mode.
• Wallpaper: Change the Home screen background wallpaper. - Screen swipe effect: Select an effect to apply when the Home screen canvas switches.
• Icon shape: Select an icon shape. - Sort apps by: Set how apps are sorted on the Home screen.
- Hide apps: Select apps you want to hide from the Home screen.
- Continuous loop: Enable to allow continuous Home screen scrolling (loop back to first screen after the last screen).
- QuickMemo+ panel: Choose whether to add an additional home screen panel to write a memo using QuickMemo+.
Locking and Unlocking the Device
Pressing the Power/Lock Key turns off the screen and puts the device into lock mode. The device automatically gets locked if it is not used for a specified period. This helps to prevent accidental taps and saves battery power.
To unlock the device, press the Power/Lock Key and swipe the screen in any direction.

- Double-tapping on the screen also can wake up the screen instead of the Power/Lock Key.
Changing the Screen Lock Method
You can change the way that you lock the screen to prevent others accessing your personal information.
1 Tap ○ > Display > Lock screen > Select screen lock.
2 Select a desired screen lock from None, Swipe, Knock Code, Pattern, PIN and Password.

- If you incorrectly attempt to unlock the device 5 times, the screen is blocked for 30 seconds.
Smart Lock
You can use Smart Lock to make unlocking your device easier.
You can set it to keep your device unlocked when you have a trusted Bluetooth device connected to it, when it's in a familiar location like your home or work, when it recognizes your face or voice, or when it detects you're carrying it.
Setting up the Smart Lock feature
1 Tap ○ > Display > Lock screen > Smart Lock.
2 Enter your unlock code and select the item you want to add to Smart Lock.
3 Follow the instructions on the screen.

- Before you activate Smart Lock, you need to set up a screen lock (Knock Code, Pattern, PIN or Password).
On-screen Keyboard
You can enter text using the on-screen keyboard. The on-screen keyboard appears on the screen when you tap an available text entry field.
Using the keypad and entering text
| Icon Description | |
 | Tap once to capitalize the next letter you type. Touch and hold for all caps. |
 | Tap to go to the keyboard settings. Touch and hold to enter text by voice, handwriting, or access the clip tray. |
 | Tap to enter a space. |
 | Tap to create a new line. |
 | Tap to delete the previous character. |
Entering special characters
The on-screen keyboard allows you to enter special characters.
For example, to input “á”, touch and hold the “a” button until the pop-up appears and displays related special characters. Without lifting the finger, drag your finger to the desired special character. Once it’s highlighted, lift your finger.

- A symbol at the top right corner of a key indicates that additional characters are available for that key.
Connecting to Networks and Devices
Wi-Fi
You can use high-speed Internet access while within the coverage of the wireless access point (AP).
Connecting to Wi-Fi networks
1 Tap > > Wi-Fi.
2 Tap to turn Wi-Fi on and start scanning for available Wi-Fi networks.
3 Tap a network to connect to it.
- If the network is secured with a lock icon, you will need to enter a security key or password.
4 The Status bar displays icons that indicate Wi-Fi status.

- If you are out of the Wi-Fi zone or have set Wi-Fi to Off, the device may automatically connect to the Web using mobile data, which may incur data charges.

- TIP! How to obtain the MAC address - Tap > Wi-Fi > Advanced Wi-Fi > MAC address.
Bluetooth
Bluetooth is a short-range communications technology that allows you to connect wirelessly to a number of Bluetooth devices, such as headsets and hands-free car kits, Bluetooth-enabled handhelds, computers, printers, and wireless devices.

- LG is not responsible for the loss, interception or misuse of data sent or received via the Bluetooth feature.
• Always make sure that you share and receive data with devices that are trusted and properly secured. - If there are obstacles between the devices, the operating distance may be reduced.
- Some devices, especially those that are not tested or approved by Bluetooth SIG, may be incompatible with your device.
Pairing your device with another Bluetooth device
1 Tap > >Bluetooth.
2 Tap to turn Bluetooth on.
3 Tap SEARCH to view the visible devices in range.
4 Choose the device you want to pair with from the list. Once the paring is successful, your device connects to the other device.

- Pairing between two Bluetooth devices is a one-time process. Once a pairing has been created, the devices will continue to recognize their partnership and exchange information.

- TIP! - Please consult documentation included with Bluetooth device for information on pairing mode and passcode (typically 0 0 0 0 – four zeroes).
Sending data via Bluetooth
1 Select a file or item, such as a contact or media file.
2 Select the option for sending data via Bluetooth.
3 Search for and pair with a Bluetooth-enabled device.
- Due to different specifications and features of other Bluetooth-compatible devices, displays and operations may be different, and functions such as transfer or exchange may not be possible with all Bluetooth compatible devices.
Basic Functions 43
Receiving data via Bluetooth
1 Tap > Bluetooth.
2 Tap to turn Bluetooth on.
3 You will receive a request to accept data from the sending device. Be sure to select ACCEPT.
Wi-Fi Direct
Wi-Fi Direct provides a direct connection between Wi-Fi enabled devices without requiring an access point.
Turning on Wi-Fi Direct
1 Tap > > Wi-Fi.
2 Tap : > Advanced Wi-Fi > Wi-Fi Direct.

- When in this menu, your device is visible to other visible Wi-Fi Direct devices nearby.
Content Sharing
Playing content from another device
You can play photos, videos or songs saved on your device from a TV.
1 Connect the TV and your device to the same Wi-Fi network.
2 While viewing the items from the Gallery or Music app, tap : > Play on other device.
3 Select the TV you want to connect to.

• For use with Chromecast, Google Play services should be up to date.
Viewing content from nearby devices
You can view content from various devices, such as a computer, NAS or mobile device, by using the Gallery or Music app.
Connecting the devices
Connect both your device and another device that support DLNA function to the same wireless network.

• Make sure that File sharing (DLNA) is activated on both the device and the connected device.
Searching for nearby devices
You can view a list of DLNA devices on the same network by selecting the Nearby devices menu in each app.
Use content from nearby devices as if you were using it on your device.
Sending or receiving files
You can share files between your device and another LG device, a tablet or computer.
Sending files
From the Gallery, File Manager or Music app, tap : > Share or , then select a device on the file sharing list.
Receiving files
Drag the status bar downward and tap ∨, then tap File sharing.
You can also share files using SmartShare Beam. To activate, tap > Share & connect > File sharing > SmartShare Beam

• Make sure that your device is connected to the same wireless network as the target device for the file transfer.
• Make sure that File sharing is activated on both devices.
Sending files to a computer
You can quickly send large files to your computer.
1 Install LG Bridge on your computer.
2 Start LG Bridge on the computer, then sign in using your LG account.
3 Tap ○ > Share & connect > LG AirDrive, then sign in using your LG account.
4 Select a computer on the sharing list from the Gallery, File Manager, and Music apps.

• You can download LG Bridge from the LG Mobile website(www.lg.com).
- When you transfer files from the device to the computer while LG Bridge is not running, they are stored for 7 days in the temporary storage. Temporarily stored files are automatically saved on the computer when you launch LG Bridge within 7 days.
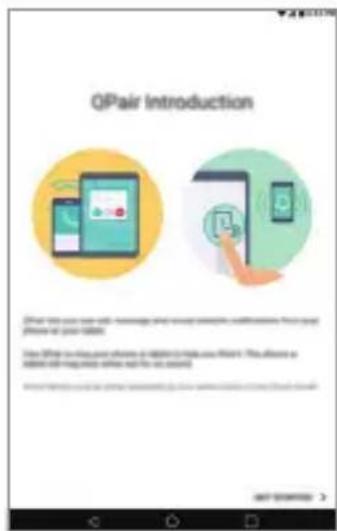
QPair
By connecting your tablet and mobile device via QPair, you can sync incoming calls, messages, and social networking notifications between your tablet and mobile device.
text_image
QPair Introduction What the you can use social media, what you want to understand your own phone at your website. You'll use your phone to access your website. You will use your phone to access your website and do you account.1 Run QPair and tap GET STARTED > Start on your tablet first and then run the same steps on your device.

TIP!
- QPair may not be pre-installed on the device. Go to the Google Play Store and search for QPair and install it.

- QPair works with devices running Android 4.1 or later. Some features may be limited depending on your device model.
- Since QPair uses the Bluetooth function, it may not work normally if you change the Bluetooth settings while QPair is in use.
2 Bluetooth connection will be turned on and you will be able to pair the devices.
QPair features
Call notifications: Sends the tablet a notification when the device receives a call. The notification displays the caller's number and allows you to answer and decline the call. You can also change call settings, such as a ringtone, ringtone volume, or send a decline message when you get a call.

- You can only receive calls supported by Bluetooth technology. Dialing a call from the tablet using the QPair feature is not possible.
Message notifications: Sends the tablet a notification when the device receives a message. You can also change message settings, such as message pop-up, message preview, and notification sound.
Social network notifications: Displays a social networking notification on your tablet's Status Bar when it arrives on your device.

- To use this feature, enable the QPair social network notifications option on your device.
Capture+ transfer: Saves your current Capture+ in the tablet's Gallery, and then syncs the tablet's Gallery with the Gallery on your device.
Transferring Data between a PC and Your Device
You can copy or move data between a PC and the device.
Transferring data
1 Connect your device to a PC using the USB cable that came with your device.
2 Open the Notifications panel, tap the current USB connection, and select File transfer.
3 A window will pop-up on your PC, allowing you to transfer the desired data.

- The LG United Mobile Driver is required to be installed on your PC to be able to detect the device.
• Check the requirements for using File transfer.
| Items Requirement | |
| OS Microsoft Windows XP SP3, Vista or higher | |
| Window Media Player version | Windows Media Player 10 or higher |
- Please refer to www.android.com/filetransfer/#tipsin order to use the File transfer feature on the MAC OS.
Google Account Setup
The first time you open a Google application on your tablet, you will be required to sign in with your existing Google account. If you do not have a Google account, you will be prompted to create one.
Creating Your Google Account
1 Tap > > Accounts & sync.
2 Tap ADD ACCOUNT > Google > Or create a new account.
3 Enter your first and last name, then tap NEXT.
4 Follow the instructions and enter the required and optional information about the account. Wait while the server creates your account.
Signing into Your Google Account
1 Tap > > Accounts & sync.
2 Tap ADD ACCOUNT > Google.
3 Enter your email address and tap NEXT.
4 Enter your password and tap NEXT.
5 After signing in, you can use Gmail and take advantage of Google services on your tablet.
6 Once you have set up your Google account, your tablet will automatically synchronize with your Google account on the web (if a data connection is available).
After signing in, your tablet will sync with your Google services, such as Gmail, Contacts, and Google Calendar. You can also use Maps, download applications from Play Store, back up your settings to Google servers, and take advantage of other Google services on your tablet.
Installing and uninstalling apps
Installing apps
Access an app store to search and download apps.
- You can use the SmartWorld, Play Store or the app store provided by your service provider.

• Some app stores may require you to create an account and sign in.
• Some apps may charge fees.
- If you use mobile data, you may be charged for data usage, depending on your pricing plan.
- SmartWorld may not be supported depending on the area or service provider.
Uninstalling apps
Uninstall apps that you no longer use from your device.
Uninstalling with the touch and hold gesture
On the Home screen, touch and hold the app to uninstall, then drag it over Delete at the top of the screen.
You can also touch and hold the app and release it, then tap ✗ to uninstall.
- Uninstalled apps can be reinstalled within 24 hours of uninstallation. See App trash for details.
Uninstalling by using the settings menu
Tap ○ > 🎨 > Apps, select an app, then tap Uninstall.
Uninstalling apps from the app store
To uninstall an app, access the app store from which you download the app and uninstall it.

• Some apps cannot be uninstalled by users.
App trash
You can view the uninstalled apps on the Home screen. You can also reinstall apps within 24 hours of uninstallation.
1 Touch and hold an empty area of the Home screen, then tap App trash.
2 Choose the desired option.
- Restore: Reinstall the selected app.
- Remove the uninstalled apps permanently from the device.

- Uninstalled apps are automatically removed from the device 24 hours after they were uninstalled. If you want to reinstall the uninstalled apps, you must download them again from the app store.
- This feature is activated on the default Home screen only. If you uninstall apps while using other launcher, they are immediately and permanently removed from the device.
03
Useful Apps
Contacts
You can add contacts on your device and synchronize them with the contacts in your Google Account or other accounts that support syncing contacts.
Searching for a Contact
1 Tap ➕ Essentials folder > .
2 Tap Search contacts and enter the contact name using the keyboard.
Adding a New Contact
1 Tap ➕ Essentials folder > >
2 Select the desired account (if applicable).
3 If you want to add a picture to the new contact, tap 📋. Choose Take photo or Select photo.
4 Enter the desired information for the contact.
5 Tap SAVE.
Favorites Contacts
You can classify frequently called contacts as favorites.
Adding a contact to your favorites
1 Tap ➕ Essentials folder > .
2 Tap a contact to view its details.
3 Tap the star at the top right of the contact details screen. The star will be highlighted.
Removing a contact from your favorites list
1 Tap ➕ Essentials folder > .
2 Choose a contact from the FAVORITES list at the top of the contact's list.
3 Tap the highlighted star at the top right of the contact details screen. The highlight will be removed from the star and the contact is removed from your favorites.
Creating a Group
1 Tap ➕ Essentials folder > .
2 Tap Groups > +
3 Enter a name for the new group.
4 Tap Add members to add contacts to the group.
5 Tap SAVE to save the group.

- If you delete a group, the contacts assigned to that group will not be lost. They will remain in your contact list.
Merging and Separating Contacts
When you have two or more entries for the same contact, you can merge them into a single entry. You can also separate contacts that were merged.
1 Tap > Essentials folder > .
2 Tap : > Manage contacts > Merge.
3 Select a tab at the top of the screen.
- Tap Merge suggestion to select entries you want to merge.
- Tap Merged contacts to select entries you want to separate.
4 Checkmark the entry (or entries) you want to merge or separate, then tap the Merge or Separate button.
Messaging
Your phone combines text and multimedia messaging into one intuitive, easy to use menu.

- You may be charged for each message you send. Please consult with your service provider.
Sending a Message
1 Tap >> > +
2 Enter a contact name or contact number into the To field. As you enter the contact name, matching contacts appear. You can tap a suggested recipient and add more than one contact.
3 Tap > then entering your message.
4 Tap to open the options menu. Choose from any of the available options.
5 Tap to attach the file that you want to share with the message.
6 Tap to send your message.
Conversation View
Messages exchanged with another party are displayed in chronological order so that you can conveniently see and find your conversations.
Changing Your Messaging Settings
You can change the settings based on your preferences.
- Tap > > Settings.
The Email application allows you to use email accounts other than Gmail, and supports the following account types: POP3, IMAP and Microsoft Exchange (for Enterprise users).
Managing Email Accounts
To open the Email application
The first time you open the Email application, a setup wizard opens to help you add an email account. You can also add your email account using the Settings menu.
- Tap >.
Adding another email account:
- Tap ○ > @ > : > Settings > +.
Changing the email general settings:
- Tap > > > Settings.
Deleting an email account:
- Tap ○ > @ > : > Settings > : > Remove account > Select the account(s) you want to delete (if necessary) > REMOVE (if necessary) > REMOVE.
Working with Account Folders
Each account has Inbox, Sent, and Drafts. Depending on the features supported by your account's service provider, you may have additional folders.
Composing and Sending Email
1 In the Email application, tap to create a new email.
2 Enter an address for the message's intended recipient. As you enter text, matching addresses will be offered from your contacts. Separate multiple addresses with semicolons.
3 Tap the Cc/Bcc field to copy or blind copy to other contacts/email addresses.
4 Tap the text field and enter your message.
5 Tap to attach the file you want to send with your message.
6 Tap to send the message.
Camera and Video
Camera Options on the Viewfinder
You can use the camera or camcorder to take and share pictures and videos.
- Tap > .

- Be sure to clean the protective lens cover with a microfiber cloth before taking pictures. A lens cover with smudges from fingers can cause blurry pictures with a "halo" effect.
Rear Camera
Tap to swap ____ between the rear camera lens and the front camera lens.
Tap to apply a film filter effect.
Tap to open the camera settings menu.

natural_image
Scenic mountain landscape with snow-capped peaks and evergreen trees under a blue sky (no text or symbols visible)Tap to view the last photo or video you captured.
Tap to start recording.
Tap to take a photo.
Tap to exit the camera.
Front Camera
Tap to turn on/ off the flash.
Tap to swap — between the rear camera lens and the front camera lens.
Tap to open the ____ camera settings menu.

natural_image
Scenic mountain landscape with snow-capped peaks and evergreen forest, no visible text or symbolsTap to view the last photo or video you captured.
Tap to apply a film filter effect.
Tap to start recording.
Tap to take a photo.
Tap to exit the camera.
Customizing the Camera Options
You can customize a variety of camera options to suit your preferences.
Tap 🎨 on the screen.

• Available options vary depending on the selected camera (front or rear camera) and the selected camera mode.
| Photo size | Select the desired value for the aspect ratio and size of your photos. |
| Video resolution | Select the desired value for resolution and size of your videos. |
| HDR | Obtain photos in vivid colours and get compensated effects even when they are taken against the light. These functions are provided by the high dynamic range (HDR) technology equipped in the camera. |
| Timer | Set the timer to automatically take photos after a specified period of time. |
| Cheese shutter Take photos with voice commands. | |
| Tag locations Save the image with GPS location data. | |
| Grid | Display guide grids so that you can take photos or record videos based on the horizontal and vertical reference lines. |
| Storage | Select if you want to store the pictures and videos in the Internal storage or SD card. (Available when the memory card is inserted.) |
| Simple view Hide all menus from the camera screen. | |
Additional options on the front camera
| Selfie shot | Customize the selfie shot settings.• Gesture shot: Shoot using the Gesture shot feature.• Auto shot: Shoot when the camera detects a face. |
| Save as flipped Save as flipped images after taking selfies. | |
Taking a Photo
1 Open the Camera application and point the lens toward the subject you want to photograph.
2 Focus indicators will appear in the centre of the viewfinder screen. You can also tap anywhere on the screen to focus on that spot.
3 When the focus indicators turn green, the camera has focused on your subject.
4 Tap to capture the photo.
Selfie shot
You can use the front camera to view your face on the screen and take selfies.
Gesture shot
You can take selfies by using gestures.
Show your palm to the front camera and then clench your fist.
You can also clench your fist and then open it towards the front camera.
• In three seconds, a photo is taken.

text_image
Illustration showing a hand holding a tablet displaying a fingerprint, and a hand demonstrating the fingerprint rotation with red curved arrows.
- To use this feature, switch to the front camera mode, then tap ⚙ > Selfie shot > Gesture shot.
• Make sure that your palm and fist are within the reference line so that the camera can detect them. - This feature may not be available while using some of the camera features.
Interval shot
You can take selfies at an interval.
While using the front camera, you can show your palm to the camera, then clench your fist twice quickly.
- Four photos are taken at about two second intervals after a timer delay of three seconds.

natural_image
Illustration of four female characters holding small white objects, no text or symbols present
- Tap 🎨 > Selfie shot > Gesture shot to use this feature.
Auto shot
You can use the face detection feature to take selfies easily and conveniently. You can set the device so that, when you look at the screen, the front camera detects your face and takes a selfie automatically.
- The white coloured guide frame appears when the front camera detects your face. If the subject within the guide frame stops moving, the guide frame colour turns blue, then the camera takes a photo.

natural_image
Illustration of a smiling woman with long brown hair against a blue sky background (no text or symbols)
- Tap 🎨 > Selfie shot > Auto shot to enable the Auto shot feature.
Save as flipped
Before taking a photo with the front camera, tap 🎨 > Save as flipped. The image is flipped horizontally.

- When using the front camera, you can change how selfies are taken in the camera options. See Customizing the Camera Options for details.
Recording a Video
1 Open the Camera application and point the lens toward the subject you want to capture in your video.
2 Tap once to start recording.

• The timer will be displayed on the screen.
3 Tap to stop recording.

- Tap to capture a screen shot while recording a video.
• ||: Tap to pause the recording.
Gallery
The Gallery application presents the pictures and videos in your storage, including those you've taken with the Camera application and those you downloaded from the web or other locations.
1 Tap >.
2 Tap an album to open and view its contents. (The pictures and videos in the album are displayed in chronological order.)
3 Tap a picture in an album to view it.

- Some file formats may not be supported, depending on the installed software.
• Some files may not be opened due to encoding. - Files that exceed the size limit may cause an error.
Viewing pictures
The Gallery displays your pictures in folders. When some apps save a picture, a folder is automatically created to contain the picture.
Pictures are displayed by the date they were created. Select a picture to view it full screen. Scroll left or right to view the next or previous image.

text_image
Back to the previous screen. Write a memo on a photo. Edit images. Add to or remove from your favorites. Start the camera. Access additional options. Delete images. Share images.
• To display the menu items, gently tap the screen. To hide the menu items, tap the screen again.
Zooming in and out
Use one of the following methods to zoom in and out on an image:
• Double-tap anywhere to zoom in and out.
- Spread two fingers apart on any place in the picture zoom in. Pinch in to zoom out.
Writing a memo on the photo
1 While viewing a photo, tap
2 Write a memo on the photo and tap SAVE.

• Some photos may not support the photo memo feature.
Editing photos
1 While viewing a photo, tap

2 Use a variety of effects and tools to edit the photo.
3 Tap SAVE to save changes.
• The changes are overwritten to the original file.
• To save the edited photo as another file, tap: > Save copy.
Playing a video

text_image
Add to or remove from your favorites. Choose screen ratio. Adjust the sound volume. Rewind the video. Open with QSlide. Edit the video. Access additional options. Lock or unlock the screen. Fast-forward the video. Pause or play the video.
• To adjust the sound volume, drag the right side of the video screen up or down.
- To adjust the screen brightness, drag the left side of the video screen up or down.
Editing videos
1 While viewing a video, tap .
2 Use a variety of effects and edit tools to edit the video.

text_image
Adjust the resolution. Revert the edit. Automatically create a 15 sec, 30 sec or 60 sec video clip. Create a movie using various effects. Launch the KineMaster video editor. Select a section to change the play speed. Adjust the video duration.3 Tap SAVE to save changes.
Making a GIF file
You can easily make a GIF file using previously recorded video. At the desired starting point while watching the video, tap : > Create GIF.
• The GIF file is generated for the time selected from the current time.
- For videos less than 5 seconds, GIF images are automatically generated for the remaining time.

- The GIF making feature is provided for the user's creative activity. If you infringe other's copyright or defamation laws by using the GIF making feature, you may be liable for civil and criminal liability. Be sure to not duplicate or transfer the work of others without permission. LG Electronics cannot accept any liability for the user's action.
Deleting files
You can delete files by using one of the following options:
- Touch and hold a file from the file list, then tap Delete.
- Tab1 from the file list and delete the desired files.
- Deleted files are automatically moved to Trash and they can be restored to the Gallery within 7 days.
- On the Gallery, tap >Trash. Tap ✗ to completely delete the files. In this case, the files cannot be restored.
Sharing files
You can share files by using one of the following options:
- While viewing a photo, tap to share the file by using a desired method.
- While viewing a video, ^* > Share to share the file by using a desired method.
- Tap from the file list to select files and share them using a desired method.
Setting a photo as a wallpaper
While viewing a photo, tap : > Set image as to set the image as wallpaper for the Home screen or lock screen.

- Depending on the software installed, some file formats may not be supported.
- If the file size exceeds the available memory, an error can occur when you open files.
Music
You can play and manage songs or music albums.
Playing a song
1 Tap ⭕.
2 Select a category.
3 Select a music file.


text_image
Back to the previous screen. Add to or delete from your favorites. Switch to the playlist. Search for music files. Access additional options. Play in random order Select a repeat mode. Adjust the sound volume. Set sound effects. Tap to play the next file/Touch and hold to fast forward. Tap to play from the beginning of the current file/ Double-tap to play the previous file/ Touch and hold to rewind. Life's Good Theme1 LG Pause or play.
- Some file formats may not be supported, depending on the installed software.
- Files that exceed the size limit may cause an error.
- Music files may be protected by international copyright owners or copyright laws. You may have to obtain legal permission before copying a music file. To download or copy a music file, first check the copyright law for the relevant country.
Clock
Alarm
You can set an alarm to trigger it at a specified time.
1 Tap ○ > Essentials folder > 📁 > Alarm.
2 Tap to add a new alarm.
3 Configure the alarm settings and tap SAVE.

• If you select a previously set alarm, you can edit the alarm.
- To delete an alarm, tap at the top of the screen. You can also touch and hold the alarm.
World Clock
You can view the current time in cities around the world.
1 Tap ○ > Essentials folder > 📟 > World clock.
2 Tap and add a city.
Timer
You can set the timer to trigger an alarm after a specified period of time.
1 Tap ○ > Essentials folder > Timer.
2 Set the time and tap Start.
- To suspend the timer, tap Pause. To resume the timer, tap Resume.
Useful Apps 68
3 Tap Stop to stop the timer alarm.
Stopwatch
You can use the stopwatch to record a lap time.
1 Tap ○ > Essentials folder > 📟 > Stopwatch.
2 Tap Start to initiate the stopwatch.
• To record a lap time, tap Lap.
3 Tap Pause to suspend the stopwatch.
• To resume the stopwatch, tap Resume.
- To clear all the records and restart the stopwatch, tap Reset.
Calculator
You can use two types of calculators: the simple calculator and the scientific calculator.
1 Tap ➕ Essentials folder > .

2 Use the keypad to make a calculation.
• To restart a calculation, touch and hold the DEL button.
Calendar
Calendar overview
You can use the calendar to manage events and tasks.
Adding events
1 Tap ➕ Essentials folder > .

2 Select a date and then tap .

3 Enter event details and tap SAVE.
• If you tap a date from the calendar and the date contains events, a
pop-up window appears showing a list of the events. Tap an event from the pop-up window to view the event details.
Syncing events
Tap : > Calendars to sync and select a calendar to sync.

- When your events are saved from the device to your Google account, they are automatically synced with the Google calendar, too. Then, you can sync other devices with the Google calendar in order to make those devices have the same events that your device has and to manage your events on those devices.
Event pocket
You can use the event pocket to create events.
Tap 📋 to open the event pocket and then drag content to a date in the calendar.
- Manage images, text, memos and temporarily saved events. You can also share text, images and memos from another app and save them to the pocket. If you tap POCKET when creating an event, the event is temporarily saved to the pocket.
- Manage tasks that have no deadline, such as events.
Tasks
You can register tasks to your device to easily manage schedules.
1 Tap ➕ Essentials folder > .
2 Tap to add a task.
3 Enter task details and then tap SAVE.

Audio Recorder
You can record and save audios. Recorded audio files can be played back or shared.
Audio Recorder
You can record and save audios. Recorded audio files can be played back or shared.
1 Tap > Essentials folder > .

• To save the location details of recording, tap: > Add tags > Add (under Location).
• To add an event, tap: > Add tags > Add (under Event).
- To select where to save the audio file, tap: > Settings > Save to, then tap the desired storage.
2 Tap.
• To pause recording, tape.
• To resume recording, tap.
• To bookmark a moment while recording, tap
3 Tap □o end the recording.
• The file is saved automatically.
4 Tap=to view and play recorded audios.
File Manager
You can view and manage files saved on your device.
1 Tap ⬇ Management folder > .
2 Tap a storage location.
3 The following options are available.
| Q | Search files |
| Open Dual window while using File Manager | |
| Add a new folder | |
| Move files | |
| Copy files | |
| Delete files | |
| Access additional options |
Downloads
Use this application to see what files have been downloaded through the applications.
- Tap > Management folder >
LG Mobile Switch
You can back up, restore and move the data saved on your device.
1 Tap ➕ Management folder > . 📋
You can also tap ○ > ⚙️ > Backup & reset > LG Mobile Switch.
2 Follow the on-screen instructions to select a desired method for transfer.

- Resetting your device may delete backup files saved in internal storage. Make sure to copy and store the important backup files to your PC.
Google Apps
Google provides entertainment, social network, and business apps. You may require a Google account to access some apps.
To view more app information, access each app's help menu.

- Some apps may not be available depending on the region or service provider.
Search quickly for items on the Internet or your device.
Gmail
Send or receive emails via the Google Mail service.
Maps
Find your location on the map, search for locations, and view location information for various places.
YouTube
Watch or create videos and share them with others.
Drive
Store your content on the cloud, access it from anywhere, and share it with others.
Play Music
Discover, listen to, and share music on your device.
Play Movies & TV
Watch movies and TV shows purchased from the Play Store.
Hangouts
Chat with your friends individually or in groups and use images, emoticons, and video calls while you are chatting.
Photos
Manage photos, albums, and videos that you have saved on the device and uploaded to Google+.
04
Settings
Settings
The Settings application contains most of the tools for customizing and configuring your device. All of the settings in the Settings application are described in this section.
To Open the Settings Application
- Tap > .
WIRELESS NETWORKS
Wi-Fi
Turns on Wi-Fi to connect to available Wi-Fi networks.
Bluetooth
Turns the Bluetooth wireless feature on or off to use Bluetooth.
Mobile data
Displays the data usage and allows you to set a personalized mobile data usage limit.
Share & connect
- File sharing: You can send and receive files between your device and other LG devices or tablets.
- LG G Pad IV 8.0: Set your device's name.
- Save to: Set the destination folder to save files sent from other devices.
- File sharing: Permit receipt of files sent from other devices.
- SmartShare Beam: Share files with other devices via SmartShare Beam.
- Help: Displays help information about using the file sharing feature.
• Media server: You can share media content on your device with nearby devices that support DLNA.
- Content sharing: Share content on your device with nearby devices.
- LG G Pad IV 8.0: Set your device's name.
- Content to share: Select the type of media content to share with other devices.
- Allowed devices: View a list of devices permitted to access content on your device.
- Not-allowed devices: View a list of devices not permitted to access content on your device.
- Screen sharing: You can mirror your tablet screen and sound onto Miracast dongle or TV wirelessly.
- Monitor mode: Project a mobile device screen and audio to this tablet using Miracast.
- LG AirDrive: Allows you to connect to your PC to manage your tablet. Download LG Bridge from the LG Electronics website on your PC before use. When you sign in to the same LG Account on your tablet and PC, you can use the LG AirDrive function.
- Printing: Allows you to print the content of certain screens (such as web pages displayed in Chrome) to a printer connected to the same Wi-Fi network as your Android device.
Tethering
- USB tethering: Allows you to share the internet connection with your computer via a USB cable.
- Wi-Fi hotSpot: You can also use your phone to provide a mobile data connection. Create a hotspot and share your connection.
- Bluetooth tethering: A Bluetooth-connected device can connect to the Internet by using your device's mobile data.
• Help: Displays help information for USB tethering and Mobile HotSpot
More
- Airplane Mode: Airplane Mode (flight mode) allows you to use many of your device's features, such as games, and music, when you are in an area where data use is prohibited. When you set your device to Airplane Mode, it cannot access online data.
- Mobile networks: Set options for network operators, access point names, and mobile data.
- VPN: From your device, you can add, set up, and manage virtual private networks (VPNs) that allow you to connect and access resources inside a secured local network, such as your corporate network.
DEVICE
Sound
Sound profile
Allows you to set the sound profile to Sound and Silent.
Volume
Adjust the device's volume settings to suit your needs and environment.
Notification sound
Select the ringtone for notifications such as new messages receipt or calendar events.
Keyboard sound
Select whether to turn on/off the keyboard sound.
Touch sound
Allows you to set your tablet to play a sound when you touch buttons, icons and other onscreen items that react to your touch.
Screen lock sound
Allows you to set your tablet to play a sound when locking and unlocking the screen.
Notifications
Do not disturb
Allows you to set a schedule when to prevent interruptions from notifications. You can set to allow certain features to interrupt when Priority only is set.
Apps
Allows you to prevent apps from displaying notifications or set apps to show notifications with priority when Do not disturb is set to Priority only.
Lock screen
Allows you to choose if you want to show or hide notifications on the lock screen.
Display
Home screen
T Select Home: Select a Home screen mode.
T Wallpaper: Allows you to set the desired wallpaper for your Home screen.
Screen swipe effect: Choose the desired type of effect to display when you swipe from one Home screen canvas to the next.
T Icon shape: Choose if you want icons to have square or rounded corners.
T Sort apps by: Sort apps by names or download date on the Home screen.
T Hide apps: Allows you to select apps to hide from the Home screen.
T Continuous loop: Enable to allow continuous Home screen scrolling (loop back to first screen after the last screen).
QuickMemo+ panel: Activate to include an additional Home screen panel for writing a memo.
Lock screen
- Select screen lock: Allows you to set a screen lock to secure your device.
- Smart Lock: Set to keep your device unlocked when you have a trusted Bluetooth device connected to it, when it's in a familiar location like your home or work, when it recognizes your face or voice, or when it detects you're carrying it.
• Wallpaper: Select the wallpaper to display for your lock screen. - Clock: Select the position of the clock on the lock screen.
- Shortcuts: Customize shortcuts on the lock screen.
- Screen swipe effect: Sets the effect used when swiping the lock screen.
- Weather animation: Enable to show weather animation on the lock screen for the current location.
- Contact info for lost tablet: Select whether to display the owner information on the lock screen and customize the owner information.
- Lock timer: Allows you to set the amount of time before the screen automatically locks after the screen has timed-out.
- Power key instantly locks: Set to instantly lock the screen when the Power/Lock Key is pressed. This setting overrides the Security lock timer setting.
Font type
Select the desired font type.
Font size
Select the desired font size.
Bold text
Bold the text on the screen.
Display size
Set the items on the screen to a size that is easy for you to see. Some items may change position.
Comfort view
Reduce the amount of blue light on the screen to reduce eye strain.
Brightness
Allows you to adjust the screen brightness.
Night brightness
Set brightness at 0% automatically between 12:00 AM \~ 06:00 AM.
Auto-rotate screen
Allows you to set to switch the screen orientation automatically when you physically rotate the device.
Screen timeout
Allows you to set the amount of time before the screen times out.
Home touch buttons
Allows you to set which Home touch buttons are displayed and their position on the bar. You can also select the colour.
KnockON
Turn the screen on or off by tapping the screen twice.
Screen saver
Display a screen saver when the device is connected to the holder or charger. Select a screen saver type to display.
Smart cleaning
Displays the space in use and free space in your tablet and allows you to selectively clean up your files.
Storage
DEVICE STORAGE
View the total storage space and free space in the device's internal storage. View a list of apps in use and the storage capacity for each app.
PORTABLE STORAGE
View the total storage space and free space in the memory card. This option appears only when a memory card is inserted. To unmount the memory card, tap △.
Battery & power Saving
BATTERY INFORMATION
The Battery charge information is displayed on a battery graphic along with the percentage of the remaining charge and its status.
Battery usage
Displays the battery usage level and battery use details. Tap one of the items to see more detailed information.
Battery percentage on status bar
Turn on to display the battery level percentage on the Status bar next to the battery icon.
Battery saver
Tap the Battery Saver switch to toggle it On or Off. You can also set when to turn battery saver on.
Memory
You can monitor the memory used on average and the memory used by apps in the device.
Apps
Display the list of applications such as currently running or downloaded. Tap an entry to view more information, tap Force stop (or Stop), then OK to stop it from running.
PERSONAL
Users
This menu displays the current users you've created.
ADD USER
Allows you to add new account for the device and use the Multi-user feature.
Location
Turn on location service, your device determines your approximate location using Wi-Fi and mobile networks. When you select this option, you're asked whether you consent to allowing Google to use your location when providing these services.
- Mode: Sets the how your current location information is determined.
- RECENT LOCATION REQUEST: Displays applications and services that have recently requested your location.
- Low power location estimation: Estimate the device location by using low power consumption.
- Google Location History: Allows you to view and manage your Google location history.
- Google Location Sharing: Allows you to choose who can see where you are and for how long.
Security
Use the Security menu to configure how to help secure your device and its data.
Content lock
Allows you to lock files for the Gallery and memos for QuickMemo+. Choose from Password or Pattern.
Encrypt SD card
Encrypt SD card storage and keep data unavailable for other devices.
Secure start-up
When you power on your tablet, you will be required to enter your screen lock.
Set up SIM card lock
Lock or unlock the SIM card, or change the password (PIN).
Make passwords visible
Set to briefly show each character of passwords as you enter them so that you can see what you enter.
Tablet administrators
View or deactivate device administrators.
Unknown sources
Allow installation of non-Play Store applications.
Credential protection
Displays the storage type for credentials.
Certificate management
Allows you to manage your security certificates.
Trust agents
Select apps to use without unlocking the screen.
Screen pin
This feature allows you to lock your device so that the current user can only access the pinned app. This is useful for users with children.
Usage access
Allow this app to view usage info of apps on your device.
Accounts & sync
Use the Accounts & sync settings menu to add, remove, and manage your Google and other supported accounts. You can also use these settings to control how and whether all applications send, receive, and sync data on their own schedules and whether all applications can synchronize user data automatically.
Gmail™, Calendar, and other applications may also have their own settings to control how they synchronize data; see the sections on those applications for details. Touch ADD ACCOUNT to add new account.
Language & keyboard
Use the Language & keyboard settings to select the language for the text on your device and to configure the on-screen keyboard, including words you've added to its dictionary.
Backup & reset
You can back up data saved on your device to another device or account. Reset the device, if necessary.
- LG Mobile Switch: Back up or restore the blocked sender list, messages, images, home screens and other data saved on the device. See LG Mobile Switch for details.
- Backup & restore: Back up your device data or restore data to your device from a backup.
- Back up my data: Back up your app data, Wi-Fi password and other settings to the Google server.
• Backup account: View the current backup account in use. - Automatic restore: Automatically restore backup settings and data when reinstalling an app.
- Network settings reset: Reset Wi-Fi, Bluetooth and other network settings.
• Factory data reset: Reset all settings for the dice and delete data.

- Resetting your device deletes all data on it. Enter your device name, Google account and other initial information again.
Google Services
Use this menu to manage your Google apps and account settings.
SYSTEM
QuickButton
Select the app you wish to get quick access to using QuickButton.
Shortcut keys
Get quick access to apps by pressing the Volume Keys twice when the screen is off or locked.
- Press the Volume Up Key twice to open the Capture+ app.
- Press the Volume Down Key twice to launch the Camera app.
Date & time
Use Date & time settings to set how dates will be displayed. You can also use these settings to set your own time and time zone rather than obtaining the current time from the mobile network.
Accessibility
Use the Accessibility settings to configure accessibility plug-ins you have installed on your device.
• Vision: Sets options for people with impaired sight.
- TalkBack: Allows you to set up the TalkBack function which assists people with impaired vision by providing verbal feedback.
- Font size: Sets the font size.
- Bold text: Bold the text on the screen.
- Display size: Set the items on the screen to a size that is easy for you to see. Some items may change position.
- Touch zoom: Allows you to zoom in and out by triple-tapping the screen.
- Window zoom: Zoom in or out within a window and invert the colour.
- Large mouse pointer: Magnify the mouse pointer.
- Screen colour inversion: Enable to invert the colour of the screen and content.
- Screen colour adjustment: Allows you to adjust the colour of screen and content.1
- Grayscale: Switch the screen to grayscale mode.
• Hearing: Sets options for people with impaired hearing.
- Captions: Allows you to customize caption settings for those with hearing impairments.
- Mute all sounds: Enable to turn off all device sounds.
- Audio channel: Sets the audio type.
- Sound balance: Sets the audio route. Move the slider on the slide bar to set it.
- Motor & cognition: Sets options for people with impaired motor skills.
- Touch assistant: Show a touch board with easy access to common actions.
- Touch input: Enter text by touching and holding the screen or modify it by simply touching the screen.
- Physical keyboard: Customize the keyboard settings.
- Auto mouse click: Automatically click where the pointer stops.
- Screen timeout: Sets the amount of time before the backlight turns off automatically.
- Touch control areas: Allows you to select an area of the screen to limit touch activation to just that area of the screen.
- Accessibility features shortcut: Allows you to assess selected features quickly when triple-tapping the Home button.
- Auto-rotate screen: Enable to allow the device to rotate the screen depending on the physical device orientation (portrait or landscape).
- Switch Access: Allows you to interact with your device using one or more switches that work like keyboard keys. This menu can be helpful for users with mobility limitations that prevent them from interacting directly with the your device.
About tablet
This menu allows you to manage your software updates and view various information relating to your device.
Regulatory & Safety
You can view regulatory marks and related information on your device.
05
Appendix
LG Language Settings
Select a language to use on your device.
- Tap > 🎨 > Language & keyboard > Language > ADD
LANGUAGE, and select a language.
- Touch and hold≡ and drag it to the top of the language list to set it as a default language.
Software Update
Device Software Update
This feature allows you to update the firmware of your device to the latest version conveniently from the internet without the need to visit a service centre.
For more information on how to use this function, please visit:
http://www.lg.com/common/index.jsp.
As the device firmware update requires the user's full attention for the duration of the update process, please make sure to check all instructions and notes that appear at each step before proceeding. Please note that removing the USB cable during the upgrade may seriously damage your device.
LG Device Software Update via Over-the-Air (OTA)
This feature allows you to update the firmware of your device to the newer version conveniently via OTA without connecting the USB cable. This feature is only available if and when LG makes the newer version of the firmware available for your device.
First, you can check the software version on your device:
Tap ○ > About tablet > Software info.
To perform the device software update, tap ○ > About tablet > Update centre > System Updates > Check now for update.

- Your personal data—including information about your Google account and any other accounts, your system/application data and settings, any downloaded applications and your DRM license—might be lost in the process of updating your device's software. Therefore, LG recommends that you back up your personal data before updating your device's software. LG does not take responsibility for any loss of personal data.
FAQ
This chapter lists some problems you might encounter when using your device. Some problems require you to call your service provider, but most are easy to fix yourself.
| Message Possible causes Possible corrective measures | ||
| No applications can be set | Not supported by service provider or registration required. | Contact your service provider. |
| Charging error | Battery is not charged. Charge battery. | |
| Outside temperature is too hot or cold. | Make sure device is charging at a normal temperature. | |
| Contact problem | Check the charger and its connection to the device. | |
| No voltage | Plug the charger into a different socket. | |
| Charger defective Replace the charger. | ||
| Wrong charger Use only original LG accessories. | ||
| Impossible to receive / send photos | Memory full | Delete some images from your device. |
| Files do not open | Unsupported file format | Check the supported file formats. |
| No sound Silent mode | Check the settings status in the sound menu to make sure you are not in silent mode. | |
Anti-Theft Guide
You can set up your device to prevent other people from using it if it's been reset to factory settings without your permission. For example, if your device is lost, stolen, or wiped, only someone with your Google account or screen lock information can use the device.
All you need to make sure your device is protected is:
- Set a screen lock: If your device is lost or stolen but you have a screen lock set, the device can't be erased using the Settings menu unless your screen is unlocked.
- Add your Google account on your device: If your device is wiped but you have your Google account on it, the device can't finish the setup process until your Google account information is entered again.
After your device is protected, you'll need to either unlock your screen or enter your Google account password if you need to do a factory reset. This ensures that you or someone you trust is doing the reset.

- Do not forget your Google account and password you had added to your device prior to performing a factory reset. If you can't provide the account information during the setup process, you won't be able to use the device at all after performing the factory reset.
More Information
Open Source Software Notice Information
To obtain the source code under GPL, LGPL, MPL, and other open source licenses, that is contained in this product, please visit http://opensource.lge.com.
In addition to the source code, all referred license terms, warranty disclaimers and copyright notices are available for download.
LG Electronics will also provide open source code to you on CD-ROM for a charge covering the cost of performing such distribution (such as the cost of media, shipping, and handling) upon email request to opensource@lge.com. This offer is valid for three (3) years from the date on which you purchased the product.
Regulatory information (IC ID number, etc.)
For regulatory details, go to Settings > Regulatory & Safety.
Trademarks
• LG and the LG logo are registered trademarks of LG Group and its related entities.
- Google™, Google Maps™, Gmail™, YouTube™, Hangouts™ and Play Store™ are trademarks of Google, Inc.
- Bluetooth® is a registered trademark of Bluetooth SIG, Inc. worldwide.
- Wi-Fi® and the Wi-Fi logo are registered trademarks of the Wi-Fi Alliance.
- All other trademarks and copyrights are the property of their respective owners.
If the Screen Freezes
If the screen freezes or the device does not respond when you try to operate it:
Press and hold the Power/Lock Key + Volume Down Key for about 10 seconds to reset your device. If it still does not work, please contact the service centre.
06
For Your Safety
Important Information
This user guide contains important information on the use and operation of this device. Please read all the information carefully for optimal performance and to prevent any damage or misuse of the device. Any changes or modifications not expressly approved in this user guide could void your warranty for this equipment.
Before You Start
Safety Instructions

• To reduce the possibility of electric shock, do not expose your device to high humidity areas, such as the bathroom, swimming pool, etc.
Always store your device away from heat. Never store your device in settings that may expose it to temperatures less than 32^ F ( 0^ C) or greater than 104^ F ( 40^ C), such as outside during extreme weather conditions or in your car on a hot day. Exposure to excessive cold or heat will result in malfunction, damage and/or catastrophic failure.
Be careful when using your device near other electronic devices. RF emissions from your device may affect nearby inadequately shielded electronic equipment. You should consult with manufacturers of any personal medical devices such as pacemakers and hearing aides to determine if they are susceptible to interference from your device. Turn off your device in a medical facility or at a gas station. Never place your device in a microwave oven as this will cause the battery to explode.
Safety Information
Read these simple guidelines. Breaking the rules may be dangerous or illegal. Further detailed information is given in this user guide.
- Never use an unapproved battery since this could damage the device and/or battery and could cause the battery to explode.
- Never place your device in a microwave oven as it will cause the battery to explode.
-
Your device contains an internal battery. Do not dispose of your battery by fire or with hazardous or flammable materials.
• Make sure that no sharp-edged items come into contact with the battery. There is a risk of this causing a fire.
• Store the battery in a place out of reach of children. -
Be careful that children do not swallow any parts such as rubber plugs (earphone, connection parts of the device, etc.). This could cause asphyxiation or suffocation.
- Unplug the power cord and charger during lightning storms to avoid electric shock or fire.
- When riding in a car, do not leave your device or set up the hands-free kit near to the air bag. If wireless equipment is improperly installed and the air bag is activated, you may be seriously injured.
• Do not use a hand-held device while driving. - Do not use the device in areas where its use is prohibited. (For example: aircraft).
- Do not expose the battery charger or adapter to direct sunlight or use it in places with high humidity, such as a bathroom.
- Do not use harsh chemicals (such as alcohol, benzene, thinners, etc.) or detergents to clean your device. There is a risk of this causing a fire.
- Do not drop, strike, or shake your device severely. Such actions may harm the internal circuit boards of the device.
- Do not use your device in high explosive areas as the device may generate sparks.
• Do not damage the power cord by bending, twisting, pulling, or heating. - Do not use the plug if it is loose as it may cause a fire or electric shock.
- Do not place any heavy items on the power cord. Do not allow the power cord to be crimped as it may cause fire or electric shock.
- Do not handle the device with wet hands while it is being charged. It may cause an electric shock or seriously damage your device.
• Do not disassemble the device. - Only use the batteries, antennas, and chargers provided by LG. The warranty will not be applied to products provided by other suppliers.
- Only authorized personnel should service the device and its accessories. Faulty installation or service may result in accidents and consequently invalidate the warranty.
- Use accessories, such as earphones and headsets, with caution. Ensure that cables are tucked away safely and do not touch the antenna unnecessarily.
FCC RF Exposure Information

- Read this information before operating the device.
In August 1996, the Federal Communications Commission (FCC) of the United States, with its action in Report and Order FCC 96-326, adopted an updated safety standard for human exposure to radio frequency (RF) electromagnetic energy emitted by FCC regulated transmitters. Those guidelines are consistent with the safety standard previously set by both U.S. and international standards bodies. The design of this device complies with the FCC guidelines and these international standards.
Body-worn Operation
This device was tested for typical body-worn operations with the back of the device kept 0 cm (0 inches) between the user's body and the back of the device.
FCC Part 15 Class B/IC RSS-Gen Compliance
This device complies with part 15 of FCC rules and ISEDC license-exempt RSS standard(s). Operation is subject to the following two conditions:
(1) this device may not cause interference, and
(2) this device must accept any interference, including interference that may cause undesired operation of the device.
Part 15.105 statement
This equipment has been tested and found to comply with the limits for a class B digital device, pursuant to Part 15 of the FCC rules. These limits are designed to provide reasonable protection against harmful interference in a residential installation. This equipment generates, uses, and can radiate radio frequency energy and, if not installed and used in accordance with the instructions, may cause harmful interference with radio communications. However, there is no guarantee that interference will not occur in a particular installation. If this equipment does cause harmful interference or television reception, which can be determined by turning the equipment off and on, you can try to correct the interference by one or more of the following measures:
• Reorient or relocate the receiving antenna.
- Increase the separation between the equipment and receiver.
- Connect the equipment into an outlet on a circuit different from that to which the receiver is connected.
- Consult the dealer or an experienced radio/TV technician for help.
Cautions for Battery
- Do not disassemble.
- Do not short-circuit.
- Do not incinerate.
• Do not expose to high temperature: 140^ F ( 60^ C).
Battery Disposal
- Please dispose of your battery properly or bring to your local wireless carrier for recycling.
- Your device contains an internal battery. Do not dispose of your battery by fire or with hazardous or flammable materials.
Adapter (Charger) Cautions
• Using the wrong battery charger could damage your device and void your warranty.
• The adapter or battery charger is intended for indoor use only.
- Do not expose the adapter or battery charger to direct sunlight or use it in places with high humidity, such as the bathroom.
Avoid damage to your hearing
- Damage to your hearing can occur if you are exposed to loud sounds for long periods of time. We therefore recommend that you do not turn on or off the device close to your ear. We also recommend that music and volumes are set to a reasonable level.
- If you are listening to music whilst out and about, please ensure that the volume is at a reasonable level so that you are aware of your surroundings. This is particularly imperative when attempting to cross the street.
07
Safety Guidelines
TIA Safety Information
Provided herein is the complete TIA Safety Information for Wireless Handheld devices. Inclusion of the text covering Pacemakers, Hearing Aids, and Other Medical Devices is required in the owner's manual for CTIA Certification. Use of the remaining TIA language is encouraged when appropriate.
Exposure to Radio Frequency Signal
Your wireless handheld portable device is a low power radio transmitter and receiver. When it is ON, it receives and also sends out radio frequency (RF) signals. In August, 1996, the Federal Communications Commissions (FCC) adopted RF exposure guidelines with safety levels for handheld wireless devices.
Those guidelines are consistent with the safety standards previously set by both U.S. and international standards bodies:
ANSI C95.1 (1992) *
NCRP Report 86 (1986)
ICNIRP (1996)
Those standards were based on comprehensive and periodic evaluations of the relevant scientific literature. For example, over 120 scientists, engineers, and physicians from universities, government health agencies and industry experts reviewed the available body of research to develop the ANSI Standard (C95.1).
* American National Standards Institute; National Council on Radiation Protection and Measurements; International Commission on Non-Ionizing Radiation Protection
The design of your device complies with the FCC guidelines (and those standards).
Tips on Efficient Operation
For your device to operate most efficiently: Do not touch the antenna unnecessarily when the device is in use. Contact with the antenna affects call quality and may cause the device to operate at a higher power level than otherwise needed.
Driving
Check the laws and regulations on the use of wireless devices in the areas where you drive. Always obey them. Also, if using your device while driving, please:
• Give full attention to driving - driving safely is your first responsibility;
• Use hands-free operation, if available;
• Pull off the road and park before using it.
Electronic Devices
Most modern electronic equipment is shielded from RF signals. However, certain electronic equipment may not be shielded against the RF signals from your wireless device.
Pacemakers
The Health Industry Manufacturers Association recommends that a minimum separation of six (6") inches be maintained between a handheld wireless device and a pacemaker to avoid potential interference with the pacemaker. These recommendations are consistent with the independent research by and recommendations of Wireless Technology Research. Persons with pacemakers:
- Should ALWAYS keep the device more than six inches from their pacemaker when the device is turned ON.
• Should not carry the device in a breast pocket. - Should use the ear opposite the pacemaker to minimize the potential for interference.
- If you have any reason to suspect that interference is taking place, turn your device OFF immediately.
Hearing Aids
Some digital wireless devices may interfere with some hearing aids. In the event of such interference, you may want to consult your service provider.
Other Medical Devices
If you use any other personal medical device, consult the manufacturer of your device to determine if they are adequately shielded from external RF energy. Your physician may be able to assist you in obtaining this information.
Health Care Facilities
Turn your device OFF in health care facilities when any regulations posted in these areas instruct you to do so. Hospitals or health care facilities may use equipment that could be sensitive to external RF energy.
Vehicles
RF signals may affect improperly installed or inadequately shielded electronic systems in motor vehicles. Check with the manufacturer or its representative regarding your vehicle. You should also inform the manufacturer of any equipment that has been added to your vehicle.
Posted Facilities
Turn your device OFF in any facility where posted notices so require.
Aircraft
FCC regulations prohibit using your device while in the air. Turn your device OFF before boarding an aircraft.
Blasting Areas
To avoid interfering with blasting operations, turn your device OFF when in a blasting area or in areas posted: ‘Turn off twoway radio’. Obey all signs and instructions.
Potentially Explosive Atmosphere
Turn your device OFF when in any area with a potentially explosive atmosphere and obey all signs and instructions. Sparks in such areas could cause an explosion or fire resulting in bodily injury or even death.
Areas with a potentially explosive atmosphere are often, but not always, marked clearly. Potential areas may include: fueling areas (such as gasoline stations); below deck on boats; fuel or chemical transfer or storage facilities; vehicles using liquefied petroleum gas (such as propane or butane); areas where the air contains chemicals or particles (such as grain, dust, or metal powders); and any other area where you would normally be advised to turn off your vehicle engine.
For Vehicles Equipped with an Air Bag
An air bag inflates with great force. DO NOT place objects, including installed or portable wireless equipment, in the area over the air bag or in the air bag deployment area. If in-vehicle wireless equipment is improperly installed and the air bag inflates, serious injury could result.
Safety Information
Please read and observe the following information for safe and proper use of your device and to prevent damage. Also, keep the user guide in an accessible place at all times after reading it.
Charger and Adapter Safety
The charger and adapter are intended for indoor use only.
Battery Information and Care
- Please dispose of your battery properly or take it to your local wireless carrier for recycling.
• The battery does not need to be fully discharged before recharging. - Use only LG-approved chargers specific to your device model since they are designed to maximize battery life.
- Do not disassemble or impact the battery as it may cause electric shock, short-circuit, and fire. Store the battery in a place out of reach of children.
- Replace the battery when it no longer provides acceptable performance. If you need to replace the battery, take it to the nearest authorized LG Electronics service point or dealer for assistance.
• Recharge the battery after long periods of non-use to maximize battery life.
• Battery life will vary due to usage patterns and environmental conditions. - Use of extended backlighting, Media Net Browsing, and data connectivity kits affect battery life and standby times.
• Actual battery life will depend on network configuration, product settings, usage patterns, battery and environmental conditions.
• Always unplug the charger from the wall socket after the device is fully charged to save unnecessary power consumption of the charger.
Explosion, Shock, and Fire Hazards
- Do not put your device in a place subject to excessive dust and keep the minimum required distance between the power cord and heat sources.
- Unplug the power cord prior to cleaning your device, and clean the power plug pin when it is dirty.
- When using the power plug, ensure that it is firmly connected. If it is not, it may cause excessive heat or fire.
- If you put your device in a pocket or bag without covering the receptacle of the device (power plug pin), metallic articles (such as a coin, paperclip or pen) may short-circuit the device. Always cover the receptacle when not in use.
- Do not short-circuit the battery. Metallic articles such as a coin, paperclip or pen in your pocket or bag may short-circuit the + and: terminals of the battery (metal strips on the battery) upon moving. Short-circuiting of the terminal may damage the battery and cause an explosion.
General Notice
• Using a damaged battery or placing a battery in your mouth may cause serious injury.
- Do not place items containing magnetic components such as a credit card, device card, bank book or subway ticket near your device. The magnetism of the device may damage the data stored in the magnetic strip.
- When the device is not being used for a long period time, store it in a safe place with the power cord unplugged.
• Using the device in proximity to receiving equipment (i.e., TV or radio) may cause interference to the device.
- Do not use the device if the antenna is damaged. If a damaged antenna contacts skin, it may cause a slight burn. Please contact an LG Authorized Service Centre to replace the damaged antenna.
- Do not immerse your device in water. If this happens, turn it off immediately. If the device does not work, take it to an LG Authorized Service Centre.
• Do not paint your device.
- The data saved in your device might be deleted due to careless use, repair of the device, or upgrade of the software. Please backup your important device numbers. (Ring tones, text messages, voice messages, pictures, and videos could also be deleted.) The manufacturer is not liable for damage due to the loss of data.
- When you use the device in public places, set the ring tone to vibration so as not to disturb others.
• Do not turn your device on or off when putting it near your ear.
- Your device is an electronic device that generates heat during normal operation. Extremely prolonged, direct contact with skin in the absence of adequate ventilation may result in discomfort or minor burns. Therefore, use care when handling your device during or immediately after operation.
- Do not attempt to repair or modify the device yourself. Your device is equipped with an internal rechargeable battery which should be replaced only by LG or an authorized LG repair centre. You should never attempt to open or disassemble this device yourself and doing so may cause damage that will void your warranty.
Consumer Information on SAR (Specific Absorption Rate)
This Model Device Meets the Government's Requirements for Exposure to Radio Waves.
Your wireless device is a radio transmitter and receiver. It is designed and manufactured not to exceed the emission limits for exposure to radiofrequency (RF) energy set by the Federal Communications Commission (FCC) of the U.S. Government. These limits are part of comprehensive guidelines and establish permitted levels of RF energy for the general population. The guidelines are based on standards that were developed by independent scientific organizations through periodic and thorough evaluation of scientific studies. The standards include a substantial safety margin designed to assure the safety of all persons, regardless of age and health. The exposure standard for wireless mobile device employs a unit of measurement known as the Specific Absorption Rate, or SAR. The SAR limit set by the FCC is 1.6W/kg.
* Tests for SAR are conducted using standard operating positions specified by the FCC with the device transmitting at its highest certified power level in all tested frequency bands.
Although SAR is determined at the highest certified power level, the actual SAR level of the device while operating can be well below the maximum value. Because the device is designed to operate at multiple power levels to use only the power required to reach the network, in general, the closer you are to a wireless base station antenna, the lower the power output. Before a device model is available for sale to the public, it must be tested and certified by the FCC that it does not exceed the limit established by the government adopted requirement for safe exposure. The tests are performed in positions and locations (e.g., at the ear and worn on the body) as required by the FCC for each model.
The highest SAR value for this device when worn on the body, as described in this user guide, is 1.07W/kg. (Body-worn measurements differ among devices models, depending upon available accessories and FCC/ISEDC requirements.) While there may be differences between SAR levels of various devices and at various positions,
they all meet the government requirement for safe exposure.
The FCC has granted an Equipment Authorization for this model device with all reported SAR levels evaluated as in compliance with the FCC RF emission guidelines.
SAR information on this model device is on file with the FCC and can be found under the Display Grant section of http://www.fcc.gov/oet/ea/fccidafter searching on FCC ID:ZNFV530.
Additional information on Specific Absorption Rates (SAR) can be found on the Cellular Telecommunications Industry Association (CTIA) website at http://www.ctia.org/
* In the United States and Canada, the SAR limit for mobile device used by the public is 1.6 watts/kg (W/kg) averaged over one gram of tissue. The standard incorporates a substantial margin of safety to give additional protection for the public and to account for any variations in measurements.
* Product meets current FCC & ISEDC Radio Frequency Exposure Guidelines.
FCC ID: ZNFV530
IC ID: 2703C-V533
Notice!
- The device for operation in the band 5150-5250 MHz is only for indoor use to reduce the potential for harmful interference to co-channel mobile satellite systems;
• The maximum antenna gain permitted for devices in the bands 5250-5350 MHz and 5470-5725 MHz shall comply with the e.i.r.p. limit;
- The maximum antenna gain permitted for devices in the band 5725-5825 MHz shall comply with the e.i.r.p. limits specified for point-to-point and non point-to-point operation as appropriate.
* High-power radars are allocated as primary users (i.e. priority users) of the bands 5250-5350 MHz and 5650-5850 MHz and these radars could cause interference and/or damage to LE-LAN devices.
WARNING! Notice for Battery replacement
• Li-Ion Battery is a hazardous component which can cause injury.
- Battery replacement by non-qualified professional can cause damage to your device.
- Your device has an internal battery. For your safety, do not remove the back cover. If you need to replace the battery, take it to the nearest authorized LG Electronics service point or dealer for assistance.
HOW TO UPDATE YOUR DEVICE
Access to latest firmware releases, new software functions and improvements.
- Select the software update in settings menu on your device.
- Update your device by connecting it to your PC. For more information about using this function, please visit http://www.lg.com/common/index.jspselect country and language.
LIMITED WARRANTY STATEMENT
1. WHAT THIS WARRANTY COVERS:
LG offers you a limited warranty that the enclosed subscriber unit and its enclosed accessories will be free from defects in material and workmanship, according to the following terms and conditions:
- The limited warranty for the product extends for ONE (1) year beginning on the date of purchase of the product by the original end user.
- The limited warranty extends only to the original end user of the product and is not assignable or transferable to any subsequent purchaser/end user.
- This warranty is good only to the original end user of the product during the warranty period as long as it is in Canada.
- Upon request from LG, the consumer must provide information to reasonably prove the date of purchase.
- During the applicable warranty period, LG will repair or replace at LG's sole option, without charge to the original end user, any defective component part of the phone or accessory.
- LG may use rebuilt, reconditioned or new parts or components when repairing any product or replace a product with a rebuilt, reconditioned or new product.
2. WHAT THIS WARRANTY DOES NOT COVER:
- Defects or damages resulting from use of the product in other than its normal and customary manner.
- Defects or damages from abnormal use, abnormal conditions, improper storage, exposure to moisture or dampness, unauthorized modifications, unauthorized connections, unauthorized repair, misuse, neglect, abuse, accident, alteration, improper installation or other acts which are not the fault of LG, including damage caused by spills of food or liquids.
- Breakage or damage to antennas unless caused directly by defects in material or workmanship.
- The fact that the Customer Service Department at LG was not notified by the original end user of the alleged defect or malfunction of the product, during the warranty period.
- Products which have had their serial numbers removed or made illegible.
-
Damage resulting from use of non-LG approved accessories.
-
All plastic surfaces and all other externally exposed parts that are scratched or damaged due to normal customer use.
- Products serviced by non-authorized persons or companies.
Notes:
-
This limited warranty supersedes all other warranties, expressed or implied either in fact or by operations of law, statutory or otherwise, including, but not limited to any implied warranty of merchantability or fitness for a particular purpose.
-
Shipping damage is the sole responsibility of the shipping company.
3. EXCLUSION OF LIABILITY:
No other express warranty is applicable to this product.
THE DURATION OF ANY IMPLIED WARRANTIES, INCLUDING THE IMPLIED WARRANTY OF MARKETABILITY, IS LIMITED TO THE DURATION OF THE EXPRESS WARRANTY HEREIN. LG ELECTRONICS CANADA, INC. SHALL NOT BE LIABLE FOR THE LOSS OF THE USE OF THE PRODUCT, INCONVENIENCE, LOSS OR ANY OTHER DAMAGES, DIRECT OR CONSEQUENTIAL, ARISING OUT OF THE USE OF, OR INABILITY TO USE, THIS PRODUCT OR FOR ANY BREACH OF ANY EXPRESS OR IMPLIED WARRANTY, INCLUDING THE IMPLIED WARRANTY OF MARKETABILITY APPLICABLE TO THIS PRODUCT.
4. HOW TO GET WARRANTY SERVICE:
To obtain warranty service, please call the following telephone number from anywhere in Canada:
LG Electronics Canada, Inc.
Tel. 1-888-LG-Canada (1-888-542-2623)
http://www.lg.com/ca_en(see links to "Support > Mobile phone support")


Life's Good
Electronics Canada Inc.
North York, Ontario
text_image
Illustration showing a hand interacting with a smartphone displaying a fingerprint, and demonstrating the right-hand rule for index finger manipulation.KnockON
text_image
Diagram of a device rear panel with numbered labels pointing to internal components1 Interrupteur
natural_image
Simple line drawing of a container with two circular holes, no text or symbols presentnatural_image
Diagram of a tablet device showing the internal structure and cable insertion process (no text or symbols)natural_image
Illustration of hands holding a smartphone with a red upward arrow on screen (no text or symbols)
natural_image
Line drawing of a hand holding a tablet and a cup, no text or symbols presenttext_image
Diagram showing a USB cable being inserted into a tablet, with an arrow indicating the cable's direction.natural_image
Illustration of a device being inserted into a tablet, showing cable and connector (no text or symbols)natural_image
Line drawing of a tablet device with a red arrow pointing to its side panel (no text or symbols)natural_image
Hand pointing at a red circular button on a gray background (no text or symbols)natural_image
Hand pointing at a red circular button on a gray background (no text or symbols)Faire glisser
text_image
Hand icon demonstrating finger movement with red double-headed arrows and a circular button on a screenGlisser
natural_image
Illustration of two fingers pressing a button with a red arrow indicating direction (no text or symbols)natural_image
Illustration of a hand with two red arrows indicating movement or force direction (no text or symbols)
natural_image
Hand with index finger pointing downward with red arrows indicating movement (no text or symbols)
text_image
Diagram showing a hand pressing a button on a device interface with directional arrows and control buttons
text_image
User interface toolbar with navigation and control buttons, including play, add, delete, and delete iconsIcônes d'état
text_image
Mobile app interface screenshot showing a hand interacting with a touchscreen display and a checkmark icon, with a red arrow indicating action.
text_image
MODIFIERnatural_image
Split image showing a coastal cliff with ocean and distant mountains, separated by a red double-headed arrow (no text or symbols)text_image
QPair Introduction QPair This can use all email and social media platforms to help you access in your website. Use QIPs for help you access or help you find it. The website is currently available when we need to be accessed.text_image
Illustration showing a hand holding a tablet displaying a fingerprint, and a hand demonstrating the fingerprint rotation with red curved arrows.
natural_image
Illustration of four female characters holding small objects, no text or symbols present
natural_image
Illustration of a smiling woman with long brown hair against a blue sky background (no text or symbols)
* American National Standards Institute; National Council on Radiation Protection and Measurements; International Commission on Non-Ionizing
LG Electronics Canada, Inc.
Tél. 1-888-LG-Canada (1-888-542-2623)