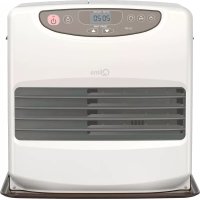
SRE9046TC - Cooker QLIMA - Free user manual and instructions
Find the device manual for free SRE9046TC QLIMA in PDF.


| Product type | Mobile kerosene heater (supplementary heating) |
| Brand | Qlima |
| Model | SRE9046TC |
| Dimensions (W x D x H) | 466 x 349 x 445 mm |
| Weight | 12.1 kg |
| Power supply | 230 V ~ 50 Hz |
| Average nominal power | 2,965 W (248 g/h) |
| Maximum heat output | 4,650 W (388 g/h) |
| Minimum heat output | 1,280 W (107 g/h) |
| Recommended room volume | 75 to 190 m³ |
| Removable tank capacity | 9 liters |
| Operating time | 18 to 67 hours |
| Fuel | Liquid fuel for mobile heating appliances (decrees 2002 and 2010) |
| Ignition | Electric (ON/OFF button) |
| Main functions | Temperature adjustment, timer, economy mode, child lock, 56h auto-off |
| Safety features | Anti-shock (E01), overheat prevention, incomplete combustion detection, 56h auto-shutoff |
| Maintenance and cleaning | Clean fan filter and fuel filter regularly; use dry cloth |
| Spare parts and repairability | Removable tank, fuel filter, hand pump; repairs by authorized service center |
| Warranty | 4 years (excluding consumables and normal wear) |
| Included accessories | Hand pump, transport cap, user manual |
Frequently Asked Questions - SRE9046TC QLIMA
User questions about SRE9046TC QLIMA
0 question about this device. Answer the ones you know or ask your own.
Ask a new question about this device
Download the instructions for your Cooker in PDF format for free! Find your manual SRE9046TC - QLIMA and take your electronic device back in hand. On this page are published all the documents necessary for the use of your device. SRE9046TC by QLIMA.
USER MANUAL SRE9046TC QLIMA
SRE 8040 TC - SRE 9046 TC
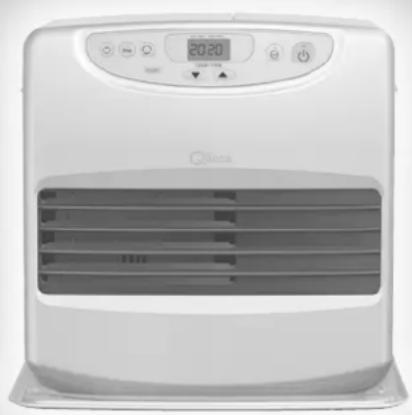
natural_image
White appliance with digital display and control buttons, no visible text or symbols on the device itself.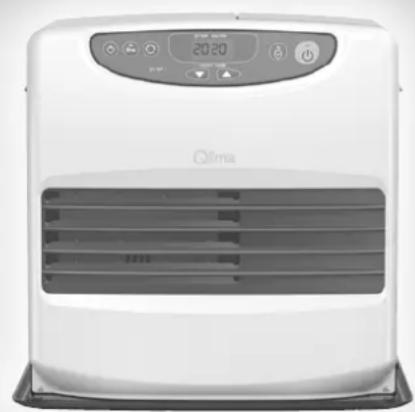
natural_image
White Qlima air conditioner unit with digital display and control buttons (no visible text or symbols on body)GB This product is not suitable for primary heating purposes
- This appliance is not intended for use by persons (including children) with reduced physical, sensory or mental capabilities, or lack of experience and knowledge, unless they have been given supervision or instruction concerning use of the appliance by a person responsible for their safety.
- Do not move the heater when it is burning or still hot. Do not refill nor service the heater when it is burning or still hot.
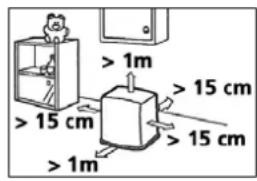
- Position the front of the heater at a distance of minimum 1.5 metres from walls, curtains, and furniture.
- Do not use the heater in dusty rooms or places with strong draughts. In either situation you will not have optimum burning. Do not use the heater in the immediate surrounding of a bath, a shower or a swimmingpool.
- Switch off the heater, before you leave or go to sleep. Unplug the heater as well, when you go away for a longer period of time (e.g. holidays).
- Store and move fuel only in suitable tanks and jerrycans.
• Make sure that the fuel is not exposed to heat or extreme temperature changes. Always store the fuel in a cool, dry and dark place (sunlight will affect the quality).
- Never use the heater in places where harmful gasses or fumes may be present (e.g. exhaust gasses or paint fumes).
- Beware that the grid of the heater becomes hot. If the appliance is covered there is a risk of fire.
• Always make sure that there is sufficient ventilation.
• This appliance can be used by children aged
from 8 years and above and persons with reduced physical, sensory or mental capabilities or lack of experience and knowledge if they have been given supervision or instruction concerning use of the appliance in a safe way and understand the hazards involved.
• Children shall not play with the appliance.
- Cleaning and user maintenance shall not be made by children without supervision.
DANGER
- Do not immerse the appliance in water and do not let water run into it.
- Never open the appliance to prevent electric shock.
WARNING
- The installation must be completely in accordance with local regulations, ordinances and standards.
- Check if the voltage indicated on the type plate corresponds to the local mains voltage before you connect the appliance.
- The appliance is suitable for mains voltages ranging from \~230 V.
- If the mains cord is damaged, you must have it replaced by an authorized service centre or similarly qualified persons in order to avoid a hazard.
• Always return the appliance to an authorized service centre for examination or repair. - Repair by unqualified people could cause an extremely hazardous situation for the user.
- Do not attempt to repair the appliance yourself, otherwise your guarantee becomes invalid.
- Keep the mains cord away from hot surfaces.
• Children should be supervised to ensure that
they do not play with the appliance.
• The plug must be accessible at all times.
- Do not insert objects into the openings of the device.
- The device must not be located immediately below a socket outlet.
- In order to avoid overheating, do not cover the device.
- Do not use this heater in the immediate surroundings of a bath, a shower or a swimming pool.
- The heater is to be installed so that switches and other controls cannot be touched by a person in the bath or shower.
• Children of less than 3 years should be kept away unless continuously supervised.
- Children aged from 3 years and less than 8 years shall only switch on/off the appliance provided that it has been placed or installed in its intended normal operating position and they have been given supervision or instruction concerning use of the appliance in a safe way and understand the hazards involved.
- Children aged from 3 years and less than 8 years shall not plug in, regulate and clean the appliance or perform user maintenance.
- CAUTION — Some parts of this product can become very hot and cause burns. Particular attention has to be given where children and vulnerable people are present.
CAUTION
- Switch off the appliance and disconnect it from the mains immediately if it produces a strange smell or an abnormal noise. Take the appliance to an authorized service centre.
- Switch off the appliance and unplug it accord-
ing to the user instructions before you move or clean it.
• Make sure the appliance and the mains cord are always out of reach of babies (at least one metre away).
- Do not use the appliance if not IPX4 protection class (see type plate) in damp places or close to water. Only IPX4 class appliances are suitable for these circumstances.
- Do not use the appliance in places where the humidity level exceeds 95%.
- Do not expose the appliance to extreme heat or cold or to direct sunlight.
- Do not use the appliance outdoors.
- Never tilt or move the appliance while it is operating.
- Do not use any extension cords or multi-socket adapters.
• Always take the plug out of the socket when the device is not in use.
① CONSIGLI PER UN USO SICURO
LE COMBUSTIBLE APPROPRIÉ
natural_image
Illustration of a cardboard box with an open lid and a separate package (no text or symbols)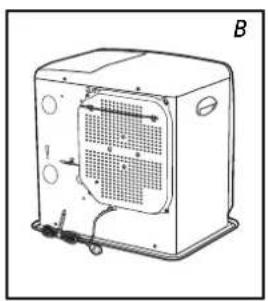
natural_image
Line drawing of a portable air conditioner unit with ventilation grilles and cooling fins (no text or symbols)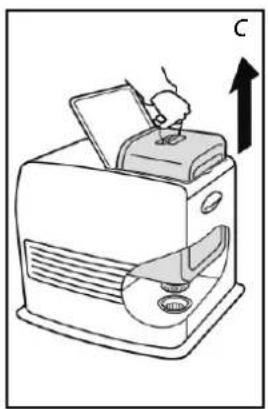
natural_image
Line drawing of a printer with a hand inserting a paper into it, showing mechanical components and an upward arrow (no text or symbols)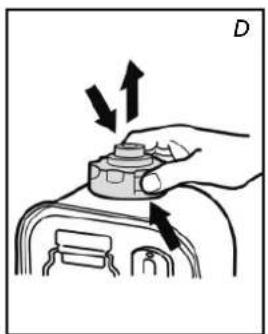
natural_image
Illustration of a hand adjusting a mechanical component with arrows indicating motion (no text or symbols)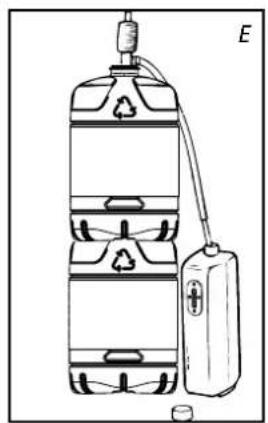
natural_image
Diagram of a water tank with recycling symbol and connected to a battery (no text or labels)MANUEL D'UTILISATION

A INSTALLATION DE L'APPAREIL
C REGLAGE DE L'HEURE
F PROGRAMMATION DE L'HEURE DESIREE (TIMER)
natural_image
Simple line drawing of a finger pressing a key on a circular button (no text or symbols)VERROUILLAGE DE SECURITE ENFANTS
natural_image
Illustration of a computer tower with a hand inserting a cable into the front panel (no text or symbols visible)natural_image
Cross-sectional diagram of a mechanical device with internal components and an arrow indicating direction (no text or symbols)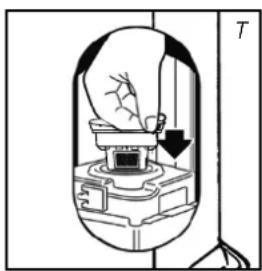
natural_image
Cross-sectional diagram of a mechanical device with internal components and a downward arrow indicating motion (no text or symbols)natural_image
Illustration of a hand using a tool to clean or prepare a device with a container and small cup nearby (no text or symbols)M ENTREPOSAGE (FIN DE LA SAISON)
P CONDITIONS DE GARANTIE
natural_image
Illustration of a box with an open lid, a folded paper sheet, and a pair of eyeglasses (no text or symbols)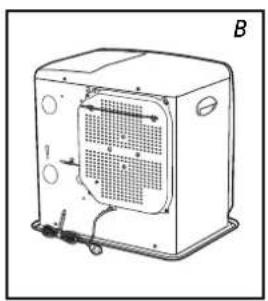
natural_image
Line drawing of a portable air conditioner unit with ventilation grilles and cooling fins (no text or symbols)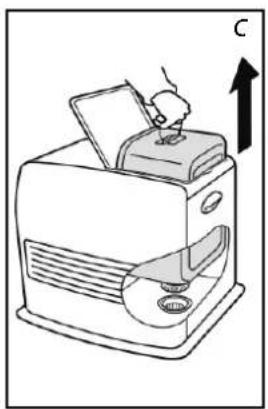
natural_image
Line drawing of a printer with a hand inserting a paper into the top box, showing mechanical components and an upward arrow (no text or symbols)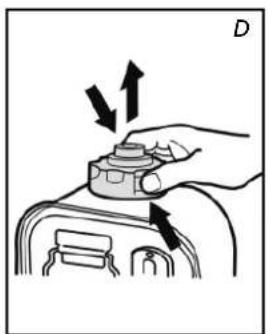
natural_image
Illustration of a hand adjusting a mechanical component with arrows indicating motion (no text or symbols)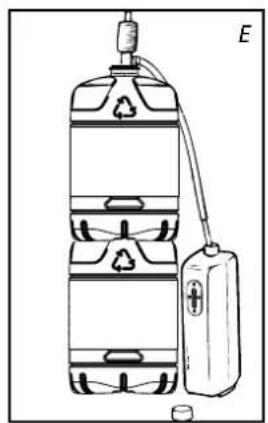
natural_image
Diagram of a water tank with recycling symbol and connected to a battery (no text or labels)GEBRAUCHSANWEISUNG

A DIE INSTALLATION DES KAMINOFENS
C ZEITEINSTELLUNG

natural_image
Simple line drawing of a finger pressing a keyhole (no text or symbols)KINDERSICHERUNG
natural_image
Illustration of a computer tower with a hand inserting a component into the front panel (no text or symbols visible)Brennstoffilter
K DIE BRENNSTOFFANZEIGE „OIL“
natural_image
Cross-sectional diagram of a mechanical device with internal components and an arrow indicating direction (no text or symbols)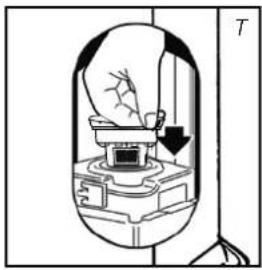
natural_image
Diagram of a mechanical device with a handle and arrow indicating direction (no text or symbols)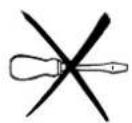
natural_image
Illustration of a hand using a tool to clean or operate a device with a battery and cup nearby (no text or symbols)natural_image
Illustration of a box with an open lid, showing three different views: top view (no text or symbols)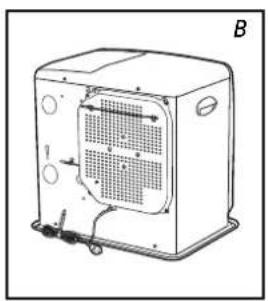
natural_image
Line drawing of a portable air conditioner unit with ventilation grilles and cooling fins (no text or symbols)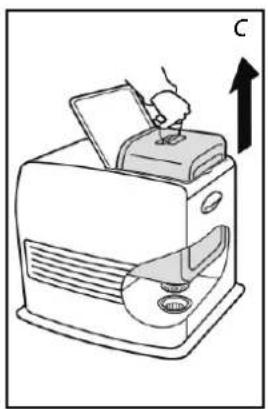
natural_image
Line drawing of a printer with a hand inserting a paper into the top box, showing mechanical components and an upward arrow (no text or symbols)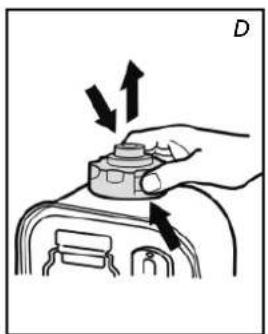
natural_image
Illustration of a hand pressing down on a mechanical component with arrows indicating motion (no text or symbols)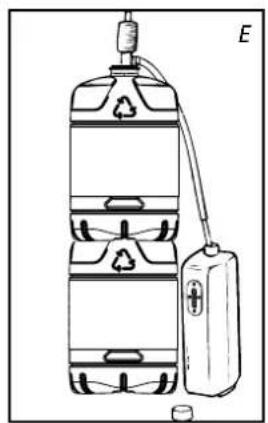
natural_image
Diagram of a water tank with recycling symbol and connected to a battery (no text or labels)VEJLEDNING

A INSTALLATION AF KAMINEN

E INDSTILLING AF DEN ∅NSKEDE TEMPERATUR
F BRUG AF TIMEREN
natural_image
Illustration of a finger pressing a circular button with a checkmark (no text or symbols)
natural_image
Simple line drawing of a finger pressing a key on a circular button (no text or symbols)B∅RNESIKRING
natural_image
Illustration of a computer tower with a hand inserting a cable into the front panel (no text or symbols visible)K 'OIL'-INDIKATOREN
natural_image
Cross-sectional diagram of a mechanical device with internal components and an arrow indicating motion (no text or symbols)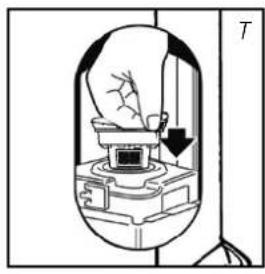
natural_image
Diagram of a mechanical device with a hand pressing down on a component, labeled 'T' (no text or symbols present)natural_image
Illustration of a hand using a tool to clean or wash a container with a bottle and cup nearby (no text or symbols)M OPBEVARING (SLUT PÅ FYRINGSSÆSONEN)
natural_image
Illustration of a box with an open lid, a folded paper sheet, and a pair of eyeglasses (no text or symbols)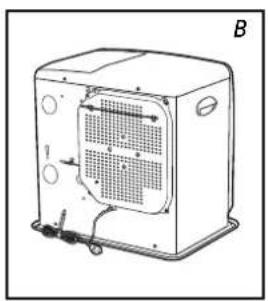
natural_image
Line drawing of a portable air conditioner unit with ventilation grilles and cooling fins (no text or symbols)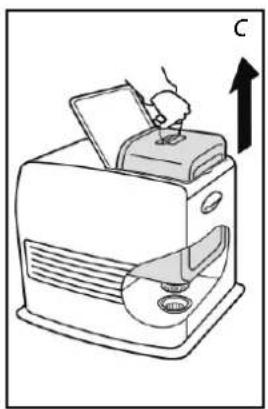
natural_image
Line drawing of a printer with a hand inserting a paper into the top box, showing mechanical components and an upward arrow (no text or symbols)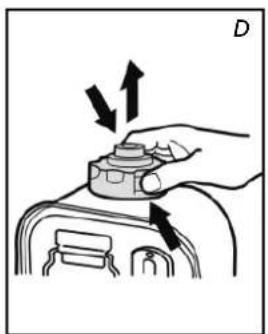
natural_image
Illustration of a hand adjusting a mechanical component with arrows indicating motion (no text or symbols)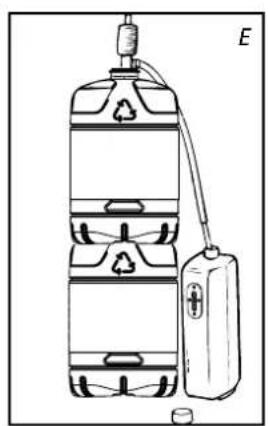
natural_image
Diagram of a water safety device with a plastic bag and recycling symbol, no text or labels presentMANUAL

A INSTALACION DE LA ESTUFA
C AJUSTE DE HORA

natural_image
Simple line drawing of a finger pressing a keyhole (no text or symbols)J USO CORRECTO DE LA FUNCION 'SAVE'
natural_image
Diagram of a computer tower with a hand inserting a cable into the front panel (no text or symbols visible)natural_image
Cross-sectional diagram of a mechanical device with internal components and an arrow indicating direction (no text or symbols)L MANTENIMIENTO
natural_image
Cross-sectional diagram of a mechanical device with internal components and a downward arrow indicating motion (no text or symbols)
natural_image
Illustration of a hand using a tool to clean or wash a machine, with no visible text or symbols.N TRANSPORTE
natural_image
Line drawing of a box with an open lid and a folded paper sheet, plus a small inset image (no text or symbols)
natural_image
Line drawing of a portable air conditioner unit with ventilation grilles and cooling fins (no text or symbols)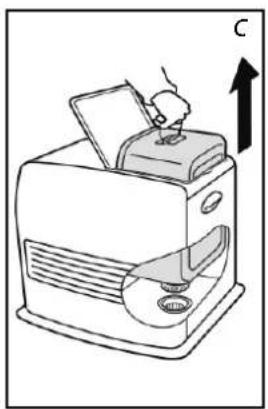
natural_image
Line drawing of a printer with a hand inserting a paper into the top box, showing mechanical components and an upward arrow (no text or symbols)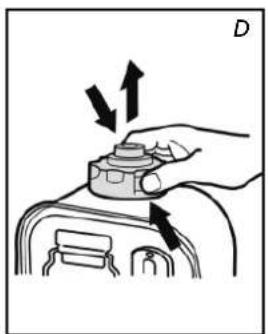
natural_image
Illustration of a hand adjusting a mechanical component with arrows indicating motion (no text or symbols)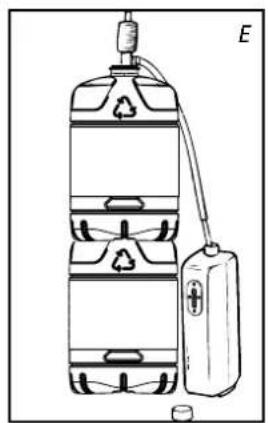
natural_image
Diagram of a water tank with recycling symbol and connected to a battery (no text or labels)KÄYTTÖÖHJEET

A LÄMMITTIMEN ASENTAMINEN


F AJASTIMEN KÄYTTÄMINEN
natural_image
Simple line drawing of a finger pressing a button with a checkmark (no text or symbols)
natural_image
Simple line drawing of a finger pressing a key on a circular button (no text or symbols)LAPSITURVALUKKO
J 'SAVE'-TOIMINNON OIKEA KÄYTTÖ
K ÖLJYN MERKKIVALO
natural_image
Illustration of a computer tower with a hand inserting a cable into the front panel (no text or symbols visible)natural_image
Technical diagram of a mechanical device with internal components and an arrow indicating motion (no text or symbols)natural_image
Diagram of a mechanical device with a downward arrow indicating motion or force, no text or symbols present
natural_image
Illustration of a kitchen appliance setup with a hand holding a tool, a water dispenser, and a bowl (no text or symbols)M VARASTOINTI (LÄMMITYSKAUDEN PÄÄTTYESSÄ)
natural_image
Illustration of a gift box with a card, a plastic sheet, and a pair of eyeglasses (no text or symbols)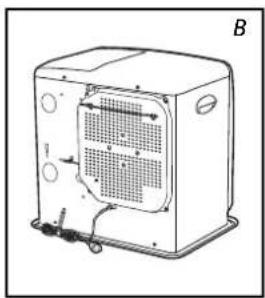
natural_image
Line drawing of a portable air conditioner unit with cooling fins and ventilation slots (no text or symbols)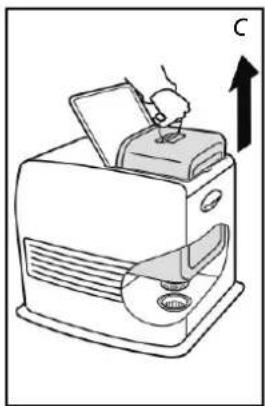
natural_image
Line drawing of a portable device with a hand inserting a card into it, showing internal components and a label 'C' (no text or symbols on the device itself)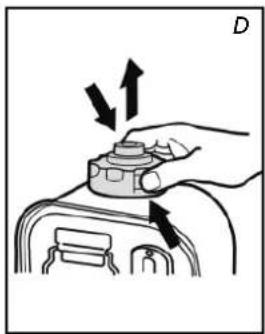
natural_image
Diagram of a hand pressing down on a mechanical component with arrows indicating motion (no text or symbols)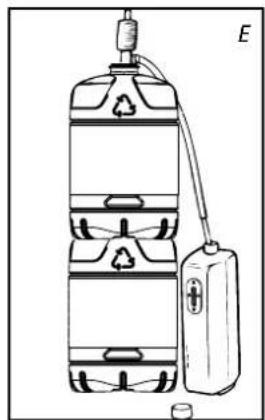
natural_image
Diagram of a water safety device with a recycling symbol and connected tubing (no text or labels)ΕΓΧΕΙΡΙΔΙΟ

C PYOMIESH THΣ ΩΡΑΣ
Set the time to use the heater as a clock or if using the timer. You can even set the time when the heater is on.

D ENAYΣH THΣ ΘΕΡΜΑΣΤΡΑΣ

F XPHSH TOY XRONODIAKOPTH
natural_image
Hand holding a circular button with a black dot and 'N' label, no text or symbols on the button itselfnatural_image
Simple line drawing of a finger pressing a key on a circular button (no text or symbols)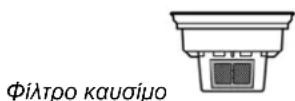
natural_image
Illustration of a hand using a pipette to clean water from a bottle and container (no text or symbols)Congratulations with your purchase of a portable domestic heater. You have purchased a quality product, which will serve you for many years to come. This, of course, provided you use the heater correctly. Please read these Directions for Use first, to ensure maximum lifetime for your heater.
Your heater comes with a 48-month manufacturer's warranty on all defects in materials or workmanship.
We wish you a warm and comfortable time with your heater.
Yours sincerely,
PVG Holding b.v.
Customer Service Department
1 READ THE DIRECTIONS FOR USE FIRST.
2 IN CASE OF ANY DOUBT, CONTACT YOUR DEALER.
GENERAL DIRECTIONS FOR USE
Below you will find the main steps to be taken for using your heater. For more details, please refer to the MANUAL (pages 130 ff.).
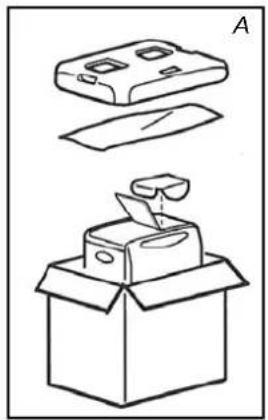
1 Remove all packaging materials (refer to Section A, Fig. A).
2 Fill the removable tank ④ (refer to Section B, Fig. C-F).
3 Insert the plug into the wall-socket.
4 Ignite the heater using the ON-OFF key (refer to Section D).
5 If required, change the temperature using the adjustment keys ④6 (refer to Section E).
6 Switch off the heater by pressing the ON-OFF key
As a safety measure against fire, the tank must be filled:
- with the appliance switched off,
- in a different room to the one where the heater is installed,
- the user must always check that the filled tank is closed correctly, away from any source of heat or naked flames
- The first time the heater is ignited it will smell like "new" for a short time.
- Store all fuel containers with their original caps and seals in a cool and dark place.
- Fuel ages. Use new fuel at the start of every heating season.
- The use of Qlima Premium Quality Fuels as a heating fuel assures you that you have a good quality fuel.
- Before changing brands and/or types of fuel make sure that the mobile heater first completely empties all of the remaining fuel inside the heater.
Do not dispose of electrical appliances as unsorted municipal waste, use separate collection facilities. Contact your local government for information regarding the collection systems available. If electrical appliances are disposed of in landfills or dumps, hazardous substances can leak into the groundwater and get into the food chain, damaging your health and well-being. When replacing old appliances with new once, the retailer is legally obligated to take back your old appliance for disposal at least for free of charge.
MAIN COMPONENTS
① Information display
② Operating keys
③ Tank compartment lid
4 Removable tank
⑤ Metal cap
6 Fuel filter
⑦ Fixed tank
⑧ Flame inspection window
9 Hot air grille
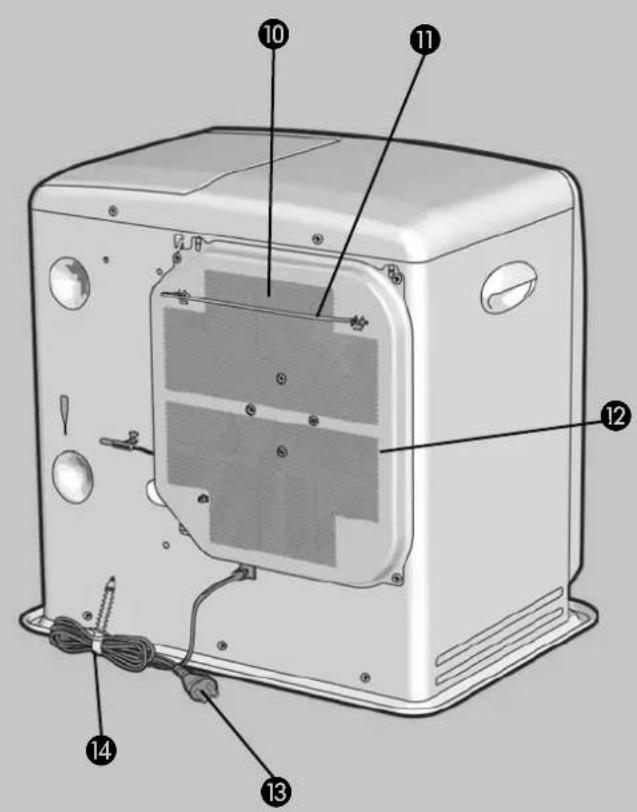
⑩ Air supply
⑪ Safety bracket
12 Filter ventilator
13 Plug
14 Connecting lead
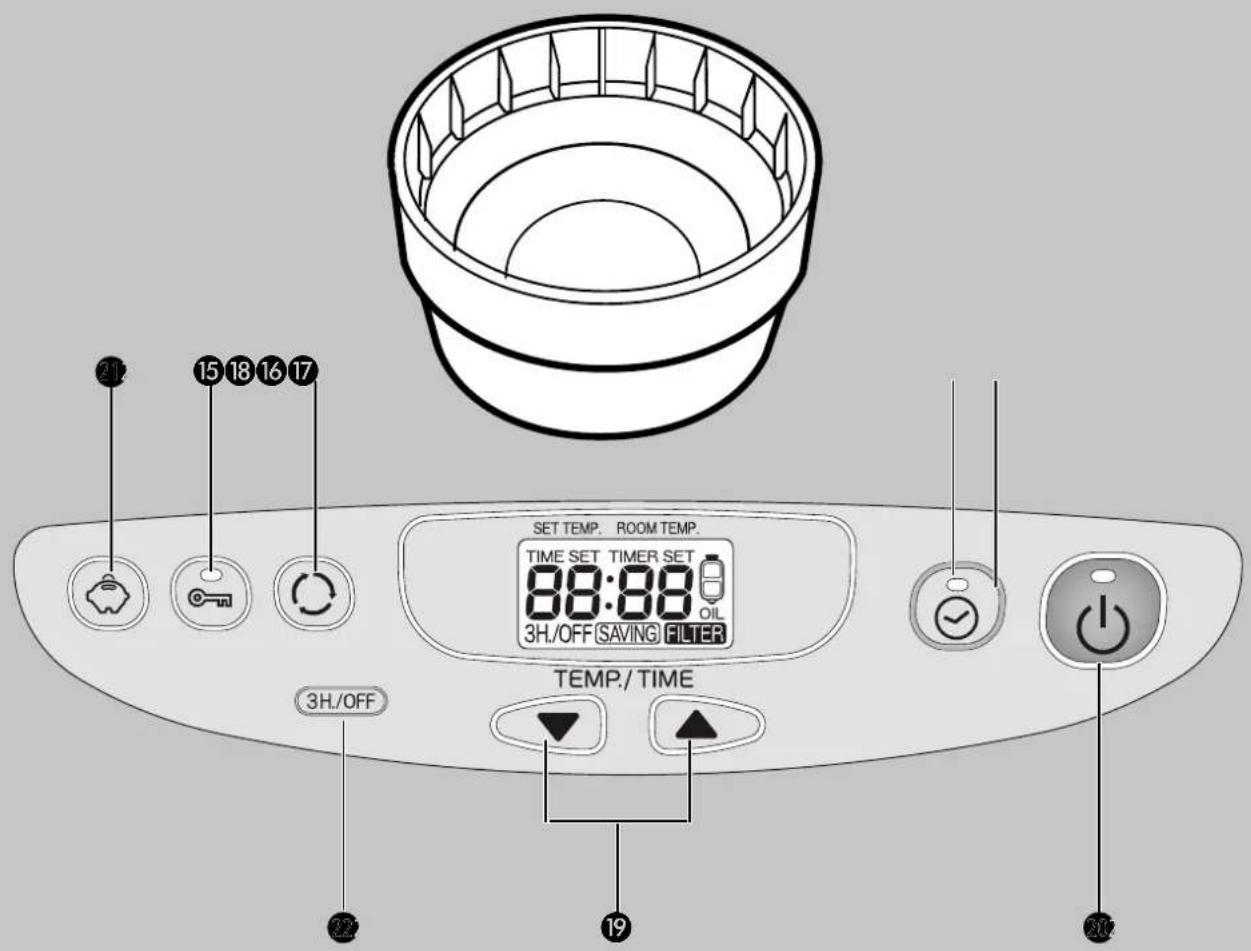
15 Child safety catch key
16 Green timer indicator
17 Timer key
18 Mode key
19 Key to set temperature/time
20 On/off key (red indicator on)
SAVE key
3H OFF function
WHAT YOU NEED TO KNOW IN ADVANCE
VENTILATE SUFFICIENTLY
Read this user manual carefully before using the appliance and keep it for future reference. Install this device only when it complies with local/national legislation, ordinances and standards. This product is intended to be used as a heater in residential houses and is only suitable for use in dry locations, in normal household conditions, indoors in living room, kitchen and garage.
Regardless of the model, you must always make sure that the heater is used in a room large enough to enable the heater to be used safely without extra ventilation. If the room is smaller than required, you must always open a door or window slightly (ensuring an opening of approx. 2.5 cm). It is important that every room where the heater is used has sufficient air intake and efficient air outflow (both openings must have a minimum cross section of 50 cm^2 ). No modifications to the safety system are allowed, as that will invalidate the guarantee that the air probe will work properly. Consult your dealer in case of doubt.
Especially for France: Your heater was designed to operate exclusively on fuel for liquid fuel-operated mobile heaters in accordance with the Decrees of 18-07-2002 and 25-06-2010. The use of other fuels is forbidden.
Ask your dealer or check our website for the addresses of our retailers.
The liquid fuel-operated mobile heater is intended as an extra heater, and not as a continuous source of heat.
Especially for United Kingdom: Only use Class C1 paraffin fuel in accordance with BS2869; Part 2, or equivalent.
The user must comply with the following instructions for proper use:
DO NOT
- use the liquid fuel-operated mobile heater in caravans, boats, and vehicle cabins;
- use the liquid fuel-operated mobile heater in insufficiently ventilated rooms (consult the table of properties for the minimum dimensions of the room to be heated), underground rooms and / or at a height of over 1000 metres;
- modify the heater safety features.
The use of this type of heating in public rooms is subject to prior regulatory permission. Obtain proper information on this in advance.
THE RIGHT FUEL
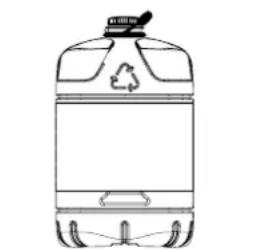
Your heater has been designed for use with high-quality water-free pure paraffin oil, such as Qlima Premium Quality Fuels. Only fuels of this kind will ensure clean and proper burning. Lower quality fuel may result in:
▶ increased possibility of malfunctioning
▶ incomplete combustion
▶ reduced heater lifetime
▶ smoke and/or fumes
▶ deposits on the grid or mantle
Using the right fuel is therefore essential for safe, efficient, and comfortable use of your heater.
natural_image
Line drawing of a plastic bottle with a recycling symbol on top (no text or labels)Only the use of the correct fuel will ensure safe, efficient, and comfortable use of your heater.
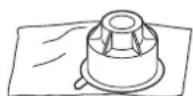
This transportation cap is packed separately in the box. Only this cap ensures trouble-free transportation of the heater after use. Store it well!
Damage and/or malfunctions of the heater due to the use of other than high-quality water-free pure parafine oil is not covered by the warranty.
Always refer to your local dealer for the right fuel for your heater.
natural_image
Illustration of a cardboard box with an open lid and a stack of plastic sheets (no text or symbols)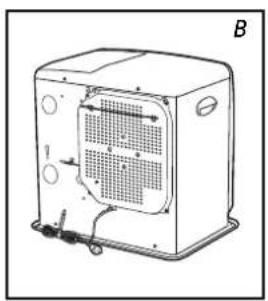
natural_image
Line drawing of a portable air conditioner unit with ventilation grilles and cooling fins (no text or symbols)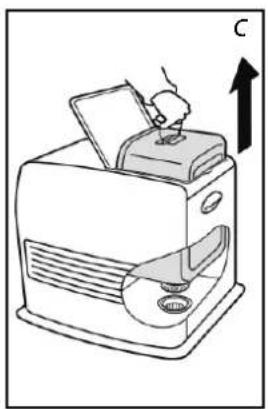
natural_image
Line drawing of a portable printer with a hand inserting a paper into it, showing internal components and an upward arrow (no text or symbols)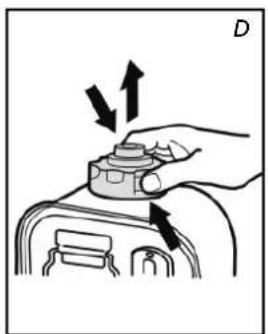
natural_image
Illustration of a hand adjusting a mechanical component with arrows indicating motion (no text or symbols)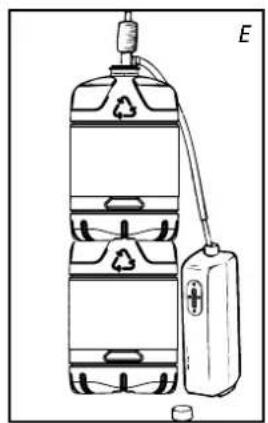
natural_image
Diagram of a water tank with recycling symbol and connected to a battery (no text or labels)MANUAL

A INSTALLING THE HEATER
1 Carefully remove your heater from the box and check the contents. In addition to the heater you also need to have:
▶ a manual fuel pump
▶ a transportation cap
▶ these directions for use
Keep the box and the packaging materials (Fig. A) for storage and/or transportation.
2 Open the lid of the tank compartment ③ and remove the piece of cardboard.
3 Fill the removable tank as indicated in Section B.
4 The floor should be firm and completely level. Reposition the heater, when it is not level. Do not try to correct the situation by placing books or other goods under the heater.
5 Use the horizontal safety bracket ⑪ to prevent the curtains from covering the ventilator (Fig. B.).
6 Insert the plug 13 into the wall-socket (230 Volts - AC / 50 Hz) and set the correct time using the adjustment keys 19 (refer to Section C).
7 Your heater is now ready for use.
B FILLING FUEL
Fill the removable tank in a suitable place since there can always be some spillage. Follow the procedure below:
1 Make sure that the heater is switched off.
2 Open the upper lid and lift the removable tank out of the heater (Fig. C). Note: Some drops may leak from the tank. Put down the removable tank (cap pointing upwards, handle on floor and take off the fuel cap.
3 Remove the metal cap. Easy to open by holding the outside (fig. D.).
4 Fill the removable tank using a fuel pump (refer to fuel pump operation instructions.) Make sure that it is in a higher position than the removable tank (Fig. E). Insert the ribbed hose into the opening of the removable tank.
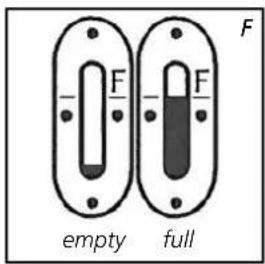
5 Check the removable tank fuel gauge while filling the tank (Fig. F). Stop filling once the gauge indicates that the tank is full. Never overfill the tank, especially not when the fuel is very cold (fuel expands when it heats up).
6 Let the remaining fuel in the pump flow back into the jerrycan and carefully
remove the pump. Carefully reposition the fuel cap back on the tank. Clean off any spilled fuel.
7 Check whether the fuel cap is straight and tightened properly. Reinstall the removable tank in the heater (cap down). Close the lid.

- Do not move the heater after reinstalling the tank.
- Take care not to damage the cap while filling the tank. Deformation of the cap can lead to fuel leakage.
8 Turn the heater on again.
C SETTING THE TIME
Set the time to use the heater as a clock or if using the timer. You can even set the time when the heater is on.
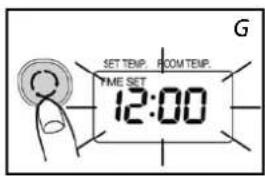
1 Press the mode key to set the time (fig. G). Time set and the time flash on the display.
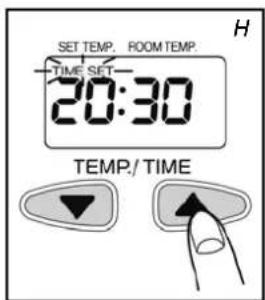
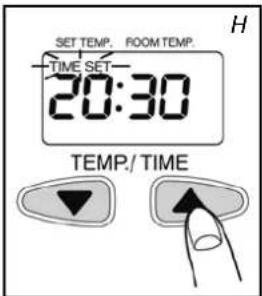
2 Press the buttons (▼) or (▲) to set the time. The time displays the numbers 00:00 to 23:59. Press the (▲) button to go forwards and the (▼) button to go backwards. The time will change in one minute steps each time you press one of these 2 buttons. The time on the display will change in ten minute steps if you keep the button pressed (fig. H.).
3 Press the mode key again to activate the timer function. See chapter F.
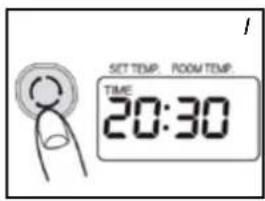
4 Press the mode keys to display the time (fig. 1.). If the time is not set, the display indicates --:--.
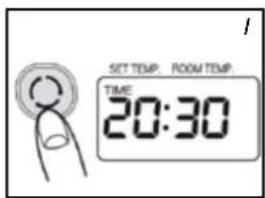

The time must be set again after a power cut or if the plug has been removed from the socket.
D IGNITING THE HEATER
When used for the first time, a new heater may give out a smell for a short while. You should therefore provide extra ventilation.
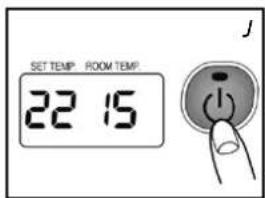

Always ignite the heater with the ON / OFF button ⚙. Never use matches or a cigarette lighter.
1 Press the ON / OFF button
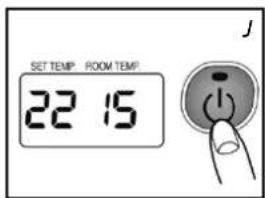
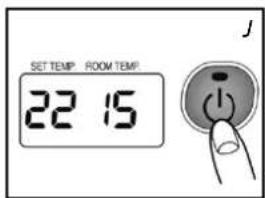
The ignition indicator will light up: the required temperature and the ambient temperature are displayed (fig. J.). The ambient temperature is displayed from 1°C. If the temperature is below 0°C, Lo is displayed. Ignition takes about 45 seconds.
2 Normal combustion:
• The flames are blue
• The burner grille can become red
Abnormal combustion:
- The flame is yellow and blue In this case take appropriate measures.
This heater cannot be switched on continuously for more than 56 hours. After 56 hours it stops automatically, even if the tank has been refilled within this period.
E SETTING THE REQUIRED TEMPERATURE
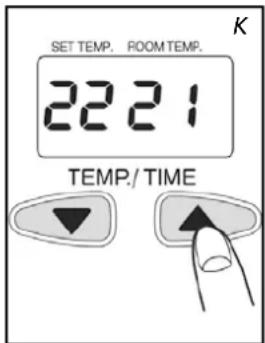
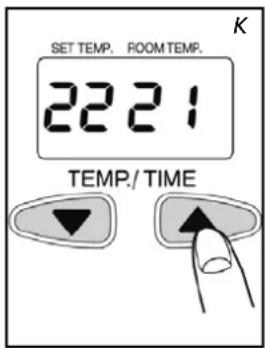
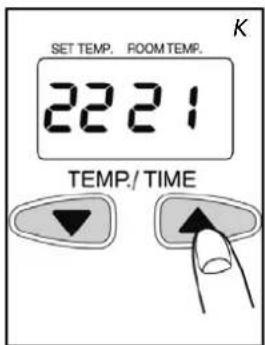
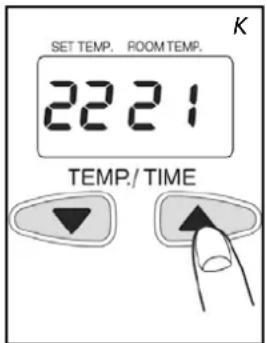
If the heater is on, the required temperature can be changed using the adjustment buttons (fig. K). To increase the temperature, press the ▲ button. To decrease the temperature, press the ▼ button. Each time you press the adjustment button the temperature changes by 1°C. The temperature can be set to a minimum of 5°C and a maximum of 26°C.

- If the heater is used in a small space, in a well-insulated space or if the outside temperature is relatively high, the ambient temperature can become higher than the required temperature. In this case, turn the heater off. - The displayed temperature is the mean ambient temperature. This temperature may not correspond with that indicated by a thermometer.
F USING THE TIMER
The timer allows you to switch on the heater automatically at a preset time. In order to switch on the timer, the correct time must have been set (refer to Section C) and the heater should be off. Follow the procedure below:
natural_image
Hand holding a circular button with a black dot and 'N' label, no text or symbols on the button itself1 Check that the time is set properly (see chapter C).
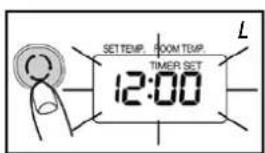
2 Press the mode button 19 (fig. L) until Timer and Set appear in the display.
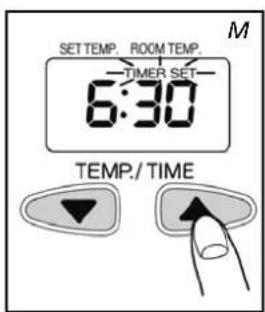
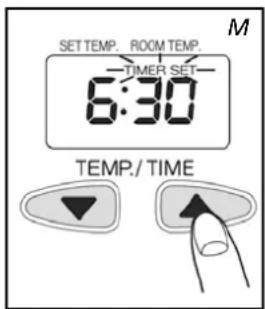
3 Press the (▼) or (▲) buttons 19 to set the required activation time for the heater. Press the (▲) button to go forwards and the (▼) button to go backwards. The time will change in one minute steps each time you press one of these 2 buttons. The time on the display will change in ten minute steps if you keep the button pressed (fig. M).
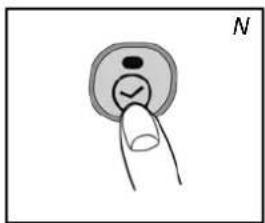
4 Press the ON/OFF buttons 🕒 to turn the heater on (the indicator will light up). It is not necessary to press this button if the heater is on.
5 Press the timer button ⑰. The indicator goes out. The time indicator will light up and the timer is set.

Take care not to press the ON / OFF button 📂 again after setting the timer, this will reset the timer.
6 The heater turns on at the time chosen.

- To cancel the timer, press the ON / OFF button (the timer indicator goes out). - Set the timer and the clock again after a power cut. - In case of an earthquake, or shocks, code E01 will appear in the display. Reset the error and repeat from point 4 to set the timer again.
3H OFF FUNCTION
When the heater is working and button 3H/OFF is pushed, the heater will switch off automatically after three hours of operation (after pushing the button). During the countdown period this setting can be de-activated by pushing the button again. In the display the status of this function is shown.
G TURNING THE HEATER OFF
1 Press the ON / OFF button. The red lamp flashes for about 8 seconds and the heater is turned off. Always check that the flame goes out.

The ventilator continues operating for about 3 minutes after turning off in order to cool the inside of the heater. If you turn off the power earlier, uncontrolled symptoms can occur (release of smoke, smell etc.).
H IN CASE OF PROBLEMS
The symptoms mentioned above are not faults and not abnormal.
Check the list.
| Symptoms Causes | ||
| While igniting | Igniting is tedious | Igniting takes about 45 seconds. After filling the tank, wait till the fuel has reached the fixed tank. Repeat ignition 2 or 3 times. |
| Crackling sound | This sound is made by the electric ignition. | |
| White smoke | This can happen if the fuel does not circulate past the burner properly | |
| During ignition or turning off | Smoke and an unpleasant smell during first use | That is the protective lacquer getting warm. This soon stops. Give the space more ventilation. |
| The ambient temperature does not increase and the requested temperature is higher. | The space is too large. | |
| The flame glows red. | The ambient air is damp or salty or it contains too many impurities. | |
| The ambient temperature does not decrease and the requested temperature is lower. | The heater is being used in a small insulated space or the outside temperature is relatively high. Turn the heater off. | |
| The displayed ambient temperature is not the same as indicated by a thermometer. | This is because the displayed ambient temperature is an indication of the average temperature of the space. | |
| Small knocking noises when the heater is in operation or immediately after turning off. | This is the sound of the metal expanding. | |
| Noise 8 seconds after turning off. | A ticking sound: can occur when the heater cools off. |
THE INFORMATION DISPLAY
The information display ① not only serves as an indicator of the (set) time and temperature (sections C, E, and F), it also indicates any malfunctioning of the heater. The code on the information display tells you what is the matter:
| Code Information | Action | |
| Time---- | The heater has been automatically turned off by a power cut or bad connection. | Restore power or restore the connection. Press the ON / OFF key 📄 again. |
| E01 | An earthquake (magnitude 5 or more), strong vibrations or a shock will ensure that the heater automatically turns off. (The safety system against shocks has worked). | Make sure there are no combustible materials around the heater, or fuel leakages. Press the ON / OFF key 📄 again. |
| E02E03 | The heater has been automatically turned off after a fault or during ignition or due to the presence of water or dust in the fuel filter or in the fixed tank. | Remove the water and the dust in the fixed tank. Clean the fuel filter (see chapter M).Press the ON / OFF button 📄 again. |
| E07 | An increase in ambient temperature has turned the heater off. (The temperature monitoring system has worked). | Ventilate the space. Let the heater cool off. Press the ON / OFF button 📄 again. |
| FilterE09 | The heater has been automatically turned off because the hot air stream, the ventilator or the ventilator filter is blocked or hindered by something. (The safety system against overheating has worked). | Remove obstacles from the ventilator opening. Clean the ventilator filter (see chapter M) Press the ON/OFF button 📄 again. If the problem occurs again after taking the above measures, contact your dealer. |
| E13 | The heater has been turned off in a closed space. (The safety system against incomplete combustion has worked). | Ventilate the space and press the ON / OFF button 📄 again.Ensure the space is sufficiently ventilated. |
| The ON indicator flashes. Err lights up | The heater has automatically stopped because the ON / OFF button was kept pressed in or was blocked. | Remove obstacles around the buttons of the display panel. Press the ON/OFF button 📄 again. |
| F00 – F30 | Poor functioning. Heater needs maintenance | Note the messages displayed and turn the heater off. Contact your dealer. |
| Symptoms Causes Measures to be taken | ||
| Heater doesn't ignite | The child safety catch lights up | Turn the child safety catch off |
| The fuel indicator lamp doesn't work | The tank is empty Fill the tank | |
| The tank is deformed Replace the tank | ||
| Dirt particles dust or water on the filter and / or in the fixed tank | Clean the fixed tank and the fuel filter. | |
| Power loss | The fuel indicator flashes | |
| The fuel indicator flashes Fill the tank | ||
| A poor quality fuel has been used. | Remove the fuel from the two tanks, then rinse with the correct fuel. | |
| Abnormal combustion | A poor quality fuel has been used. | |
| Poor ventilation Ventilate regularly | ||
| Dust on the ventilator filter Clean the ventilator filter | ||
| Unpleasant smells | A poor quality fuel has been used | Remove the fuel from the two tanks, then rinse with the correct fuel. |
| No fuel in the tank Fill the tank | ||
| Fuel leakage or spilled fuel | Do not use any more and contact your dealer | |
| Fuel leakage | Move the heater, the tank is not empty | |
| A poor quality fuel has been used. | ||
AUTOMATIC DEACTIVATION
This heater is fitted with a safety system that ensures that it switches off automatically after 56 hours continuous operation. If desired, you can switch the heater on again by pressing the ON/OFF button (see section D).
CHILDPROOF LOCK
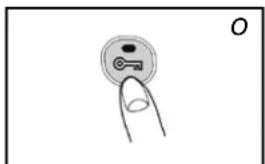
The childproof lock can be used to prevent children accidentally changing the heater settings. When the heater is burning and the childproof lock is on, the heater can only be switched off. Other functions are blocked then. If the heater has already been switched off, the childproof lock also prevents accidental ignition of the heater. Activate the childproof lock by pressing the CHILDLOCK key 15 and holding it down for more than 3 seconds. The childlock indicator will appear on the information display (Fig. O), indicating that the childproof lock has been activated. Switch off the childproof lock by pressing the CHILDLOCK key 15 and holding it down for more than 3 seconds once again.
J THE CORRECT USE OF 'SAVE'
The 'SAVE' function allows you to limit the temperature. When this function is activated, the heater will automatically switch off, when the room temperature exceeds the set temperature by 3°C. Subsequently, when the room temperature has dropped again to the set temperature, the heater will automatically switch on again. Activate the 'SAVE' setting by pressing the appropriate key. The SAVE indicator light will light up. Switch off the function by pressing the SAVE key once again.
natural_image
Simple line drawing of a finger pressing a key on a circular button (no text or symbols)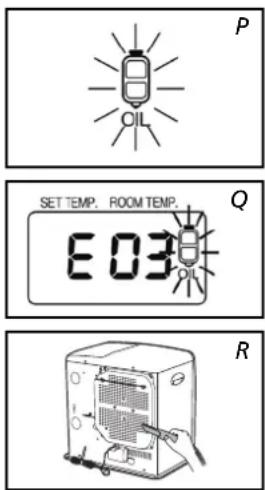
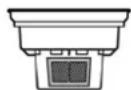
Fuel filter

Without the 'SAVE' setting your heater will maintain the set temperature by approximation as well, by adjusting its heating capacity. 'SAVE' is an economy setting, which you can use when, for instance, you are not present in the room or to keep it frost-free.
K THE 'OIL' INDICATOR
If the low fuel level indicator lights up in combination with a short tone, then the fuel tank is empty. The heater will automatically burn at its lowest setting for a period of about 80 minutes. The fuel tank must be replenished.
▶ remove the removable tank from the heater and fill it with new fuel (outside the living space in a safe place) (see chapter B)
If you take no action, the fuel tank will be emptied and the display will indicate "E 03" (fig. Q). The heater is automatically turned off.
To ignite the heater once more, fill the tank and wait a few minutes.
Then press the ON / OFF button 📄.
L MAINTENANCE
Switch off the heater and let it cool down, before you start any maintenance work. Also disconnect the plug from the mains. Your heater needs hardly any maintenance.
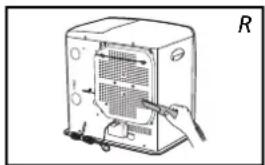
1 Clean the ventilator filter (fig. R).
Clean the fuel filter:
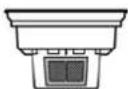
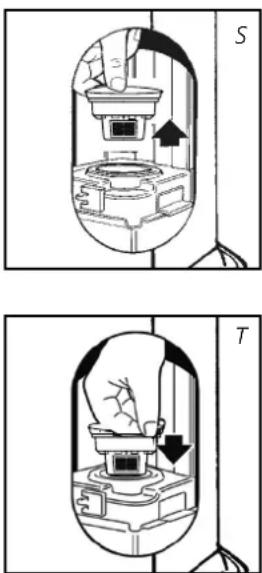
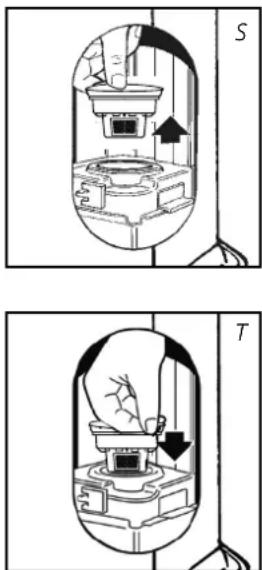
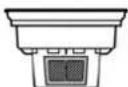
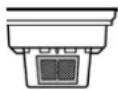
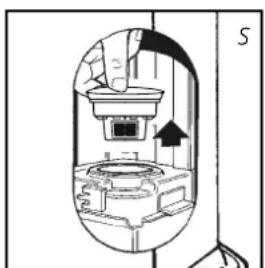
1 Remove the removable tank ④ from the heater and remove the fuel filter (Fig. S). Some drops may leak from the filter; keep a cloth at hand.
2 Remove the dirt by tapping the fuel filter upside-down against a hard surface. (Never clean it with water!)
3 Reinstall the fuel filter into the heater.

We recommend that you remove dust and stains from time to time with a damp cloth, because otherwise these may cause stains that are hard to remove.

Do not use solvents or alcohol to clean the heater: fire hazard. Clean very dirty components with a light synthetic cleaning agent.

Do not remove any heater components yourself. Always contact your dealer for repairs.

When the power cord is damaged, it may only be replaced by an authorised fitter. Use a new cord of the type H05 VV-F.
natural_image
Illustration of a hand using a pipette to clean water from a bottle, with another container nearby (no text or symbols)Transport cap

M STORAGE (END OF THE HEATING SEASON)
At the end of the heating season, you must store the heater in a dust-free place, if possible in its original packaging. Unused fuel cannot be used in the next heating season. We therefore recommend that you burn up all fuel. If there is still some fuel left, do not throw it away, but dispose of it in accordance with the local regulations for the disposal of domestic chemical waste.
Always start the new heating season with fresh fuel. When you start re-using the heater follow the instructions again (starting from section A and as specified).
N TRANSPORTATION
Take the following measures to avoid fuel leakage during the transportation of the heater:
1 Let the heater cool down.
2 Remove the removable tank ④ from the heater and remove the fuel filter. Some drops may leak from the filter; keep a cloth at hand. Store the fuel filter and the removable tank outside the heater.
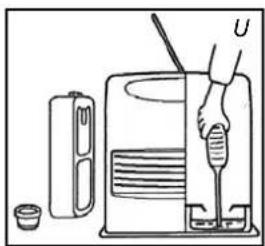
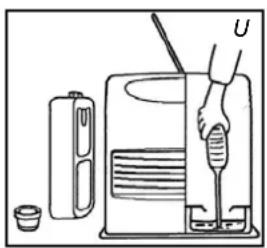
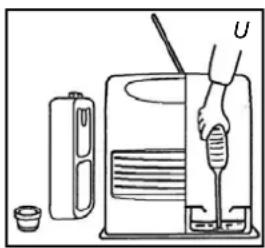
3 Empty the fixed fuel tank (fig. U).
4 Place the transport cap.
5 Always move the heater in an upright position.

Make the fixed tank empty with a fuel pump before transportation or in case of wrong or dirty fuel. First remove the fuel filter and then insert the fuel pump into the empty fixed tank. Follow the same procedure if the fuel tank contains water.
O SPECIFICATIONS
| SRE 8040 TC SRE 9046 TC | ||
| Ignition electrical | ||
| Fuel paraffin | ||
| Capacity (kW)* 1.28 - 4.00 1.28 - 4.65 | ||
| Suitable space (m3)** 65 - 170 75 - 190 | ||
| Fuel consumption (l/hr)* 0.416 0.485 | ||
| Fuel consumption (g/hr)* 333 388 | ||
| Burning time per tank (hr)* 21 18 | ||
| Capacity removable tank (litres) 9 9 | ||
| Weight (kg) | 12.1 | |
| Dimensions (mm) (including base plate) | width 466 | |
| depth 349 | ||
| height 445 | ||
| Accessories | transportation cap, manual fuel pump | |
| Mains | 230V - AC 50 Hz | |
| Rated power consumption (at ignition / at operation) | 428 W / 320 W | |
| Average power consumption (at operation) Min-Max | 88 W - 162 W | 88 W - 175 W |
* At maximum setting ** Specified values are indicative
The CE marking corresponds with the compliance with the standards EN 60-335 part 1 (1995) and EN 50-165 (08/97)
P WARRANTY PROVISIONS
Your heater comes with a 48-month warranty starting on the date of purchase. Within this period all defects in material or workmanship will be repaired without any charge. Transportation costs and the risks involved during the transportation of the heater or heater components shall always be at the expense of the purchaser. The following provisions shall apply regarding this warranty:
1 We expressly dismiss all other claims for damages, including consequential damages.
2 Any repairs or replacements of components within the term of warranty will not result in an extension of the term of warranty.
3 The warranty shall no longer apply, when the heater has been modified, non-original parts have been used, or when it is repaired by third parties.
4 The warranty shall not apply to parts that are subject to normal wear, such as the manual fuel pump and the vaporizer. See for the complete list of parts excluded from warranty on Qlima.com/warranty.
5 The warranty shall only apply, when you present the original, dated proof of purchase, provided no changes have been made to it.
6 The use of correct fuel is crucial for the correct working of the heater. The warranty shall not apply to damages caused by actions not in compliance with the Directions for Use, neglect, and the use of an incorrect type of fuel, or fuel past its use-by date. The use of incorrect fuel can even be dangerous*, please refer to the chapter 'the right fuel'.
In order to avoid unnecessary costs, we recommend that you always read the
'Directions for Use' carefully first. In case they offer no solution, please take the heater to your dealer for repair.
* Highly inflammable substances may induce uncontrollable burning, causing flames to break out. Should this happen, never try to move the heater, but always switch off the heater immediately. In case of emergency you may use a fire extinguisher, but only a type B extinguisher: a carbon dioxide or powder extinguisher.
Egregio Signore, Gentile Signora,
natural_image
Illustration of a box with an open lid, a folded paper sheet, and a pair of eyeglasses (no text or symbols)
natural_image
Line drawing of a portable air conditioner unit with ventilation grilles and cooling fins (no text or symbols)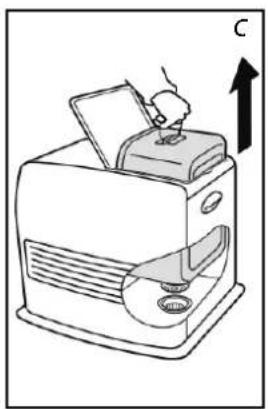
natural_image
Line drawing of a printer with a hand inserting a paper into the top box, showing mechanical components and an upward arrow (no text or symbols)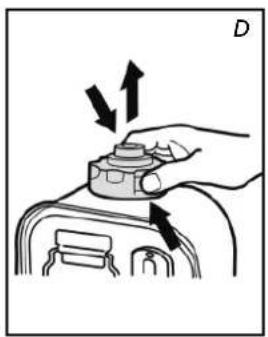
natural_image
Illustration of a hand pressing down on a mechanical component with arrows indicating motion (no text or symbols)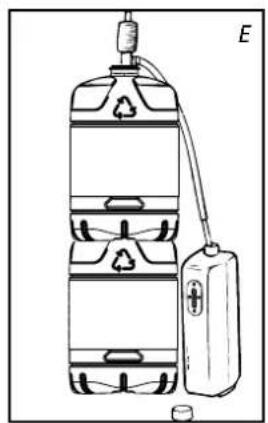
natural_image
Diagram of a water tank with recycling symbol and connected to a battery (no text or labels)ISTRUZIONI D'USO


D ACCENSIONE DELLA STUFA

F USO DEL TIMER
natural_image
Illustration of a finger pressing a button with a checkmark (no text or symbols)
natural_image
Simple line drawing of a finger pressing a keyhole (no text or symbols)DISPOSITIVO DI SICUREZZA
Filtro del combustibile

natural_image
Illustration of a hand using a tool to clean or operate a device with a water bottle and cup nearby (no text or symbols)
natural_image
Line drawing of a container with a recycling symbol on top (no text or labels)natural_image
Line drawing of a box with an open lid, showing three views: top view (no text or symbols)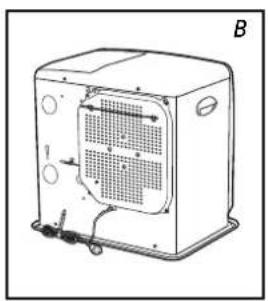
natural_image
Line drawing of a portable air conditioner unit with ventilation grilles and cooling fins (no text or symbols)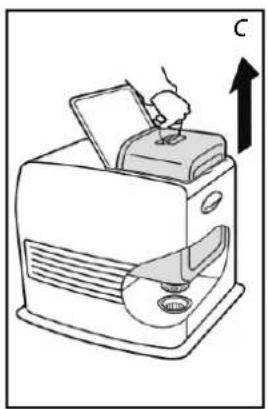
natural_image
Line drawing of a printer with a hand inserting a paper into the cover, showing mechanical components and an upward arrow (no text or symbols)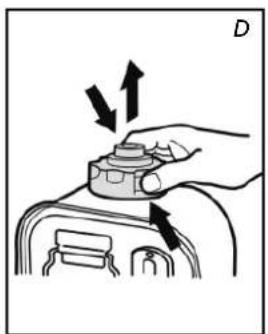
natural_image
Illustration of a hand adjusting a mechanical component with arrows indicating motion (no text or symbols)
natural_image
Diagram of a water tank with recycling symbol and connected to a battery (no text or labels)HÅNDBOK

A INSTALLERE OVNEN
C ANGI TIDEN
Angi tiden for å bruke varmeovnen som en klokke eller hvis timeren brukes. Du kan også angi tiden när varmeovnen er på.

Tenn alltid varmeovnen med ON/OFF knappen. Du må aldri bruke fyrstikker eller en sigarett.
F BRUKE TIMEREN
Ved hjelp av timeren kan varmeovnen slås på automatisk på et forhåndsinnstilt tidspunkt. For å kunne aktivere timeren må du ha stilt tiden riktig (se avsnitt C) og varmeovnen må være slått av. Følg fremgangsmåten nedenfor:
natural_image
Illustration of a finger pressing a button with a checkmark (no text or symbols)
natural_image
Simple line drawing of a finger pressing a keyhole (no text or symbols)K "OLJE" INDIKATOREN
natural_image
Illustration of a hand using a tool to clean or prepare a device with a container and cup nearby (no text or symbols)Transportlokket

M OPPBEVARING (SLUTT PÅ DEN KALDE ÅRSTIDEN)
WAT U VOORAF MOET WETEN
ALTIJD VOLDOENDE VENTILEREN
natural_image
Illustration of a box with an open lid, a folded paper sheet, and a pair of eyeglasses (no text or symbols)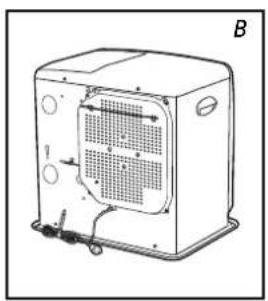
natural_image
Line drawing of a portable air conditioner unit with ventilation grilles and cooling fins (no text or symbols)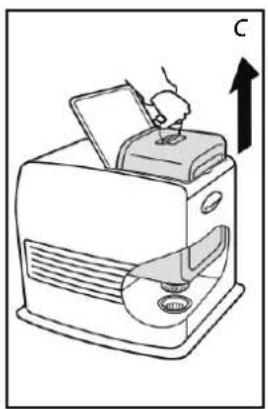
natural_image
Line drawing of a printer with a hand inserting a paper into it, showing mechanical components and an upward arrow (no text or symbols)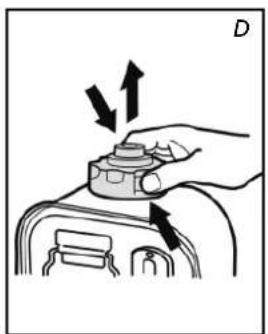
natural_image
Illustration of a hand adjusting a mechanical component with arrows indicating motion (no text or symbols)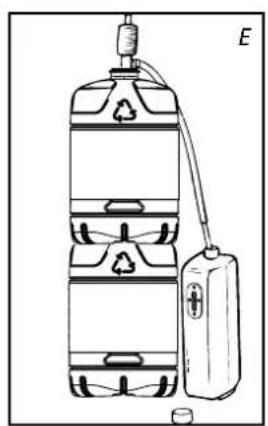
natural_image
Diagram of a water safety device with a plastic bag connected to a container, showing internal compartments and a recycling symbol (no text or labels)HANDLEIDING

A HET INSTALLEREN VAN DE KACHEL
C INSTELLEN VAN DE TIJD

F HET BENUTTEN VAN DE TIMER
natural_image
Simple line drawing of a finger pressing a keyhole (no text or symbols)HET KINDERSLOT
J HET JUISTE GEBRUIK VAN 'SAVE'
natural_image
Line drawing of a kitchen appliance with a hand holding a tool, no text or symbols present
natural_image
Illustration of a cardboard box with an open lid and a stack of plastic sheets (no text or symbols)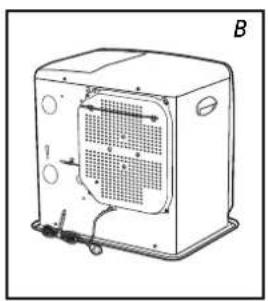
natural_image
Line drawing of a portable air conditioner unit with ventilation grilles and cooling fins (no text or symbols)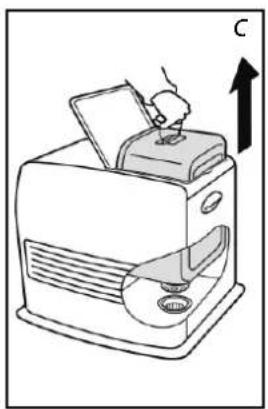
natural_image
Line drawing of a printer with a hand inserting a paper into the top box, showing mechanical components and an upward arrow (no text or symbols)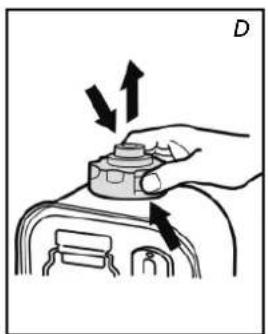
natural_image
Illustration of a hand adjusting a mechanical component with arrows indicating motion (no text or symbols)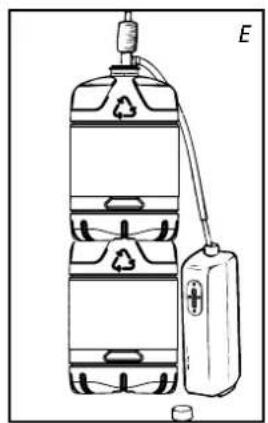
natural_image
Diagram of a water tank with recycling symbol and connected to a battery (no text or labels)MANUAL DE INSTRUÇÕES

C CONFIGURAR O TEMPO

ACENDER O AQUECEDOR

natural_image
Simple line drawing of a finger pressing a keyhole (no text or symbols)K O INDICADOR DE ÓLEO (OIL)
natural_image
Illustration of a hand using a tool to clean or wash a container, with a small container nearby (no text or symbols)ZAPEWNIĆ ODPOWIEDNIA WENTYLACJE,
natural_image
Illustration of a box with an open lid, a folded paper sheet, and a pair of eyeglasses (no text or symbols)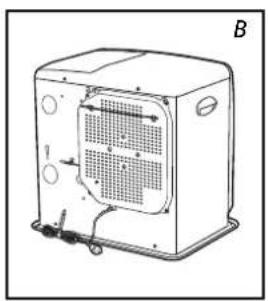
natural_image
Line drawing of a portable air conditioner unit with ventilation grilles and cooling fins (no text or symbols)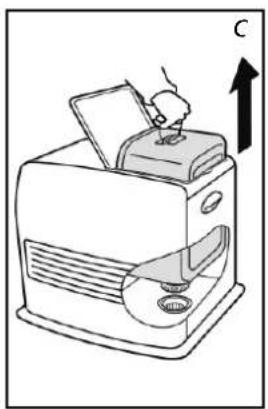
natural_image
Line drawing of a printer with a hand inserting a paper into the top box, showing mechanical components and an upward arrow (no text or symbols)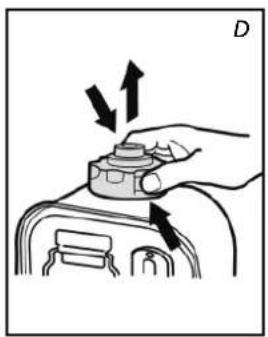
natural_image
Diagram of a hand pressing down on a mechanical component with arrows indicating motion (no text or symbols)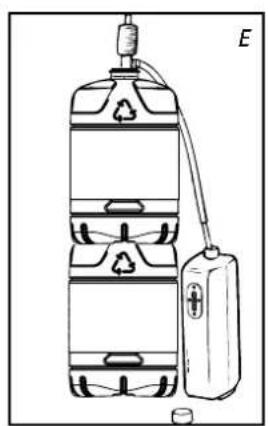
natural_image
Diagram of a water safety device with a plastic bag and connected tubing, showing internal compartments and a labeled component 'E' (no text or symbols on the diagram itself)INSTRUKCJA OBSŁUGI

A INSTALACJA GRZEJNIKA


natural_image
Simple line drawing of a finger pressing a button with a 'N' label (no text or symbols on the diagram itself)
natural_image
Simple line drawing of a finger pressing a key on a circular button (no text or symbols)natural_image
Illustration of a computer tower with a hand inserting a screwdriver into the front panel (no text or symbols)K WSKAŹNIK „OIL”
natural_image
Cross-sectional diagram of a mechanical device with internal components and an arrow indicating direction (no text or symbols)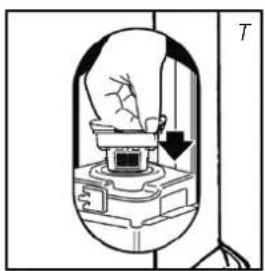
natural_image
Diagram of a mechanical device with a handle and internal components, no visible text or symbolsnatural_image
Illustration of a hand using a tool to clean or wash a container, with a small container nearby (no text or symbols)M PRZECHOWYWANIE (KONIEC SEZONU GRZEWCZEGO)
SE ALLTID TILL ATT DET FINNS TILLRÄCKLIG VENTILATION
natural_image
Illustration of a cardboard box with an open lid and a stack of plastic sheets (no text or symbols)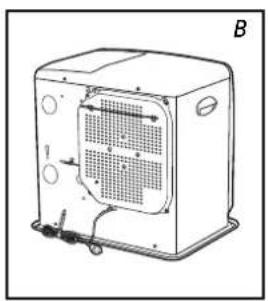
natural_image
Line drawing of a portable air conditioner unit with ventilation grilles and cooling fins (no text or symbols)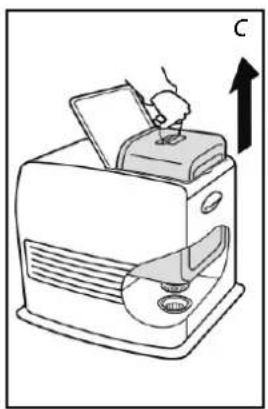
natural_image
Line drawing of a printer with a hand inserting a paper into the cover, showing an upward arrow (no text or symbols)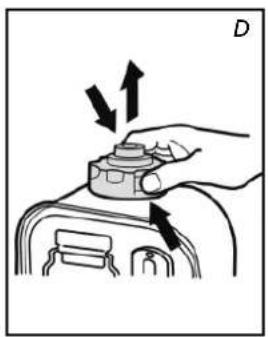
natural_image
Diagram of a hand pressing down on a mechanical component with arrows indicating motion (no text or symbols)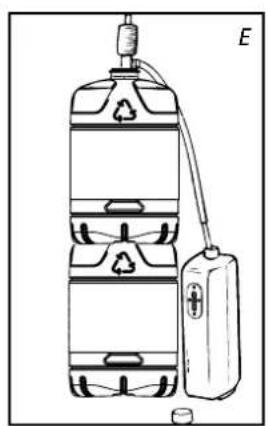
natural_image
Diagram of a water safety device with a battery and recycling symbol, no text or labels presentMANUAL

A INSTALLERA VÄRMAREN



natural_image
Illustration of a finger pressing a button with a checkmark (no text or symbols)
natural_image
Simple line drawing of a finger pressing a keyhole (no text or symbols)K OLJEINDIKATORN
natural_image
Cross-sectional diagram of a mechanical device with internal components and an arrow indicating direction (no text or symbols)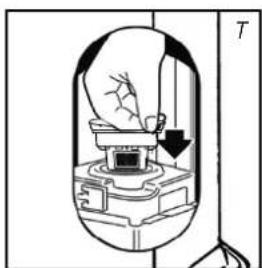
natural_image
Cross-sectional diagram of a mechanical device with a handle and base, showing internal components and a downward arrow (no text or symbols)
natural_image
Illustration of a hand using a tool to clean or wash a container, with a small container nearby (no text or symbols)Transportlocket

natural_image
Line drawing of a plastic bottle with a recycling symbol on the lid (no text or labels)natural_image
Illustration of a box with an open lid, a partially cut-out package, and a pair of eyeglasses (no text or symbols)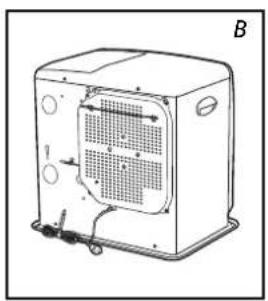
natural_image
Line drawing of a portable air conditioner unit with ventilation grilles and cooling fins (no text or symbols)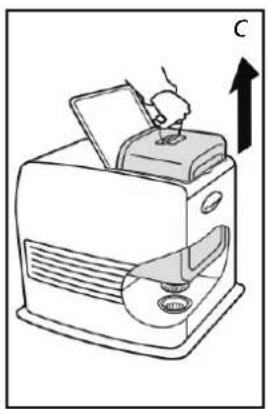
natural_image
Illustration of a hand using a device to press or install a component, with an upward arrow indicating motion (no text or symbols present)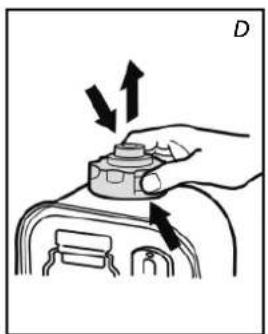
natural_image
Illustration of a hand pressing down on a mechanical component with arrows indicating motion (no text or symbols)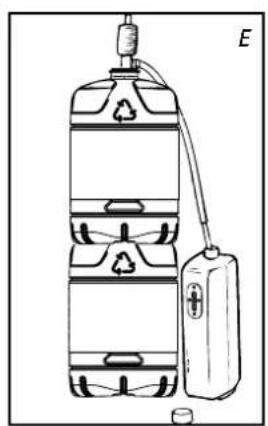
natural_image
Diagram of a water tank with recycling symbol and connected to a battery (no text or labels)NAVODILA ZA UPORABO

A A PRIPRAVA PEČI NA DELOVANJE

F UPORABA TIMERJA
natural_image
Hand holding a finger to press a circular button with a black dot and 'N' label (no text or symbols on the button itself)
natural_image
Simple diagram of a cylindrical oil lamp with radiating lines and a label 'P' (no text or symbols on the lamp itself)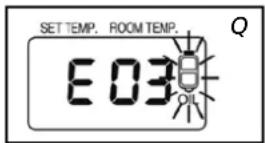
natural_image
Diagram of a computer tower with a hand inserting a screwdriver into the front panel (no text or symbols present)Filter za gorivo
natural_image
Cross-sectional diagram of a mechanical device with internal components and an arrow indicating motion (no text or symbols)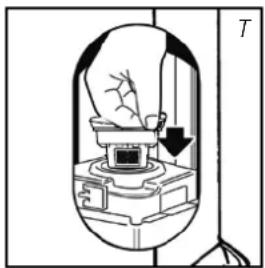
natural_image
Diagram of a mechanical device with a downward arrow indicating motion or force, no visible text or symbols
K PRIKAZOVALNIK GORIVA
natural_image
Illustration of a hand using a tool to clean or wash a machine, with a water bottle and small cup nearby (no text or symbols)
Pokrovček za prevoz
M SHRANJEVANJE (PO KONČANI GRELNI SEZONI)
Distributed in Europe by PVG Holding B.V.
Benötigen Sie weitere Informationen oder treten Probleme auf, besuchen Sie bitte unsere Website www.qlima.com, oder setzen Sie sich mit unserem Kundendienst in Verbindung (T: +31 412 694 694).
For alle yderligere oplysninger eller ved eventuelle problemer med apparatet henvises til www.qlima.com eller det lokale Kundecenter (T: +45 77 34 33 30).
ES Si necesita información o si tiene algún problema, visite nuestra página Web www.qlima.es, o póngase en contacto con el servicio cliente (T: +34 916 113 113).
Si vous souhaitez obtenir des informations supplémentaires ou si vous rencontrez un problème, rendez-vous sur notre site Web (www.qlima.fr / www.fr.qlima.be) ou contactez notre service client (T : +33 2 32 96 07 47 / +32 (0)3 326 39 39).
FHN Jos haluat huoltoapua, lisätietoja tai laitteen kanssa tulee ongelmia, tutustu verkkosivustoon osoitteessa www.qlima.com tai kysy neuvoa PVG kuluttajapalvelukeskuksesta (T: +45 77 34 33 30).
(68) If you need information or if you have a problem, please visit the our website (www.qlima.com) or contact our sales support (T: +31 412 694 694).
① Per informazioni e in caso di problemi, visitate il sito Web www.qlima.it oppure contattate il Centro Assistenza Clienti (T: +39 0571 628 500).
Hvis du trenger informasjon, eller hvis du har et problem med produktet, kan du gå til nettsidene www.qlima.com. Alternativt kan du kontakte med PVG' forbrukertjeneste (T: +45 77 34 33 30).
NL Als u informatie nodig hebt of als u een probleem hebt, bezoek dan de onze website (www.qlima.nl / www.qlima.be) of neem contact op met de afdeling sales support (T: +31 412 694 694 / +32 (0)3 326 39 39).
Se necessitar de informações ou se tiver problemas, visite o Web site www.qlima.es ou contacte o Centro de Assistência (T: +34 916 113 113).
W przypadku problemów i w celu uzyskania szczegółowych informacji odwiedź stronę internetową Qlima dostępną pod adresem www.qlima.com lub skontaktuj się z Centrum kontaktów Qlima (T: +48 48 613 00 70)
Om du behöver service eller information eller har problem med apparaten kan du besöka www.qlima.com eller kontakta Qlima kundtjänst (T: +45 77 34 33 30).
⑤LĐ Če želite dodatne informacije, obiščite spletno mesto podjetja na naslovu www.qlima.si ali pokličite na telefonsko (T: +386 (0)41 674 139).


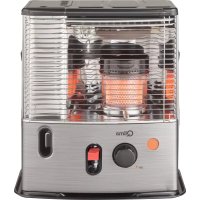
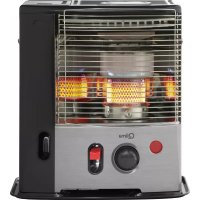
- SRE 8040 TC - SRE 9046 TC
- DANGER
- WARNING
- CAUTION
- ① CONSIGLI PER UN USO SICURO
- LE COMBUSTIBLE APPROPRIÉ
- MANUEL D'UTILISATION
- A INSTALLATION DE L'APPAREIL
- C REGLAGE DE L'HEURE
- F PROGRAMMATION DE L'HEURE DESIREE (TIMER)
- VERROUILLAGE DE SECURITE ENFANTS
- M ENTREPOSAGE (FIN DE LA SAISON)
- P CONDITIONS DE GARANTIE
- GEBRAUCHSANWEISUNG
- A DIE INSTALLATION DES KAMINOFENS
- C ZEITEINSTELLUNG
- KINDERSICHERUNG
- K DIE BRENNSTOFFANZEIGE „OIL“
- VEJLEDNING
- A INSTALLATION AF KAMINEN
- E INDSTILLING AF DEN ∅NSKEDE TEMPERATUR
- F BRUG AF TIMEREN
- B∅RNESIKRING
- K 'OIL'-INDIKATOREN
- M OPBEVARING (SLUT PÅ FYRINGSSÆSONEN)
- MANUAL
- A INSTALACION DE LA ESTUFA
- C AJUSTE DE HORA
- J USO CORRECTO DE LA FUNCION 'SAVE'
- L MANTENIMIENTO
- N TRANSPORTE
- KÄYTTÖÖHJEET
- A LÄMMITTIMEN ASENTAMINEN
- F AJASTIMEN KÄYTTÄMINEN
- LAPSITURVALUKKO
- J 'SAVE'-TOIMINNON OIKEA KÄYTTÖ
- K ÖLJYN MERKKIVALO
- M VARASTOINTI (LÄMMITYSKAUDEN PÄÄTTYESSÄ)
- ΕΓΧΕΙΡΙΔΙΟ
- C PYOMIESH THΣ ΩΡΑΣ
- D ENAYΣH THΣ ΘΕΡΜΑΣΤΡΑΣ
- F XPHSH TOY XRONODIAKOPTH
- GENERAL DIRECTIONS FOR USE
- MAIN COMPONENTS
- WHAT YOU NEED TO KNOW IN ADVANCE
- VENTILATE SUFFICIENTLY
- DO NOT
- THE RIGHT FUEL
- A INSTALLING THE HEATER
- B FILLING FUEL
- C SETTING THE TIME
- D IGNITING THE HEATER
- E SETTING THE REQUIRED TEMPERATURE
- F USING THE TIMER
- 3H OFF FUNCTION
- G TURNING THE HEATER OFF
- H IN CASE OF PROBLEMS
- THE INFORMATION DISPLAY
- AUTOMATIC DEACTIVATION
- CHILDPROOF LOCK
- J THE CORRECT USE OF 'SAVE'
- K THE 'OIL' INDICATOR
- L MAINTENANCE
- M STORAGE (END OF THE HEATING SEASON)
- N TRANSPORTATION
- O SPECIFICATIONS
- P WARRANTY PROVISIONS
- ISTRUZIONI D'USO
- D ACCENSIONE DELLA STUFA
- F USO DEL TIMER
- DISPOSITIVO DI SICUREZZA
- HÅNDBOK
- A INSTALLERE OVNEN
- C ANGI TIDEN
- F BRUKE TIMEREN
- K "OLJE" INDIKATOREN
- M OPPBEVARING (SLUTT PÅ DEN KALDE ÅRSTIDEN)
- WAT U VOORAF MOET WETEN
- ALTIJD VOLDOENDE VENTILEREN
- HANDLEIDING
- A HET INSTALLEREN VAN DE KACHEL
- C INSTELLEN VAN DE TIJD
- F HET BENUTTEN VAN DE TIMER
- HET KINDERSLOT
- J HET JUISTE GEBRUIK VAN 'SAVE'
- MANUAL DE INSTRUÇÕES
- C CONFIGURAR O TEMPO
- ACENDER O AQUECEDOR
- K O INDICADOR DE ÓLEO (OIL)
- ZAPEWNIĆ ODPOWIEDNIA WENTYLACJE,
- INSTRUKCJA OBSŁUGI
- A INSTALACJA GRZEJNIKA
- K WSKAŹNIK „OIL”
- M PRZECHOWYWANIE (KONIEC SEZONU GRZEWCZEGO)
- SE ALLTID TILL ATT DET FINNS TILLRÄCKLIG VENTILATION
- A INSTALLERA VÄRMAREN
- K OLJEINDIKATORN
- NAVODILA ZA UPORABO
- A A PRIPRAVA PEČI NA DELOVANJE
- F UPORABA TIMERJA
- K PRIKAZOVALNIK GORIVA
- M SHRANJEVANJE (PO KONČANI GRELNI SEZONI)
- Distributed in Europe by PVG Holding B.V.
Brand : QLIMA
Model : SRE9046TC
Category : Cooker