
TE-T56U - Tea Maker SHARP - Free user manual and instructions
Find the device manual for free TE-T56U SHARP in PDF.

| Product Type | Tea Machine |
| Brand | SHARP |
| Model | TE-T56U |
| Dimensions (W x H x D) | 233 x 296 x 225 mm (9.25 x 11.75 x 8.875 in) |
| Weight | Approx. 3.0 kg (6.6 lb) |
| Power Supply | 120 V, 60 Hz, AC only |
| Power Consumption | 940 W (main unit 910 W, tea mortar 30 W) |
| Water Tank Capacity | Up to 4 cups (MAX line) |
| Tea Container Capacity | Up to 4 cups for boiling tea / iced tea, 3 cups for latte |
| Preparation Modes | Boiling tea (HOT), warm tea (WARM), latte, iced tea |
| Grinding Function | Ceramic tea mortar with fine (FINE) or coarse (COARSE) setting |
| Number of Cups per Grind Cycle | 1 to 4 cups, or MAX (up to 6 g of leaves) |
| Tea Dispensing | Dispensing lever with safety lock |
| Indicator Lights | Quantity indicator, mode indicator, grind indicator, POWDER IN, START |
| Buttons | GRIND, MODE, START/PAUSE, STOP |
| Silent Function | Ability to disable beeps (except alarms) |
| Included Accessories | Cleaning brush, tea spoon (small and large), recipe booklet |
| Maintenance and Cleaning | Hand wash removable parts; descaling with citric acid; monthly cleaning of air filter and mortar |
| Safety | Automatic shut-off, dispensing lever lock, do not immerse, hot surfaces |
| Spare Parts and Repairability | Repair by a SHARP authorized technician only; parts: rotating blade, rubber gasket, mortar |
| Warranty | 1 year (parts and labor) in Canada |
Frequently Asked Questions - TE-T56U SHARP
User questions about TE-T56U SHARP
0 question about this device. Answer the ones you know or ask your own.
Ask a new question about this device
Download the instructions for your Tea Maker in PDF format for free! Find your manual TE-T56U - SHARP and take your electronic device back in hand. On this page are published all the documents necessary for the use of your device. TE-T56U by SHARP.
USER MANUAL TE-T56U SHARP
Features of the Tea Maker E-7
Before Use E-8
Grinding the Tea Leaves E-9
Making Hot Tea E-11
Making a Latte E-15
Making Cold Tea E-16
Care and Cleaning E-17
Troubleshooting-E-23
Specifications· E-23
For Customer Assistance E-25
Limited Warranty E-26
TABLE DES MATIERES
When using electrical appliances, basic safety precautions should always be followed to reduce the risk of fire, electric shock, and/or injury to persons, including the following:
- Read all instructions.
- Do not touch hot surfaces. Use handles or knobs.
- To protect against fire, electric shock and injury to persons do not immerse cord, plugs, or appliance in water or other liquid.
- Close supervision is necessary when this appliance is used by or near children.
- Unplug from outlet when not in use and before cleaning. Allow to cool before putting on or taking off parts, and before cleaning the appliance.
- Do not operate any appliance with a damaged cord or plug or after the appliance malfunctions, or has been damaged in any manner. Contact a SHARP AUTHORIZATION SERVICER.
- The use of accessory attachments not recommended by the appliance manufacturer may result in fire, electric shock or injury to persons.
- Do not use outdoors.
-
Do not let cord hang over edge of table or counter, or touch hot surfaces.
-
Do not place on or near a hot gas or electric burner, or in a heated oven.
- To disconnect, press "STOP" and remove plug from wall outlet.
- Do not use this appliance for other than intended use.
- Be certain lids are securely in place before operating appliance.
- Scalding may occur if the lids are removed during the brewing cycle.
- The Tea Container is designed for use with this appliance. It must never be used on a range top.
- Do not set a hot Tea Container on a wet or cold surface.
- Do not use a cracked Tea Container or a Tea Container having a loose or weakened handle.
- Do not clean Tea Container with cleansers, steel wool pads, or other abrasive materials.
- Check Tea Mortar for presence of foreign objects before using.
SAVE THESE INSTRUCTIONS
For Household Use Only
WARNING
RISK OF FIRE OR ELECTRIC SHOCK DO NOT OPEN

WARNING: TO REDUCE THE RISK OF FIRE OR ELECTRIC SHOCK,
DO NOT REMOVE COVER (OR BACK)
NO USER-SERVICEABLE PARTS INSIDE
REPAIR SHOULD BE DONE BY AUTHORIZATION SERVICE PERSONNEL ONLY
INFORMATION YOU NEED TO KNOW
Please make reading this Operation Manual your first step prior to using your tea maker.
This important booklet explains exactly how the appliance works and what you need to know to operate it successfully.
Electrical Requirements
The electrical power input requirement should be a protected 15amp 120Vac 60 Hz electrical outlet. It is recommended that a separate circuit serving only this appliance be provided.
This appliance has a polarized plug (one blade is wider than the other). To reduce the risk of electric shock, this plug is intended to fit into a polarized outlet only one way. If the plug does
not fit fully in the outlet, reverse the plug. If it still does not fit, contact a qualified electrician.
Do not attempt to modify the plug in any way.
Extension Cord
A short power-supply cord is provided to reduce the risks resulting from becoming entangled in or tripping over a longer cord.
Longer extension cords may be used if care is exercised.
If a long extension cord is used, its designated electrical rating must be at least equal to the electrical rating of the appliance. The extension cord should also be positioned so that it does not hang over a countertop or tabletop where it can be pulled on by children or tripped over.
Additional Important Safeguards
- Do not touch the plug with wet hands when inserting or removing from the outlet.
Plug securely into the electric wall socket and remove by gripping the plug.
Never pull on just the cord when unplugging from the wall.
- Put fresh cold water in the water reservoir.
Do not put hot water or any other liquids like milk, in the water reservoir, except as instructed in the operation manual to clean the appliance.
With regular use, hard water may clog your tea maker. Carry out descending is recommended. See page E-20. - The appliance should not be left unattended during operation.
- Do not place anything on the top of appliance during operation.
-
Do not attempt to move the appliance when it contains hot liquids. Allow the appliance to cool completely before moving. Remove the Tea Mortar and tea container before moving.
-
Do not operate the appliance if the water reservoir is cracked and/or leaking water. Contact a SHARP AUTHORIZED SERVICER.
- Do not try to adjust or repair the appliance yourself.
- To prevent burns when the water is boiling:
a. Do not touch the tea container.
b. Do not put your hands and face directly next to the steam outlet.
- Do not place or use the appliance under direct sunlight.
- Do not place or use the appliance anywhere water may splash onto it.
- Do not insert any objects in the air intake openings.
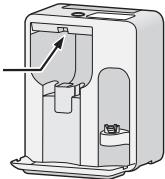
- Accessible parts
(e.g.: tea container, hot water supply port) will become hot during
Do not touch them during or immediately after operation.
Hot water supply port
Changes or modifications to the appliance not expressly approved by the party responsible for compliance could void the user's authority to operate the appliance.
NOTE: This appliance has been tested and found to comply with the limits for a Class B digital device, pursuant to part 15 of the FCC Rules.
These limits are designed to provide reasonable protection against harmful interference in a residential installation.
This appliance generates, uses and can radiate radio frequency energy and, if not installed and used in accordance with the instructions, may cause harmful interference to radio communications.
However, there is no guarantee that interference will not occur in a particular installation.
If this appliance does cause harmful interference to radio or television reception, which can be determined by turning the appliance off and on, the user is encouraged to try to correct the interference by one or more of the following measures:
- Reorient or relocate the receiving antenna.
- Increase the separation between the appliance and receiver.
- Connect the appliance into an outlet on a circuit different from that to which the receiver is connected.
- Consult the dealer or an experienced radio/TV technician for help.
Main Unit
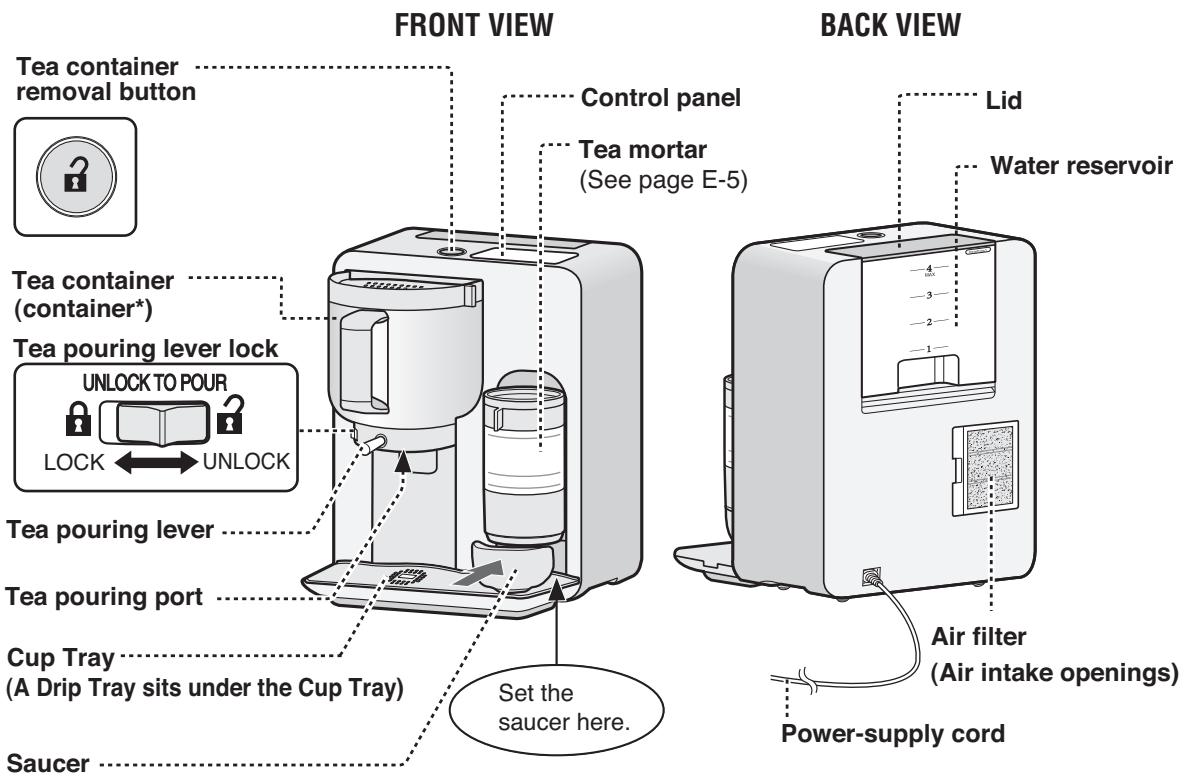
* The operation manual will refer to the tea container as 'container' for short.
Control Panel
Quantity lamp
Indicates the total amount of tea leaves for grinding.
GRIND button
Press to select the quantity of tea leaves for grinding.
Water boiling indicator
Flashes while water is boiling.
MODE button
Press to select your mode. (Hot, Warm, Latte)
Mode lamp
Indicates your selected mode (Hot, Warm, Latte)
STOP button
Press the STOP button to cancel any mistakes made during programming, or to stop an operation. Also press when turning the Tea maker off.
POWDER IN indicator
Flashes when powdered tea should be added.
START indicator
Flashes when ready.
Remains lit while operating.
START/PAUSE button
Press to start an operation.
To pause, press again during the operation.
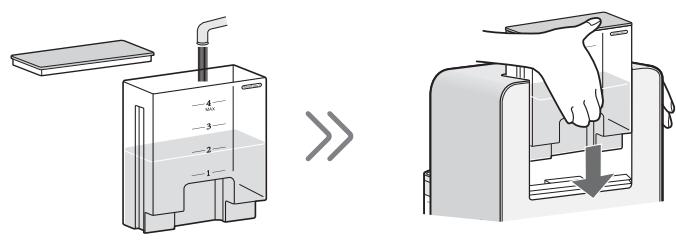
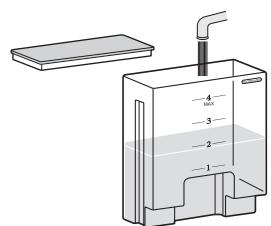
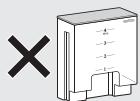
Water Reservoir
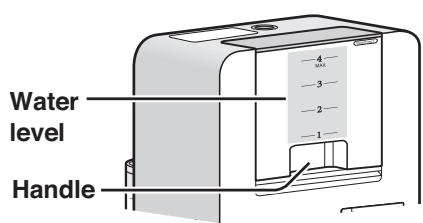
Grip the handle while holding the main unit with your other hand.
Securely insert the water reservoir into the main unit.
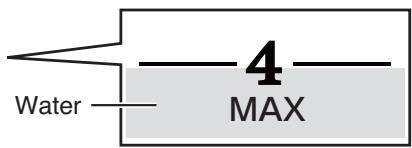
NOTES:
- Water level markings indicate water needed for the corresponding cups of brewed tea.
- Do not fill the water reservoir over the MAX mark (4)
- Do not add any liquid (milk, etc.) other than fresh cold water into the water reservoir.
- Do not add water into the water reservoir during the boiling process. (Exceeding the maximum number of cups will cause the tea container to overflow.)
- Do not pour water into the water reservoir while it is in main unit.
- Do not remove the water reservoir from the main unit after it has been filled with water.
- After use, empty the water reservoir and wash the water reservoir and lid.
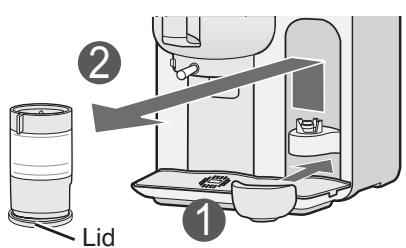
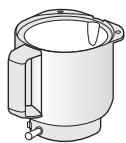
Tea Container
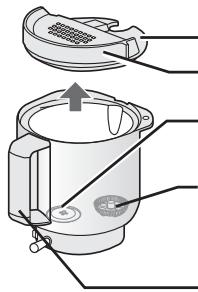
Lid
Lid cover
(Do not remove)
Rubber seal
(Do not remove)
Rotary blade
(with a magnet)
(See page E-18)
Handle
Inside the container, there are 2 kinds of lines, 冷茶(cold tea) and マテ(latte)
NOTES:
- The markings indicate water/ milk required for the corresponding cups of brewed tea.
- Do not fill the container over line 4 for cold tea, and line 3 for latte.
- Do not put any ice in the container.
- Do not pour water/milk into the container while it is inserted in the main unit.
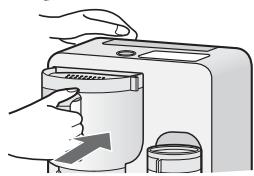
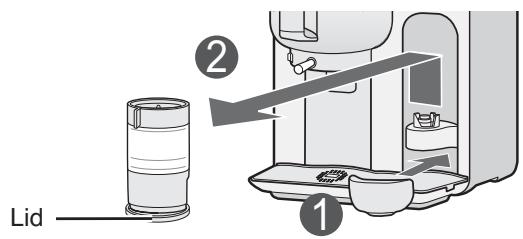
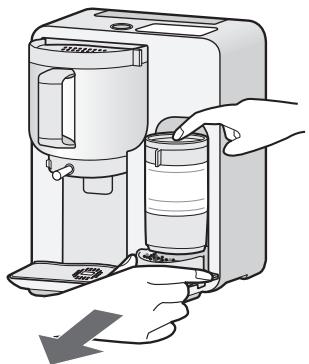
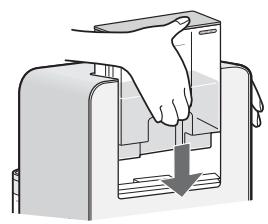
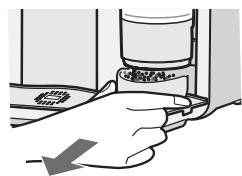
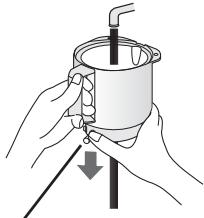
Hold down the tea container removal button, and
carefully pull the container toward you.
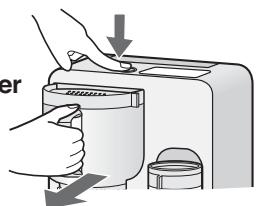
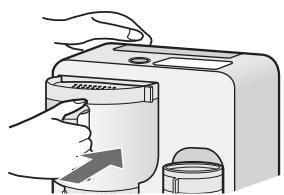
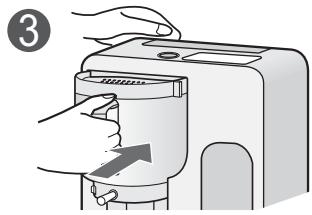
Installation
Push the container in until you feel it click into place.
NOTE:
To prevent scalding yourself, do not remove the container while the water is boiling or immediately after.
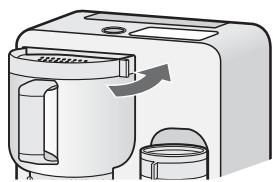
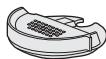
Lid / Lid cover
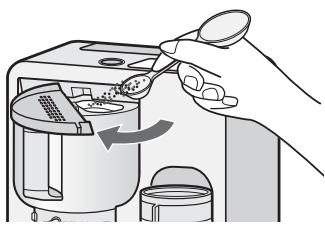
Adding the powdered tea
- Keep the container secure in the main unit. Slide the lid cover to reveal an oval opening on the right side.
- Add the powdered tea into the container through the opening.
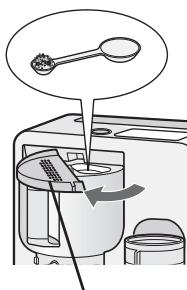
Lid cover
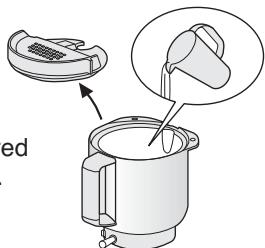
Adding the powdered tea to water/milk
(for cold tea and latte)
- Remove the container from the main unit.
- Open the lid. Add the liquid and the powdered tea into the container.
- Return the lid to its original position.
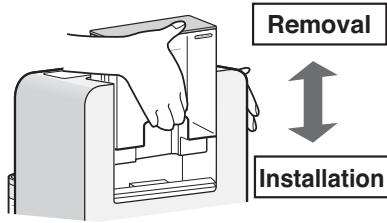
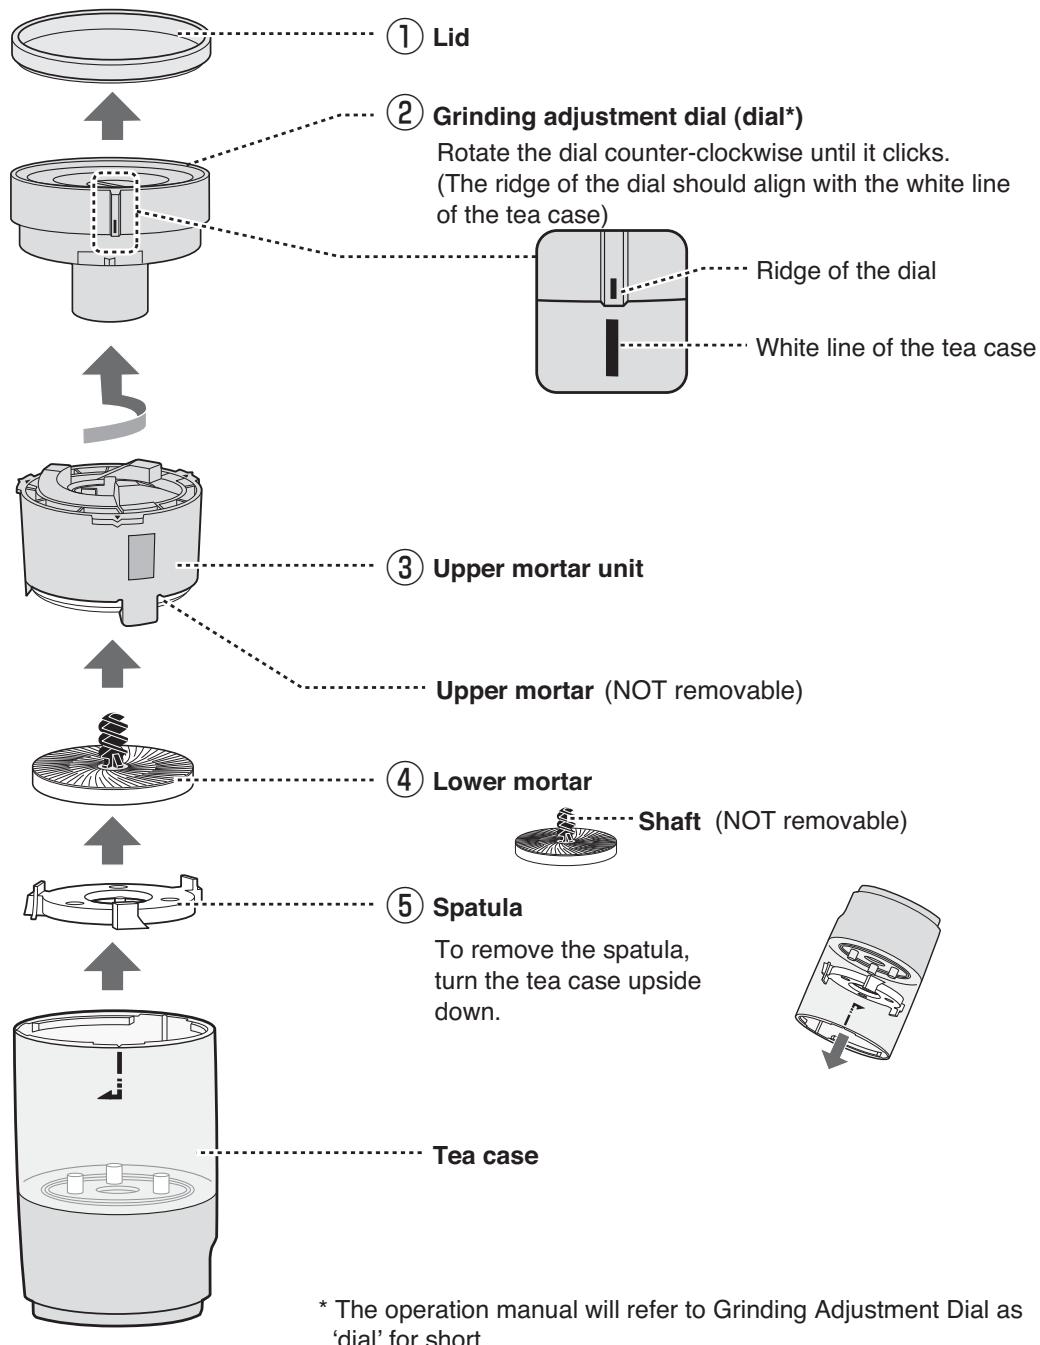
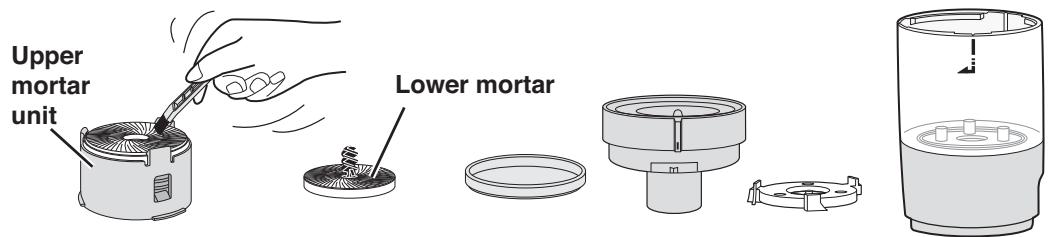
Tea Mortar
Disassembly
When disassembling the Tea Mortar, remove each part in the following numerical order. (For assembly, see page E-21)
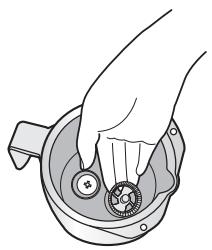
Removal
Lift the Tea Mortar up and away from the main unit.
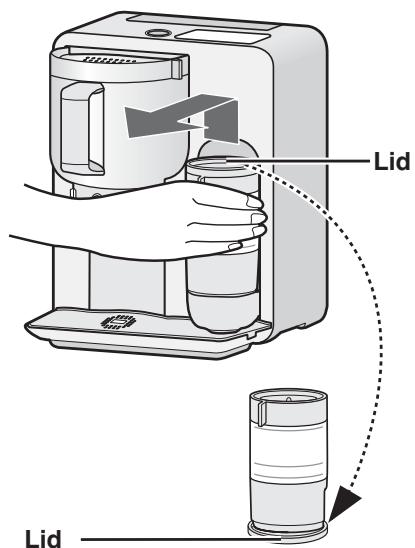
After grinding, remove the lid first. Use the lid to cover the bottom of the Tea Mortar and catch the excess powdered tea.
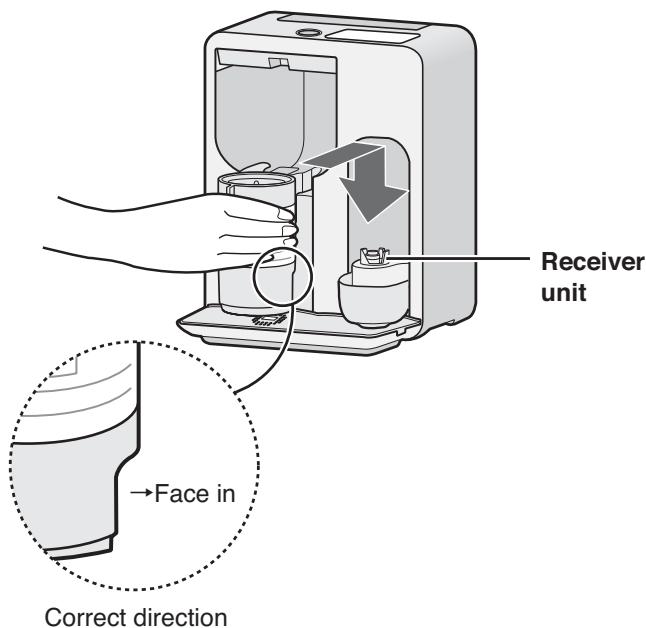
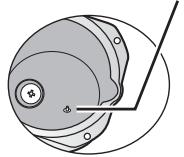
Installation
Face the Tea Mortar in the correct direction and place it securely onto the receiver unit.
(Make sure to remove anything left on the receiver unit and bottom of the Tea Mortar)
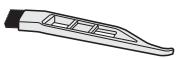
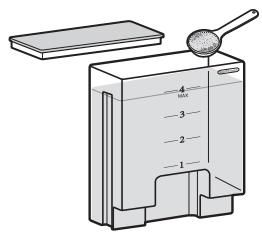
Accessories
(one of each included)
- Cleaning brush (for the Tea Mortar)
-
Operation manual (with warranty)
-
Menu book
Large (for tea leaves)
Tea spoon
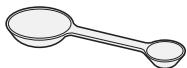
Small (for powdered tea)
Sound ON/OFF
You can mute the Tea Maker.
First, make sure that the Tea Maker is plugged in.
To mute the tea maker, press and hold the START button until it beeps.
To cancel the mute setting, press and hold the START button until it beeps.
NOTES:
- The sound setting will be stored in memory even if AC power is interrupted or disconnected.
- Alarm sounds will remain active even when in the sound OFF setting.
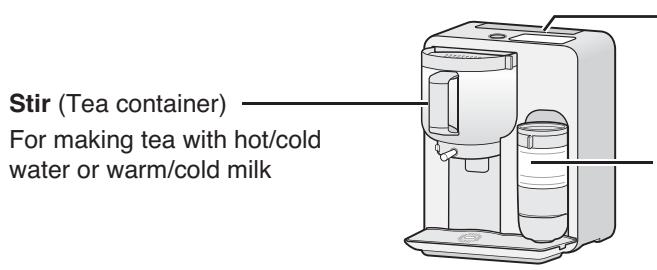
Boil (Water reservoir)
For boiling fresh cold water
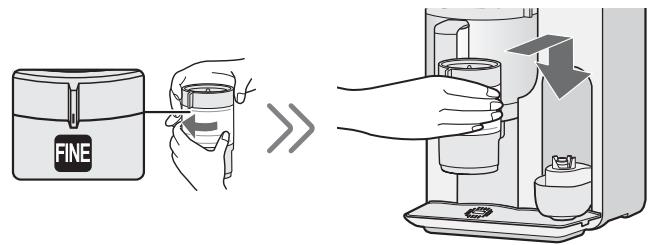
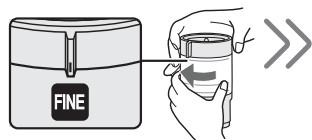
Grind (Tea Mortar)
For making powdered tea from tea leaves. Adjusting the dial can make two kinds of powdered tea.
Dial Settings
FINE: For drinking
COARSE: For cooking
| Drink | Quantity* | Time | Things to prepare |
| Hot tea | 1 to 4 cups | Boil and stir: 3-5 min | ·Powdered tea** (0.02 - 0.085oz/0.6 - 2.4g) ·Water (Fill the water reservoir to the desired water level) |
| Grind, boil and stir: 3 min 30 sec - 7 min 25 sec | ·Tea leaves** (0.035 - 0.1oz/1.0 - 2.8g) ·Water (Fill the water reservoir to the desired water level) | ||
| ~ For Authentic Matcha ~ 1 cup | Boil and stir: Approx. 3 min | ·Matcha Powder (0.1oz/3.0g) ·Water (Fill the water reservoir to the water level 1) | |
| Latte | 1 to 3 cups | Stir: Approx. 1 min 30 sec | ·Powdered tea** (0.07 - 0.2 oz/2 - 6g) ·Milk (Pour into the container to the desired Laré [Latte] line) DO NOT USE THE WATER RESERVOIR. Use whole milk. Low fat and skim milk cannot produce sufficient foam. |
| Cold tea | 1 to 4 cups | Stir: Approx. 1 min 30 sec | ·Powdered tea** (0.02 - 0.085oz/0.6 - 2.4g) ·Cold water (Pour in the container to the desired 冷茶 [Cold tea] line) DO NOT USE THE WATER RESERVOIR. |
| ~ For Authentic Matcha ~ 1 cup | Stir: Approx. 1 min 30 sec | ·Matcha Powder (0.1oz/3.0g) ·Cold water (Pour in the container to 冷茶 [Cold tea] line 1) |
- 1 cup (Level/line 1): Approx. 5.1oz/150mL, 2 cups (Level/line 2): Approx. 9.6oz/285mL
3 cups (Level/line 3): Approx. 14.2oz/420mL, 4 cups (Level/line 4): Approx. 19oz/560mL
** In case of green tea. The quantity will vary depending on a type of tea leaves. - You can make hot tea while grinding tea leaves. (See page E-13) Moreover, you can make latte and cold tea while grinding tea leaves
- The appliance has no heat-retention function. Flavors will be ideal just after the drink is made.
- You can try various ideas from our menu book including teas, lattes, savory dishes and sweet desserts.
Before First Use
- Carefully unpack your tea maker, and remove all packing materials.
- Place the tea maker on a flat and sturdy surface.
- Clean the container and insert it into the main unit.
- Clean the water reservoir. Fill it to the MAX mark with fresh cold water. Do not fill over the MAX mark. Set the lid and insert into the main unit.
- Press the MODE button once, and press the START button.
- When 4 beeps sound, place a cup on the cup tray under the container. Unlock the tea pouring lever. Hold down the tea pouring lever and fill the cup. Discard the water.
- Repeat pouring and discarding hot water, until it no longer flows from the tea pouring port.
Points to Remember
Tea Leaves
-
A Japanese tea, Chinese tea, and black tea are fit for use. The following items may cause mechanical failure:
-
Tea made of anything other than tea leaves (e.g.: barley tea, black bean tea)
- Tea that includes anything other than tea leaves (e.g.: brown rice tea)
- Long tea leaves that cannot be ground by the Tea Mortar. (They can be used if cut into short pieces)
- Tea leaves already ground into powdered form.
For more information, please refer to the attached menu book.
- Store the tea leaves in a tea caddy. Metallic tea caddies are recommended.
- Do not attempt to grind wet tea leaves.
Water Reservoir
- Do not place on or near a gas or electric burner, or on any other high temperature surface. Heat will cause it to warp or melt.
- After use, empty the water reservoir and wash the water reservoir and lid.
Tea Container
- Do not use with a gas or electric burner, or in microwave oven. Heat will cause it to warp or melt.
- Set the lid and lid cover correctly when making a drink. Otherwise, the contents in the container may splash out during stirring.
- The inside of the container is coated with fluorine. Do not scratch the coating to extend its lifespan.
- The rotary blade has a magnet at its base. Do not place the cup close to items that are sensitive to magnets.
Tea Mortar
-
The upper and lower mortars are made of ceramic. Extreme shocks will break them. Handle with care.
After cleaning, always dry thoroughly. -
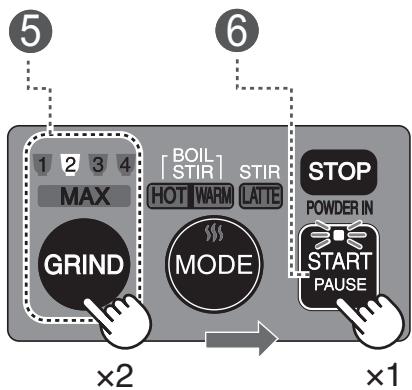
Suppose you want to grind tea leaves for 2 cups of tea.
1 Set the saucer.
Remove the lid of the Tea Mortar. Then remove the Tea Mortar and place it on the lid.
3 Set the dial to FINE and place the
Tea Mortar on the receiver unit.
(Initial setting of the mortar is COARSE)
If you are using powdered tea for cooking, set the dial to COARSE.
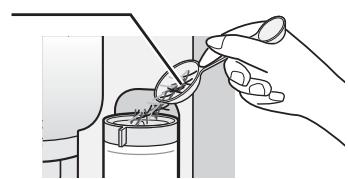
4 Add tea leaves slowly into the Tea Mortar using the large spoon.
Place the lid on the Tea Mortar.
Large tea spoon
| Quantity | Tea leaves | Grinding | |
| Powdered tea* | Time | ||
| 1 (1 cup) | 1/2 spoonful | Approx. 0.02 oz/0.6 g | Approx. 1 min 40 sec |
| 2 (2 cups) | Slightly less than 1 spoonful | Approx. 0.04 oz/1.2 g | Approx. 3 min 15 sec |
| 3 (3 cups) | Slightly more than 1 spoonful | Approx. 0.06 oz/1.8 g | Approx. 4 min 50 sec |
| 4 (4 cups) | 1 1/2 spoonful | Approx. 0.08 oz/2.4 g | Approx. 6 min 25 sec |
| MAX (Grind more) | 3 1/2 spoonful | Approx. 0.21oz/6.0 g | Approx. 15 min |
- With green tea, quantity will vary depending on the type of tea leaves.
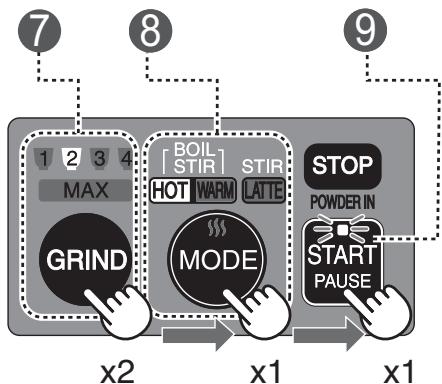
Plug the unit into an outlet. Select the quantity by pressing the GRIND button twice.
Press the START button once. The Tea Mortar will begin grinding the tea leaves. The ground tea powder will collect in the saucer.

After grinding is complete, 4 beeps will sound and the Tea Mortar will stop automatically.
Tap the lid of Tea Mortar and pull out the saucer.
If there are tea leaves still left in the Tea Mortar, press the GRIND button once and the START button once.
- The quantity lamp will change every time you press the GRIND button.

- If you press the GRIND button during operation, the flashing quantity lamp will indicate the remaining time.
1 : 0 to 1 min 39 sec
2 :1 min 40 sec-3min14sec
3 : 3 min 15 sec - 4 min 49 sec
4 min 50 sec -6 min 24 sec
MAX
:6min25sec- 15min
- Tap the lid of the Tea Mortar to clear the powdered tea from the bottom of the Tea Mortar.
- If you do not immediately use the powdered tea, store in a sealed container and refrigerate. Using the powdered tea soon after grinding is recommended.
After use, disconnect the plug from the outlet and carry out any cleaning or maintenance.
Issues with grinding tea leaves continually
Sometimes quantity lamps will flash and alert sounds will sound when pressing the GRIND button. This means that cooling time is necessary to avoid overheating the mechanical components. See page E-24 and allow the Tea Mortar to cool down.
NOTE:
Do not re-grind already powdered tea in the Tea Mortar.
There are two methods for making hot or warm tea:
- Boil and stir: Making tea with powdered tea ground in advance.
- Grind, boil and stir: Boiling water while grinding tea leaves.
The temperature of the warm tea is about 59 - 68^ (15 - 20^ ) less than the hot tea.
1. Boil and stir:
- Suppose you want to make 2 cups of hot tea.
1 Ensure the container is empty, and insert it into the main unit.
- Wipe off any moisture before inserting the container.
Fill the water reservoir to water level 2 with fresh cold water, and insert it into the main unit.
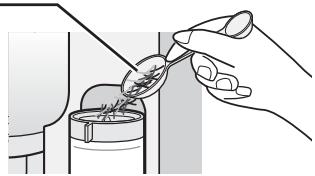
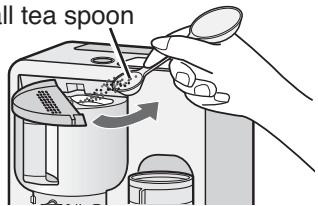
3 Open the lid cover of the container by sliding it clockwise. Using the small tea spoon, add powdered tea into the tea container through the oval opening.
4 Close the lid cover.
[Amount of powdered tea*]
In the case of green tea
1 cup... 1 tea spoon
2 cups... 2 tea spoons
3 cups... 3 tea spoons
4 cups... 4 tea spoons
In the case of
Authentic Matcha
1 cup... 5 tea spoons
Measure powdered tea with small heaping tea spoons.
![SHARP TE-T56U - [Amount of powdered tea*] - 1](/content/2019/10/5771/images/480cde01e20943c16f9cbd7e2210a57ae9ebc3e1f94555be0c5ce642d2a84b3e.jpg)
- Amount will vary depending on the type of tea leaves. See the attached menu book.
- Adjust the amount of powdered tea according to taste.
Plug the unit into an outlet. Select HOT by pressing the MODE button once.
Press the START button once. The tea maker will start to heat the water. The boiled water will automatically empty into the container and be stirred with powdered tea.
![SHARP TE-T56U - [Amount of powdered tea*] - 2](/content/2019/10/5771/images/96e57dfa5bc41908357898bda8a06bea88dfa80682459ba69bca806b59e012f8.jpg)
- To make warm tea, press the MODE button twice at step 5.
The mode lamp will change every time you press the MODE button. HOT→WARM→LATTE→OFF
The time varies depending on the water temperature.
After making tea, 4 beeps will sound and the tea maker will stop automatically.
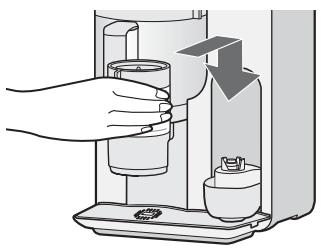
Put a tea cup on the cup tray under the container.
Unlock the tea pouring lever lock.
- Before pouring tea, unlock the tea pouring lever lock. After pouring tea, lock it again for your safety.
![SHARP TE-T56U - [Amount of powdered tea*] - 3](/content/2019/10/5771/images/8eccdc849373f6ebaf9460ebe22d39904371f77769f2227d34e6f0b1f5bdad21.jpg)
After using, disconnect the plug from the outlet, and carry out any cleaning or maintenance.
NOTE:
All water in the water reservoir will automatically empty into the container. If the container is not empty prior to brewing, it may overflow.
2. Grind, boil and stir:
- Suppose you want to grind tea leaves and make 2 cups of hot tea at the same time.
1 Set the saucer.
2 Remove the lid of the Tea Mortar. Then remove the Tea Mortar and place it on the lid.
3 Ensure the container is empty, and insert it into the main unit.
- Wipe off any moisture before inserting the container.
4 Fill the water reservoir to water level 2 with fresh cold water, and insert it into the main unit.

Set the dial to FINE and place the Tea Mortar on the receiver unit.
(Initial setting of the mortar is COARSE)
6 Add tea leaves slowly into the Tea Mortar using the large spoon. Place the lid on the Tea Mortar.
Large tea spoon
To measure the amount of tea leaves, see page E-9.
- When using the appliance for the first time, or after cleaning/maintenance, the resulting volume of powdered tea will be less than usual. When you want to grind one or two spoonfuls of tea leaves, increase the quantity of tea leaves by one tea spoonful.
Plug the unit into an outlet. Select quantity by pressing the GRIND button twice.
8 Select HOT by pressing the MODE button once.
Press the START button once. The Tea Mortar will start to grind the tea leaves, and water will be heated.
To make warm tea, press the MODE button twice at step 8.
[Time until the tea is made]
1 ...Approx. 2 min
2...Approx. 3 min 20 sec
3 ...Approx. 5 min
4 ...Approx. 6 min 40 sec
MAX]...Approx.15min30sec
After grinding is complete, 4 beeps will sound and the Tea Mortar will stop automatically. Tap the lid of the Tea Mortar and pull out the saucer.
"POWDER IN" will flash and indicate the time to add the powdered tea into the container.
When "POWDER IN" is flashing, open the lid cover of the container by sliding it clockwise.
Using the small tea spoon, add the powdered tea into the container through the oval opening. Close the lid cover and then press the START button once. The tea maker will begin to stir the hot water and powdered tea.
Small tea spoon

12 After making tea, 4 beeps will sound and the tea maker will stop automatically.
Put a tea cup on the cup tray under the container. Unlock the tea pouring lever lock. Hold down the tea pouring lever and pour the tea.
- The surface of the container will be hot. When you add the powdered tea to the container, take care not to burn yourself.
- Press the START button within 30 minutes of when "POWDER IN" is flashing.
- Before pouring tea, unlock the tea pouring lever. After pouring tea, lock it again for your safety.

LOCK UNLOCK
After use, disconnect the plug from the outlet and carry out any cleaning or maintenance.
NOTE:
All water in the Water Reservoir will automatically empty into the container. If there is any liquid in the container prior to brewing, it may overflow.
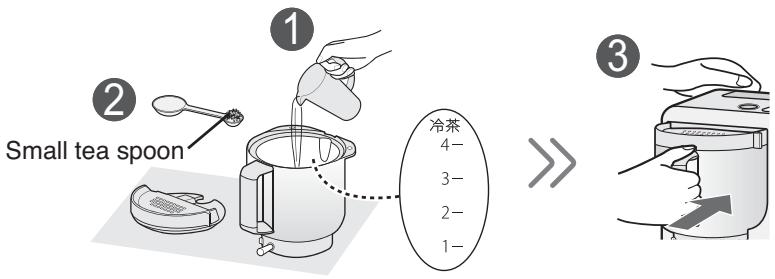
You can make a latte by stirring milk with powdered tea ground in advance.
- Suppose you want to make one cup of green tea latte.
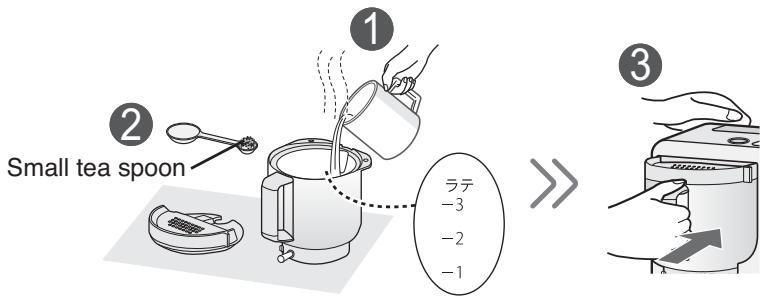
Open the lid of the container. Pour in the desired amount of warm milk (for 1 cup, pour to line1 of ラテ [latte])
Add powdered tea in the container using the small spoon (for 1 cup, add 3-4 heaping spoons)
3 Close the lid and insert the container into the main unit.
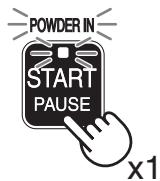
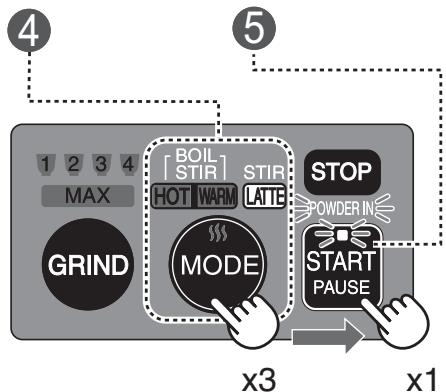
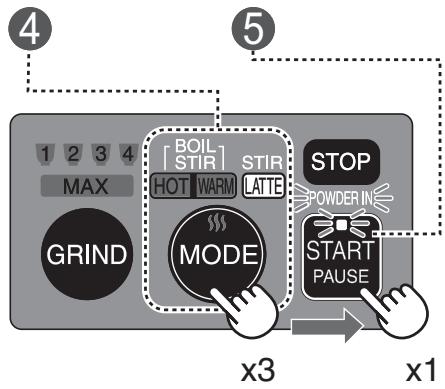
Plug the unit into an outlet. Select LATTE by pressing the MODE button 3 times.
Press the START button once. The tea maker will begin to stir.
- Do not use the water reservoir.
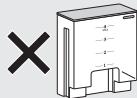
- When you pour warm milk into the container, take care not to burn yourself.
Cold milk that has been stored in a refrigerator is also acceptable.
[Amount of powdered tea*]
In the case of green tea 1 cup... 3 - 4 tea spoons 2 cups... 6 - 7 tea spoons 3 cups... 10 tea spoons Measure the quantity of powdered tea using small heaping tea spoons.
![SHARP TE-T56U - [Amount of powdered tea*] - 1](/content/2019/10/5771/images/526491e78a0492d39e2280bf89fd566a1643b6eb334b2cf031473d1891925a8f.jpg)
- Amount will vary depending on the type of tea leaves. See the attached menu book.
- Adjust the amount of powdered tea according to taste.
- Pour milk into the container first to make a smooth textured latte.
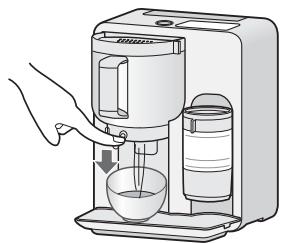
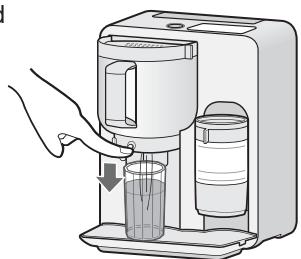
After making the latte, 4 beeps will sound and the tea maker will stop automatically. Put a tea cup on the cup tray under the container. Unlock the tea pouring lever. Hold down the tea pouring lever to pour the tea.
![SHARP TE-T56U - [Amount of powdered tea*] - 2](/content/2019/10/5771/images/49390029e4c49bae0d68aaa901a24fa633ea9e89761b1ed0d3f985dd78d707ee.jpg)
- Before pouring tea, unlock the tea pouring lever lock. After pouring tea, lock it again.
![SHARP TE-T56U - [Amount of powdered tea*] - 3](/content/2019/10/5771/images/4a32949a8f5eae7944bf48c437b9d324db4e5176d65e773f1b5473ac8e37041e.jpg)
After use, disconnect the plug from the outlet and carry out any cleaning or maintenance.
NOTES:
- You can scoop out any remaining foam in the container to top off your latte.
Do not use a metallic spoon. - Do not use milk that has been stored at room temperature.
- The quality of foam will vary depending on the temperature, or the types of tea leaves or milk.
MAKING COLD TEA
You can make cold tea by stirring cold water with powdered tea ground in advance.
- Suppose you want to make one cup of cold green tea.
1 Open the lid of the container. Pour in the desired amount of cold water (for 1 cup, pour to line1 of 冷茶 [cold tea])
Add powdered tea into the container using the small spoon (for 1 cup, add 1 heaping tea spoon)
3 Close the lid and insert the container into the main unit.
Plug the unit into an outlet. Select LATTE by pressing the MODE button 3 times.
Press the START button once. The tea maker will begin to stir.
After making tea, 4 beeps will sound and the tea maker will stop automatically. Put a tea cup on the cup tray under the container. Unlock the tea pouring lever. Hold down the tea pouring lever to pour the tea.
- Do not use the water reservoir.
[Amount of powdered tea\*]
In the case of green tea
1 cup... 1 tea spoon
2 cups... 2 tea spoons
3 cups... 3 tea spoons
4 cups... 4 tea spoons
In the case of Authentic Matcha
1 cup... 5 tea spoons
Measure the quantity of powdered tea using heaping small tea spoons.
![SHARP TE-T56U - [Amount of powdered tea\*] - 1](/content/2019/10/5771/images/ee1635d162c63376f0a8065d7ee36da682935d393b245809e5980a79f749fc64.jpg)
- Amount will vary depending on the type of tea leaves. See the attached menu book.
- Adjust the amount of powdered tea according to taste.
-
Pour water into the container first to make a smooth textured cold tea.
-
Before pouring tea, unlock the tea pouring lever. After pouring tea, lock it again for your safety.
![SHARP TE-T56U - [Amount of powdered tea\*] - 2](/content/2019/10/5771/images/7e9a3e74b041c038bd984ae857e4dceebc9869c31352b194a737c702c3b67d1e.jpg)
After use, disconnect the plug from the outlet and carry out any cleaning or maintenance.
Before cleaning, turn the Tea Maker off. Unplug and allow it to cool completely.
An authorized service representative should perform any other servicing, except for specific cases detailed in the operation manual.
CAUTION: Do not use commercial cleaners, abrasive, harsh cleaners, solutions that contain sodium hydroxide, or scouring pads on any part of the tea maker.
Dishwashers cannot be used to clean your tea maker.
Main Unit
After Use
Using a soft cloth moistened only with water, gently wipe the panel until it becomes clean. Avoid using excessive amounts of water. Do not use any sort of chemical or abrasive cleaner. Remove the cup tray and drip tray. Wipe the base plate.

Water Reservoir / Lid
After Use
After use, wash in a mild soap or detergent solution with a damp soft cloth or sponge. Rinse and dry. Do not wash in the dishwasher. Do not use harsh cleaners, sharp metal scrapers, or stiff brushes on the water reservoir and lid.
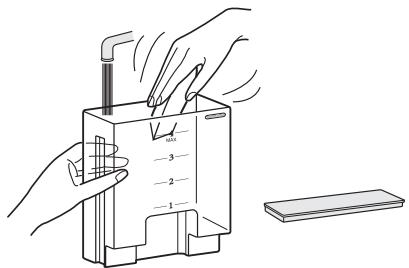
Saucer / Cup Tray / Drip Tray
After Use
Wash with warm or cold water using a soft sponge and then let dry. For heavier spills and dirt, use a mild soap or detergent solution.

Saucer
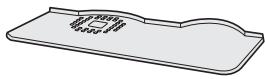
Cup tray
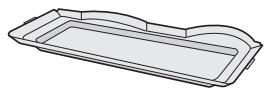
Drip tray
Tea Container
After Use
- Wash with warm or cold water using a soft sponge and then let dry. Remove the rotary blade in the container.
- For heavier spills and dirt, use a mild soap or detergent solution.
- For tea stains, use oxygen bleach.
Clean around the rubber seal with running water while holding down the tea pouring lever. Any remaining dirt may cause water leakage. Make sure to unlock the tea pouring lever before cleaning.
Container
Lid

Rotary Blade


Rubber seal
Tea pouring lever
NOTES:
- If the rubber seal is removed, unlock the tea pouring lever, hold down the lever, and securely re-attach the rubber seal to the bottom of the container. Then fill the container with water to check whether any water leakage occurs.
- Do not remove the rubber seal and the lid cover by force.
Rotary Blade
Removal
Carefully pull out the rotary blade. (It may be firmly attached to the container)
Installation
Carefully push the rotary blade onto the projection that is at the bottom of the container.
Projection
NOTE:
To prevent misplacement or accidental swallowing, do not forget to reinstall the rotary blade after cleaning.
Tea Mortar
After Use
Disassemble the Tea Mortar. (See page E-5) Remove the remaining powdered tea using the supplied cleaning brush. After cleaning, re-assemble the parts. (See page E-21)
NOTE:
Never separate the upper mortar unit and lower mortar with force.
Monthly Maintenance
Disassemble the Tea Mortar. (See page E-5) Remove the remaining powdered tea using the supplied cleaning brush. Then wash in a mild soap or detergent solution with a soft sponge. Rinse and dry thoroughly.
In the following cases, carry out maintenance before a month has passed:
- The upper mortar unit and lower mortar seem to be clogged, and powdered tea is not coming out smoothly.
- When you wish to grind a different type or flavor of tea leaf.
- All quantity lamps are flashing and the appliance stops grinding. (upper mortar unit and lower mortar may be stuck together)
- An unusual sound is being produced during grinding.
The Tea Mortar is extremely dirty. - You will not use the appliance for a long period of time.
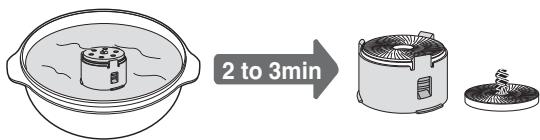
When the Upper Mortar unit and Lower Mortar are stuck together
Removing them by force may cause damage to the appliance. Immerse them in warm water and wait until they can be taken apart easily. (standing time: 2 to 3 min.)
After they are separated, remove the powdered tea using the supplied cleaning brush, then wash and dry thoroughly. After drying, re-assemble the parts. (See page E-21)
IMPORTANT:
Air dry the Tea Mortar (8 hours or more) even after removing moisture with a dry cloth. If any moisture remains, powdered tea may become clogged on the surface of upper and lower tea mortars. This will reduce the amount of powdered tea produced.
Special note for cleaning the Tea Mortar:
When drying, do not use electric dish dryers or microwave ovens, etc. Such devices may cause damage to components.
Air Filter
Monthly Maintenance
Remove the air filter panel from the back of the main unit. Wash in warm or cold water, and wipe dry. Reinstall on the main unit immediately.
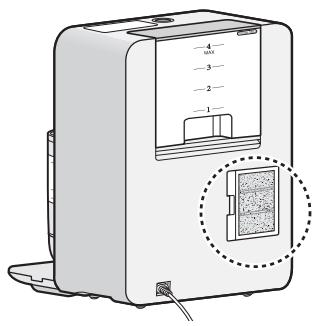
Removal
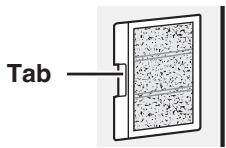
Push the tab to the right.
Installation
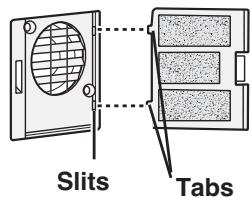
Insert the 2 tabs of the air filter panel into the corresponding slits on main unit. Press the air filter until it snaps into place.
Descaling
(Boiling time: Approx. 5 min)
After frequent use, mineral content from water may build up in the pipe or other parts of the appliance. This is called "scale". If scale becomes an issue, water will begin taking longer to boil or remain in the water reservoir. Remove any scale build-up with the following method:
- Fill the water reservoir to the MAX mark with fresh cold water. Do not fill past the MAX mark.
- Dissolve 1 tablespoon of pure citric acid crystals in the water. Stir well. Set the lid and insert into the main unit.
- Insert the empty container into the main unit. Plug in.
- Press the MODE button once, and then press the START button.
- When 4 beeps sound, remove the container and discard the hot water.
- Fill the water reservoir to the MAX mark with fresh cold water, and set the lid. Insert the water reservoir into the main unit.
- Insert the empty container into the main unit.
- Press the MODE button once, and then press the START button.
- When 4 beeps sound, remove the container and discard the hot water.
- Repeat steps 6 to 9 two or three times. After use, disconnect the plug from the outlet.


WARNING:
The container and its lid will become hot. To PREVENT BURNS, remove while using potholders.
NOTES:
- Frequency of descending will vary depending on the hardness of the water. If you use hard water (high in mineral content), regular descending is recommended.
- Pure citric acid is available at numerous drugstores.
Assembling the Tea Mortar
Position the "才元 [front]" side of the spatula face-up and insert it into the tea case. Make sure to align the holes of the spatula with the protrusions of the tea case.
Insert the lower mortar into the tea case. (2-a) Align the holes on the bottom of the lower mortar with the protrusions, rotating the lower mortar slowly until it fits securely. (2-b)
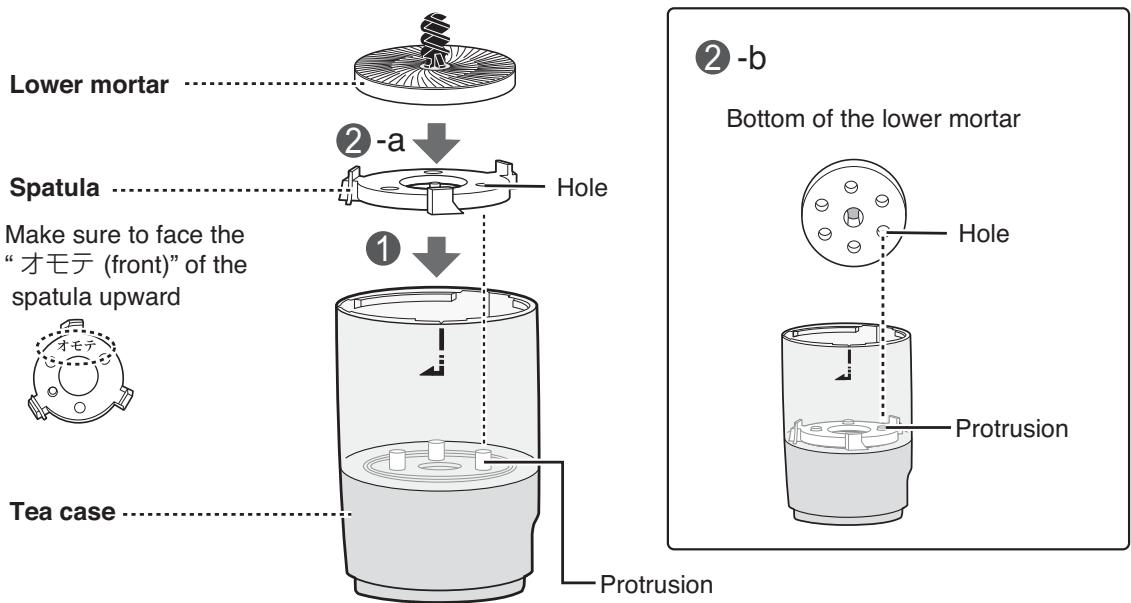
Place the upper mortar unit onto the lower mortar. Align "▼" of the upper mortar unit with the white line "I" of the tea case.
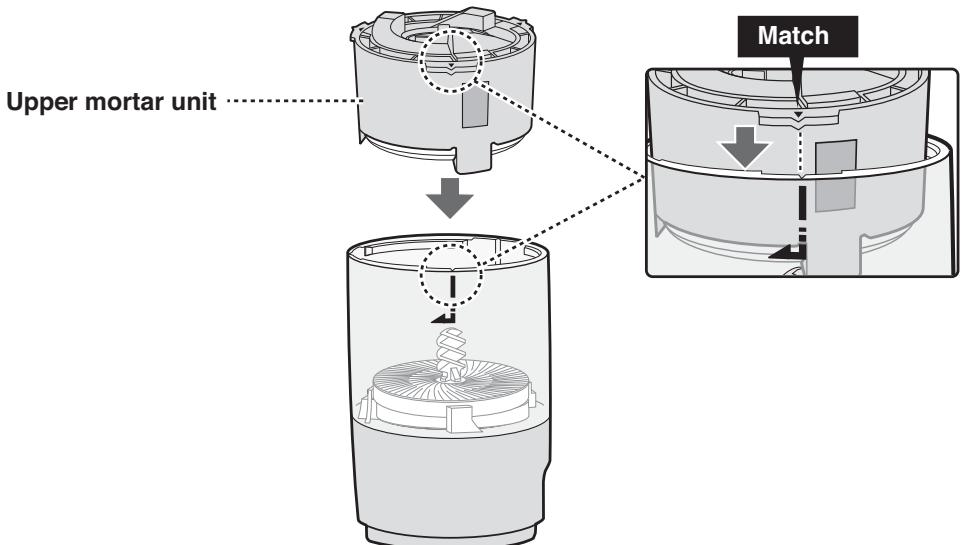
NOTE:
There are three on the upper mortar unit. Match any of them with the white line " | " of the tea case.

Insert the dial into the tea case so that the ridge of the dial align with the white line on the tea case. Then press the dial into the tea case and turn the dial clockwise.
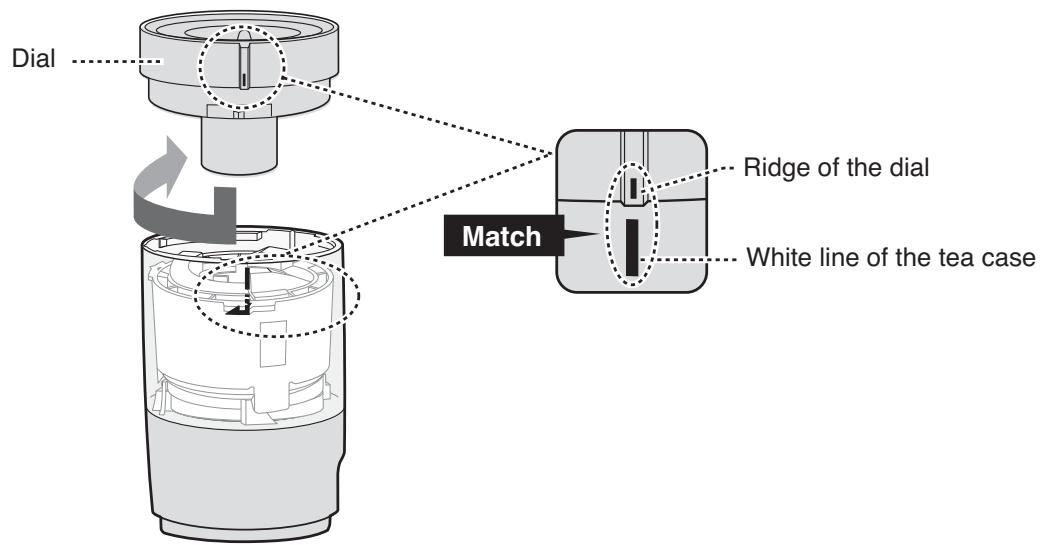
NOTES:
-
If you cannot insert the dial, then steps ① to ③ have not been carried out properly. Re-assemble the Tea Mortar from step ① while paying attention to the following:
-
Spatula: Make sure that "才元 [front]" is face-up.
- Lower Mortar: Make sure to align the holes on the bottom with the protrusions of the tea case.
-
Upper Mortar unit: Make sure it is in the correct position.
-
We recommended setting the dial to "COARSE" when you store the Tea Mortar. (This prevents the upper mortar unit and lower mortar from sticking together.)

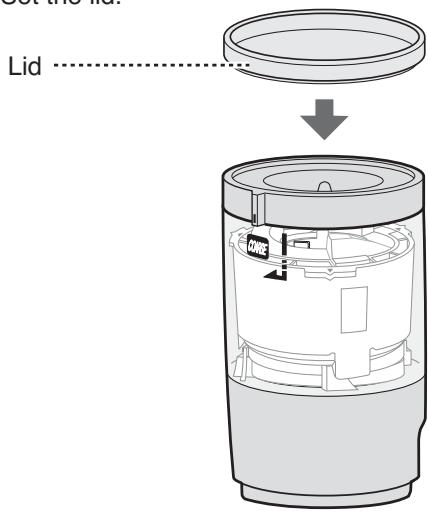
Set the lid.
The following situations are normal and are not signs that the tea maker is malfunctioning.
| PROBLEM | ANSWER |
| The Tea Mortar is making a squeaking sound. | ·When grinding for the first time or right after cleaning the Tea Mortar, hearing a squeaking sound is common. |
| The Tea Mortar suddenly stops during grinding. An unusual sound is coming out of the Tea Mortar. | ·Check that you are using an appropriate type of tea leaves. Disassemble the Tea Mortar. See page E-5. Remove the remaining powdered tea using the supplied cleaning brush. After cleaning, re-assemble the parts. See page E-21. See page E-19 for the details of maintenance for the Tea Mortar. |
| No sound when buttons are pressed. No beeps when operations are completed. | ·Sound is turned OFF. See page E-6 to turn sound back on. |
| The tea maker boils water slowly. The water reservoir does not fully empty out during use. | ·Follow step-by-step instructions for descaling. See page E-20. |
| There is no powdered tea in the saucer. | ·It will take about 30 seconds for powdered tea to come out after pressing the START button. ·Remove the tea leaves in the Tea Mortar. Shorten any long tea leaves prior to re-grinding. ·Make sure the assembly of the spatula in the Tea Mortar is correct. ·Disassemble the Tea Mortar. See page E-5. Remove the remaining powdered tea using the supplied cleaning brush. After cleaning, re-assemble the parts. See page E-21. See page E-19 for the details of maintenance for the Tea Mortar. |
| Coarse powdered tea comes out. | ·Check the dial setting. ·Fineness of the powdered tea will vary depending on the type of tea leaves. |
| There are lumps in the latte/cold tea. | ·Make sure to add liquid prior to adding the powdered tea. |
| Quantity of the powdered tea coming out from the Tea Mortar is less than usual. | ·When using a new Tea Mortar, or after a cleaning, the resulting amount of powdered tea may be less than usual. ·Quantity will vary depending on the type of tea leaves. |
If you still require service, disconnect the plug from the outlet and CONTACT YOUR NEAREST SHARP AUTHORIZED SERVICER.
SPECIFICATIONS
AC Line Voltage: Single phase 120V, 60Hz, AC only
AC Power Required: 940 W
Main unit 910 W
Tea mortar 30 W
Outside Dimensions (WxHxD): 9 1/4" x 11 3/4" x 8 7/8"
233 mm x 296 mm x 225 mm
Weight: Approx. 6.6 lbs. / 3.0 kg
If you notice unusual flashing lights and you believe that the Tea Maker is not working properly, check the chart below before consulting a Sharp Authorized Servicer.
This will help prevent unnecessary service calls.
| DISPLAY | ANSWER |
| The quantity Lamp you selected flashes when you press the START button. E.g.: Suppose you want to grind tea leaves for 1 cup. MAX | Make sure that the Tea Mortar is set correctly. Remove the Tea Mortar, and then place it back on the receiver unit properly and press the START button. |
| The Quantity Lamp flashes when you press the GRIND button. E.g.: Suppose you want to grind tea leaves for 4 cups. MAX (This indicates you are unable to grind tea leaves for 4 cups/MAX) | The Tea Mortar has overheated. Allow it to cool down for the following time (depending on the number of cups corresponding cups) Cooling time (max.) 1cup: 3min 20sec, 2cups: 6min 30sec, 3cups: 9min 40sec, 4cups: 12min 50sec, MAX: 30min |
| Mode lamp you selected flashes when you press the START button. E.g.: Suppose you want to select “HOT”. > HOT ARM LATTE | Make sure that the container is set correctly. Remove the container, place it back into the main unit properly and then press the START button. |
| “MAX” and “LATTE” are flashing. 1 2 3 4 MAX > HOT WARM > LATTE | There is no water in the Water Reservoir. Press the STOP button and remove the water reservoir. Fill the water reservoir and insert it back into the main unit and re-program. |
| All Quantity Lamps are flashing and the Tea Maker stops. > MAX | Upper mortar unit and lower mortar may be stuck together. See page E-19 for maintenance directions. |
| The Tea Maker does not work when you press the START button. All lamps light up in sequence. | The Tea Maker is in demonstration mode. This feature is mainly for use by retail outlets, and only allows for trial operation. To cancel, press and hold the STOP button until it beeps and then press it 4 times. |
If you still require service, disconnect the plug from the outlet and CONTACT YOUR NEAREST SHARP AUTHORIZED SERVICER.
FOR CUSTOMER ASSISTANCE
To aid in reporting this Tea Maker in case of loss or theft, please record below the model number and serial number located on the unit. We also suggest you record all the information listed and retain for future reference.
MODEL NUMBER SERIAL NUMBER
DATE OF PURCHASE
DEALER TELEPHONE
SERVICER TELEPHONE
For the United States
TO PHONE:
DIAL 1-800-BE-SHARP (237-4277) for:
SERVICE (for your nearest Sharp Authorized Servicer)
PARTS (for your authorized parts distributor)
ADDITIONAL CUSTOMER INFORMATION
DIAL 1-800-642-2122 for : REPLACEMENT ACCESSORIES
TO WRITE:
Sharp Electronics Corporation
Attn: Customer Assistance Center
Sharp Plaza Blvd
Memphis, Tennessee 38193
TO ACCESS OUR WEB SITE: www.sharpusa.com
For Canada
TO PHONE:
Dial 1-905-568-7140 for:
SERVICE (for your nearest Sharp Authorized Servicer)
PARTS (for your Authorized Parts Distributor)
ACCESSIONS
ADDITIONAL CUSTOMER INFORMATION
TO WRITE: For service problems, warranty information, missing items an other assistance:
Sharp Electronics of Canada Ltd. Customer Care 335 Britannia Road East Mississauga, Ontario L4Z 1W9
TO ACCESS OUR WEB SITE: www.sharp.ca
Please provide the following information when you write or call: model number, serial number, date of purchase, your complete mailing address (including zip code), your daytime telephone number (including area code) and description of the problem.
LIMITED WARRANTY
SHARP ELECTRONICS CORPORATION warrants to the first consumer purchaser that this Sharp brand product (the Product), when shipped in its original container, will be free from defective workmanship and materials, and agrees that it will, at its option, either repair the defect or replace the defective Product or part thereof with a new or remanufactured equivalent at no charge to the purchaser for parts or labor for the period(s) set forth below.
This warranty does not apply to any appearance items of the Product nor to any Product the exterior of which has been damaged or defaced, which has been subjected to improper voltage or other misuse, abnormal service or handling, or which has been altered or modified in design or construction.
In order to enforce the rights under this limited warranty, the purchaser should follow the steps set forth below and provide proof of purchase to the servicer.
The limited warranty described herein is in addition to whatever implied warranties may be granted to purchasers by law. ALL IMPLIED WARRANTYES INCLUDING THE WARRANTYES OF MERCHANTABILITY AND FITNESS FOR USE ARE LIMITED TO THE PERIOD(S) FROM THE DATE OF PURCHASE SET FORTH BELOW. Some states do not allow limitations on how long an implied warranty lasts, so the above limitation may not apply to you.
Neither the sales personnel of the seller nor any other person is authorized to make any warranties other than those described herein, or to extend the duration of any warranties beyond the time period described herein on behalf of Sharp.
The warranties described herein shall be the sole and exclusive warranties granted by Sharp and shall be the sole and exclusive remedy available to the purchaser. Correction of defects, in the manner and for the period of time described herein, shall constitute complete fulfillment of all liabilities and responsibilities of Sharp to the purchaser with respect to the Product, and shall constitute full satisfaction of all claims, whether based on contract, negligence, strict liability or otherwise. In no event shall Sharp be liable, or in any way responsible, for any damages or defects in the Product which were caused by repairs or attempted repairs performed by anyone other than an authorized servicer. Nor shall Sharp be liable or in any way responsible for any incidental or consequential economic or property damage. Some states do not allow the exclusion of incidental or consequential damages, so the above exclusion may not apply to you.
THIS WARRANTY GIVES YOU SPECIFIC LEGAL RIGHTS. YOU MAY ALSO HAVE OTHER RIGHTS WHICH VARY FROM STATE TO STATE.
Your Product Model Number & Description:
TE-T56U-GR or TE-T56U-RD, Tea Maker. Be sure to have this information available when you need service for your Product.
Warranty Period for this Product:
One (1) year parts and labor.
Where to Obtain Service:
From a Sharp Authorized Servicer located in the United States. To find the location of the nearest Sharp Authorized Servicer, call Sharp toll free at 1-800-BE-SHARP (1-800-237-4277).
What to do to Obtain Service:
Ship prepaid or carry in your Product to a Sharp Authorized Servicer. Be sure to have Proof of Purchase available. If you ship the Product, be sure it is insured and packaged securely.
TO OBTAIN PRODUCT INFORMATION OR PURCHASE ACCESSORIES, CALL 1-800-BE-SHARP OR VISIT www.SharpUSA.com
THIS LIMITED WARRANTY IS VALID ONLY IN THE FIFTY (50) UNITED STATES, THE DISTRICT OF COLUMBIA. AND PUERTO RICO.
LIMITED WARRANTY
Consumer Electronics Products
Congratulations on your purchase!
Sharp Electronics of Canada Ltd. (“Sharp”) warrants to the first purchaser for this Sharp brand product (“Product”), when shipped in its original container and sold or distributed in Canada by Sharp or by an authorized Sharp dealer, and Product was not sold “as is” or “sales final” that the Product will during the applicable warranty period, be free from defects in material and workmanship, and will within the applicable warranty period, either repair the defective Product or provide the first purchaser a replacement of the defective Product.
Conditions: This limited warranty shall not apply to:
(a) Any defects caused or repairs required as a result of abusive operation, negligence, accident, improper installation or inappropriate use as outlined in the owner's manual or other applicable Product documentation.
(b) Any defects caused or repairs required as a result of any Product that has been tampered with, modified, adjusted or repaired by any person other than Sharp, a Sharp authorized service centre or a Sharp authorized servicing dealer.
(c) Any defects caused or repairs required as a result of the use of the Product with items not specified or approved by Sharp, including but not limited to chemical cleaning agents.
(d) Any replacement of accessories required through normal use of the Product, including but not limited to, earphones, remote controls, AC adapters, batteries, temperature probe, trays, filters, belts, ribbons, cables and paper.
(e) Any cosmetic damage to the Product surface or exterior that has been defaced or caused by normal wear and tear.
(f) Any defects caused or repairs required as a result of damage caused by any external or environmental conditions, including but not limited to, transmission line/power line voltage or liquid spillage or acts of God.
(g) If the serial number or model number affixed to Product has been removed, defaced, changed, altered or tampered with.
(h) This limited warranty will not apply if the Product has been used or is being used in a commercial setting or application; this warranty is meant solely for the non-commercial, household use of the Product by consumers in their home or residence.
(i) Any installation, delivery, setup and/or programming charges
(i) The removal and reinstallation of Over-The-Range Microwave or Microwave Printer if it is installed in an inaccessible location or requiring removal of cupboards, handles or other cosmetic parts, or is not installed in accordance with installation instructions included with Product.
How to get service: Warranty service may be obtained upon delivery of the Product, together with proof of purchase (including date of purchase) and a copy of this limited warranty statement, to an authorized Sharp service centre or an authorized Sharp servicing dealer. In home warranty service will be carried out to locations accessible by on-road service vehicle and within 50km of an authorized Sharp service centre on any Sharp Television with the screen size of 42^ or larger and on any Over-The-Range Microwave Oven or Microwave Printer. The servicer may if necessary take the unit for repair at the servicer's facility. No other person (including any Sharp dealer or service centre) is authorized to extend, enlarge or transfer this warranty on behalf of Sharp. The purchaser will be responsible for any and all removal, reinstallation, transportation and insurance costs incurred with exception for Over-The-Range Microwave Oven or Microwave Printer whereby Sharp will be responsible for the removal and reinstallation.
The express warranties in this limited warranty are, except for consumer purchasers domiciled in Quebec, in lieu of and, except to the extent prohibited by applicable law, Sharp disclaims all other warranties and conditions, express or implied, whether arising by law, statute, by course of dealing or usage of trade, including, without limitation, implied warranties or conditions of merchantability and/or quality, fitness for a particular use or purpose, and/or non-infringement. Limitations (not applicable to consumer purchasers domiciled in Quebec to the extent prohibited under Quebec law): (a) Sharp shall not be liable for any incidental, special, consequential, economic, exemplary or indirect damages of any kind or nature (including lost profits or damages for loss of time or loss of use or loss of data) arising from or in any connection with the use or performance of a Product or a failure of a Product, even if Sharp is aware of or has been advised of the possibility of such damages; (b) the remedies described in this limited warranty constitute complete fulfillment of all obligations and responsibilities of Sharp to the purchaser with respect to the Product and shall constitute full satisfaction of all claims, whether based on contract, negligence, strict liability or otherwise. Some provinces may not allow the exclusion or limitation of certain damages, or limits on the duration or voiding of implied warranties or conditions; in such provinces, the exclusions and limits herein may not apply. This limited warranty is, except for consumer purchasers domiciled in Quebec, governed by the laws of the Province in Canada in which the purchaser has purchased the Product. For consumer purchasers domiciled in Quebec this limited warranty is governed by the laws of Quebec.
| WARRANTY PERIODS: (calculated from the date of original purchase): | Parts & Labour (exceeds noted) |
| Audio Product | 1 year |
| Blu-Ray Product | 1 year |
| LCD/LED TV | 1 year |
| Microwave Oven | 1 year (magnetron - 4 additional years) |
| Air Purifier | 1 year |
| 3D Glasses | 1 year |
| Wireless LAN Adapter | 1 year |
| Small home appliances | 1 year |
To obtain the name and address of the nearest Authorized Sharp Service Centre or Dealer, or for more information on this Limited Warranty, Sharp Extended Warranty Offers, Sharp Canada Products or Accessory Sales, please contact Sharp:
- By writing to Sharp Electronics Of Canada Ltd. at 335 Britannia Road East Mississauga, Ontario L4Z 1W9
- Calling: at 905-568-7140
- Visiting our Web site: www.sharp.ca
THIS LIMITED WARRANTY IS VALID ONLY IN CANADA

NOTE
SHARP ELECTRONICS CORPORATION
Sharp Plaza, Mahwah,
New Jersey 07495-1163 U.S.A.
SHARP®
SHARP ELECTRONICS OF CANADA LTD.
335 Britannia Road East Mississauga,
Ontario L4Z 1W9 Canada