SJ626E - Snow blower Snow Joe - Free user manual and instructions
Find the device manual for free SJ626E Snow Joe in PDF.

| Product Type | Electric Snow Blower |
| Brand | Snow Joe |
| Model | SJ626E |
| Motor | 14.5 A, 120 V ~ 60 Hz |
| No-load speed | 2,700 rpm |
| Clearing Width | 55.9 cm |
| Clearing Depth | 33 cm |
| Maximum Throwing Distance | 7.6 m |
| Rotor | 4 Steel-Tipped Blades |
| Snow Discharge Control | 180° Swiveling Chute with Adjustable Deflector |
| Net Weight | 15.5 kg |
| Power Supply | Outdoor Extension Cord (max. 30 m, 14 or 12 AWG) |
| Double Insulated | Yes |
| Safety Device | Safety Push Button + On/Off Switch Lever |
| Lubrication | Lifetime (motor and auger) |
| Replaceable Wear Parts | Rubber Blades, Belt, Pulley, Wear Plates, Scraper Blade |
| Warranty | 2 years (extendable up to 5 years at shopjoe.com/register) |
| Optional Accessories | Extension Cord PJEXT50-B, Chute Cleaning Tool SJCOT, Cover SJCVR-24 |
| Storage | In a dry place, out of reach of children, after cleaning and drying |
Frequently Asked Questions - SJ626E Snow Joe
User questions about SJ626E Snow Joe
0 question about this device. Answer the ones you know or ask your own.
Ask a new question about this device
Download the instructions for your Snow blower in PDF format for free! Find your manual SJ626E - Snow Joe and take your electronic device back in hand. On this page are published all the documents necessary for the use of your device. SJ626E by Snow Joe.
USER MANUAL SJ626E Snow Joe
Form No. ASP-SJ626E-880E-MR5
natural_image
Line drawing of a snowman lawn mower with handle and blade (no text or symbols)THANK YOU FOR YOUR PURCHASE!
SCAN
REGISTER
ONLINE TODAY

Place UPC sticker here
ACTIVATE YOUR 2 YEAR WARRANTY
RECEIVE 90 DAYS BONUS COVERAGE
VISIT SHOPJOE.COM/REGISTER

text_image
+EXTENDED WARRANTYUPGRADE YOUR COVERAGE AT SHOPJOE.COM/REGISTER
FOR UP TO 3, 4, OR 5 YEARS OF TOTAL TOOL COVERAGE
When we say we stand behind our product, we mean it! Now you can blow, mow, cut, saw or tend to any other yard task with confidence, knowing that if there is a problem with your tool within the warranty period, we will gladly solve it.
HAS YOUR SNOW JOE
EXPERIENCE LEFT
YOU SMILING?

TELL YOUR FRIENDS AND TAG US!
We love to hear your feedback! Share your experience by writing comments and reviews on shopjoe.com, or connect with us on social media!


@ SNOWJOECO
GOWITHJOE
OR HAS SOMETHING
LEFT YOU LESS
THAN SATISFIED?

WE'RE SORRY ABOUT THAT!
Our friendly customer service team is ready to help you with any issues you may have.
help you with any issues you may have, Monday - Sunday from 9AM to 5PM EST
Monday - Sunday from 5AM to 5PM EST
CALL US, EMAIL US, CHAT WITH US

HELP@SHOPJOE.COM For fastest response

SHOPJOE.COM

1-866-225-9723
Original instructions.
© 2025 All Season Power LLC.
Snow Joe ^5 , Sun Joe ^5 , Aqua Joe ^6 , Auto Joe ^6 , and Power Joe ^6 are
registered trademarks used under license from Weather Brands LLC.
New Castle, DE 19720
Model SJ626E
Form No. ASP-SJ626E-880E-MR5
IMPORTANT!
Safety Instructions
All Operators Must Read These Instructions Before Use
Any electrical appliance can be dangerous if used incorrectly. Some of the safety precautions given in this manual apply generally to many appliances. Other warnings are specific to the use of this snow thrower. Keep this manual for future reference.
General Safety WARNINGS!
You and any other operator of this snow thrower must read, understand, and follow these instructions in their entirety, and should reread them at the start of each snow season. Failure to follow these instructions may result in ELECTRIC SHOCK, FIRE, and/or serious PERSONAL INJURY.
Notice the personal safety alert symbol ⚠️ used in this manual to draw your attention to a WARNING given along with the particular operating instruction. This means that the operation requires special ATTENTION, CAUTION, and AWARENESS.
- Keep work area clean and well lit. Cluttered, dark areas invite accidents.
- Do not operate the snow thrower in an explosive atmosphere, such as in the presence of flammable liquids, gases, or dust. Electrical appliances create sparks that may ignite the dust or fumes.
- Keep children, pets, and bystanders away from the work area. Be aware that the normal noise of the machine when turned on may make it difficult for you to hear approaching people. Spectators should wear safety glasses and be kept a safe distance away from the work area. Do not let spectators touch the snow thrower or the extension cord.
-
Electrical plugs must match the outlet. Never modify the plug in any way. Do not use any adapter plugs with grounded appliances. Unmodified plugs and matching outlets will reduce the risk of electric shock.
-
Avoid body contact with earthed or grounded surfaces (i.e. upper and lower water pipes, radiators, ranges, refrigerators, microwave ovens, and outer frames of heating equipment). Take necessary precautions to avoid electric shock. There is an increased risk of electric shock if your body is earthed or grounded.
-
Do not abuse the cord. Keep the cord away from heat, oil, sharp edges, or moving parts. Never carry the snow thrower by its cord or yank the cord to disconnect it from the electrical outlet. Damaged or entangled cords increase the risk of electric shock.
-
Replace or properly repair damaged cords. If the cord becomes damaged in any manner while plugged into the wall receptacle, immediately pull the extension cord plug from the receptacle.
-
Contact with water while operating the snow thrower can result in electric shock and serious bodily injury. Do not use the snow thrower in damp or wet locations or expose to rain. Do not handle the plug or the appliance with wet hands or while standing in water.
-
⚠WARNING - Use outdoor extension cords marked SW-A, SOW-A, STW-A, STOW-A, SJW-A, SJOW-A, SJTW-A, or SJTOW-A. These cords are rated for outdoor use and reduce the risk of electric shock.
-
Turn off the power switch and disconnect the power cable before making any adjustments to the unit and before inspecting, servicing, changing accessories, or cleaning the snow thrower. Follow the same procedure if any other dangerous conditions are present during operation. Any adjustments to the unit should be performed after revolving parts inside the snow thrower stop completely. Such preventative safety measures reduce the risk of starting the power tool accidentally.
-
If you find the main power cable or the extension cable damaged, please pull out the plug from the socket and disconnect the power immediately. Repair the cable or replace it if necessary.
-
When replacing any parts, you must strictly observe the instructions and procedures described in this operator's manual. Special care should be paid to any rubber parts, since these parts may increase the engine load and decrease its mechanical power if damaged.
-
Do not move or transport the snow thrower when the plug is connected to the power socket and the switch is turned on.
-
If, during use, you notice that the unit runs unstably or hear abnormal sounds from the motor, stop the machine, disconnect the power immediately and contact an authorized Snow Joe® + Sun Joe® service center.
Electrical Safety
-
Ground fault circuit interrupter (GFCI) protection should be provided on the circuit(s) or outlet(s) to be used for the snow thrower. Receptacles are available having built-in GFCI protection and may be used for this measure of safety.
-
To prevent electric shock, use only with an extension cord suitable for outdoor use, such as SW-A, SOW-A, STW-A, STOW-A, SJW-A, SJOW-A, SJTW-A, or SJTOW-A.
Before use, check that the extension cord is in good condition. When using an extension cord, make sure to use one heavy enough to carry the current your product will draw. An undersized cord will cause a drop in line voltage resulting in loss of power and overheating.
- To reduce the risk of electric shock, this appliance has a polarized plug (i.e. one blade is wider than the other). Use this appliance only with a polarized UL-, CSA-, or ETL-rated extension cord for outdoor, all-weather use. The appliance plug will fit into a polarized extension cord only one way.
If the appliance plug does not fit fully into the extension cord, reverse the plug. If the plug still does not fit, obtain a correct polarized extension cord. A polarized extension cord will require the use of a polarized wall outlet. The extension cord plug will fit into the polarized wall outlet only one way. If the plug does not fit fully into the wall outlet, reverse the plug. If the plug still does not fit, contact a qualified electrician to install the proper wall outlet. Do not modify the appliance plug, extension cord receptacle, or extension cord plug in any way.

WARNING

Electric shock may cause SEVERE INJURY or DEATH. Heed these warnings:
- Do not allow any part of the electric snow thrower to make contact with water while it is in operation. If the appliance becomes wet while turned off, wipe dry before starting.
- Use only a UL-, CSA- or ETL-rated extension cord for outdoor, all-weather use, such as the Snow Joe ^ + Sun Joe ^ SJTW-A 14-gauge 50-foot extension cord with lighted end (Model PJEXT50-B). Visit snowjoe.com to purchase this extension cord online or, to order by phone, call 1-866-SNOWJOE (1-866-766-9563).
- Do not use an extension cord over 100 ft (30 m).
- Do not touch the appliance or its plug with wet hands or while standing in water. Wearing rubber boots offers some protection.
EXTENSION CORD CHART
| Extension Cord Length | Up to 50 ft (15 m) | +50 ft - 100 ft (+15 m - 30 m) |
| Wire Gauge (A.W.G.): | 14 12 |
- To prevent the appliance cord from disconnecting from the extension cord during operation, use the on-board cord restraint hook and/or make a knot with the two cords as shown in Table 1.
Table 1. Method of Securing Extension Cord

text_image
Cord set Appliance cord(A) Tie cord as shown
natural_image
Simple line drawing of a resistor connected in series with two leads (no text or symbols)(B) Connect plug and receptacle
- Do not abuse the cord. Never pull the snow thrower by the cord or yank the cord to disconnect it from the receptacle. Keep the cord away from heat, oil, and sharp edges.
Personal Safety
- Stay alert – Watch what you are doing and use common sense when operating the snow thrower. Do not use the machine when tired, ill, or under the influence of drugs, alcohol, or medication. A moment of inattention may result in serious personal injury.
- Wear proper clothing – Wearing rubber boots offers additional protection from electric shock. Do not wear loose clothing or jewelry that may become caught in the machine. Wear protective headgear to keep hair away from revolving parts of the machine. Safety glasses offer better protection than everyday eyeglasses.
- Moving parts present risks – Keep your face, hair, clothing, hands, and feet away from moving parts. All guards and safety attachments must be installed properly before using the unit. Shut off and disconnect the cord before touching any parts other than the handles and the switch.
- Surfaces - This snow thrower is intended for use on paved surfaces. Do not use on gravel, stone, or other unpaved surfaces unless the snow thrower is adjusted for such surfaces according to the instructions given in this operator's manual.
- Avoid accidental starting – Make sure the switch is in the off position before plugging in the unit. Do not carry the snow thrower with your finger on the switch.
- Body position – Maintain proper footing and balance at all times. Place heels firmly on the ground and tightly grasp the handle bar. Watch for uneven surfaces and do not overreach. In case you fall or collide with the snow thrower, inspect the unit for any damage or cracks. When stepping backwards, be careful to avoid obstacles beneath your feet or behind you to avoid falling.
- If the snow thrower strikes any object, immediately stop the snow thrower, then inspect for damage – Repair any damage before restarting and operating the snow thrower.
Safety Instructions for Walk-Behind Snow Throwers
- Read the operator's manual carefully – Learn your snow thrower's applications and limitations as well as the specific potential hazards related to this machine. Do not use this machine for any purpose other than the one for which it was designed. Otherwise, it may cause mechanical defaults, serious damage, or personal injury.
- Preliminary unit inspection – Thoroughly inspect the unit before use. Make sure all the parts are secure and installed correctly. If you notice any abnormalities, do not use the machine until it has been properly repaired.
Always perform a test run the first time you use the snow thrower or after replacing parts to ensure that the unit is functioning properly.
- Preliminary area inspection – Clear the area to be plowed before each use. Remove all objects, such as rocks, broken glass, nails, wire, or string, which can be thrown by or become entangled in the snow thrower. Keep the area of operation clear of all spectators, particularly children and pets.
- Excessive force – The snow thrower was designed to respond at a certain rate for various snow conditions for optimum safety and performance. Do not force it; keep pressure constant.
- Malfunctioning switch – Do not use the snow thrower if the switch does not turn it on and off. Any electrical appliance that cannot be controlled by the switch is not safe to use and must be repaired.
- Hitting an object – If the snow thrower accidentally strikes an object, follow these steps:
i) Stop the snow thrower and unplug the unit
ii) Inspect for damage
iii) Repair or replace any damaged part before restarting and operating the snow thrower.
- Discharge chute safety – Never direct the snow discharge chute at the operator, at bystanders, at vehicles, or at windows. The discharged snow stream and foreign objects accidentally picked up by the snow thrower can cause serious damage and personal injury. Do not use your hands to unclog the discharge chute. Stop the motor before removing debris.
- Hand-held operating position – Operation of the snow thrower in the hand-held position is unsafe.
- Abnormal operation – If you notice the snow thrower running in an unstable state or hear abnormal sounds from the engine, immediately stop the machine, disconnect the power, and contact an authorized Snow Joe ^ + Sun Joe ^ dealer or the Snow Joe ^ + Sun Joe ^ customer service center at 1-866-SNOWJOE (1-866-766-9563).
- Noise control – When using the snow thrower, you must respect local laws and regulations regarding noise control and environmental protection. To avoid noise disturbance, you should carefully decide upon an appropriate operation time and consider the surrounding conditions.
- When work is completed – Disconnect the snow thrower from the power source when not in use, when changing accessories, and before performing any maintenance function.
- Store safely – Store the snow thrower indoors in a dry area between uses. Keep it in a locked area, where children and unauthorized users cannot gain access. Do not store the machine while it is still connected to the power source as this may result in damage and injury.
- Maintain for safety and longevity – Check for misalignment or binding of moving parts, breakage of parts, and any other conditions that may affect the unit's operation. If damaged, repair or replace the damaged part before use. Use only original replacement parts designed specifically for your model. When replacing any parts, you must strictly observe the instructions and procedures described in this manual. Special care should be paid to any rubber parts, since these parts may increase the engine load and decrease its mechanical power if damaged. Always check that all bolts, nuts, and knobs are tight before using the snow thrower!
Safety Symbols
The following table describes safety symbols that may appear on this product. Read, understand, and follow all instructions on the machine before attempting to assemble and operate.
| Symbols | Descriptions Symbols | Descriptions | |
 | READ THE OPERATOR'S MANUAL(S) - Read, understand, and follow all instructions in the user manual(s) before attempting to assemble and operate. | 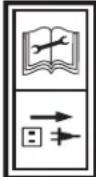 | Disconnect the plug before conducting maintenance or when it is damaged or tangled. |
 | SAFETY ALERT - Indicates a precaution, a warning, or a danger. |  | It is obligatory at all times to wear goggles or a visor to protect the eyes and face. |
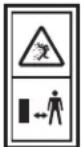 | Beware of stones and other objects that could be thrown from the appliance. Keep all bystanders and domestic animals a safe distance away from the work area. | 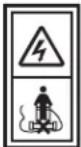 | Keep the flexible power supply cord away from the cutting blades. |
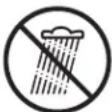 | WARNING! Do not expose the unit to rain or wet conditions. Keep dry. | 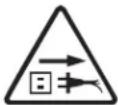 | Always keep the power cable away from heat sources, oils, or sharp edges. Immediately remove plug from the mains if the cable is damaged or entangled. |
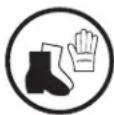 | Wear protective gloves and non-slip footwear when using the machine and handling debris. | 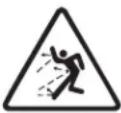 | CAUTION! Beware of stones and other foreign objects that could be thrown from the appliance. |
 | Keep hands and feet away from the rotating parts. |  | Keep hands away from the moving parts of the snow thrower. The rotating parts can cause severe bodily injury. |
 | |||
 | DANGER! Cutting/dismemberment hazard - Keep hands away from the rotating auger. Do not use hands to unclog rotor housing. Stop motor before removing debris. |  | Keep feet away from the moving parts of the snow thrower. The rotating parts can cause severe bodily injury. |
 | |||
 | The rotating part will continuously run for several seconds after you turn off the machine. |  | Double insulation. |
| STOP |
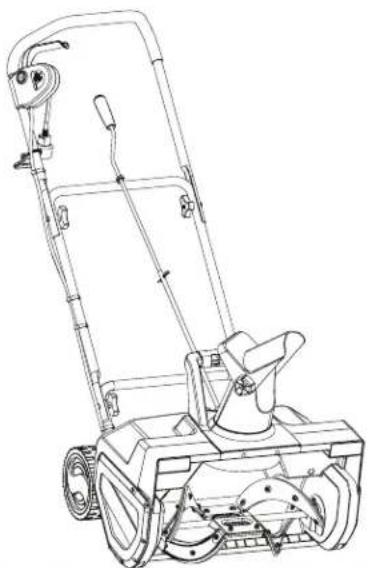
Know Your Electric Snow Thrower
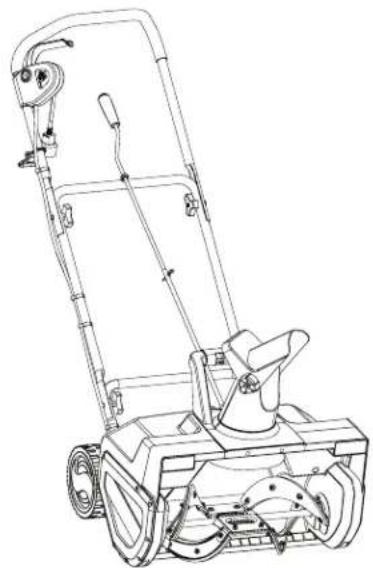
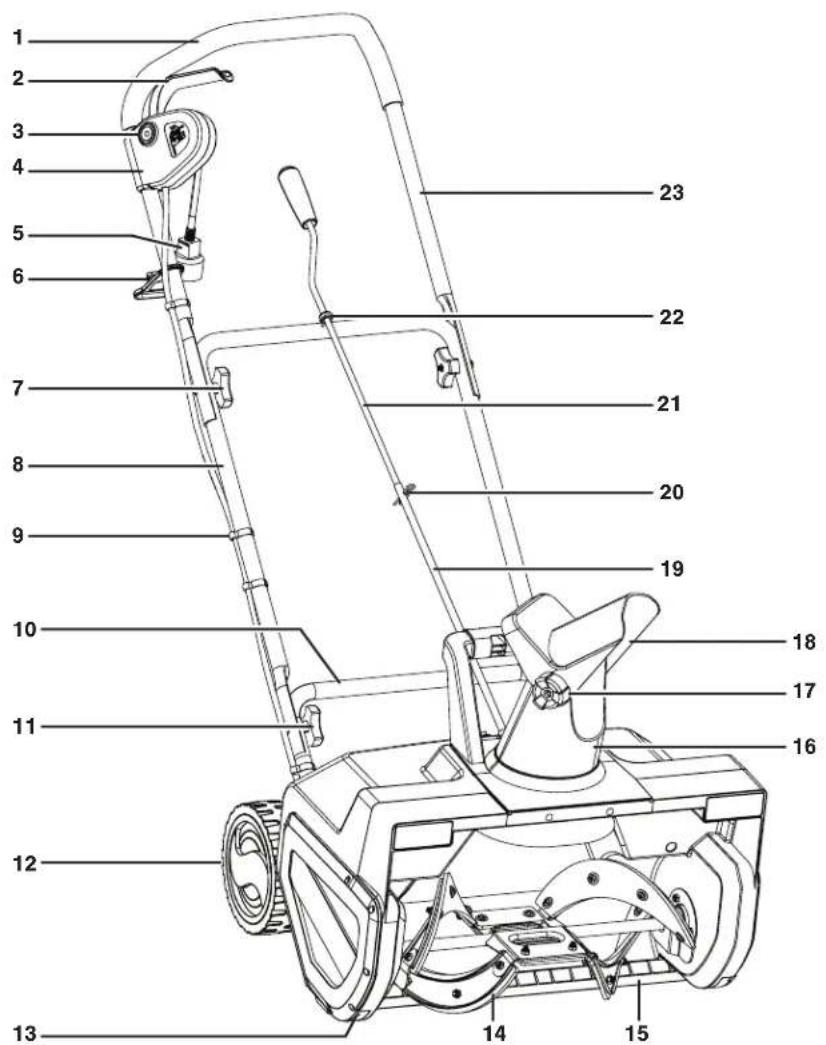
Read the owner's manual and safety rules carefully before operating your electric snow thrower. Compare the illustration below to the actual unit in order to familiarize yourself with the location of the various controls and adjustments. Save this manual for future reference.
text_image
Labeled diagram of a lawn pusher with numbered parts for identification-
Soft grip
-
ON/OFF switch
-
Safety lock button
-
Switch box
-
Appliance cord
-
Extension cord restraint hook
-
Upper handle knobs and bolts (2 sets)
-
Middle frame
-
Cable clips (3)
-
Lower frame
-
Lower handle knobs and bolts (2 sets)
-
Wheels (2)
-
Skid shoes (2)
-
Auger
-
Scraper bar
-
Discharge chute
-
Deflector knob
-
Chute deflector
-
Lower chute crank
-
Hitch-pin
-
Upper chute crank
-
Rubber ring
-
Upper frame
Technical Data
Motor 14.5A
Rated Voltage 120V \~ 60 Hz
No Load Speed 2700 rpm
Clearing Width 22 in. (55.9 cm)
Clearing Depth 13 in. (33 cm)
Throw Distance Max 25 ft (7.6 m)
Directional Control 180° adjustable chute
Rotor 4 rubber-tipped steel blades
Net Weight 34 lbs (15.5 kg)
Unpacking
Carton Contents:
• Electric snow thrower with middle frame and upper frame
- Upper crank rod
- Lower crank rod
- Extension cord restraint hook
- Cable clips (3)
- Handle knobs and bolts (4 sets)
- Manual with registration card
-
Carefully remove the electric snow thrower and check to see that all of the above items are supplied.
-
Inspect the product carefully to make sure no breakage or damage occurred during shipping. If you find damaged or missing parts, DO NOT return the unit to the store. Please call the Snow Joe ^® + Sun Joe ^® customer service center at 1-866-SNOWJOE (1-866-766-9563).
NOTE: Do not discard the shipping carton and packaging materials until you are ready to use your new electric snow thrower. The packaging is made of recyclable materials. Properly dispose of these materials in accordance with local regulations or save the packaging for long-term product storage.
IMPORTANT! The equipment and packaging materials are not toys. Do not let children play with plastic bags, foils, or small parts. These items can be swallowed and pose a suffocation risk!
Assembly
⚠ WARNING! Inspect wiring, which, if damaged during shipping, may cause serious bodily injury during equipment use. If any damage is seen or suspected, do not assemble. Instead, contact the Snow Joe® + Sun Joe® customer service center at 1-866-SNOWJOE (1-866-766-9563) for assistance.
Handle with care during assembly so that electrical wiring does not become damaged.
Handle Frame Assembly
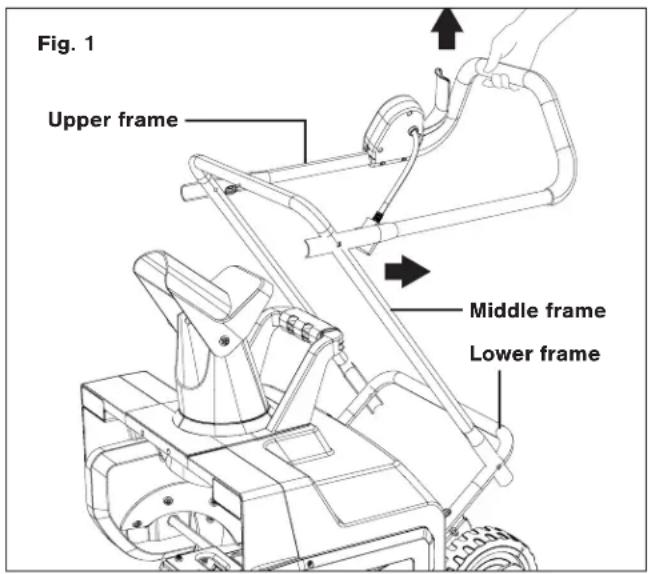
- For easy assembly, the unit comes complete with most parts already connected. To complete the handle assembly, simply pull the middle frame back and pull the upper frame up (Fig. 1).
text_image
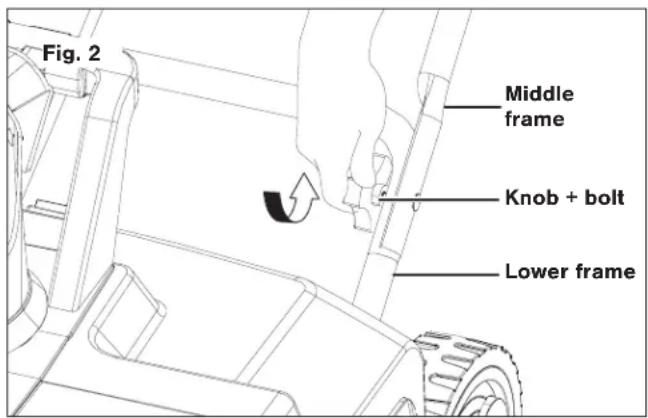
Fig. 1 Upper frame Middle frame Lower frame- Secure the connection of the middle frame to the lower frame by fastening the first set of knobs and bolts on each side (Fig. 2).
text_image
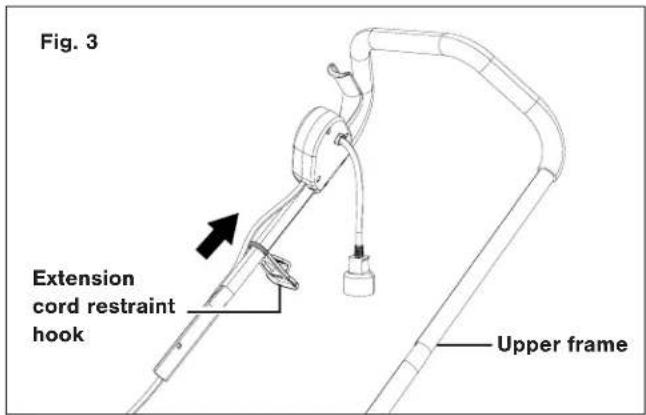
Fig. 2 Middle frame Knob + bolt Lower frame- Before securing the upper frame, slide the extension cord restraint hook up the upper frame (Fig. 3).
text_image
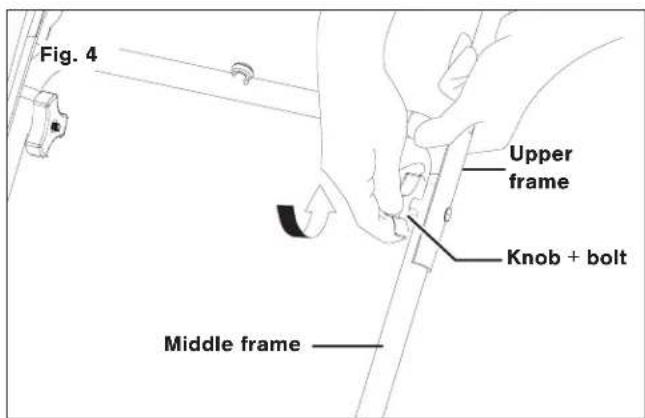
Fig. 3 Extension cord restraint hook Upper frame- Secure the connection of the upper frame to the middle frame by fastening the second set of knob and bolt on each side (Fig. 4).
text_image
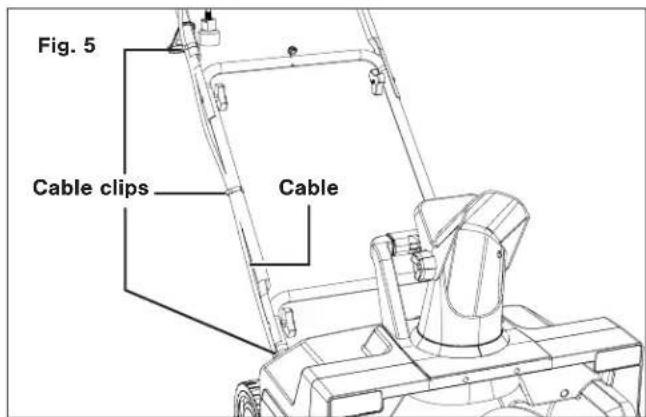
Fig. 4 Upper frame Knob + bolt Middle frame- Clip on the 3 cable clips on the frame, and insert the cable inside the cable clips (Fig. 5).
text_image
Fig. 5 Cable clips CableChute Crank Assembly
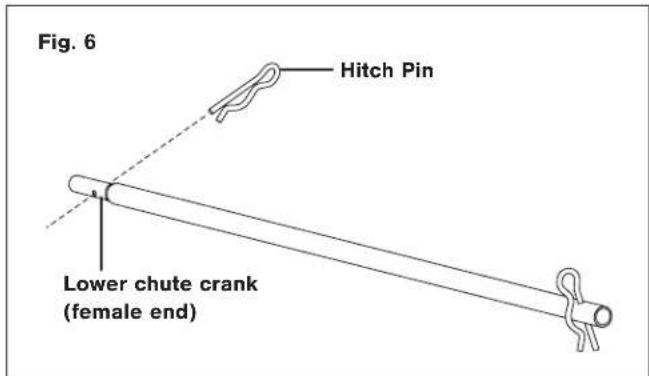
- Remove the hitch pin from the female end of the lower chute crank (Fig. 6).
text_image
Fig. 6 Hitch Pin Lower chute crank (female end)- Install the lower crank rod by inserting it into the opening at the back of the housing and aligning the holes (Fig. 7).
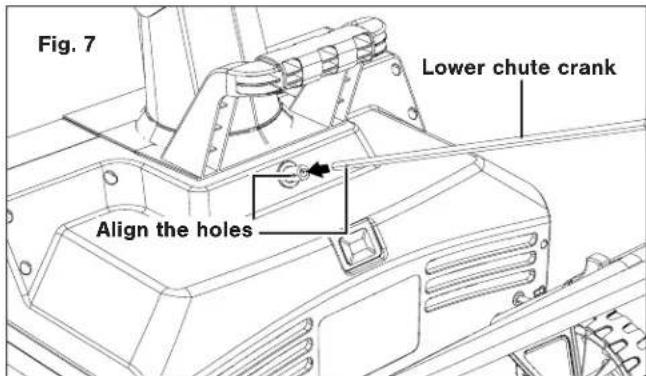
text_image
Fig. 7 Lower chute crank Align the holes- Secure the lower chute crank in place with the hitch pin (Fig. 8).
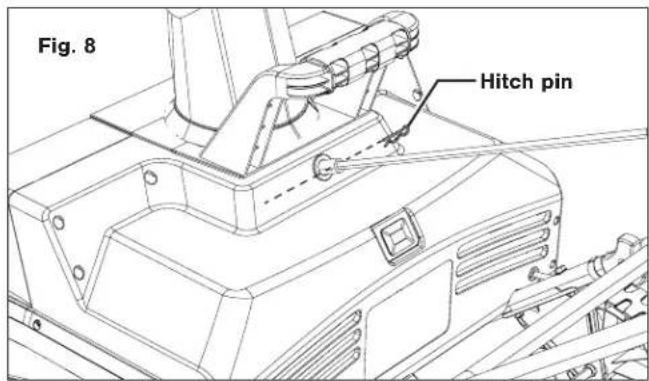
text_image
Fig. 8 Hitch pin- Remove the other hitch pin from the lower chute crank (Fig. 9).
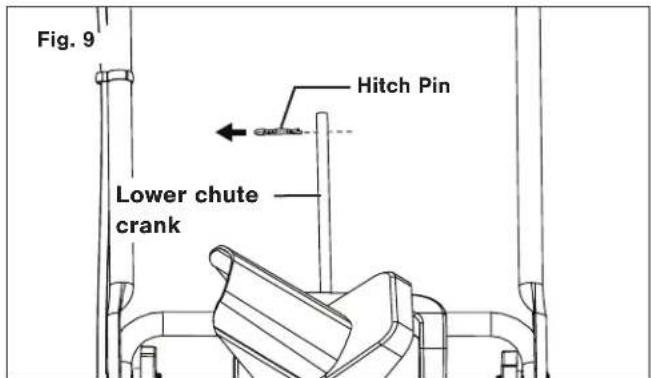
text_image
Fig. 9 Hitch Pin Lower chute crank- Slide the upper chute crank through the rubber ring located on the middle frame (Fig. 10).
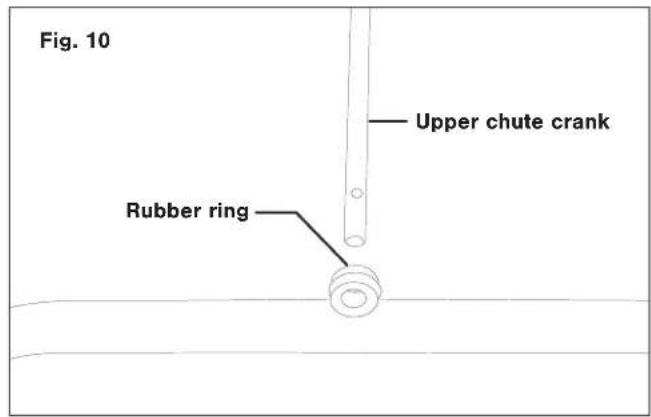
text_image
Fig. 10 Upper chute crank Rubber ring- Slide the upper chute crank into the lower chute crank (Fig. 11).
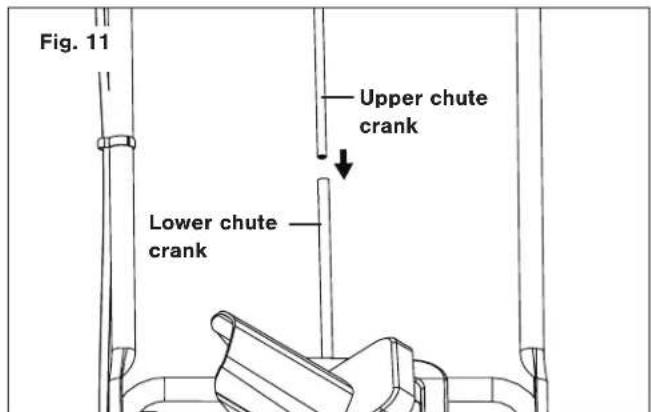
text_image
Fig. 11 Upper chute crank Lower chute crank- Align the screw holes and secure with hitch pin (Fig. 12).
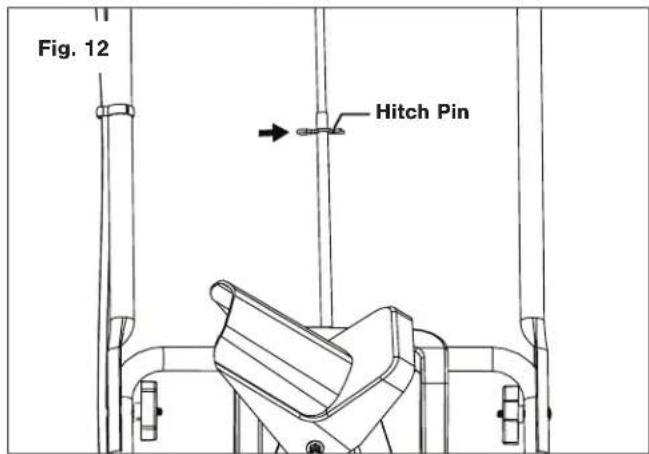
text_image
Fig. 12 Hitch PinOperation
NOTE: Before using this machine, make sure that the power source you will use complies with the specifications detailed in this manual. Before inserting the plug into the socket, verify that the snow thrower's auger and rubber plates are firmly secured with screws, and that the rubber plates are facing the correct direction. Perform a test run to ensure that the rotor turns freely.
Securing the Extension Cord
- For safe and efficient use of your snow thrower, use only a UL-rated extension cord recommended for outdoor use. Refer to the Extension Cord Chart on page 2.
- Push the loop of the extension cord through the slot from the opposite side of the restraint hook. Position the loop over the hook and pull the cable back through the slot (Fig. 13).
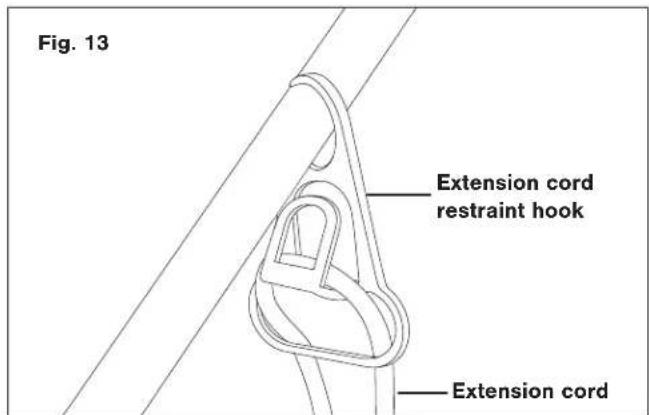
text_image
Fig. 13 Extension cord restraint hook Extension cord- Insert the female end of the extension cord into the appliance's polarized male plug (Fig. 14).
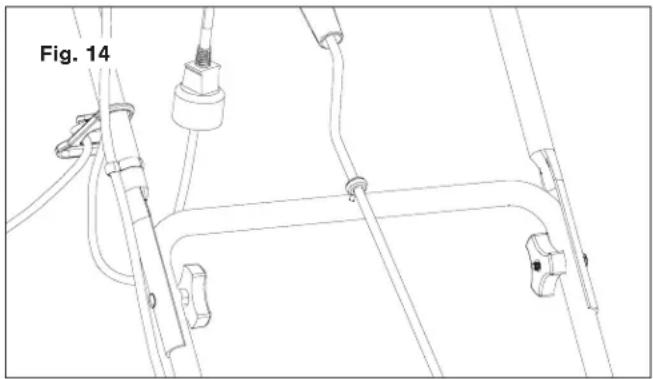
natural_image
Technical line drawing of a mechanical assembly with no visible text or symbols⚠ WARNING! Damaged electrical cords present risk of fire, electrical shock, and serious bodily injury.
Before operating the snow thrower, carefully examine the electrical cord. If the cord is damaged, do not use the snow thrower. Replace or repair the damaged cord immediately. If you need assistance, contact an authorized Snow Joe ^® + Sun Joe ^® dealer or the Snow Joe ^® + Sun Joe ^® customer service center at 1-866-SNOWJOE (1-866-766-9563).
Powering On + Off
WARNING! The auger starts rotating immediately after the snow thrower is switched on. Keep hands and feet away from the auger.
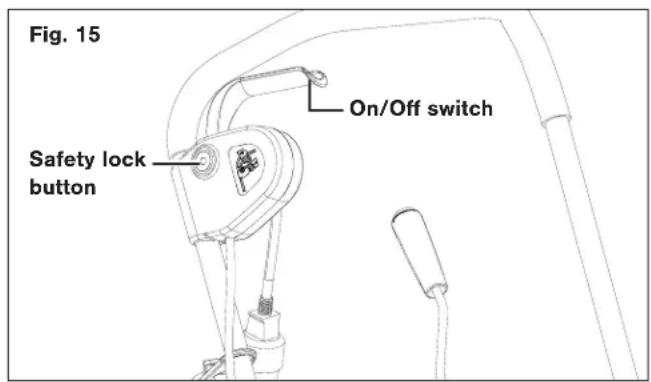
- To power on, depress and hold the safety lock button found alongside the switch housing (Fig. 15).
- While depressing the safety lock button, pull the ON/OFF switch lever toward you. Once the machine powers on, release the safety lock button and begin operation (Fig. 15). The machine can only be started by depressing the safety lock button first, followed by squeezing the ON/OFF switch lever; reverse operation will not start the machine.
text_image
Fig. 15 Safety lock button On/Off switch- To power off, release your grip on the ON/OFF switch lever.
Moving the Machine + Plowing the Snow
⚠ WARNING! Foreign objects, such as rocks, broken glass, nails, wire, or string, can be picked up and thrown by the snow thrower, causing serious personal injury.
Remove all foreign objects from the area to be plowed before operating the snow thrower.
-
Keep the area of operation free of foreign objects that can become thrown by the rotor blades. Perform a thorough inspection of the area since some objects may be hidden from view by surrounding snow. If the snow thrower hits an obstruction or picks up a foreign object during use, stop the snow thrower, disconnect the extension cord, remove the obstruction, and inspect the unit for damage. Repair or replace any damaged part before restarting and operating the unit.
-
Keep children, pets, and bystanders away from the area of operation. Be aware that the normal noise of the machine when turned on may make it difficult for you to hear approaching people.
-
When moving the snow thrower, use the wheels on one side as the pivot point. Slightly tilt the snow thrower on this pivot point to move it forward or backward.
-
Start your clearing path near the electrical outlet and work outward, throwing snow in a back and forth motion. To clear in the opposite direction, step over the cord and pivot the snow thrower on its wheels. Make sure to overlap clearing paths.
-
Note the wind direction. If possible, move in the same direction as the wind so that the snow is not thrown against the wind (and thus back into your face and onto the just cleared path).
-
While moving the snow thrower, do not drag the power cable violently or roughly. The snow thrower should move within the range that the cable can reach.
-
Do not push the snow thrower with excessive force. You should push the machine gently and evenly in accordance with the unit's throw rate.
-
Do not apply additional man-made load to the engine since this may cause engine damage.
-
Some parts of the snow thrower may freeze under extreme temperature conditions. Do not attempt to operate the snow thrower with frozen parts. If the parts freeze while the snow thrower is in use, stop the snow thrower, unplug the extension cord, and inspect for frozen parts. Free all parts before restarting or operating the snow thrower. Never force controls that have frozen.
-
When working on pebbles, gravel, or unpaved surfaces, avoid throwing loose surface material along with the snow by pushing down on the handle to raise the scraper bar at the base of the unit above the pebbles or gravel.
-
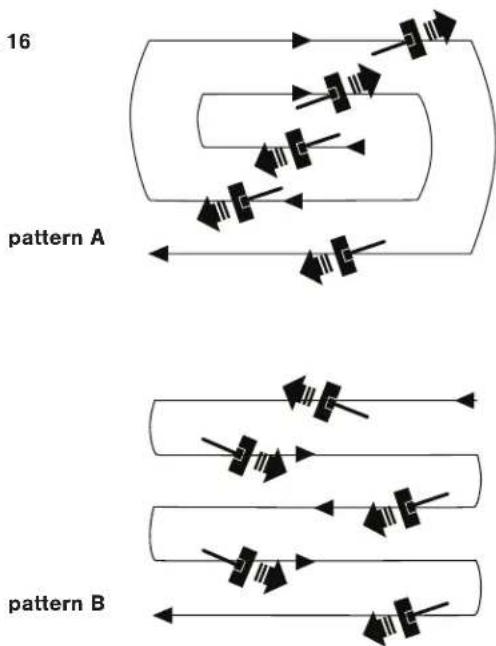
For larger areas, a definite pattern of operation is required to thoroughly clean an area of snow. These patterns will avoid throwing snow in unwanted places, a well as eliminate the need for a second removal of snow (Fig. 16).
Pattern A: Throw the snow to the right or left side where it is possible. For areas such as a long driveway, it is advantageous to start in the middle. Plow from one end to the other, throwing snow to both sides.
Pattern B: If the snow can only be thrown to one side of the area to be cleared, start on the opposite side.
Fig. 16
flowchart
graph TD
    subgraph "pattern A"
        direction LR
        A1["Arrow"] --> A2["Arrow"]
        A3["Arrow"] --> A4["Arrow"]
        A5["Arrow"] --> A6["Arrow"]
        A7["Arrow"] --> A8["Arrow"]
        A9["Arrow"] --> A10["Arrow"]
    end
    subgraph "pattern B"
        direction LR
        B1["Arrow"] --> B2["Arrow"]
        B3["Arrow"] --> B4["Arrow"]
        B5["Arrow"] --> B6["Arrow"]
        B7["Arrow"] --> B8["Arrow"]
        B9["Arrow"] --> B10["Arrow"]
    end
    style "pattern A" fill:#f9f,stroke:#333
    style "pattern B" fill:#bbf,stroke:#333
Fig. 18
natural_image
Technical line drawing of a mechanical device with no visible text or symbolsChanging Throw Direction + Throw Height
WARNING! Never direct the discharge chute at the operator, at bystanders, at vehicles, or at nearby windows. The discharged snow and foreign objects accidentally picked up by the snow thrower can cause serious damage and personal injury.
Always orient the discharge chute in the opposite direction from where you, bystanders, surrounding vehicles, or windows are located.
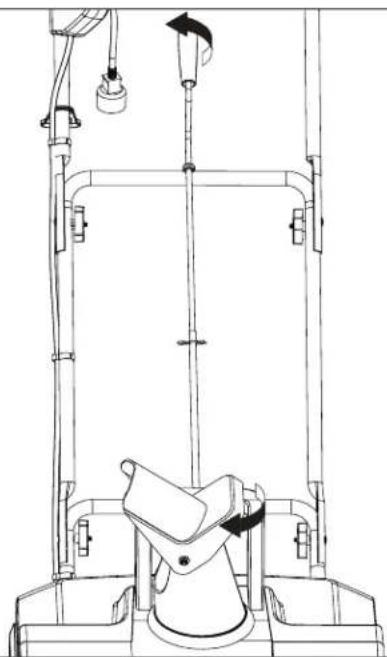
NOTE: The chute crank shaft rotation is stiff in the first initial use. It will loosen with use.
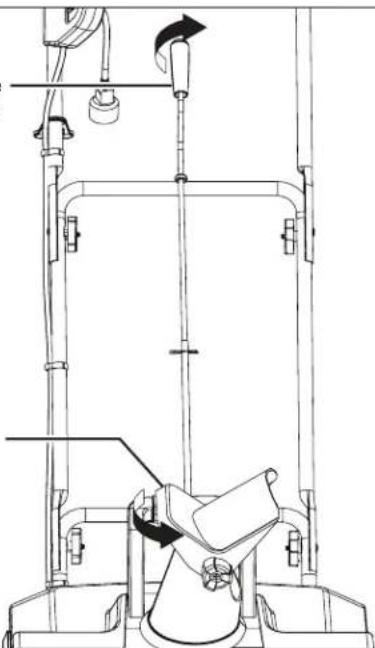
- The discharge chute can be adjusted 180 degrees by rotating the chute crank. Rotate the chute control crank clockwise to move the discharge chute to the left (Fig. 17) and counterclockwise to move the chute to the right (Fig. 18).
Fig. 17
Chute crank
natural_image
Technical line drawing of a mechanical device with no visible text or symbols- The chute deflector on the top of the discharge chute controls the height of the snow stream. Loosen the knob to raise or lower the deflector to the desired height of snow you wish to throw. Tighten the knob to secure the deflector (Fig. 19).
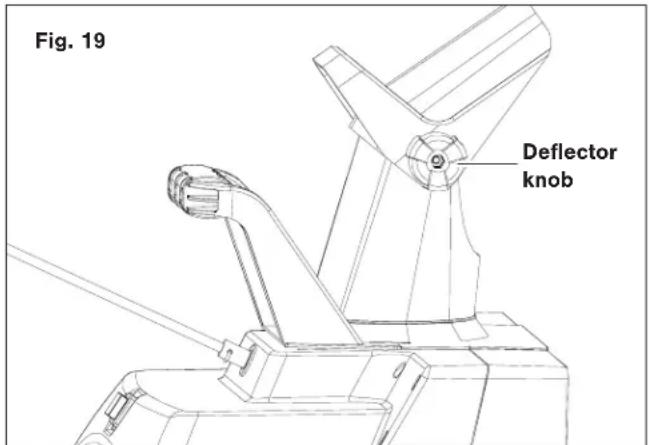
text_image
Fig. 19 Deflector knob⚠ WARNING! Make sure that the chute deflector snaps and locks completely onto the discharge chute. An opening between the discharge chute and the chute deflector may allow foreign objects to be picked up by the snow thrower and thrown in the direction of the operator causing serious boldly injury.
- Do not advance the chute deflector too far forward causing an opening to appear between the deflector and discharge chute.
- Do not overtighten the knobs on the chute deflector.
Maintenance
⚠ WARNING! Make sure to turn off the switch and disconnect the extension cord before performing any maintenance task on your snow thrower.
Lifetime Lubrication (Motor + Auger)
Lubrication is not necessary and may damage the unit. The snow thrower is lubricated for lifetime use at the factory before shipment.
General Maintenance Tips
- Do not attempt to repair the machine unless you have the proper tools and instructions for disassembly and repair of the machine.
-
Check bolts and screws at frequent intervals for proper tightness to ensure that the equipment is in safe working condition.
-
After each snow removal session, run the snow thrower for a few minutes to prevent the collector/impeller from freezing. Shut off the motor, wait for all revolving parts to stop completely, and wipe residual ice and snow off the unit. Rotate the chute crank several times to remove any excess snow.
- Only use a cloth soaked with hot water and a soft brush to clean the snow thrower; never wet or spray water on the machine!
- Do not use detergent or solvents as these could cause irreparable damage to the snow thrower. Chemicals can destroy the plastic parts.
- To protect the snow thrower from corrosion when storing for long periods, lightly oil the metal parts.
- Store the appliance in a dry area out of reach of children.
- For the user's safety, worn or damaged parts must be replaced. Replace with original replacement parts only. Parts from another snow thrower may not fit properly, causing an unsafe situation.
Replacing the Rubber Plates
NOTE: When replacing worn rubber plates, pay close attention to carefully distinguish between the coarse and smooth side of the plates. Place the coarse side inside and the smooth side outside.
- Detach the worn rubber plate assembly by removing the two sets of nut, bolt and washer located on the ends (Figs. 20 - 21).
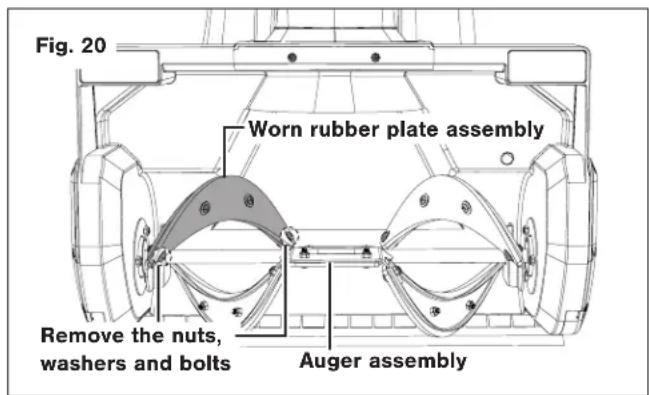
text_image
Fig. 20 Worn rubber plate assembly Remove the nuts, washers and bolts Auger assembly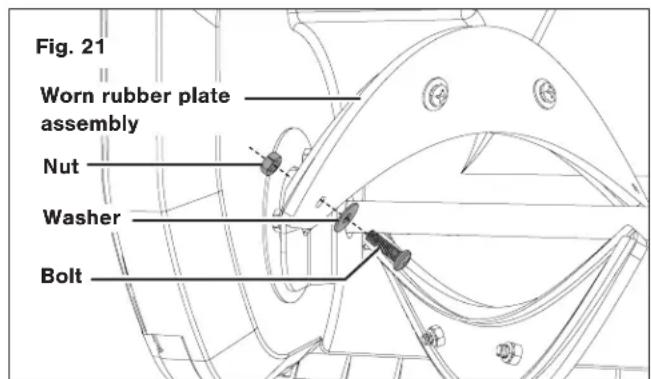
text_image
Fig. 21 Worn rubber plate assembly Nut Washer Bolt- Loosen the middle two sets of nut, washer and bolt to detach the worn rubber plate from the metal frame (Fig. 22).
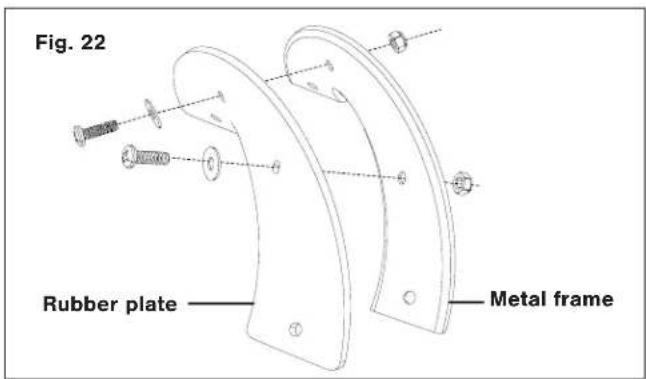
text_image
Fig. 22 Rubber plate Metal frame- Attach the new rubber plate onto the metal frame by replacing and tightening the middle two sets of nut, washer and bolt (Fig. 22).
- Reassemble the rubber plate assembly to the auger assembly by replacing and tightening the two sets of nut, washer and bolt used to secure it (Figs. 20 - 21).
- Repeat above steps for all worn plates.
Replacing the Scraper Bar
- The scraper bar is located at the base of the snow thrower beneath the rotor housing (Fig. 23).

text_image
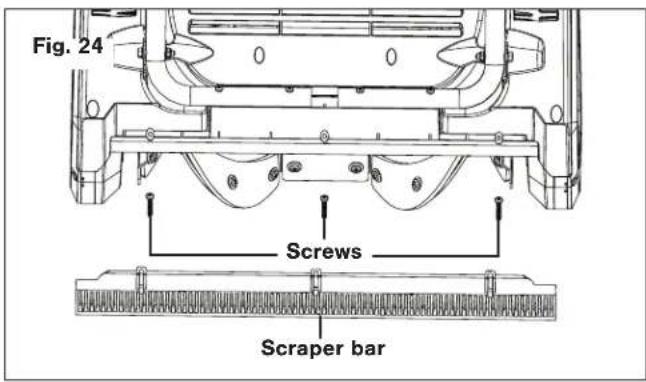
Fig. 23 Scraper bar- Detach the worn scraper bar from the snow thrower by removing the 3 screws that hold it in place (Fig. 24).
text_image
Fig. 24 Screws Scraper bar- Install the new scraper bar and fasten it securely to the snow thrower with the 3 screws (Fig. 24).
Replacing the Belt + Pulley
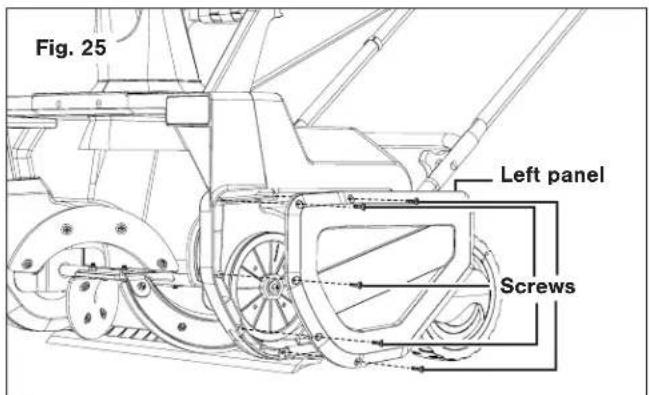
NOTE: Determine the left and right hand side of the snow thrower by standing behind the unit in the normal operating position.
- Remove the screws from the left panel of the snow thrower and remove the left panel (Fig. 25).
text_image
Fig. 25 Left panel Screws- Lift the belt tension pulley and roll the worn belt up and off the big pulley from the top of the big pulley (Fig. 26).

text_image
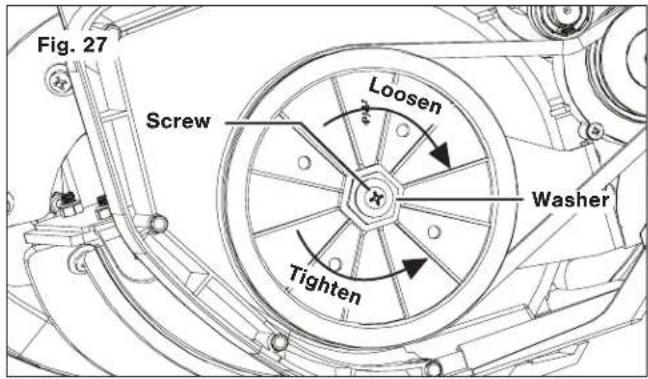
Fig. 26 Belt tension pulley Belt Big pulley- To replace the big pulley, remove the screw and washer from the middle of the pulley. While securing the auger so it does not spin, use a 7/8-inch socket to turn the outer nut of the pulley clockwise (the pulley is left-handed, so loosening and tightening occur in reverse orientation; clockwise to loosen and counterclockwise to tighten). Once the old pulley is removed, replace the big pulley and tighten the outer nut counterclockwise with the 7/8-inch socket. Replace and tighten the screw and washer (Fig. 27).
text_image
Fig. 27 Screw Loosen Washer TightenNOTE: Heavy wet snow puts a load on belts, thus requiring more frequent belt replacement.
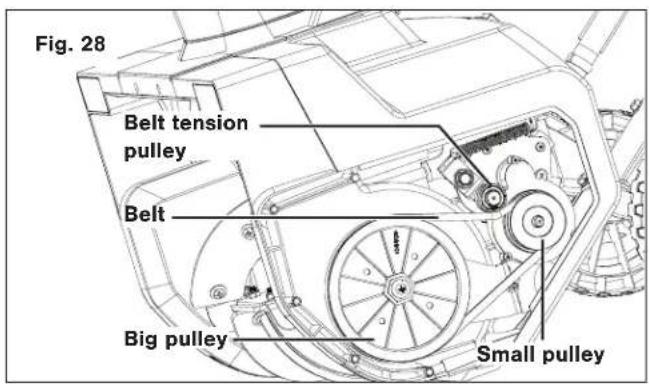
- To install the new belt, lift the belt tension pulley and roll the new belt onto the small pulley at an angle. Then roll the belt onto the top of big pulley by rotating the big pulley counterclockwise as the belt grips the top of the big pulley (Fig. 28).
text_image
Fig. 28 Belt tension pulley Belt Big pulley Small pulley- Replace the left panel of the snow blower with all screws.
Replacing the Skid Shoes
The skid shoes are located at the bottom of the side panels. Unfasten the two screws on the side panel to remove the worn skid shoes (Fig. 29). Install the replacement by fastening it to the side panel with the same two screws.

text_image
Fig. 29 Screws Skid shoeAutomatic Reset
The snow thrower has built-in automatic reset functions. In the event of a major obstruction that halts auger movement, simply unplug your unit, clear the auger obstruction, wait 60 seconds, and then resume use of your machine.
Storage
- Allow the engine to cool completely before cleaning, storing, or transporting the snow thrower. Be sure to secure the unit while transporting.
- Disconnect the extension cord from the snow thrower. Inspect the extension cord closely for signs of wear or damage. Replace it if it is worn or damaged.
- Inspect the snow thrower carefully for worn, loose, or damaged parts. Check connections and screws and tighten if necessary. For repairing or replacing parts, contact your authorized Snow Joe ^® + Sun Joe ^® dealer or the Snow Joe ^® + Sun Joe ^® customer service center at 1-866-SNOWJOE (1-866-766-9563).
- Store the unit, along with the disconnected extension cord, in a locked, dry place out of the reach of children to prevent unauthorized use or damage. Cover loosely with a tarp or with the Snow Joe ^® universal 24-inch electric snow thrower cover (Model SJCVR-24) for added protection. Visit snowjoe.com to purchase the cover online.
Service + Support
If your Snow Joe ^® SJ626E electric snow thrower requires service or maintenance, please call 1-866-SNOWJOE (1-866-766-9563) for assistance.
Model + Serial Numbers
When contacting the company, reordering parts, or arranging service from an authorized dealer, you will need to provide the model and serial numbers, which can be found on the decal on the main cover of the unit to the left of the discharge chute. Copy these numbers into the space provided below.
Record the following numbers from the housing or handle of your new product:
Model #:

Optional Accessories
⚠ WARNING! ALWAYS use only authorized Snow Joe ^® + Sun Joe ^® replacement parts and accessories. NEVER use replacement parts or accessories that are not intended for use with this electric snow thrower. Contact Snow Joe ^® + Sun Joe ^® if you are unsure whether it is safe to use a particular replacement part or accessory with your electric snow thrower. The use of any other attachment or accessory can be dangerous and could cause injury or mechanical damage.
| ModelAccessori | ||
1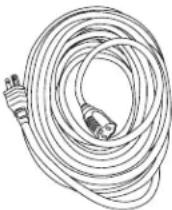 | Snow Joe ^® + Sun Joe ^® SJTW-A 14-gauge50-foot extension cord with lighted end | PJEXT50-B |
( 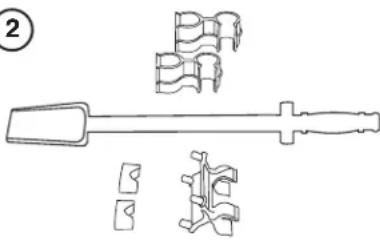 | Universal snow thrower chute clean-out tool | SJCOT |
NOTE: Accessories are subject to change without any obligation on the part of Snow Joe ^® + Sun Joe ^® to provide notice of such changes. Accessories can be ordered online at snowjoe.com or via phone by contacting the Snow Joe ^® + Sun Joe ^® customer service center at 1-866-SNOWJOE (1-866-766-9563).
ALL SEASON POWER CUSTOMER PROMISE
ABOVE ALL ELSE, All Season Power LLC (“All Season Power”) is dedicated to you, our customer. We strive to make your experience as pleasant as possible. Unfortunately, there are times when a Snow Joe ^® , Sun Joe ^® , Aqua Joe ^® , or Auto Joe ^® product (“Product”) does not work or breaks under normal operating conditions. We think it’s important that you know what you can expect from us. That’s why we have a Limited Warranty (“Warranty”) for our Products.
OUR WARRANTY:
All Season Power warrants new, genuine, powered and non-powered Products to be free from defects in material or workmanship when used for ordinary household use for a period of two years from the date of delivery of the Product to the original, end-user purchaser when purchased from All Season Power or from one of All Season Power's authorized sellers with proof of purchase. Because All Season Power is unable to control the quality of its Products sold by unauthorized sellers, unless otherwise prohibited by law, this Warranty does not cover Products purchased from unauthorized sellers. If your Product does not work or there's an issue with a specific part that is covered by the terms of this Warranty, All Season Power will elect to either (1) send you a free replacement part, (2) replace the Product with a new or comparable product at no charge, or (3) repair the Product. How cool is that!
This Warranty gives you specific legal rights, and you may also have other rights which vary from State to State.
PRODUCT REGISTRATION:
All Season Power strongly encourages you to register your Product. You can register online at shopjoe.com/register, or by printing and mailing in a registration card available online from our website, or by calling our Customer Service Department at 1-866-225-9723, or by e-mailing us at help@allseasonpower.com. Failure to register your Product will not diminish your warranty rights. However, registering your Product will allow All Season Power to better serve you with any of your customer service needs.
WHO CAN SEEK LIMITED WARRANTY COVERAGE:
This Warranty is extended by All Season Power to the original purchaser and original owner of the Product.
WHAT IS NOT COVERED?
This Warranty does not apply if the Product has been used commercially or for non-household or rental applications. This Warranty also does not apply if the Product was purchased from an unauthorized seller. This Warranty also does not cover cosmetic changes that do not affect performance. Wearing parts like belts, augers, chains and tines are not covered under this Warranty, and can be purchased at shopjoe.com/support or by calling 1-866-225-9723.

CERTIFIED AUTHENTIC
Keep your warranty intact. Only use CERTIFIED AUTHENTIC Snow Joe ^® , Sun Joe ^® , Aqua Joe ^® + Auto Joe ^® replacement parts + accessories. Use of any other parts + accessories will void the warranty. Genuine parts + accessories can be found and purchased online at shopjoe.com/support by entering the model number of your product.

Modelo SJ626E
Forma NASP-SJ626E-880S-MR5
natural_image
Line drawing of a snowman blade with handlebars and mounting feet (no text or symbols)Forma NASP-SJ626E-880S-MR5
natural_image
Simple line drawing of a resistor with a small rectangular component on top, connected in a loop (no text or symbols)text_image
Labeled diagram of a lawn pusher with numbered parts for identificationnatural_image
Technical line drawing of a mechanical assembly with no visible text or symbolsnatural_image
Technical line drawing of a mechanical device with no visible text or symbolsnatural_image
Line drawing of a snowman push-in with visible blades and handle (no text or symbols)MERCI POUR VOTRE ACHAT!
SCANNEZ
ENREGISTREZ
EN LIGNE AUJOURD'HUI

ACTIVEZ VOTRE GARANTIE DE 2 ANS
RECEVEZ EN PRIME UNE EXTENSION DE 90 JOURS
RENDEZ-VOUS SUR LE SITE SHOPJOE.COM/REGISTER
© 2025 All Season Power LLC.
New Castle, DE 19720