GH342RV - Heating QLIMA - Free user manual and instructions
Find the device manual for free GH342RV QLIMA in PDF.

| Product type | Mobile supplementary gas heater |
| Brand | Qlima |
| Model | GH342RV |
| Category | Heater |
| Direct heat output | 4.2 kW |
| Energy Efficiency Index (EEI) | 90.98 % |
| Energy efficiency class | A |
| Fuel | Propane/butane gas – max. 15 kg bottle – low-pressure regulator 30 mbar (EN16129) |
| Ignition type | Piezoelectric |
| Heat settings | Minimum, medium, maximum |
| Recommended room volume | Minimum 50 m³ (85 m³ for living room) |
| Required ventilation | Ventilation openings >100 cm² (2x50 cm²) |
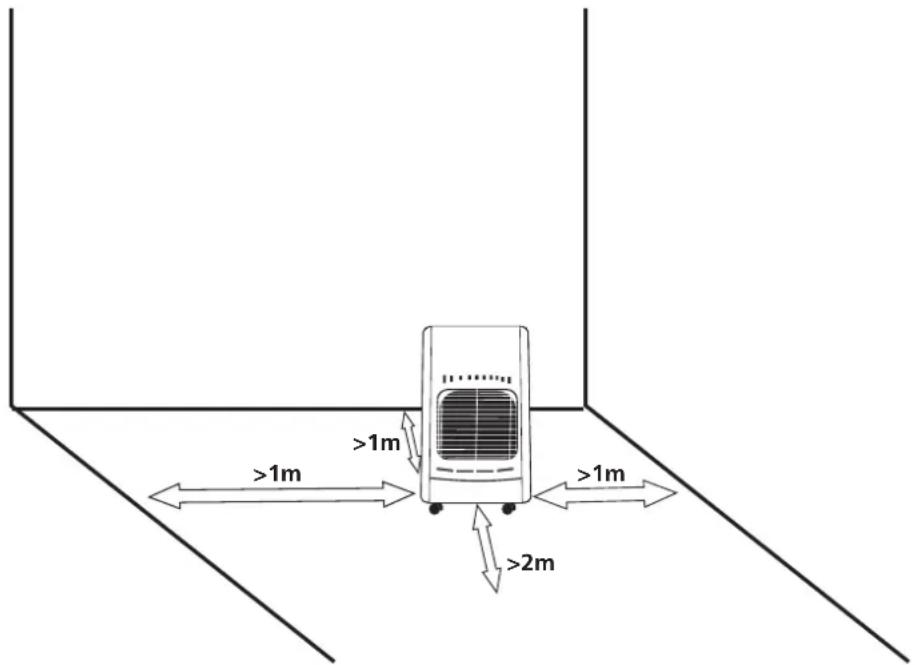
| Safety distance (flammable materials) | Front: 2 m – Sides and rear: 1 m |
| Safety | Oxygen depletion sensor (ODS), automatic shut-off, leak protection |
| Maintenance | Exterior cleaning with soft cloth and mild detergent – Annual check by a professional |
| Available spare parts | Gas hose (ø 8-10 mm, <1 m), regulator, thermocouple, piezoelectric igniter |
| Repairability | Repairs exclusively by an approved specialist |
| Warranty | 24 months (purchase date) – upon presentation of original invoice |
| Standards | EN449:2002+A1:2007 – EU Regulation 2016/426 (GAR) – EU Regulations 2015/1186 and 2015/1188 |
| Usage | Indoors only, dry rooms, not for primary heating |
| Transport wheels | Included |
Frequently Asked Questions - GH342RV QLIMA
User questions about GH342RV QLIMA
0 question about this device. Answer the ones you know or ask your own.
Ask a new question about this device
Download the instructions for your Heating in PDF format for free! Find your manual GH342RV - QLIMA and take your electronic device back in hand. On this page are published all the documents necessary for the use of your device. GH342RV by QLIMA.
USER MANUAL GH342RV QLIMA
natural_image
Exterior view of a black Qilmon air conditioner unit with visible cooling fins and wheels (no text or symbols)guarantee

YEARS
| D | BENUTZERHANDBUCH | 8 |
| DK | BRUGERVEJLEDNING | 14 |
| E | INSTRUCCIONES DE USO | 20 |
| F | MANUEL D'UTILISATION | 26 |
| FIN | KÄYTTÖOHJEET | 32 |
| GB | DIRECTIONS FOR USE | 38 |
| G | EXΓΕΙΡΙΔΙΟ ΧΡΗΣΗΣ | 44 |
| I | ISTRUZIONI D'USO | 50 |
| N | BRUKSANVISNING | 56 |
| NL | GEBRUIKSAANWIJZING | 62 |
| P | INSTRUÇÕES DE UTILIZAÇÃO | 68 |
| PL | INSTRUKCJA OBSŁUGI | 74 |
| S | ANVÄNDARHANDBOK | 80 |
You


D Montage der gasheizung
DK Samling af gasvarmeren
E Montaje del calefactor a gas
F Montage du chauffage à gaz
FIN Kaasulämmittimen kokoaminen
GB Assembling the gas heater
G Συναρμολόγηση της σόμπας αερίου
Montaggio della stufa a gas
N Slik setter du sammen gassovnen
NL De gaskachel monteren
P Montagem do aquecedor a gás
P Montaż piecyka
S Montera gasvärmaren
D
INHALTSVERZEICHNIS
Havitysonjeet kayllolan fopussa
Takuuendot
GB
TABLE OF CONTENTS
What you need to know in advance
Assembling the gas heater
Assembling the gas heater installation
installation
Use
Gas leaks
Safety tips
Saferty tips Cleaning and maintenance
Cleaning and maintenance End of life and disposal inst
End of line and disposal instructions
warranty provisions
G
INNEHÅLLSFÖRTECKNING
monteria ge installation
Installation
Anvandning
Gasläckage
Säkerhetsti
5340 AB Oss, the Netherlands
Qlima.com | Made in PRC
PIN 2531-DN-0031
Serial number PO-EF01
| DDKEFGB | FIN | G | |||||
| A | Vordere Abdeckung mit Brenner | Frontpanel inkl. brænder | Panel frontal incl. quemador | Panneau frontal incl. le brûleur | Etupaneeli, mukaan lukien poltin | Front panel incl. burner | Μπροστινός πίνακας με καυστήρα |
| B | Linke Abdeckung | Venstre panel | Panel izquierdo | Panneau gauche | Vasen paneeli | Left panel | Αριστερός πίνακας |
| C | Rechte Abdeckung | Højre panel Parte | derecha del panel | Panneau droit Oikea | paneeli Right panel | Δεξιός πίνακας | |
| D | Obere Abdeckung | Toppanel Parte superior del panel | Panneau supérieur | Yläpaneeli Top panel | Πάνω πίνακας | ||
| E | Hintere Abdeckung | Bagpanel Parte posterior del panel | Panneau arrière | Takapaneeli | Back panel | Πίσω πίνακας | |
| F | Untere Abdeckung | Bundpanel | Parte inferior del panel | Panneau inférieur | Alapaneeli | Bottom panel | Κάτω πίνακας |
| G | 4 Räder | 4 hjul | 4* ruedas | x4 roues | 4* pyörää | 4* wheels | 4* ρόδες |
| H | 11x Schrauben (M4x8) | Skruer M4*8 (11x) | Tornillos M4*8 (11x) | Vis M4 x 8 (x11) | Ruuvit M4*8 (11x) | screws M4*8 (11x) | Βίδες M4*8 (11x) |
| I | 4x Schrauben (M5x8) | Skruer M5*8 (4x) | Tornillos M5*8 (4x) | Vis M5 x 8 (x4) | Ruuvit M5*8 (4x) | Screws M5*8 (4x) | Βίδες M5*8 (4x) |
| J | Schraubschlüssel | Skruenøgle | Llave | Clé | Kiintoavain | Wrench | Γαλλικό κλειδί |
| Zubehörbeutel: umfasst G, H, I, J (siehe Abb. 1) | Tilbehørspakke: omfatter G, H, I, J (se billede 1) | Paquete de accesorios: incluye G, H, I, J (consulte la imagen 1) | Pack accessoires : incluant G, H, I, J (voir la photo 1) | Lisävarustepak-kaus: sisältää G, H, I, J (katso kuva 1) | Accessories package: include G, H, I, J (see pic 1) | Πακέτο αξεσουάρ: περιλαμβάνει G, H, I, J (βλέπε εικόνα 1) | |
I N NL P PL S
| A | Pannello frontale incluso bruciatore | Frontdeksel inkl. brenner | Voorpaneel, incl. brander | Painel frontal incl. queimador | Panel przedni z palnikiem | Frontpanel inkl. brännare |
| B | Pannello sinistro | Venstre deksel | Linker paneel | Painel esquerdo | Panel lewy | Vänster panel |
| C | Pannello destro | Høyre deksel | Rechter paneel | Painel direito | Panel prawy | Höger panel |
| D | Pannello superiore | Toppdeksel | Top paneel | Painel superior | Panel górný | Övre panel |
| E | Pannello posteriore | Bakdeksel | Achter paneel | Painel posterior | Panel tylny | Bakre panel |
| F | Pannello inferiore | Bunndeksel Bodem | Paneel Painel | inferior | Panel dolny | Bottenpanel |
| G | 4* ruote | 4. Hjul | 4*wielen | 4 x rodas | Kółka 4 szt. | 4* hjul |
| H | Viti M4*8 (11x) | Skruer M4*8 (11x) | Schroeven M4*8 (11x) | Parafusos M4 x 8 (11x) | Śruby M4*8 (11 szt.) | Skruvar M4*8 (11x) |
| I | Viti M5*8 (4x) Skruer M5*8 (4x) Schroeven M5*8 (4x) | Parafusos M5 x 8 (4x) | Śruby M5*8 (4 szt.) | Skruvar M5*8 (4x) | ||
| J | Chiave inglese | Nøkkel | Steeksleutel | Chave | Klucz | Skruvnyckel |
| Pacchetto accessori: include G, H, I, J (vedi figura 1) | Tilbehørspakke: inkludert G, H, I, J (se bilde 1) | Accessoire pakket: met daarin G, H, I, J (zie afb. 1) | Conjunto de acessórios: Incluir G, H, I, J (ver imagem 1) | Zestaw akcesoriów: zawiera G, H, I, J (patrz zdj. 1) | Tillbehörspaket: inkluderar G, H, I, J (se bild 1) | |
Table 1 items in the box


D Montage der gasheizung
DK Samling af gasvarmeren
E Montaje del calefactor a gas
F Montage du chauffage à gaz
FIN Kaasulämmittimen kokoaminen
GB Assembling the gas heater
G Συναρμολόγηση της σόμπας αερίου
Montaggio della stufa a gas
N Slik setter du sammen gassovnen
NL De gaskachel monteren
P Montagem do aquecedor a gás
P Montaż piecyka
S Montera gasvärmaren

D HINWEIS
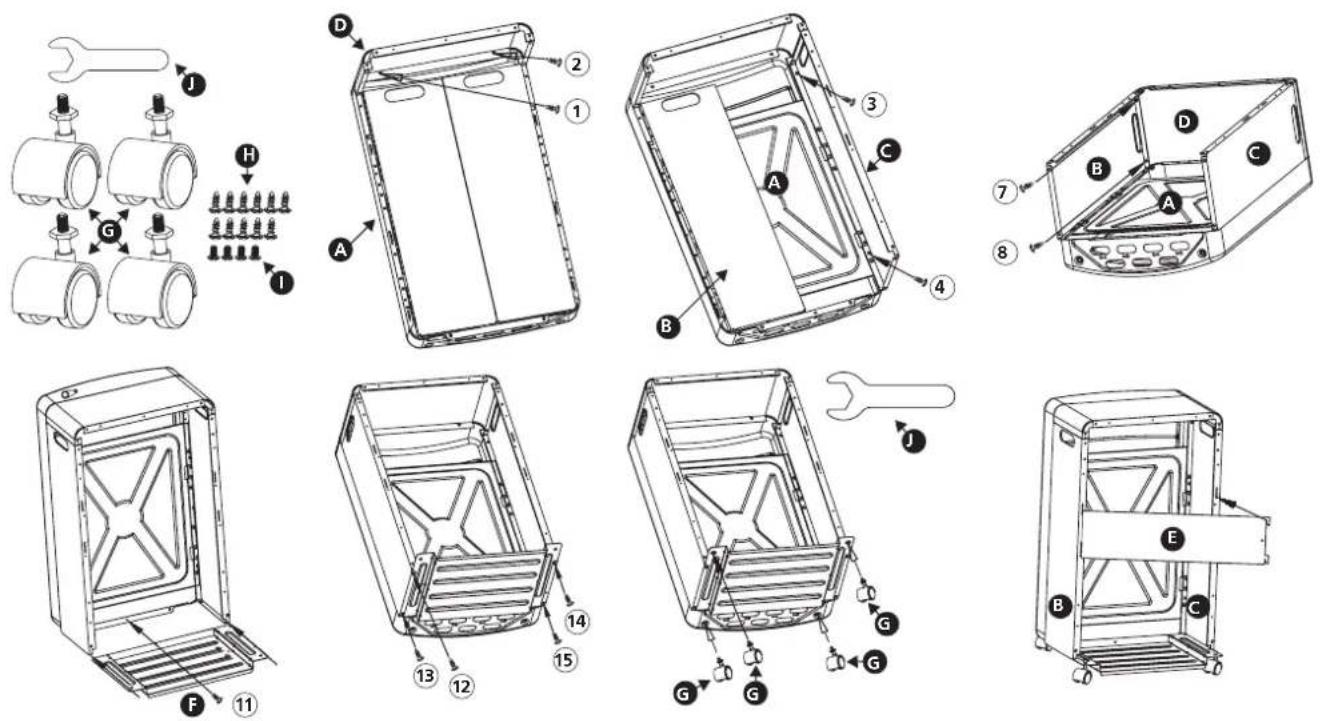
for numbers 1-11: use screw H for numbers 12-15: use screw I
G ΣΗΜΕΙΩΣΗ
GB 1 Mount C to A (use screws 3&4) 2 Mount B to A (use screws 5&6)
natural_image
Technical line drawing of a mechanical device with internal compartments and mounting base (no text or symbols)Pic 5.
Pic 6.
GB Mount F to B and C using screws 12-15
Pic 7.
D G montieren (4x) – Schraubschlüssel J verwenden
DK Monter G (4x) – brug skruenøgle J
E Monte G (4x) – use llave J
F Fixer G (x4) – utiliser la clé J
FIN Asenna osa G (4x) – käytä kiintoavainta J
GB Mount G (4x) - use wrench J
G Τοποθετήστε G (4x) – χρησιμοποιείστε γαλλικό κλειδί J
Montare G (4x) – usare la chiave J
N Monter G (4x) - bruk skiftenøkkel J
NL Monteer G (4x) – gebruik steeksleutel J
P Montar G (4x) – utilizar a chave J
PL Przymocować G (4 szt.) – użyć klucza J
S Montera G (4x) – använd skiftnyckel J
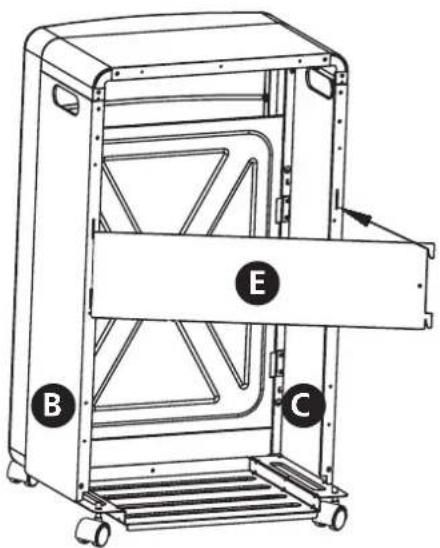
natural_image
Technical line drawing of a mechanical device with labeled components A, B, C, and E (no text or symbols beyond labels)Pic 8.
D E installieren:
- mount it on the left first by pushing the hooks in E into the slots in B.
- Form an arch of E and slide the hooks on the right side in the slots in Panel C
G Εγκατάσταση Ε:
GARANTIE DISPOSITIONS
- Read the Directions for Use before using the heater.
- This product is intended to be used as a heater in residential houses and is only suitable for use in dry locations, in normal household conditions, indoors in living room, kitchen and garage.
- This gas heater requires a minimum of space and ventilation in which it may be used safely (refer to Section D). In addition, always leave a window or door slightly ajar (± 2.5 cm). We also recommend doing this in highly insulated or draught-free rooms and/or at altitudes above 1,500 meters.
• These gas heaters require a hose and regulator. In case of doubt ask for information from your gas supplier. - The heater must be installed as described in the 'installation', section and the following warnings described in the 'warnings' section should be taken into account.
This heater is constructed in conformity with the EN449:2002+A1:2007 standard and the applicable Gas Appliance Regulation (EU) 2016/426 (GAR).
- Do not move the heater when it is burning or still hot.
- Have any repairs and/or maintenance carried out by a recognized service engineer only.
• Install the heater according to the instructions as described in the installation section of the directions for use. - This heater is manufactured according to CE safety standards. Nevertheless, as with any other heating device, care must be
taken.
- The heater is intended to provide supplementary heat. Therefore do not consider it as a central heater.
- The device must not be located immediately below a socket outlet.
- This appliance can be used by children aged from 8 years and above and persons with reduced physical, sensory or mental capabilities or lack of experience and knowledge if they have been given supervision or instruction concerning use of the appliance in a safe way and understand the hazards involved.
- Do not use in bathrooms, bedrooms, basements or high rise buildings.
- This appliance is not intended for use by persons (including children) with reduced physical, sensory or mental capabilities, or lack of experience and knowledge, unless they have been given supervision or instruction concerning use of the appliance by a person responsible for their safety.
- Children should be supervised to ensure that they do not play with the appliance.
• Gas tube length < 1 meter, ∅ 8-10 mm. - Children of less than 3 years should be kept away unless continuously supervised.
- Children aged from 3 years and less than 8 years shall only switch on/off the appliance provided that it has been placed or installed in its intended normal operating position and they have been given supervision or instruction concerning use of the appliance in a safe way and understand the hazards involved.
- Children aged from 3 years and less than 8 years shall not plug in, regulate and clean the appliance or perform user maintenance.

SAFETY TIPS 1
- If the heater is positioned too close to inflammable materials you may risk fire.
- CAUTION - Some parts of this product can become very hot and cause burns. Particular attention has to be given where children and vulnerable people are present.
- Do not replace the gas container or service the heater when it is still burning or still hot;
- Do not insert hands, fingers or objects into any of the heater's openings.
• Make sure that people and animals keep a safe distance from the radiant part in order to prevent them from any injury or risk of fire. - The guard on this appliance is to prevent risk of fire or injury from burns and no part of it shall be permanently removed. IT DOES NOT GIVE FULL PROTECTION FOR YOUNG CHILDREN OR THE INFIRM.
• After use close the gas container valve. - Turn off the heater when going to sleep.
- Follow the instructions to find any gas leakage as described in these Directions for Use.
- Reference to country installation regulations in force: check your local national installation regulations in force. Only install the heater when it complies with national regulations, laws and standards.
- The heater is only suitable for use in dry, not dusty, locations. Do not use in leisure vehicles such as caravans and mobile homes.
- Make sure that the correct gas is used and that the gas containers are not exposed to heat or extreme temperature changes. Always
store the gas containers in a cool, dry and dark place.
- Use only a correct low pressure regulator according to EN16129. Outlet pressure details: see rating label. Do not move the appliance when operating, shocks and bumps may activate the safety device. In case of any doubt contact your local dealer.
- Use the heater only in well-ventilated rooms. In this way the gases produced by combustion will be removed by fresh air.
- Never use the heater in places where harmful gases or fumes may be present (e.g. exhaust gases or paint fumes).
- If the heater is positioned too close to inflammable materials you may risk fire.
- For safety reasons take care when children or animals are in the proximity of the heater, as with any other heating device, and make sure that children are always aware of the presence of a burning heater.
- In order to avoid overheating, do not cover the device.
- Do not use this heater in the immediate surroundings of a bath, a shower or a swimming pool.
- The fireguard of this heater is intended to prevent direct access to heating elements and must be in place when the heater is in use.
- Cleaning and user maintenance shall not be made by children without supervision.
ASSEMBLING THE GAS HEATER
- Carefully remove your heater from the box and check the contents. In addition to the heater you should also have: Directions for Use for the gas heater
- Remove all other packaging materials and check the heater for any damage. If you have any doubts concerning the heater, please contact qualified service personnel. Keep all packaging material out of the reach of young children.
- Assemble the heater as mentioned at PIC 2 to PIC 8 in the first pages of this instruction manual.
- Before connecting the low-pressure regulator, please check and read the following: The gas heater should only be powered by Propane-Butane in a container with a maximum weight of 15kg. Connect the low-pressure regulator with a fixed calibration of maximum 30 mbar that complies with EN16129. The hose should be according to national standards. For correct connection, the hose should be connected using metal bands of a suitable size. For correct connection, follow the instructions provided with the low-pressure regulator.
- Slide the two metal rings around the hose. Connect the hose to the hose union of the low-pressure regulator and to that of the tab. Close the metal rings firmly with a screw, but make sure that you do not damage the fitting or any component.
- Before connecting the low-pressure regulator to the gas container, make sure that the gas container is closed and that there are no open flames (i.e. a lit oven) in the place where you are working. Connect the low-pressure regulator according to the user instructions that are provided with the low-pressure regulator.
Check for gas leaks: see section F
- Place the gas container in its compartment. Take care that the hose is not twisted or obstructed, and that it is unable to touch any hot parts of the heater.
- Hook the rear cylinder cover onto the compartment by inserting the two hooks into the respective holes of the cabinet.
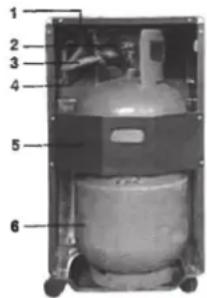
- Burner effect regulator
- Gas Main Valve
- Gas Hose
- Gas Pressure regulator
- Protection baffle
- Gas Cylinder
Inaddition
- To replace the gas container, make sure that the gas container is closed (follow the user instructions provided with the low-pressure regulator). Let the gas heater cool down first and make sure that there are no open flames or other sources of heat in the area in which you are working.
- Only change the gas container in a flame free environment.
- In addition it is recommended that the gasket seals of the regulator and the flexible rubber hose be checked to ascertain their condition. If you have any doubt concerning the condition of the hose or the seals, replace them.
- Make sure that you do not damage the connection or any other components;
- Never turn the gas container upside down in order to make full use of the contents. This may release liquid residues left in the container that damage the heater irreparably;
- For disconnection or connection of the low-pressure regulator, always follow the user instructions provided with the regulator;
- The manufacturer is not responsible for any harm or damage if attention is not paid to the points described above.
- Do not twist the flexible tubing or the hose.
INSTALLATION
- Use the gas heater in well-ventilated rooms only. A minimum room size of 85m^3 is recommended for living rooms and 50m^3 for other rooms, but the room should never be less than 50m^3 . For ventilation 2x a surface of 50cm^2 ventilation openings are required.
- The room in which the gas heater is used should have enough air circulation for normal combustion. Therefore it is required that the room must be provided with a grand total of >100cm^2 of all ventilation openings.
- Always place the heater on a flat and stable surface. Never install or use the heater in a bathroom or bedroom, in the basement, on the upper floors of a building or in leisure accommodations;
- Never position the gas heater too close to other sources of heat (a distance of at least 1 metre is required between the gas heater and other heating sources) or inflammable or explosive materials. During operation, the gas heater should not face objects that can be damaged or burned;
- Position the heater so that the heat is directed towards the center of the room and towards an open space. In addition, the front, radiant
part must be at least 2.0 meter away from any inflammable materials, i.e. curtains or sofas;
- Never operate the gas heater when the gas container is outside the compartment.
- Only replace gas cylinder in a flame free environment.
- Before connecting the gascontainer to the device
o Check and clean the filter of the regulator
o Release a little bit of gas (outdoors) from the gascontainer. This will clear present dirt particles to prevent them from entering the pressure regulator or device.
• Each time when gas cylinder or gas tube is connected: always do a leakage test with soapy water - see chapter 'gas leaks'.
Problem:
No flame/no ignition in winter (temp. <7 °C)
Solution:
Check whether butane or propane is being used: butane will burn ever more poorly as the temperature drops below 7 °C because it then turns into liquid. With LPG (= propane/butane mixture), it will often help to give the gas cylinder a shake.
Use only a correct low pressure regulator. Outlet pressure details: see rating label. Do not move the appliance when operating, shocks and bumps may activate the safety device. Do not twist the flexible tubing or hose.
USE
The knobs for turning the gas heater ON are located on the upper part of the heater:
- Open the gas container (follow the user instructions provided with the low-pressure regulator).
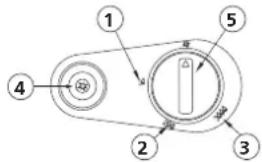
- See the fig. Turn the regulation knob (5) into position 1. Press button (5) down for 20 seconds. After 20 seconds: keep pressing button 5 down and at the same time, press the piezoelectric button (4) a few times until the small blue pilot flame at the lower end of the front of the heater is visible. KEEP PRESSING DOWN BUTTON (5) for another 20-40 seconds.
After 20-40 seconds: the button 5 can be released (keep it in position 1). If the pilot flame disappears: repeat the procedure. Especially with a new gas bottle OR when the heater is not used for a couple of days this procedure could take a couple of times because the gas must flow from the gas bottle through the gas tube towards the pilot flame first!
After button (1) is released: the button can now be turned to the desired heating position: (2) medium heat or (3) maximum heat.
- minimum
- medium
- maximum
- ignition
- regulation knob
Release the knob and turn it to the position corresponding with the desired amount of heat:
- To turn OFF the device, close the gas container valve.(follow the instructions provided with the low-pressure regulator).
- Do not hold the regulation knob pressed down for longer than 40 seconds.
- Never move the heater when it is hot and/or in operation.
GAS LEAKS
If you think there may be a gas leak, please follow this procedure:
- Close the gas container valve. (follow the user instructions for the regulator);
- Extinguish all open flames, for instance stoves;
- Open windows in order to increase airflow circulation;
- Turn off electrical devices, for instance lamps;
• Prepare a bucket of soapy water; - Open the gas container (follow the user instructions for the regulator);
- Brush the soapy water on all fittings and connections of the gas circuit;
- If there is a gas leak, bubbles will rise up from the location of the leak;
- If a leak is found, close the gas container (follow the user instructions for the regulator).
- Tighten the fitting and the metal rings of the connection;
- Open the gas container (follow the user instructions for the regulator) and repeat the procedure again.
If there is still a gas leak contact a professional and qualified engineer for help.

SAFETY TIPS 2
• Always place the heater facing the center of the room.
- Do never move the heater when it is burning.
- Prevent people, especially young children and elderly people from touching very hot surfaces.
- Never dry clothes at the top of the metal guard grill
- Keep all flammable materials at least one meter away from the heater.
- Never use a gas heater in a bathroom, bedroom, mobile home, high rise buildings or caravan. Toxic gases may cause serious health problems in these situations.
- Never use or store solvents and pressure pack cans near a gas heater, even if the heater is turned off.
- Never dispose of rubbish such as cigarette butts in a gas fire -this can affect combustion and produce dangerous pollutants.
- Make sure rooms containing gas heater are well ventilated.
- Keep areas around the heater free of papers, trash, and any other combustible items
- Place the heater on a level, hard, nonflammable surface; do not place on rugs, carpets or socket, near bedding or drapes, or on tables or countertops.
- Turn the heater off if you leave the area, and never leave a heater on while sleeping or if you leave home.
• Always use specified or standard wire, plug and socket, always protect them from moisture or water.
• Always turn off gas valve and remove the plug after use. - Always make sure that you actually see the appliance when you want to switch it on. Never use things like a timer, programmer or any other device (including Internet apps) that switches on the appliance automatically as this may cause fire!
CLEANING AND MAINTENANCE
Before cleaning, turn the gas heater OFF and wait until it has cooled down completely. To clean the outside of the heater, use a soft cloth dampened with water and liquid detergent. Never use scouring pads or abrasive products. Do not use water, inflammable or abrasive cleaners.
- Regularly inspect the ODS. If there is any dust or lint, remove it without damaging the burner or tubing.
- Check the condition of the flexible rubber hose frequently. Also check the condition of the gasket seal on the pressure regulator every time the gas container is changed.
- Take care not to hit or damage the fragile surface of the burner, the fittings and gas hoses, the regulator and all other components of the gas circuit.
- It is recommended that the gas heater be inspected once a year by a professional.
- Please follow the storage instructions when the gas heater is not to be used for an extensive period.
END OF LIFE AND DISPOSAL INSTRUCTIONS
- Disconnect the gas container from the gas heater.
- Store the gas container in a well-ventilated room. Position it far away from inflammable, explosive or hot materials and preferably not in the home. In addition it should never be stored in the basement or attic.
- The gas heater should be stored in a dry place and should be protected against dust (preferably in the original packaging).
- If it is decided that the gas heater is not to be used any more, it is recommended that it be disconnected from the gas container. Also cut the rubber hose. If children play with the heater, make sure that dangerous parts are removed. Never dispose of non-biodegradable products in the environment, but dispose of them in accordance with current national legislation. At the end of its lifetime, the product must not be disposed of as urban waste. It must be taken to a special local authority differentiated waste collection center or to a dealer providing this service. Disposing of a household appliance separately avoids possible negative consequences for the environment and health deriving from inappropriate disposal and enables the constituent materials to be recovered in order to make significant savings in energy and resources. As a reminder of the need to dispose of household appliances separately, the product is marked with an image of a crossed-out wheeled dustbin.
Remember that the gas heater consists of the following materials:
- Iron, i.e. the heater cabinet and the burner body.
- Aluminum, gas tubes.
- Brass, i.e. the tap and atmosphere analyzer.
- Plastic, i.e. the wheels and the piezoelectric igniter.
• Copper covered with rubber, i.e. piezoelectric igniter and the thermocouple.
• Ceramics, burner plate.
WARRANTY PROVISIONS

The appliance is supplied with a 24-month guarantee, commencing on the date of purchase. All material and manufacturing defects will be repaired or replaced free of charge within this period. The following rules apply:
• We expressly refuse all further damage claims, including claims for collateral damage.
- Repairs to or replacement of components within the guarantee period will not result in an extension of the guarantee.
- The guarantee is invalidated if any modifications have been made, non-genuine parts are fitted or repairs are carried out by third parties.
- Components subject to normal wear, such as filters, batteries, lamps and heating elements are not covered by the guarantee.
- The guarantee is valid only when you present the original, dated purchase invoice and if no modifications have been made.
- The guarantee is invalid for damage caused by neglect or by actions that deviate from those in this instruction booklet.
- Transportation costs and the risks involved during the transportation of the appliance or components of the appliance shall always be for the account of the purchaser
- Damage caused by not using suitable spare parts is not covered by the guarantee.
To prevent unnecessary expense, we recommend that you always first carefully consult the instructions for use. Take the appliance to your dealer for repairs if these instructions do not provide a solution.
www.Qlima.com
When the appliance is no longer functional, it should be disposed of in such a way as to cause minimum environmental impact, in accordance with the regulations of your local authority.

ΠΡΟΕΙΔΟΠΟΙΗΣΕΙΣ
- Brenner effekt regulator
- Gass Hovedventil
- Gasslange
- Gasstrykkregulatoren
- Beskyttelse dexel
- Gassbeholdere
I tillegg
Energiindeks: EEI=90.98%
GB - This product is not suitable for primary heating purposes Energy efficiency class: Class A
Direct heat output: 4.2kW
Energy efficiency index: EEI=90.98%
Refer to instruction manual for the assembly, installation, maintenance, disassembly, recycling and/or disposal at end-of-life. The afore described gas heater is in conformity with following EC directive and Regulations:
- Gas Appliances Regulation (EU) 2016/426 (GAR)
- Commission Delegated Regulation (EU) 2015/1186 & 2015/1188
The following harmonised standards have been applied:
- EN449:2002 + A1:2007
- Commission Delegated Regulation (EU) 2015/1186 and 2015/1188
Distributed in Europe by PVG Holding B.V.
Benötigen Sie weitere Informationen oder treten Probleme auf, besuchen Sie bitte unsere Website www.qlima.com, oder setzen Sie sich mit unserem Kundendienst in Verbindung (T: +31 412 694 694).
For alle yderligere oplysninger eller ved eventuelle problemer med apparatet henvises til www.qlima.com eller det lokale Kundecenter (T: +45 77 34 33 30).
(ES) Si necesita información o si tiene algún problema, visite nuestra página Web www.qlima.es, o póngase en contacto con el servicio cliente (T: +34 916 113 113).
F Si vous souhaitez obtenir des informations supplémentaires ou si vous rencontrez un problème, rendez-vous sur notre site Web (www.qlima.fr / www.fr.qlima.be) ou contactez notre service client (T : +33 2 32 96 07 47 / +32 (0)3 326 39 39).
FHN Jos haluat huoltoapua, lisätietoja tai laitteen kanssa tulee ongelmia, tutustu verkkosivustoon osoitteessa www.qlima.com tai kysy neuvoa PVG kuluttajapalvelukeskuksesta (T: +45 77 34 33 30).
(68) If you need information or if you have a problem, please visit the our website (www.qlima.com) or contact our sales support (T: +31 412 694 694).
① Per informazioni e in caso di problemi, visitate il sito Web www.qlima.it oppure contattate il Centro Assistenza Clienti (T: +39 0571 628 500).
Hvis du trenger informasjon, eller hvis du har et problem med produktet, kan du gå til nettsidene www.qlima.com. Alternativt kan du kontakte med PVG' forbrukertjeneste (T: +45 77 34 33 30).
(NL) Als u informatie nodig hebt of als u een probleem hebt, bezoek dan de onze website (www.qlima.nl / www.qlima.be) of neem contact op met de afdeling sales support (T: +31 412 694 694 / +32 (0)3 326 39 39).
Se necessitar de informações ou se tiver problemas, visite o Web site www.qlima.es ou contacte o Centro de Assistência (T: +34 916 113 113).
FL W przypadku problemów i w celu uzyskania szczegółowych informacji odwiedź stronę internetową Qlima dostępną pod adresem www.qlima.com lub skontaktuj się z Centrum kontaktów Qlima (T: +48 48 613 00 70)
Om du behöver service eller information eller har problem med apparaten kan du besöka www.qlima.com eller kontakta Qlima kundtjänst (T: +45 77 34 33 30).
⑤D. Če želite dodatne informacije, obiščite spletno mesto podjetja na naslovu www.qlima.si ali pokličite na telefonsko (T: +386 (0)41 674 139).

Dieses Produkt eignet sich nicht als Hauptheizgerät. Dieses Produkt ist nur für gut isolierte Räume oder für den gelegentlichen Gebrauch geeignet.
Dette produkt er ikke egnet til brug som primær opvarmningskilde. Dette produkt er kun egnet til godt isolerede rum eller lejlighedsvis brug.
Este producto no es adecuado para calefacción primaria. Este producto está indicado únicamente en lugares abrigados o para una utilización puntual.
Ce produit ne peut pas être utilisé comme chauffage principal. Ce produit ne peut être utilisé que dans des locaux bien isolés ou de manière occasionnelle.
Tämä tuote ei sovellu ensisijaiseksi lämmittimeksi. Tämä tuote soveltuu ainoastaan hyvin eristettyihin tiloihin tai satunnaiseen käyttöön.
this product is not suitable for primary heating purposes. This product is only suitable for well insulated spaces or occasional use.
① Il presente prodotto non è adatto a funzioni di riscaldamento primario. Il presente prodotto è adatto solo a ambienti correttamente isolati o ad un uso occasionale.
Bette produktet er ikke egnet for primær oppvarming. Dette produktet er bare egnet for velisolerte rom eller sporadisk bruk.
① Dit product is niet geschikt voor gebruik als primaire verwarming. Dit product is uitsluitend geschikt voor goed geïsoleerde plaatsen of voor incidenteel gebruik.
Este produto não é adequado para fins de aquecimento principal. Este produto é adequado apenas para espaços bem isolados espaços ou utilização ocasional.
Ten produkt nie może słuzyc jako podstawowe zródło ogrzewania. Ten produkt jest odpowiedni tylko do sporadycznego użytku lub do stosowania w dobrze izolowanych pomieszczeniach.
Denna produkt lämpar sig inte för primär uppvärmning. Denna produkt är endast lämpad för välisolerade utrymmen eller sporadisk användning.
Tozdelek ni primeren za primarno ogrevanje. Tento výrobok je určený iba do dobre izolovaných priestorov alebo na príležitostné použitie