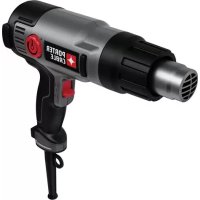
PC1500HG - Heat gun Porter-Cable - Free user manual and instructions
Find the device manual for free PC1500HG Porter-Cable in PDF.


| Product Type | Variable temperature and two-speed heat gun |
| Brand | Porter-Cable |
| Model | PC1500HG, PC1500HGA |
| Supply Voltage | 120 V AC, 60 Hz |
| Maximum Temperature | 538 °C (1,000 °F) |
| Temperature Adjustment | Yes, by rotary knob (clockwise to increase) |
| Speeds | 2 positions: I (low), II (high) |
| Switch | On/Off with speed selection (0, I, II) |
| Included Accessories (PC1500HGA) | Fan jet nozzle, glass protector, cone nozzle, coil reflector |
| Main Uses | Paint stripping, softening linoleum and tiles, heat shrinking, thawing metal pipes |
| Safety | Do not use as a hair dryer; allow to cool 30 min before storage; do not block air intakes/outlets |
| Maintenance | Clean with mild soap and a damp cloth; do not immerse |
| Replacement Parts | Identical, available at www.portercable.com or at repair center |
| Repairability | Not user-serviceable; contact an authorized center |
| Warranty | 3-year limited (tools), 2-year (battery packs) |
| Free maintenance service | 1 year: replacement of normal wear parts |
| Money-back guarantee | 90 days if dissatisfied |
Frequently Asked Questions - PC1500HG Porter-Cable
User questions about PC1500HG Porter-Cable
0 question about this device. Answer the ones you know or ask your own.
Ask a new question about this device
Download the instructions for your Heat gun in PDF format for free! Find your manual PC1500HG - Porter-Cable and take your electronic device back in hand. On this page are published all the documents necessary for the use of your device. PC1500HG by Porter-Cable.
USER MANUAL PC1500HG Porter-Cable
Temperature Heat Gun
Instruction manual
⚠️ Important Safety Warnings and Instructions
⚠ WARNING: When using electric tools, basic safety precautions should always be followed to reduce risk of fire, electric shock, and personal injury, including the following.
READ ALL INSTRUCTIONS
TO REDUCE RISK OF INJURY:
- Before any use, be sure everyone using this tool reads and understands all safety instructions and other information contained in this manual.
- Save these instructions and review frequently prior to use and in instructing others.
⚠️ General Safety Warnings and Instructions for All Tools
- KEEP WORK AREA CLEAN. Cluttered areas and benches invite injuries.
- CONSIDER WORK AREA ENVIRONMENT. Don't expose power tools to rain. Don't use power tools in damp or wet locations. Keep work area well lit. Do not use in presence of flammable liquids or gases. Motors in these tools normally spark, and the sparks may ignite the fumes.
- GUARD AGAINST ELECTRIC SHOCK. Prevent body contact with grounded surfaces. For example; pipes, radiators, ranges, refrigerator enclosures. Use extreme caution when drilling, driving, or cutting into walls, floors, ceilings or other areas or wherever live electrical wires may be contacted, do not touch any metal parts of the tool. Hold the tools only by the plastic handle to prevent electric shock.
- KEEP CHILDREN AWAY. Do not let children and visitors contact tool or extension cord. All children and visitors should be kept away from work area.
- STORE IDLE TOOLS. When not in use, tools should be stored in dry, and high or locked-up place-out of reach of children.
- DON'T FORCE TOOL. It will do the job better and safer at the rate for which it was intended.
- USE RIGHT TOOL. Don't force small tool or attachment to do the job of a heavy-duty tool. Don't use tool for purposes not intended.
- DRESS PROPERLY. Do not wear loose clothing or jewelry. They can be caught in moving parts. Heavy duty gloves to protect hands and non-skid footwear are recommended when working outdoors. Wear protective hair covering to contain long hair.
- USE SAFETY GLASSES AND OTHER SAFETY EQUIPMENT. Use safety goggles or safety glasses with side shields, complying with applicable safety standards and, when needed, a face shield. Also use face or dust mask if cutting operation is dusty. This applies to all persons in the work area. Also use a hard hat, hearing protection, gloves, safety shoes and dust collection systems when specified or required.
- DON'T ABUSE CORD. Never carry tool by cord or yank it to disconnect from receptacle. Keep cord from heat, oil, and sharp edges.
- SECURE WORK. Use clamps or a vise to hold work. It's safer than using your hand and it frees both hands to operate tool.
- DON'T OVERREACH. Keep proper footing and balance at all times.
- MAINTAIN TOOLS WITH CARE. Keep tools sharp and clean for better and safer performance. Follow instructions for lubricating and changing accessories. Inspect tool cords periodically and if damaged, have repaired by authorized service facility. Inspect extension cords periodically and replace if damaged. Keep handles dry, clean, and free from oil and grease.
- DISCONNECT TOOLS. Unplug the tool when not in use, when moving tool from place to place, before servicing, and when changing accessories (such as blades, bits, cutters) or making adjustments.
- REMOVE ADJUSTING KEYS AND WRENCHES. Form habit of checking to see that keys and adjusting wrenches are removed from tool before turning it on.
- AVOID UNINTENTIONAL STARTING. Don't carry tool with finger on switch. Be sure switch is off when plugging in.
- OUTDOOR USE EXTENSION CORDS. When tool is used outdoors, use only extension cords intended for use outdoors and so marked.
-
STAY ALERT. Watch what you are doing. Use common sense. Do not operate tool when you are tired or otherwise impaired.
-
CHECK DAMAGED PARTS. Before further use of the tool, a guard or other part that is damaged should be carefully checked to determine that it will operate properly and perform its intended function. Check for alignment of moving parts, binding of moving parts, breakage of parts, mounting, and any other conditions that may affect its operation. A guard or other part that is damaged should be properly repaired or replaced by an authorized service center. Do not use tool if switch does not turn it on and off.
- REPAIRS AND SERVICE. Repairs, maintenance and any adjustments not specified in this manual should be performed by Porter Cable authorized service centers or other qualified service organizations, always using identical replacement parts.
- USE OF ACCESSORIES AND ATTACHMENTS. The use of any accessory or attachment not recommended for use with the tool could be hazardous. Note: Refer to the accessory section of this manual for further details.
SAFETY GUIDELINES - DEFINITIONS
It is important for you to read and understand this manual.
The information it contains relates to protecting YOUR SAFETY and PREVENTING PROBLEMS. The symbols below are used to help you recognize this information.
⚠️ DANGER: Indicates an imminently hazardous situation which, if not avoided, w result in death or serious injury.
⚠ WARNING: Indicates a potentially hazardous situation which, if not avoided, could result in death or serious injury.
⚠️ CAUTION: Indicates a potentially hazardous situation which, if not avoided result in minor or moderate injury.
CAUTION: Used without the safety alert symbol indicates a potentially hazardous situation which, if not avoided, may result in property damage.
Additional Safety Instructions
IMPORTANT SAFETY INSTRUCTIONS FOR HEAT GUNS
- Remember that hidden areas such as those behind walls, ceilings, floors, soffit boards and other panels may contain flammable materials that could be accidentally ignited when stripping paint from the panel. Such a fire would not be readily apparent, and could cause considerable damage and danger of injury. This heat gun is capable of producing temperatures in excess of 1000° F ( 538° C).
- Do not use this tool as a hair dryer.
- Always turn heat gun off, disconnect from power source and let the tool cool do least 30 minutes before moving or storing it. Do not lay the heat gun on flammable surfaces when operating the gun or immediately after shutting it off. Always set the gun on a flat level surface so that the nozzle tip is pointed upward when allowing to cool. For easy storage, the tool can hang from the hang hole. The heat gun should indoors.
- Always use good quality scrapers and stripping knives.
- Never obstruct the air intake or nozzle outlet.
- Be sure to direct the hot air blast in a safe direction; away from other people or flammable objects.
- Keep fingers away from metal nozzle; it becomes very hot.
- Don't touch the nozzle to any surface while running or shortly after running.
- Avoid poking anything down inside the nozzle.
- Know your work environment. Remember that areas behind soffit board, ceilings, and floors may contain highly flammable materials. Check these areas before applying heat.
- Clean dry paint from the nozzle after use; it could ignite.
-
Clean your scraper blade frequently during use; it could ignite.
-
Do not use the heat gun in combination with chemical strippers.
- Do not use accessory nozzles as scrapers.
- Keep nozzle away from cord.
- Do not use to cook or warm food.
- Be constantly aware that this tool can ignite flammable materials, and soften or melt others. Regardless of the task you are performing, shield or keep away from these materials that are close to the work area.
You may occasionally notice some slight smoking of the tool after it is turned off. This is the result of heating the residual oil that was deposited on the heating element during the manufacturing process.
IMPORTANT NOTICE:
In order for this tool to be an effective paint stripper, it must produce extremely high temperatures. As a consequence, the stripper is capable of igniting paper, wood, paint and varnish residue and similar materials.
As you become more familiar with the tool and develop the proper technique, the danger of accidental ignition will be greatly reduced. In establishing the proper technique, the best thing to do is practice! Work on simple stripping projects, preferably outdoors, until you get a “feel” for how to use your stripper safely and effectively.
As you practice, observe the following procedures for safety:
- Always be sure the tool is turned off and disconnected from power supply when unattended.
- Clean the scraper blade often during use. Built up residue on the blade is highly flammable.
- Experiment to find the optimum distance from the tool's nozzle to the surface being stripped. This distance (usually 1-2 inches)(25-50 mm) will vary depending on the material being removed.
- Keep the heat gun moving ahead of the scraper blade at all times.
- As you work, clean up loose pieces of paint as they accumulate around the work area.
- When working indoors, keep away from curtains, papers, upholstery and similar flammable materials.
- Above all, remember that this is a serious power tool that is capable of producing excellent results when used properly. Practice on simple projects until you feel comfortable with your stripper. Only then will you have mastered the proper technique.
WARNING: Extreme care should be taken when stripping paint. The peelings, residue and vapors of paint may contain lead, which is poisonous. Any pre-1977 paint may contain lead and paint applied to homes prior to 1950 is likely to contain lead. Once deposited on surfaces, hand to mouth contact can result in the ingestion of lead. Exposures to even low levels of lead can cause irreversible brain and nervous system damage; young and unborn children are particularly vulnerable.
Before beginning any paint removal process you should determine whether the paint you are removing contains lead. This can be done by your local health department or by a professional who uses a paint analyzer to check the lead content of the paint to be removed.
Lead based paint should only be removed by a professional and should not be removed using a heat gun.
Persons removing paint should always follow these guidelines:
- Move the work piece outdoors. If this is not possible, keep the work area well ventilated. Open the windows and put an exhaust fan in one of them. Be sure the fan is moving the air from inside to outside.
- Remove or cover any carpets, rugs, furniture, cooking utensils, and air ducts.
- Place drop cloths in the work area to catch any paint chips or peelings. Wear protective clothing such as extra work shirts, overalls and hats.
-
Work in one room at a time. Furnishings should be removed or placed in the center of the room and covered. Work areas should be sealed off from the rest of the dwelling by sealing doorways with drop cloths.
-
Children, pregnant women or potentially pregnant women and nursing mothers should not be present in the work area until the work is done and all clean up is complete.
- Wear a dust respirator mask or a dual filter (dust and fume) respirator mask which has been approved by the Occupational Safety and Health Administration (OSHA), the National Institute of Safety and Health (NIOSH), or the United States Bureau of Mines. These masks and replaceable filters are readily available at major hardware stores. Be sure the mask fits. Beards and facial hair may keep masks from sealing properly. Change filters often. Disposable paper masks are not adequate.
- Use caution when operating the heat gun. Keep the heat gun moving as excessive heat will generate fumes which can be inhaled by the operator.
- Keep food and drink out of the work area. Wash hands, arms and face and rinse mouth before eating or drinking. Do not smoke or chew gum or tobacco in the work area.
- Clean up all removed paint and dust by wet mopping the floors. Use a wet cloth to clean all walls, sills and any other surface where paint or dust is clinging. Do not sweep, dry dust or vacuum. Use a high phosphate detergent or trisodium phosphate (TSP) to wash and mop areas.
- At the end of each work session put the paint chips and debris in a double plastic bag, close it with tape or twist ties, and dispose of properly.
- Remove protective clothing and work shoes in the work area to avoid carrying dust into the rest of the dwelling. Wash work clothes separately. Wipe shoes off with a wet rag that is then washed with the work clothes. Wash hair and body thoroughly with soap and water.
The label on your tool may include the following symbols.
V ....volts A.....amperes
Hz ..... hertz W ..... watts
min......minutes ......alternating
current
☐ Class II Construction
earthing terminal
⚠️ ......safety alert symbol
.../min ......revolutions or
reciprocations per minute
⚠ WARNING: Some dust created by power sanding, sawing, grinding, drilling, and other construction activities contains chemicals known to the State of California to cause cancer, birth defects or other reproductive harm. Some examples of these chemicals are:
- lead from lead-based paints,
• crystalline silica from bricks and cement and other masonry products, and
• arsenic and chromium from chemically-treated lumber.
Your risk from these exposures varies, depending on how often you do this type work. To reduce your exposure to these chemicals: work in a well ventilated are work with approved safety equipment, such as those dust masks that are special designed to filter out microscopic particles.
- Avoid prolonged contact with dust from power sanding, sawing, grinding, drilling and other construction activities. Wear protective clothing and wash exposed areas with soap and water. Allowing dust to get into your mouth, eyes, or lay skin may promote absorption of harmful chemicals.
⚠ WARNING: Use of this tool can generate and/or disperse dust, which may cause serious and permanent respiratory or other injury. Always use NIOSH/OSI approved respiratory protection appropriate for the dust exposure. Direct particles away from face and body.
⚠ WARNING: ALWAYS use safety glasses. Everyday eye glasses are NOT safety glasses. Also use face or dust mask if cutting operation is dusty.
ALWAYS WEAR CERTIFIED SAFETY EQUIPMENT:
• ANSI Z87.1 eye protection (CAN/CSA Z94.3)
• ANSI S12.6 (S3.19) hearing protection
• NIOSH/OSHA/MSHA respiratory protection
USE OF EXTENSION CORDS
Make sure the extension cord is in good condition before using. Always use the proper size extension cords with the tool – that is, proper wire size for various lengths of cord and heavy enough to carry the current the tool will draw. Use of an undersized cord will cause a drop in line voltage resulting in loss of power and overheating. For proper size cords see chart below.
| Minimum Gauge for Cord SetsVolts Total Length of Cord in Feet | |||||
| 120V 0-25 26-50 51-100 101-150(0-7,6m) (7,6-15,2m) (15,2-30,4m) (30,4-45,7m) | |||||
| 240V 0-50 51-100 101-200 201-300(0-15,2m) (15,2-30,4m) (30,4-60,9m) (60,9-91,4m) | |||||
| Ampere Rating | |||||
| More Than | Not more Than | American Wire Gage | |||
| 0 | - | 6 18 | 16 | 16 | 14 |
| 6 | - | 10 18 | 16 | 14 | 12 |
| 10 | - | 12 16 | 16 | 14 | 12 |
| 12 | - | 16 14 | 12 | Not Recommended | |
MOTOR
Be sure your power supply agrees with nameplate marking. 120 Volts AC only means your tool will operate on standard 60 Hz household power. Do not operate AC tools on DC. A rating of 120 volts AC/DC means that you tool will operate on standard 60 Hz AC or DC power. This information is printed on the nameplate. Lower voltage will cause loss of power and can result in over-heating. All Porter Cable tools are factory-tested; if this tool does not operate, check the power supply.
FUNCTIONAL DESCRIPTION
- Two speed switch
- Hang hole
- Air vents
- Hot air nozzle
- Temperature adjustment knob

Tool Operation
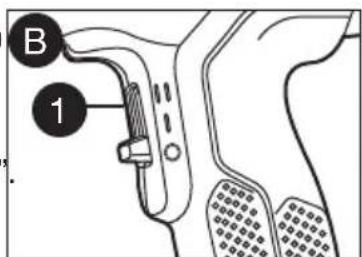
SWITCH - FIGURE B
The position of the switch controls both the fan speed and the heat output of the gun. There is considerable overlap in the temperature ranges with the use of the temperature adjustment knob.
- To turn the tool on in low air speed, low heat, slide the switch (1) to the position marked "I".
- To turn the tool on in high air speed, high heat, slide the switch (1) to the position marked "II".
- To turn the tool off, slide the switch (1) to the position marked "0".
TEMPERATURE ADJUSTMENT KNOB FIGURE C
• To raise the air temperature, turn the knob (5) clockwise.
• To lower the air temperature turn the knob (5) counterclockwise.
REMOVING PAINT - FIGURE D
Efficient paint removal requires the development of technique. Follow the guidelines in this manual and you'll find that you will have mastered the procedure after a few simple projects.
Turn on the tool and hold the nozzle about one inch (25mm) from the surface to be stripped, as shown in figure D. (Give the unit about 15-20 seconds running time to reach its full heat potential.) The paint being heated will usually begin to blister when it reaches the proper temperature for stripping.
When it reaches this point begin scraping with smooth, even strokes. If the paint is sufficiently hot and the scraper is properly suited to the surface being stripped, the paint should come off in a strip equal to the full width of the scraper. Move the unit slightly ahead of the scraper to assure that the paint being stripped is softened.
Best results will be achieved if the heat gun is moved slowly, but constantly, from side to side to evenly distribute heat. Do not linger or pause in one spot.
Remember that splinters and small particles of stripped paint can be ignited and blown through holes and cracks in the surface being stripped.


HINTS ABOUT PAINT STRIPPING
A smooth, downward scraping action will give good results and will help to prevent gouging the work surface.
With some paints, prolonged heating will actually make them tougher to strip. Try a few different heating times until you develop the technique best suited to your particular application.
The heat gun is designed to remove both oil based and latex based paints.
It will not remove stains or primer coats that have impregnated the wood grain.
Scrape paint as soon as it softens, it will soon cool and harden again. Clean the edge of your scraper often to retain a clean, sharp edge. Shield areas adjacent to where you're scraping. For example: shield the door with nonflammable materials if you're stripping the door frame.
Don't concentrate the tools heat on a window pane or other glass surface. Excessive heat may crack the glass. Use some nonflammable material to shield the glass when stripping the window frame.
OTHER USES
For hands free operation, place the heat gun on a flat surface as shown in figure E. Aside from stripping paint, your heat gun has a wide array of other uses. Use it for softening linoleum and floor tile and for loosening heat sensitive adhesives. It's perfect for use with heat shrinkable tubing and anywhere you need a portable heat source. You can even use it to thaw frozen metal water pipes.
Automotive uses include reducing set up time on body fillers or drying time on paints (the product manufacturer's recommendations must be followed.) Caution must be exercised around gasoline, automotive fluids, tires, gaskets, upholstery and hoses, etc. to prevent damage or fires. Be constantly aware that this tool can ignite flammable materials and soften or melt others. Avoid overheating adjacent flammable materials such as wood, insulation, electrical wiring jackets or plastic. Thaw only those metal pipe sections that are fully exposed. Do not attempt to thaw pipes that are inside walls, floors, ceilings, or otherwise enclosed. Do not attempt to thaw pipes that are wrapped in insulation.
ACCESSORIES
⚠ WARNING: The use of any accessory not recommended for use with this tool could be hazardous. Always unplug the attaching or removing accessories. Do not remove accessory tips until the tool has to room temperature.
The following attachments are included with the PC1500HGA Heat Gun.
FAN NOZZLE
Wider distribution of the hot air, for working on large surfaces- floors, doors, etc.

GLASS PROTECTOR
Safer working near glass. Distributes heat away from area to be protected.
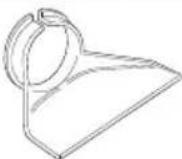
CONE NOZZLE
For precise operations- concentrates the air onto a smaller surface area.

SPOOL REFLECTOR
Evenly dispenses air around whole object. Ideal for soldering pipework, shrink sealing electrical cable.

CAUTION: These nozzles remain hot after use. Use care in handling them.
TROUBLESHOOTING
PROBLEM POSSIBLE CAUSE POSSIBLE SOLUTION
- Unit will not start. • Cord not plugged in. • Plug tool into a working outlet.
- Circuit fuse is blown. • Replace circuit fuse. (If the
product repeatedly causes the circuit fuse to blow, discontinue use immediately and have it serviced at a Porter Cable service center or authorized servicer.) - Circuit breaker is tripped. - Reset circuit breaker. (If the
product repeatedly causes the circuit breaker to trip, discontinue use immediately and have it serviced at a Porter Cable service center or authorized servicer.) - Cord or switch is damaged. • Have cord or switch replaced
at a Porter Cable Service Center or Authorized Servicer
For assistance with your product, visit our website at www.portercable.com for a list of service centers, or call the Porter-Cable Customer Care Center at (888) 848-5175.
MAINTENANCE
Use only mild soap and damp cloth to clean the tool. Never let any liquid get inside the tool; never immerse any part of the tool into a liquid.
REPLACEMENT PARTS
Use only identical replacement parts. For a parts list or to order parts, visit our service website www.portercable.com. You can also order parts from your nearest Porter-Cable Factory Service Center or Porter-Cable Authorized Warranty Service Center. Or, you can call our Customer Car Center at (888) 848-5175.
SERVICE AND REPAIRS
All quality tools will eventually require servicing and/or replacement of parts. For information ab Porter-Cable, its factory service centers or authorized warranty service centers, visit our website www.portercable.com or call our Customer Care Center at (888) 848-5175. All repairs made by service centers are fully guaranteed against defective material and workmanship. We cannot guarantee repairs made or attempted by others.
You can also write to us for information at PORTER-CABLE, 4825 Highway 45 North, Jackson, Tennessee 38305, (888) 848-5175 -Attention: Product Service. Be sure to include all of the information shown on the nameplate of your tool (model number, type, serial number, etc.).
ACCESSORIES
⚠ WARNING: Since accessories, other than those offered by Porter-Cable, have not been tested with this product, use of such accessories with this tool could be hazardous. To reduce the risk of injury, only Porter-Cable recommended accessories should be used with this product.
A complete line of accessories is available from your Porter-Cable Factory Service Center or a Porter-Cable Authorized Warranty Service Center. Please visit our Web Site www.portercable.com for a catalog or for the name of your nearest supplier.
THREE YEAR LIMITED WARRANTY
PORTER-CABLE will repair or replace, without charge, any defects due to faulty materials or workmanship for three years from the date of purchase for tools (two years for batteries). This warranty does not cover part failure due to normal wear or tool abuse. For further detail of warranty coverage and warranty repair information, visit www.portercable.com or call (888) 848-5175. This warranty does not apply to accessories or damage caused where repairs have been made or attempted by others. This warranty gives you specific legal rights and you may have other rights which vary in certain states or provinces.
In addition to the warranty, PORTER-CABLE tools are covered by our:
1 YEAR FREE SERVICE: PORTER-CABLE will maintain the tool and replace worn parts caused by normal use, for free, any time during the first year after purchase.
90 DAY MONEY BACK GUARANTEE: If you are not completely satisfied with the performance of your PORTER-CABLE Power Tool for any reason, you can return it within 90 days from the date of purchase with a receipt for a full refund – no questions asked.
LATIN AMERICA: This warranty does not apply to products sold in Latin America. For products sold in Latin America, see country specific warranty information contained in the packaging, call the local company or see website for warranty information.
To register your tool for warranty service visit our website at www.portercable.com.
WARNING LABEL REPLACEMENT
If your warning labels become illegible or are missing, call (888) 848-5175 for a free replacement.
The following are PORTER-CABLE trademarks for one or more power tools and accessories: a black color scheme; a "four point star" design; and three contrasting/outlined longitudinal sites. The following are also trademarks for one or more Porter-Cable and Delta products: 2 BY 4®, AirAmerica®, AIRBOSS™, Auto-Set®, B.O.S.S.®, Bammer®, Biesemeyer®, Builders Saw®, ChargeAir®, Charge Air Pro®, CONTRACTOR SUPERDUTY®, Contractor's Saw®, Delta®, DELTA®, Delta Industrial®, DELTAMACHINERY & DESIGN™, Delta Shopmaster and Design®, Delta X5®, Deltacraft®, DELTAGRAM®, Do It. Feel It.®, DUAL LASERLOC AND DESIGN®, EAIR®, EASYAIR TO GO™, ENDURADIAMOND®, Ex-Cell®, Front Bevel Lock®, Get Yours With the Sun Shines®, Grip to Fit®, GRIPVAC™, GTF®, HICKORY WOODWORKING®, Homecraft®, HP FRAMER HIGH PRESSURE®, IMPACT SERIES™, Innovation That Works®, Jet-Lock®, J.Boss®, Kickstand®, LASERLOC®, LONG-LASTING WORK LIFE®, MAX FORCE™, MAX LIFE®, Micro-Set®, Midi-Lathe®, Monsoon®, MONSTER-CARBIDE™, Network®, OLDHAM®, Omnijig®, PC EDGE®, Performance Crew™, Performance Gear®, Pocket Cutter®, Porta-Band®, Porta-Plane®, Porter Cable®, Porter-Cable Professional Power Tools®, Powerback®, POZI-STOP™, Pressure Wave®, PRO 4000®, Proair®, Quicksand and Design®, Quickset II®, QUIET DRIVE TECHNOLOGY™, QUIET DRIVE TECHNOLOGYAND DESIGN™, Quik-Change®, QUIK-TILT®, RAPID-RELEASE™, RAZOR®, Redefining Performance®, Riptide®, Safe Guard II®, Sand Trax® and Design®, Sanding Center®, Saw Boss®, Shop Boss®, Sidekick®, Site Boss®, Speed-Block®, Speedmatic®, Stair Ease®, Steel Driver Series®, SUPERDUTY®, T4 & DESIGN®, THE AMERICAN WOODSHOP®, THE PROFESSIONAL EDGE®, Thin-Line®, Tiger Saw®, TIGERCLAW®, TIGERCLAW AND DESIGN®, Torq-Buster®, TRU-MATCH®, T-Square®, Twinlaser®, Unifence®, Uniguard®, UNIRIP®, UNISAW®, UNITED STATES SAW®, Veri-Set® Versa-Feeder®, VIPER®, VT™, VT RAZORT™, Water Driver®, WATER VROOM®, Waveform® Whisper Series®, X5®, YOUR ACHIEVEMENT. OUR TOOLS.®
Trademarks noted with ® are registered in the United States Patent and Trademark Office and also be registered in other countries. Other trademarks may apply.
PORTER CABLE.
4825 Highway 45 North Jackson, Tennessee 38305
(888)848-5175 www.portercable.com
PORTER CABLE®
Les éléments ci-dessous sont des marques de commerce des outils et des accessoires de PORTER-CABLE : un agencement de couleurs grise et noire; un motif d' « étoile à quatre point et trois bandes longitudinales contrastantes/à contours. Les marques suivantes sont également marques de commerce se rapportant à un ou plusieurs produits PORTER-CABLE ou Delta : 24®, 890™, Air America®, AIRBOSS™, Auto-Set®, B.O.S.S.®, Bammer®, Biesemeyer®, Builde Saw®, Charge Air®, Charge Air Pro®, CONTRACTOR SUPERDUTY®, Contractor's Saw®, De DELTA®, Delta Industrial®, DELTA MACHINERY & DESIGN™, Delta Shopmaster and Design, Delta X5®, Deltacraft®, DELTAGRAM®, Do It. Feel It.®, DUAL LASERLOC AND DESIGN®, E AIR®, EASYAIR TO GO™, ENDURADIAMOND®, Ex-Cell®, Front Bevel Lock®, Get Yours With the Sun Shines®, Grip to Fit®, GRIPVAC™, GTF®, HICKORY WOODWORKING®, Homecraft HP FRAMER HIGH PRESSURE®, IMPACT SERIES™, Innovation That Works®, Jet-Lock®, J Boss®, Kickstand®, LASERLOC®, LONG-LASTING WORK LIFE®, MAX FORCE™, MAX LIFE Micro-Set®, Midi-Lathe®, Monsoon®, MONSTER-CARBIDE™, Network®, OLDHAM®, Omnijig PC EDGE®, Performance Crew™, Performance Gear®, Pocket Cutter®, Porta-Band®, Porta-Plane®, PORTER-CABLE®, PORTER-CABLE Professional Power Tools®, Powerback®, POZ STOP™, Pressure Wave®, PRO 4000®, Proair®, Quicksand and Design®, Quickset II®, QUIE DRIVE TECHNOLOGY™, QUIET DRIVE TECHNOLOGYAND DESIGN™, Quik-Change®, QU TILT®, RAPID-RELEASE™, RAZOR®, Redefining Performance®, Riptide®, Safe Guard II®, S Trap and Design®, Sanding Center®, Saw Boss®, Shop Boss®, Sidekick®, Site Boss®, Speed Bloc®, Speedmatic®, Stair Ease®, Steel Driver Series®, SUPERDUTY®, T4 & DESIGN®, THI AMERICAN WOODSHOP®, THE PROFESSIONAL EDGE®, Thin-Line®, Tiger Saw®, TIGERCLAW®, TIGERCLAW AND DESIGN®, Torq-Buster®, TRU-MATCH®, T-Square®, Twinlaser®, Unifence®, Uniguard®, UNIRIP®, UNISAW®, UNITED STATES SAW®, Veri-Set® Versa-Feeder®, VIPER®, VT™, VT RAZOR™, Water Driver®, WATER VROOM®, Waveform® Whisper Series®, X5®, YOURACHIEVEMENT. OUR TOOLS.®
Manual de'instrucciones
www.portercable.com
Las siguientes son marcas comerciales PORTER-CABLE que distinguen a una o más herramientos y accesorios: un gráfico de color gris y negro; un diseño de “estrella de cuatro puntas” y tres fras longitudinales contrastantes/delineadas. Las siguientes también son marcas comerciales para más productos de PORTER-CABLE y Delta: 2 BY 4®, 890™, Air America®, AIRBOSS™, AutoSet®, B.O.S.S.®, Bammer®, Biesemeyer®, Builders Saw®, ChargeAir®, Charge Air Pro®, CONTRACTOR SUPERDUTY®, Contractor's Saw®, Delta®, DELTA®, Delta Industrial®, DELT MACHINERY & DESIGN™, Delta Shopmaster and Design®, Delta X5®, Deltacraft®, DELTAGRAM®, Do It. Feel It.®, DUAL LASERLOC AND DESIGN®, EASY AIR®, EASYAIR TGO™, ENDURADIAMOND®, Ex-Cell®, Front Bevel Lock®, Get Yours While the Sun Shines® to Fit®, GRIPVAC™, GTF®, HICKORY WOODWORKING®, Homecraft®, HP FRAMER HIGH PRESSURE®, IMPACT SERIES™, Innovation That Works®, Jet-Lock®, Job Boss®, Kickstand LASERLOC®, LONG-LASTING WORK LIFE®, MAX FORCE™, MAX LIFE®, Micro-Set®, Midi Lathe®, Monsoon®, MONSTER-CARBIDE™, Network®, OLDHAM®, Omnijig®, PC EDGE®, Performance Crew™, Performance Gear®, Pocket Cutter®, Porta-Band®, Porta-Plane®, POR CABLE®, PORTER-CABLE Professional Power Tools®, Powerback®, POZI-STOP™, Pressure Wave®, PRO 4000®, Proair®, Quicksand and Design®, Quickset II®, QUIET DRIVE TECHNOLOGY™, QUIET DRIVE TECHNOLOGYAND DESIGN™, Quik-Change®, QUIK-TILT RAPID-RELEASE™, RAZOR®, Redefining Performance®, Riptide®, Safe Guard II®, Sand Tr and Design®, Sanding Center®, Saw Boss®, Shop Boss®, Sidekick®, Site Boss®, Speed-Block Speedmatic®, Stair Ease®, Steel Driver Series®, SUPERDUTY®, T4 & DESIGN®, THE AMERICAN WOODSHOP®, THE PROFESSIONAL EDGE®, Thin-Line®, Tiger Saw®, TIGERCLAW®, TIGERCLAW AND DESIGN®, Torq-Buster®, TRU-MATCH®, T-Square®, Twinlaser®, Unifence®, Uniguard®, UNIRIP®, UNISAW®, UNITED STATES SAW®, Veri-Set® Versa-Feeder®, VIPER®, VT™, VT RAZORT™, Water Driver®, WATER VROOM®, Waveform® Whisper Series®, X5®, YOUR ACHIEVEMENT. OUR TOOLS.®


- ⚠️ IMPORTANT SAFETY WARNINGS AND INSTRUCTIONS
- READ ALL INSTRUCTIONS
- TO REDUCE RISK OF INJURY
- ⚠️ GENERAL SAFETY WARNINGS AND INSTRUCTIONS FOR ALL TOOLS
- SAFETY GUIDELINES - DEFINITIONS
- ADDITIONAL SAFETY INSTRUCTIONS
- IMPORTANT SAFETY INSTRUCTIONS FOR HEAT GUNS
- IMPORTANT NOTICE
- USE OF EXTENSION CORDS
- MOTOR
- FUNCTIONAL DESCRIPTION
- TOOL OPERATION
- SWITCH - FIGURE B
- TEMPERATURE ADJUSTMENT KNOB FIGURE C
- REMOVING PAINT - FIGURE D
- HINTS ABOUT PAINT STRIPPING
- OTHER USES
- ACCESSORIES
- FAN NOZZLE
- GLASS PROTECTOR
- CONE NOZZLE
- SPOOL REFLECTOR
- TROUBLESHOOTING
- PROBLEM POSSIBLE CAUSE POSSIBLE SOLUTION
- MAINTENANCE
- REPLACEMENT PARTS
- SERVICE AND REPAIRS
- THREE YEAR LIMITED WARRANTY
- WARNING LABEL REPLACEMENT
- PORTER CABLE
- PORTER CABLE®
Brand : Porter-Cable
Model : PC1500HG
Category : Heat gun