Gelato 48855 - Ice machine UNOLD - Free user manual and instructions
Find the device manual for free Gelato 48855 UNOLD in PDF.

User questions about Gelato 48855 UNOLD
0 question about this device. Answer the ones you know or ask your own.
Ask a new question about this device
Download the instructions for your Ice machine in PDF format for free! Find your manual Gelato 48855 - UNOLD and take your electronic device back in hand. On this page are published all the documents necessary for the use of your device. Gelato 48855 by UNOLD.
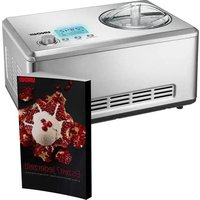
USER MANUAL Gelato 48855 UNOLD
natural_image
Exterior view of a modern glass and black industrial blender with 'UNOLD' branding (no additional text or symbols)EISMASCHINE GELATO
Bedienungsanleitung
natural_image
Modern kitchen appliance with digital display and bucket containing red liquid (no visible text or symbols)
natural_image
Illustration of a modern wheat bread machine with a metal bucket containing grain, accompanied by small kitchen utensils and a glass of milk (no text or symbols visible)UNOLD
Care + Style
natural_image
Product photo of a red and black electric toothbrush with a black clip, alongside a small gear-like tool (no text or symbols visible)
natural_image
Pink hair dryer with black handle and cord, no visible text or symbolsUNOLD®
Fan + Heat
natural_image
Close-up of a metallic desktop fan with visible blades and base (no text or symbols)
natural_image
Red electric fan with cooling fan and control panel (no visible text or symbols)INHALTSVERZEICHNIS
Instructions for use Model 48855
Technical Specifications....24
Explanation of symbols....24
For your safety....24
Control panel....28
Before using the appliance for
the first time....28
Before making ice cream 29
Making ice cream 30
Cleaning and care....33
Instructions and tips for the
ice cream recipes ....34
Recipe ideas for children and grown-ups....34
Recipe ideas for grown-ups....36
Guarantee Conditions....37
Waste Disposal/Environmental Protection ...37
Service 23
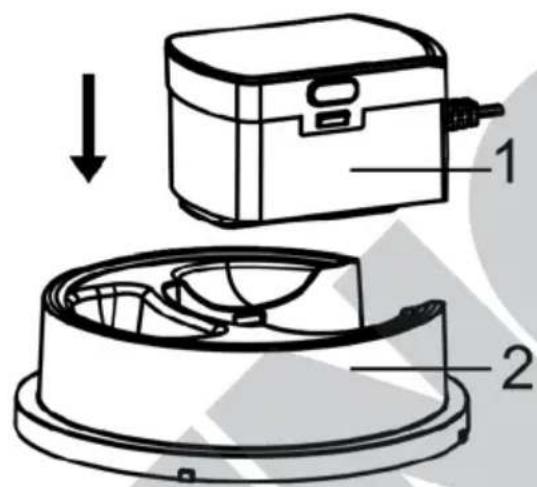
1 Mbotor
2 Lid with fill opening
3 Drive shaft/axle
4 Mixer
5 Removable cooling container
6 Cooling container insert
7 Housing
FR Page 38
natural_image
Interior view of a refrigerator showing pastries and a baking pan with 'Schweptstätke Kürch' label (no readable text on items)EIS HERSTELLEN
natural_image
Technical line drawing of a mechanical component with a top view and side view (no text or symbols)natural_image
Technical diagram showing a mechanical assembly with an upward arrow and internal components (no text or labels)text_image
Technical diagram of a device with labeled parts, showing a top-down view and internal structure.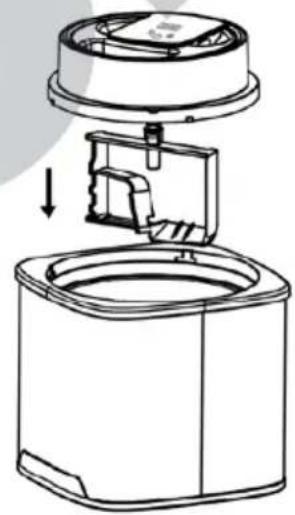
natural_image
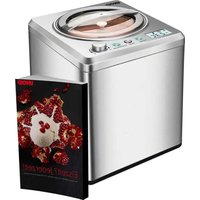
Technical line drawing of a device with internal components and an arrow indicating assembly (no text or symbols)Capacity: approx. 1500 ml
Dimensions: approx. 21.9 x 21.9 x 25.5 cm (W/D/H)
Weight approx. 3.2 kg
Power cord: approx. 110 cm
Features: Capacity 1.5 litres, removable cooling container, housing of high-quality stainless steel and plastic, lid with fill opening, display with timer and touch control panel, motor with clockwise and anti-clockwise rotation, degree of protection II
Accessories: Operating instructions with r ece
Equipment features, technology, colours and design are subject to change without notice.
EXPLANATION OF SYMBOLS

This symbol denotes a possible hazard which could cause injury or damage to the appliance.
FOR YOUR SAFETY
Please read the following instructions and keep them on hand for later reference.
Instructions for persons in the household
-
This appliance can be used by children 8 years and older, as well as by persons with reduced physical, sensory or mental abilities or with lack of experience and/or knowledge, if they are supervised or if they have been instructed with regard to safe use of the appliance and have understood the dangers that can result from use of the appliance.
-
Children must not play with the appliance.
-
Children are not allowed to perform cleaning and user maintenance, unless they are 8 years of age or older and are supervised.
-
Keep the appliance and the power cord out of the reach of children under 8 years of age.
Instructions concerning health
-
Consume thawed ice cream immediately, do not refreeze it.
-
Only consume the ice cream as long as it is still fresh. Immediately freeze any remaining ice cream and consume it within one week.
-
Use only fresh ingredients.
-
When using eggs, particularly ensure that they are as fresh as possible to avoid the formation of germs. Do not re-freeze left-over ice cream that contains eggs.
-
Ice cream that has been produced with raw egg or partially heated eggs should not be eaten by small children, pregnant women, the elderly or by persons who are chronically ill or acutely ill.
-
Clean the appliance immediately, when you have finished preparing the ice cream. If you do not germs can form.
-
If cooling fluid escapes from the cooling container, the cooling container must be replaced.
-
The coolant contained in the cooling tank is not suitable for consumption. If liquid escapes from the cooling container, do not use the container any more. In case of accidental contact, take the following measures: Wash contaminated clothing, immediately clean skin thoroughly with soap and water, rinse mouth if swallowed accidentally and do not induce vomiting – seek medical advice immediately!
Electrical safety
- Connect the appliance only to an AC power supply with voltage as specified on the rating plate.
- This appliance must not be operated with an external timer or a remote control system.
- After use, before cleaning or if there are any faults during operation, always unplug the power plug.
- Never immerse the appliance in water or other liquids, protect the power cord from moisture.
-
Completely unwind the power cord before use.
-
To prevent damage to the power cord do not wind the power cord around the appliance, and do not kink the power cord.
- Only use the appliance indoors.
- Only unplug the appliance from the electrical outlet by pulling on the power plug. Do not, under any circumstances, pull on the power cable to unplug the appliance.
- To prevent damage to the power cord never carry the appliance via the power cord or pull on the power cord.
- Unplug the appliance from the electrical outlet before you disassemble and clean the appliance, remove or attach component parts or if the appliance should be set up at a different location.
- Check the power plug and the power cord regularly for wear or damage. If the power cord or other parts are damaged, send the appliance to our customer service department for inspection and repair. Unauthorised repairs can result in serious risks for the user and void the warranty.
Instructions for set-up and safe use of the appliance
- The appliance and the insert components are not dishwasher safe.
- Place the appliance on a free, level surface.
- The appliance is intended for household use only, or for similar areas of use, such as,
■ kitchenettes in businesses, offices or other workplaces,
■ agricultural enterprises,
■ for use by guests in hotels, motels or other lodgings,
■ in private guest houses or holiday homes.
-
For safety reasons, never place or operate the appliance on or in the vicinity of hot surfaces.
-
The power cord must not hang down over the edge of the work surface.
- To avoid injury/freezing, do not touch the inside of the cooling container with bare hands or other body parts (particularly if hands or other body parts are wet).
-
The maximum fill quantity should not be exceeded. The cooling container should not be filled more than 4 cm under the upper edge, since ice cream expands during the freezing process.
-
The appliance must be completely assembled and switched on before you add the desired ingredients. Never put the required ingredients into the cooling container beforehand, because the ingredients can firmly freeze onto the edge of the container. This can prevent the desired result from being achieved.
- Do not move the appliance when it is in operation.
- Never leave the appliance unattended when it is in operation.
- Never use the appliance without cooling containers!
- Do not hold objects in the running appliance during operation, and do not reach into the appliance with your hand. Danger of injury!
- Use the appliance only after it has been properly assembled.
- Never operate the appliance with accessories of other appliances.
- Do not use any pointed or sharp objects in the ice cream container. Such objects can scratch the ice-cream container. If necessary, use a plastic or wooden scraper.
- Switch off the appliance and unplug the power plug, when you have concluded preparing the ice cream, if you would like to clean the appliance, of if you must rectify an appliance fault.
- ATTENTION: Only fill container with food products.

Never reach into the appliance while it is in operation – danger of injury! Do not touch the inside of the cooling container with bare hands!
Do not open motor of the appliance under any circumstances. There is danger of electric shock.
Attention: To avoid injury/freezing, never touch the cooling container with wet fingers or hands.
The manufacturer will not be liable in the event of incorrect assembly, improper or incorrect use or if repairs are carried out by unauthorized third parties.
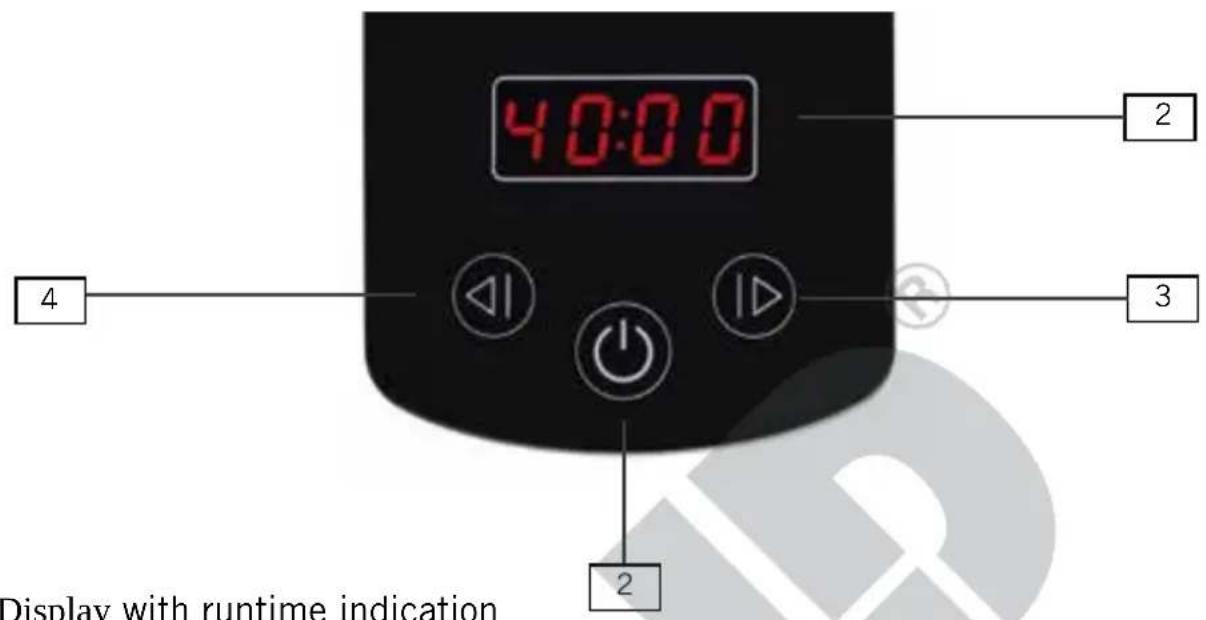
CONTROL PANEL
text_image
40:00 2 4 3 2 Display with runtime indication1 Display with runtime indication
2 ON/OFF button switches the appliance on or off.
3 Button + increases runtime
4 Button - decreases runtime
BEFORE USING THE APPLIANCE FOR THE FIRST TIME
- Remove all packaging materials and any transport safeguards. Keep packaging materials away from children – danger of suffocation!
- Check whether all parts are present. If parts are missing or damaged, contact your dealer or our customer service organisation.
- Clean all parts with a damp cloth, as described in the section „Cleaning and care“.
- Place the appliance on a solid, level and dry work surface.
BEFORE MAKING ICE CREAM
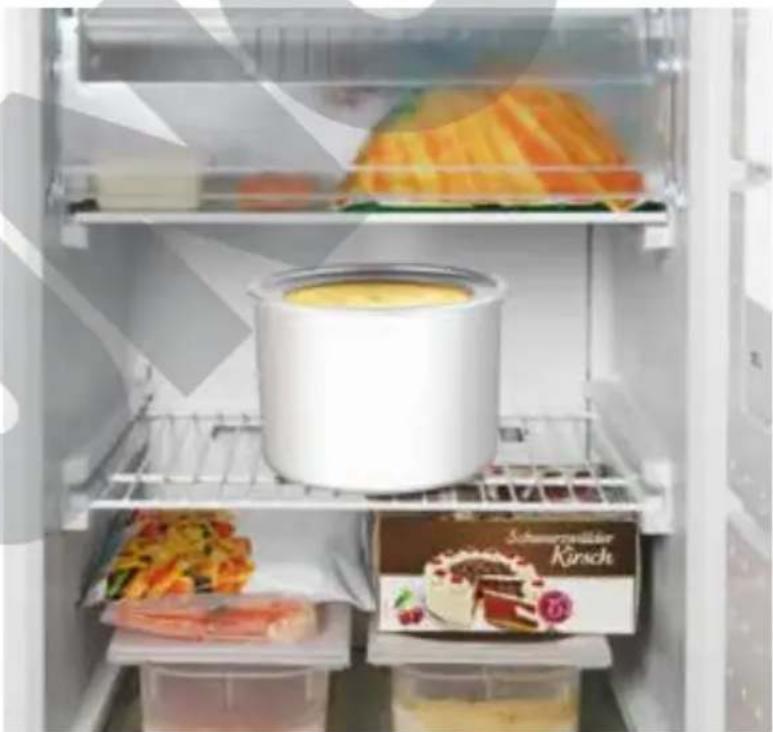
- Before you can make ice cream, you must place the cooling container filled with a cooling fluid in the *** freezer compartment or freezer for approx. 8 hours. The temperature must be at least -18°C. Beforehand, ensure that you clean the inside of the containers and then completely dry them.
- Place the cooling container upright in the freezer compartment, with the opening upwards.
- The freezing process takes between 8 and 22 hours depending on the temperature of the freezer. By shaking the container you can determine whether all the coolant is frozen.
- Tip: When you are not using the ice cream machine, store the cooling container in a plastic bag, for example, in the freezer. Thus the container will always be ready for use.
- If you want to make several types of ice cream in succession, we recommend the purchase of additional cooling containers. You can order additional cooling containers directly from Unold; an order form is provided on page 107.
natural_image
Interior view of a refrigerator showing food items including a baking pan, cheese, and Kirsch advertisement (no visible text or symbols)MAKING ICE CREAM
The desired ingredients should have already been pre-cooled for several hours prior to preparation! If you are using alcohol for the recipe, please only add it to the ice cream when the ice cream has the desired consistency. The maximum fill quantity for the cooling container is 500 ml.
Tip: If you are using a recipe with alcohol, only use a little alcohol and only add it at the end of the freezing time because the alcohol extends the freezing time.
- Prepare the ice cream mixture as specified in the recipes in the recipe section. If the ice cream mixture must be boiled, this should be done a day in advance so that the mixture has time to cool thoroughly.
- We recommend that you always thoroughly cool the ice cream mixture in the refrigerator before use.
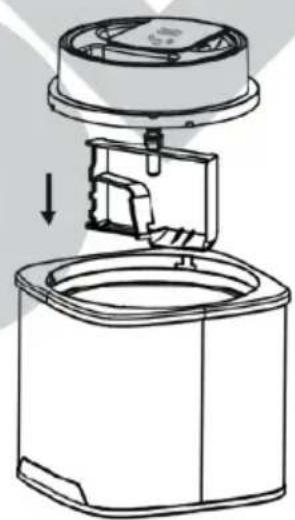
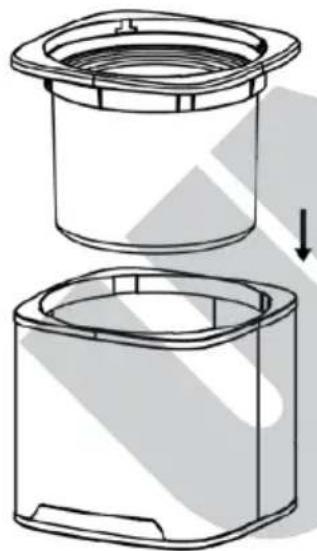
- Take the cooling container out of the freezer compartment.
- Place the cooling container in the cooling container insert.
- Then place the cooling container insert with cooling container in the housing of the appliance.
natural_image
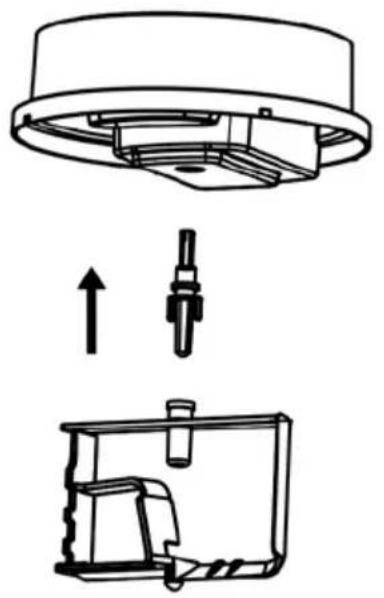
Technical line drawing of a mechanical component with a top view and side view (no text or symbols)- If necessary, fit the axle onto the mixer. Ensure that both parts are correctly connected – the side of the axle with the two little arms must be attached in the direction of the mixer.
- Fasten the motor on the lid and carefully place both on the appliance.
- Insert the axle in the opening on the underside of the motor.
- The motor can only be correctly fixed in place on the lid in one direction (see Fig.).
natural_image
Technical diagram showing a mechanical assembly with an upward arrow and internal components (no text or labels)- Turn the lid anti-clockwise until it firmly locks in place.
text_image
Technical diagram showing a device with labeled parts, including a box and fan assembly.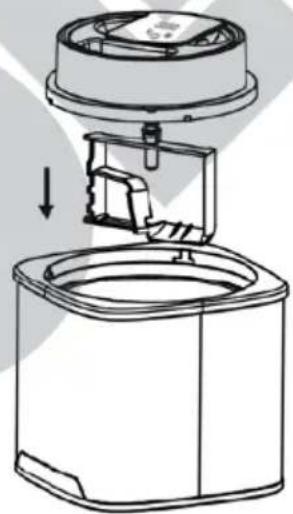
natural_image
Technical line drawing of a device with internal components and a downward arrow indicating motion (no text or symbols)- Plug the appliance into an electrical outlet. The appliance is in standby mode.
- Switch on the appliance via the ON/OFF button, 40:00 appears in the display.
- Now use the 🔊 and 🔒 buttons to select the desired runtime between 5 minutes and 45 minutes in 5-minute increments. The selected time appears in the display and counts down.
- Note: If you do not make any button entries, after 2 seconds the mixer motor starts.
- Then uncover the opening on the filling shaft and pour the ice cream mixture into the appliance through the shaft. Do not, under any circumstances, pour the ice cream mixture into the appliance when the appliance is swit-
ched off. The ice-cream mixture would immediately freeze on the edge of the cooling container.
- Since the volume increases during the freezing process, do not fill the container all the way up to the edge, but rather leave approximately 5 to 7 ~cm space.
- Let the ice cream maker run until the ice cream has the desired consistency. If necessary, you can reduce or extend the selected runtime. Depending on the ingredients this takes 20 to 40 minutes. Check the freezing process from time to time, and switch off the appliance when the mixer has come to a standstill.
- If the ice cream mixture becomes too solid, the mixer's direction of rotation changes as needed to prevent motor damage.
- Attention: Do not switch off the appliance while it is making ice cream. This would freeze the ice cream mixture on the inner edge of the cooling container. If the motor overheats during preparation, it switches off automatically. In this case, unplug the mains plug and let the appliance cool. If you want to prepare ice cream again, you may have to use new ice cream ingredients.
- If you are using a recipe with alcohol, only use a little alcohol and only add it at the end of the freezing time because the alcohol extends the freezing time.
- Switch off the appliance via the ON/OFF button.
- Take the lid off of the appliance, by pulling it upward and off of the appliance.
- Remove the cooling container insert together, with the cooling container, from the appliance.
- It is best to remove the ice cream with a plastic or wooden spatula, so as not to scratch the container.
- Ice cream should have a soft consistency. However, if you prefer harder ice cream, then additionally place the container in the freezer compartment/freezer.
- However do not keep the ice cream in the container in the freezer compartment for longer than 30 minutes. If you do not want to eat the ice cream immediately, please pour it into a closed freezer container, which you then place in the freezer compartment. In this regard, due to the contraction of ice crystals the ice cream can form water streaks because the optimal ice cream temperature is approx. -10°C, but the temperature in the freezing appliances is usually lower.

Never reach into the appliance while it is in operation – danger of injury! Do not touch the inside of the cooling container with bare hands! Attention: Do not, under any circumstances, touch the cooling container with wet body parts, such as your fingers, for example. Otherwise, there is danger of injury/freezing.
CLEANING AND CARE

Unplug the mains plug of the appliance after use and before cleaning. Do not touch the coolant container with bare hands when lifting it out of the appliance. Otherwise, there is danger of injury/freezing.
- Allow the cooling container to warm to room temperature before cleaning it. Otherwise, there is danger of injury/freezing.
- Wipe off the inside of the cooling container thoroughly with a damp cloth and then dry it well.
- Rinse the mixer with a mild washing-up liquid.
- Wipe off the inside and outside of the housing and lid with a damp cloth and a little washing-up liquid, and with a cloth dampened with clean water. Do not use sharp objects or abrasive cleaning agents.
- Thoroughly dr y he appli ance.
- Do not, under any circumstances, immerse the motor with the power cord, in liquids.
- The cooling container must be completely dry before it is put back in the freezer compartment.
- Regular cleaning significantly extends the service life of the appliance.
- Store the appliance in a dry location, where it is protected against dust. Tip: Keep the packaging of the appliance on hand and keep the ice cream maker in this box when it is not in use.
INSTRUCTIONS AND TIPS FOR THE ICE CREAM RECIPES
Use only fruit that is completely ripe.
Only add pieces of fruit and/or entire berries at the end.
If the recipe requires eggs, only use very fresh eggs.
You can replace milk with cream, or cream with milk.
The more cream you use the creamier the ice cream will be.
You can replace sugar with honey, syrup or sweetener. However this is not possible for soft ice cream.
Milk can also be replaced with soy milk.
The ice cream tastes best right after it has been freshly prepared. However, if you want to store ice cream longer add 30 grams stabiliser to the ice cream mixture.
The stabiliser prevents the ice crystals from contracting again in storage and it prevents the ice cream from becoming grainy. You can get the stabiliser at
Hobbybäcker-Versand - Inge Pinzer
Am Mühlholz 6 – 89287 Bellenberg, Germany
Tel. +49 73 06/92 59 00 - Fax +49 73 06/92 59 05
If you want firmer ice cream, place the ice cream mixture in the freezer compartment for 15-30 minutes, before pouring the mixture into the ice cream maker. In the summer months, in particular, temperatures even in the refrigerator can be slightly higher since, for example, the refrigerator door is opened and the room temperature is higher.
Ice cream does not melt so quickly if you add a package of cold-soluble gelatine) to the ice cream before freezing.
RECIPE IDEAS FOR CHILDREN AND GROWN-UPS
Vanilla ice cream
150 ml milk, 150 g cream, 1/2 vanilla pod, 1 pinch salt, 1 egg yolks, 40 g sugar, 25 g condensed milk.
Put the milk and 50 g cream in a pot and heat. Slit the vanilla pod open lengthwise, scrape out the seeds with a spoon and together with the pod and the salt, add to the cream/milk. Stir-34 von 108
ring constantly, bring the entire mixture to a boil, remove immediately from the burner and take out the pod. Whip the egg yolk together with the sugar until creamy, then under constant stirring, add the hot cream/milk. Pour the liquid back into the pot and heat, stirring constantly, until the ice cream mixture thickens slightly. Stir in
the condensed milk, put the ice cream mixture in a different container and let it cool, then put it in the refrigerator for one hour. Whip the whipping cream until stiff and fold it into the cooled pudding mixture. Pour the mixture into the running ice cream maker and let it freeze for 15 to 30 minutes.
Chocolate ice cream
100 ml milk, 1 egg yolk, 40 g sugar, 1/2 package vanilla sugar, 50 g milk chocolate, 100 g cream, 1 Tsp. cocoa Heat the milk in a pan and let it boil up once. In the meantime, beat the egg yolk with the vanilla sugar into a foam mixture. In this process drizzle the sugar into the mixture slowly. Stirring the hot milk constantly with the wire whisk, slowly pour it into the ice cream foam mixture. Put the egg/milk mixture back into the milk pan, and again heat it up under constant stirring until the liquid thickens slightly. Pour the entire mixture into a mixing bowl and let it cool for half an hour.
In the meantime melt the chocolate with three tablespoons in the water bath under constant stirring and stir it into the egg milk mixture with a heap-ing teaspoon of cocoa until the chocolate is completely dissolved. Allow the mixture to cool for half an hour, then again put it in the refrigerator for approx. one hour.
Whip the remaining whipping cream slightly and fold it into the chocolate/ milk mixture. Pour the entire mixture into the running ice cream machine and let it freeze approx. 30 minutes.
Frozen yogurt
90 g cream, approx. 40 g powdered sugar, 175 g yogurt, any flavour (e.g. fruit yogurt or nut yogurt), 1 egg Whip the cream and the powdered sugar until it is creamy. Drizzle the egg into the yogurt and fold the cream into the yogurt. Pour the mixture into the running ice cream maker and let it freeze for approx. 25 minutes.
Ice cream Schokoküsse (chocolate kisses – a German confection consisting of marshmallow cream dipped in chocolate on a waffle)
4 chocolate kisses, 1-2 Tsp. powdered sugar, 175 ml milk
Carefully take the chocolate kisses apart. To do this detach the waffle bases and the chocolate glaze, and set these items aside. Pour the sugar foam into a bowl. Add the sugar and milk to the sugar foam and stir everything together into an homogeneous cream. Pour this into the ice cream maker and freeze for approx. 10 minutes. Now add the chocolate fragments to the ice cream mixture and freeze everything for an additional 10 to 15 minutes. In the meantime place the chocolate kiss waffles on a tray. After the freezing time elapses use a large ice cream scoop (size 14) and place a large scoop
of the ice cream mixture on each waffle. Re-freeze the ice cream chocolate kisses for several hours in the freezer. Tip: You can glaze the ice cream chocolate kisses with brown chocolate or
RECIPE IDEAS FOR GROWN-UPS
Pineapple-chocolate shake
1 can pineapple slices (approx. 125 g net weight), 65 ml coconut milk, 2 egg whites, 25 g powdered sugar, 1 Tsp. white rum, 1/2 banana, 1/2 Tsp. lemon juice, glacé cherries, wooden skewers, 125 ml pineapple juice, an additional 60 ml coconut milk.
Puree 3/4 of the pineapple slices with the pineapple syrup from the can and the coconut milk (62 ml). Cut the remaining slices into small pieces, add to the mixture, and let everything cool for one half hour. Beat the egg white and powdered sugar and fold it into the fruit puree. In the ice cream machine let the entire mixture freeze for approx. 40 minutes. After 25 minutes add the rum. Cut half of the banana into slices and drizzle with lemon juice. Put the slices and cherries on wooden skewers.
Place four large scoops of ice cream in a mixing bowl. Keep the rest in the freezer. Add the pineapple juice, the coconut milk, and the rest of the banana to the scoops of ice cream and puree it all. Distribute the mixed bevwhite chocolate and sprinkle with chocolate shavings.
erage in the four glasses and decorate with the skewers.
Campari-orange sorbet
35 ml Campari, 200 ml orange juice, 75 g powdered sugar, 1 egg white Pour the Campari with 180 ml orange juice and 30 g powdered sugar into a high mixing bowl and stir until the sugar is dissolved. Put the entire mixture in the refrigerator for two hours. After the cooling time has elapsed, beat the egg whites with the rest of the powdered sugar and remaining orange juice until it is foamy. Stir the egg white mixture together with the orange-Campari mixture. Pour the ice cream mixture into the running ice cream machine and let it freeze for 30 to 40 minutes.
Tip: Due to its alcohol content, the Campari-orange sorbet is quite soft, so that you can portion it directly from the freezing device.
This sorbet tastes very good when you put it into tall glasses with an icing bag, and top it off with fresh squeezed orange juice.
GUARANTEE CONDITIONS
We grant a 24 months guarantee, and in case of commercial use a 12 months guarantee, starting from the date of purchase for any damage demonstrably due to manufacturing defects and when the appliance has been used according to its intended use. Within the warranty period we will remedy defective materials or workmanship through repair or replacement, at our option. Our warranty terms apply only to appliances sold in Germany and Austria. For other countries, please contact the responsible importer. In the event of a claim for remedy of defects, please send the appliance to our after sales service, properly packaged and postage paid, together with a copy of the automatically generated sales receipt, which must show the date of purchase, and a description of the defect. If the defect is covered by the warranty, the customer will be reimbursed for the shipping costs only in Germany and Austria. The warranty does not cover damage from normal wear, improper handling and failure to comply with the maintenance and care instructions. The warranty is void if repairs or modifications are made to the appliance by third parties. Any claims of the end consumer vis-à-vis the retailer are not limited by this warranty.
WASTE DISPOSAL / ENVIRONMENTAL PROTECTION
Our appliances are produced on a high quality level for a long lifetime. Regular maintenance and expert repairs by our after-sales service can extend the useful life of the appliance. If an appliance is defective and repair is not possible we ask you to follow the following instructions for disposal. Do not dispose this appliance together with your standard household waste. Please bring this product to an approved collection point for recycling of electric and electronic products. By separate collection and disposal of waste products you help to protect natural resources and ensure, that the product is disposed in an adequate way to protect health and environment.
Refrigerant: Carboxymethylcellulose, urea, water
The instruction booklet is also available for download: www.unold.de
The authors have thoroughly considered and tested the recipes included in these operating instructions. Nevertheless, a guarantee cannot be accepted. The authors, respectively UNOLD AG and their assignees shall not be liable for personal injuries, material damages and financial loss.
NOTICE D'UTILISATION MODÈLE 48855
SPÉCIFICATION TECHNIQUE
natural_image
Interior view of a refrigerator showing food containers and a baking pan with a chocolate cake labeled 'Schweptminder Kirsch' (no text on main objects)FABRIQUER DE LA GLACE
natural_image
Technical line drawing of a mechanical component with a top view and side view showing internal structure (no text or symbols)natural_image
Technical diagram showing a mechanical assembly with an upward arrow indicating motion or force, no text or symbols present.text_image
Technical diagram of a microwave oven with labeled parts and an arrow indicating assembly or inspection.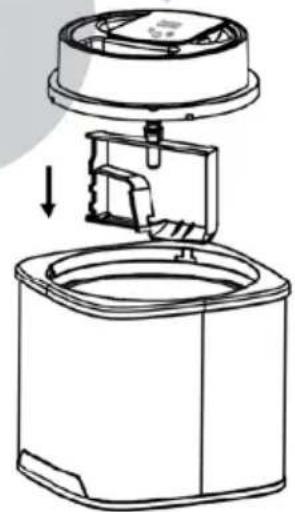
natural_image
Technical line drawing of a microwave oven with internal components and a downward arrow indicating motion (no text or symbols)CONDITIONS DE GARANTIE
natural_image
Interior view of a refrigerator with food items on shelves, including a cake labeled 'Schweerzusäker Kürsch' (no visible text beyond label)IJS MAKEN
natural_image
Technical line drawing of a mechanical component with a cylindrical top and side view, showing a downward arrow indicating assembly (no text or symbols present)natural_image
Technical diagram showing a mechanical assembly with an upward arrow and internal components (no text or labels)text_image
Technical diagram showing a device with labeled parts, including a box and fan assembly.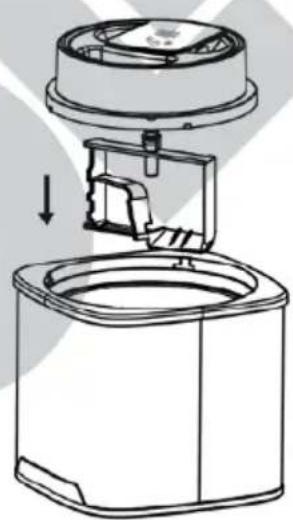
natural_image
Technical line drawing of a mechanical device with internal components and a downward arrow indicating motion (no text or symbols)Koelmiddel: Carboxymethylcellulose, ureum, water

ISTRUZIONI PER L'USO MODELLO 48855
DATI TECNICI
Potenza: 12 W, 220–240 V\~, 50 Hz
natural_image
Interior view of a refrigerator showing pastries and food items (no visible text or symbols)natural_image
Technical line drawing of a mechanical component with a top view and side view (no text or symbols)natural_image
Technical diagram showing a mechanical assembly with an upward arrow and internal components (no text or labels)text_image
Technical diagram showing a device with labeled parts, including a box and fan assembly.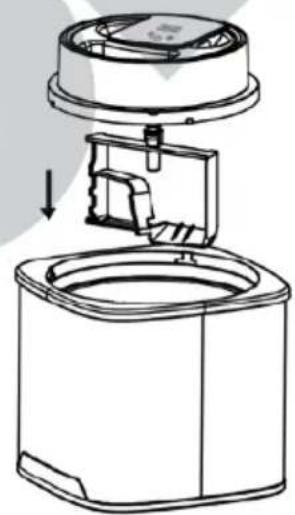
natural_image
Technical line drawing of a device with internal components and a downward arrow indicating motion (no text or symbols)natural_image
Interior view of a refrigerator showing pastries and food items (no visible text or symbols)ELABORAR HELADO
natural_image
Technical line drawing of a mechanical component with a top view and side view (no text or symbols)natural_image
Technical diagram showing a mechanical assembly with an upward arrow and internal components (no text or labels)text_image
Technical diagram showing a device with labeled parts, including a box and fan assembly.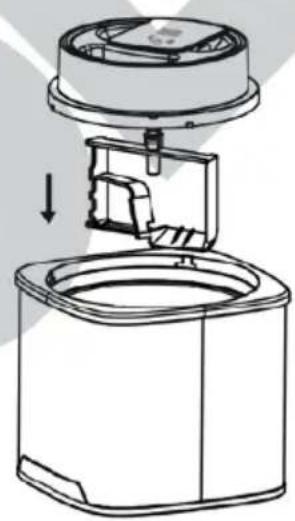
natural_image
Technical line drawing of a device with internal components and an arrow indicating assembly (no text or symbols)natural_image
Interior view of a refrigerator showing food containers and a baking pan with a chocolate cake labeled 'Schweptswäder Kirsch' (no text on main objects)PRODUKCJA LODÓW
natural_image
Technical line drawing of a mechanical component with a top view and side view (no text or symbols)natural_image
Technical diagram showing a mechanical assembly with an upward arrow and internal components (no text or labels)text_image
Technical diagram showing a device with labeled parts, including a top view and a side view of a circular component.