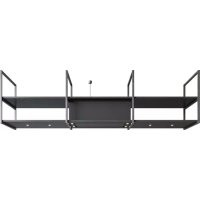
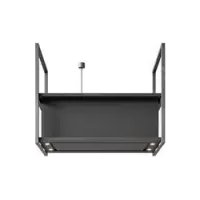
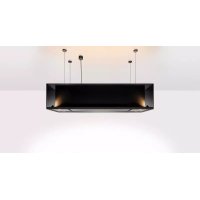
Pureline Frame 15010 - Basket NOVY - Free user manual and instructions
Find the device manual for free Pureline Frame 15010 NOVY in PDF.
User questions about Pureline Frame 15010 NOVY
0 question about this device. Answer the ones you know or ask your own.
Ask a new question about this device
Download the instructions for your Basket in PDF format for free! Find your manual Pureline Frame 15010 - NOVY and take your electronic device back in hand. On this page are published all the documents necessary for the use of your device. Pureline Frame 15010 by NOVY.
USER MANUAL Pureline Frame 15010 NOVY
1 INSTRUCTIONS FOR SAFETY AND USE
2.1 Operating the device
2.2 Turning the extraction on and off
3.5 Led lighting cooker hood
3.6 recessed spotlight in shelf (if applicable)
AND USE Further information on Novy products, accessories and services may be found on the internet: www.novy.com These are the directions for use for the appliance as shown on the front. The installation instructions are in a separate booklet supplied with the appliance. These directions for use make use of a number of symbols. The meanings of the symbols are shown below. Symbol Meaning Action
Indication Explanation of an indication on the device.
Warning This symbol indicates an important tip or a dangerous situation. Observe this instruction in order to prevent injury and damage to property.
Technical safety instructions − This appliance complies with the applicable safety in- structions. However, improper use may cause personal injury or damage to the appliance. − Read the directions for use and the installation instruc- tions before installing and using this appliance. You will nd important information here for the assembly and use of the appliance.
Safety is guaranteed only with expert installation in accordance with the installation manual. The installing technician is responsible for proper operation at the in- stallation location.
The appliance is intended exclusively for household use (preparation of food) and excludes all other domestic, commercial or industrial use. Do not use the appliance outside.
Check the condition of the appliance and the installation ttings as soon as you remove them from the packaging. Remove the appliance from the packaging with care. Do not use sharp knives to open the packaging. − Do not install the appliance if it is damaged, and in that case inform Novy.
Keep good care of this manual and pass it on to any person who may use the appliance after you.
Novy is not liable for damage resulting from incorrect assembly, incorrect connection, incorrect use or incorrect operation. − Do not touch live components. − Do not convert or alter the appliance. − Remove labels and stickers on the appliance with tips for use or installation. The type sticker is to be found behind the grease lter in the appliance. Do not remove it.
Safety instructions with children in the house − The appliance’s packaging forms a hazard for children. Do not let children play with the packaging materials. Keep packaging materials away from children.
Children from the age of 8 years and older may use this appliance only under the supervision of a person who is responsible for their safety, or if they have been taught how to use this piece of equipment under safe circumstances. − Keep an eye on children in order to ensure that they do not play with the appliance.
Children younger than 8 years should be kept away from the appliance and the connection cable. − Cleaning and maintenance of the appliance may not be carried out by children.
The appliance’s lighting is extremely bright and may damage the eyes. In particular, ensure that babies do not look directly into the lights.
Ensure that batteries are stored out of children's reach. Do not allow children to replace batteries without supervision.
Safety instructions when using the appliance − People with restricted physical, sensory or intellectual capacities, or people lacking in knowledge or experience, may use this appliance only under the supervision of a person who is responsible for their safety, or if they have been taught how to use this piece of equipment under safe circumstances.
Flambéing under the appliance is not allowed under any circumstances.
Whenever you are frying, roasting, grilling or deep-frying, always stay close. Overheated oil and fat can rapidly catch alight and as a result damage the extractor hood. − Clean the grease lter regularly in accordance with the instructions in these directions for use. Failure to follow the cleaning instructions will lead to grease deposits in the lter with a resultant re hazard.
Never use the appliance without the grease lters in order to prevent dirt and grease penetrating the appliance, which may impact the operation and functioning over time. − In the event of re, always switch the appliance off. − Never douse burning fats with water, but cover the pan with a suitable lid or re blanket. − Note that certain parts of the appliance within reach of the hands may become hot while cooking. − Gas burners can build up a lot of heat while operating. Make sure that this heat cannot increase too much in the cooker hood. The cooker hood installed above the gas burners may become damaged or catch re.
- Only operate the gas burners with cookware on them.
- Turn off the gas burner when you remove the cook- ware from the gas.
- When using several gas burners at the same time, set the cooker hood to position 2 or higher.
- Never operate large burners of more than 5 kW with the highest ame for longer than 15 minutes, e.g. a wok. − Switch on the appliance a few minutes before starting to cook for effective extraction of the cooking vapours.– 34 –
Make use of the delay position if the appliance has one. The instructions for the delay position are set out in these directions for use. − Avoid all draughts above the cooking surface. − Position your cooking utensils in such a way that ris ing vapour is directed under the extraction surface of the hood.
Cooking with induction: set the intensity of the ap pliance and hob as low as possible in order to limit excess vapour. − If the appliance has an bottom panel, ensure that it is always properly closed. Take care that it is properly in- serted into the clamps and cannot come free. When opening the bottom panel, do not put your hands on the side of the hinges in order to prevent being crushed. − Objects placed on the device may overload the fasten- ing elements / mounting material (dowels and screws). Ask the installer about the maximum load capacity (kg). The installer has determined (possibly in consultation with the contractor or architect) the mounting material (dowels and screws) that is suitable for the construction situation and the total weight of the entire construction including the selected shelf material and possible loads on these shelves. − If objects are placed on the device: prevent them from falling and creating a dangerous situation.
Air supply However large the kitchen or the room with open kitchen is, only so much air can be extracted from the room as is supplied. Too little air supply could result in a yield loss of 50% and more. [!] If the extraction is used at the same time as a combus- tion system (for example heaters red by gas, oil, wood or coal, hot water boilers using gas, gas hobs and gas ovens), combustion gases may be sucked back in and lead to poisoning. A combustion system uses air from the room as combustion air. Combustion gases arise as a result, which are removed to the outside by an extraction system. The appliance sucks in air from the kitchen and adjacent rooms. Negative pressure occurs if the air supply is inad- equate. The toxic gases are then sucked back from the chimney or extraction duct into the room. With simultaneous use of the appliance and combustion appliances in the same room, the negative pressure may not exceed 4 Pa (=0.04 mBar). Negative pressure can be prevented by allowing sufcient air into the room through openings that cannot be closed (for example through win- dows or doors, in combination with a ventilation cabinet in the wall). Have an expert assess the overall ventilation system in your home for a proposal on suitable measures in the area of air supply. When using the appliance with an internal or external mo- tor (unit) with air extraction to the outside, there must be adequate air supply in the room where the appliance has been installed / is positioned, so that fresh air can ow in. Fresh air can be provided by tilting a window, opening a door or installing an inlet grille. With an appliance with recirculation, there must be a min- imum of ventilation in the room where the appliance has been installed / is positioned. Ventilation can be provided by the overall ventilation in the home or by tilting a window or opening a door. Certain appliances are tted with a connection for a win- dow contact switch (see the technical specications for your appliance). If the appliance is to operate at the same time as a heating appliance that needs air from the room, and if the required supply can only take place through a single open window, there is the option of connecting the appliance to a window contact switch (not included). This ensures that the appliance operates only when the window is open. If the window is closed, the fan cannot be switched on. Contact your technician for the correct accessories for your appliance.
Precautionary measures against damage
The correct installation method is described in the in- stallation instructions. Read these instructions through carefully.
The installation and electrical connection of the appliance should be left to a recognised expert.
NOVY cannot accept liability for any damage arising from incorrect installation or connection.
Check the distance between the hob and the appliance. The minimum and maximum heights are shown in the installation instructions.
Precautionary measures in the event of a fault
If a fault occurs, switch off the appliance and disconnect the power supply.
Repairs should be carried out only by specialised person- nel. Do not under any circumstances open the equipment yourself. Contact the Novy service department.– 35 – ENVIRONMENTAL PROTECTION Tips for saving energy The new appliance is exceptionally efcient and econom- ical with energy. Some tips follow below for making your appliance even more energy-efcient. − Switch the appliance on at the lowest speed when you start cooking to adjust the relative humidity andeliminate cooking odours.
Only use the highest speed when absolutely necessary.
Only increase the speed of the appliance when thequan- tity of vapour so requires.
Keep the appliance lter/lters clean to optimise grease and odour ltering efciency. − Switch to higher power in good time if much vapour is released. This is more efcient than using the appliance for a long time, and catching vapour already spread in the kitchen.
Do not allow the appliance to unnecessarily ventilate after cooking. − Switch the lighting off when leaving the kitchen or if the kitchen is already light enough.
Ensure adequate air supply in the room, so that the appliance can operate efciently and economically.
Put lids on the pots to reduce cooking vapours and condensation. Recycling the transport packaging and the old appliance This appliance is protected against damage during trans- port by packaging. The materials used are not harmful to the environment and are suitable for recycling. Ensure environmentally-friendly disposal of the packaging. Your appliance also contains many materials that can be recycled. For this reason, used appliances should be separated from other waste. Recycling of old appliances arranged by your manufacturer will in this way be carried out under the best circumstances. For recycling your appliance, we refer you to the recent European guidelines in force concerning electrical and electronic waste. Ask your municipality or your salesperson about the closest collection point for your old appliance. Keep old appliances out of the reach of children. Recycling batteries Do not put batteries into the standard household refuse. Ask your municipality or your salesperson about the closest battery collection point. Keep batteries out of the reach of children.
2 CONTROLS AND FUNCTIONS
2.1 Operating the device
You can operate the cooker hood with the control buttons on the cooker hood or with the supplied remote control. Operating on the cooker hood:
Decrease speed level
Increase speed level
2.2 Turning the extraction on and off
Turning the extraction on o Press button
to turn on the extractor. The extractor always starts in the function last used (lighting and/or motor). Turning the extraction o with delay mode To set delay mode press key
once. The rst indicator light ashes, the other indicator lights come on at the last position set. After 30 minutes the motor and lighting automatically switch off. It is advised to always fully allow this function towork.
Use the delay time of 30 minutes so the cooking odours can be properly removed in the monob- loc filter. Switching extraction o without delay mode Press key
show positions one to three. − The red LED
shows the Power position. The Power position is only used if there are strong odours, or a lot of smoke or vapour. Its use must be kept to a minimum because of the large extraction of air in this position. − The Power position automatically goes back to speed three after 6 minutes.
The motor has a thermal switch that switches the motor off with overheating. After cooling the motor will switch on again.
Determining the cause of overheating is re- quired. This can be caused for example by a pan fire, theimpeller motor being blocked or an object getting in the exhaust opening and causing it to bepartly or fully blocked. Auto-Stop To avoid the extractor hood from staying on, the motor is automatically switched off after 3 hours (only if in 3 hours operation has not been changed). The extractor hood lighting stays on.
Turning the lighting on and o To turn the lighting on or off press
The light works independent of the motor. The additional lighting in the shelf(s) works at the simul- taneous time of the lighting in the cooker hood. There is no additional lighting in the 2-frame version. The LED lighting has a soft on/soft off mode, which means that the lighting will evenly go on and off. When switching on the lighting, this will always light up with full power and it can also be used when the fan is off. Dimming LED lighting When the LED lighting has been switched on, it can be dimmed by keeping key
pressed. Change in colour temperature with LED-lighting You can change the colour temperature of the LED-lighting form 2.700 K (warm white) into 4.000 K (neutral white). The description for changing this can be found in section 3.4.
➀ Lighting ➁ Increase speed levels ➂ Decrease speed levels ➃ Switch on / off ➄ Novy button: not applicable The remote control for hood is preinstalled and ready for use. Change the code on the remote control If the set code disrupts other transmitters, another code can be selected using the remote control. There are 10 different codes. Determine the code used Simultaneously press and . The lamp on the remote control ashes as many times as the selected code (there are 10 code options in total). Change the code − Simultaneously press and and . − The green light on the remote control ashes as many times as the selected code. If another code is required repeat this step again (1x ashing is code 1, 2x ashing is code 2 etc. There are total of 10 codes).
Simultaneously press on the cookerhood and until the second green Speed indicator lamp is blinking.`
Press the key on the remote control within 10 seconds to conrm the settings. The cooker hood and the remote control are now in line with each other.– 37 –
The extraction hood has the InTouch function. If you have an induction hob from Novy with InTouch, you can operate the extraction hood from the hob. There is also the option that the extraction hood can be operated with a remote control. Programming InTouch on the induction plate The remote control must rst work with the hood. If ne- cessary, the remote control code can be changed, as described in Section 2.5 − Connect the plate to the mains supply.
Touch simultaneously the keys and on the induction plate until you hear a beep signal (prox. 7 sec.).
Wait until the cooker hood illumination begins to ashing OR you hear a "click" sound when you have an extractor hood without lighting (Be patient, this can betake a while). − Does the light blink or you hear the "click" sound; press immediately on any InTouch key or or or or on the induction hob.
You will hear a "beep" signal to indicate the link between the two devices. Now you can operate the hood with the keys on the induction plate. You can nd more information about using the InTouch functions in the InTouch manual for the hob or remote control. Turning the InTouch function on and o
The InTouch function is on by default. Turning off the InTouch function on the cooker hood results in the connection between cooker hood and Novy induction hob with InTouch and/ or remote control is also disabled. To switch the InTouch function off press the
keys at the same time for 3 seconds and the 2nd and 4th LEDs ash 3 times to conrm. (The appliance must be switched off). The function can be switched on by pressing the
keys at the same time for 3 seconds. The 2nd and 3rd LEDs ash 3 times to conrm (theappli- ance must be switched off).
Follow all instructions as described in the Con- ditions for Safety and Use section.
Follow the cleaning instructions below for a longer working life and optimal operation of the appliance.
The bottom panel, grease filter and recircula- tion filter can fall out when you are handling them. This can result in damage. Make sure you hold the bottom panel and the filter(s) securely at all times when handling them.
WARNING! Risk of injury! Open and close the bottom panel slowly. Use a stable stepladder and pay attention to stability. Do not step on the hob or the worktop surface.
Allow the lighting to cool down sufficiently be- fore you start cleaning the extractor hood.
Never use aggressive, abrasive or chlorinated products.
Do not use a high pressure or steam cleaner. Stainless steel Clean with a cleansing tissue with mild cleaning agent then dry with a soft cloth. Maintenance of the stainless steel can be performed with the Novy cleaner (906060). Coated parts of the extractor hood The extractor hood can be cleaned with a damp cleansing tissue and a mild cleaning agent. Glass Glass parts of the extractor hood can be cleaned with asoft cloth and a glass cleaner.
3.2 Removing the bottom panel
If the bottom panel is to be removed from the cooker hood for cleaning, proceed as follows: − Grasp the bottom panel at the left and right ends.
Slowly tilt the bottom panel downwards and continue to hold it in place.
As soon as the bottom panel is at a 90º angle downwards, the bottom panel can be slid to the right to remove it from the hinges. Here you will feel some resistance. Do this with caution to prevent damage to the cooker hood. Make sure you hold the bottom panel securely at all times.
The bottom panel can then be cleaned by hand. The– 38 – bottom panel is not suitable for cleaning in the dishwasher. − Before reinstalling the bottom panel, immediately clean the accessible parts on the inside of the cooker hood. − To replace the bottom panel, grasp the bottom panel at the left and right ends and hold it in place. Make sure you hold the bottem panel securely at all times. − Hold the bottom panel in a 90º angle downwards and slide the bottom panel to the left over the hinges until you notice a click. − The bottom panel cannot be closed if the bottom panel is not fully positioned over the hinges. − The bottom panel can then be closed.
If the following instructions are not carried out, serious soiling can cause a fire hazard. Indication cleaning grease filter
Indication: 4 flashing indicator lights After 20 cooking hours 4 ashing indicator LEDs show that the grease lter must be cleaned. Reset the cleaning indicator
When you replace the grease filter after clean- ing, it is sufficient to press the
key for 5 seconds toagain set the indicator. If you do not do this the indicator light will continue to ash when switching on the extractor hood. Accessing the grease filter Take hold of the right and left side of the bottom panel (A) and pull down simultaneously. Remove the lter (B) by tak ing hold of its hook and pulling down. Cleaning the grease filter The metal grease lter can be cleaned by hand or in adish- washer. We recommend cleaning the grease lterby hand. Cleaning the filter by hand: − Immerse the lter in a solution of boiling water to which a degreasing detergent has been added. − Use a brush for cleaning − Then rinse the lters with warm water under a tap and allow them to dry. Cleaning the filter in a dishwasher: When cleaning in a dishwasher the lter may discolour as a result of the salt content. This does not affect its operation. − Use a customary dishwasher detergent
Do not put the saturated grease lters together with crockery in the dishwasher − Select a programme with a low temperature − After cleaning allow the lter to drain.
When cleaning in a dishwasher the filter may discolour as a result of the salt content. This does not affect its operation. Replacing the grease filters
Before replacing the grease lter, clean the edges of the part in the extractor hood in which the lter isplaced. − Grasp the lter with 2 hands. − Make sure that the lock or the lip on the lter is on the bottom side. − Insert the back of the lter in the opening, press the lter upwards at the front and make sure it clicks tight.
You can obtain a new grease filter from adealer or the Novy website. Article number grease filter: 6830.020(2x).
Indication: red indicator light stays on After a set time a red indicator light on the appliance shows that the monobloc lter must be replaced.– 39 – Access to the monoblock filter The monoblock lter is located at the top of the cooker hood, below a protection grid. Open the protection grid, by taking the handle and clicking it off the outlet grid. Then take out the monoblock lter. Replace the monoblock filter Place the monoblock lter back in the opening provided in the protection grid at the top of the cooker hood. Click the protection grid back on top of the monoblock lter.
Do not operate the unit without the grease filters and monoblock filters Reset the replacement indicator
After replacing the monblock filter(s), carry out the following action. The motor of the cooker hood must be running. Simultaneously press
for 3 seconds until the red indicator led flashes 3 times for confirmation. If the cooker hood is not reset, it will automatically reset after the motor of the cooker hood has been switched on 10 times. Installing the monoblock filter Refer to your recirculation kit manual for removal and installation of the monoblock lter.
You can obtain a new monoblock filter from specialist retailers or via the Novy website. Article number monoblock filter: 7300.055
3.5 Led lighting cooker hood
Replacing the led lighting First, remove the power supply from the hood and allow the lighting to cool down sufciently.
1. Carefully press the spotlight holder; next, remove the
spotlight holder by means of a tilting movement.
2. Removing the LED spotlight:
A. First disconnect the cable leading to the LED spotlight to be replaced. Disconnecting is done by releasing the lock by applying a light pressure and pulling it off at the same time. B. Then remove the LED spotlight to be replaced by making a soft rotating movement counterclockwise. C. Remove the LED spotlight to be replaced from the bayonet ring.
3. Mounting the new LED:
A. Place the new LED light into the locking ring. B. Make a rotating movement to the right until the LED light is locked. C. Connect the power cable. D. Place the spotlight holder back in the cooker hood and reconnect the power.– 40 – Change in colour temperature with LED-lighting First make sure that the power supply of the hood has been disconnected. Remove the plug from the hood or switch off the power group. The colour of the LED-lighting has been set to 2.700 K (warm white) by default. If the colour is to be changed to
4.000 K (neutral white), follow the instruction given below:
− Open the bottom panel at the bottom of the hood. − Press with two hands against the side of the inox lamp holder and carefully pull down simultaneously, so you get access to the lighting on the inside.
The wiring has been connected to the LED-lamp with a connector.
Disconnect the connector from the LED-lamp and move the wiring to the other free connection on the lamp. − Repeat this for all four LED-lamps. − Then close the inox lamp holder again. The colour of the LED-lighting has now been changed from 2.700 K to 4.000 K.
3.6 recessed spotlight in shelf (if applicable)
Replacing the recessed spotlight in the shelf (only applicable to 3 and 4 frame models) First, make sure that the cooker hood is de-energised and allow the lights to cool down sufciently.
1. Removing the recessed spotlight
From the underside of the shelf, carefully pull the edges of the recessed spotlight to release it. Remove the spotlight by rotating it downwards in an anti-clockwise direction. Make sure that the connectors and lighting cables come down from the spotlight opening in the shelf. Colour temperature 2,700K (warm white) or 4,000K (neutral white) depending on connection choice. Red connection = 2,700K Blue connection = 4,000K Ensure that all recessed spotlights are connected in the same way to prevent any difference in colour temperature.
2. Release the recessed spotlight:
A. Note the colour of the connection to which the recessed spotlight is attached. B. Disconnect the connector of the recessed spotlight to be replaced from the lighting cable on the shelf. Press slightly on the connector's locking tab and pull the connectors apart.
3. Installing the new recessed spotlight:
A. Connect the correctly coloured connecting cable from the recessed spotlight to the light cable. B. Carefully push the new spotlight into the opening in the shelf, making sure that the light cable/connectors are not trapped between the spotlight and the shelf. This is easier if you squeeze the springs together. C. Then reconnect the power supply.
For changing the batteries unscrew the plastic cover, remove the old batteries and insert the new ones. Pay attention to the polarity marking given in the battery compartment.
Empty batteries are not to be disposed of in the household refuse, but they are to be handed in as chemical waste. Technical information − Power supply: 2xAAA batteries − Frequence: 433.92Mhz − Numbre of codes: 10 − Worktemperature: 0-50°C − Dimensions: 110 x 50 x 19mm
If there is a fault you can contact your (kitchen) supplier and/or Novy Customer Service. Belgium Tel.: +32 (0)56 36 51 02 France Tel.: +33 (0)3 20 94 06 62 Germany Tel.: +49 (0)511 54 20 771 The Netherlands Tel.: +31 (0)88 011 91 10 Unite Kingdom Tel.: +44 (0) 207 866 2493 Italy Tel.: +39 (0)39.20.57.501 For all other countries: your local installer or Novy in Belgium: +32 (0)56 36 51 02 To be able to deal with the fault promptly and efciently it is necessary that the Repaired Service knows which type of appliance you have.
You can find the type number on a sticker in theinside of the extractor hood. This becomes visible as soon as you take the filter out of the extractor hood. You can note the type number here:– 41 – 4 QUICKGUIDE
EXPOSED ACTION INDICATION NOTE PAG. Switching on the engine
p 35 Switching off the motor with delay mode
Green LED ashes Engine stays on for 30 minutes p 35 Switching o the motor without delay mode 2 x
Engine goes off immediately p 35 Increase engine speed
p 36 Decrease engine speed
p 36 Dimming the lighting Continue to press p 36 Reset cleaning indicator grease lters
for 5 seconds. p 38 Reset replacement indicator monoblock
for 3 seconds Red LED ashes 3x ! Motor must be switched on ! p 39 InTouch on
for 3 seconds 2nd en 3th LED ashes ! Motor must be switched off ! p 37 InTouch off
for 3 seconds 2nd en 4th LED ashes ! Motor must be switched off ! p 37