883 - Basket NOVY - Free user manual and instructions
Find the device manual for free 883 NOVY in PDF.

User questions about 883 NOVY
0 question about this device. Answer the ones you know or ask your own.
Ask a new question about this device
Download the instructions for your Basket in PDF format for free! Find your manual 883 - NOVY and take your electronic device back in hand. On this page are published all the documents necessary for the use of your device. 883 by NOVY.
USER MANUAL 883 NOVY
natural_image
Pure electrical circuit lines without any symbolsEN Operating and installation Instructions p. 11
text_image
0 = - ≡≡ ≡≡ = =Onderhoud
natural_image
Technical diagram of a structural assembly with arrows indicating motion or force direction (no text or symbols)natural_image
Technical line drawing of a mechanical assembly with two views: top shows a horizontal beam with supports and arrows indicating direction, bottom shows a close-up of a component with a valve and base, no text or symbols present.text_image
0 = - ≡≡ ≡≡ = =Entretien
natural_image
Pure technical diagram of a mechanical assembly with no visible text, numbers, or symbolsfig. 1
Nettoyage:
natural_image
Technical line drawing of a mechanical assembly with downward force arrows indicating load or displacement (no text or symbols)
natural_image
Pure technical line drawing of a mechanical assembly without any text, numbers, or symbolstext_image
0 = ≡≡ ≡≡ =- =Reinigung
natural_image
Pure technical diagram of a mechanical or structural assembly without any text, numbers, or symbolsnatural_image
Technical line drawing of a mechanical assembly with two views: top shows a horizontal beam with supports and arrows indicating direction, bottom shows a close-up of a component with a valve and base, no text or symbols present.- Please read these operating instructions carefully. They contain information about installation, operation, safety and maintenance you need to be aware of.
• This hood is for domestic use only - It is recommended to have the installation done by a qualified professional. Any damage due to faulty or unprofessional installation relieves the manufacturer of any form of responsibility.
- Check the condition of the hood and the installation material before installing. Carefully remove the hood out of the packaging. Be careful not to use sharp knives to open the box.
- Please keep these instructions to pass on to future users.
- Disposal of transport packaging and old appliance
Your new appliance was sent to you in protective packaging. All utilised materials are environmentally safe and recyclable. Please help us by disposing of the packaging in an environmentally friendly manner.
Old appliances are not worthless rubbish. Valuable raw materials can be reclaimed by recycling old appliances. This appliance is identified according to the European Directive 2002/96/EC on waste electrical and electronic equipment. Please ask your dealer or inquire at your local authority about current means of disposal.
- Technical problem
In case of technical problems please contact Novy Service Department:
For Belgium: Tel.: 056/36.51.02
For France: Tel.: 03.20.94.06.62
For Germany: Tel.: 0511.54.20.771
For all other countries: your local installer or Novy Belgium: +32 (0)56/36.51.02
Please supply us with the model number of your hood. The model number can be found on the engraved plaque behind the filter.
You can make a note of the number here: ....
- For all remarks or questions to which this manual doesn't answer please contact our Customer Service:
For Belgium: Tel.: 056/36.51.01
For France: Tel.: 03.20.94.06.62
For Germany: Tel.: 0511.54.20.771
For all other countrys: your local installer or Novy Belgium: +32 (0)56/36.51.02
Use
NOTE: These operating instructions apply to several appliance models It is possible that individual features are described which do not apply to your appliance.
When using a hood sufficient air flow is necessary. However large your kitchen may be, there is only so much air available in that space. Opening a door or window or the installation of a ventilation grid close to the hood insures a good quality of air flow.
Insufficient air flow will impair the extraction efficiency of your hood immensely.
Insufficient air flow can cause reflux from other air ducts such as chimneys or combustion appliances. When using a cooker hood and appliances using energy other than electrical in the same space, the pressure in the room may not surpass 4 Pa (= 0.04mBar).
Safety
- Deep frying under the hood is only allowed under constant supervision.
- Under no circumstances is it allowed to flambé under the hood.
• In case of fire always switch off the hood. - Never extinguish burning fat or oil with water. Cover the pot with a well fitting lid or a burn-blanket.
Advice
For maximum efficiency please follow this advice:
- When cooking make sure pots are positioned properly under the hood surface.
- Activate the hood a few minutes prior to cooking.
- Switch the hood off 10 minutes after cooking is finished (switch off with 10 minute delay).
- Avoid drafts under the hood surface.
- When using induction: adapt the intensity of both hob and hood to the lowest possible level in order to avoid excessive creation of damp fumes.
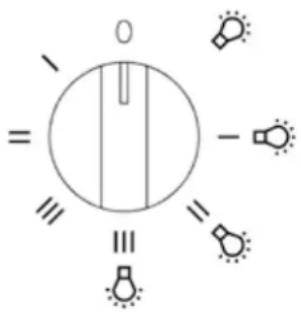
Operation
0 : the hood is switched off
: light
I, II, III : 3 speed levels without light
I, II, III + ⚙: 3 speed levels with light
text_image
0 = - ≡≡ ≡≡ =Maintenance
Maintenance of the grease filter
The hood contains one or 2 metal filters (according to the model) which should be cleaned twice a month.
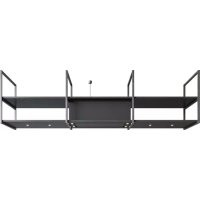
Access to the filter
Take hold of the right and left side of the plate an pull down simultaneously. Remove the filter by taking hold of its hook and by pulling it down.

natural_image
Pure technical diagram of a mechanical assembly with no visible text, numbers, or symbolsCleaning the filter:
• in the dishwasher
- manually: in a hot solution of water and a liquid detergent. Rince and allow to dry completely
Important! The previous instructions need to be followed. If not an increased fire hazard may occur.
Maintenance of the hood
Please allow the lights to cool down sufficiently before cleaning the hood.
Use a soft, wet cloth and a mild detergent to clean the hood.
Never use aggressive, abrasive detergents or sponges. Bleach will damage stainless steel.
The stainless steel surfaces can be treated with Novy Inoxcleaner (906.060) after cleaning.
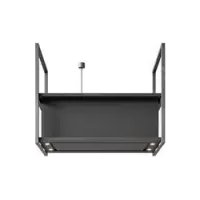
Replacing the lamps
The hood needs to be disconnected from the electric mains before proceeding.
Remove the glass plate covering the lights by pulling down on both sides. Remove the lamp from the socket.

natural_image
Technical diagram of a mechanical assembly with downward force arrows indicating motion (no text or labels)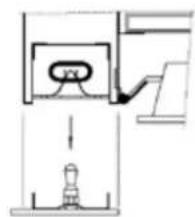
natural_image
Pure technical diagram of a mechanical assembly without any text, numbers, or symbols* 883/8: 2 lamps of 11 Watt
* 884/8 : 2 x 2 lamps of 11 Watt
* 888/8 : 2 lamps of 11 Watt
Electrical connection
Electrical output: electrical cord + plug with ground. To be plugged into socket with ground.
Check for compatibility with information on type plate (behind filter).
Socket must be within reach.
Changes or replacement of the electrical cord should be performed by a professional only.
Dimensions: p. 17
Electrical scheme: p. 18
ALGEMENE INFORMATIE
text_image
0 = - ≡≡ ≡≡ =natural_image
Pure technical diagram of a mechanical assembly with no text, numbers, or symbolsnatural_image
Technical diagram of a mechanical assembly with beam and support components (no text or labels)
natural_image
Simple line drawing of a showerhead with a valve and base, no text or symbols presenttext_image
ZEN215 ZEN216 ZEN217 ZEN218 ZEN219 ZEN220 ZEN221 ZEN222 ZEN223 ZEN224 ZEN225 ZEN226 ZEN227 ZEN228 ZEN229 ZEN230 ZEN231 ZEN232 ZEN233 ZEN234 ZEN235 ZEN236 ZEN237 ZEN238 ZEN239 ZEN240 ZEN241 ZEN242 ZEN243 ZEN244 ZEN245 ZEN246 ZEN247 ZEN248 ZEN249 ZEN250 ZEN251 ZEN252 ZEN253 ZEN254 ZEN255 ZEN256 ZEN257 ZEN258 ZEN259 ZEN260 ZEN261 ZEN262 ZEN263 ZEN264 ZEN265 ZEN266 ZEN267 ZEN268 ZEN269 ZEN270 ZEN271 ZEN272 ZEN273 ZEN274 ZEN275 ZEN276 ZEN277 ZEN278 ZEN279 ZEN280 ZEN281 ZEN282 ZEN283 ZEN284 ZEN285 ZEN286 ZEN287 ZEN288 ZEN289 ZEN290 ZEN291 ZEN292 ZEN293 ZEN294 ZEN295 ZEN296 ZEN297 ZEN298 ZEN299 ZEN300 RST1 RST1/SPR1/SPR1/SPR1/SPR1/SPR1/SPR1/SPR1/SPR1/SPR1/SPR1/SPR1/SPR1/SPR1/SPR1/SPR1/SPR1/SPR1/SPR1/SPR1/SPR1/SPR1/SPR1/SPR1/SPR1/SPR1/SPS1/SPS1/SPS1/SPS1/SPS1/SPS1/SPS1/SPS1/SPS1/SPS1/SPS1/SPS1/SPS1/SPS1/SPS1/SPS1/SPS1/SPS1/SPS1/SPS1/SPS1/SPS1/SPS1/SPS1/SPS1/SPs1/SPs1/SPs1/SPs1/SPs1/SPs1/SPs1/SPs1/SPs1/SPs1/SPs1/SPs1/SPs1/SPs1/SPs1/SPs1/SPs1/SPs1/SPs1/SPs1/SPs1/SPs1/SPs1/SPs1/SPs1/SPr1/SPr1/SPr1/SPr1/SPr1/SPr1/SPr1/SPr1/SPr1/SPr1/SPr1/SPr1/SPr1/SPr1/SPr1/SPr1/SPr1/SPr1/SPr1/SPr1/SPr1/SPr1/SPr1/SPr1/SPr1/SPs1/ RST3Warrenty certificate NOVY hoods
Naam/Nom/Name/Name: