SDD 54 USPP - Dishwasher WHIRLPOOL - Free user manual and instructions
Find the device manual for free SDD 54 USPP WHIRLPOOL in PDF.

User questions about SDD 54 USPP WHIRLPOOL
0 question about this device. Answer the ones you know or ask your own.
Ask a new question about this device
Download the instructions for your Dishwasher in PDF format for free! Find your manual SDD 54 USPP - WHIRLPOOL and take your electronic device back in hand. On this page are published all the documents necessary for the use of your device. SDD 54 USPP by WHIRLPOOL.
USER MANUAL SDD 54 USPP WHIRLPOOL
natural_image
Exterior view of three Whirlpool industrial appliances with control panels and a large 'Whirl' logo (no text on main devices)Whirlpool
| MANUALE ISTRUZIONE PER LAVASTOVIGLIE PROFESSIONALI |
| INSTRUCTION MANUAL FOR PROFESSIONAL DISHWASHERS |
| MANUEL D’ INSTRUCTIONS POUR LAVE-VAISSELLE A USAGE COLLECTIF |
| BEDIENUNGSANLEITUNG FUR PROFESSIONELLER GLÄSER UND GESHIRRSPÜLMASCHINE |
| MANUAL DE ISTRUCCIONES PARA LAVAVAVAJILLAS PROFESIONAL |
| Istruzioni originali - Original instructions – Instructions originales – Originalbetriebsanleitung - Instrucciones originales MANUALE « A » STANDARD ECO REV01 01/11/2016 |
TARGA DATI/TECHNICAL LABEL

text_image
Atext_image
Technical diagram showing three mechanical assembly components with labeled parts and directional arrowstext_image
Whirlpooltext_image
Whirlpooltext_image
Whirlpool
text_image
Whirlpool 1 2 3 ∞ 1natural_image
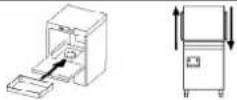
Technical line drawing of a refrigerator with open doors and a side view showing internal components (no text or symbols)5.2 - FUNZIONAMENTO MODELLI DIGIT
natural_image
Technical line drawing of a refrigerator with open doors and side view showing front and rear views (no text or symbols)natural_image
3D rendering of cylindrical storage units mounted on a rectangular tray (no text or symbols visible)text_image
Whirlpooltext_image
Whirlpoolnatural_image
Technical illustration of mechanical components including a cylindrical device, two cylindrical parts with arrows indicating motion, and a control panel (no text or symbols present)Controlli periodici
natural_image
Mechanical assembly diagram showing two metal brackets with numbered components (no text or symbols)We thank you for purchasing our dishwasher.
You are recommended to read all the instructions given in this manual very carefully to understand the best and correct way to use the dishwasher.
TECHNICAL INSTRUCTIONS:
These instructions are for qualified technicians who install, commission, test and possibly carry out maintenance on the dishwasher.
The installation technician shall make sure the user has understood the contents of the instruction manual, has understood how the machine works properly and knows how to load the baskets with crockery and glasses correctly.
USER INSTRUCTIONS:
They give operational advice, descriptions of the controls and how to clean and service the dishwasher correctly.
WARNINGS

THE USER IS RESPONSIBLE FOR THE LEGAL FULFILMENTS CORRELATED TO THE INSTALLATION AND USE OF THE PRODUCT. IF THE PRODUCT IS NOT INSTALLED OR USED CORRECTLY, OR SUITABLE MAINTENANCE IS NOT CARRIED OUT, THE MANUFACTURER CANNOT BE HELD LIABLE FOR ANY BREAKAGES, MALFUNCTIONS, DAMAGES TO PROPERTY OR INJURIES TO PEOPLE THAT COULD OCCUR.

ALWAYS UNPLUG THE DISHWASHER FROM THE MAINS SOCKET BEFORE STARTING ANY MAINTENANCE WORK. IF THIS IS NOT POSSIBLE, IF THE MAINS SWITCH IS HIDDEN BEHIND THE MACHINE OR FAR AWAY FROM WHOEVER CARRIES OUT THE WORK, YOU MUST PUT UP A SIGN ON THE EXTERNAL MAINS SWITCH AFTER TURNING IT OFF TO WARN OTHERS THAT MAINTENANCE WORK IS IN PROGRESS
1 – SAFETY AND OPERATIONAL WARNINGS
2 - INSTALLING / TECHNICAL SPECIFICATIONS
3 - RINSE AID AND DETERGENT DISPENSING
4 – PREVENTIVE CHECKS
5 - OPERATIONAL INSTRUCTIONS
6 - MAINTENANCE AND CLEANING
7 - ERRORS DISPLAYED/PROBLEMS
1 - SAFETY AND OPERATIONAL WARNINGS
THIS MANUAL CONSTITUTES AND INTEGRAL PART OF THE DISHWASHER; IT MUST ALWAYS BE PRESERVED INTACT AND KEPT TOGETHER WITH THE MACHINE.
POSITIONING, CONNECTIONS, ACTIVATION AND TROUBLESHOOTING, AND SUBSTITUTION OF THE POWER CABLE MUST BE PERFORMED BY QUALIFIED PERSONNEL.
THE DISHWASHER IS INTENDED EXCLUSIVELY FOR PROFESSIONAL USE AND MUST BE USED BY AUTHORIZED PERSONNEL. IT IS DESIGNED TO WASH DISHES (PLATES, CUPS, BOWLS, TRAYS, SILVERWARE) AND SIMILAR ITEMS USED IN GASTRONOMIC SECTORS AS WELL AS IN THE PUBLIC CATERING BRANCH, AND IN CONFORMITY TO THE INTERNATIONAL ELECTRICAL AND MECHANICAL SAFETY (CEI-EN-IEC 60335-2-58/61770) AND ELECTROMAGNETIC COMPATIBILITY (CEI-IEC-EN 55014-1/-2, 61000-3;4, 50366) NORMS.
THE MANUFACTURER DECLINES ANY RESPONSIBILITY FOR DAMAGE TO PERSONS OR THINGS CAUSED BY FAILURE TO OBSERVE THE INSTRUCTIONS PRESENT IN THE MANUAL, INCORRECT USE, TAMPERING, EVEN WITH A SINGLE PART OF THE MACHINE, AND THE USE OF NON-ORIGINAL SPARE PARTS. IN CASE OF DAMAGE OF THE POWER SUPPLY CABLE, IT MUST BE REPLACED ONLY BY MANUFACTURER OR BY AUTHORIZED CUSTOMER CENTER AND BY QUALIFIED TECNICIANS.

THE GROUNDING CONNECTION IS OBLIGATORY, IN ACCORDANCE WITH THE METHODS PRESCRIBED BY THE ELECTRICAL SYSTEM'S SAFETY NORMS.
THIS MACHINE IS MARKED IN CONFORMITY TO THE EUROPEAN DIRECTIVE 2002/96/EC, WASTE ELECTRICAL AND ELECTRONIC EQUIPMENT (WEE).
ENSURING THAT THIS PRODUCT BE DISPOSED OF IN A PROPER MANNER CONTRIBUTES TO THE PREVENTION OF POTENTIAL NEGATIVE HEALTH AND ENVIRONMENTAL CONSEQUENCES. WE DECLARES THAT THE EMISSION SOUND PRESSURE LEVEL LPA IS 62 DB/A WITH AN UNCERTAINTY EQUALS TO KPA ±1 DB. SOUND POWER LEVEL IS LWA 73.79 WITH ITS UNCERTAINTY EQUALS TO KWA ±1 DB
THE SYMBOL UPON THE PRODUCT, OR UPON ITS ACCOMPANYING DOCUMENTATION, INDICATES THAT THIS PRODUCT MAY NOT BE TREATED AS DOMESTIC WASTE, BUT RATHER MUST BE TAKEN TO A COLLECTION FACILITY WHICH IS SUITABLE FOR THE RECYCLING OF ELECTRIC AND ELECTRONIC EQUIPMENT. DISCARD THIS PRODUCT IN CONFORMITY TO THE LOCAL NORMS REGARDING WASTE DISPOSAL. FOR MORE INFORMATION REGARDING THE TREATMENT, SALVAGE AND RECYCLING OF THIS PRODUCT, CONTACT YOUR COMPETENT LOCAL OFFICES, YOUR LOCAL WASTE COLLECTION SERVICE PROVIDER OR THE POINT OF SALE IN WHICH THE PRODUCT WAS PURCHASED.

DO NOT INSERT SOLVENTS SUCH AS ALCOHOL OR TURPENTINE INTO THE MACHINE, WHICH COULD CAUSE AN EXPLOSION. DO NOT INSERT DISHES WITH ASH, WAX OR VARNISH RESIDUES INTO THE MACHINE.

NEVER USE THE DISHWASHER OR ITS PARTS AS A STEPLADDER OR SUPPORT FOR PERSONS, THINGS OR ANIMALS. LEANING OR SITTING UPON THE DISHWASHER'S OPEN DOOR COULD CAUSE AN OVERTURN WITH CONSEQUENT DANGER TO PEOPLE IN THE PROXIMITY. IN ORDER TO AVOID TRIPPING UPON IT, DO NOT LEAVE THE DISHWASHER DOOR OPEN.

DO NOT DRINK THE RESIDUAL WATER WHICH MAY BE PRESENT WITHIN THE DISHES OR THE DISHWASHER ITSELF AFTER A WASH CYCLE.

THE MACHINE IS NOT SUITABLE TO BE USED BY MINORS, AND BY PEOPLE WITH REDUCED PHYSICAL, SENSORIAL OR MENTAL CAPABILITIES, WHO LACK THE NECESSARY EXPERIENCE AND KNOWLEDGE FOR ITS PROPER OPERATION. THE USE OF THE MACHINE IS PERMITTED TO THESE PEOPLE EXCLUSIVELY UNDER THE SUPERVISION OF A PERSON IN CHARGE OF THEIR SAFETY.

After cleaning the appliance at the end of the day, make sure no metal foreign bodies are left inside it, which could cause internal rusting. Traces of rust could also come from non-stainless cutlery/crockery, unsuitable detergents, from damaged wire baskets, scouring pads or metal sponges or renegeration salt spilled on the bottom of the tank.
1.1 GENERAL WARNINGS
Keep the instruction handbook near the dishwasher for future consultation.
Read the handbook carefully before installing and using the dishwasher for the first time.
If the electrical and plumbing systems have to be adapted to install the dishwasher, these modifications must be carried out by authorised professionals.
- The dishwasher is a professional machine. It must be used by adult and authorised personnel. It must be installed and repaired exclusively by a qualified technical assistance service. The manufacturer declines all forms of responsibility for improper use, maintenance and repairs.
- This dishwasher must not be used by children or anybody who has restricted physical, sensorial or mental capacities or by anybody who has not been appropriately trained or who is not properly supervised.
- The door must be guided by hand when opening and closing it.
- Make sure the dishwasher does not sit on the power supply cable or on the filling and draining hoses. Adjust the support feet of the machine to set it level.
- Do not stand on the appliance or any parts of it to reach higher places, because it is not designed to take the weight of people, but just the weight of the basket for the crockery and cutlery to be washed.
- The dishwasher is designed only and exclusively to wash plates, glasses and various crockery soiled with residues of human food. Do NOT use it to wash objects soiled with petrol, paint, pieces of steel or metal, fragile objects or objects made of material that will not withstand the washing process. Do not use acid or alkaline corrosive chemical products or solvents or chlorine based detergents.
- Do not open the doors of the dishwasher while it is working. The dishwasher is equipped with a safety device that will immediately stop it to avoid the leakage of water if the doors should be opened accidentally. Always remember to switch the dishwasher off and to empty the tank before accessing it to clean it or for any other reason.
- When you have finished using the dishwasher at the end of the day and when you need to carry out any form of maintenance on it, you must disconnect the dishwasher from the mains power supply by switching the service switch and the mains power switch on the wall off and shut off the water supply tap.
- The user must not carry out any repairs or maintenance work on the dishwasher. These jobs must be carried out by qualified and authorised personnel.
- Any assistance required on this dishwasher must be carried out by authorised personnel.
NB: Use exclusively original spare parts, otherwise the product warranty issued and the manufacturer's responsibility will become void.
- Do not use old water filling hoses, but exclusively new filling hoses.
- The following fundamental rules must be observed when using this appliance:
1) Never touch the appliance with wet hands or feet.
2) Never use the appliance with bare feet.
3) Do not install the appliance in workplaces where it could get sprayed/splashed with water.
- Do not put your bare hands into water containing detergent. If you do, wash them thoroughly under running water straightaway.
- Strictly follow the manufacturer's instruction handbook for the cleaning operations.
- This appliance is designed to work in a workplace with a maximum ambient temperature of 35^ , in a suitable area where the temperature is never lower than 5^ .
- Do not use water to extinguish fire on electrical parts.
• After disconnecting the power supply, only qualified personnel may access the control panel.
- The machine has a protection rating against accidental water splashes of IPX1; it is not protected against pressurised water sprays; you are therefore recommended not to use pressurised cleaning systems.
ATTENTION: YOU MUST WAIT 10 MINUTES AFTER SWITCHING THE MACHINE OFF TO CLEAN IT INTERNALLY.
ATTENTION: IT IS FORBIDDEN TO PUT YOUR HANDS INTO THE TANK AND/OR TO TOUCH THE PARTS AT THE BOTTOM OF THE TANK DURING AND/OR AT THE END OF THE WASH CYCLE.
NB: The manufacturer declines all forms of responsibility for personal injuries or damage to property deriving from the failed observance of the instructions given above.
1.2 VERIFY

DISHWASHER WITHOUT WATER SOFTENER

TEMPERATURE / TEMPERATUR MIN. 45°C - MAX 55°C
PRESSIONE / PRESSURE / DRUCK MIN. 2 - MAX 4 kPa/Bar
DUREZZA / HARDNESS / DUREZA / WASSERHÄRTE MIN. 7° - MAX 12°F / MIN. 5° - MAX 7°dH
SE LA DUREZZA DELL' ACQUA E' SUPERIORE A 12°F / 7° dH INSTALLARE UN ADDOLCITORE ESTERNO
IF WATER HARDNESS IS HIGHER THAN 12°F / 7° dH INSTALL AN EXTERNAL WATER SOFTENER
SI LA DURETE DE L'EAU EST SUPERIEUR A 12°F / 7° dH INSTALLER UN ADOUCISSEUR EXTERNE
LIEGT DIE WASSERHÄERTE UBER 7° dH. RATEN WIR EINEN EXTERNEN WASSERENTHÄRTER ZU INSTALLIEREN
SI LA DUREZA DEL AGUA ES SUPERIOR A 12°F / 7° dH INSTALAR UN DESCALCIFICADOR
H SCARICO / DRAIN / VIDANGE / ABFLUSS / DESAGÜE: MAX 10 CM – CAPOT/HOOD/ DURCHSCHB MAX 20 CM

DISHWASHER WITH WATER SOFTENER

TEMPERATURE / TEMPERATUR MAX 30°C
PRESSIONE / PRESSURE / DRUCK MIN. 3 - MAX 4 kPa/Bar
DUREZZA / HARDNESS / DUREZA / WASSERHÄRTE MIN. 7° - MAX 26°F / MIN. 5° - MAX 15°dH
USARE SALE DA RIGENERAZIONE E RIEMPIRE IL CONTENITORE IN VASCA PERIODICAMENTE
USE REGENERATING SALT AND PERIODICALLY FILL THE CONTAINER IN THE WASHTANK
UTILISER SEL REGENERANT ET LE VERSER DANS LE CONTENEUR DE LA CUVE RÉGULIÈREMENT
FAILURE THE INDICATIONS MAY COMPROMISE THE SAFETY AND DECLINE THE WARRANTY.
LE NON RESPECT DES INDICATIONS COMPROMETTE LA SECURITE ET LA GARANTIE DE L'APPAREIL.
These instructions are for qualified technicians who install, commission, test and possibly carry out maintenance on the dishwasher.
The installation technician shall make sure the user has understood the contents of the instruction manual, has understood how the machine works properly and knows how to load the baskets with crockery and glasses correctly.
2.1 TECHNICAL SPECIFICATIONS
| Water supply temperature °C 55 | ||
| Water supply temperature (model with watersoftener) | °C | Max 30 |
| Water supply hardness °F 7 – 12 | ||
| Water supply pressure kPa 200/400 | ||
| Water supply pressure (model with watersoftener) kPa 300/400 | ||
| Rinse cycle water consumption at 200 kPa l 2,4/2,6 | ||
| Wash water temperature | °C 50 - 60 | |
| Rinse water temperature | °C 82 - 85 | |
| Net weight kg | Min.27Max 131 | |
| Ambient temperature max °C 40 | ||
| Power cable type | ◀HAR▶ | H07RN-F |
| Refer to the rating label located on the front cover of this manual or on the right side panel of the dishwasher for the voltage and total power. | ||
2.2 POSITIONING
Take the dishwasher to the place of installation, unpack it, check the integrity of the appliance and its components and inform the transporter in writing immediately if any damages should be noticed.
After unpacking, make sure the appliance has not been damaged during transport.
To dispose of the packing materials, you are recommended to dispose of the materials listed below according to standards currently in force:
- a wooden pallet
- a nylon bag (LDPE)
- multiply card
• Polypropylene strapping (PP)
Remember that the manufacturer does not organise or manage the differentiated disposal of the appliance at the end of its service life.
2.3 WATER CONNECTION
| Temperature of the supply water | °C | 55 |
| Temperature of the supply water (for versions with softener) | °C | Max 35 |
| Hardness of the supply water | °F | 7 – 12 |
| Pressure of the supply water | kPa 200/400 | |
| Pressure of the supply water (for versions with softener) | kPa | 300/400 |
Connect the water supply to the machine using a stop valve that is capable of shutting-off the flow of water quickly and completely.
Make sure the pressure of the mains water is between the values written on the table.
If it is lower than 200 kPa (dynamic pressure), to ensure the perfect operation of the machine, it is mandatory to install a pressure booster pump (on request, the machine can be supplied with a built-in pressure booster pump). If the mains pressure is higher than 400 kPa, you need to install a pressure reducer.
For water with average water hardness above 12^ f, it is mandatory to use a scale inhibitor. On request, the machine can be supplied with a built-in scale inhibitor.
If the machine is equipped with a scale inhibitor, you need to regularly regenerate the resins using special regeneration salt.
The salt compartment can take approximately 1 kg of grain salt.
The salt compartment is located on the bottom of the tank. Take the basket out, unscrew the cap and pour salt in using the funnel supplied with the machine. Before screwing the cap back on, remove any spilled salt near the opening. Top-up with salt when there is no water in the tank so that the washing water cannot get into the water softener. Always unplug the machine from the mains power supply before doing this operation. Remember to plug the appliance back into the mains socket after finishing the job.
The first time you use the appliance, after adding the salt, add some water to the salt container.
NB: For water with hardness above 12^ f, if there is no scale inhibitor, the damages caused by scale will not be covered by the warranty.
The temperature of the supply water must be between the values indicated on the table.
Each machine is supplied with a water filling hose with threaded 3/4"fitting.
The drainage hose is to be connected, after adding a siphon, directly to the drains. The water falls freely into the drains, therefore the point where it is connected to the drain outlet must always be below the level of the wash tank. If the existent drain point is above this level, a suitable drain pump has to be installed (optional). Do not fit the drain hose into the drains of sinks, bathtubs etc.
For versions with built-in osmosis system, install the carbon or mesh filter supplied on the water supply cock. The water hardness must be between 7 and 12°F and the maximum temperature 30°C.
The filters must be replaced at least twice a year.
Failed observance of these parameters will cause the internal osmotic membrane to deteriorate rapidly.
Make sure the water hardness is between 7 and 12°F, otherwise install a water softener to prevent damages caused by scale, which are not covered by warranty.
| DISHWASHERS WITH SOFTENER ADJUSTMENTS | A | B |
| A = Hardness of inlet water in °F | 14 °F | 100 |
| 22 °F | 70 | |
| 32 °F | 50 | |
| B = Every how many wash cycles the automatic regeneration cycle should start. | 37 °F | 40 |
| 42 °F | 30 | |
| 52 °F | 25 |
1^ FRENCH = 0.56° German = 0.7° British = 10 p.p.m.
2.4 ELECTRICAL CONNECTION
The electrical connection must be carried out according to technical standards currently in force.
Make sure the measured mains voltage matches that written on the technical data nameplate of the dishwasher. You have to fit an appropriate omnipolar protection circuit breaker switch suitable for the input of the dishwasher.
This switch must be used exclusively for this utility and installed right next to it.
Make sure the electrical systems are suitably earthed.
The machine also has a connection, at the rear bottom part, marked with the equipotential symbol that is used to connect various appliances together equipotentially (check standards on electrical systems).
FOR MACHINES WITH THREE-PHASE POWER SUPPLY, BE CAREFUL NOT TO INVERT THE PHASE WIRES WITH THE NEUTRAL WIRE.
ATTENTION ! MAKE SURE THE THREE-PHASE PUMPS TURN IN THE CORRECT DIRECTION (where installed).
IF THE POWER SUPPLY CABLE SHOULD GET DAMAGED, IT MUST BE REPLACED EXCLUSIVELY WITH A NEW ONE FROM THE MANUFACTURER OR FROM AN AUTHORISED SERVICE CENTRE AND BY QUALIFIED TECHNICIANS.
2.5 TEMPERATURES
The thermostats are preset at the following temperatures: 55^ C for the washing water (tank) and at 82^ C for the rinse water (boiler). The tank thermostat cannot be adjusted whereas the boiler thermostat can; turn the knob on the thermostat, or use the controls on the control panel for versions with electronic control panel.
3 - RINSE AID AND DETERGENT DISPENSING
Only use detergents and rinse aids specific for industrial dishwashers. Do not use normal washing up liquid. Do not use detergents for domestic dishwashers.
Ask a specialist in chemical products for the correct choice of products to use and their quantities.
ATTENTION! MACHINE LIVE: Remove the front panel of the dishwasher to adjust the dispensers.
3.1 RINSE AID QUANTITY – RINSE AID DISPENSER
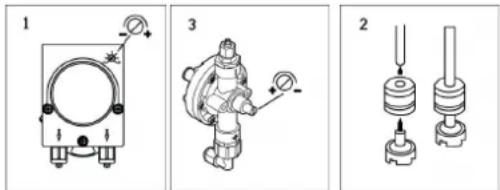
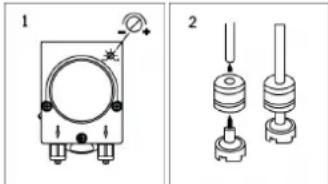
The rinse aid dispenser is always installed and there are two types: hydraulic (3) or peristaltic (1). They both work automatically.
text_image
Technical diagram showing three mechanical components with labeled parts and directional indicatorsThe hydraulic dispenser (3) exploits the rinsing pressure to activate itself, while the peristaltic dispenser (1) is electrically operated.
Make sure the CLEAR product suction hose is inserted into the container of the rinse aid products and that the little filter is installed and also the weight on the hose (2).
To enable it, simply start the machine and run some complete wash cycles.
Adjustments: For each rinse cycle, the rinse aid draws a quantity of rinse aid product.
In the peristaltic dispenser (1), the minimum flow rate is obtained by turning the adjustment screw anti-clockwise, while the maximum flow rate is obtained by turning it clockwise.
In the hydraulic dispenser (3), the minimum flow rate is obtained by turning the adjustment screw clockwise, while the maximum flow rate is obtained by turning it anti-clockwise.
The dispenser is preset to intake approximately 5 cm of hose (0.70g.)
Too much rinse aid would leave the dishes streaky and would generate foam in the wash tank.
Dishes with drips of water and rather slow drying time mean that the quantity of rinse aid is insufficient.
Before you establish the correct quantity of the surfactant, you should test the hardness of the water in advance.
(If the hardness of the water is above 12^ f, you need to install a softener upstream from the supply solenoid valve of the machine).
Seeing as the quantity varies considerably based on the concentration of the product and on the formula, the quantities that we have given are merely indicative and are just a rough idea.
To dispense the exact quantity of product, once intaken, take the clear hose out of the surfactant container and measure the movement of the water column inside it.
3.2 DETERGENT QUANTITY – MANUAL DISPENSING OR USING A DISPENSER (OPTIONAL) MANUAL
Following the instructions of the detergent supplier, put the required quantity of liquid detergent into the wash tank, which is approximately 20g every 5 wash cycles. The quantity may vary according to the type and quantity of water. Use exclusively specific foam-inhibitor detergents, in the concentrations indicated.
LIQUID DETERGENT DISPENSER (OPTIONAL)
text_image
Technical diagram showing two mechanical components with labeled parts and directional arrowsIn the detergent dispenser (1) the minimum flow rate is obtained by turning the adjustment screw anti-clockwise, while the maximum flow rate is obtained by turning it clockwise; bear in mind that 1 g. of detergent takes up a volume of approximately 8 cm of hose.
Make sure the RED product intake hose is inserted into the detergent tank and that the little filter has been installed as well as the weight on the hose (2).
For the type and quantity of detergent to use, ask your supplier of chemical products.
Too much detergent will not only generate foam in the wash tank, but will also leave the dishes streaky.
4 - PREVENTIVE CHECKS
Check the following before using the dishwasher:
WATER LEVEL
While the wash tank is filling, the water should stop flowing when its level is at least 1 cm. from the spill level of the overflow device.
The filling solenoid valve should start to work again when the level of water is 2 cm. above the heating element in the tank.
WASHING AND RINSING ARMS
The washing and rinsing arms must turn freely without any interference and all the nozzles must work correctly.
TEMPERATURES
The temperatures of the rinse and washing water must be those written on the table.
DISPENSER
For each cycle, the dispenser should intake the correct amount of rinse aid and/or detergent.
WASHING RESULTS
The washing results should ensure that every possible trace of solid waste has been removed from the surface of the dishes.
At the end of the cycle, the perfectly clean dishes should dry in a couple of minutes through evaporation once the basket is taken out of the machine.
5 - OPERATIONAL INSTRUCTIONS
| Open the mains water cock (utility). | Check: | Switch the main ON/OFF switch on (utility) | |
| the level of detergent and rinse aid in the containers. | that the filters are in the correct position, the spray arms turn and that there are no foreign bodies in the dishwasher.Make sure the overflow sits in the drain hole properly | ||
 |  |  | |
5.1 - DAILY USE FOR MODELS STANDARD AND ECO
| The panel shown in the manual and in the graphics may contain functions which are not present on your machine.. | What to do and what happens | |
 | Activate the wall switch, open the door, insert the overflow and close the door:Press theon/offbutton. The boiler and tank water-loading led indicator light turns on. Once the boiler and tank have been loaded,the boiler led indicator lightturns on. | |
 | ||
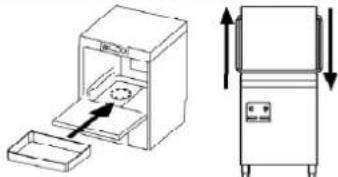
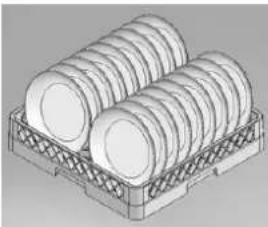
 | Insert the rack | |
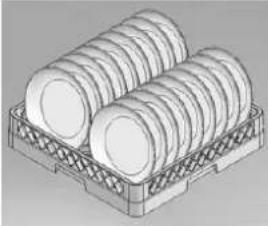 | LOADING THE DISHWASHERThe basket can hold 12 dishes or 18 plates.Remove any solid leftovers from the plates (bones, peel, nuts etc);leave the plates to soak in cold water if there are any stubborn leftovers, such as dried cheese, egg etc.Put the glasses in the basket with their stem upwards.Use the cutlery basket for cutlery. Put the cutlery loose in the basket, preferably with the handle at the bottom. Be careful not to injure yourself on the fork prongs and knife blades. | |
 | Wait for 15 minutes after the boiler led indicator lightto turn off. | |
 | CHOOSING A WASH PROGRAM (not available on all models)You can select the wash program using the cycles selector. | |
 | To start the wash cycle, press the cycle button. | |
 | ||
| Once the cycle has started, the wash cycle led indicator light turns on. If the door is opened during the cycle, the program stops. Once the door has been closed again, the program resets itself; to restart the cycle, press the cycle button | ||
 | Once the program has finished, the wash cycle led indicator light turns off and the boiler led indicator light turns on. | |
 | ||
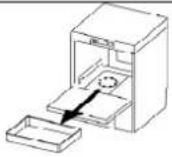
 | Remove the rack | |
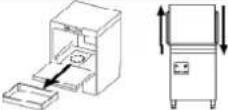
5.2 - OPERATING PHASES OF DIGIT MODELS
| The control panel and the graphics shown in the manual might show functions that are not provided on your machine. | Actions and what happens |
 | Activate the wall-switch, open the door and insert the overflow, close the door.Press theon/offbutton, the selected cycle lights up, water is filled into the boiler and into the tank.When both the boiler and the tank are filled, thelights up yellow. |
 | Load the basket. |
 | LOADING THE DISHWASHERRemove any solid leftovers from the plates (bones, peel, nuts etc); leave the plates to soak in cold water if there are any stubborn leftovers, such as dried cheese, egg etc.Put the glasses in the basket with their stem upwards.Use the cutlery basket for cutlery. Put the cutlery loose in the basket, preferably with the handle at the bottom. Be careful not to injure yourself on the fork prongs and knife blades. |
  | When the machine is started up the first time at the beginning of the day, wait for the resistances to heat the water contained in the boiler and in the tank, for themay to light up green and for themachine ready icon appear.CHOOSING AND STARTING A WASH PROGRAMUse the P button to select the wash program: one of the LEDs of the selected cycles will light up: 1 2 3 ∞P1: duration 60”P2: duration 120”P3: duration 180”P4: duration 480”Program P4 can be used to finish with the rinse cycle, by pressing the START button again (blue) during the wash phase. |
 | In order to start up the wash cycle, press ▶ |
| During the cycle in course, ▶ will light up blue and the cycle LED will start blinking. If the door is opened while the wash cycle is in progress, the program will stop. When the door is closed again, the program resets. In order to re-start the wash cycle, press the cycle button again. | |
 | When the program is completed, from blue turns yellow and the cycle LED stops blinking. |
 | Unload the basket |
5.3 - MANUAL COLD RINSE AT THE END OF THE CYCLE (optional)
 | On some models it is possible to set a cold rinse at the end of the cycle.Start the wash cycle by pressing, and while the cycle is in course keep the pressed until lights up |
5.5 - DIGIT REGENERATION CYCLE (models with built-in water softener)
 | AUTOMATIC REGENERATION CYCLEThe regeneration cycle is automatic. The dishwasher is equipped with a wash meter. When the set number of cycles is reached, the dishwasher will activate the regeneration function the first time it is switched off and the tank is emptied.When the machine is working normally and the set number of cyclesis reached, the blinking icon appears. This points out that the machine will activate the regeneration function the next time it is switched off. |
 | “NO SALT” LED (VERSIONS WITH SOFTENER):Salt for dishwashers is fundamental for the regenerative cycle of the softener installed in the machine. The blinking icon point out that there is not enough salt in the container inside the tank. To top-up, use the funnel supplied and clean any spilled salt from inside the tank.NB: REMOVE ANY SPILLED SALT FROM THE TANK IMMEDIATELY, otherwise it could damage the surface of the tank with rust or similar marks. |
| Attention: use exclusively specific salt for dishwashers and not kitchen salt!The salt compartment takes approximately 1 kg of grain salt.The salt compartment is located on the bottom of the tank. Take the basket out, unscrew the cap and pour salt in using the funnel supplied with the machine. Before screwing the cap back on, remove any spilled salt near the opening. Top-up with salt when there is no water in the tank so that the washing water cannot get into the water softener. Always unplug the machine from the mains power supply before doing this operation. Remember to plug the machine back into the mains socket after completing the operation.When using the machine for the first time, after you fill with salt, add some water to the salt container. | |

text_image
Whirlpool
text_image
Whirlpool5.7 - DRAIN Digit versions
 | Total draining at the end of the day (models without drain pump)Switch the machine off by pressing the on/off key, open the door and remove the overflow, wait until the machine is completely emptied. Put the overflow back into its place and close the door again.Switch off the main wall switch and shut off the water inlet tap. |
| Total draining at the end of the day (models with drain pump)Open the door, remove the overflow and close the door again.Switch the machine off by pressing the on/off key: the drain pump will start until the tank is completely empty. Before starting-up the machine again, you need to put the overflow back into the tank, |
close the door and press the on/off key. In order to shut the machine down at the end of the day, switch off the wall switch and close the water inlet tap.

Do not turn off the dishwasher while water is still in the tank. Always drain it first. When finished using the machine, after having performed the final drainage and eventual regeneration, turn the machine off by pressing the on/off button, deactivate the wall switch and turn off the water interception faucet. Do not leave the machine on, inactive and unutilized for long periods of time.
6 - MAINTENANCE AND CLEANING
Even though the dishwasher does not require any special programmed maintenance in particular, we still recommend you have it checked out by a specialized technician twice a year.
N.B: The manufacturer cannot be held liable for intentional damages or damages caused by carelessness, negligence or from the failed observance of the prescriptions, instructions and standards or from incorrect connections or plumbing.
The dishwasher complies with the protection rating IPX1 and it is forbidden to use a direct jet of water to clean it.
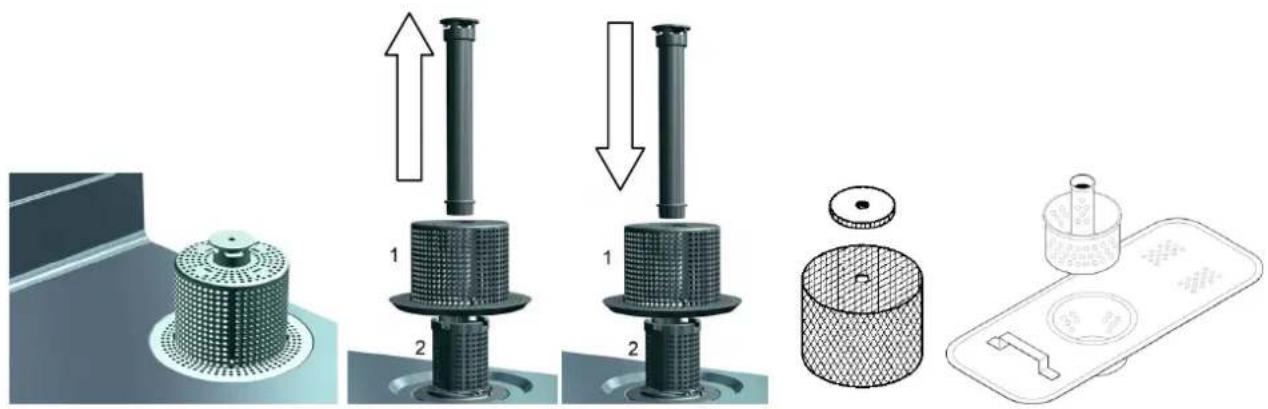
CLEANING THE FILTER THROUGHOUT THE DAY
For heavy use, you are recommended to clean the filter every 30-40 cycles while the machine is in working conditions. To do this, follow the "emptying the tank" instructions.
Remove the filter (1) (simply lift it out of its seat as illustrated), making sure large bits and pieces do not fall into the tank; clean the filter and rinse it thoroughly.
Also clean the internal filter (2) and remove any bits and pieces inside it.
Put the filter back into its seat correctly (1). Do not use pointed or sharp tools to do this.
Clean away any scale to avoid possible build-up. Clean the surface carefully and frequently using a damp cloth. Use neutral and non-abrasive detergents that do not contain chlorine-based substances or products that could corrode and damage stainless steel.
Do not use the afore-mentioned products to clean the floor under the dishwasher either, or even near it, in order to prevent vapours or drips from causing damage to the steel surface.
To clean the tank and the walls, you are recommended to use a damp cloth or a shammy leather cloth, with soapy water and a mild detergent. Never user scouring pads or metal sponges.
text_image
Technical diagram showing mechanical assembly steps with labeled components and directional arrows indicating motion or movement.Periodic checks
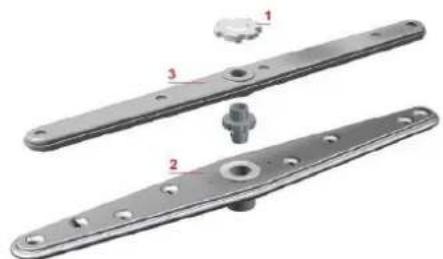
Disassemble the spray arms (bottom and top 2-3), by unscrewing the central screw (1).
Clean the holes and the nozzles under clean running water, do not use any pointed or sharp tools that could damage them. Fit the spray arms back in place.
natural_image
Mechanical assembly diagram showing two metal brackets with numbered components (no text or symbols)Clean the machine internally using a damp cloth and neutral detergent then rinse and dry thoroughly.

Never use the following types of products to clean the tank and the steel surfaces:
- Products containing chlorides or hydrochloric acid
- Bleach
- Products for cleaning silver
- Scouring pads or metal sponges
NB: the incorrect use of the afore-mentioned products may cause rust marks on the surfaces.
Long-term stoppage
If the dishwasher is not going to be used for quite some time, you have to empty the detergent and rinse aid dispensing device to avoid crystallizations and damages to the pumps: remove the priming pipes from the detergent and rinse aid containers and soak them in a container of clean water, run some wash cycles and empty the machine completely.
To finish, switch off the main on/off switch and shut off the water inlet tap; only put the detergent and rinse aid priming pipes back into their containers when you start the machine again, making sure not to invert them (red pipe=detergent; clear pipe = rinse aid).
Do not leave the dishwasher switched on if it is not used for some time or if the operator is not able to monitor it directly.
7 - ERRORS DISPLAYED/PROBLEMS
| PROBLEM POSSIBLE C | AUSE POSSIBLE SOLUTION | |
| THE MAINS LIGHT FAILS TO SWITCH ON Mains not connected Check the electric mains connection. | ||
| THE WASH CYCLE FAILS TO START | The dishwasher has still not filled. | Wait for the triangular Led to switch on. |
| POOR WASHING RESULTS | The holes of the spray arms are clogged or scale is obstructing them. | Dismantle and clean the spray arms. |
| Not enough or unsuitable detergent or rinse aid | Check the type and quantity of detergent. | |
| Plates/glasses not positioned correctly. | Arrange the plates/glasses correctly. | |
| Too low wash temperature | Check the temperature on the display; if it is below 50°, call the technical assistance service. | |
| The set cycle is unsuitable | Increase the wash cycle duration, especially if the crockery/cutlery is particularly dirty or there are stubborn leftovers to clean. | |
| INSUFFICIENT RINSING | The spray nozzles are clogged. Scale in boiler. | Check if the nozzles are clean and if the softener (if installed) works correctly. |
| THE GLASSES AND CUTLERY ARE STAINED | The rinse aid is unsuitable or is not dispensed correctly.Water hardness above 12°dF or high dissolved salt content. | Check the rinse aid container and if it is suitable for the type of mains water. If the problem consists, contact the technical assistance service. |
| WATER IN TANK AFTER DRAINING | The drain pipe is not positioned correctly or is partially obstructed. | Check if the pipe and the drain of the dishwasher are obstructed and if the drain is positioned too high up; refer to the connection diagram. |
text_image
Technical diagram showing three mechanical components with labeled parts and directional arrows indicating motion or force.3.2 DOSAGE PRODUIT LESSIVIEL – MANUEL OU A L'AIDE D'UN DOSEUR (OPTIONNEL) MANUEL
natural_image
Technical diagrams of two mechanical components with no visible text or symbolsnatural_image
Technical illustration of mechanical components including a cylindrical motor, two cylindrical gauges, and a multi-cylinder housing (no text or symbols present)natural_image
Mechanical assembly diagram showing two metal brackets with labeled parts (no text or symbols present)FAILURE THE INDICATIONS MAY COMPROMISE THE SAFETY AND DECLINE THE WARRANTY.
LE NON RESPECT DES INDICATIONS COMPROMETTE LA SECURITE ET LA GARANTIE DE L'APPAREIL.
text_image
Technical diagram showing three mechanical assembly configurations with labeled parts and directional arrowsnatural_image
Technical diagram showing two mechanical components: a cylindrical device with a knob and a multi-cylinder assembly (no text or labels)text_image
Whirlpool