
KES6403 - Coffee machine KITCHENAID - Free user manual and instructions
Find the device manual for free KES6403 KITCHENAID in PDF.

| Product type | Espresso machine |
| Brand | KitchenAid |
| Model | KES6403 |
| Power supply | 120 V~, 60 Hz, 1460 W |
| Water tank capacity | 1.4 L (47 oz) |
| Infusion pressure | Not specified, but suitable for espresso |
| Main functions | Espresso brewing (1 or 2 doses), steam production, hot water dispensing, volume programming, temperature and water hardness |
| Portafilter | 58 mm, with single wall and double wall baskets (1 and 2 doses) |
| Included accessories | Milk pitcher, measuring spoon, tamper, filter baskets |
| Maintenance and cleaning | Regular cleaning of parts, automatic descaling, cleaning of steam tube after each use |
| Safety | Automatic shutdown in case of overheating, pump protection, shutdown when water tank is empty (indicator) |
| Warranty | 1 year full warranty, free replacement in the first year |
| Dimensions (approx.) | Not provided |
| Weight (approx.) | Not provided |
Frequently Asked Questions - KES6403 KITCHENAID
User questions about KES6403 KITCHENAID
0 question about this device. Answer the ones you know or ask your own.
Ask a new question about this device
Download the instructions for your Coffee machine in PDF format for free! Find your manual KES6403 - KITCHENAID and take your electronic device back in hand. On this page are published all the documents necessary for the use of your device. KES6403 by KITCHENAID.
USER MANUAL KES6403 KITCHENAID
natural_image
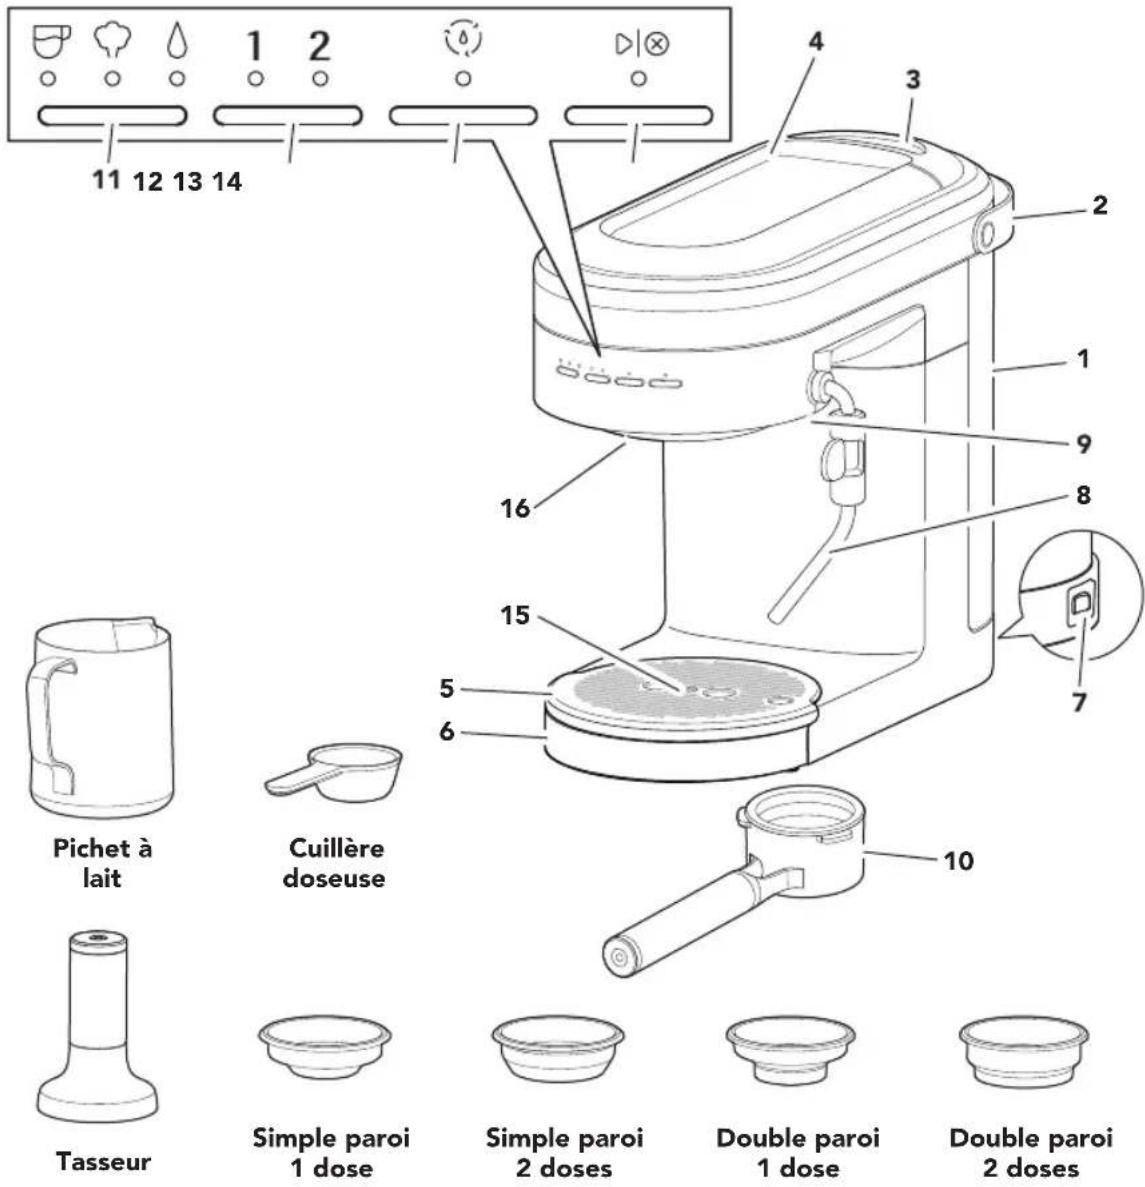
Exterior view of a KitchenAid coffee maker with various kitchen utensils and bowls (no visible text or symbols)PARTS AND FEATURES
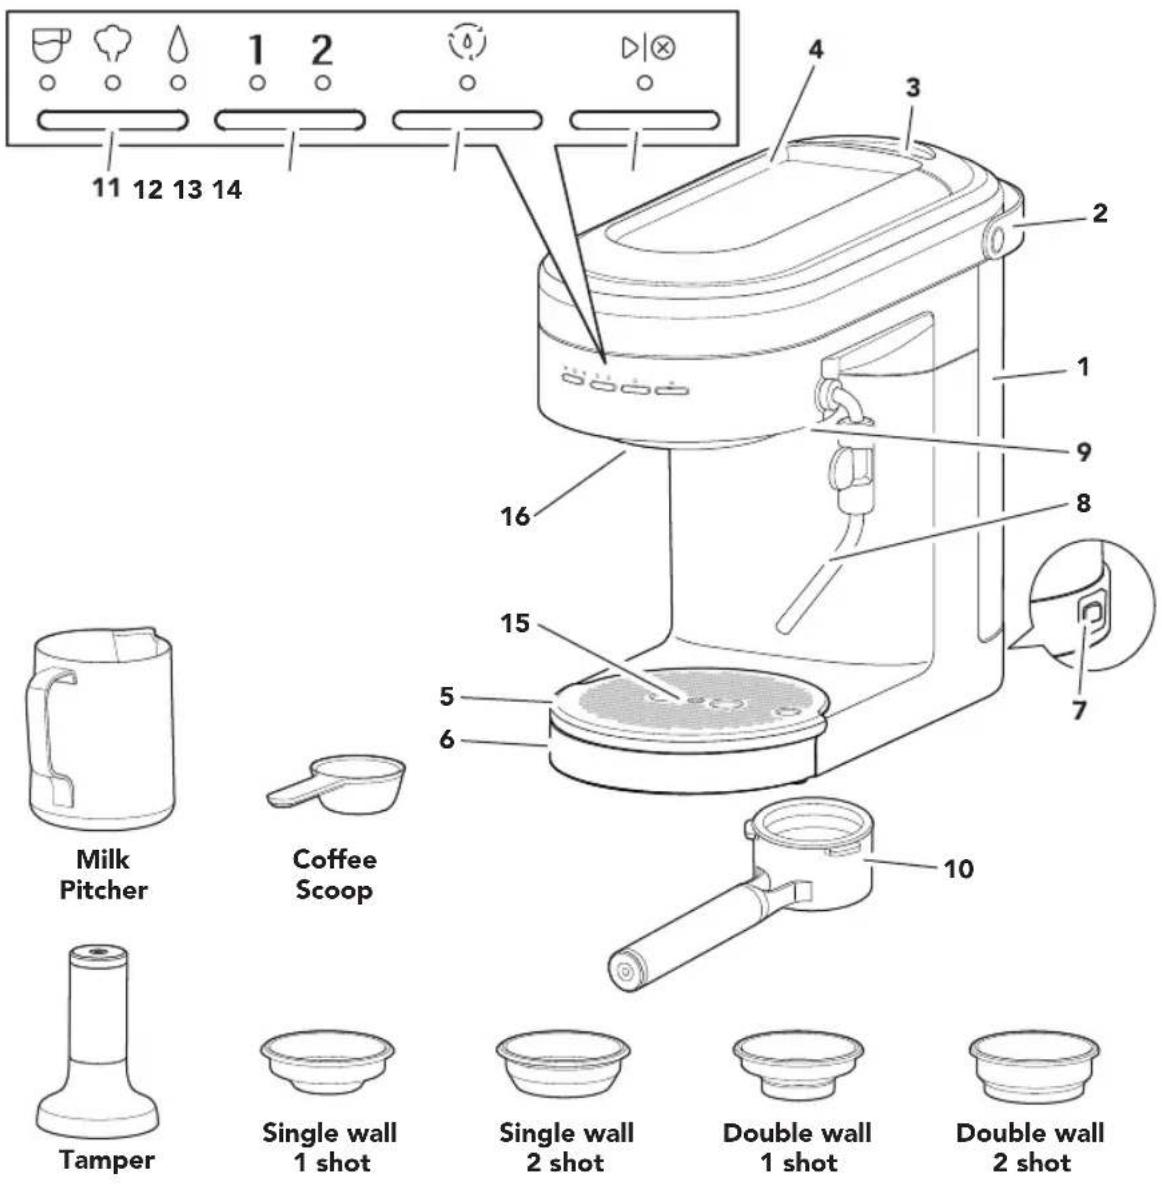
1 Water Tank (Capacity: 47 ounces)
2 Water Tank Handle
3 Water Tank Lid
4 Cup Warmer
5 Drip Tray Plate
6 Drip Tray
7 Main Power On/Off Switch
8 Steam Wand
9 Steam Wand Release Button
10 Portafilter (58 mm)
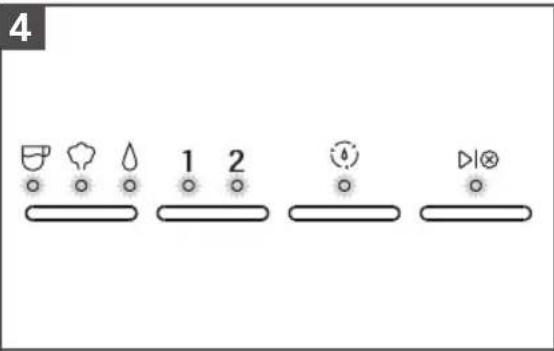
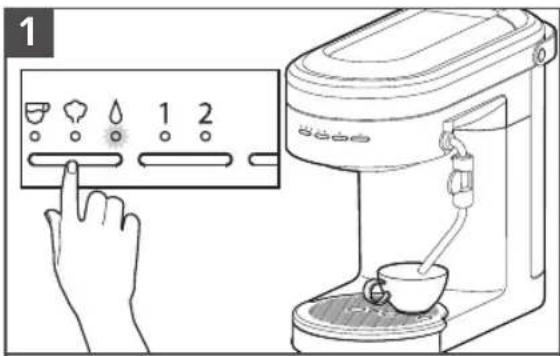
11 Mode Button : Espresso
:Steam
: Hot Water
12 Dose Button : 1 (1 shot)
: 2 (2 shot)
13 Clean Cycle Button
14 Start/Cancel Button
15 Empty Drip Tray Indicator
16 Group Head
PRODUCT SAFETY
Your safety and the safety of others are very important.
We have provided many important safety messages in this manual and on your appliance. Always read and obey all safety messages.

This is the safety alert symbol.
This symbol alerts you to potential hazards that can kill or hurt you and others.
All safety messages will follow the safety alert symbol and either the word "DANGER" or "WARNING." These words mean:

You can be killed or seriously injured if you don't immediately follow instructions.

You can be killed or seriously injured if you don't follow instructions.
All safety messages will tell you what the potential hazard is, tell you how to reduce the chance of injury, and tell you what can happen if the instructions are not followed.
IMPORTANT SAFEGUARDS
When using electrical appliances, basic safety precautions should always be followed, including the following:
- Read all instructions.
- Do not touch hot surfaces. Use handles or knobs.
- Close supervision is necessary when any appliance is used by or near children.
- To protect against fire, electric shock, and personal injury do not immerse cord, plugs, or appliance in water or other liquids.
- Unplug from outlet when not in use and before cleaning. Allow to cool before putting on or taking off parts, and before cleaning.
- Do not operate any appliance with a damaged cord or plug, or after the appliance malfunctions, or is dropped or damaged in any manner. Return appliance to the nearest Authorized Service Facility for examination, repair, or electrical or mechanical adjustment.
- The use of accessory attachments not recommended by the appliance manufacturer may result in fire, electric shock, or personal injury.
- Do not use the appliance outdoors.
- Do not let cord hang over edge of table or counter, or touch hot surfaces.
- Do not place on or near a hot gas or electric burner, or in a heated oven.
- Always turn the appliance off, then plug cord into the wall outlet. To disconnect, turn the appliance off, then remove plug from wall outlet.
- Do not clean the Espresso Machine with abrasive cleaners, steel wool, or other abrasive materials.
PRODUCT SAFETY
- Use extreme caution when using hot steam.
- Do not use appliance for other than intended use.
- Irritation to skin or eyes can occur if they come into contact with the descaling solution. Avoid skin and eye contact. Rinse off descaling solution with clean water. Obtain medical advice after eye contact.
- Damage to delicate surfaces can occur after contact with the descaling solution. Remove any splashes immediately.
- WARNING: To avoid the risk of injury, do not open the brew chamber during the brew process.
SAVE THESE INSTRUCTIONS
This product is designed for household use only.
ELECTRICAL REQUIREMENTS
WARNING

Electrical Shock Hazard
Plug into a grounded 3 prong outlet.
Do not remove ground prong.
Do not use an adapter.
Do not use an extension cord.
Failure to follow these instructions can result in death, fire, or electrical shock.
Voltage: 120 V\~
Frequency: 60 Hz
Wattage: 1460 W
NOTE: If the plug does not fit in the outlet, contact a qualified electrician or service person. Do not modify the plug in any way. Do not use an adapter.
Do not use an extension cord. If the power supply cord is too short, have a qualified electrician or service person to install an outlet near the appliance.
The cord should be arranged so that it will not drape over the countertop or tabletop where it can be pulled on by children or tripped over unintentionally.
GETTING STARTED
First, clean all parts and accessories (See "Care and Cleaning" section).
Place the Espresso Machine on a dry, flat, level surface such as a countertop or table.
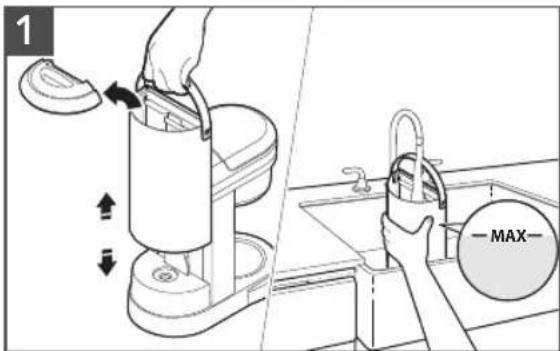
Fill the Water Tank with fresh water (max. 47 ounces / 1.4 liters). Replace the Water Tank Lid.
natural_image
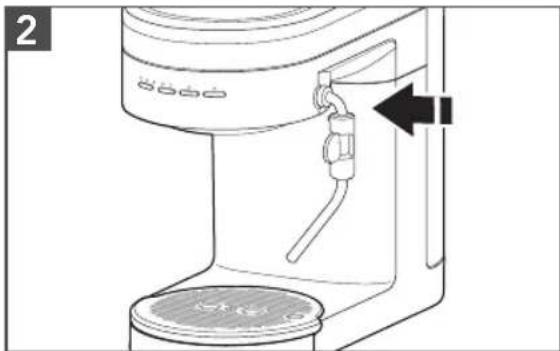
Line drawing of a coffee maker with a handle and base, showing no text or symbolsInsert the Steam Wand until you hear a click.
IMPORTANT: Distilled water or mineral water can damage the Espresso Machine.
Do not use either to brew espresso.

natural_image
Black and white illustration of a hand with a lightning bolt symbol (no text or labels)WARNING
Electrical Shock Hazard
Plug into a grounded 3 prong outlet.
Do not remove ground prong.
Do not use an adapter.
Do not use an extension cord.
Failure to follow these instructions can result in death, fire, or electrical shock.
Plug into a grounded 3 prong outlet.
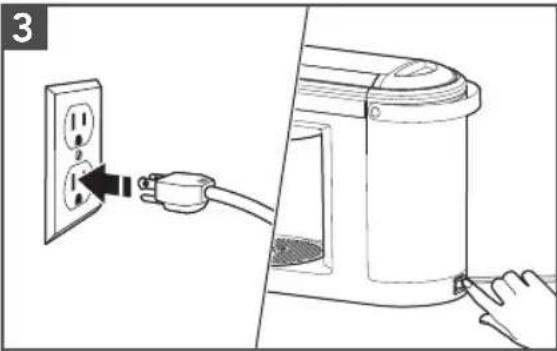
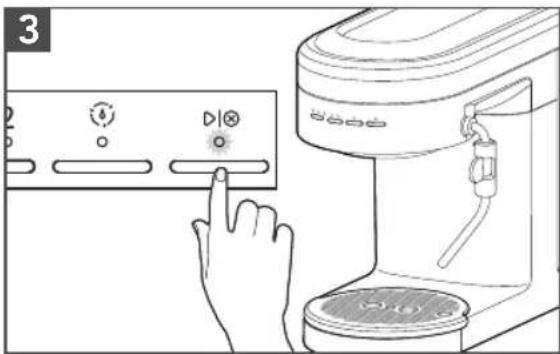
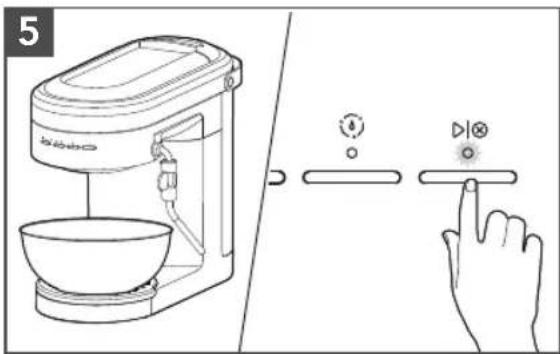
Press the Main power switch to "ON (-)".
The machine automatically pumps water into the heater and starts heating. When lights stop blinking, the Espresso Machine is ready for use.
GETTING STARTED
5
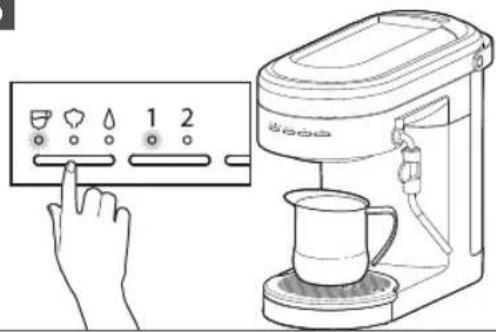
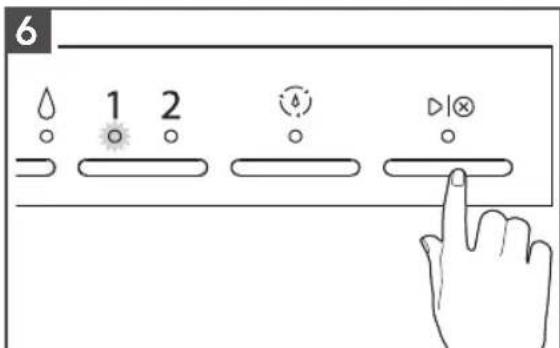
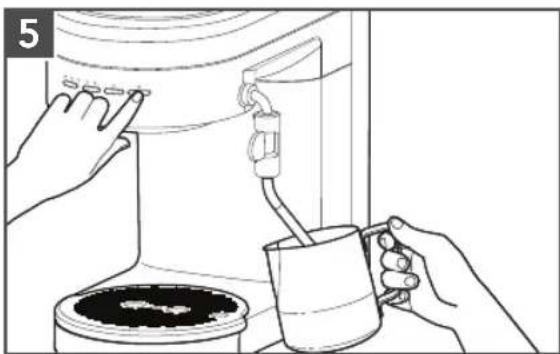
To rinse the Group Head, place a container under the Group Head. Toggle the Mode Button to select Espresso. Toggle Dose Button to 1 and press ▶ button. The machine will flush water through the Group Head and automatically stop when the cycle is complete.
6
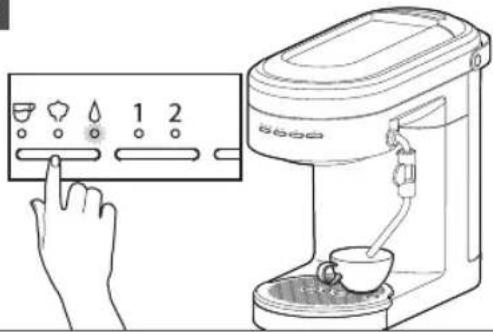
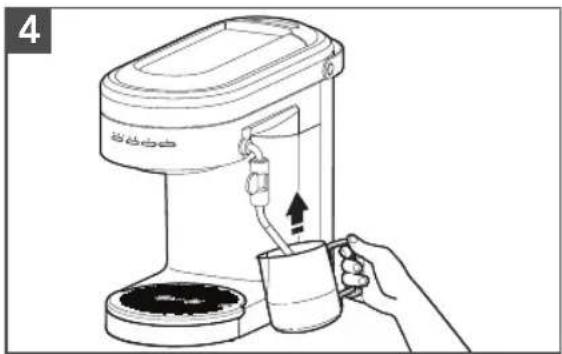
To rinse the Steam Wand, direct the Steam Wand towards the Drip Tray or into a cup. Then, toggle the Mode Button to select Hot Water and press ▶ button to start. Allow water to flow for 3 to 5 seconds then, press ▶ button to stop.
PRODUCT USAGE
BREWING ESPRESSO
natural_image
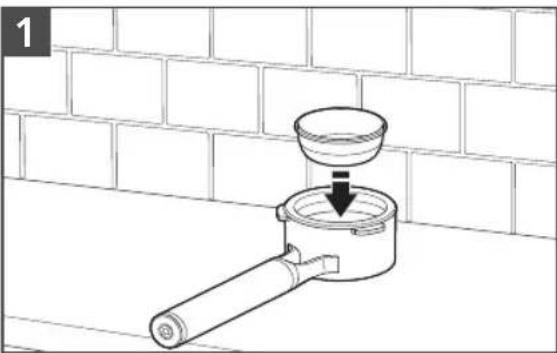
Line drawing of a pipe valve with a bowl and downward arrow, placed on a brick wall (no text or symbols)Select desired Filter basket (see Basket selection chart). Press the Filter basket into the Portafilter until it clicks into place.
2
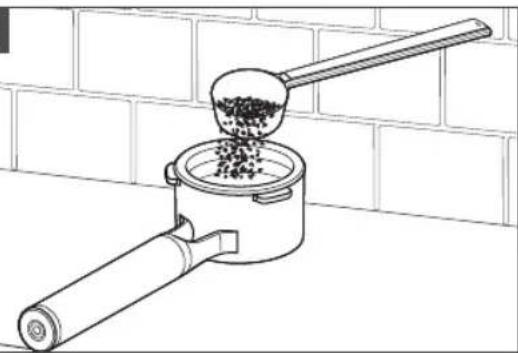
natural_image
Line drawing of a coffee maker using a ladle to spread coffee beans into a container, against a brick wall background (no text or symbols)Fill the Filter basket with fine Espresso coffee grounds (see Basket selection chart for dosing recommendations).
BASKET SELECTION CHART
| Basket type Shot Dose (gram) Use for | |||||
| Single wall |  | 1 shot | [2ZST] | 10 - 12 Freshly ground whole bean coffee | |
| Single wall | [G2H3] | 2 shot |  | 18 - 20 Freshly ground whole bean coffee | |
| Double wall |  | 1 shot |  | 10 - 12 Pre-ground coffee | |
| Double wall |  | 2 shot |  | 18 - 20 Pre-ground coffee | |
PRODUCT USAGE
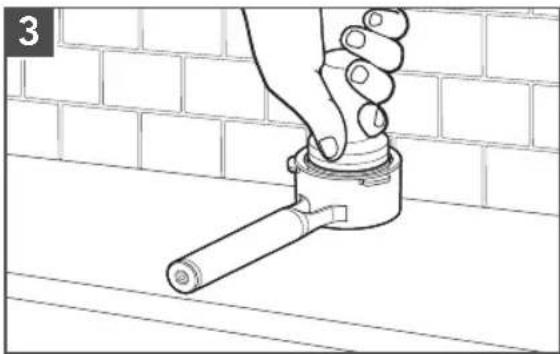
natural_image
Line drawing of a hand holding a pipe fitting against a brick wall (no text or symbols)Tap the Portafilter to level the ground coffee bed and rest on a flat surface. Use the Tamper to tamp down the ground coffee. Sweep excess coffee grinds from the rim.
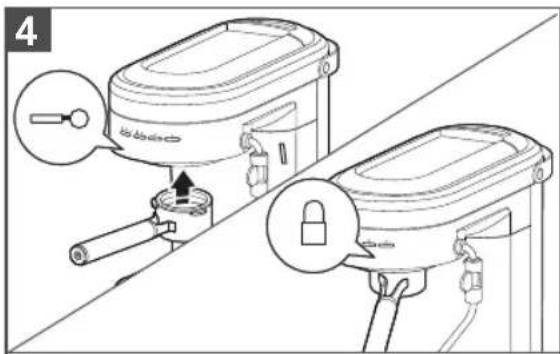
Position the Portafilter under the Group Head with the handle align to unlock. Raise the Portafilter into the Group Head and twist to the right side to lock.
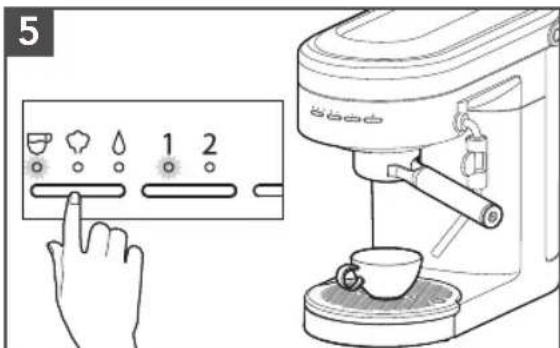
Toggle the Mode Button to select Espresso. Toggle the Dose Button to select desired number of shots 1 (\~ 1 ounce) or 2 (\~ 2 ounces).
Press ▶ button to run selected Espresso cycle.
NOTE: Do not remove the Portafilter when brewing.
TIP: Shot duration should be between 20-30 seconds for 1 and 2 shot selections.
- If less than 20 seconds: decrease grind size and/or increase tamp pressure.
- If more than 30 seconds: increase grind size and/or reduce tamp pressure.
PRODUCT USAGE
USING THE STEAM MODE FOR MILK
1
Toggle the Mode Button to select Steam. The machine will automatically start heating, indicated by the flashing Steam light. The Steam light will go solid when machine is ready for steaming.
natural_image
Line drawing of a hand pouring liquid from a mug into a container on a surface, with brick wall background (no text or symbols)Fill the Milk pitcher with desired amount of cold milk.
TIP: Fill to bottom of the pour spout.
Angle the Steam Wand towards the Drip Tray or into a cup. Press ▶ button to start. Once water turns to steam, press ▶□ button to stop.
natural_image
Line drawing of a coffee maker with a hand holding a cup, showing the process (no text or symbols)Adjust the Steam Wand to desirable position. Submerge the tip of the Steam Wand just below the surface of milk in the Milk pitcher.
natural_image
Illustration of hands using a water dispenser to clean a coffee machine with a mug, no text or symbols presentPress ▶ button to initiate the steam.
Froth until desired level of foam and temperature is reached. To stop the steam, press ▶button again.
To avoid splattering, wait until the steam stops before removing the Steam Wand from the milk.
PRODUCT USAGE
USING HOT WATER FEATURE
The Steam Wand can also dispense hot water which is great for an americano, tea, hot chocolate, etc. You can also use hot water to pre-heat cups.
Toggle the Mode Button to select Water. Place a cup under the Steam Wand.
Press Dose Button to select the volume of water 1 (\~ 4 ounces) or 2 (\~ 6 ounces). Press ▶ button to start water cycle. Water flows out from the Steam Wand.
NOTE: You can pause the cycle by pressing ▷1⊗ button to stop the flow of water before the cycle complete.
PROGRAMING FUNCTION
The Espresso Machine is equipped with programing functionality. Any customized settings will be saved even in the event power is lost to the machine.
PROGRAMING THE ESPRESSO AND HOT WATER AMOUNT
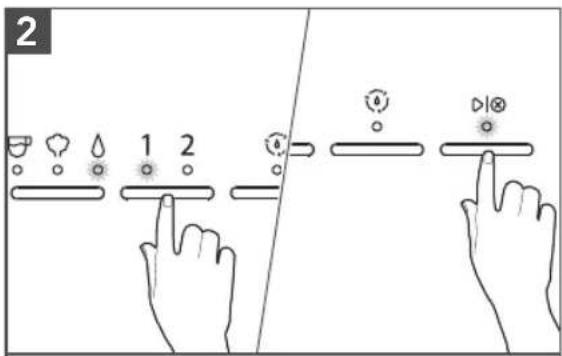
To change pre-programmed Espresso Volume for 1 or 2: Toggle the Mode Button to select Espresso. Select the dose you desire to program (1 or 2). Press and hold button until desired espresso amount is reached in your cup.
While programing your selected dose, the dose and the button lights will blink. Lights will stop blinking when programing is complete.
To change pre-programmed Water Volume for 1 or 2: Toggle the Mode Button to select Water. Select the dose you desire to program (1 or 2). Press and hold ▶button until desired water amount is reached in your cup. While programing your selected dose, the dose and the ▶button light will blink. Lights will stop blinking when programing is complete.
PROGRAMING FUNCTION
TIP: To restore all factory settings, Press and Hold "Dose Button" for 3 seconds. Changing the factory default Espresso or Water Volumes may impact the intended performance of the machine.
PROGRAMING THE WATER TEMPERATURE AND WATER HARDNESS
To change pre-programmed Water
Temperature: Toggle the Mode Button to select Espresso, press and hold for 3 seconds.
The indicator lights will show the default factory setting or previous saved setting (see Indicator light chart for reference).
Toggle the Mode Button between Low-Mid-High to select desired temperature.
To save your selection, press ▷ button or wait for 10 seconds.
To change pre-programmed Water
Hardness: Toggle the Mode Button to Water, Press and hold for 3 seconds.
The indicator lights will show the default factory setting or previous saved setting (see Indicator light chart for reference).
Toggle the Mode Button between Low-Mid-High to select desired water hardness.
To save your selection, press ▶ button or wait for 10 seconds.
INDICATOR LIGHT CHART
| Water Temperature or Water Hardness | |||
| Low | |||
| Medium | |||
| High |
NOTE: Water Hardness - Low: 0 to 60 ppm
Medium: 60 to 120 ppm
High: more than 120 ppm
TIP: To restore all factory settings, Press and Hold "Dose Button" for 3 seconds.
All indicator lights will blink indicating that all settings are restored.
CARE AND CLEANING
For best results, regularly clean the Espresso Machine and accessories.
IMPORTANT: Unplug the Espresso Machine before cleaning. Allow the Espresso Machine and accessories to cool down.
NOTE: Do not use abrasive cleansers or scouring pads when cleaning the Espresso Machine, parts, or accessories. Do not immerse the Espresso Machine or cord in water or other liquids.
natural_image
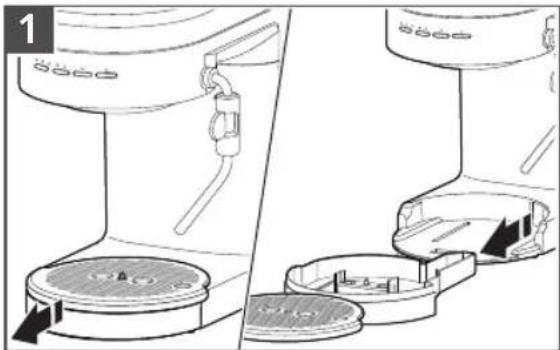
Diagram showing two views of a water purifier with labeled components and directional arrows (no text or symbols)When the Drip Tray indicator rises and becomes visible above the surface of the Drip Tray Plate, empty the Drip Tray and rinse with warm water.
natural_image
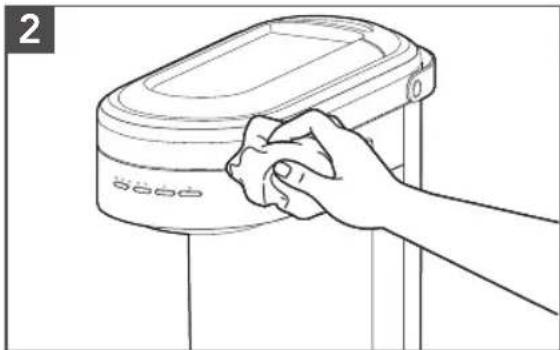
Line drawing of a hand cleaning a cylindrical device with a cloth (no text or symbols)Wipe the Espresso Machine housing and Group Head with a clean soft damp cloth.
natural_image
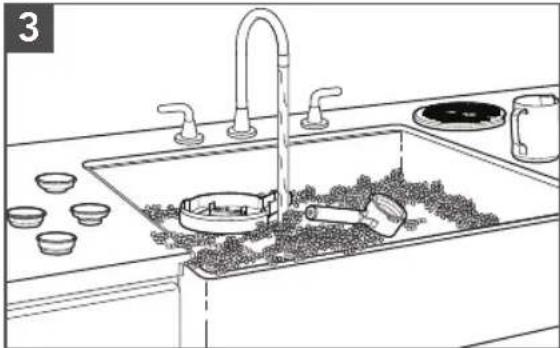
Line drawing of a kitchen sink with faucet, sink bowl, and cup (no text or symbols)Wash the Drip Tray, Portafilter, Filter baskets, Milk pitcher, and Drip Tray Plate in warm, soapy water and rinse with clean water. Dry with a soft cloth.
natural_image
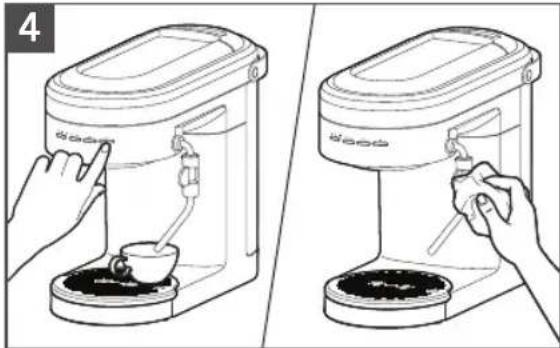
Line drawing showing two steps of a coffee maker using a spoon, with no text or symbols present.Clean the Steam Wand after every use. Toggle the Mode button to select Water. Position the Steam Wand over Drip Tray or into a cup. Press ▶button, wait 3 to 5 seconds. Press ▶button to stop. Wipe down Steam Wand exterior with a soft damp cloth.
NOTE: To remove the Steam Wand press the Steam Wand Release Button.
CARE AND CLEANING
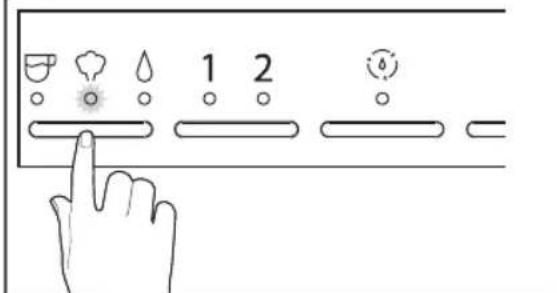
DESCALING THE ESPRESSO MACHINE
The descaling program enables simple and effective descaling of your Espresso Machine. Descale the Espresso Machine regularly, but a minimum whenever the "Clean (√) indicator is blinking. The frequency of descaling depends on the hardness of the water in your region. Therefore, it is important to program the Espresso Machine according to the water hardness level of your location.
NOTE: The descaling process runs in 4 phases, takes approximately 10 minutes and must be completed before next use. At any time during the descaling program you can pause the cycle by pressing ▶|⊗ button. And, resume too by pressing ▶button.
IMPORTANT: Only use descaling solution intended for Espresso Machines.
SET UP OF GROUP HEAD DESCALING
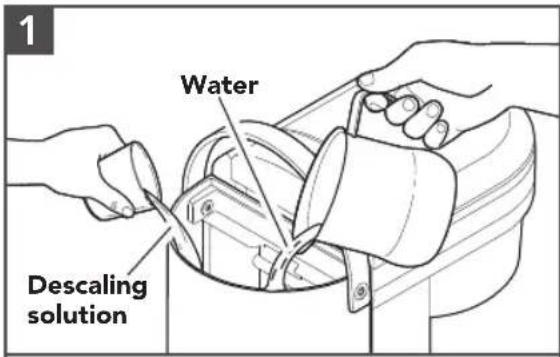
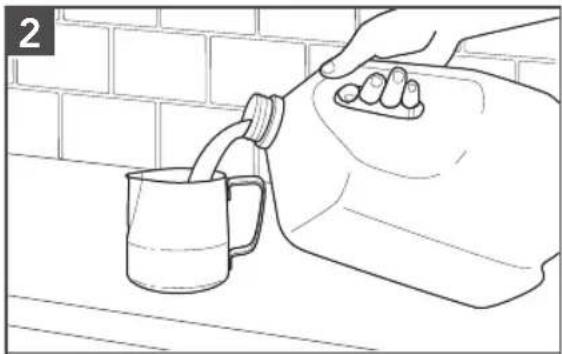
Fill 8.5 ounces water and 4.25 ounces descaling solution inside the Water Tank.
NOTE: The clean cycle is designed to run as per the above mentioned water and descaling solution volumes.
The cycle cannot be completed with any less volume than mentioned above.
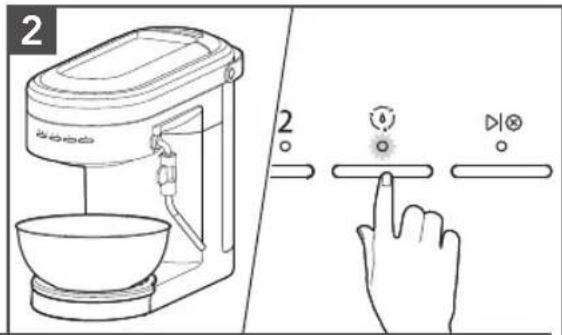
Phase 1: Place a container (\~ 17 ounces) on the Drip Tray below the Group Head. Press the Clean cycle (button for 3 seconds or until Clean light is solid. Then, press button to start first phase of decalcification cycle.
Start/Cancel (D) will blink fast after the first phase is complete. Empty the container.
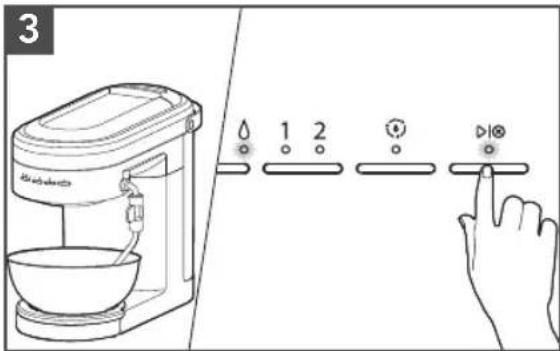
Phase 2: Place the container (\~ 17 ounces) below the Steam Wand. Then, press ▷I⊗ button. Start/Cancel (▶I⊗ and Water Mode lights will blink fast after the second phase is complete. Empty the container.
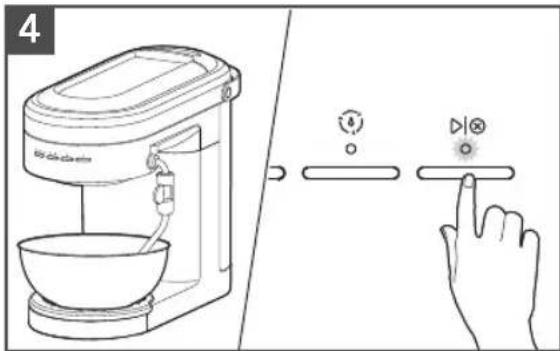
Phase 3: Place the container (\~ 17 ounces) below the Steam Wand. Empty, rinse and refill the Water Tank with fresh water to Max fill line. Replace the Water Tank. Press ▶|⊗ button.
Start/Cancel (D) blink fast after the third phase is complete. Empty the container.
CARE AND CLEANING
Phase 4: Place the container (\~ 17 ounces) on the Drip Tray below Group Head. Then, press button. Clean light and button light will blink fast after the fourth and final phase is complete. Empty the container. Press button to complete the Clean cycle. Machine will go back into heating mode.
WINTER STORAGE CARE
IMPORTANT: To avoid damage, use and store your Espresso Machine where it will not freeze. Because some water remains inside the unit, freezing can damage the product. If storing or moving during freezing weather, purge your Espresso Machine.
To purge the Espresso Machine, ensure Steam Wand is attached and Water Tank is at least half full.
- Place a cup under the Steam Wand nozzle.
- Turn the Espresso Machine On, toggle the Mode Button to Steam. Press ▶|⊗ button. Once steam exits the Steam Wand for approximately 10 seconds, remove Water Tank and allow remaining water in the machine to exit through the Steam Wand.
- Purging cycle will be complete once Espresso Machine stops and the Water mode will blink.
- Turn the Main power On/Off (-) button to Off. Empty and re-install Water Tank. Then, unplug the Espresso Machine.
TROUBLESHOOTING GUIDE

natural_image
Black-and-white illustration of a hand with a lightning bolt symbol (no text or numbers)WARNING
Electrical Shock Hazard
Plug into a grounded 3 prong outlet.
Do not remove ground prong.
Do not use an adapter.
Do not use an extension cord.
Failure to follow these instructions can result in death, fire, or electrical shock.
| Problem Solution | |
| Espresso Machine will not start | Check if the Espresso Machine is securely plugged into a grounded 3 prong outlet. |
| Check to see if the Main Power On/Off Switch is turned on. | |
| If you have a circuit breaker box, then make sure the circuit is closed. | |
| Espresso flows slowly or only drips | Coffee is ground too finely. Use slightly coarser grind. |
| Coffee tamped too hard. Use slightly lighter tamp between 30-40 lb or 15-20 kg of force. | |
| Filter basket can be blocked. Use a pin to unblock the hole(s). | |
| Machine might need to be descaled. Refer to the “Descaling the Espresso Machine” section. | |
| Espresso flows too quickly | Coffee is ground too coarsely. Use slightly finer grind. |
| Not sufficient coffee in the filter basket. Increase dose of coffee. Refer to the “Basket selection chart” section. | |
| Coffee tamped too softly. Use slightly firmer tamp between 30-40 lb or 15-20 kg of force. | |
| Espresso flows over the edge of the Portafilter | Portafilter is not inserted in the Group Head properly. Ensure the Portafilter is completely inserted and rotated until the handle is aligned to the lock icon. |
| There are coffee grounds around the rim of the filter basket. Swipe excess coffee to ensure proper seal in the Group Head. | |
| Too much coffee in the filter basket. Use lower dose of coffee. Refer to the “Basket selection chart” section. | |
| Steam Wand is not producing hot water/steam | Operating temperature has not been reached. Allow the machine to reach to the operating temperature. |
| Steam/hot water flows slowly from Steam Wand | Steam Wand is partially blocked. Remove Steam Wand from Espresso Machine. Soak in cleaning solution and use a pin to clear out the hole and rinse with clear water. |
| Machine might need to be descaled. Refer to the “Descaling the Espresso Machine” section. |
TROUBLESHOOTING GUIDE
| Problem Solution | |
| No Crema is being produced | Coffee is ground too coarsely. Use slightly finer grind. |
| Coffee tamped too softly. Use slightly firmer tamp between 30-40 lb or 15-20 kg of force. | |
| Single wall filter basket might have been used with pre-ground coffee. Please see the “Basket selection chart” section. | |
| Knocking/pumping sound occurs during espresso, steam, or hot water cycle | The Espresso Machine is going through a normal operation, therefore no action is required. |
| All Mode/Dose lights are blinking | Machine is in protection mode to avoid the pump from over heating. Turn Off the machine for 7.5 minutes. |
| The Steam light and all Dose lights are blinking | Machine is in the protection mode to avoid from overheating. Turn Off the machine for 10 minutes. |
| Water light continuously blinks | Ensure water is in the Water Tank and ensure Water Tank is properly assembled. |
| Steam Wand is blocked. Remove it from Espresso Machine and thoroughly clean it. | |
| Coffee puck is too dense, adjust to larger grind size. If using a Double wall basket, then clean exit hole with a pin. | |
| All lights are blinking at the same time | Turn off the Espresso Machine and unplug for approximately 10 minutes. Then, plug back in and restart the machine. If problem persists call service. |
| All lights are continuously on | If the problem occurs again, unplug the machine for approx. 5 minutes, plug back in and restart the machine and then run 1 complete clean cycle. |
| If the problem is not due to one of the above items | See the “Arranging for Service” chapter in the “Warranty and service” section. Do not return the Espresso Machine to the retailer as they do not provide service. |
WARRANTY AND SERVICE
KITCHENAID® ESPRESSO MACHINE WARRANTY FOR THE 50 UNITED STATES, THE DISTRICT OF COLUMBIA, PUERTO RICO, AND CANADA
This warranty extends to the purchaser and any succeeding owner for KitchenAid Espresso Machine operated in the 50 United States, the District of Columbia, Puerto Rico, and Canada.
| Length of Warranty: | One Year Full Warranty from date of purchase. |
KitchenAid Will Pay for Your Choice of: | Hassle-Free Replacement of your Espresso Machine.See the next page for details on how to arrange for service, or call the Customer eXperience Center toll-free at 1-800-541-6390.ORThe replacement parts and repair labor costs to correct defects in materials and workmanship.Service must be provided by an Authorized KitchenAid Service Center. |
| KitchenAid Will Not Pay for: | A. Repairs when your Espresso Machine is used in other than normal single family home use.B. Damage resulting from accident, alteration, misuse or abuse.C. Any shipping or handling costs to deliver your Espresso Machine to an Authorized Service Center.D. Replacement parts or repair labor costs for Espresso Machine operated outside the 50 United States, District of Columbia, Puerto Rico, and Canada. |
| DISCLAIMER OF IMPLIED WARRANTIES; LIMITATION OF REMEDIESIMPLIED WARRANTIES, INCLUDING TO THE EXTENT APPLICABLE WARRANTIES OF MERCHANTABILITY OR FITNESS FOR A PARTICULAR PURPOSE, ARE EXCLUDED TO THE EXTENT LEGALLY PERMISSIBLE. ANY IMPLIED WARRANTIES THAT MAY BE IMPOSED BY LAW ARE LIMITED TO TWO YEAR, OR THE SHORTEST PERIOD ALLOWED BY LAW. SOME STATES AND PROVINCES DO NOT ALLOW LIMITATIONS OR EXCLUSIONS ON HOW LONG AN IMPLIED WARRANTY OF MERCHANTABILITY OR FITNESS LASTS, SO THE ABOVE LIMITATIONS OR EXCLUSIONS MAY NOT APPLY TO YOU.IF THIS PRODUCT FAILS TO WORK AS WARRANTED, CUSTOMER'S SOLE AND EXCLUSIVE REMEDY SHALL BE REPAIR OR REPLACEMENT ACCORDING TO THE TERMS OF THIS LIMITED WARRANTY. KITCHENAID AND KITCHENAID CANADA DO NOT ASSUME ANY RESPONSIBILITY FOR INCIDENTAL OR CONSEQUENTIAL DAMAGES. This warranty gives you specific legal rights and you may also have other rights which vary from state to state or province to province. | |
WARRANTY AND SERVICE
HASSLE-FREE REPLACEMENT WARRANTY – 50 UNITED STATES, DISTRICT OF COLUMBIA, AND PUERTO RICO
We're so confident the quality of our products meets the exacting standards of KitchenAid that, if your Espresso Machine should fail within the first year of ownership, KitchenAid will arrange to deliver an identical or comparable replacement to your door free of charge and arrange to have your original Espresso Machine returned to us. Your replacement unit will also be covered by our one year limited warranty.
If your Espresso Machine should fail within the first year of ownership, simply call our toll-free Customer eXperience Center at 1-800-541-6390 Monday through Friday. Please have your original sales receipt available when you call. Proof of purchase will be required to initiate the claim. Give the consultant your complete shipping address. (No P.O. Box numbers, please.)
When you receive your replacement Espresso Machine, use the carton, packing materials, and prepaid shipping label to pack up your original Espresso Machine and send it back to KitchenAid.
HASSLE-FREE REPLACEMENT WARRANTY - CANADA
We're so confident the quality of our products meets the exacting standards of the KitchenAid brand that, if your Espresso Machine should fail within the first year of ownership, we will replace your Espresso Machine with an identical or comparable replacement. Your replacement unit will also be covered by our one year limited warranty.
If your Espresso Machine should fail within the first year of ownership, simply call our toll-free Customer eXperience Center at 1-800-807-6777 Monday through Friday. Please have your original sales receipt available when you call. Proof of purchase will be required to initiate the claim. Give the consultant your complete shipping address.
When you receive your replacement Espresso Machine, use the carton, packing materials, and prepaid shipping label to pack up your original Espresso Machine and send it back to KitchenAid.
ARRANGING FOR SERVICE AFTER THE WARRANTY EXPIRES, OR ORDERING ACCESSORIES AND REPLACEMENT PARTS
In the United States and Puerto Rico:
For service information, or to order accessories or replacement parts, call toll-free at 1-800-541-6390 or write to: Customer eXperience Center, KitchenAid Small Appliances, P.O. Box 218, St. Joseph, MI 49085-0218
Outside the United States and Puerto Rico:
Consult your local KitchenAid dealer or the store where you purchased the Espresso Machine for information on how to obtain service.
For service information in Canada:
Call toll-free 1-800-807-6777.
For service information in Mexico:
Call toll-free 01-800-0022-767.
PIÈCES ET CARACTÉRISTIQUES
natural_image
Line drawing of a coffee maker with a handle and spout, showing no text or symbolsnatural_image
Black-and-white illustration of a hand with a lightning bolt symbol indicating electrical hazard (no text or labels)AVERTISSEMENT
natural_image
Line drawing of a pipe valve with a bowl and downward arrow, mounted on a brick wall (no text or symbols)natural_image
Line drawing of a coffee maker using a ladle to spread coffee beans on a brick wall (no text or symbols)natural_image
Line drawing of a hand holding a mechanical component against a brick wall background (no text or symbols)natural_image
Line drawing of a hand pouring liquid into a mug on a surface, with brick wall background (no text or symbols)natural_image
Line drawing of a coffee maker with a hand holding a cup, showing internal components and a directional arrow (no text or symbols)natural_image
Line drawing showing hands using a water dispenser to clean a coffee machine with a mug (no text or symbols)natural_image
Diagram showing two views of a water dispenser with labeled parts, no text or symbols presentnatural_image
Line drawing of a hand cleaning a cylindrical device (no text or symbols)natural_image
Line drawing of a modern kitchen sink with faucet, bowl, and dish (no text or symbols)natural_image
Line drawing showing two steps of a coffee maker using a pour-over setup, with no text or symbols present.natural_image
Diagram showing a hand inserting a plug into an electrical outlet, next to a device with a handle (no text or symbols present)natural_image
Line drawing of a hand pouring liquid from a mug into a container, with brick wall background (no text or symbols)natural_image
Line drawing of a coffee maker with a hand holding a cup, showing liquid level and handle (no text or symbols)natural_image
Illustration of hands using a water dispenser to clean a coffee cup, with no text or symbols present.natural_image
Diagram showing two views of a kitchen appliance with labeled parts, no text or symbols presentnatural_image
Line drawing of a hand cleaning a kitchen appliance (no text or symbols)natural_image
Line drawing of a kitchen sink with bowls, a faucet, and a showerhead (no text or symbols)natural_image
Line drawing showing two steps of a coffee maker using a spoon, with no visible text or symbolsCustomer eXperience Center, KitchenAid Small Appliances, P.O. Box 218, St. Joseph, MI 49085-0218
www.kitchenaid.com.mx
de 8:00 a.m. a 6:00 p.m.
www.kitchenaid-ca.com
Colombia
web: www.kitchenaid.com.do
DISCOVER MORE. DÉCOUVREZ PLUS. DESCUBRA MÁS. KITCHENAID.COM/QUICKSTART

natural_image
White silhouette of a telephone handset on black background (no text or symbols)PRODUCT QUESTIONS OR RETURNS
QUESTIONS SUR LE PRODUIT OU LES RETOURS
MEXICO: KitchenAid.com.mx
LATIN AMERICA: KitchenAid-Latam.com
KitchenAid®
®/TM ©2021 KitchenAid. All rights reserved. Used under license in Canada.

- PRODUCT SAFETY
- Your safety and the safety of others are very important.
- IMPORTANT SAFEGUARDS
- When using electrical appliances, basic safety precautions should always be followed, including the following:
- SAVE THESE INSTRUCTIONS
- WARNING
- GETTING STARTED
- Electrical Shock Hazard
- PRODUCT USAGE
- BREWING ESPRESSO
- BASKET SELECTION CHART
- USING HOT WATER FEATURE
- PROGRAMING FUNCTION
- PROGRAMING THE ESPRESSO AND HOT WATER AMOUNT
- PROGRAMING THE WATER TEMPERATURE AND WATER HARDNESS
- INDICATOR LIGHT CHART
- CARE AND CLEANING
- DESCALING THE ESPRESSO MACHINE
- SET UP OF GROUP HEAD DESCALING
- WINTER STORAGE CARE
- TROUBLESHOOTING GUIDE
- WARRANTY AND SERVICE
- HASSLE-FREE REPLACEMENT WARRANTY - CANADA
- ARRANGING FOR SERVICE AFTER THE WARRANTY EXPIRES, OR ORDERING ACCESSORIES AND REPLACEMENT PARTS
- In the United States and Puerto Rico:
- Outside the United States and Puerto Rico:
- For service information in Canada:
- For service information in Mexico:
- AVERTISSEMENT
- Colombia
- DISCOVER MORE. DÉCOUVREZ PLUS. DESCUBRA MÁS. KITCHENAID.COM/QUICKSTART
- KitchenAid®
Brand : KITCHENAID
Model : KES6403
Category : Coffee machine