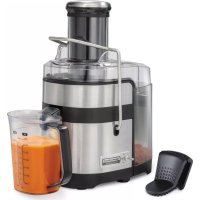
67906 - Juicer HAMILTON BEACH - Free user manual and instructions
Find the device manual for free 67906 HAMILTON BEACH in PDF.



| Product Type | Juice Extractor |
| Brand | Hamilton Beach |
| Model | 67906 |
| Power Supply | 120 V ~ 60 Hz |
| Speeds | 2 speeds: low (LO) and high (HI) |
| Strainer Basket Material | Stainless steel |
| Juice Container Capacity | With MAX fill line |
| Feed Chute | Extra-large |
| Safety Device | Safety lock, overload protection |
| Cleaning | Removable parts dishwasher safe (except motor base) |
| Included Accessories | Pusher, juice container with lid, pulp container, cleaning brush |
| Warranty | 5-year limited |
| Customer Service (Canada) | 1.800.267.2826 |
| Customer Service (United States) | 1.800.851.8900 |
| Use | Household only |
Frequently Asked Questions - 67906 HAMILTON BEACH
User questions about 67906 HAMILTON BEACH
0 question about this device. Answer the ones you know or ask your own.
Ask a new question about this device
Download the instructions for your Juicer in PDF format for free! Find your manual 67906 - HAMILTON BEACH and take your electronic device back in hand. On this page are published all the documents necessary for the use of your device. 67906 by HAMILTON BEACH.
USER MANUAL 67906 HAMILTON BEACH
Visit www.hamiltonbeach.com for our complete line of products and Use and Care Guides – as well as delicious recipes, tips, and to register your product online.
Please call us – our friendly associates are ready to help. USA: 1.800.851.8900
Questions
natural_image
Exterior view of a modern juiceizer with a clear beaker, no visible text or symbolsJuice Extractor
Centrifugeuse
Extractor de Jugo
English 2
Français.... 13
Español 24
IMPORTANT SAFEGUARDS
When using electrical appliances, basic safety precautions should always be followed to reduce the risk of fire, electric shock, and/or injury to persons, including the following:
- Read all instructions.
- This appliance is not intended for use by persons with reduced physical, sensory, or mental capabilities, or lack of experience and knowledge, unless they are closely supervised and instructed concerning use of the appliance by a person responsible for their safety.
- This appliance shall not be used by children. Keep the appliance and its cord out of reach of children.
- Close supervision is necessary when any appliance is used near children. Children should be supervised to ensure that they do not play with the appliance.
- To protect against risk of electric shock, do not immerse cord, plug, or motor base in water or other liquid.
- Turn the appliance OFF(①) then unplug from outlet when not in use, before putting on or taking off parts, and before cleaning. To unplug, grasp the plug and pull from the outlet. Never pull from the power cord.
- Avoid contacting moving parts. Keep fingers out of feed chute.
- Never feed food by hand—always use the food pusher.
- Always make sure the juice extractor is properly and completely assembled before the motor is turned ON. The unit will not turn ON unless properly assembled. Do not release safety locking arm while juice extractor is in operation.
- Be sure to turn switch to OFF (d)position after each use of your juice extractor. Make sure the motor stops completely before disassembling.
-
Do not put fingers or other objects into the juice extractor feed chute while it is in operation. If food becomes lodged in the opening, use food pusher to push it down. When this method is not possible, turn the motor OFF (⊕) unplug the cord from the outlet, and disassemble juicer to remove the remaining food.
-
Do not use appliance for other than intended use.
- Do not operate any appliance with a damaged supply cord or plug, or after the appliance malfunctions or has been dropped or damaged in any manner. Supply cord replacement and repairs must be conducted by the manufacturer, its service agent, or similarly qualified persons in order to avoid a hazard. Call the provided customer service number for information on examination, repair, or adjustment.
- The use of attachments not recommended or sold by the appliance manufacturer may cause fire, electric shock, or injury.
- Do not use outdoors.
- Do not let cord hang over edge of table or counter, or touch hot surfaces, including stove.
- Do not leave juice extractor unattended while it is operating.
- Blades are sharp; handle carefully. Do not touch the small cutting blades in the base of the stainless steel strainer basket.
- Keep hair, clothing, and jewelry, as well as spatulas and other utensils, away from feed chute during operation to prevent the possibility of severe injury to persons and/or damage to the appliance.
- Do not use the appliance if the rotating strainer basket or juice cover is damaged.
- Always use the juice extractor on a dry, level surface.
- Any maintenance other than cleaning should be performed by an authorized service center.
- To reduce the risk of personal injury and/or damage to the appliance, do not use bent, dented, or otherwise damaged strainer basket.
- Do not operate without the pulp container in place.
- Do not place on or near a hot gas or electric burner or in a heated oven.

-
Check that the appliance is OFF (①) before plugging cord into wall outlet. To disconnect, turn the control to OFF (②) then remove plug from wall outlet. To unplug, grasp the plug and pull from the outlet. Never pull from the power cord.
-
CAUTION! In order to avoid a hazard due to inadvertent resetting of the thermal cut-out, this appliance must not be supplied through an external switching device, such as a timer, or connected to a circuit that is regularly switched on and off by the utility.
SAVE THESE INSTRUCTIONS
Other Consumer Safety Information
This appliance is intended for household use only.
⚠ WARNING Electrical Shock Hazard: This appliance is provided with a grounded (3-prong) plug to reduce the risk of electric shock. The plug fits only one way into a grounded outlet. Do not defeat the safety purpose of the plug by modifying the plug in any way or by using an adapter. If the plug does not fit into the outlet, have an electrician replace the outlet. The length of the cord used on this appliance was selected to reduce the hazards of becoming tangled in or tripping over a longer cord. If a longer cord is necessary, an approved extension cord may be used. The electrical rating of the extension cord must be equal to or greater than the rating of the appliance. The extension cord must be a grounding-type, 3-wire cord. Care must be taken to arrange the extension cord so that it will not drape over the countertop or tabletop where it can be pulled on by children or accidentally tripped over. The electrical rating of this appliance is listed on the bottom panel of the unit.
The strainer basket is a delicate screen. If bent or damaged, do not use, as it could break into small pieces and cause personal injury and/or damage the appliance. Call our toll-free customer service number to order a new basket. Replace basket when it shows signs of wear. NOTE: This machine is equipped with motor overload protection. If the motor stops during operation due to overheating, unplug and allow it to cool down for 15 minutes. Plug machine back in after 15 minutes to resume normal operation.
WARNING Cut Hazard.
Extra-wide feed chute. Do not place hands or fingers down feed chute. Always use the food pusher.
Failure to follow this instruction can result in serious personal injury.
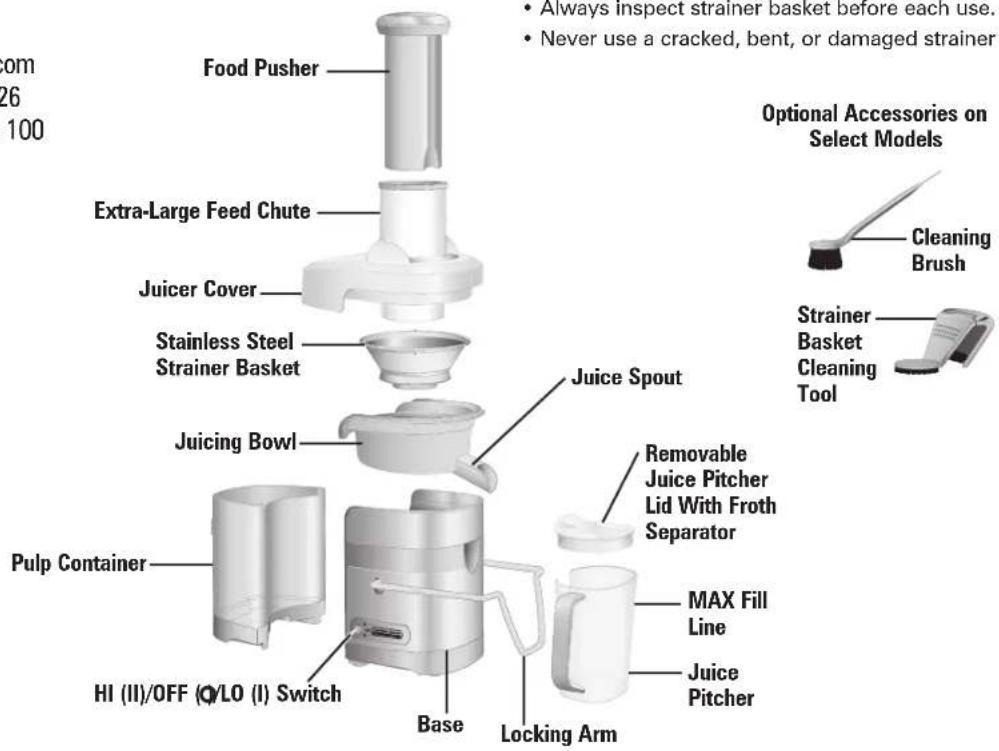
Parts and Features
To order parts:
US: 1.800.851.8900
www.hamiltonbeach.com
Canada: 1.800.267.2826
Mexico: 01 800 71 16 100
⚠ WARNING Cut Hazard. Strainer basket may come apart during use, if used while damaged.
To reduce the risk of personal injury:
• Always inspect strainer basket before each use.
- Never use a cracked, bent, or damaged strainer basket.

How to Assemble

natural_image
Two industrial devices with internal components and a black arrow indicating flow direction (no text or symbols visible)- Place the pulp container into position.

natural_image
Two-step diagram showing a food cleaning process: one with a lid and arrow, the other with a funnel and arrow (no text or symbols)- Place juicing bowl into the top of the motor base. Then place the stainless steel strainer basket inside the juicing bowl.
BEFORE FIRST USE: After unpacking the juice extractor, remove cardboard from filter basket and wash everything except the base in warm, soapy water. Rinse and dry immediately. Never immerse the base in water or other liquids; wipe it with a damp sponge.
natural_image
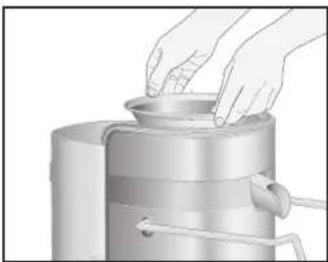
Illustration of hands cleaning a stainless steel coffee maker (no text or symbols visible)- With hands on outer edge, press strainer basket down firmly to lock into position.

natural_image
Mechanical assembly diagram showing a component being inserted into a housing (no text or symbols visible)- Place the juicer cover over the strainer bowl, positioning the feed chute over the strainer basket, and lower into position.
natural_image
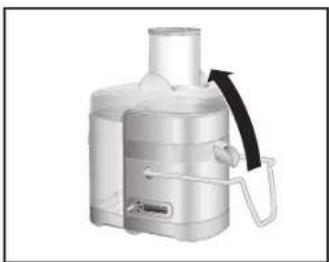
Exterior view of a modern electric juice maker (no text or symbols visible)- Move the locking arm up and over the juicer cover until it clicks into place.

natural_image
Diagram of a kitchen mixer with a side view showing the mixing process (no text or symbols present)- Place the removable juice pitcher lid with froth separator on the juice pitcher. Place the juice pitcher with lid under the juice spout.
natural_image
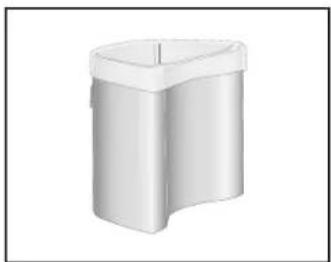
3D rendering of a white cylindrical trash bin with a flat top and narrow neck (no text or symbols)TIP: To minimize cleanup, place a plastic grocery bag in pulp container to collect pulp. When juicing is completed, simply remove grocery bag containing pulp.
NOTE: Do not allow pulp container to overfill since this may prevent correct operation or damage the unit.
How to Use
Wash fruits and vegetables.
NOTE: Most fruits and vegetables such as apples, carrots, cucumbers, and tomatoes will not need to be cut since they will fit into feed chute whole. It is recommended that fruits or vegetables such as oranges, melons, or mangoes are peeled before placing in juice extractor for best flavor.
natural_image
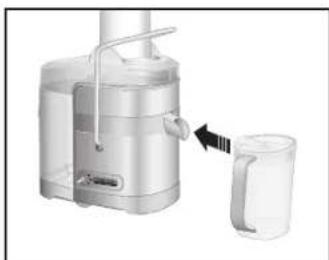
Illustration of a food juicer with a glass mug and arrow indicating a handle (no text or symbols)- Ensure that unit is correctly assembled (see page 5) and place juice pitcher with lid under spout.
⚠ WARNING Cut Hazard. Extra-wide feed chute. Do not place hands or fingers in the feed chute. Always use the food pusher. Failure to follow this instruction can result in serious personal injury.

natural_image
Close-up of a server rack with two socket outlets connected by a cable (no text or symbols visible)- Plug into outlet. Turn HI (II)/OFF (QLO (I) switch to LO or HI.

natural_image
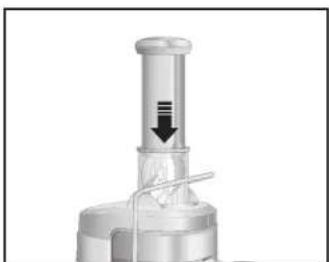
Close-up of a mechanical device with a cylindrical component and a downward arrow, no visible text or symbols- With the motor running, place food into the feed chute. Slide the food pusher down the feed chute by aligning the groove in the food pusher with the small ridge on the inside of the top of the feed tube. To extract the maximum amount of juice, always push food pusher down slowly. Juice will flow into juice pitcher and pulp will accumulate in pulp container. NOTES:
- Do not fill the juice pitcher past the Max Fill line.
- Pulp container can be emptied during juicing by turning juice extractor OFF (① and then carefully removing pulp container. (Replace empty pulp container before continuing to juice.)

natural_image
Illustration of a three-wheeled juice maker with a side arm and handle, showing no text or symbols.- Remove pulp container. NOTE: Do not allow pulp container to overfill since this may prevent correct operation or damage the unit.
6
How to Disassemble

natural_image
Diagram showing a power outlet connected to a plug, with no visible text or symbols- Turn juice extractor OFF ( and unplug. Allow strainer basket to stop turning.

natural_image
Diagram showing a hand operating a lever mechanism with a separate view of the lever assembly (no text or symbols present)- Lower the locking arm down to rest on the counter. Lift off the juicer cover.

natural_image
Illustration of a stainless steel coffee maker with a handle and spout, no visible text or symbols- To release the strainer basket, lift edge of juicing bowl.

natural_image
Exterior view of a modern office building (no signage)- Lift off the juicer bowl with the strainer basket still in place.

natural_image
Illustration of hands cleaning a kitchen sink with a hand holding a cloth (no text or symbols)- To remove the strainer basket, turn the juicer bowl upside down over the sink and carefully remove the basket.

natural_image
Diagram of a white industrial blender with a black arrow indicating the process (no text or symbols present)- Remove the pulp container by sliding away from motor base.
Care and Cleaning
- Unplug.
- Wipe juicer base and cord with a damp cloth or sponge. To remove stubborn spots, use a mild, nonabrasive cleanser.
- ⚠️ CAUTION Laceration Hazard.
The center of the strainer basket contains small, sharp blades to process fruits and vegetables during the juicing function. Do not touch blades when handling the strainer basket.
- Always treat the strainer basket with care; it can be damaged easily.
To assist with cleaning, soak the strainer basket in hot, soapy water for approximately 10 minutes immediately after juicing is completed. If pulp is left to dry on the basket, it may clog the fine pores of the filter mesh, thereby lessening the effectiveness of the juice extractor.
Discoloration of the plastic may occur with some fruit and vegetables. To help prevent this, wash all parts immediately after use.
⚠ WARNING Electrical Shock Hazard. Do not immerse motor base in water or any other liquid.
- The cleaning brush included with the unit is the most effective way to clean the strainer basket. Using the brush, hold the strainer basket under running water and brush inside and outside of the basket.
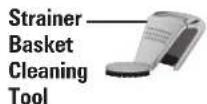
- Place the strainer basket cleaning tool on the edge of the strainer.
- Wipe the strainer basket by moving the strainer basket cleaning tool in a circle.
- Wash feed chute, juicer cover, strainer basket, food pusher, juice pitcher, and pitcher lid in warm, soapy water or in the dishwasher.
- DO NOT use the "SANI" setting when washing in the dishwasher. "SANI" cycle temperatures could damage your product. Do not place the motor base in the dishwasher. Some part distortion may occur if your household dishwasher's temperature is higher than normal or if the parts are placed too close to the heating element.
Juicing Tips and Techniques
PURCHASING AND STORING FRUITS AND VEGETABLES:
• Always wash fruits and vegetables before juicing.
• Always use fresh fruits and vegetables for juicing.
- To save money and obtain fresher produce, purchase fruits or vegetables that are in season.
- Keep your fruits and vegetables ready for juicing by washing them before storing.
- Most fruits and hardier-type vegetables can be stored at cool room temperature. More delicate and perishable items such as tomatoes, berries, leafy greens, celery, cucumbers, and herbs should be stored in the refrigerator until required.
PREPARING FRUITS AND VEGETABLES:
- It is recommended that fruits or vegetables such as oranges, melons, or mangoes are peeled before placing in juice extractor for best flavor.
- All fruits with pits and large seeds such as nectarines, peaches, apricots, plums, and cherries MUST be pitted before juicing.
HINT: Your juice extractor makes invigorating, frothy orange juice. Simply peel the oranges and juice. For best results, refrigerate oranges before juicing.
USING THE PULP:
- The remaining pulp left after juicing fruits or vegetables is mostly fiber and cellulose which, like the juice, contain vital nutrients necessary for the daily diet and can be used in many ways. Pulp can be frozen for later use.
- There are a number of recipes that use pulp. You can also use pulp to thicken casseroles or soups.
- Pulp is great used in the garden for compost.
SOY MILK, ALMOND MILK, AND RICE MILK:
- Your juice extractor may be used to make soy milk, almond milk, and rice milk. One cup (237 ml) of soybeans, almonds, or rice must be soaked in 4 cups (946 ml) of water for 24 to 48 hours in the refrigerator. Slowly pour 1 cup (237 ml) of the soaked mixture at a time into the food chute. The liquid extracted from the soaked mixture is the "milk."
- Almonds must be soaked 24 to 48 hours before juicing.
- Soy milk should be boiled to improve the flavor.
- Vanilla, honey, and sugar may be added to enhance the flavor of each milk type.
NOTES:
- This machine is equipped with motor overload protection. If the motor stops during operation due to overheating, unplug and allow it to cool down for approximately 15 minutes. Plug machine back in to resume normal operation.
USING THE CORRECT SPEED:

LO – fruit and vegetables with high water content, i.e., tomato, watermelon, oranges.

HI – fruit and vegetables with higher fiber content, i.e., carrots, cabbage, apples.
Troubleshooting
Machine will not work when switched ON.
- The locking arm may not be correctly engaged. Check to see if the locking arm is in its proper position. Refer to page 6.
- This machine is equipped with motor overload protection. If the motor stops during operation due to overheating, unplug and allow it to cool down for 15 minutes. Plug machine back in after 15 minutes to resume normal operation.
Motor appears to stall when juicing.
- The juicing action may be too vigorous. Try slower juicing action by pushing the food pusher down more slowly. Refer to page 6, Step 3.
- Wet pulp can build up under the juicer cover or pulp container. Turn unit OFF (φ and unplug. Empty the pulp bin; then clean juicer cover and strainer basket.
Pulp is too wet and insufficient juice is produced.
• Try a slower juicing action.
- Turn OFF (D and unplug. Remove strainer basket and clean mesh walls with a fine brush. This will remove excess fiber buildup which could be inhibiting the juice flow. Refer to page 8.
Juice sprays out of spout.
- Try a slower juicing action by pushing the food pusher down more slowly. Refer to page 6, Step 3.
- Make sure the juice pitcher with lid is placed under the spout.
Juice drips out of spout immediately after juicing.
- With motor on, raise and lower food pusher in feed chute several times. The action forces remaining pulp and juice out of strainer bowl.
Machine vibrates excessively.
- Buildup of pulp in mesh of strainer basket. Turn unit OFF (and unplug. Clean strainer basket. Refer to page 8. If machine vibration continues after cleaning, this could be a sign of a damaged strainer basket. Call our toll-free customer service number to order a new strainer basket.
Juice leaks out the side of the pitcher when pouring.
- The pitcher may have been overfilled. Do not exceed the MAX fill line.
Juice leaks onto the motor base when removing the juicing bowl for cleaning.
- Before removing the juicing bowl, tilt the spout into the juice pitcher to empty any residual juice.
Notes
Hamilton Beach 5-Year Limited Warranty
This warranty applies to products purchased and used in the U.S. and Canada. This is the only express warranty for this product and is in lieu of any other warranty or condition.
This product is warranted to be free from defects in material and workmanship for a period of five (5) years from the date of original purchase. During this period, your exclusive remedy is repair or replacement of this product or any component found to be defective, at our option; however, you are responsible for all costs associated with returning the product to us and our returning a product or component under this warranty to you. If the product or component is no longer available, we will replace with a similar one of equal or greater value.
This warranty does not cover glass, filters, wear from normal use, use not in conformity with the printed directions, or damage to the product resulting from accident, alteration, abuse, or misuse. This warranty extends only to the original consumer purchaser or gift recipient. Keep the original sales receipt, as proof of purchase is required to make a warranty claim. This warranty is void if the product is used for other than single-family household use or subjected to any voltage and waveform other than as specified on the rating label (e.g., 120V \~ 60 Hz).
We exclude all claims for special, incidental, and consequential damages caused by breach of express or implied warranty. All liability is limited to the amount of the purchase price. Every implied warranty, including any statutory warranty or condition of merchantability or fitness for a particular purpose, is disclaimed except to the extent prohibited by law, in which case such warranty or condition is limited to the duration of this written warranty. This warranty gives you specific legal rights. You may have other legal rights that vary depending on where you live. Some states or provinces do not allow limitations on implied warranties or special, incidental, or consequential damages, so the foregoing limitations may not apply to you.
To make a warranty claim, do not return this appliance to the store. Please call 1.800.851.8900 in the U.S. or 1.800.267.2826 in Canada or visit hamiltonbeach.com in the U.S. or hamiltonbeach.ca in Canada. For faster service, locate the model, type, and series numbers on your appliance.
Hamilton Beach Brands, Inc.
4421 Waterfront Drive
Glen Allen
Virginia 23060
USA
IMPORTANTES INSTRUCTIONS
natural_image
Diagram showing a device being connected to a power grid, with no visible text or symbols.natural_image
Two-step diagram showing a hand pouring liquid into a fan, with no visible text or symbols.natural_image
Illustration of hands cleaning a stainless steel coffee maker (no text or symbols visible)natural_image
Mechanical assembly diagram showing a component being inserted into a housing (no text or symbols visible)natural_image
Exterior view of a modern electric juice maker (no text or symbols visible)natural_image
Diagram showing a kitchen mixer with a side view of the mug and a side view of the blender (no text or symbols present)natural_image
White cylindrical trash bin with a lid, isolated on white background (no text or symbols)natural_image
Illustration of a modern juice<|im_start|> Greenland filter with two cups and a brush (no text or symbols)natural_image
Illustration of a pair of food pumps, one with a handle and arrow indicating direction (no text or symbols)natural_image
Diagram showing a device connected to an electrical outlet with a cable inserted (no text or symbols visible)natural_image
Mechanical device with a cylindrical component and internal structure, no visible text or symbolsnatural_image
Diagram showing a power outlet connected to a plug, with no visible text or symbolsnatural_image
Diagram showing a hand operating a lever mechanism with directional arrows (no text or symbols)natural_image
Illustration of a stainless steel coffee maker with a handle and spout, no text or symbols presentnatural_image
Exterior view of a modern office building (no signage)natural_image
Illustration of hands cleaning a kitchen sink with a hand holding a towel (no text or symbols)natural_image
Diagram of a two-step industrial device with a left-side arrow indicating motion (no text or symbols present)Hamilton Beach Brands, Inc.
4421 Waterfront Drive
Glen Allen
Virginia 23060
USA
Interruptor HI (II)/OFF (ΦLO (I) (alta (II)/apagado (Φbaja (I))

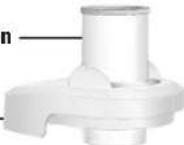


Base
natural_image
Diagram showing a device being connected to a power grid, with no visible text or symbols.natural_image
Two-step diagram showing a food cleaning process: one with a lid and arrow, the other with a funnel and arrow (no text or symbols)natural_image
Illustration of hands cleaning a stainless steel coffee maker (no text or symbols visible)natural_image
Mechanical assembly diagram showing a component being inserted into a housing (no text or symbols visible)natural_image
Exterior view of a modern office building (no signage)natural_image
Diagram of a kitchen brush and a mug with directional arrows indicating process flow (no text or symbols)natural_image
3D rendering of a simple white cylindrical container with a narrow neck (no text or symbols)
natural_image
Illustration of a three-wheeled juice maker with a side arm and handle, showing no text or symbols.natural_image
Illustration of a pair of food containers, one with a handle and arrow pointing to a mug (no text or symbols)natural_image
Diagram showing a device connected to an electrical outlet with a cable inserted (no text or symbols visible)- Enchufe en el tomacorriente. Gire el interruptor HI (II)/OFF (○)/LO (I) a LO (baja) o HI (alta).
natural_image
Mechanical device with a cylindrical component and a downward arrow indicating motion (no text or symbols)natural_image
Diagram showing a power outlet connected to a plug, with no visible text or symbolsnatural_image
Diagram showing a hand operating a lever mechanism with directional arrows (no text or symbols)natural_image
Illustration of a stainless steel coffee maker with a handle and spout, no text or symbols presentnatural_image
Exterior view of a modern office building (no signage)natural_image
Illustration of hands cleaning a kitchen sink with a hand holding a sponge (no text or symbols)natural_image
Diagram of a two-step electric shaver device with a left-side arrow indicating motion (no text or symbols present)Motor appears to stall when juicing.
- Questions
- Juice Extractor
- Centrifugeuse
- Extractor de Jugo
- IMPORTANT SAFEGUARDS
- SAVE THESE INSTRUCTIONS
- Other Consumer Safety Information
- This appliance is intended for household use only.
- WARNING Cut Hazard.
- Parts and Features
- How to Assemble
- How to Use
- How to Disassemble
- Care and Cleaning
- Juicing Tips and Techniques
- PURCHASING AND STORING FRUITS AND VEGETABLES:
- PREPARING FRUITS AND VEGETABLES:
- USING THE PULP:
- SOY MILK, ALMOND MILK, AND RICE MILK:
- NOTES:
- USING THE CORRECT SPEED:
- Troubleshooting
- Machine will not work when switched ON.
- Motor appears to stall when juicing.
- Pulp is too wet and insufficient juice is produced.
- Juice sprays out of spout.
- Juice drips out of spout immediately after juicing.
- Machine vibrates excessively.
- Juice leaks out the side of the pitcher when pouring.
- Juice leaks onto the motor base when removing the juicing bowl for cleaning.
- Notes
- Hamilton Beach 5-Year Limited Warranty
- IMPORTANTES INSTRUCTIONS
Brand : HAMILTON BEACH
Model : 67906
Category : Juicer