62663 - Hand blender HAMILTON BEACH - Free user manual and instructions
Find the device manual for free 62663 HAMILTON BEACH in PDF.

User questions about 62663 HAMILTON BEACH
0 question about this device. Answer the ones you know or ask your own.
Ask a new question about this device
Download the instructions for your Hand blender in PDF format for free! Find your manual 62663 - HAMILTON BEACH and take your electronic device back in hand. On this page are published all the documents necessary for the use of your device. 62663 by HAMILTON BEACH.
USER MANUAL 62663 HAMILTON BEACH
Visit hamiltonbeach.com for our complete line of products and Use and Care Guides – as well as delicious recipes, tips, and to register your product online.
natural_image
Black and silver electric hand mixer with handle and lever (no text or symbols visible)When using electrical appliances, basic safety precautions should always be followed to reduce the risk of fire, electric shock, and/or injury to persons, including the following:
-
Read all instructions.
-
This appliance is not intended for use by persons with reduced physical, sensory, or mental capabilities, or lack of experience and knowledge, unless they are closely supervised and instructed concerning use of the appliance by a person responsible for their safety.
-
This appliance shall not be used by children. Keep the appliance and its cord out of reach of children.
-
Close supervision is necessary when any appliance is used near children. Children should be supervised to ensure that they do not play with the appliance.
-
To protect against risk of electrical shock, do not put cord, plug, or mixer body in water or other liquid.
-
Turn the appliance OFF(O), then unplug from outlet when not in use, before putting on or taking off parts, and before cleaning. To unplug, grasp the plug and pull from the outlet. Never pull from the power cord.
-
Avoid contacting moving parts. Keep hands, hair, and clothing, as well as spatulas and other utensils, away from beaters during operation to reduce risk of injury to persons and/or damage to mixer.
-
Remove beaters from mixer before washing.
-
Do not let cord hang over edge of table or counter or touch hot surfaces, including stove.
-
Do not operate any appliance with a damaged supply cord or plug, or after the appliance malfunctions or has been dropped or damaged in any manner. Supply cord replacement and repairs must be conducted by the manufacturer, its service agent, or similarly qualified persons in order to avoid a hazard. Contact Customer Service for information on examination, repair, or adjustment as set forth in the Limited Warranty.
-
The use of attachments not recommended or sold by the appliance manufacturer for use with this model may cause fire, electric shock, or injury.
-
Do not use outdoors.
-
Do not place on or near a hot gas or electric burner, or in a heated oven.
-
Check that control is off before plugging cord into wall outlet. To disconnect, turn control to OFF (and then remove plug from wall outlet. To unplug, grasp the plug and pull from the outlet. Never pull from the power cord.
-
Do not use appliance for other than intended purpose.
-
CAUTION! In order to avoid a hazard due to inadvertent resetting of the thermal cut-out, this appliance must not be supplied through an external switching device, such as a timer, or connected to a circuit that is regularly switched on and off by the utility.
SAVE THESE INSTRUCTIONS
Other Consumer Safety Information
This appliance is intended for household use only.
WARNING Electrical Shock Hazard: This appliance is provided with a polarized plug (one wide blade) to reduce the risk of electric shock. The plug fits only one way into a polarized outlet. Do not defeat the safety purpose of the plug by modifying the plug in any way or by using an adapter. If the plug does not fit fully into the outlet, reverse the plug. If it still does not fit, have an electrician replace the outlet.
The length of the cord used on this appliance was selected to reduce the hazards of becoming tangled in or tripping over a longer cord. If a longer cord is necessary, an approved extension cord may be used. The electrical rating of the extension cord must be equal to or greater than the rating of the appliance. Care must be taken to arrange the extension cord so that it will not drape over the countertop or tabletop where it can 2
be pulled on by children or accidentally tripped over.
CAUTION Moving Parts Hazard.
To reduce the risk of personal injury, always unplug mixer before inserting or removing accessories.
WATTAGE/PEAK POWER INFORMATION
The marked rating of the hand mixer is determined by Underwriters Laboratories as the maximum stabilized power consumption of the hand mixer at high speed under a loaded condition.
Peak power is an average of the maximum wattage a hand mixer may consume during initial operation at high speed.
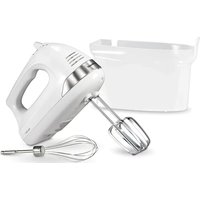
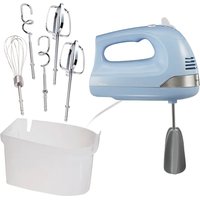
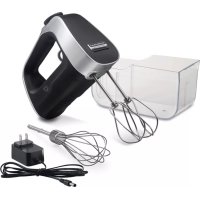
Parts and Features
To order parts:
hamiltonbeach.com
BEFORE FIRST USE: Wash beaters and whisk in hot, soapy water. Rinse and dry.
text_image
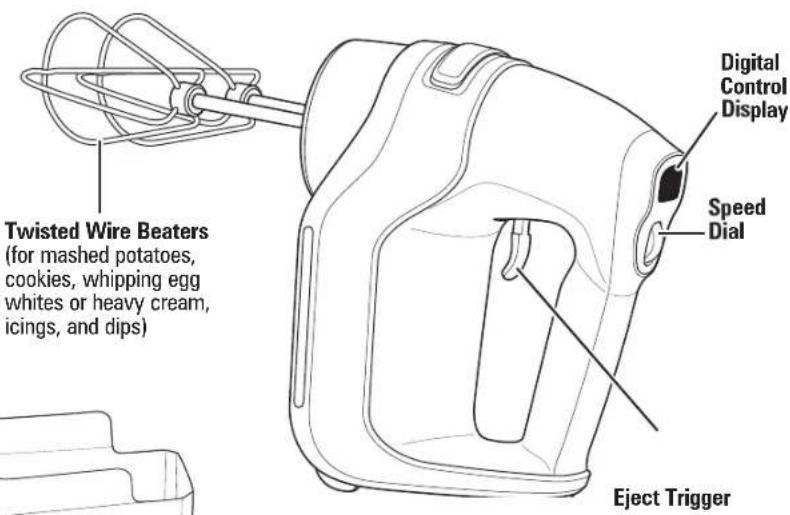
Twisted Wire Beaters (for mashed potatoes, cookies, whipping egg whites or heavy cream, icings, and dips) Digital Control Display Speed Dial Eject Trigger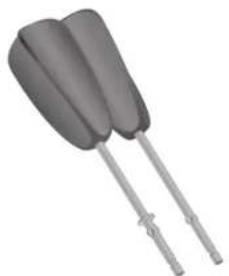
natural_image
Two gray plastic objects with handles, resembling a stylized spoon or tool (no text or symbols visible)Easy Clean Beaters
(for creaming butter quickly, thick batters, brownies and doughs with mix-ins, spreads, and icing)
natural_image
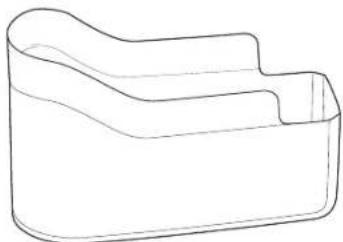
Line drawing of a 3D rectangular object with curved top and bottom edges (no text or symbols)Storage Case
natural_image
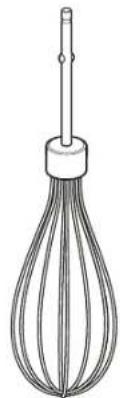
Line drawing of a whisk with a central rod (no text or symbols)Whisk (Whipping/Aerating)
How to Use Hand Mixer
natural_image
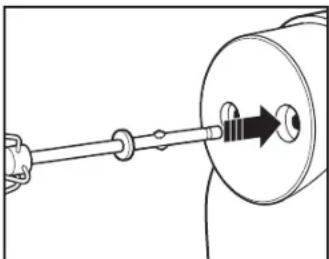
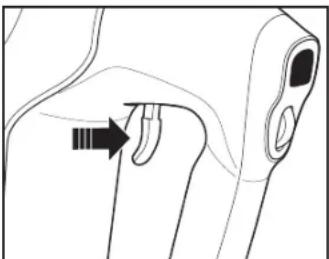
Pure mechanical diagram showing a shaft and gear assembly without any text, numbers, or symbols- Make sure the mixer is unplugged and speed dial is set to Q(OFF). Insert soft scrape beaters or the whisk attachment into either opening on the bottom of mixer until they click into place. If using the dough hooks, insert the attachment with the collar into the larger opening and the remaining attachment into the smaller opening until they click into place. Plug into outlet. Place beaters into bowl.
natural_image
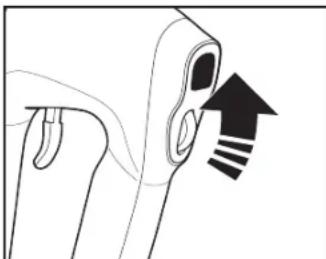
Diagram of a medical device with an arrow indicating direction (no text or symbols present)- Move the speed dial to the desired speed, starting at 1 and increasing to a higher speed as desired. The selected speed will show in the digital control display.
natural_image
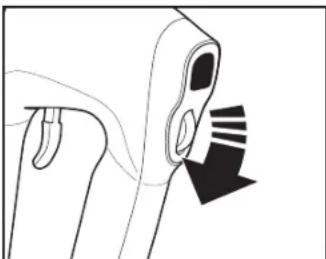
Diagram of a hand holding a device with a black arrow indicating motion or force (no text or symbols)- When finished mixing, move the speed dial to ⬆(OFF) and unplug mixer.
natural_image
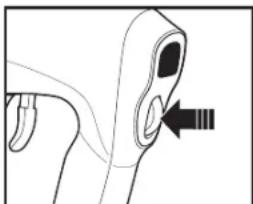
Diagram of a mechanical component with an arrow indicating direction (no text or symbols present)- ⚠️ CAUTION Always unplug mixer before attempting to remove beaters. Squeeze trigger to eject beaters.
natural_image
Line drawing of a mechanical component with a black arrow pointing to a detail (no text or symbols)Burst Function – Press and hold down the speed dial for additional power at any speed.
Additional Features
natural_image
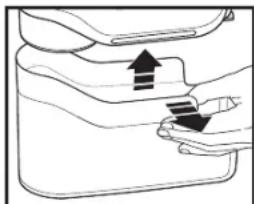
Illustration of a hand pressing down on a container with arrows indicating motion (no text or symbols)Storage Case – To release mixer from the case, pull corner of case at opening outward and rotate handle of mixer in opposite direction.
natural_image
Simple line drawing of a flower with a stem and arrow, no text or symbols presentSwivel Cord Lock – Lock into position by moving cord all the way to the right or left until it clicks into place. To unlock, push in opposite direction until cord unlocks.
How to Use (cont.)
General Mixing Guide
The following mixing guide is a suggestion for selecting mixing speeds for 7-speed mixers. Begin on speed 1 and increase to desired speed depending on the recipe consistency.
| SPEED* FUNCTION ATTACHMENT FOOD | |||
| ○ | OFF | Must be OFF (○) to eject beaters | |
| 1 Stirring Beaters Instant pudding | |||
| 2 Folding Beaters Cakes (mixes and from scratch) | |||
| 3 Kneading Dough Hooks Bread and pasta doughs | |||
| 4 Mixing Beaters Cookie doughs | |||
| 5 Creaming Whisk Frosting | |||
| 6 Beating Whisk Whipped cream | |||
| 7 Whipping Whisk Egg whites | |||
*Mixer uses Slow Start technology at each speed to prevent splatters.
Cookie Mixing Guide:
- Cookie dough is one of the thickest doughs to mix.
- Use a large mixing bowl to spread out ingredients for easier mixing.
- Have butter or margarine at room temperature.
- Add flour 1 cup (237 ml) at a time, thoroughly mixing after each addition.
Care and Cleaning
WARNING Electrical Shock Hazard.
Disconnect power before cleaning. Do not immerse mixer, cord, or plug in any liquid.
- Always unplug mixer from electrical outlet and eject the attachments before cleaning.
- Soft scrape beaters, wire whisk, dough hooks and optional attachments are dishwasher-safe or wash in hot, soapy water. Rinse and dry.
- Wipe the mixer body and cord with a clean, damp cloth.
NOTE: Do not use abrasive cleaners or scouring pads. To reduce the risk of electrical shock, do not immerse the mixer body in water at any time.
Troubleshooting
The motor works very slowly.
- Too many ingredients in the bowl. Remove some ingredients and restart.
- The speed dial is set too low. Set the speed dial to higher speed.
The motor does not start.
- The power plug is not plugged into the wall outlet, or the circuit breaker is tripped. Plug into outlet and check function of outlet.
- The hand mixer is not turned on. Move speed dial to desired speed.
- The motor is damaged. Call our customer service department.
The beaters stop rotating.
- This mixer has a safety feature when it detects a heavy load (no rotation). To reset, turn control knob to QOFF.
- Too many ingredients in the bowl. Remove some ingredients and restart.
Hamilton Beach 5-Year Limited Warranty
This warranty applies to products purchased and used in the U.S. and Canada. This is the only express warranty for this product and is in lieu of any other warranty or condition.
This product is warranted to be free from defects in material and workmanship for a period of five (5) years from the date of original purchase. During this period, your exclusive remedy is repair or replacement of this product or any component found to be defective, at our option; however, you are responsible for all costs associated with returning the product to us and our returning a product or component under this warranty to you. If the product or component is no longer available, we will replace with a similar one of equal or greater value.
This warranty does not cover glass, filters, wear from normal use, use not in conformity with the printed directions, or damage to the product resulting from accident, alteration, abuse, or misuse. This warranty extends only to the original consumer purchaser or gift recipient. Keep the original sales receipt, as proof of purchase is required to make a warranty claim. This warranty is void if the product is used for other than single-family household use or subjected to any voltage and waveform other than as specified on the rating label (e.g., 120 V \~ 60 Hz).
We exclude all claims for special, incidental, and consequential damages caused by breach of express or implied warranty. All liability is limited to the amount of the purchase price. Every implied warranty, including any statutory warranty or condition of merchantability or fitness for a particular purpose, is disclaimed except to the extent prohibited by law, in which case such warranty or condition is limited to the duration of this written warranty. This warranty gives you specific legal rights. You may have other legal rights that vary depending on where you live. Some states or provinces do not allow limitations on implied warranties or special, incidental, or consequential damages, so the foregoing limitations may not apply to you.
To make a warranty claim, do not return this appliance to the store. Please write Hamilton Beach Brands, Inc., Customer Service Department, 4421 Waterfront Dr., Glen Allen, VA 23060, or visit hamiltonbeach.com/customer-service in the U.S. or hamiltonbeach.ca/customer-service in Canada. For faster service, locate the model, type, and series numbers on your appliance.
Hamilton Beach Brands, Inc.
4421 Waterfront Drive
Glen Allen
Virginia 23060
USA
PRÉCAUTIONS IMPORTANTES
natural_image
Diagram of a mechanical assembly with a shaft and connector (no text or symbols)natural_image
Diagram of a medical device with an arrow indicating direction (no text or symbols present)natural_image
Diagram of a mechanical component with a black arrow indicating direction (no text or symbols)natural_image
Diagram of a medical device with an arrow pointing to a specific anatomical structure (no text or labels present)natural_image
Anatomical diagram of a human ear with an arrow pointing to the ear area (no text or labels present)natural_image
Diagram of a hand pressing down on a curved surface with arrows indicating motion (no text or symbols)natural_image
Simple line drawing of a flower with a stem, no text or symbols presentHamilton Beach Brands, Inc.
4421 Waterfront Drive
Glen Allen
Virginia 23060
USA
12
natural_image
Two gray objects resembling a stylized spoon or tool, with no visible text or symbols.natural_image
Line drawing of a stepped container or cushion (no text or symbols)natural_image
Line drawing of a whisk with a central rod (no text or symbols)Batidor (Batir/Airear)