
11552 - Steam cleaner HAMILTON BEACH - Free user manual and instructions
Find the device manual for free 11552 HAMILTON BEACH in PDF.

| Product Type | Garment Steamer (Steam Cleaner) |
| Brand | Hamilton Beach |
| Model | 11552 |
| Usage | Household |
| Power Supply | 120 V ~ 60 Hz |
| Water Tank Type | Removable, with ribbed cap |
| Heat-up Time | About 1 minute |
| Steam Type | Continuous |
| Steam Hose | Flexible |
| Rod | Retractable, height adjustable |
| Integrated Hanger | Yes |
| Included Accessories | Brush and pleat accessory (optional depending on model) |
| Materials | Plastic and Metal |
| Recommended Maintenance | Monthly descaling with white vinegar and water solution |
| Safety | Polarized plug; do not immerse; supervision required near children |
| Warranty (Canada) | 5 years |
| Warranty (United States) | 1 year |
| Customer Service (Canada) | 1.800.267.2826 |
| Customer Service (United States) | 1.800.851.8900 |
| Website | www.hamiltonbeach.ca |
Frequently Asked Questions - 11552 HAMILTON BEACH
User questions about 11552 HAMILTON BEACH
0 question about this device. Answer the ones you know or ask your own.
Ask a new question about this device
Download the instructions for your Steam cleaner in PDF format for free! Find your manual 11552 - HAMILTON BEACH and take your electronic device back in hand. On this page are published all the documents necessary for the use of your device. 11552 by HAMILTON BEACH.
USER MANUAL 11552 HAMILTON BEACH
Visit www.hamiltonbeach.com for our complete line of products and Use and Care Guides - as well as delicious recipes, tips, and to register your product online
Questions Please call us - our friendly associates are ready to help. USA:1.800.851.8900
IMPORTANT SAFETY INSTRUCTIONS
When using electrical appliances, basic safety precautions should always be followed to reduce the risk of fire, electric shock, and/or injury to persons, including the following:
- Read all instructions.
- This appliance is not intended for use by persons (including children) with reduced physical, sensory, or mental capabilities, or lack of experience and knowledge, unless they are closely supervised and instructed concerning use of the appliance by a person responsible for their safety.
- Close supervision is necessary when any appliance is used by or near children. Children should be supervised to ensure that they do not play with the appliance.
- The garment steamer must not be left unattended while it is connected to the electric outlet.
- To reduce the risk of contact with hot water emitting from steam vents, check appliance before each use by holding it away from body and operating steam button.
- Use appliance only for its intended use.
- To reduce the risk of electric shock, do not immerse the appliance in water or other liquids.
- Never yank cord to disconnect from outlet; instead, grasp plug and pull to disconnect.
-
Do not allow cord to touch hot surfaces. Let appliance cool completely before putting away. Loop cord loosely around appliance when storing.
-
Always disconnect the appliance from the electrical outlet before filling the garment steamer with water, emptying the water from the garment steamer, and when the garment steamer is not in use.
- Do not operate the garment steamer with a damaged cord or in the event the garment steamer has been dropped or damaged or there are visible signs of damage or it is leaking. To avoid the risk of electric shock, do not disassemble the garment steamer. Take it to a qualified serviceman for examination and repair. Incorrect assembly might result in a risk of electric shock when the garment steamer is used after reassembly.
- Burns could occur from touching hot metal parts, hot water, or steam. Use care when you turn a steam appliance upside down—there may be hot water in the reservoir.
- To avoid a circuit overload, do not operate another high-wattage appliance on the same circuit.
- If an extension cord is absolutely necessary, a 15-ampere cord should be used. Cords rated for less amperage may overheat. Care should be taken to arrange the cord so that it cannot be pulled or tripped over.
- When placing the steam nozzle in the holder, ensure that the surface on which the base assembly is placed is stable.
SAVE THESE INSTRUCTIONS
Other Consumer Safety Information
This product is intended for household use only.
WARNING Electrical Shock Hazard: This product is provided with a polarized plug (one wide blade) to reduce the risk of electric shock. The plug fits only one way into a polarized outlet. Do not defeat the safety purpose of the plug by modifying the plug in any way or by using an adapter. If the plug does not fit fully into the
outlet, reverse the plug. If it still does not fit, have an electrician replace the outlet.
Direct steam at clothing only. Directing steam toward any other surface may damage that surface.
- Do not steam clothes that are being worn.
- Do not use steam in the direction of people or pets.

Parts and Features
Optional Accessories on Select Models
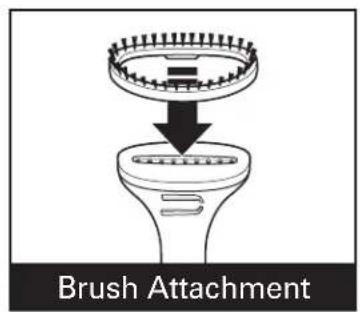
Snap onto steam nozzle.
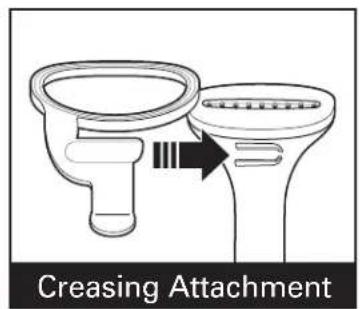
Slide onto steam nozzle until it locks into place.
Assembly Instructions
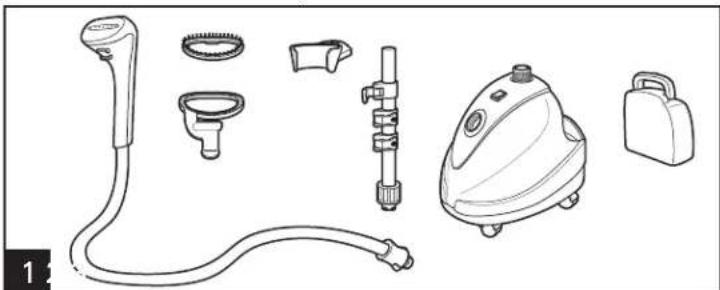
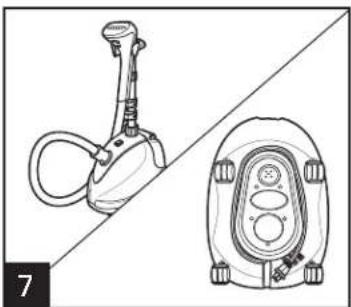
Unpack all pieces from carton and remove any packing materials. Assemble steam nozzle holder by pushing it onto the tube end of the retractable pole. NOTE: Brush and Creasing Attachments are optional accessories on select models.
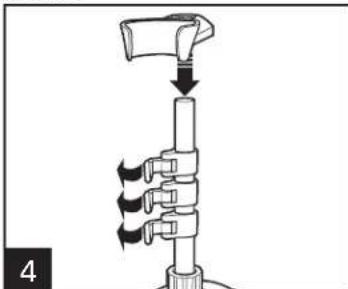
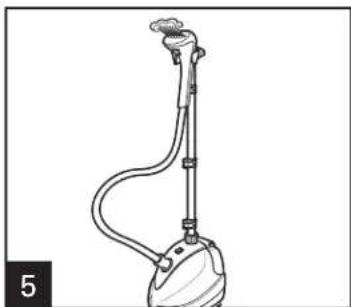
Assemble steam nozzle holder by pushing it onto the tube end of the retractable pole. To extend the retractable pole, flip each lever on the pole to the open position.
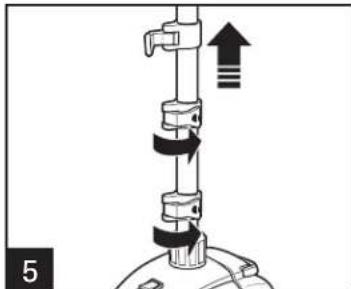
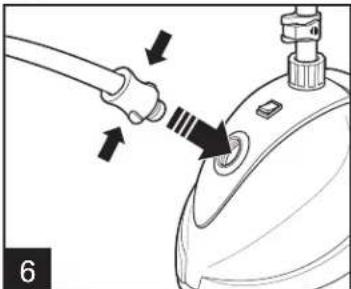
Extend the pole up to full height; then flip levers closed to secure. Firmly grasp base of flexible steam hose and push in tabs on both sides. Insert into opening on steamer.
CAUTION Burn Hazard: Escaping steam is hot. Ensure base of hose is fully inserted as directed. If steam is leaking around base of hose, turn off and allow to cool before attempting to adjust the base of hose.
Before First Use: Remove ALL packing materials from garment steamer.

Insert base of retractable pole into opening on top of the steamer, lining up the cutout notches; then slide the ridged collar down over the opening.
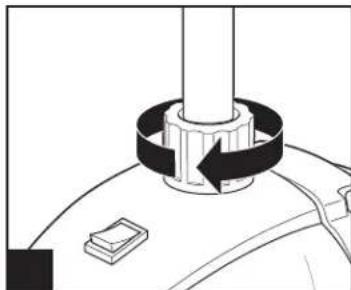
Holding ridged collar on base of pole, turn clockwise until tightened and secure.
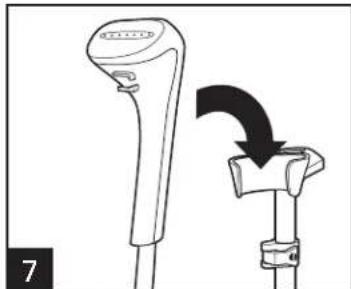
Hang steam nozzle/handle on steam nozzle holder.
How to Steam
NOTE: Do not install or remove steaming attachments when the unit is ON.
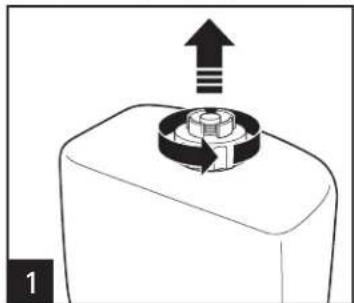
Unscrew the ridged cap on bottom of water tank.
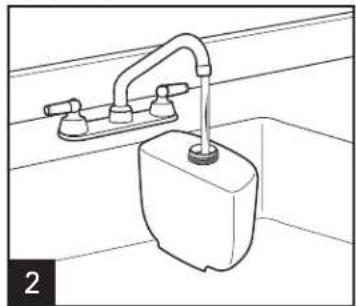
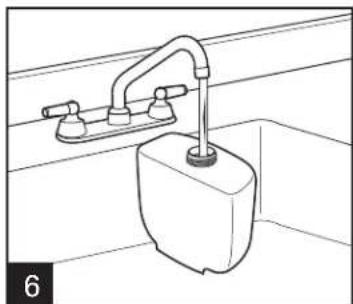
Fill the tank with cool water.
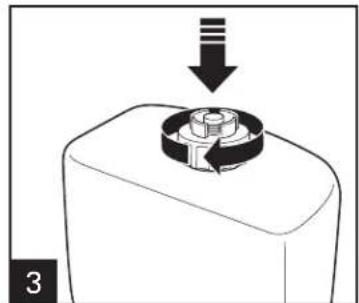
Replace cap.
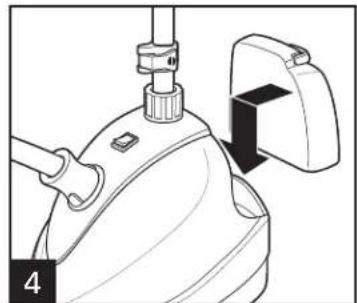
Place water tank back onto steamer.
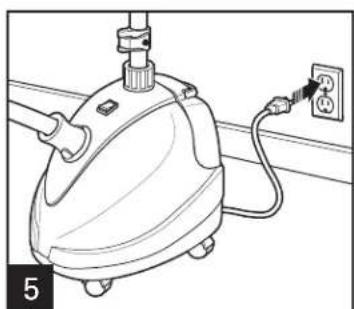
Plug unit into electrical outlet.
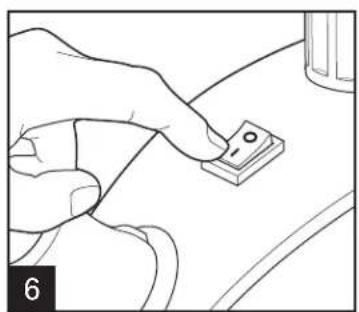
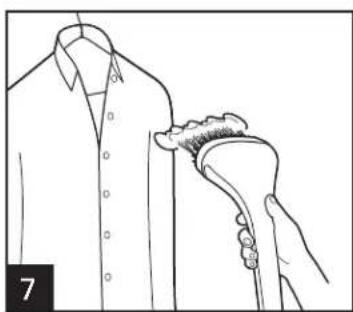
Turn ON/OFF switch to the ON ( I ) position. Wait at least one minute for the steam to start flowing from the steam nozzle. Begin steaming at top of garment. Slowly move steam nozzle vertically up and down to cover entire garment.
position. Wait at least one minute on the steam nozzle. Begin steaming from nozzle vertically up and down
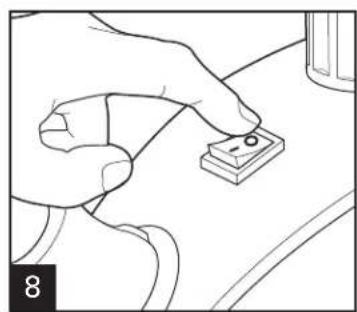
When finished, turn power switch OFF (O and unplug unit.
CAUTION Burn Hazard: Steam is hot. Always point nozzle away from yourself and others. Never steam clothes while they are being worn.
Garment Steamer Tips
NOTICE: To avoid garment damage, check garment label for fabric composition and any steaming instructions such as this symbol:

Do not use steam
- The retractable pole should be fully extended during operation to ensure the free flow of steam through the flexible steam hose.
- Inserting the retractable pole so that the integrated garment hanger faces the rear of the unit will ensure stability while steaming clothing.
-
Do not operate without water in the water tank. To add water during operation, first switch steamer OFF (O and then remove water tank and refill.
-
Use caution when hanging clothing from the integrated garment hanger. Too much weight or pulling on the garment hanger may cause the unit to tip over.
- The integrated garment hanger is not intended for hanging multiple garments at one time or for garment storage.
- When steaming, touching fabrics lightly with the steam nozzle/ handle will assist in wrinkle removal. It is important to make contact with the garment and/or fabric.
- For more difficult wrinkles, try steaming from the underside of the fabric. This allows the fibers in the material to relax.
- Pants are more easily steamed upside down, holding the cuffs.
- Your garment steamer is also ideal for steaming curtains, upholstery, and other fabric items that are difficult or unable to be ironed.
Using the Brush/Creasing Attachments
NOTE: Attachments are optional accessories on select models. Make sure unit is OFF when assembling attachments.
Brush Attachment
Use the Brush Attachment to:
- Steam upholstery, pillows, and other fabrics
- Freshen clothing and fabrics that have become "matted" over time
- Assist with lint removal while steaming
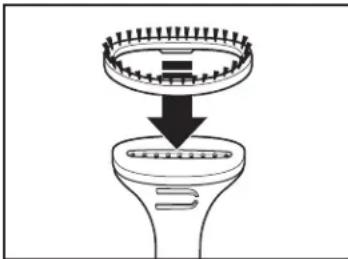
Brush Attachment
Creasing Attachment
Use the Creasing Attachment to:
- Steam creases into pants, shirt cuffs, and collars
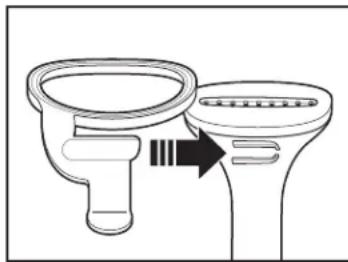
Creasing Attachment
Care and Cleaning
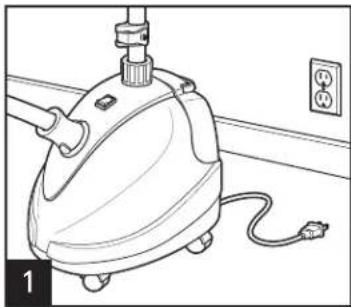
Make sure unit is unplugged.
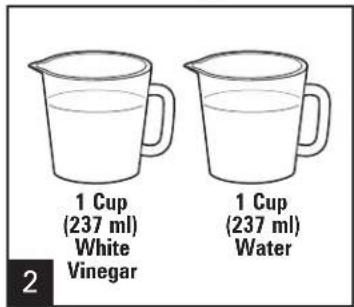
Mix a solution of one cup white vinegar and one cup water.
Follow this procedure monthly to avoid mineral deposits and buildup, which can affect the steaming performance of the unit.
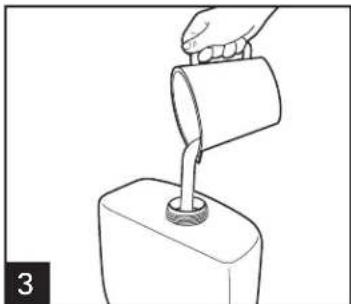
Slowly pour the solution into the water tank and replace the cap.
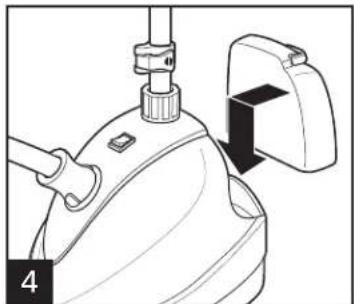
Replace water tank onto steamer.
Turn the unit ON (I) and let the liquid solution steam out of the steam handle/nozzle.
Repeat this process with clean water until vinegar odor is no longer present.
Reassemble steamer for storage. Wrap cord around the cord wrap on bottom of steamer.
| Troubleshooting | |
| PROBLEM | PROBABLE CAUSE |
| Unit won't steam. Not enough steam. | Make sure there is water in the water tank and unit is plugged in and switched to ON (1) position. • Do not hold the steam handle/nozzle too low for too long, or steam will condense into water inside the hose and may block normal steam flow. Periodically lift steam nozzle/handle as high as possible to let any condensation in flexible steam hose drain back into unit. |
| Flexible steam hose drips and/or leaks. | • Extend retractable pole until it is fully open. Do not allow kinks in the flexible steam hose. |
| Steamer leaves water spots on clothing. | • Allow enough time (approximately one minute) for steamer to preheat before use. • Periodically lift steam nozzle/handle as high as possible to let any condensation in flexible steam hose drain back into unit. |
| Flexible steam hose emits a gurgling noise. | • Fully extend flexible steam hose to allow steam to flow freely. |
Limited Warranty
This warranty applies to products purchased and used in the U.S. and Canada. This is the only express warranty for this product and is in lieu of any other warranty or condition.
This product is warranted to be free from defects in material and workmanship for a period of five (5) years from the date of original purchase in Canada and one (1) year from the date of original purchase in the U.S. During this period, your exclusive remedy is repair or replacement of this product or any component found to be defective, at our option; however, you are responsible for all costs associated with returning the product to us and our returning a product or component under this warranty to you. If the product or component is no longer available, we will replace with a similar one of equal or greater value.
This warranty does not cover glass, filters, wear from normal use, use not in conformity with the printed directions, or damage to the product resulting from accident, alteration, abuse, or misuse. This warranty extends only to the original consumer purchaser or gift recipient. Keep the original sales receipt, as proof of purchase is required to make a warranty claim. This warranty is void if the product is used for other than single-family household use or subjected to any voltage and waveform other than as specified on the rating label (e.g., 120V 60Hz ).
We exclude all claims for special, incidental, and consequential damages caused by breach of express or implied warranty. All liability is limited to the amount of the purchase price. Every implied warranty, including any statutory warranty or condition of merchantability or fitness for a particular purpose, is disclaimed except to the extent prohibited by law, in which case such warranty or condition is limited to the duration of this written warranty. This warranty gives you specific legal rights. You may have other legal rights that vary depending on where you live. Some states or provinces do not allow limitations on implied warranties or special, incidental, or consequential damages, so the foregoing limitations may not apply to you.
To make a warranty claim, do not return this appliance to the store. Please call 1.800.851.8900 in the U.S. or 1.800.267.2826 in Canada or visit hamiltonbeach.com in the U.S. or hamiltonbeach.ca in Canada. For faster service, locate the model, type, and series numbers on your appliance.
PRECAUTIONS IMPORTANTES
Ruperto Martinez No. 238 Ote
Centro MONTERREY, 64000 N.L.
Tel: 01 81 8343 6700
Jalisco
SERVICIOS DE MANTENIMIENTO CASTILLO
Garibaldi No. 1450
Ladrón de Guevara
GUADALAJARA 44660 Jal.
Tel: 01 33 3825 3480
Modelo: 11550
Tipo: S03
CharacteristicasElecricas: 120V\~ 60Hz 1500W