Cinema 100 3.0 System - Speaker Paradigm - Free user manual and instructions
Find the device manual for free Cinema 100 3.0 System Paradigm in PDF.

User questions about Cinema 100 3.0 System Paradigm
0 question about this device. Answer the ones you know or ask your own.
Ask a new question about this device
Download the instructions for your Speaker in PDF format for free! Find your manual Cinema 100 3.0 System - Paradigm and take your electronic device back in hand. On this page are published all the documents necessary for the use of your device. Cinema 100 3.0 System by Paradigm.
USER MANUAL Cinema 100 3.0 System Paradigm
natural_image
Abstract black-and-white graphic of a curved, pixelated pattern resembling a stylized wave or wave (no text or symbols)CINEMA™
SPEAKER SYSTEMS
IMPORTANT: Please read before wall mounting speakers.

Wall mount speakers securely enough that they cannot fall and cause personal injury or damage to property. Use safety straps (if included). Detailed information on attaching the safety straps is included in the section on Wall Mounting later in the manual.

Paradigm DOES NOT supply hardware for mounting speakers to the wall. Hardware shown in this manual is for example only and will vary depending on the wall type. Always use screws appropriate for wall type and weight of speakers.

If installing into drywall, install into 1/2" (13 mm) or 5/8" (16 mm) drywall only. Screws must be long enough to go through anchor bolt (not supplied) and firmly into drywall (see inset circle, page 12).
NON LIABILITY: We are aware that the wall-mounting assemblies provided for Cinema speakers could be used for purposes and in ways other than those for which they were intended. The manufacturer, distributor, retailer and their respective agents cannot be held responsible or liable for injuries or property damage—direct indirect or consequential—arising from the use of or inability to use these products safely and properly. Every effort has been made to provide accurate, error-free installation instructions. Paradigm Electronics Inc. disclaims liability for difficulties that may arise from the misinterpretation of information contained in these instructions.


RECYCLING AND REUSE GUIDELINES (Europe)
In accordance with the European Union WEEE (Waste Electrical and Electronic Equipment) directive effective August 13, 2005, we would like to notify you that our speakers may contain regulated materials which, upon disposal, require special reuse and recycling processing. For this reason Paradigm Electronics Inc. (the manufacturer of Paradigm speakers and Anthem electronic products) has arranged with its distributors in European Union member nations to collect and recycle this product at no cost to you. To find your local distributor please contact the dealer from whom you purchased this product or go to our website at www.paradigm.com.
Please note that only the product falls under the WEEE directive. When disposing of packaging and other shipping material we encourage you to recycle through the normal channels.
Thank you for choosing award-winning Cinerspeakers and congratulations. You are about to hear the difference these sonically accurate speakers will make in your music and home theater system. They are the product of countless hours of comprehensive research and development and will reward you with exceptional sound for many years.
To ensure proper installation please read this manual and follow all instructions. If you have further questions contact your Authorized Paradigm® Dealer or visit the Q&A page on our website at www.paradigm.com.
TABLE OF CONTENTS
Your New Speakers 3
How to Avoid Speaker Damage 3
Speaker Placement 3
Stand Mounting 6
Wall Mounting....8
Speaker Connection 13
Troubleshooting Guide 14
Technical Specifications....15
Limited Warranty 17
YOUR NEW SPEAKERS
Paradigm Cinema speakers are ideally suited to a variety of lifestyle applications. They are designed to allow easy installation throughout your home. To ensure the best performance possible we strongly recommend that you observe the placement guidelines provided in the “Speaker Placement” section.
Cleaning
Do not use a strong or abrasive cleaner on your speakers. Clean them with a soft damp cloth but do not get them wet.
On Stands or Wall Mounting
We include tabletop/shelf stands (supports) and wall-mounting brackets for Cinema speakers (varies by model). See the illustrations later in the manual for how to mount them to stands and wall brackets. Paradigm floorstanding stands are also available for your new Cinema 100s at an additional charge (see your dealer for more information).
IMPORTANT! If wall mounting take extra care during the installation process—always use the safety straps (if included) as secondary restraints.
HOW TO AVOID SPEAKER DAMAGE
Use an appropriate amplifier. At high volumes, a very powerful amplifier can overdrive your speakers and damage them. On the other hand, if your amplifier isn't powerful enough, it can produce clipping distortion that can easily damage high-frequency drivers (see dealer).
Don't be fooled by your amplifier's volume control. It adjusts listening level—it does not indicate power output. If your speakers begin to sound harsh or grating, or if you hear the bass breaking up turn the volume down immediately or you will damage your speakers! This type of damage constitutes abuse and is not covered by warranty!
Tone controls and equalizers can demand even more power from an amplifier, lowering the point at which it produces clipping distortion. Use them sparingly, if at all, and do not use them when listening at loud levels.
SPEAKER PLACEMENT
The following placement guidelines will help you get the best performance from your Cinema speakers. Illustrations showing you how to attach speakers to stands and wall-mounting brackets are provided in the section following this one. For the Cinema ^™ Trio, follow placement instructions provided in the illustration on page 5.
Front Speakers (Left/Right)
On the Stands (See illustration opposite)
For the most accurate timbral balance, place your front speakers so that their high-frequency drivers (tweeters) point toward the listening area and sound arrives at approximately ear level.
On the Wall (See illustration opposite)
Follow the placement directions provided in the paragraph above.
Center Speaker
On the Stand (see illustration below)
Place the center speaker on its stand below the display so that sound arrives as close to ear level as possible. The speaker should sit about the same distance away from the listening area as the front speakers. (Some receivers and processors electronically adjust for differences in distance between speakers... check to see if yours does.)
On the Wall (see illustration below)
Place the center speaker above or below the display, whichever position brings sound closest to ear level. It should sit about the same distance away from the main listening areas as the front speakers. (See note above about electronic adjustments for distance.)

text_image
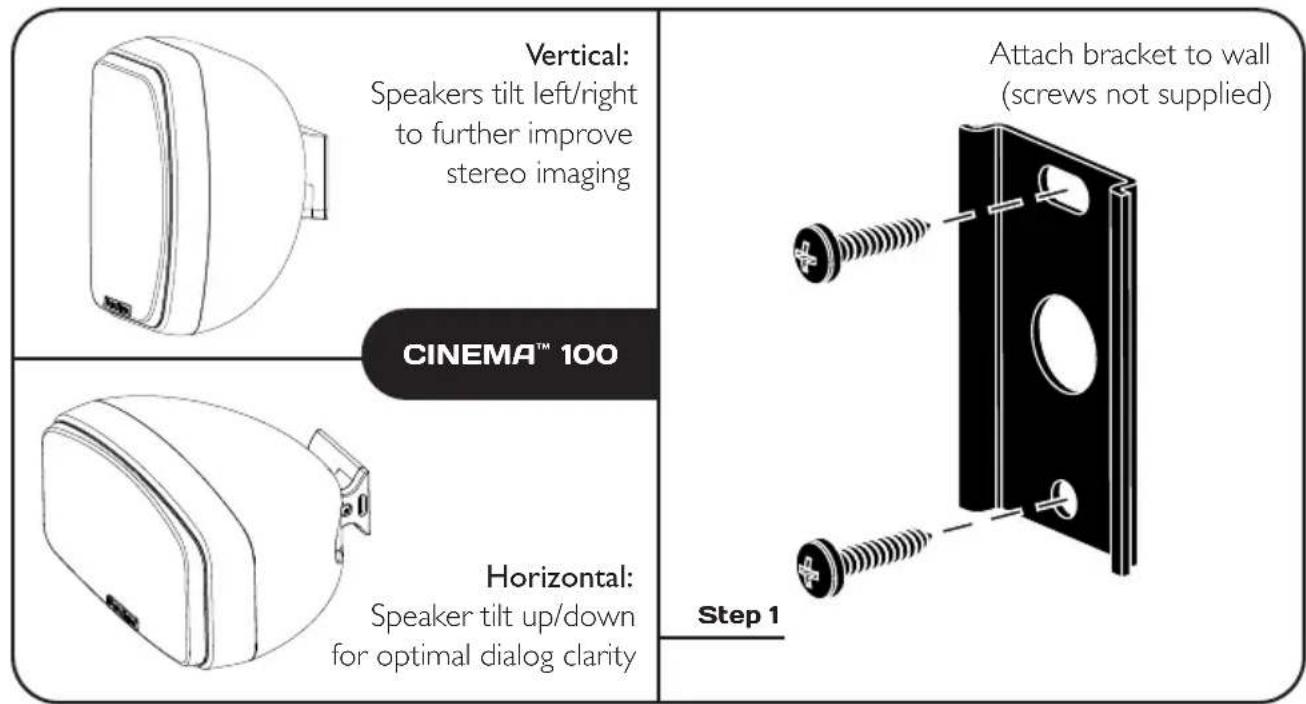
CINEMA™ 100, 200 & 400 OR OR OR OR Cinema™ 200/400 Left/Right speakers are wall mountable only.Surround and Rear Speakers
When used as surround/rear speakers, Cinema speakers should be kept well away from the listening area for optimal surround-sound performance (as shown on next page). They can be placed on stands (supports) or on the wall, following the assembly directions provided for the appropriate model.
5.1 Surround Configuration (5.1 requires 5 speakers plus a subwoofer)
Position speakers on each side, corner, or rear of the listening area as shown on next page.
7.1 Surround Configuration (7.1 requires 7 speakers plus a subwoofer)
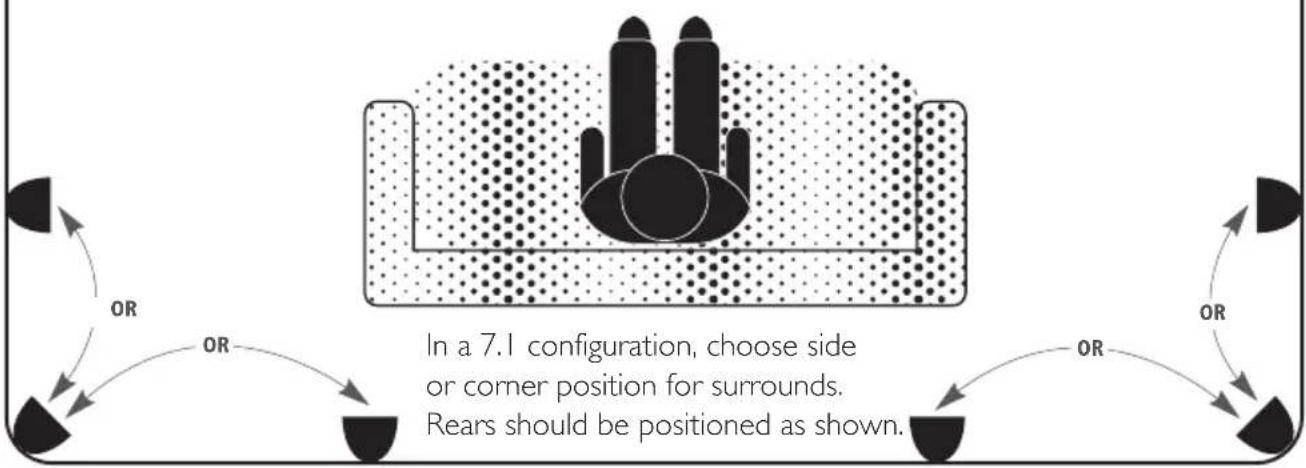
Position one surround speaker on each side or corner of the listening area as shown on the next page. Position additional rear speakers behind the listening area—one slightly to the right, the other slightly to the left, also as shown on next page.
SPEAKER PLACEMENT (CONTINUED)
Surround and rear configurations shown
flowchart
graph TD
    A["Top: Inside"] --> B{Rear Position}
    B -->|Side or Corner Position| C["Bottom Left"]
    B -->|Side or Corner Position| D["Bottom Right"]
    B -->|Side or Corner Position| E["Bottom Left"]
    style A fill:#f9f,stroke:#333
    style B fill:#ccf,stroke:#333
    note right of B "In a 7.1 configuration, choose side or corner position for surrounds. Rears should be positioned as shown."
Cinema Trio (Front/Left/Center speakers in one unit)
Place the speaker above or below the display, whichever position brings sound closest to ear level. If also using surround/rear speakers follow the directions for correct placement provided earlier.

text_image
OR ORSTAND MOUNTING (ALL HARDWARE INCLUDED)

text_image
CINEMA™ 100 Push down on terminal clips to allow wire access. Connect wires before attaching stand.STAND MOUNTING (CONTINUED)
Stand is only used when speaker is in a horizontal configuration
CINEMA™ 200 & 400
text_image
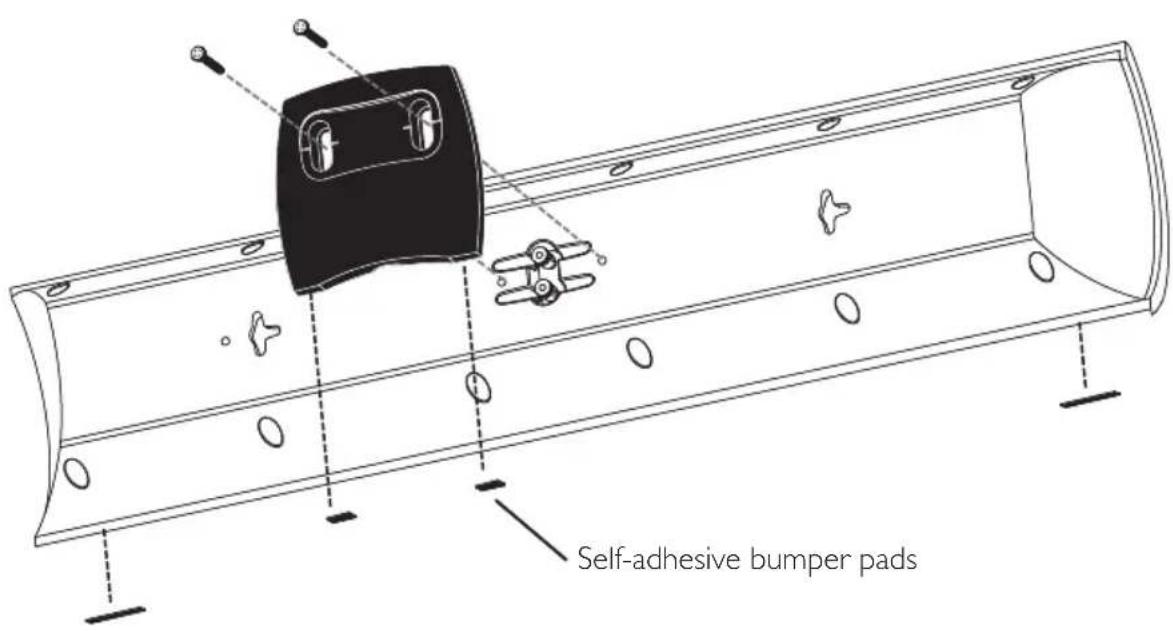
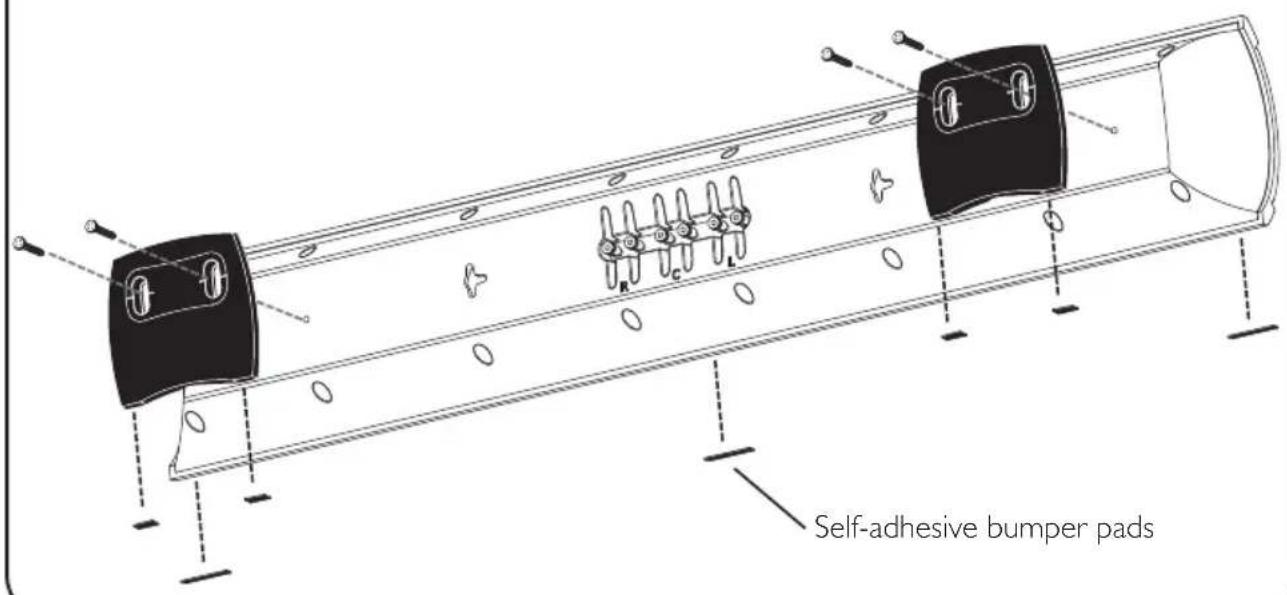
Self-adhesive bumper padsStands are only used when speaker is in a horizontal configuration
CINEMA™ TRIO
text_image
Self-adhesive bumper padsIf you are not comfortable performing the following procedures, have a professional perform the installation (see your Authorized Paradigm® Dealer about hiring a professional).

text_image
Assemble all parts before moving to Step 3 Step 2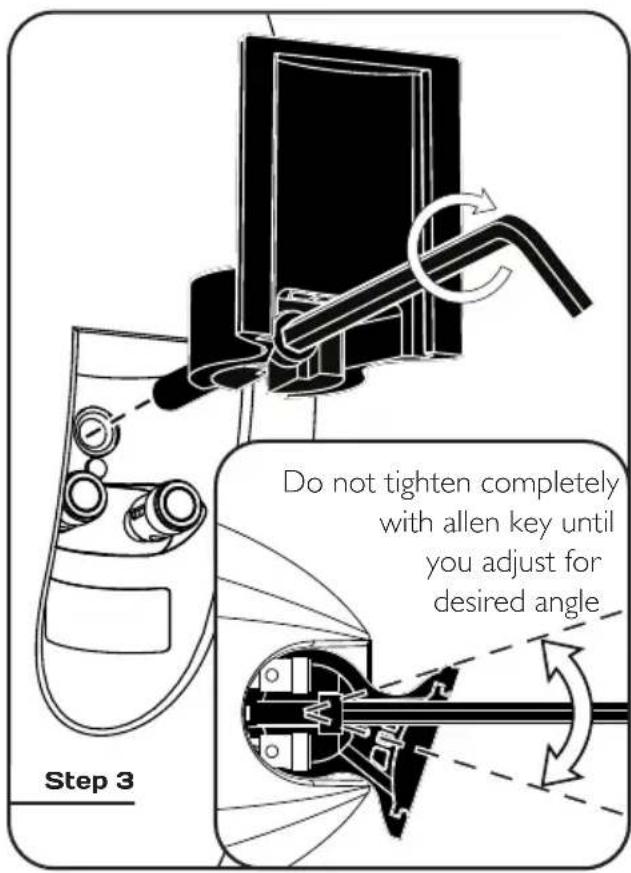
text_image
Do not tighten completely with allen key until you adjust for desired angle Step 3WALL MOUNTING (CONTINUED)
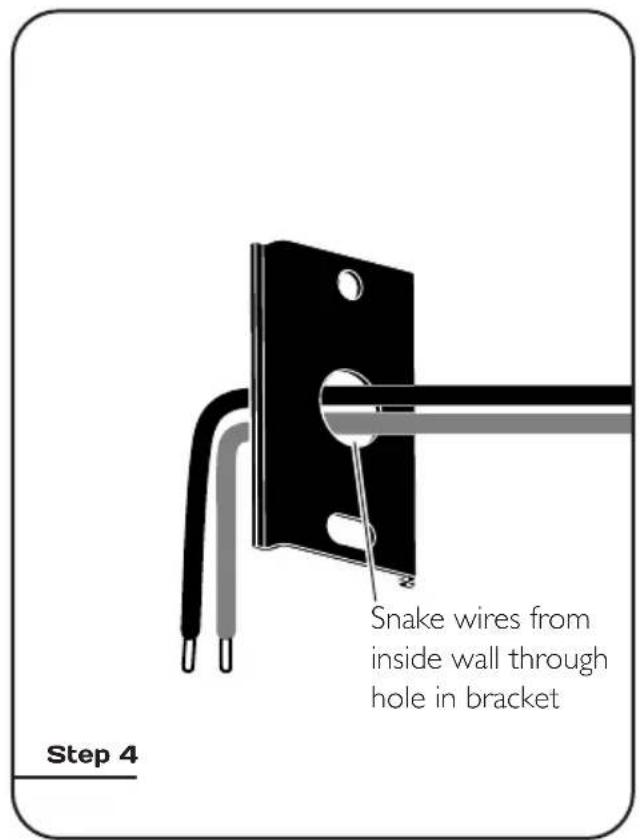
WIRING INSIDE THE WALL
text_image
Snake wires from inside wall through hole in bracket Step 4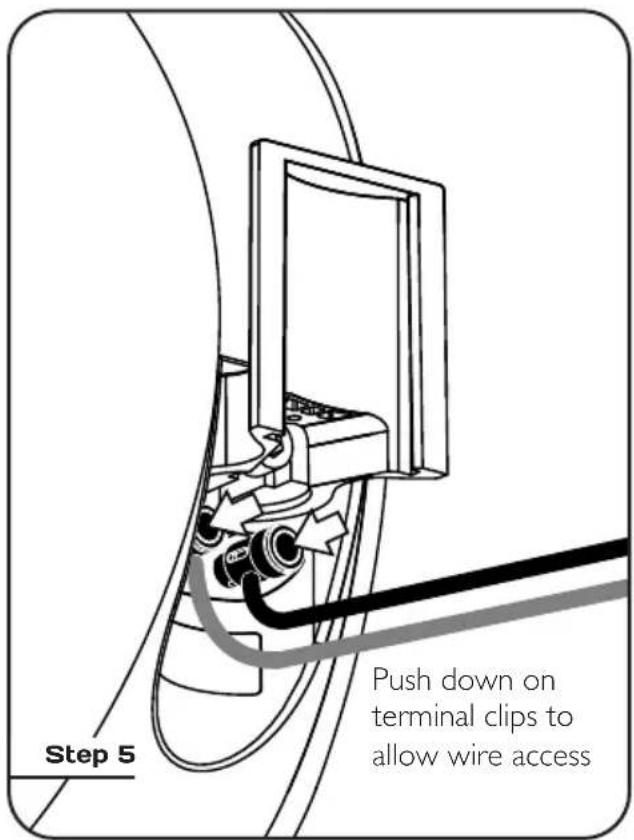
text_image
Step 5 Push down on terminal clips to allow wire access
text_image
Step 6 Step 7
text_image
Attach locking cover to bracket and screw inWIRING ALONG THE WALL

text_image
Snake wires through hole in locking cover Step 4
text_image
Step 5 Push down on terminal clips to allow wire access
text_image
Step 6 Step 7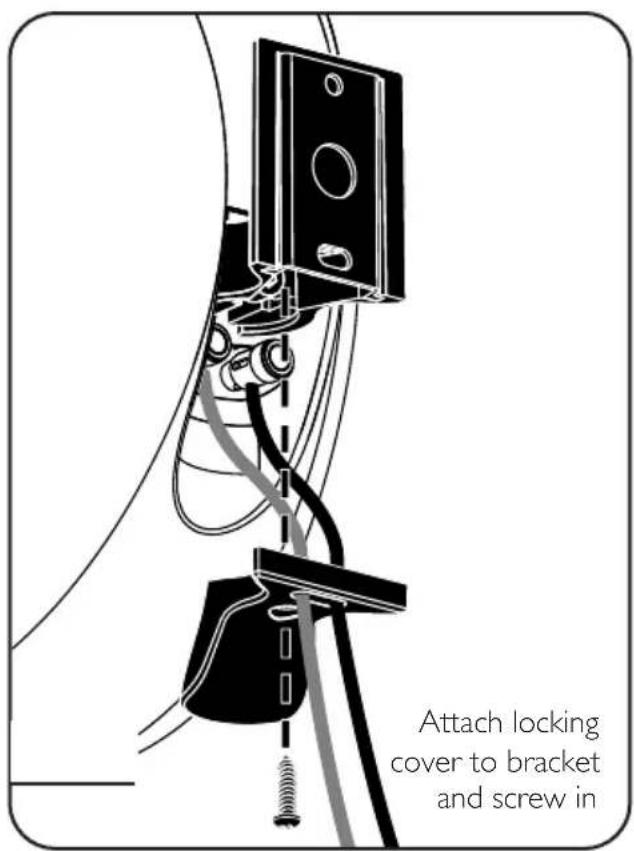
text_image
Attach locking cover to bracket and screw inWALL MOUNTING (CONTINUED)
VERTICAL MOUNTING
FOR CINEMA™ 200, 400 & TRIO

text_image
Position onPosition bracket vertically on wall as shown, then follow the steps for horizontal positioning.
HORIZONTAL MOUNTING FOR CINEMA™ 200, 400 & TRIO
Wall screws not supplied

natural_image
Technical line drawing of a mechanical assembly with no visible text or symbolsNOTE: This step is for positioning only. Screws will be removed in next step to allow installation of additional anchor bolts
Position bracket and ensure it is level. Mark the two center screw holes. Drill pilot holes, then press anchor bolts firmly into drywall and screw in. Follow with flathead screws: DO NOT SCREW ALL THE WAY IN AT THIS POINT—leave screw heads protruding slightly.

text_image
Step 2 WARNING! For stability, all four screws MUST be usedBracket is slotted (see illustration), to allow further adjustment up or down, if necessary. Re-check to ensure bracket is level. Mark inner screw holes.

text_image
Step 3
natural_image
Mechanical diagram showing a rotating shaft and lever mechanism within a circular housing (no text or symbols)Remove the two flathead screws (not shown). Drill inner pilot holes, then press anchor bolts firmly into drywall and screw in. Now insert all four flathead screws and tighten.
WARNING! All screws must be inserted straight and fully tightened to ensure correct operation of anchor bolts.

text_image
CINEMA™ 200 & 400 WIRING Safety strap attaches here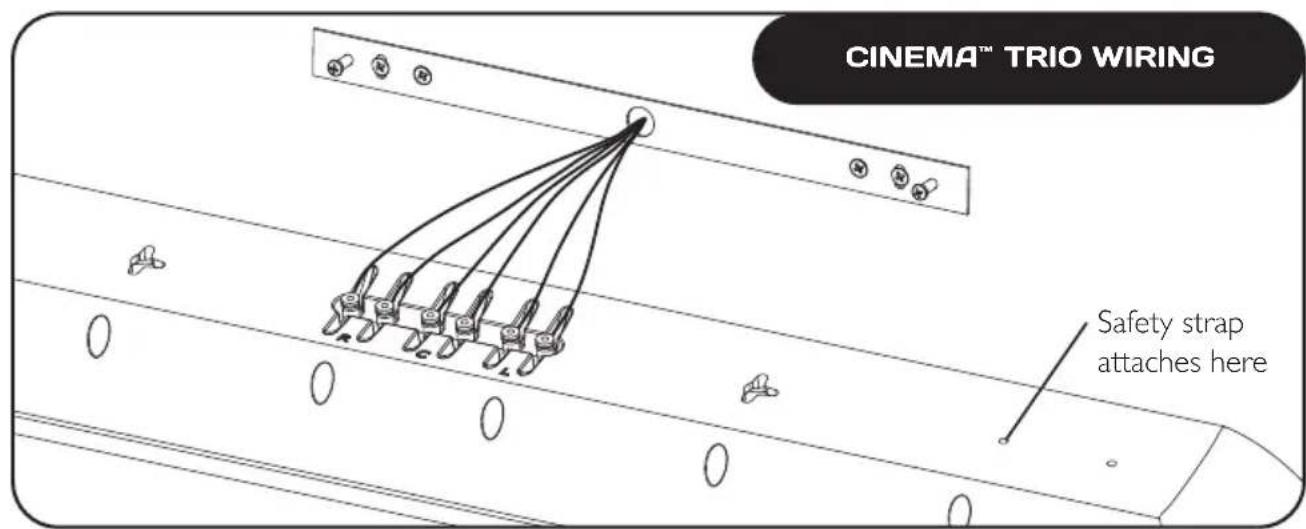
text_image
CINEMA™ TRIO WIRING Safety strap attaches hereWALL MOUNTING (CONTINUED)

text_image
CINEMA™ 200, 400 & TRIOAlign keyhole slots (see inset) on rear of speaker with protruding screw heads on the bracket, then using an "in and down" motion mount speaker on bracket.
SPEAKER CONNECTION

Turn your amplifier OFF before connecting speakers. This will avoid damage which could result from accidental shorting of speaker cables.
The following chart identifies the minimum gauge requirements for various cable lengths:
| MINIMUM GAUGE REQUIREMENTS | ||
| LENGTH | DIAMETER | GAUGE |
| Under 4.5 m (15 ft) | 1.3 mm (0.05 in) | 16 awg |
| Under 9 m (30 ft) | 1.6 mm (0.06 in) | 14 awg |
| Over 9 m (30 ft) | 2.0 mm (0.08 in) | 12 awg |
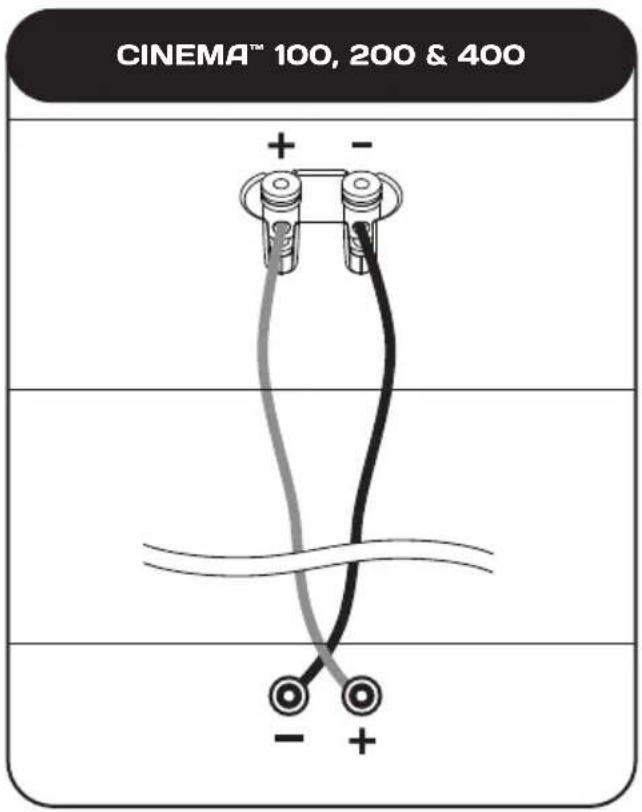
Your speakers are equipped with binding posts that can be used with pin connectors, as well as with bare wire. Refer to the diagram below and using high-quality speaker cable (see your dealer), connect one speaker at a time to your receiver/amplifier. Connect the red (+) amplifier terminal to the red (+) speaker terminal and the black (−) to the black (−) (see next page). Push binding posts to secure.
Turn your amplifier on and listen to your speakers. If you notice a complete lack of mid-bass and a dislocated image, one or more of your speakers may be connected out-of-phase (their polarity is reversed). Re-check to ensure that each speaker's cable is connected with correct polarity: red (+) to red (+) and black (−) to black (−). Make sure wires are firmly fastened. Push binding posts to secure.
text_image
CINEMA™ 100, 200 & 400 + -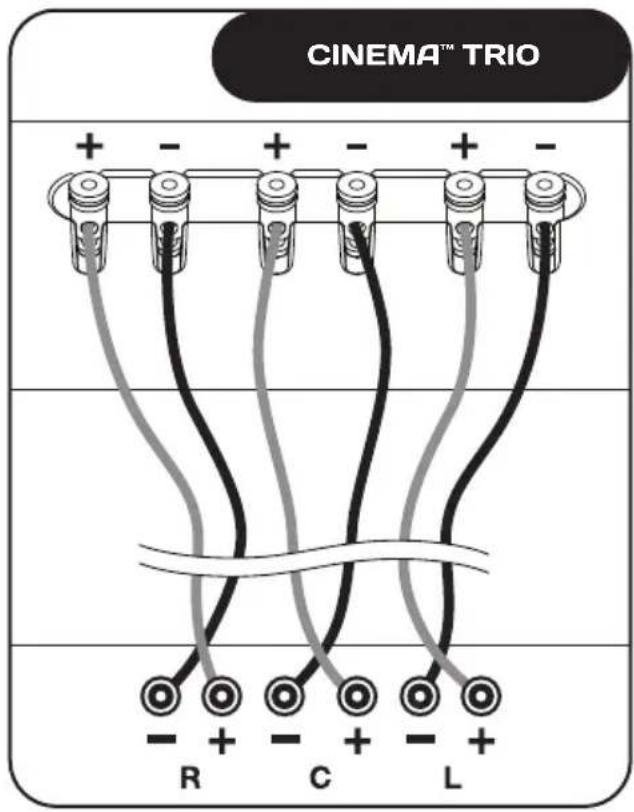
text_image
CINEMA™ TRIO + - + - + - R C LTROUBLESHOOTING GUIDE
| PROBLEM | SOLUTION |
| No Sound | Make sure receiver, preamp or amplifier is plugged in and turned on.Check power outlet at the wall is working.Are headphones plugged in, or is the system on Mute?Re-check all connections. |
| No Sound from One or More Speakers | Check your balance control or VC-150 Volume Control (if using).Check that all power cords are properly plugged in and functioningSwap a non-working speaker with one that works to determine if the problem is with the speaker or something else (i.e. wiring, amplifier). |
| Lack of Bass or Dislocated Image | One or more speakers may be connected out of phase (their polarity is reversed).Re-check to ensure that each speaker's cable is connected with correct polarity: red (+) to red (+) and black (-) to black (-). |
TECHNICAL SPECIFICATIONS
| CINEMATM 100 CINEMA | TM 200 | |
| Design | 2-driver, 2-way acoustic suspension, stand-mounted / wall-mounted | 3-driver, 2-way LCR, acoustic suspension, on-wall with option to sit center speaker on a table or shelf with supports included |
| Crossover(s) | 2nd-order electro-acoustic at 1.8 kHz | 2nd-order electro-acoustic at 1.8 kHz |
| High-Frequency Driver(s) | 25-mm (1 in) S-PALTM satin-anodized pure-aluminum dome, ferro-fluid damped and cooled | 25-mm (1 in) S-PALTM satin-anodized pure-aluminum dome, ferro-fluid damped and cooled |
| Bass / Midrange Driver(s) | 90-mm (3-1/2 in) mineral-filled polypropylene cone, 25-mm (1 in) high-temperature voice coil, oversize ceramic / ferrite magnets | Two 90-mm (3-1/2 in) mineral-filled polypropylene cones, 25-mm (1 in) high-temperature voice coil, oversize ceramic / ferrite magnets |
| Bass Driver(s) | n/a | n/a |
| Low-Frequency Extension* | 85 Hz (DIN) | 80 Hz (DIN) |
| Frequency Response:On-Axis30° Off-Axis | ±2 dB from 125 Hz – 20 kHz±2 dB from 125 Hz – 15 kHz | ±2 dB from 120 Hz – 20 kHz±2 dB from 120 Hz – 15 kHz |
| Sensitivity – Room / Anechoic | 88 dB / 85 dB | 90 dB / 87 dB |
| Suitable Amplifier Power Range | 15 – 100 watts | 15 – 150 watts |
| Maximum Input Powe† | 50 watts | 70 watts |
| Impedance | Compatible with 8 ohms | Compatible with 8 ohms |
| Dimensions (h x w x d) | 21.2 cm × 12.2 cm × 15.7 cm8-3/8 in × 4-13/16 in × 6-3/16 in | 50.5 cm × 16.1 cm × 10.4 cm19-7/8 in × 6-5/16 in × 4-1/16 in |
| Weight (unpacked) | 1.8 kg / 4.0 lb per speaker (with stand) | 3.7 kg / 8.3 lb per speaker |
| Finishes | Black Gloss | Black Gloss |
| CINEMATM 400 CINEMA | TM TRIO | |
| Design | 5-driver, 2-1/2-way LCR, acoustic suspension, on-wall with option to mount center configuration on table or shelf | All-in-one left / right / center: 7-driver, 3-channel, 2-way, acoustic suspension |
| Crossover(s) | 2nd-order electro-acoustic at 2.1 kHz; 2nd-order electro-acoustic at 500 Hz (bass drivers) | 2nd-order electro-acoustic at 1.8 kHz |
| High-Frequency Driver(s) | 25-mm (1 in) S-PALTM satin-anodized pure-aluminum dome, ferro-fluid damped and cooled | Three 25-mm (1 in) S-PAL" satin-anodized pure-aluminum domes, ferro-fluid damped and cooled |
| Bass / Midrange Driver(s) | Two 90-mm (3-1/2 in) mineral-filled polypropylene cones, 25-mm (1 in) high- temperature voice coil, oversize ceramic / ferrite magnets | Four 90-mm (3-1/2 in) mineral-filled polypropylene cones, 25-mm (1 in) high- temperature voice coil, oversize ceramic / ferrite magnets |
| Bass Driver(s) | Two 90-mm (3-1/2 in) mineral-filled polypropylene cones, 25-mm (1 in) high- temperature voice coil, oversize ceramic / ferrite magnets | n/a |
| Low-Frequency Extension* | 75 Hz (DIN) | 85 Hz (DIN) |
| Frequency Response: On-Axis 30° Off-Axis | ±2 dB from 115 Hz - 20 kHz ±2 dB from 115 Hz - 15 kHz | ±2 dB from 125 Hz - 20 kHz ±2 dB from 125 Hz - 15 kHz |
| Sensitivity - Room / Anechoic | 95 dB / 92 dB | 89 dB / 86 dB |
| Suitable Amplifier Power Range | 15 - 200 watts | 15 - 150 watts |
| Maximum Input Power# | 100 watts | 70 watts per channel |
| Impedance | Compatible with 8 ohms | Compatible with 8 ohms |
| Dimensions (h x w x d) | 67.0 cm x 16.1 cm x 10.4 cm 26-3/8 in x 6-5/16 in x 4-1/16 in | 16.1 cm x 91.5 cm x 10.4 cm 6-5/16 in x 36 in x 4-1/16 in |
| Weight (unpacked) | 5.8 kg / 12.8 lb per speaker | 7.6 kg / 16.8 lb per speaker |
| Finishes | Black Gloss | Black Gloss |
* DIN 45 500 Indicates -3 dB in a typical listening room.
With typical program source, provided the amplifier clips no more than 10% of the time.
LIMITED WARRANTY
Paradigm ^® speakers covered in this manual are warranted to be and remain free of manufacturing and/or material defects for a period of five (5) years from the date of original purchase.
Within the time periods specified, repair, replacement or adjustment of parts for manufacturing and/or material defects will be free of charge to the original owner.
Thermal Or Mechanical Abuse/Misuse Is Not Covered Under Warranty.
Limitations:
- Warranty begins on date of original retail purchase from an Authorized Paradigm® Dealer only. It is not transferable
- Warranty applies to product in normal home use only. If product is subjected to any of the conditions outlined in the next section, warranty is void
- Warranty does not apply if the product is used in professional or commercial applications
Warranty is Void if:
• The product has been abused (intentionally or accidentally)
- The product has been used in conjunction with unsuitable or faulty equipment
- The product has been subjected to damaging signals, derangement in transport, mechanical damage or any abnormal conditions
- The product (including cabinet) has been tampered with or damaged by an unauthorized service facility
• The serial number has been removed or defaced
Owner Responsibilities:
- Provide normal/reasonable operating care and maintenance
- Provide or pay for transportation charges for product to service facility
- Provide proof of purchase (your sales receipt given at time of purchase from your Authorized Paradigm® Dealer must be retained for proof-of-purchase date)
Should servicing be required, contact your nearest Authorized Paradigm® Dealer, Paradigm Electronics Inc. or Import Distributor (outside the U.S. and Canada) to arrange, bring in or ship prepaid, any defective unit. Visit our website, www.paradigm.com for more information.
Paradigm Electronics Inc. reserves the right to improve the design of any product without assuming any obligation to modify any product previously manufactured.
This warranty is in lieu of all other warranties expressed or implied, of merchantability, fitness for any particular purpose and may not be extended or enlarged by anyone. In no event shall Paradigm Electronics Inc., their agents or representatives be responsible for any incidental or consequential damages. Some jurisdictions do not allow limitation of incidental or consequential damages, so this exclusion may not apply to you.
Retain this manual and your sales receipt for proof of warranty term and proof of purchase.
Paradigm®
MODE D'EMPLOI

text_image
CINEMA MCCINEMA ^MC
SYSTEMÈS D'ENCEINTES