Royal Line V 24 Smart - TV MEGASAT - Free user manual and instructions
Find the device manual for free Royal Line V 24 Smart MEGASAT in PDF.

User questions about Royal Line V 24 Smart MEGASAT
0 question about this device. Answer the ones you know or ask your own.
Ask a new question about this device
Download the instructions for your TV in PDF format for free! Find your manual Royal Line V 24 Smart - MEGASAT and take your electronic device back in hand. On this page are published all the documents necessary for the use of your device. Royal Line V 24 Smart by MEGASAT.
USER MANUAL Royal Line V 24 Smart MEGASAT
natural_image
Scenic coastal landscape with turquoise ocean, lush green hills, and rocky cliffs under a partly cloudy sky (no text or symbols visible)Royal Line V Smart
Bedienungsanleitung
Inhaltsverzeichnis
8.4 Kanal Installation....27
8.4.1 Antenne Installation....27
8.4.2 Kabel Installation 28
8.4.3 Satelliten Installation 28
8.4.4 CAM-Betreiberprofil 29
8.4.5 CAM-Profilname 29
8.4.6 Programme kopieren 29
natural_image
Simple diagram showing a device with three screws and a downward arrow, no text or symbols present.text_image
Technical diagram of a computer chassis showing internal components and screwdriver insertion process5. Bezeichnungen
5.1 Frontansicht
text_image
Benutzervereinbarung We also our subsidiaries and affiliates controlled to providing quality services and a safe assessment to users. This Privacy Policy is meant to help consumers ("you") understand what information we collect, why it is discussed and how the information is used and shared. Where it is reasonable and practicable to do us, we will collect your personal information only, body-as-usual. However, it's very important, we might be provided with information by third parties. This Privacy Policy does not cover shares of third parties. For more information about their interests, please consult their privacy policies do so nor responsible for it. Zustimmen □ Alles auswählen Privacy Policy TURUS OF USE How to be a Social Privacy Statement Duration to follow an expression Defective 1. You means the natural person who has Personal Data is collected and processing it.6. Erstinstallation
natural_image
Action shot of two soccer players in red and black uniforms kicking a ball on a grass field, with blurred background figures and no visible text or symbols.Musik-Wiedergabe

text_image
Off The Beaten Path 2016 Pg lost You Wanna be Tough Better Do What You CanBild-Wiedergabe

text_image
Playlist Left Rotation Right Rotation Scale up Scale down Timer set10. Fehlerbehebung
natural_image
Scenic coastal landscape with turquoise ocean, lush green hills, and rocky cliffs under a partly cloudy sky (no text or symbols visible)Royal Line V Smart
user manual
Content
- Safety instructions....04
- Note on internet connection and data consumption....05
- Delivery....05
- Base mounting (optional)....06
- Designations....08
5.1 Front view 08
5.2 Rear view....08
5.3 Bottom side connections....09
5.4 Lateral connections....09
5.5 Remote control....10
- Initial installation .... 11
6.1 Language and region selection.... 11
6.2 Set code (child lock)....11
6.3 Network settings 12
6.4 User agreement 12
6.5 Register and log in 13
6.6 Setup....13
6.7 Channel loading 14
- Home screen 15
7.1 Search....15
7.2 Home screen....16
7.3 Free-TV....17
7.4 Discover....18
7.5 Apps 19
7.6 Quick settings 20
7.7 User account....20
- Settings....21
8.1 Network and connection.... 21
8.1.1 Wired and wireless network 21
8.1.2 Bluetooth....21
8.1.3 HDMI....22
8.2 Picture and sound 22
8.2.1 Quick sound and video settings 22
8.2.2 Picture mode 23
8.2.3 Advanced picture settings.... 23
8.2.4 Sound mode 24
8.2.5 Sound output device 24
8.2.6 Advanced sound settings 24
Content
8.3 Device settings....25
8.3.1 System settings....25
8.3.2 Energy saving settings.... 25
8.3.3 Start settings....26
8.3.4 Cache cleaner....26
8.3.5 Info 26
8.3.6 Restarting the television 26
8.3.7 Resetting the television....26
8.4 Channel installation....27
8.4.1 Antenna installation....27
8.4.2 Cable installation 28
8.4.3 Satellite installation....28
8.4.4 CAM-Operator profile....29
8.4.5 CAM-Profilname 29
8.4.6 Copying programmes....29
8.5 Accessibility 29
8.6 Childproof lock....30
8.7 Software-Update 30
8.8 App settings....31
- TV reception and multimedia functions....32
9.1 Selecting the input source....32
9.2 Calling up and editing the channel list....33
9.3 Playing media via USB.... 34
-
Troubleshooting 35
-
Specifications 36
1. Safety instructions
Please read the operating instructions carefully before using the appliance. Damage caused by improper handling is excluded from the warranty.
Mains connection: Please check the operating voltage of your power supply before commissioning. This appliance is suitable for AC 100-240 V, 50/60 Hz or DC 10-30 V.
Overloading: Do not overload sockets, extension cables or adapters. Do not use damaged power cords and do not touch them with wet hands to avoid risk of electric shock.
Liquids: Do not expose the appliance to dripping or splashing water and do not place any containers filled with liquids (e.g. vases) on the appliance.
Ventilation: Do not cover the ventilation slots and ensure sufficient distance from walls, furniture or curtains. Do not place the appliance in the immediate vicinity of heat sources (e.g. radiators, direct sunlight).
Choking hazard: Keep packaging materials such as film away from children - choking hazard!
Cleaning: Disconnect the appliance from the power supply before cleaning. Use a soft, dry cloth and do not use aggressive cleaning agents or liquids.
Opening the appliance: Do not open the appliance. Repairs may only be carried out by qualified personnel in order to avoid the risk of electric shock.
Power supply unit: The power supply unit must be installed near the appliance and be easily accessible at all times.
Battery - Risk of explosion: Risk of explosion if the battery is replaced incorrectly. Only use the same or an equivalent type of battery. Dispose of batteries in an environmentally friendly manner in accordance with local regulations.
HF exposure: This device fulfils the requirements for limiting HF exposure. Maintain a minimum distance of 20 mm between the user and the antenna during operation.
2. Note on internet connection and data consumption
Many functions of this TV - such as streaming services, apps, media libraries, free TV content or software updates - require an active internet connection.
A stable and sufficiently fast connection is required to play online content in order to enjoy films, series or live programmes without interruption.
If the TV is connected via a mobile router or hotspot with a SIM card, data volume is consumed when streaming videos or downloading apps. Depending on the picture quality (e.g. HD or 4K), data consumption can be very high.
Please note that this may result in additional costs, depending on your mobile phone tariff, especially if you do not have a data flat rate.
If the playback jerks, stops or reloads frequently, this is usually due to insufficient internet speed or limited bandwidth.
The connection can be weaker on campsites or in holiday resorts in particular, as many users share a common Wi-Fi or mobile phone connection.
For reliable playback, we recommend using a fast Internet connection and - if possible - a LAN connection instead of Wi-Fi.
3. Delivery
■ Royal Line V Smart
■ Remote Control
- Batteries
- Mini AV adapter
■ 230/12 volt mains adapter
■ 12 Volt car connection cable
- User manual
4. Base mounting (optional)

Note:
The stand is not included in the scope of delivery, but can be purchased from your specialist dealer as an accessory. If you have purchased the stand, please check that all parts are complete and undamaged before installation. If any parts are missing or damaged, please contact your specialist dealer.
Stand holder

Stand base

3x Countersunk head screw

3x Cylinder head screw
Step 1
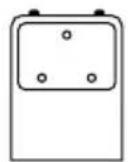


Place the stand bracket on the base plate and secure it with the countersunk screws supplied.
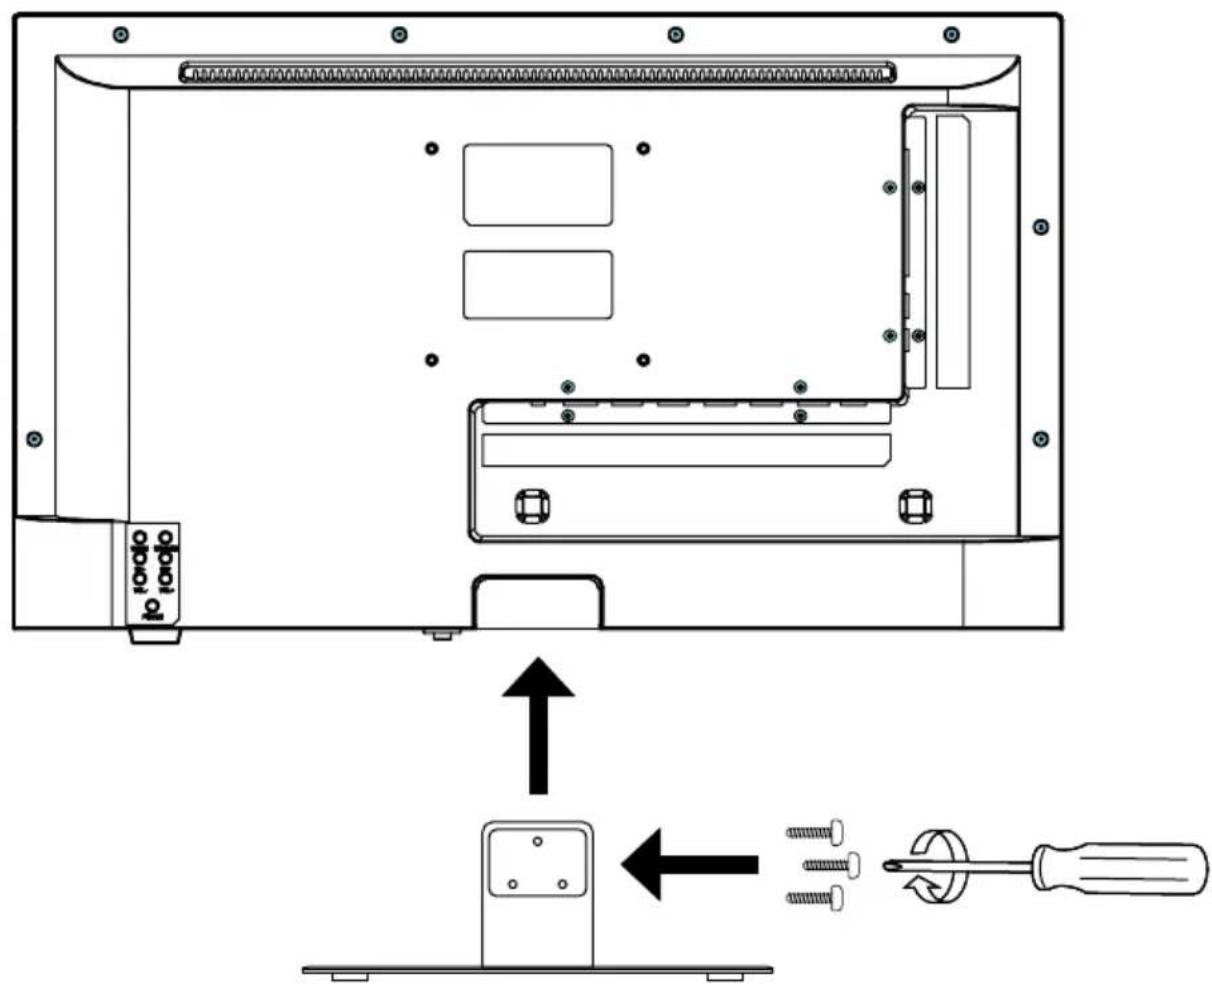
4. Base mounting (optional)
Step 2
- Place the TV on a flat, soft surface (e.g. blanket or foam) to prevent damage to the device or display.
- Attach the stand to the TV as shown.
- Fasten the stand using the cylinder head screws supplied and a Phillips screwdriver.
text_image
Technical diagram of a computer chassis showing internal components and screwdriver insertion process5. Designations
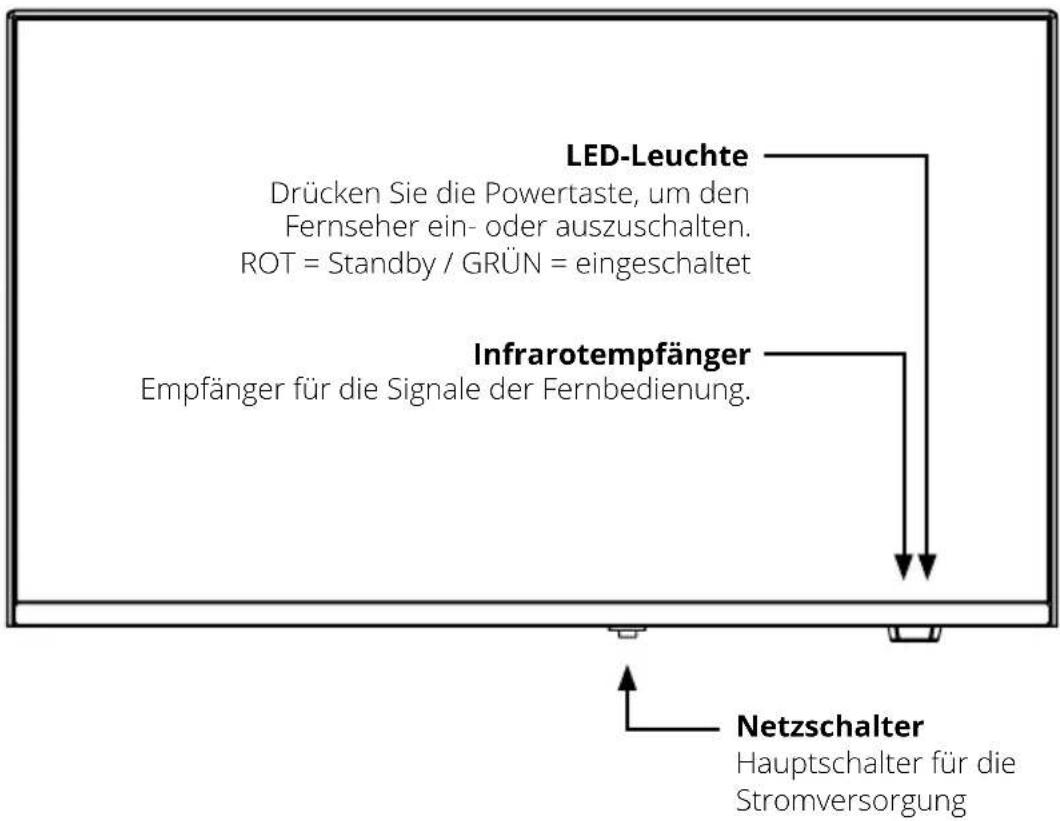
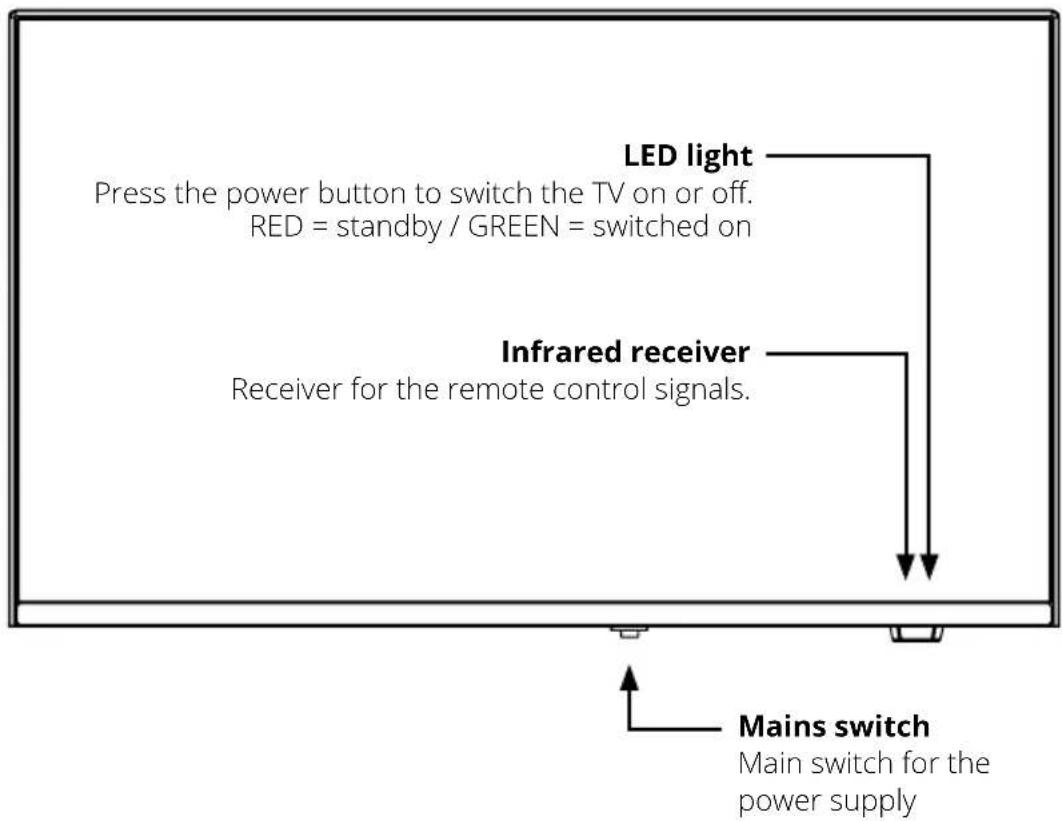
5.1 Front view
text_image
LED light Press the power button to switch the TV on or off. RED = standby / GREEN = switched on Infrared receiver Receiver for the remote control signals. Mains switch Main switch for the power supply5.2 Rear view
text_image
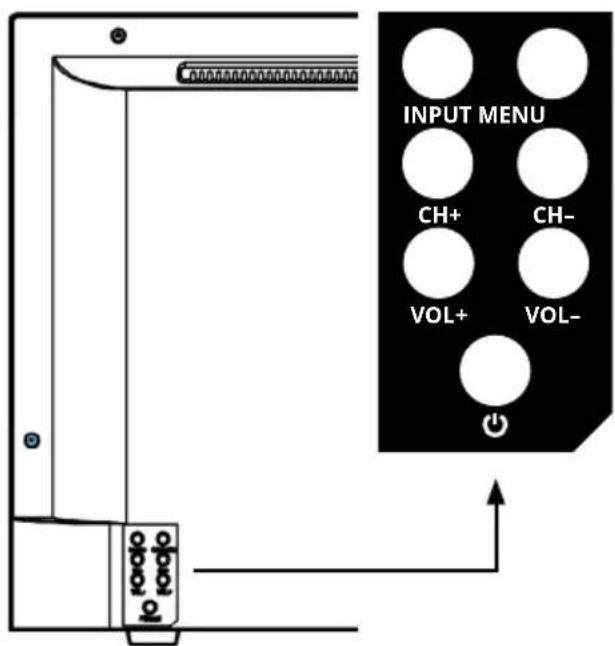
INPUT MENU CH+ CH- VOL+ VOL- +| INPUT | Press the button to select the signal source (e.g. DTV, HDMI ...). |
| MENU Press the button to open the menu. | |
| CH +/- | Switches the programmes up or down. |
| VOL +/- | Adjusts the volume (louder/quieter). |
| Switches the TV to standby mode or switches it on again from standby. | |
5. Designations
5.3 Bottom side connections

text_image
DC IN RJ45 COAXIAL OUT HDMI1 HDMI2 HDMI3 ANT IN DVB-S/S2 ANT IN DVB-C/T2| DC IN for 12/230 volt power supply unit or 12/24 volt on-board power supply | |
| RJ45 LAN connection for Internet connection | |
| COAXIAL Coaxial digital audio output | |
| HDMI 1, 2 and 3 HDMI inputs for external playback devices | |
| ANT IN / DVB-S/S2 Input for satellite aerial (13/18 V, max. 500 mA) | |
| ANT IN / DVB-C/T2 Input for DVB-T/T2 aerial or cable connection |
5.4 Lateral connections

text_image
USB2 USB1 5V 50mA CI Mini AV IN Earphone| USB 1 and 2 | USB 2.0 connections for media playback(optional: also for recording and timeshift function) |
| CI Slot for CI/CI+ modules | les |
| Mini AV IN AV input (FBAS/audio) via adapter cable | |
| Earphone Headphone | output (3.5 mm jack) |
5. Designations
5.5 Remote control
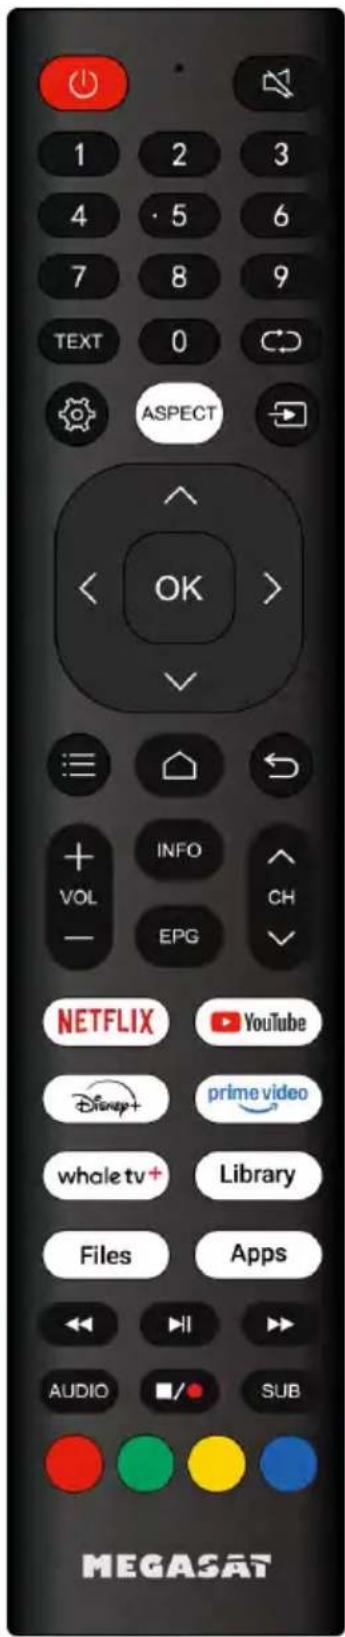
text_image
1 2 3 4 5 6 7 8 9 TEXT 0 ASPECT OK + VOL INFO CH - EPG NETFLIX YouTube Disney+ prime video whale tv+ Library Files Apps AUDIO SUB MEGASAT| Switch the television on/off (standby) | |
| Mute the sound | |
| ZIFFERNTASTEN To enter programme numbers, for example | |
| TEXT Opens the teletext | |
| Switches between the current and last viewed channel | |
| Opens the quick settings of the TV | |
| ASPECT Changes the aspect ratio | |
| INPUT button: Opens the menu to select the input source | |
| PFEILTASTEN To navigate through the menus | |
| OK | Confirms a selection |
| Opens the options list for further settings | |
| Switches to the main menu / start screen | |
| Back button: Scrolls back one level | |
| VOL +/- Increase / decrease volume | |
| INFO Shows information on the respective channel | |
| EPG Displays the EPG (Electronic Programme Guide) | |
| CH +/- Switch programmes (up/down) | |
| NETFLIX Opens the Netflix app | |
| YOUTUBE Opens the YouTube app | |
| DISNEY+ Opens the Disney+ app | |
| PRIME VIDEO Opens the Prime Video app | |
| WHALE TV+ Opens the WhaleTV+ app | |
| LIBRARY | Opens the library with recorded content or saved media |
| FILES Opens the file manager (e.g. browse USB files) | |
| APPS Opens the overview of installed apps | |
| Rewind | |
| ▶II | Play/Pause |
| Fast forward | |
| AUDIO Opens the audio settings | |
| ■ / ● | Stop/Record |
| SUB | Opens the subtitle settings |
| FARBTASTEN | Various functions in the respective menus |
6. Initial installation
Connect the TV to the power supply. Then switch on the power switch on the underside of the device. The TV can then be switched on using the remote control or the buttons on the back. The initial installation appears automatically on the screen.
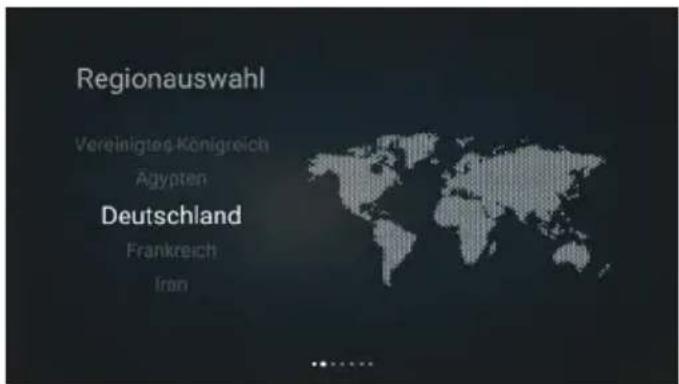
6.1 Language and region selection
You can select the desired system language in this menu item. Then confirm with OK to go to the next page.
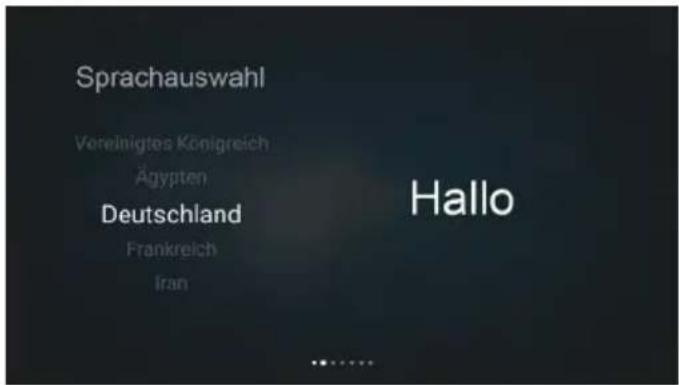
In this menu item, you can specify the default country or region of the system. Then confirm with OK to go to the next page.
6.2 Set code (child lock)
During the initial setup, you have the option of setting a 4-digit code. You can use this code to restrict access to certain content or apps for adults.
Enter your desired code using the arrow buttons on the remote control and confirm with OK. If you want to skip the setup, select „Skip“ - the code can be set or changed later at any time in the Settings > Parental control menu.
6. Initial installation
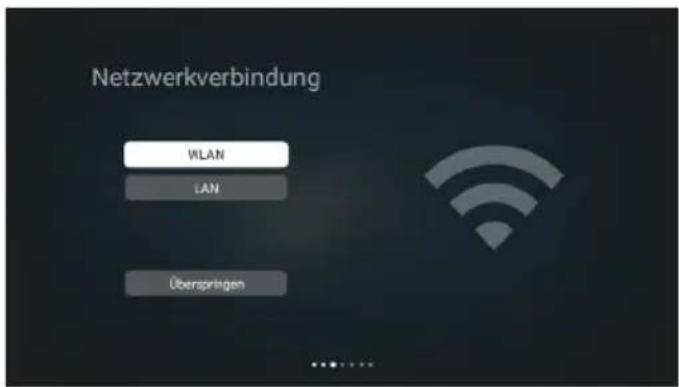
6.3 Network settings
In this step, you can connect the TV to the Internet. Alternatively, you can skip the network setup and establish the connection later.
LAN connection
If you want to use a LAN connection, select LAN. This option is only available if a network cable is connected and connected to the Internet. If a LAN cable is plugged in, the WLAN function is automatically deactivated.
WLAN connection
If you select WLAN instead, a note on energy efficiency appears first, as power consumption is slightly higher when WLAN is active. Tap Confirm to continue and search the available Wi-Fi networks.
The window for searching for wireless networks then appears. All wireless networks found are displayed on the right-hand side of the screen. Use the remote control to select the desired network and confirm with OK. Then enter the password for the selected wireless network and also confirm with OK.
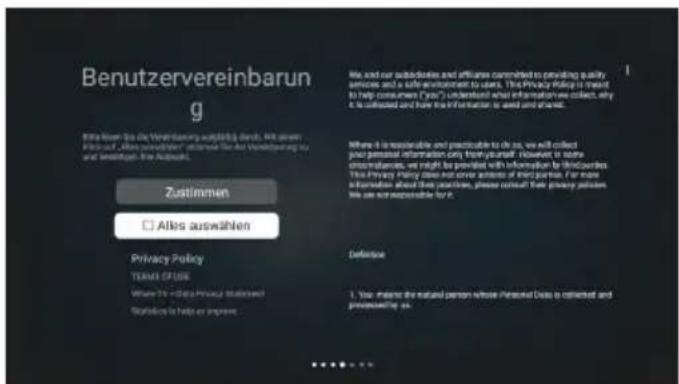
The user agreement is displayed in the next step. Read the information displayed carefully. Click on „Select all“ to agree to all points in the agreement. Then select „Agree“ to confirm your selection and continue with the setup. You can open the individual documents and view their contents by clicking on the items listed (e.g. Privacy Policy, Terms of Use, Data Privacy Statement).
text_image
Benutzervereinbarung Ella Mien Sie die Vereinbarung ausprüfung durch. We am durch „Allers auswählen“ übertragen für die Vereinbarung vor und beziehenden. Die Auswalt. Zustimmen □ Alters auswählen Privacy Policy TERMS GRADE Where 1% Statistics to help us improve We said our subsidiaries and affiliates committed to providing quality, services and a safe environment to deal. This Privacy Policy is needed to help consumers ("you") understand what information we collect, any it is discussed and have the information is used and shared. Where it is responsible and applicable to do so, we will collect your personal information only four years ago. However, it is more correspondents, we might be provided with information for this course. This Privacy Policy has not ever created or made of other partners. For more information about their practices, please consult their privacy policy. We are responsible for it. Defective 1. Your means the natural person whose Personal Data is collected and processing on.6. Initial installation
6.5 Register and log in
In this step, you can register or log in to Whale TV. Registration creates a so-called Whale Card, which gives you access to personalised services and additional functions.
The benefits include personalised film and TV recommendations, a favourites function to save your favourite programmes as well as regular promotions and exclusive benefits for Whale OS users.
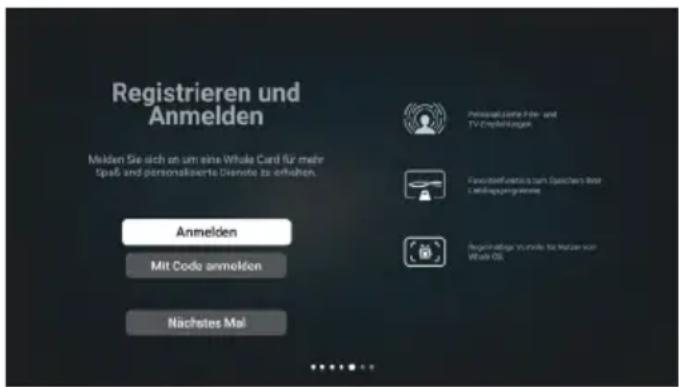
Select „Sign in“ to sign in with your account or „Sign in with code“ to complete the sign-in process from another device. If you want to skip this step, select „Next time“.
6.6 Setup
After „Register and log in“, the system setup starts automatically. In this step, the TV saves all previously made settings and configures the system for the first start. The process only takes a few seconds.

After the TV has restarted, another window will appear (personalisation service). Confirm with OK, then the data protection and privacy information will be displayed. Select „Accept“ to finalise the process.
6. Initial installation
6.7 Channel loading
After completing the initial setup, the TV is ready for operation, but still without a saved channel list.
To load the preset channel list, proceed as follows:
-
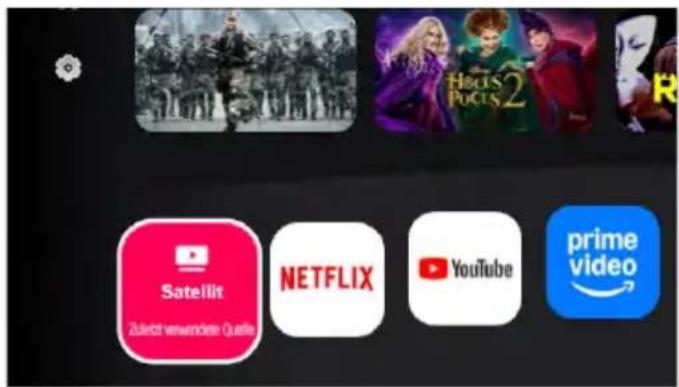
Open the menu on the start screen by clicking on the „Satellite“ symbol at the bottom left.
-
The „Install channels“ window appears. Three options are available here:
text_image
Satellit Zuletzt verwendere Quelle NETFLIX YouTube prime video- Install channel: Opens the „Channel installation“ menu. Here you can perform a satellite search and install channels.
- Source: Select the desired input source (e.g. HDMI, USB).
- Load channel list: Automatically loads a preconfigured channel list with all common channels.
Select "Load channel list" to apply the channel list.
The TV then restarts automatically and is immediately ready for reception - you can watch TV directly via satellite without having to carry out your own channel search.
The channel order can then be customised according to your wishes. Further information on this can be found in chapter 9.2 „Calling up and editing the channel list“.
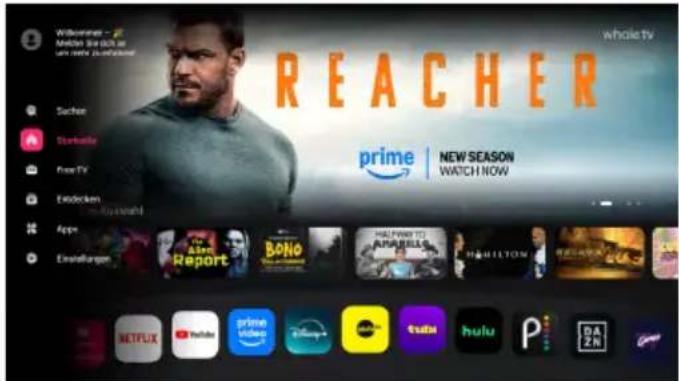
7. Home screen
After switching on the TV, the start page appears.
Press the left direction button on the remote control to open the navigation menu on the left-hand side of the screen. This menu contains the following function areas:
- Search: Enter search terms to search for specific content.
- Home screen: Main screen with frequently used apps, personal recommendations and other content.
- Free TV: Access to free-to-air channels, video-on-demand offers and other free content.
- Discover: Allows you to browse and search for films, series, videos and more.
- Apps: Overview of installed apps, app updates, app categories, recommended apps and app search.
- Quick settings: Opens the global settings menu (see section „Global menu“).
- User account: Access to your personal profile and account settings (This menu item only appears if you have logged in with your WhaleTV account).
text_image
Welcome - 21 Meitken live stock as who have been available whole tv REACHER Sachon Starbucks Free TV Eckrocken App Einstellungen prime | NEW SEASON WATCH NOW The Aire Report Bono HALL FLOW TO APARELLA HAMILTON Netflix YouTube prime Video video play trulia hulu P DAZN7.1 Search
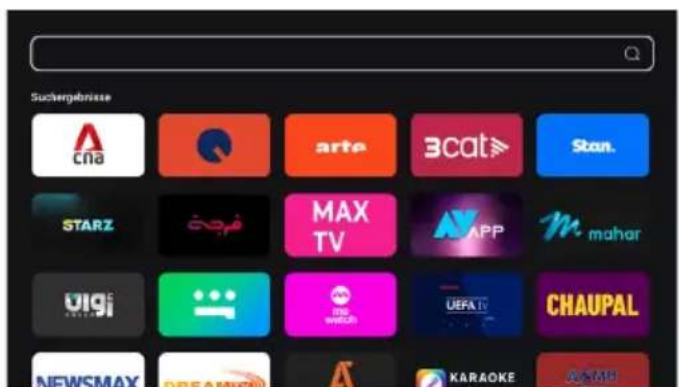
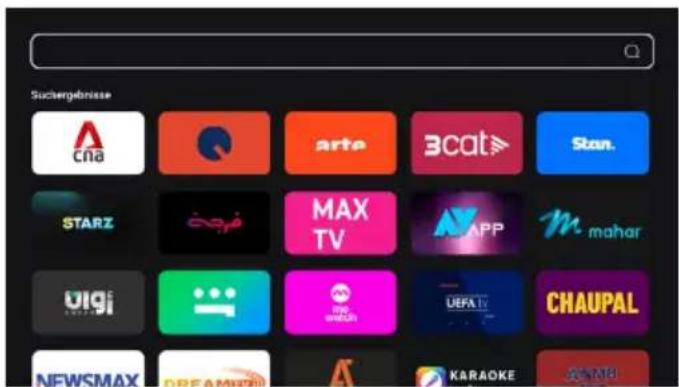
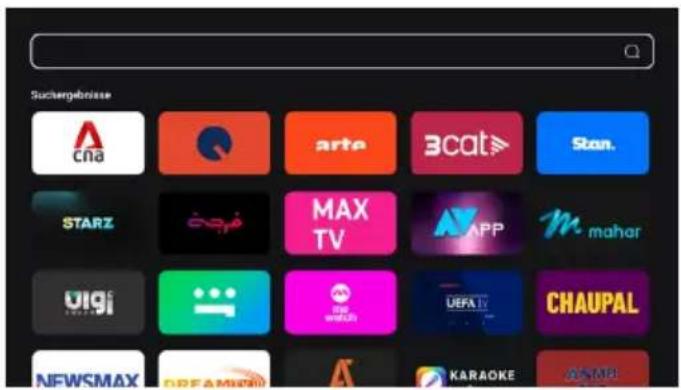
The universal search allows you to find films, series, videos, people, live programmes, TV channels and apps.
- Search page: Selecting the search icon opens the search page. Current trend searches are displayed here and voice commands are suggested for convenient voice searches.
- Search results page: After entering a search term and confirming the search, the results page appears. The content found is clearly sorted by category so that you can quickly find the results you are looking for.
text_image
Suchergabnisse CNA arte 3cat> Stan. STARZ MAX TV APP mahar Vigi DISH UEFAT CHAUPAL NEWSMAX DREAM KARAOKE ASMP7. Home screen
7.2 Home screen
The start screen consists of several areas:
- Banner: Large display of recommended content. The banners change automatically, but can also be scrolled through manually using the remote control.
- App bar: Displays pre-installed, recommended and user-installed apps.
- App recommendations:
- (a) If an app offers its own recommendations, an additional row of recommendations appears at the top of the screen when this app is selected, which can be used to open content directly.
- (b) If no recommendations are available, the "Your top picks" area is displayed instead.
- Last used source: Shows the last used signal source (e.g. antenna or HDMI). Selecting this switches directly to the previous source.
When you are on the home page, you can scroll down to see more content.
A so-called waterfall feed is loaded, which shows additional recommendations from various apps such as YouTube, Prime Video, Disney+ and other popular services.
The content is continuously updated and offers personalised suggestions as well as current trends.

text_image
REACHER prime | NEW SEASON WATCH NOW Ihre Top-Auswahlt Guruilla NETFLIX YouTube prime Video chino tvku hulu P DAZN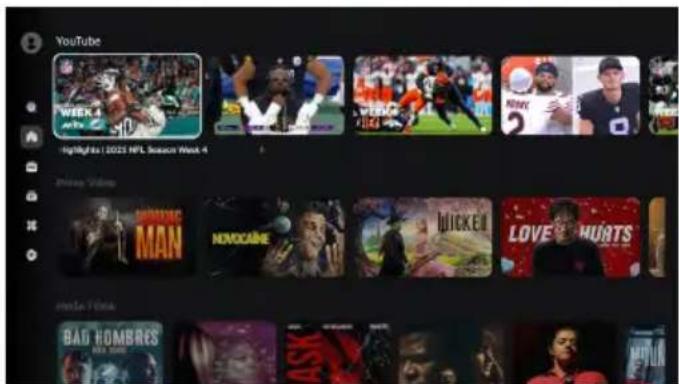
text_image
YouTube WEEK 4 10:00 WEEK 4 10:00 WEEK 4 10:00 WEEK 4 10:00 WEEK 4 10:00 WEEK 4 10:00 WEEK 4 10:00 WEEK 4 10:00 WEEK 4 10:00 WEEK 4 10:007. Home screen
7.3 Free-TV
In the Free TV section, you will find various free online offerings that are streamed via the Internet. This content is not related to conventional satellite reception - an active Internet connection is therefore required to watch it.
The page is divided into four categories:
- Now live: Shows currently running online programmes and live streams. You can switch directly to the available content via the Programme Guide.

text_image
Süchergebnisse CNA arte BCAT Stan. STARZ MAX TV MAPP m mahar Uigi UEFA TV CHAUPAL NFWSMAX DREAMBO KARAOKE-
Recommended channels: Suggestions for free online channels with different themes, such as entertainment, comedy, documentaries or lifestyle.
-
Popular free films: Selection of freely available films that can be streamed over the internet.
-
Free apps: Recommendations for streaming apps such as Whale TV+, Filmzie, Arte, Prime Video or Plex. These apps are not yet installed and can be downloaded directly if required.
7. Home screen
7.4 Discover
In the Discover section, you can browse the entire range of Whale TV content. Films, series, live programmes and videos are displayed here - both with playback source and pure content previews with descriptions and trailers. The section serves as a large media library and database for film, TV and audio content so that you can easily discover new content.
- Recommended content: Overview with current film and series highlights, news and trailers for upcoming productions.
- Categories: Content is divided into different areas such as films, series, live and videos. You can select according to your interests.
- Film details: Information such as film cover, trailer, highlights, actors and a detailed content description are displayed for each title. By selecting an actor, you will receive additional information on their other roles.
- Search function: The integrated search function can be used to filter content according to specific criteria or to find specific content by entering text.
- Personalised recommendations: The system automatically suggests content that matches your previous viewing habits and interests.
text_image
Suchergebnisse CNA arte 3cat> Stan. STARZ MAX TV APP mahar Vigi NEWSMAX DREAM KAKAOKE CHAUPAL7. Home screen
7.5 Apps
In the Apps section (App Store), you will find a large selection of applications that you can discover, download and install on the TV. This allows you to customise functions and content.
The Apps area is organised as follows:
- Search bar / app search: Enter keywords to search for specific apps.
- Banner: Shows current recommendations and news. The banners change automatically, but can also be scrolled through manually.
- My apps: Contains all apps already installed as well as the „Update“ section, which displays available updates.
- Categories: Here you can browse apps by topic and select specific ones.
- Recommended apps: Overview of popular and frequently used apps.

All available app updates are displayed in the Update area.
You can update individual apps manually or use the „Update all“ function to update all apps at the same time.
Information such as name, category, version, file size, description and preview images are displayed on the details page of an app. From here, you can download, open, update or uninstall the app.

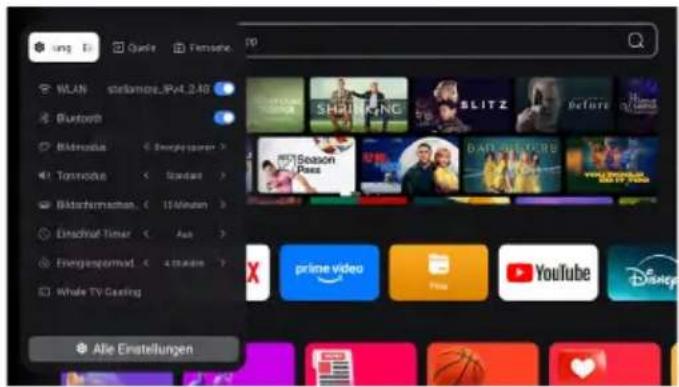
You can use the Quick settings menu item to call up important TV functions directly without having to switch to the full system settings. Once selected, the Global menu opens, in which frequently used options are clearly displayed.
Here you can, for example:
■ Activate or deactivate WLAN and Bluetooth®th
■ Change the picture mode (e.g. Standard, Energy saving, Dynamic)
■ Adjust the sound mode
■ Set the screen saver or the sleep timer
- Configure the energy-saving mode
■ Activate Whale TV Casting to transfer content from a mobile device to the TV.
text_image
Sachergebnisse CNA arte 3CAT> Stan. STARZ MAX TV APP mahar Oigi UEFA TV CHAUPAL NFWSMAX DREAMMO KARAOKE ASPAR7.7 User account
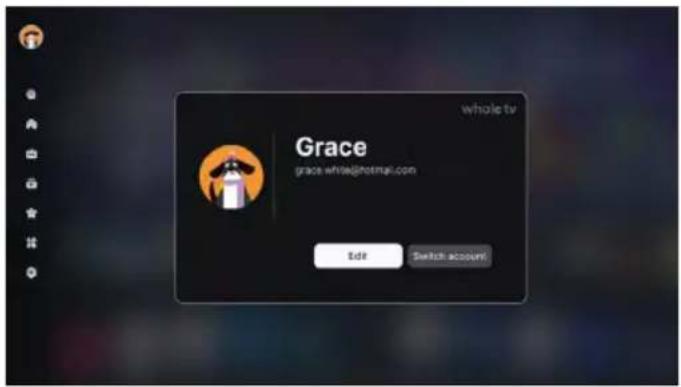
The icon at the top left of the home screen takes you to the user account (User Centre).
Here you can log in to your existing account or register a new account.
If you are already logged in, your user name and e-mail address will be displayed.
You can use the „Edit“ and „Change account“ buttons to customise your account information or log in with a different account.
text_image
whole tv Grace grace.white@hotmail.com Edit Switch accountIf no account is displayed, the login screen appears with the options „Register“, „Log in“ or „Log in with code“ - as when setting up the TV for the first time.
8. Settings
8.1 Network and connection
In the Network and connection menu, you can manage all settings for the TV's Internet connection and wireless communication. Here you can set up both wired and wireless networks as well as configure Bluetooth® and HDMI connections.
8.1.1 Wired and wireless network
In this section, you can connect the TV to the Internet - either via Wi-Fi or via a LAN connection.
Switch on the WLAN and select the desired network from the list of available connections. If the network is hidden (SSID not visible), you can enter the name and password manually via „Add new network“.
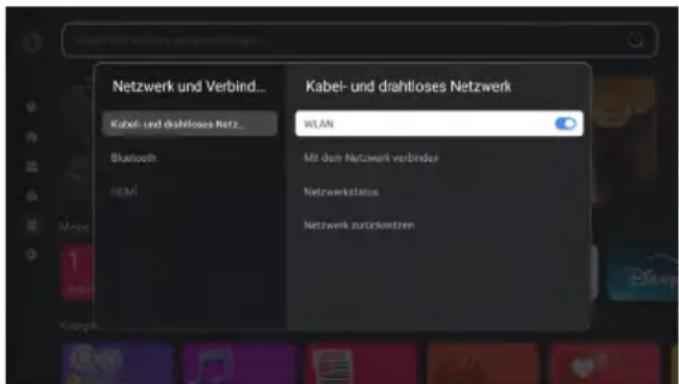
After connecting a network cable, the TV automatically connects to the Internet. As soon as an IP address has been successfully assigned, the connection data is displayed under „Show network information“.
8.1.2 Bluetooth
In the Bluetooth ^® menu, you can connect wireless devices to the TV or manage existing connections.
1. Activate/deactivate Bluetooth®
Switch on the Bluetooth® function to make the TV visible to wireless devices. If Bluetooth® is deactivated, no connections can be established or devices searched for.
2. Searching for and managing Bluetooth ^® devices
When the submenu is called up, the system automatically searches for Bluetooth ^® devices in the vicinity. If no devices are found, the menu closes automatically after a short time. As soon as available devices are recognised, they appear in a list on the right - similar to the WLAN search. Select the desired device (e.g. speakers or headphones) using the arrow buttons and confirm with OK. After a successful connection, a message will appear indicating that the device has been successfully paired.
3. Reset Bluetooth®
This function deletes all saved Bluetooth ^® connections. This is helpful if there are connection problems or if a device is no longer recognised. After resetting, new devices can be paired again.
8. Settings
8.1.3 HDMI
Connected HDMI devices can be recognised and managed in this area. Depending on the TV model, settings for the signal source, CEC control (HDMI-CEC) or the automatic input signal can be made here.
8.2 Picture and sound
In the Picture and sound menu, you can customise the TV's display and sound settings to suit your personal preferences. Both quick settings and advanced options are available here.
8.2.1 Quick sound and video settings
The most important parameters can be adjusted directly via the quick settings without leaving the menu. Available options:
■ Picture mode
■ Picture size
■ Backlight
Sound mode
■ Sound output device
8. Settings
8.2.2 Picture mode
Here you select a predefined picture setting according to your viewing habits:
- Standard: Balanced brightness and contrast for everyday use.
- Soft: Reduced brightness and softer colour tones for comfortable viewing in subdued light.
■ Dynamic: Vivid colours and higher contrast, ideal for bright environments.
■ Energy saving: Reduced backlighting to reduce power consumption.
■ Vivid: Very high-contrast and colour-intensive display.
- Customised: Enables customisation of all picture parameters.
8.2.3 Advanced picture settings
The following values can be fine-tuned in this menu:
- Backlight
- Brightness
- Contrast
- Saturation
- Sharpness
- Colour tone
- Colour temperature
- Noise reduction

Note:
The settings for brightness, contrast, saturation, sharpness and colour tone can only be changed if Picture mode > Custom is selected in the menu.
8. Settings
8.2.4 Sound mode
Here you specify the device via which the sound is to be output.
The TV's integrated speaker is activated by default.
If another audio device (e.g. Bluetooth ^® speaker, soundbar or headphones) is connected, this can be selected here.
8.2.5 Sound output device
Here you specify the device via which the sound is to be output. The TV's integrated speaker is activated by default. If another audio device (e.g. Bluetooth ^® speaker, soundbar or headphones) is connected, this can be selected here.
8.2.6 Advanced sound settings
You can adjust further sound parameters in the advanced sound settings:
■ Balance: Sets the volume balance between the left and right side.
- Audio format: Selection between Automatic, Passthrough or PCM, depending on the connected audio device.
- System key tone: Activates or deactivates the tones when operating the menu.
- SPDIF delay: Adjusts the audio output via SPDIF to compensate for picture/sound delays.
- AVL (Automatic Volume Control): Keeps the volume at a consistent level, even with changing sound sources.
■ Surround: Activates or deactivates virtual surround sound playback.
8. Settings
8.3 Device settings
In the Device settings menu, you can manage the TV's general functions and system settings. The language, region, energy-saving functions and other device settings can be customised here.
8.3.1 System settings
You can customise the basic functions of the TV in the system settings:
- Language: Programme audio and subtitles - selection of the menu language, the preferred audio track and the subtitle language
- Teletext: Activates or deactivates the teletext (teletext) of the current programme.
- CAM PIN: Allows you to enter a PIN for CI/CI+ modules that require authentication or a password prompt.
■ Region: Specifies the country or region to customise regional services and channel settings. - Date and time: Displays and sets the current time (automatically via network or manually).
- Keyboard: Selection of the preferred keyboard language and input method.
- Blue screen: Activates the display of a blue background when there is no signal (e.g. when the source is switched off).
8.3.2 Energy saving settings
Here you can control the power consumption and automatic switch-off of the TV:
- Screen saver: Activates a screen saver animation if the TV is not operated for a longer period of time.
- Sleep timer: Sets the time after which the TV switches off automatically.
■ Energy-saving mode: Reduces brightness and power consumption to save energy. - Timer menu: Overview of all set time functions (e.g. switch-on/switch-off times).
8. Settings
8.3.3 Start settings
In this menu, you define the behaviour of the TV when it is switched on:
- Start screen options: Selection of whether the start screen, live TV or the internal memory is displayed when switching on.
■ Demo mode: Activates a demonstration function that operates the TV with demo content (e.g. for exhibitions or presentations).
8.3.4 Cache cleaner
The cache cleaner helps to optimise the system memory and improve performance:
- App cache clean-up: Deletes cached data of individual apps without removing the app itself. This can help to free up memory space or fix small functional errors.
- System cache cleanup: Removes temporary system files to free up the TV's overall memory and ensure smoother operation.
8.3.5 Info
Under Info you will find general device information and legal information:
■ Device name: The name under which the TV is displayed in the network.
■ Device information: Technical details such as model number, software version and serial number.
- User agreement: Insight into the general terms of use.
- Third-party source: Information on software or service provider components used.
- System WebView licences: Licences and legal information on the WebView components integrated in the system.
■ Personalisation service: Management of data protection settings and personalised services.
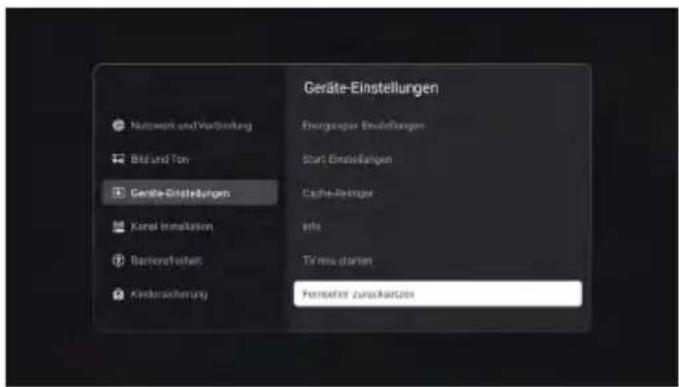
8.3.6 Restarting the television
Restarts the TV without deleting saved settings or data. This function can be helpful for minor system problems.
8.3.7 Resetting the television
Resets the TV to factory settings. All personal data and installed apps are deleted and the initial setup starts automatically.
8. Settings
8.4 Channel installation
In the Channel installation menu, you can search for and save all available TV channels.
Depending on the type of reception, different options are available for automatic or manual channel search.
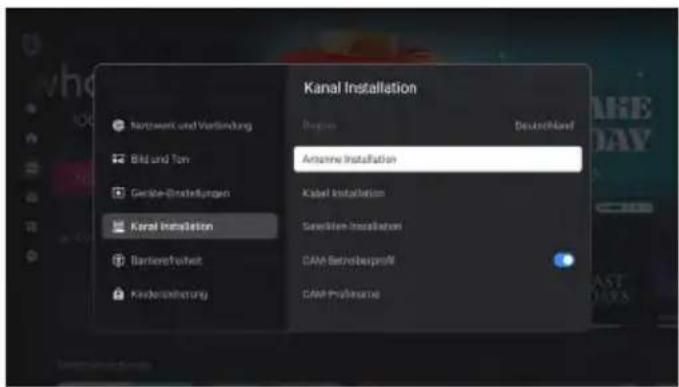
In the individual menus, channels can be searched for automatically or manually. In the automatic search, all receivable programmes are saved, while the manual search looks for specific frequencies or transponders.
8.4.1 Antenna installation
This menu is used for terrestrial reception (DVB-T/T2). You can set the following options here:
- Channel search: Starts the automatic search for all available analogue and/or digital channels.
- Digital manual installation: Allows you to selectively enter a channel or frequency to search for individual stations.
- Analogue manual installation: For older analogue transmissions (if supported).
- Automatic channel search: If activated, the TV automatically searches for new channels as soon as a signal is detected.
- LNC: Activates or deactivates the LNC control (Low Noise Converter), which is required for certain reception systems.
8. Settings
8.4.2 Cable installation
This menu is used to set up cable reception (DVB-C). The available functions are similar to those for aerial installation:
- Channel search: Starts the automatic search for analogue and/or digital cable channels.
- Digital manual installation: Enter a specific frequency or symbol rate to find specific channels.
- Analogue manual installation: Manual search for analogue cable channels.
- Automatic channel search: Activates an automatic channel search at startup if new channels are detected.
■ LNC: Switches the LNC function for special cable systems on or off.
8.4.3 Satellite installation
This menu is used for satellite reception (DVB-S/S2) and offers the most extensive setting options.
- Search for satellites: Here you first select a provider (e.g. HD+). If you select „More“, a new window opens in which you can manually select the desired satellite (e.g. Astra 19.2° East). Then specify the scan mode (e.g. automatic scan, network search or blind scan) and the channel selection (only free channels, all channels) and start the search process by clicking „Start“.
-
Manual installation: All reception parameters can be set individually here:
-
Satellite: Selection of the desired satellite (e.g. Astra 19.2° East).
- Connection type: Selection between No DiSEqC, DiSEqC 1.0/1.2, Unicable I/II.
- LNB frequency, 22 kHz, LNB voltage: Adaptation of technical values to your satellite system.
- Select transponder: Determines the frequency on which channels are searched for.
- Start channel search: Starts the search process with the selected settings.
- Automatic channel search: Activates the automatic detection and storage of new channels.
■ LNC: Controls the low noise converter for satellite reception.
8. Settings
8.4.4 CAM-Operator profile
Activates or deactivates the operator profile of the CI/CI+ module used. If activated, the functions and services provided by the respective provider (e.g. HD+ or ORF Digital) are used.
8.4.5 CAM-Profilname
Displays the name and technical information of the CI/CI+ module currently in use. This information is used to identify the module and can be helpful for technical enquiries.
8.4.6 Copying programmes
You can use this function to export or import the saved channel lists:
- TV to USB: Saves the current channel list to a connected USB data carrier.
- USB to TV: Imports a previously saved channel list from the USB data carrier back to the TV.
8.5 Accessibility
Various functions can be activated in the Accessibility menu to make the TV more convenient to use for people with hearing or visual impairments.
- Accessibility: Switches all accessibility functions on or off. If deactivated, the following options are greyed out or not available.
- Hearing impaired: Activates special audio tracks or subtitles for hearing impaired viewers, if these are provided by the broadcaster.
- Audio description: Switches on additional voice commentaries that describe scenes and actions for visually impaired viewers (only for programmes that support this function).
- Mixed volume: This item becomes active when the audio description is switched on. The ratio between the main soundtrack and the audio description track can be adjusted on a scale from 0 to 100.
8. Settings
8.6 Childproof lock
You can restrict access to certain functions or programmes in the Parental control menu. To open the menu, you must first enter a PIN code. In the factory setting, this code is 0000.
After entering the code, the following options appear:
- Lock system: Activates or deactivates the child lock. If this function is activated, an additional menu item „Parental control" is displayed. An age restriction of 1 to 18 years can be set there. Programmes with a higher age rating are then blocked or require the PIN code to be entered again.
- Change code: Allows you to enter a new PIN code. For security reasons, the default code 0000 should be changed after the initial setup.
- Delete code: Resets the PIN code and removes all age restrictions. After deletion, a new code can be assigned if desired.
8.7 Software-Update
In the Software update menu, you can update the TV's system software to the latest version. Regular updates ensure that the TV is stable, new functions are added and any errors are rectified.
- Software update via the Internet: Performs an online update when the TV is connected to the Internet. The system automatically checks whether a new version is available and offers the update for installation.
- Software update via USB: Enables the software to be updated using a USB data carrier. Copy the update file provided to a USB stick, insert it into the TV and follow the instructions on the screen.
- Current software: Displays the currently installed software version of the TV. This information can be helpful for support enquiries or to check the update status.

Note:
You can also find the latest firmware version on our website at www.megasat.tv ▶ Downloads.
8. Settings
8.8 App settings
Installed applications can be managed, permissions adjusted and system resources optimised in the App settings menu. Open apps can be viewed here, app data deleted or access rights specifically controlled.
- Recently opened apps: Displays a list of recently used apps. This overview helps you to quickly switch between active apps or close unused apps to free up system resources.
- Show all apps: Opens a complete overview of all apps installed on the TV. By selecting an app, various options can be executed, such as
- Open: Starts the selected app
- Uninstall updates: Removes installed updates
- Force stop: Terminates an app that continues to run in the background
- Empty cache: Deletes temporary app data to free up memory space
- Clear data: Resets the app to its initial state
- Delete default values: Removes specified default actions
- Permissions: Opens the detailed authorisation management of the respective app
- App authorisations: Here you can specify which functions or data the installed apps are authorised to access. Available authorisation areas include
- Camera
- Music and audio
- Photos and videos
- Files and media
- Devices in the vicinity can be customised
9. TV reception and multimedia functions
9.1 Selecting the input source
You can use the input sources to specify the signal from which the TV receives the picture - for example, from a connected receiver, a games console or a Blu-ray player.
Press the SETTINGS button on the remote control to open the quick settings menu.
Use the right arrow button to switch to the Source menu, in which the following inputs are displayed:
text_image
wang Quote Tensene. 10 WLAN stellamore.Pv4.248 Bluetooth Bikmodia < EnergyPlayer > Tomodo < Sport Biktorremschen < 15 Minuten > Einzelaf Timer < Ask > Eingengesamt < 4 times > Whole TV Gaming Allie Erstellungen SHARING BLITZ DeTorr MOS Season Poste prime video Print YouTube Disney■ AV: Connection for analogue devices such as older DVD players or video recorders.
- HDMI 1 - 3: Connections for digital devices such as receivers, consoles, computers or streaming boxes. Select the input to which your device is connected and confirm with OK.
The TV menu is also available. Here you can choose between:
■ Aerial: Reception via DVB-T/T2.
■ Cable: Reception via DVB-C.
■ Satellite: Reception via DVB-S/S2.
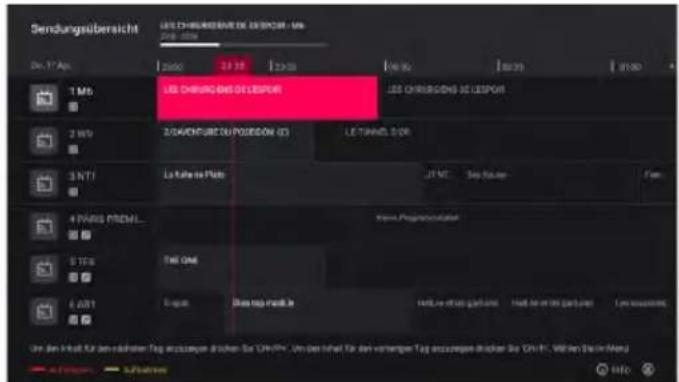
- TV programme: Opens the electronic programme guide (EPG) with all current programmes and information. Tip: Pressing the EPG button on the remote control also takes you directly to the TV programme.
text_image
Sendungsübersicht LES CHIRISCHEN 3D LESPORT - Mio 2016 2017 2018 2019 2020 2021 2022 2023 2024 2025 2026 2027 2028 2029 2030 2031 2032 2033 2034 2035 2036 2037 2038 2039 2040 2041 2042 2043 2044 2045 2046 2047 2048 2049 2050 2051 2052 2053 2054 2055 2056 2057 2058 2059 2060 2061 2062 2063 2064 2065 2066 2067 2068 2069 2070 2071 2072 2073 2074 2075 2076 2077 2078 2079 2080 2081 2082 2083 LE CHIRISCHEN 3D LESPORT LE CHIRISCHEN 3D LESPORT
Note:
If no signal is detected, check that the external device is switched on and correctly connected to the TV.
9. TV reception and multimedia functions
9.2 Calling up and editing the channel list
You can view and sort all saved channels and manage favourites in the channel list.
- Change channel lists: Press OK to open a selection window at the top of the screen. Here you can switch between different channel lists of the currently selected tuner, including the provider lists (OP List).
- Channel information: Additional information is displayed in the centre area of the channel list, e.g. whether a channel is encrypted, whether it has been blocked, the channel
type, the channel number and the channel name. The channel logo, if available, is displayed as a standard symbol.
■ Red button: Add channel to favourites list
■ Green button: Remove channel from the favourites list
- Quick jump: Enter the desired channel number using the remote control to jump directly to a specific channel.
- Options menu: Use the options button (symbol with three horizontal lines) to open additional settings and editing functions for the channel list.

text_image
All Antone Channels FOUR RBC A 01 Sky Sky news 02 ESPN 03 CNBC 04 Discovery 05 BBC World News 069. TV reception and multimedia functions
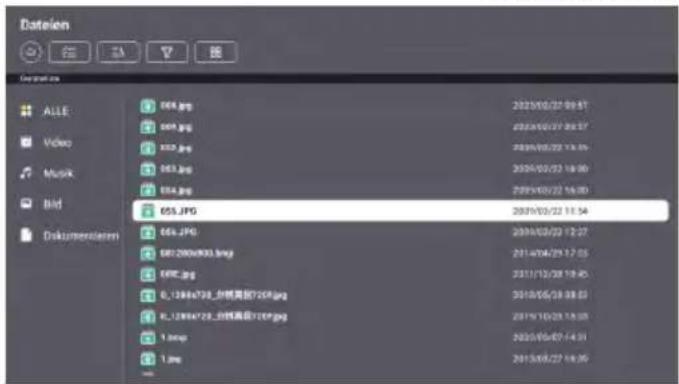
9.3 Playing media via USB
To play media files (e.g. photos, music or videos), insert a suitable USB memory device with compatible files into the TV's USB port. Then press the FILES button on the remote control to open the USB menu and select the desired files.
- ALL: Displays all media files (videos, music, images and documents) on the USB memory device in a complete overview.
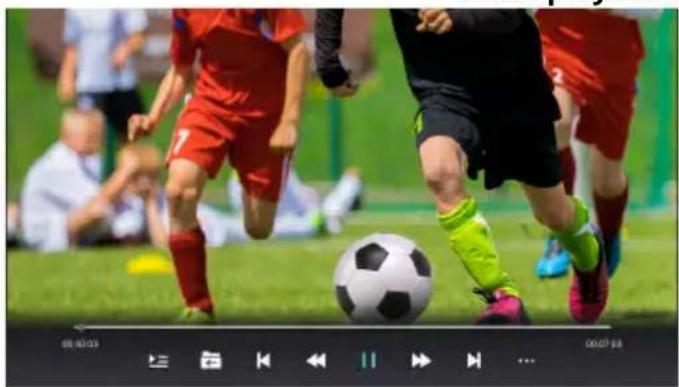
- Video: Displays only video files. Playback can be controlled using the remote control (play/pause, fast forward/rewind, etc.).
- Music: Displays only audio files. Playback is controlled via the remote control (play/pause, next track, previous track, etc.).
- Picture: Only displays picture files. During display, images can be enlarged, reduced or rotated, for example.
- Documents: Displays supported document files (e.g. text or PDF) and opens them for display on the screen.

Note:
Depending on the media type, operation is via the remote control. Available functions (e.g. playback, rewind, rotate image, zoom) are displayed as icons on the screen during use.
File overview
text_image
Dateien File Edit View Help GOOGRAV ALLE 064.jpg 2023/05/27 09:57 Video 064.jpg 2023/05/27 09:57 Music 052.jpg 2024/05/22 11:39 Bild 063.jpg 2024/05/22 11:30 Dokumentlern 054.jpg 2024/05/22 11:30 655.JPG 2024/05/22 11:54 666.JPG 2024/05/22 12:27 081.2004/033.bmp 2014/04/29 17:25 686.jpg 2021/12/28 19:45 0_1288e728_0f#e#e728.jpg 2018/05/28 09:53 0_1288e728_0f#e#e728.jpg 2019/10/23 13:33 1.bmp 2025/05/07 14:31 1.bmp 2015/08/27 14:30Video playback
natural_image
Action shot of two soccer players in red and black uniforms kicking a ball on a grass field, with blurred background figures and no visible text or symbols.Music playback

text_image
Off The Beaten Path 2016 Pg lost You Wanna be Tough Better Do What You CanImage playback
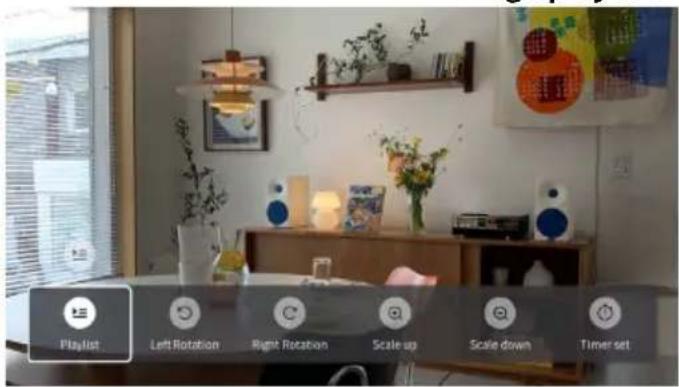
text_image
Playlist Left Rotation Right Rotation Scale up Scale down Timer set10. Troubleshooting
Please check the following information to identify the cause of a problem yourself and rectify it if necessary before contacting customer service.
| TV cannot be switched on | ·Check that the power cable is correctly connected to the socket and power adapter.·Check that the power adapter cable is correctly connected to the TV set.·The electronic protection circuit may have been reset: Unplug the power adapter from the socket, wait 1 minute and then reconnect the plug. |
| No picture | ·Check that the antenna cable is connected correctly.·Check that the correct input has been selected (INPUT button).·Check the brightness and contrast settings in the picture menu. |
| No sound | ·Check whether the sound is switched off or the mute function is activated (MUTE).·Carefully increase the volume.·Check that the audio cables are connected to the correct inputs. |
| Poor picture quality | ·Check the connection to the receiver.·Check the picture settings. |
| Picture too big, too small or distorted | ·Use the ASPECT button to customise the image display. |
| Remote control does not respond | ·Change the batteries.·Use the remote control within the specified range (max. 5 metres, 30°).·Avoid exposing the infrared sensor to direct light. |
| No WLAN / internet connection | ·Check whether the router is switched on and connected to the Internet.·Check whether the WLAN password has been entered correctly.·Check the signal strength of the WLAN in the Network settings menu.·Position the router closer to the TV or use a LAN cable. |
| Apps do not start or do not work properly | ·Check the TV's internet connection.·Restart the app or the TV.·Carry out a software/firmware update if necessary.·Check whether the respective app is currently available and supported in the system. |
| No access to streaming services (e.g. Netflix, Prime Video) | ·Check the internet connection.·If necessary, log in again with your user account.·Update the app to the latest version.·Note possible regional restrictions on content.·A valid subscription is required to use certain services. |
| Device responds slowly or hangs up | ·Switch off the TV and disconnect it from the mains for 1 minute.·Check whether the installed firmware is up to date.·Remove any unused USB storage devices or accessories. |
11. Specifications
| Royal Line V 19 Smart Royal Line V 22 Smart | ||
| Display LED display (pixel class 1) | ||
| Screen size 18,5 inch (47 cm) 21,5 inch (54,6 cm) | ||
| resolution 1366 x 768 1920 x 1080 | ||
| Contrast ratio 1000 : 1 3000 : 1 | ||
| Brightness value 250 cd/m2 | ||
| Viewing angle 178° H / 178° V | ||
| Tuner DVB-S / -S2 / -C / -T / -T2 | ||
| DVB-T2 standard H.265 / HEVC | ||
| Programme slots 1.000 (DVB-S / DVB-T / DVB-C) | ||
| Bluetooth® interface Version 5.0 | ||
| Bluetooth® operating frequency 2400 MHz - 2483,5 MHz | ||
| Bluetooth® Maximum transmission power | < 10 dBm (E.I.R.P.) | |
| WLAN interface | ja | |
| WLAN operating frequencies | 2,4 GHz Wi-Fi: 2400 - 2483,5 MHz5 GHz Wi-Fi: 5150 - 5250 MHz5 GHz Wi-Fi: 5725 - 5850 MHz | |
| WLAN Maximum transmission power (E.I.R.P.) | 2,4 GHz Wi-Fi: < 13 dBm5 GHz Wi-Fi (5150 - 5250 MHz): < 23 dBm5 GHz Wi-Fi (5725 - 5850 MHz): < 13,98 dBm | |
| WLAN protocol | 802.11 a/b/g/n/ac | |
| Smart TV function | yes | |
| Operating system | WhaleTV operating system | |
| Processor | Cortex-A35 Quad Core 1.5GHz Processor(1 GB DDR / 8 GB Flash) | |
| Photo playback formats | JPEG, BMP, PNG, GIF | |
| Audio playback formats | MP3, WMA, AAC, M4A, FLAC | |
| Video playback formats | AVI, MP4, MPEG, MPG, TS, MOV, FLV | |
| Mechanical power switch | ja | |
| Loudspeaker | 2 x 5 Watt (Stereo) | |
| VESA standard | 100 x 100 mm | |
| Antenna input DVB-S / -S2 | 1x | |
| Antenna input DVB-T / -T2 / -C | 1x | |
| Headphone output | 1x (3.5 mm jack) | |
| Audio output (S/PDIF coaxial) | 1x (3.5 mm jack) | |
| HDMI connection | 3x | |
| USB connection | 2x | |
| LAN interface | 1x | |
| CI+ module slot | 1x | |
| Mini AV input | 1x | |
| Power supply | DC 12/24 Volt, 3A | |
| 10~30 Volt stabilised | ||
| Operating temperature | 0 °C to +40 °C | |
| Power consumption during operation | 13 watts (max. 36 watts) | 15 watts (max. 36 watts) |
| Power consumption in standby | < 0,5 watts | < 0,5 watts |
| Energy efficiency class (spectrum A to G) | E | E |
| Dimensions with base (W/H/D) (optional) | 431 x 284 x 110 mm | 496 x 291 x 110 mm |
| Dimensions without base (W/H/D) | 431 x 256 x 48 mm | 496 x 321 x 48 mm |
| Weight | 2,0 kg | 2,3 kg |
11. Specifications
| Royal Line V 24 Smart Royal Line V 27 Smart | ||
| Display LED-Display (Pixel class 1) | ||
| Screen size 23,8 inch (60,5 cm) 27 inch (69,5 cm) | ||
| resolution 1920 x 1080 | ||
| Contrast ratio 3000 : 1 4000 : 1 | ||
| Brightness value 250 cd/m2 | ||
| Viewing angle 178° H / 178° V | ||
| Tuner DVB-S / -S2 / -C / -T / -T2 | ||
| DVB-T2 standard H.265 / HEVC | ||
| Programme slots 1.000 (DVB-S / DVB-T / DVB-C) | ||
| Bluetooth® interface Version 5.0 | ||
| Bluetooth® operating frequency 2400 MHz - 2483,5 MHz | ||
| Bluetooth® Maximum transmission power < 10 dBm (E.I.R.P.) | ||
| WLAN interface | yes | |
| WLAN operating frequencies | 2,4 GHz Wi-Fi: 2400 - 2483,5 MHz5 GHz Wi-Fi: 5150 - 5250 MHz5 GHz Wi-Fi: 5725 - 5850 MHz | |
| WLAN Maximum transmission power (E.I.R.P.) | 2,4 GHz Wi-Fi: < 13 dBm5 GHz Wi-Fi (5150 - 5250 MHz): < 23 dBm5 GHz Wi-Fi (5725 - 5850 MHz): < 13,98 dBm | |
| WLAN protocol | 802.11 a/b/g/n/ac | |
| Smart TV function | yes | |
| Operating system | WhaleTV operating system | |
| Processor | Cortex-A35 Quad Core 1.5GHz Processor(1 GB DDR / 8 GB Flash) | |
| Photo playback formats | JPEG, BMP, PNG, GIF | |
| Audio playback formats | MP3, WMA, AAC, M4A, FLAC | |
| Video playback formats | AVI, MP4, MPEG, MPG, TS, MOV, FLV | |
| Mechanical power switch | yes | |
| Loudspeaker | 2 x 5 Watt (Stereo) | |
| VESA standard | 100 x 100 mm | |
| Antenna input DVB-S / -S2 | 1x | |
| Antenna input DVB-T / -T2 / -C | 1x | |
| Headphone output | 1x (3.5 mm jack) | |
| Audio output (S/PDIF coaxial) | 1x (3.5 mm jack) | |
| HDMI connection | 3x | |
| USB connection | 2x | |
| LAN interface | 1x | |
| CI+ module slot | 1x | |
| Mini AV input | 1x | |
| Power supply | DC 12/24 Volt, 3A | DC 12/24 Volt, 4A |
| (10~30 Volt stabilised) | ||
| Operating temperature | 0 °C to +40 °C | |
| Power consumption during operation | 17 watts (max. 36 watts) | 21 watts (max. 50 watts) |
| Power consumption in standby | <0,5 watts | <0,5 watts |
| Energy efficiency class (spectrum A to G) | E | E |
| Dimensions with base (W/H/D) (optional) | 542 x 349 x 110 mm | 617 x 402 x 140 mm |
| Dimensions without base (W/H/D) | 542 x 318 x 45 mm | 617 x 368 x 43 mm |
| Weight | 2,8 kg | 4,5 kg |
Legal information
Conformity information
Megasat Werke GmbH hereby declares that the following equipment is in compliance with the essential requirements and other relevant provisions of Directive 2014/53/EU (RED).
Conformity has been assessed on the basis of the following harmonised standards:
■ EN 18031-1:2024
■ EN 18031-2:2024
■ EN 301 549 V3.2.1 (2021-08)
In addition, the devices fulfil the basic requirements and relevant provisions of the following directives:
■ 2014/30/EU (EMV)
■ 2014/35/EU (LVD)
■ 2011/65/EU (RoHS) including directives (EU) 2015/863 and (EU) 2017/2102
■ (EU) 2019/882 (Accessibility requirements for products and services) according to EN 301 549 V3.2.1 and WCAG 2.2
Affected devices:
| Megasat Royal Line V 19 Smart | (Art.-No. 240145) |
| Megasat Royal Line V 22 Smart | (Art.-No. 240146) |
| Megasat Royal Line V 24 Smart | (Art.-No. 240147) |
| Megasat Royal Line V 27 Smart | (Art.-No. 240148) |
The complete declaration of conformity is available from Megasat Werke GmbH and can be accessed online at: www.megasat.tv/support/downloads
CE
Disclaimer
These operating instructions have been compiled with the utmost care. Nevertheless, we accept no liability for any errors, misprints or incorrect information. We reserve the right to make changes and further technical developments. Use is at your own risk.
Legal information
Symbols and notes
Old appliances must not be disposed of with household waste. You are legally obliged to dispose of old electrical and electronic equipment at municipal collection centres. Batteries and rechargeable batteries must be removed and disposed of properly before disposal.
The packaging of this product consists of environmentally friendly materials that can be recycled. Please dispose of packaging and filling materials in accordance with local regulations on waste separation.
Note on battery disposal
Two batteries (type AAA) for the remote control are included in the scope of delivery. Batteries must not be disposed of with household waste. Consumers are legally obliged to dispose of used batteries at a suitable collection point or at a retailer. Batteries containing harmful substances are labelled with the symbol of a crossed-out dustbin and the chemical symbols Pb (lead), Cd (cadmium) or Hg (mercury).
Cd Hg Pb
PRODUCT REGISTRATION
By registering your Megasat product, you will always be up to date. We will automatically notify you by e-mail as soon as new firmware is available for your device.
Register your product now at:
www.megasat.tv → Support → Product registration
MEGASAT
natural_image
Scenic coastal landscape with turquoise ocean, lush green hills, and rocky cliffs under a partly cloudy sky (no text or symbols visible)Royal Line V Smart
Mode d'emploi
Table des matières
natural_image
Simple diagram showing a device with three screws and a downward arrow, no text or symbols present.text_image
Technical diagram of a computer chassis showing internal components and screwdriver insertion process5. Désignations
5.1 Vue de face

text_image
Accord d'utilisateur Médiur des échéresseurs l'«Apprent » et le d'outement sur « la vise adoptant (l'acord de certaines voins sidiaries)». We and our subsidies and affiliates committed to providing quality service and a safe environment to users. This Privacy Policy is correct to help consumers ("you") understand what information we collect, any it is fulfilled and how the information is used and shared. Accepter Tout d'électioner Privacy Policy Tout d'ouss: When TV + Data Privacy Statement Étatique à Help ou Improve Parental Counter Estimation To: 14 Dollar Appri We and our subsidies and affiliates committed to providing quality service and a safe environment to users. This Privacy Policy is correct to help consumers ("you") understand what information we collect, any it is fulfilled and how the information is used and shared. When it is reasonable and predictable to do so, we will collect your personal information only (every yourself). However, it has correspondents, we might be provided with information by third parties. The Privacy Policy does not have access of their parties. I'm more information about their parties, please consult their privacy policies do us are responsible for it. Defence I. You must see the national person who's Perceived Data is collected and processing off.text_image
Welcome - 21 Meister the skin as with more is off/second whole tv REACHER Sachon Starbucks Free TV Eckrocken Apps Einstellungen prime | NEW SEASON WATCH NOW The Aire Report Bono HALL FLOW TO THE APARTERS HAMILTON NETFLIX YouTube prime Video eBayes truba hulu P DAZNtext_image
Mise à jour Google you can use application your folder or platform to drive your Disney+7. Écran d'accueil
7.6 Réglages rapides
natural_image
Action shot of a soccer player kicking the ball during a match, with other players and spectators in the background (no visible text or symbols)Lecture de musique

text_image
Off The Beaten Path 2015 Pg lost You Wanna be Tough Better Do What You CanLecture d'images