37530 - Rice cooker HAMILTON BEACH - Free user manual and instructions
Find the device manual for free 37530 HAMILTON BEACH in PDF.

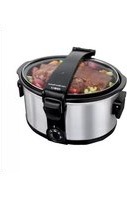
| Product Type | Digital Rice Cooker and Steamer |
| Brand | Hamilton Beach |
| Model | 37530 |
| Power Supply | 120 V ~ 60 Hz |
| Main Functions | Steaming, rice cooking, keep warm mode (WARM) up to 1 hour, delayed start timer up to 24 hours, automatic shutoff, low water level indicator |
| Box Contents | Lid, rice bowl, 3 steaming bowls with removable bottoms, removable drip tray, egg tray, water inlet drawer, base, control panel |
| Water Tank Capacity | Up to MAX line (not specified) |
| Maximum Cooking Time | 1 hour |
| Delayed Start | From 30 minutes to 24 hours |
| Safety | Polarized plug, automatic shutoff, do not immerse base, hot surfaces |
| Care and Cleaning | Rice bowl and drip tray are dishwasher safe (top rack); other parts hand wash; descaling with white vinegar |
| Warranty | 5 years in Canada, 1 year in the United States |
Frequently Asked Questions - 37530 HAMILTON BEACH
User questions about 37530 HAMILTON BEACH
0 question about this device. Answer the ones you know or ask your own.
Ask a new question about this device
Download the instructions for your Rice cooker in PDF format for free! Find your manual 37530 - HAMILTON BEACH and take your electronic device back in hand. On this page are published all the documents necessary for the use of your device. 37530 by HAMILTON BEACH.
USER MANUAL 37530 HAMILTON BEACH
hamiltonbeach.com For recipes, tips and product information.
When using electrical appliances, basic safety precautions should always be followed to reduce the risk of fire, electric shock, and/or injury to persons, including the following:
- Read all instructions.
- This appliance is not intended for use by persons (including children) with reduced physical, sensory, or mental capabilities, or lack of experience and knowledge, unless they are closely supervised and instructed concerning use of the appliance by a person responsible for their safety.
- Close supervision is necessary when any appliance is used by or near children. Cleaning and user maintenance shall not be made by children unless they are supervised. Children should be supervised to ensure that they do not play with the appliance.
- Do not touch hot surfaces. Use handles or knobs. Use pot holders when removing hot containers.
- To protect against risk of electrical shock, do not immerse cord, plug, or base in water or other liquid.
- Unplug from outlet when not in use and before cleaning. Allow to cool before putting on or taking off parts. To unplug, grasp the plug and pull from the outlet. Never pull from the power cord.
-
Do not operate any appliance with a damaged supply cord or plug, or after the appliance malfunctions or has been dropped or damaged in any manner. Supply cord replacement and repairs must be conducted by the manufacturer, its service agent, or similarly qualified persons in order to avoid a hazard. Contact Customer Service for information on examination, repair, or adjustment as set forth in the Limited Warranty.
-
Appliance may remain hot after unit is turned off.
- The use of accessory attachments not recommended by the appliance manufacturer may cause injuries.
- Do not use outdoors.
- Do not let cord hang over edge of table or counter or touch hot surfaces, including stove.
- Do not place on or near a hot gas or electric burner or in a heated oven.
- Extreme caution must be used when moving an appliance containing hot food, water, or other hot liquids.
- To disconnect, turn OFF ① and then remove plug from wall outlet. To unplug, grasp the plug and pull from the outlet. Never pull from the power cord.
- Do not use appliance for other than intended use.
- Lift and open lid carefully to avoid scalding, and allow water to drip into the drip tray.
- CAUTION: Risk of electric shock. Cook only in removable bowls and trays.
- Do not place the unit directly under cabinets when operating as this product produces large amounts of steam. Avoid reaching over the product when operating.
SAVE THESE INSTRUCTIONS
Other Consumer Safety Information
This product is intended for household use only.
A WARNING Electrical Shock Hazard: This appliance has a polarized plug (one wide blade) that reduces the risk of electric shock. The plug fits only one way into a polarized outlet. Do not defeat the safety purpose of the plug by modifying the plug in any way or by using an adapter. If the plug does not fit, reverse the plug. If it still does not fit, have an electrician replace the outlet.
The length of the cord used on this appliance was selected to reduce the hazards of becoming tangled in or tripping over a longer cord. If a longer cord is necessary, an approved extension cord may be used. The electrical rating of the extension cord must be equal to or greater than the rating of the appliance. Care must be taken to arrange the extension cord so that it will not drape over the countertop or tabletop where it can be pulled on by children or accidentally tripped over.
To avoid an electrical circuit overload, do not use another high-wattage appliance on the same circuit with this appliance.
Parts and Features
To order parts, visit: hamiltonbeach.com/parts
| 1 Lid | |
| 2 | #3 Steam Bowl (with removable bottom) (on certain models) |
| 3 | #2 Steam Bowl (with removable bottom) |
| 4 Rice Bowl | |
| 5 | #1 Steam Bowl (with removable bottom) |
| 6 Removable Drip Tray | |
| 7 Heating Element | |
| 8 Water Reservoir Window | |
| 9 Base | |
| 10 Control Panel | |
| 11 Water Reservoir | |
| 12 Water Inlet Printer | |
| 13 Handles | |
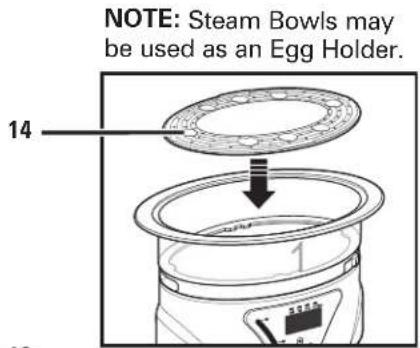
| 14 Egg Holder (holes in bottom of trays are used to hold eggs) | |
NOTE: #3 Steam Bowl is included with certain models.

How to Steam
Before first use: Wash Lid, Rice Bowl, Steam Bowls, and Drip Tray, and removable bottoms in warm, soapy water.
Rinse and dry.
Wipe interior of Water Reservoir with a damp, nonabrasive cloth.
Never operate Steamer without water in Reservoir, or use a liquid other than water for cooking purposes, since this may damage the unit.
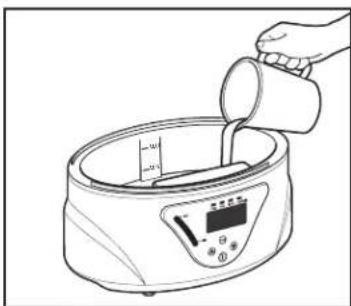
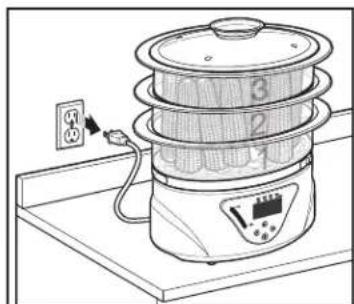
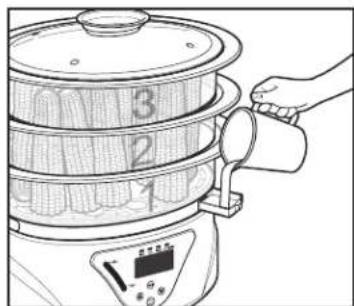
1. Add cold water to MAX fill line on Water Reservoir.
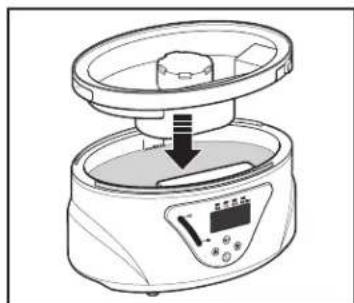
2. Place Removable Drip Tray securely on Base.
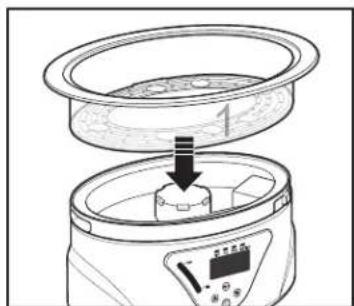
3. Add #1 Steam Bowl onto Removable Drip Tray.
-
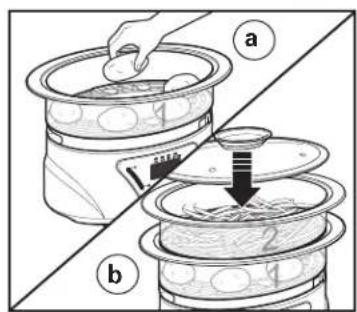
Steam Bowls may be used four ways:
-
1 single Steam Bowl. Place #1 Steam Bowl; see (a) above.
- 2 Steam Bowls together. Place #1 Steam Bowl on Base and top with #2 Steam Bowl; see (b) above.
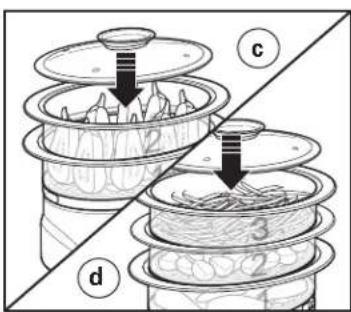
- Remove bottom from #2 Steam Bowl and/or #3 Steam Bowl for larger foods; see (c or d) above.
5. To cook rice: Ensure Water Reservoir is filled to MAX line. Place rice and water into Rice Bowl; then insert Rice Bowl into #1 Steam Bowl.
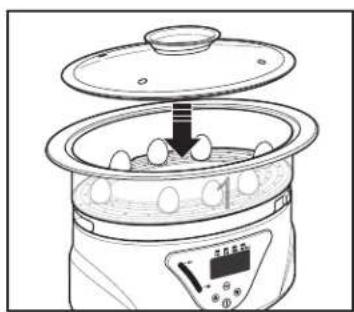
6. To hard-cook eggs: Place bottom in bottom of # 1 Steam Bowl with Egg Holder side up. Stand eggs in Egg Holder (maximum of 8 large eggs for each Steam Bowl).
How to Steam (cont.)
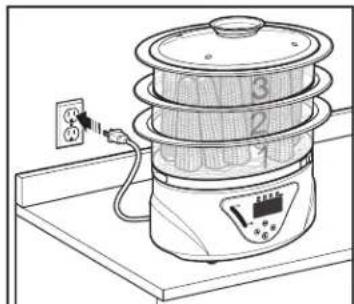
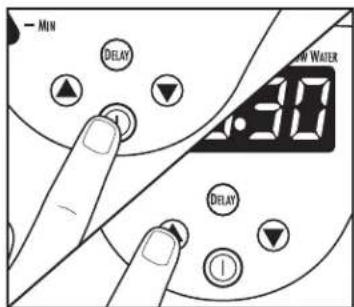
7. Plug into outlet. Food Stearmer will beep when turned on.
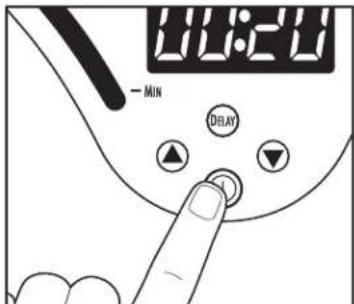
8. Press (pan/off) button to start steaming cycle.
9. To adjust desired cooking time, press up or down arrows. Maximum steam time is 1 hour. NOTE: If no adjustment is made to cooking time, unit will begin steaming after approximately 5 seconds.
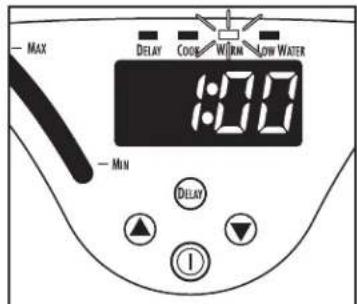
10. Unit will beep when cooking time is complete and will automatically switch to WARM mode for up to 1 hour. WARM mode can be cancelled at any time by pressing (on/off) button.
11. Unit beeps when turned off and beeps again when unplugged. NOTE: Unit will automatically shut off after 1 hour of WARM time.
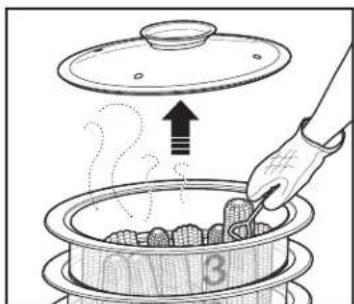
12. Using an oven mitt, carefully remove Lid and food.
NOTE: Poultry, meat, fish or seafood should always be placed in #1 Steam Bowl to avoid dripping on food in lower Steam Bowls.
For Low Water:
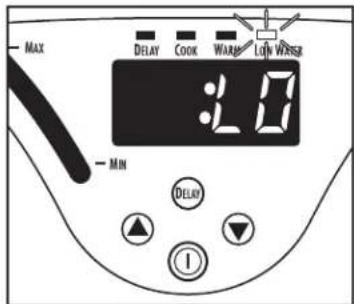
- Unit will beep, display will tell you water is low, and LOW WATER indicator light will come on.
- To add water to Water Reservoir: Pull out Water Inlet Diagram and gradually fill Reservoir with water. Check Water Reservoir Window to see water level.
How to Set Delay Start Timer
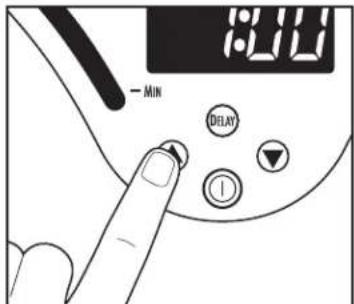
- Press (on/off) button and then up or down arrows to set cooking time.
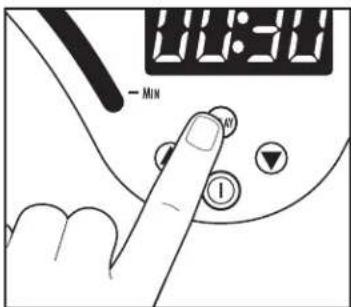
- Press DELAY button. Display will flash 00:30 as default delay time. Minimum set time is 30 minutes and maximum delay time is 24 hours.
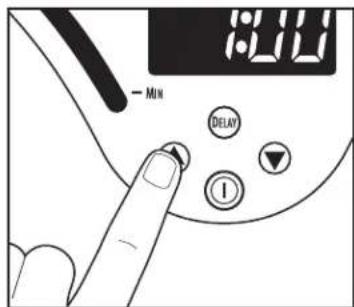
- Press up or down arrows to set delay time. After approximately 5 seconds, display will show selected delay time and unit will begin to count down. After delay time expires, Steamer will switch to cooking mode and steam for selected cook time. NOTE: Delay Start should only be used with non-perishable foods. Do not use Delay Start for steaming meat, fish, poultry, or eggs. Follow USDA food safety guidelines. Visit food safety.gov for more information.
NOTE: Raw meat should NEVER be cooked using DELAY start timer. Visit food safety.gov for more information on safe food handling.
Cooking/steaming will begin once unit has completed delay time countdown.
- Steamer will switch to WARM mode for up to 1 hour after cooking ends.
If water level in Steamer becomes too low, it will switch OFF and flash "--." Fill unit with water to MAX line; then push ① (on/off) button to restart Steamer. LOW WATER indicator light will also illuminate.
Steaming Chart
Steamer cooking times (approximate) are based on steaming with cold water filled to MAX Fill line. Steamer will switch to WARM after cooking time. Models with #3 Steam Bowl: Cooking time in all 3 Steam Bowls may need to be adjusted.
| Food Item | Weight/Amount | Approximate Cooking Time |
| Asparagus, thin stalks 1 pound (454 g) 14-20 minutes | ||
| Whole carrots 1 pound (454 g) 18-25 minutes | ||
| Broccoli florets from 1 head 1/2 to 3/4 pound (227 g to 340 g) 18-22 minutes | ||
| Corn on the cob (stand up in 2 or 3 Steam Bowls) 6 medium 16-18 minutes | ||
| Green Beans 1 pound (454 g) 12-16 minutes | ||
| Squash, yellow and green, 1/2-inch (1.3-cm) thick slices 1 pound (454 g) 16-20 minutes | ||
| Whole small red potatoes 1 1/2 pounds (681 g) 28-32 minutes | ||
| Boneless, skinless chicken breasts 3 (5 oz. [142 g] each) 14-18 minutes | ||
| Salmon fillets 1 pound (454 g) 16-20 minutes | ||
| Salmon steaks 1-inch (2.5 cm) thick | 1 1/2 pounds (680 g) 18-22 minutes | |
| Shrimp, veined with tails (16/20 count) | 1 pound (454 g) 11-15 minutes | |
| Eggs, large | 8 | 20-22 minutes |
| Long-grain white rice (cooked in Rice Bowl) | 1 cup (237 mL) rice/1 cup (237 mL) water | 32-35 minutes |
| Long-grain brown rice (cooked in Rice Bowl) | 1 cup (237 mL) rice/1 1/4 to 1 1/2 cups (296 mL to 355 mL) water | 67-70 minutes |
| Frozen dumplings (potstickers) 1 1/2-pound package (680 g) | 8-12 minutes | |
| Large fresh tamales (2 in each Steam Bowl) | 6 | 35-40 minutes |
Follow USDA food safety guidelines and visit foodsafety.gov for safe internal cooking temperatures.
Care and Cleaning
- Unplug and allow Food Steamer to cool completely.
- Rice Bowl and Drip Tray are dishwasher-safe in top rack only. Wash Lid, Steam Bowls and removable bottoms in warm, soapy water. Rinse and dry. DO NOT use "SANITIZE" setting when washing in dishwasher. SANITIZE cycle temperatures could damage your product.
- After every use, wipe Water Reservoir with a clean, damp nonabrasive cloth.
- Wipe Base with a damp cloth. Do not use abrasive cleaners.
Troubleshooting
Drip Tray and/or Steam Bowls tilt/are unstable.
- Drip Tray installed incorrectly. Reorient Drip Tray and place #1 Steam Bowl first.
Unit will not turn on.
- Check to ensure unit is plugged in.
Steaming takes too long/little or no steam.
- Heating Element has accumulated deposits. Clean by putting 5 Tablespoons (74 mL) white vinegar into Water Reservoir; then fill Water Reservoir with tap water to MIN line. Turn unit on and set a timer for 5 minutes. Allow liquid to cool and then wash/dry all pieces thoroughly.
Rice cooked in Rice Bowl is under/overcooked.
Water level is too low, or Lid not placed on a Steam Bowl. Ensure only one Steam Bowl is used. Ensure Lid is placed securely on Steam Bowl.
WARNING Electrical Shock Hazard. Do not immerse base in water or other liquid.
To Remove Water and Mineral Deposits from Water Reservoir
- Add 1 cup white vinegar plus cold water to MAX fill line.
- Follow How to Steam steps without adding any parts.
- Set time for 15 minutes, then remove any remaining water.
- Cool completely, and wipe Water Reservoir with a clean cloth.
NOTE: Using filtered water will help reduce mineral deposits.
To Store Food Steamer
- Cool Food Steamer completely and clean before storing. Ensure all water has been removed from Water Reservoir; make sure Water Reservoir is completely dry before storing.
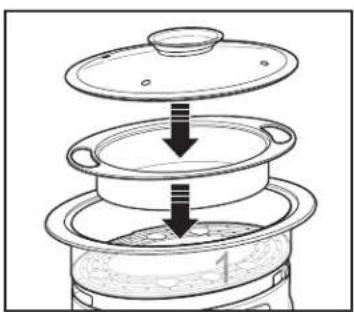
- Add Removable Drip Tray to Base, stack Steam Bowls inside each other on Drip Tray, and add Rice Bowl. Top with Lid.
Unit does not shut off after steaming.
- Unit has switched to WARM mode. Turn Steamer off if desired, or allow unit to keep food warm until ready to eat.
Food not cooked uniformly. - Steam Bowl overcrowded with food. Leave enough space for adequate steam flow.
Food done in #1 Steam Bowl, but not done in #2 Steam Bowl or #3 Steam Bowl.
- Food cooks faster in #1 Steam Bowl. Always place longer-cooking food items in #1 Steam Bowl. Or, place one Bowl (with longer-cooking food) onto Base and let steam first; then later add second Bowl with shorter-cooking food. Try not to block steam holes.
Limited Warranty
This warranty applies to products purchased and used in the U.S. and Canada. This is the only express warranty for this product and is in lieu of any other warranty or condition.
This product is warranted to be free from defects in material and workmanship for a period of five (5) years from the date of original purchase in Canada and one (1) year from the date of original purchase in the U.S. During this period, your exclusive remedy is repair or replacement of this product or any component found to be defective, at our option; however, you are responsible for all costs associated with returning the product to us and our returning a product or component under this warranty to you. If the product or component is no longer available, we will replace with a similar one of equal or greater value.
This warranty does not cover glass, filters, wear from normal use, use not in conformity with the printed directions, or damage to the product resulting from accident, alteration, abuse, or misuse. This warranty extends only to the original consumer purchaser or gift recipient. Keep the original sales receipt, as proof of purchase is required to make a warranty claim. This warranty is void if the product is used for other than single-family household use or subjected to any voltage and waveform other than as specified on the rating label (e.g., 120V 60Hz ). We exclude all claims for special, incidental, and consequential damages caused by breach of express or implied warranty. All liability is limited to the amount of the purchase price. Every implied warranty, including any statutory warranty or condition of merchantability or fitness for a particular purpose, is disclaimed except to the extent prohibited by law, in which case such warranty or condition is limited to the duration of this written warranty. This warranty gives you specific legal rights. You may have other legal rights that vary depending on where you live. Some states or provinces do not allow limitations on implied warranties or special, incidental, or consequential damages, so the foregoing limitations may not apply to you.
To make warranty claim, do not return this appliance to the store. Please write Hamilton Beach Brands, Inc., Customer Service Department, 4421 Waterfront Dr., Glen Allen, VA 23060, or visit hamiltonbeach.com/customer-service in the U.S. or hamiltonbeach.ca/customer-service in Canada. For faster service, locate the model, type, and series numbers on your appliance.
Notes
PRECAUTIONS IMPORTANTES
Mixcoac, Benito Juarez